> ## Documentation Index
> Fetch the complete documentation index at: https://docs.asapp.com/llms.txt
> Use this file to discover all available pages before exploring further.

# Dynamic Forms

> Collect customer information in Apple Messages for Business using multi-page forms that route to the next question based on each answer.

Dynamic Forms are multi-page forms in Apple Messages for Business (AMB) that decide the next question based on the answer a customer just gave. Each page presents one question, and the response determines which page the customer sees next.

Use Dynamic Forms when the information you need depends on earlier answers, such as an intake questionnaire where a claim type changes the remaining questions. For fixed sets of fields that every customer answers, standard AMB Form Messages remain the simpler choice.

<Note>
  Dynamic Forms require configuration by your ASAPP account team. Contact your account team to enable the feature for your company.
</Note>

## How it works

A Dynamic Form is a set of sequential pages joined by transition rules. When a customer submits a page, ASAPP evaluates the rules for that page and serves the next page in real time.

* **Question-to-question transitions:** each page declares which page follows it. A page can route to different destinations depending on the response.
* **Conditional logic:** transition rules use if/then conditions evaluated against the answer on the current page and answers collected earlier in the form.
* **Real-time progression:** the path through the form is resolved as the customer answers, so no page is sent until its condition is met.
* **Default paths:** each branching page needs a fallback destination so that any response that matches no condition still advances the form.

Because pages are served one at a time, a customer never sees questions that their earlier answers made irrelevant.

## Question types available on a page

Each page holds a single question or a small set of related inputs. Configure the input type per question:

* **Date & time** : Allows customers to select both a date and a time.
* **Numeric** : A numeric input field that accepts only numbers. Can be used for phone numbers, zip codes, or any other numeric input.
* **Selector** : A question that allows the customer to choose from a predefined set of options.
* **Text** : A free text input field that accepts any characters. Can be used for names, addresses, or any other textual input.
* **Paragraph** : A multi-line text input field that allows customers to provide longer responses.

Selector questions are the most reliable basis for conditional logic, because the set of possible answers is known when you write the rule. Free text and numeric answers can also drive conditions, using comparisons rather than exact option matching.

## Build a form in AI Console

The Form Builder in AI Console handles form creation, question configuration, and the logic that connects pages.

<Steps>
  <Step title="Create the form view">
    <p>To create a secure form, follow these steps:</p>

    <ol>
      <li>Navigate to the ASAPP Messaging section in the AI Console.</li>
      <li>Navigate to the <strong>Library</strong> section and click <strong>Forms</strong> tab.</li>
      <li>Click <strong>Add Form</strong> to create a new form.</li>
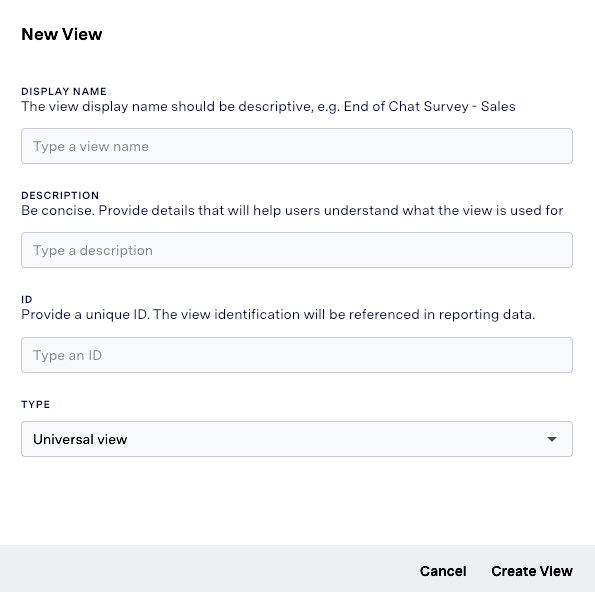
      <li>Fill in the required details for the form, such as the Display Name, Description, Unique Id. For the Form Type, select <strong>Universal View</strong>.</li>
      <li>Click <strong>Create View</strong> to create the form view.</li>

      <Frame>
        <img src="https://mintcdn.com/asapp/61RmTCssVn-7tcbr/images/generativeagent/CreateForms1.png?fit=max&auto=format&n=61RmTCssVn-7tcbr&q=85&s=4d1f65b2dd2100bf87860fb2b9a5f050" width="595" height="592" data-path="images/generativeagent/CreateForms1.png" />
      </Frame>
    </ol>
  </Step>

  <Step title="Enable Title and Summary (Optional)">
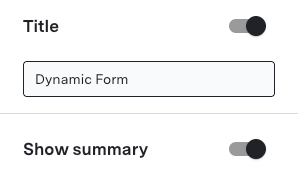
    <p>Optionally, you can enable if you want to display a title and summary for the form.</p>

    <P> To enable the title, toggle the <strong>Title</strong> switch on and enter a title in the text box. Similarly, to enable the summary, toggle the <strong>Show Summary</strong> switch. </P>

    <Frame>
      <img src="https://mintcdn.com/asapp/61RmTCssVn-7tcbr/images/generativeagent/EnableTitleSummary.png?fit=max&auto=format&n=61RmTCssVn-7tcbr&q=85&s=903a0e35bd5c17fc7bf449e0117cc4ca" width="298" height="183" data-path="images/generativeagent/EnableTitleSummary.png" />
    </Frame>
  </Step>

  <Step title="Define Splash Text">
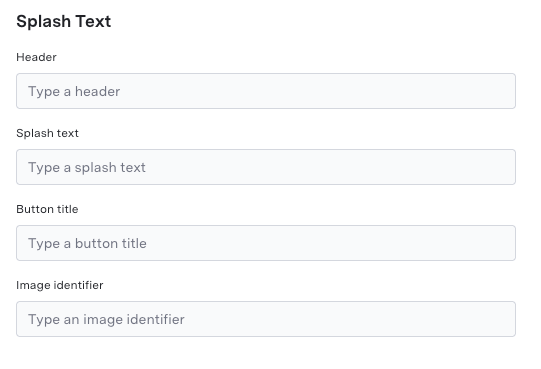
    <p>The splash text is the introductory text that appears at the beginning of the form. It provides context and instructions to the customer before they start filling out the form.</p>

    <p>To define the splash text, enter the Header, Splash Text, Button Title, and Image Identifier in the respective fields.</p>

    <Frame>
      <img src="https://mintcdn.com/asapp/61RmTCssVn-7tcbr/images/generativeagent/DefineSplashText.png?fit=max&auto=format&n=61RmTCssVn-7tcbr&q=85&s=4a3b6453969256259baa7afa0ae1cd09" width="541" height="369" data-path="images/generativeagent/DefineSplashText.png" />
    </Frame>
  </Step>

  <Step title="Add pages and questions">
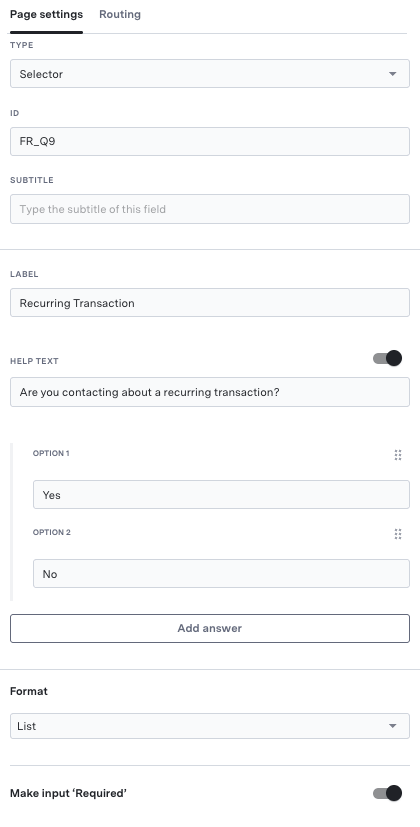
    <p>Add one page per question. To add a new page:</p>

    <ol>
      <li>Click <strong>Add</strong> under <strong>Item</strong>.</li>
      <li>Select a [question type](#question-types-available-on-a-page) from the available options.</li>
      <li>Configure the question text, labels, ID, and any additional settings for the question.</li>
      <li>Repeat the above steps for each question/page you want to add to the form.</li>
    </ol>

    <Frame>
      <img src="https://mintcdn.com/asapp/61RmTCssVn-7tcbr/images/generativeagent/AddPagesQuestions.png?fit=max&auto=format&n=61RmTCssVn-7tcbr&q=85&s=b09dd450ca35315befce01a3232335ac" width="420" height="827" data-path="images/generativeagent/AddPagesQuestions.png" />
    </Frame>

    <p>Keep question text short, because AMB renders each page in the Messages interface.</p>
  </Step>

  <Step title="Define transition rules">
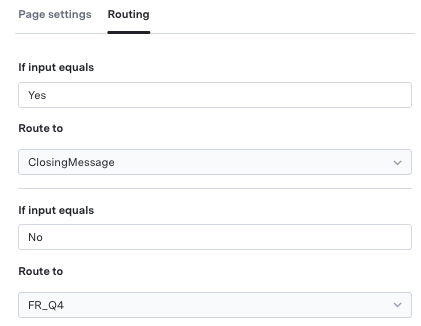
    For each page, define the conditions that determine the next page. The builder displays these transitions visually, so you can trace every path a customer can take through the form.

    <p>To define transition rules, select the page you want to configure, navigate to the <strong>Routing</strong> tab, and select a destination page under <strong>Route to</strong> or <strong>Route from</strong> for each possible answer.</p>

    <Warning>
      A branching page with no default destination can leave a customer with no next page. Confirm that every page has a reachable destination for all possible responses.
    </Warning>

    <Frame>
      <img src="https://mintcdn.com/asapp/61RmTCssVn-7tcbr/images/generativeagent/DefineTransitionRules.png?fit=max&auto=format&n=61RmTCssVn-7tcbr&q=85&s=f46563f5fb8c2689f0c3eb2e08289258" width="421" height="326" data-path="images/generativeagent/DefineTransitionRules.png" />
    </Frame>
  </Step>

  <Step title="Save the form">
    <p>After configuring all pages, questions, and transition rules, click the <strong>Save</strong> button on the top right to save the form.</p>

    <p> For any changes made to the form, you can choose to save the changes as a part of the same version or a new version.</p>
  </Step>
</Steps>

## Add a form to a virtual agent flow

Dynamic Forms are embedded in [flows](/agent-desk/virtual-agent/flows "Flows") rather than triggered on their own. Add the form at the point in the conversation where you need the information, and the virtual agent sends it to the customer and waits for submission before continuing.

Answers collected by the form are available to later nodes in the flow, so you can use them for branching, API calls, or agent context on handoff.

## Manage draft and live versions

Forms have two states, which lets you edit a form without changing what customers currently receive:

| State | Behavior                                                                                |
| ----- | --------------------------------------------------------------------------------------- |
| Draft | Editable. Not served to customers. Multiple rounds of edits and validation happen here. |
| Live  | Served to customers by any flow that references the form. Read-only.                    |

To change a live form, edit its draft, validate, then promote the draft. Promotion replaces the live version for every flow that references the form, so review which flows use a form before promoting.

## Channel and adapter support

Dynamic Forms are delivered in Apple Messages for Business and are compatible with custom chat adapters, so the same form can be reached through a brand's own chat integration.

Support constraints follow existing AMB Form Messages behavior, including the operating system versions that render form messages natively and the field configurations that cause a form to fall back to a web form. Confirm the current constraints with your ASAPP account team before designing a long or complex form.

For channel setup, see the [Apple Messages for Business](/agent-desk/integrations/apple-messages-for-business "Apple Messages for Business") integration guide.

## Next steps

<CardGroup>
  <Card title="Integrate Apple Messages for Business" href="/agent-desk/integrations/apple-messages-for-business">
    Learn how to integrate Apple Messages for Business with your virtual agent to enable dynamic forms.
  </Card>

  <Card title="Add a form to a flow" href="/agent-desk/virtual-agent/flows">
    Learn how to add a form to a virtual agent flow, so the agent can collect information from customers during the conversation.
  </Card>
</CardGroup>