> ## Documentation Index
> Fetch the complete documentation index at: https://docs.asapp.com/llms.txt
> Use this file to discover all available pages before exploring further.

# Deploying AI Summary for Salesforce

> Learn how to use the AI Summary Salesforce plugin.

## Using This Guide

**Deployment Guides** describe the technical components of ASAPP services and provide information about how to interact with and implement these components in your organization.

## Overview

ASAPP AI Summary generates a summary of each voice or messaging (chat) interaction between a customer and an agent. AI Summary also generates Structured Data and intent outputs.

With automated interaction summaries, organizations reduce agent time and effort both during and after calls, and gain high-coverage summary data for future reference by agents, supervisors and quality teams.

<Note>
  AI Summary currently supports English-language conversations only.
</Note>

### Technology

ASAPP AI Summary has the following technical components:

* An AI Summary model that ASAPP uses to generate summary text
* An ASAPP component that interfaces between ASAPP's AI Summary and

Conversation APIs to generate summaries for each conversation.

<Frame>
  <img src="https://mintcdn.com/asapp/AXwA7-nbwQCJ8xte/image/uuid-e7d605d0-27c4-490c-c4d7-88e9e44f2ee1.png?fit=max&auto=format&n=AXwA7-nbwQCJ8xte&q=85&s=00818b92162b5fd47a8fcb1d0e33667a" width="1731" height="1020" data-path="image/uuid-e7d605d0-27c4-490c-c4d7-88e9e44f2ee1.png" />
</Frame>

## Setup

### Requirements

**Browser Support**
ASAPP AI Summary is supported in Google Chrome and Microsoft Edge
<Note>This support covers the latest version of each browser and extends to the previous two versions</Note>

Please consult your ASAPP account contact if your installation requires support for other browsers

**Salesforce**
ASAPP supports Lightning-based chat (cf. classic)

<Frame>
  <img src="https://mintcdn.com/asapp/V0FXHedP7HW51oOw/image/uuid-c6a319ef-4846-1c14-7ea5-5294ed44e8e2.png?fit=max&auto=format&n=V0FXHedP7HW51oOw&q=85&s=197eb06f56ad435844c348f0f301942a" width="191" height="32" data-path="image/uuid-c6a319ef-4846-1c14-7ea5-5294ed44e8e2.png" />
</Frame>

<Frame>
  <img src="https://mintcdn.com/asapp/AXwA7-nbwQCJ8xte/image/uuid-e66b3aab-d17a-a7dc-f607-4f8a9504db87.png?fit=max&auto=format&n=AXwA7-nbwQCJ8xte&q=85&s=7a6329c3b8870b0efed7b970de0a601f" width="181" height="44" data-path="image/uuid-e66b3aab-d17a-a7dc-f607-4f8a9504db87.png" />
</Frame>

**SSO Support**
AI Summary supports SP-initiated SSO with either OIDC (preferred method) or SAML.
**Domain Whitelisting**

In order for AI Summary to interact with ASAPP's backend and third-party support services, the following domains need to be accessible from end-user environments:

| Domain                                       | Description                                                        |
| :------------------------------------------- | :----------------------------------------------------------------- |
| `*.asapp.com`                                | ASAPP service URLs                                                 |
| `*.ingest.sentry.io`                         | Application performance monitoring tool                            |
| `fonts.googleapis.com`                       | Fonts                                                              |
| `google-analytics.com`                       | Page analytics                                                     |
| `asapp-chat-sdk-production.s3.amazonaws.com` | Static ASAPP AWS URL for desktop network connectivity health check |

### Procedure

There are two parts to the AI Summary setup process. Use the links below to skip to information about a specific part of the process:

1. [Configure the Salesforce organization](#1-configure-the-salesforce-organization-centrally-35766 "1. Configure the Salesforce Organization Centrally") centrally using an administrator account
2. [Setup agent/user authentication](#2-set-up-single-sign-on-sso-user-authentication-35766 "2. Set Up Single Sign-On (SSO) User Authentication") through the existing single sign-on (SSO) service

<Tip>
  Expected effort for each part of the setup process:

  * 1 hour for installation and configuration of the ASAPP chat components
  * 1-2 hours to enable user authentication, depending on SSO system complexity
</Tip>

#### 1. Configure the Salesforce Organization Centrally

**Before You Begin**
You will need the following information to configure ASAPP for Salesforce:

* Administrator credentials to login to your Salesforce organization account.
  * **NOTE:** Organization and Administrator should be enabled for 'chat'.
* A URL for the ASAPP installation package, which will be provided by ASAPP.

<Note>
  ASAPP provides the same install package for implementing both AI Compose and AI Summary in Salesforce. Use this guide to configure AI Summary.

  If you're looking to implement AI Compose, [use this guide](/ai-productivity/ai-compose/deploying-ai-compose-for-salesforce).
</Note>

* API Id and API URL values, which can be found in your ASAPP Developer Portal account (developer.asapp.com) in the **Apps** section.
  **Configuration Steps**

**1. Install the ASAPP Package**

* Open the package installation URL from ASAPP.
* Login with your Salesforce organization administrator credentials. The package installation page appears:
  <Frame>
    <img src="https://mintcdn.com/asapp/BoXlOITRW7VjgmOG/image/uuid-2e51b4cf-646c-4e67-42b2-4df188321f5f.png?fit=max&auto=format&n=BoXlOITRW7VjgmOG&q=85&s=3b3453f446e56ddb5ff72e61eb376229" width="1048" height="668" data-path="image/uuid-2e51b4cf-646c-4e67-42b2-4df188321f5f.png" />
  </Frame>
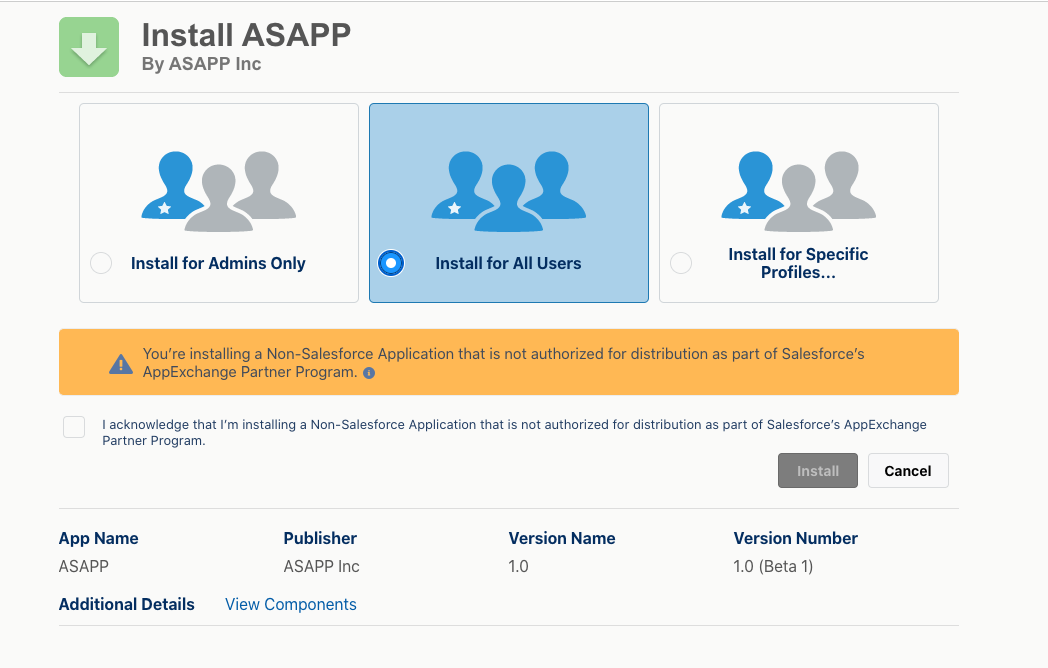
* Choose **Install for All Users** (as shown above).
* Check the acknowledgment statement and click the **Install** button:
  <Frame>
    <img src="https://mintcdn.com/asapp/AXwA7-nbwQCJ8xte/image/uuid-efdaa3e5-109a-a6f1-46d9-fbc0777d7340.png?fit=max&auto=format&n=AXwA7-nbwQCJ8xte&q=85&s=ac6e51a8691b073a193dc8e7ccc00f93" width="993" height="52" data-path="image/uuid-efdaa3e5-109a-a6f1-46d9-fbc0777d7340.png" />
  </Frame>
  <Frame>
    <img src="https://mintcdn.com/asapp/AXwA7-nbwQCJ8xte/image/uuid-d6534373-fa62-f370-e790-fee74118bd80.png?fit=max&auto=format&n=AXwA7-nbwQCJ8xte&q=85&s=e52dca54a2f61a7bb4c4449ad45d5ba6" width="101" height="57" data-path="image/uuid-d6534373-fa62-f370-e790-fee74118bd80.png" />
  </Frame>
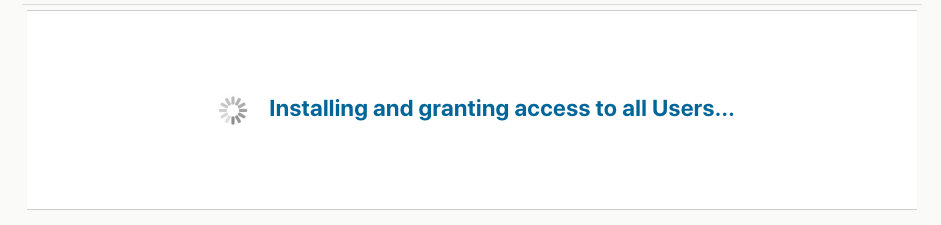
* The Installation runs. An **Installation Complete!** message appears:
  <Frame>
    <img src="https://mintcdn.com/asapp/aK0YOQVZSULmKYJl/image/uuid-6c4df35c-6c3f-a1d2-b0cc-64b5d0aac3d9.png?fit=max&auto=format&n=aK0YOQVZSULmKYJl&q=85&s=30b848a1afa7994b62afd9e4d5709c68" width="941" height="225" data-path="image/uuid-6c4df35c-6c3f-a1d2-b0cc-64b5d0aac3d9.png" />
  </Frame>
  <Frame>
    <img src="https://mintcdn.com/asapp/aK0YOQVZSULmKYJl/image/uuid-8229e206-9c06-70e3-af08-2a5c9b4373c3.png?fit=max&auto=format&n=aK0YOQVZSULmKYJl&q=85&s=128008375db731bea3d9e24380e211c3" width="954" height="178" data-path="image/uuid-8229e206-9c06-70e3-af08-2a5c9b4373c3.png" />
  </Frame>
* Click the **Done** button.
  **2. Add ASAPP to the Chat Transcript Page**
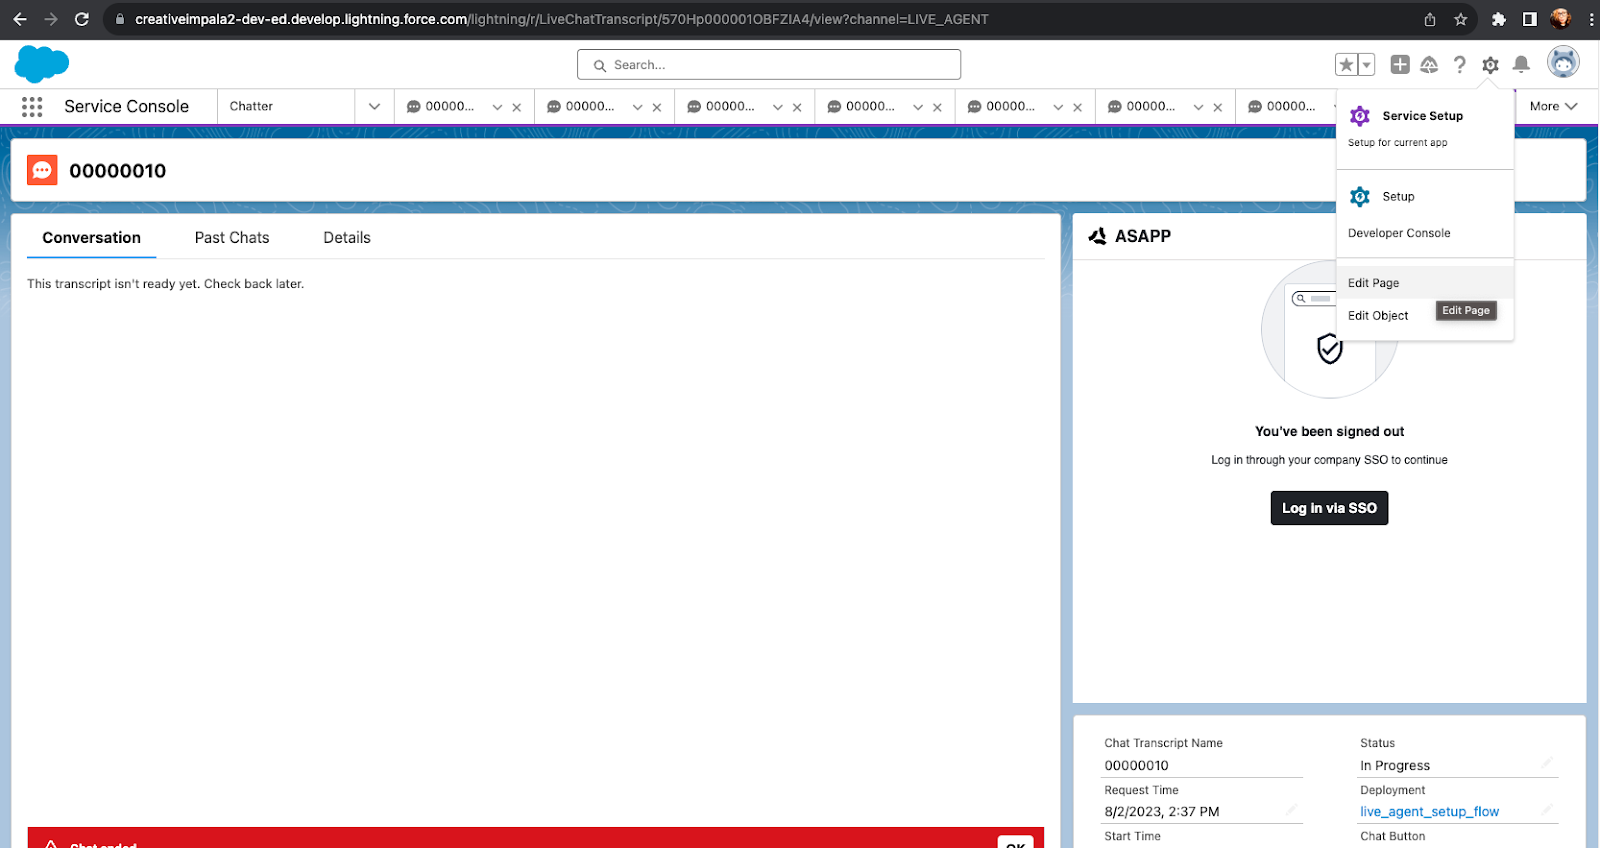
* Open the 'Service Console' page (or your chat page).
* Choose an existing chat session or start a new chat session so that the chat transcript page appears (the exact mechanism is organization-specific).
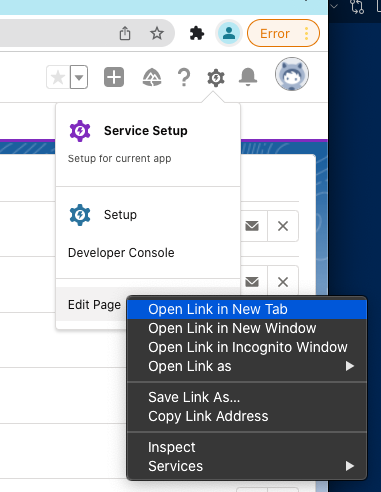
* In the top-right, click the **gear** icon, then right-click **Edit Page**, and **Open Link in a New Tab**.
  <Frame>
    <img src="https://mintcdn.com/asapp/9jlDT2iVQhMOPce8/image/uuid-16a63275-b025-59fc-3aa5-154a5ca10db6.png?fit=max&auto=format&n=9jlDT2iVQhMOPce8&q=85&s=25c46727857f80c804b5420fc05e7532" width="381" height="492" data-path="image/uuid-16a63275-b025-59fc-3aa5-154a5ca10db6.png" />
  </Frame>
* Navigate to the new tab to see the chat transcript edit page:
  <Frame>
    <img src="https://mintcdn.com/asapp/NE5s_J_rgoRPqQQt/image/uuid-412d4636-2ddf-33fd-04bb-598df2851636.png?fit=max&auto=format&n=NE5s_J_rgoRPqQQt&q=85&s=6763ed8b39daad3645ef7becd83d0f46" width="1916" height="975" data-path="image/uuid-412d4636-2ddf-33fd-04bb-598df2851636.png" />
  </Frame>
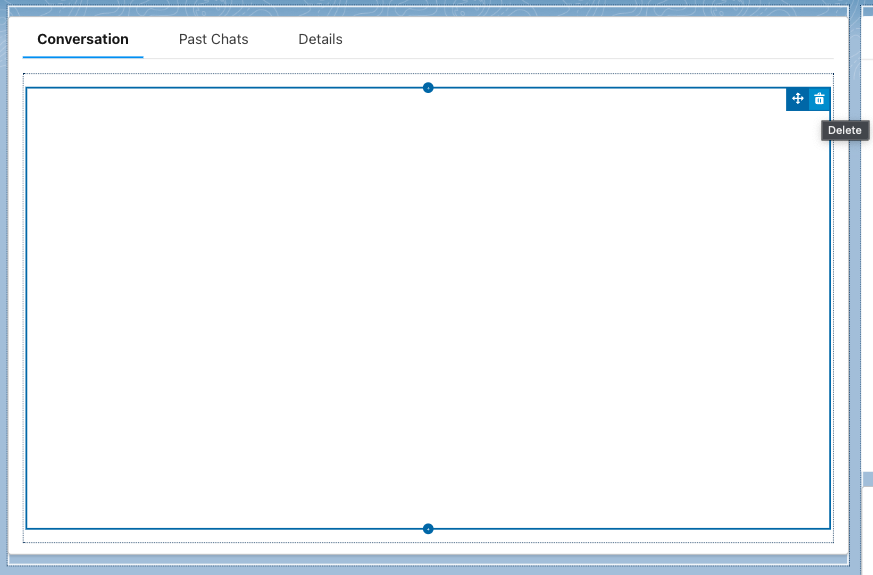
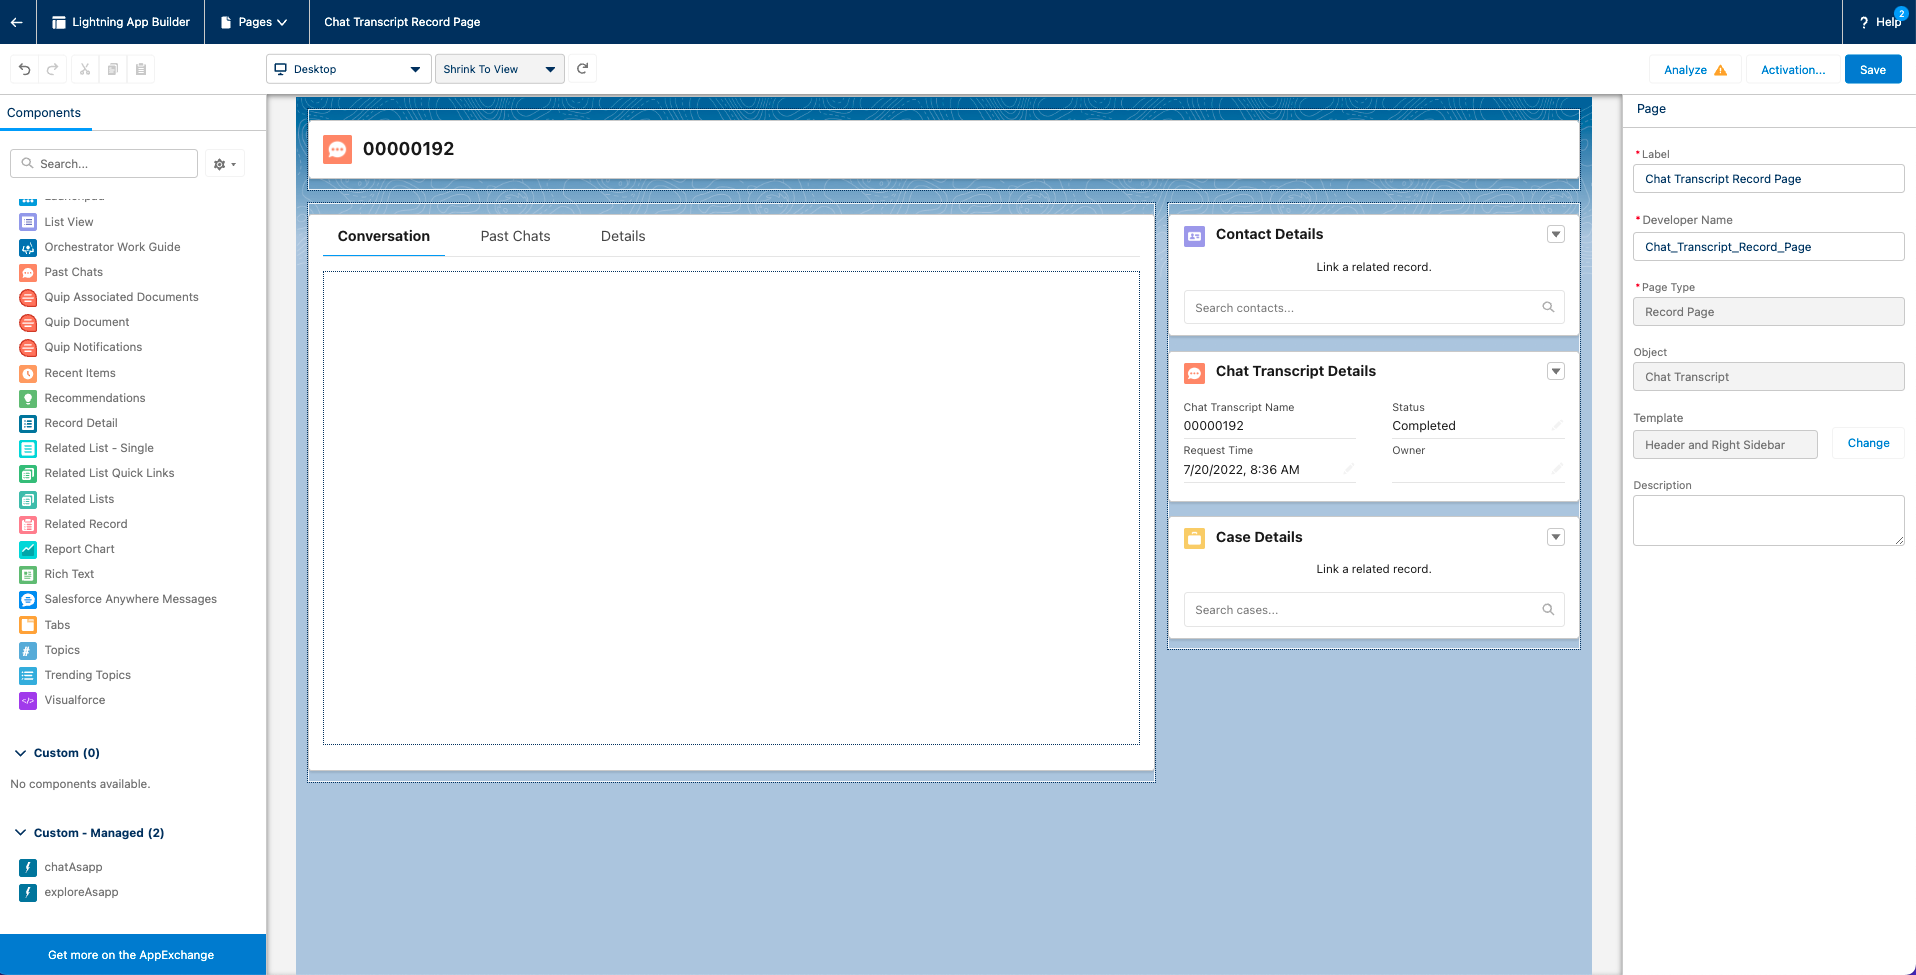
* Select the conversation panel (middle) and delete it.
  <Frame>
    <img src="https://mintcdn.com/asapp/9jlDT2iVQhMOPce8/image/uuid-082909fc-339c-417c-2ba6-af6de29ef281.png?fit=max&auto=format&n=9jlDT2iVQhMOPce8&q=85&s=7ec2b11ed0c1bcbf01216c8118c3d9f9" width="873" height="575" data-path="image/uuid-082909fc-339c-417c-2ba6-af6de29ef281.png" />
  </Frame>
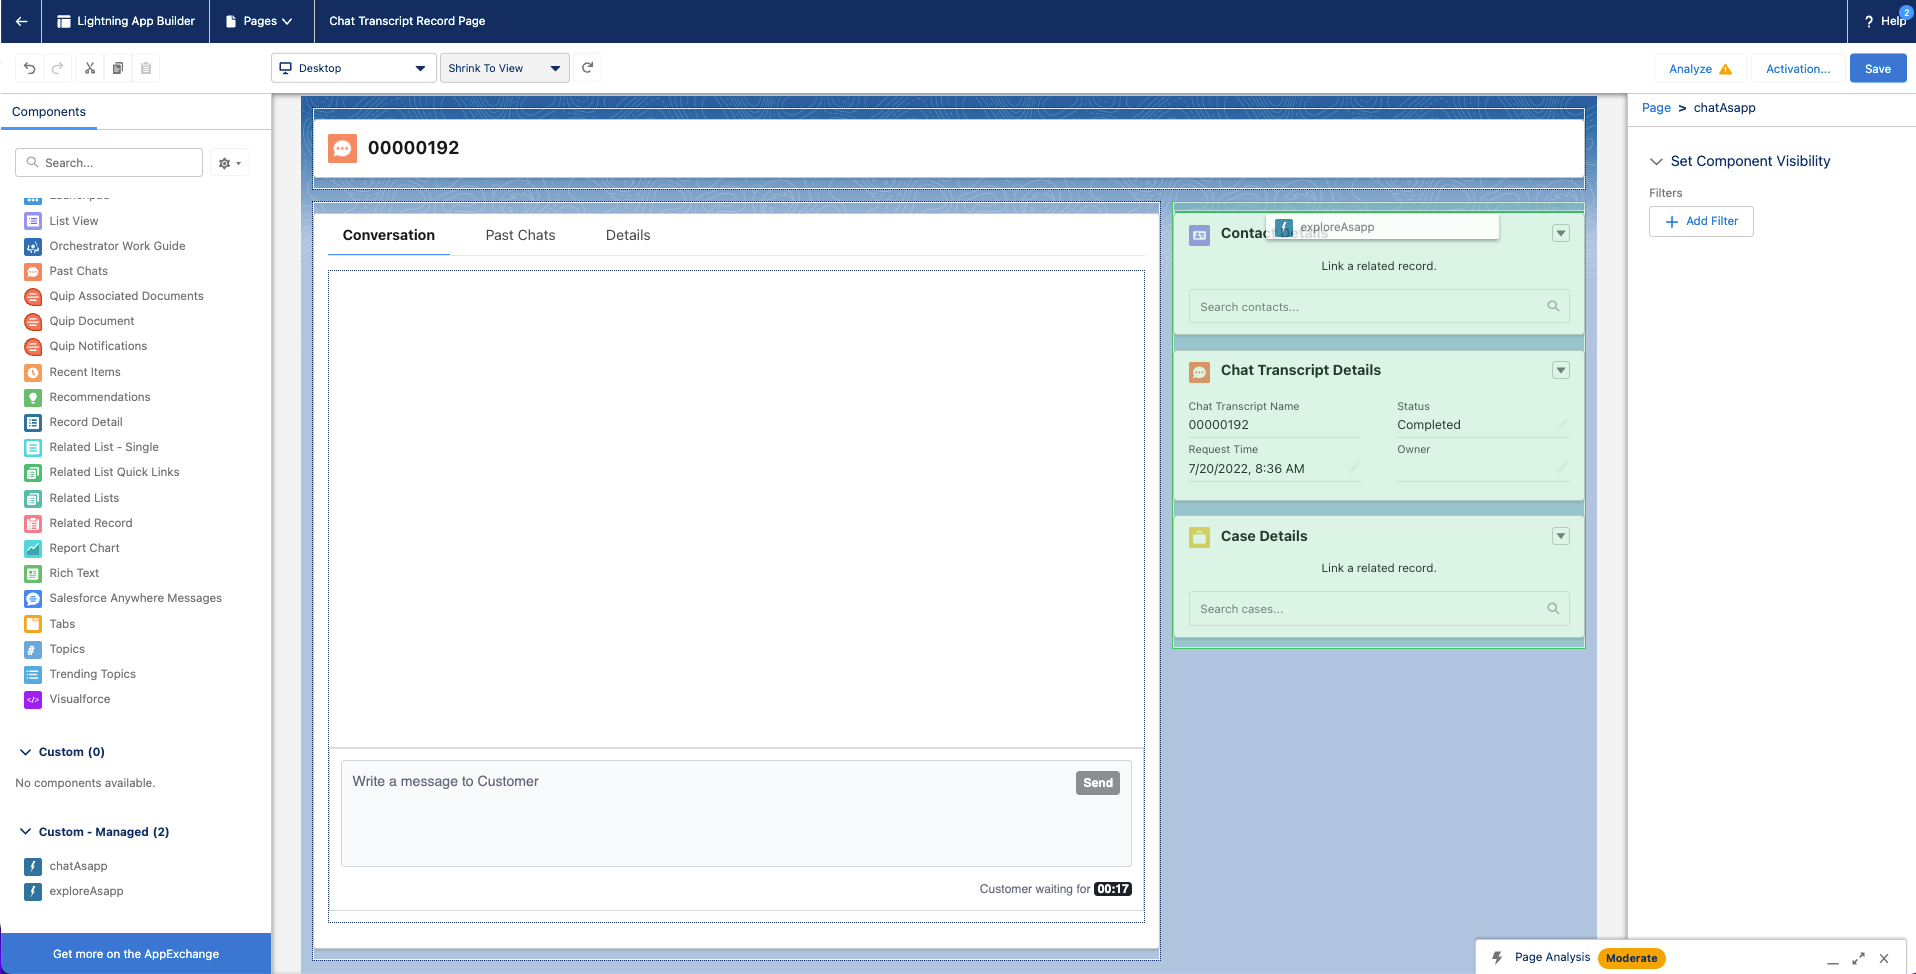
* Drag the **chatAsapp** component (left), inside the conversation panel:
  <Frame>
    <img src="https://mintcdn.com/asapp/9jlDT2iVQhMOPce8/image/uuid-03d5534d-9513-e847-f942-8c11291b8806.png?fit=max&auto=format&n=9jlDT2iVQhMOPce8&q=85&s=b8ea52284cb0cd4118857b3bf043d096" width="3584" height="1780" data-path="image/uuid-03d5534d-9513-e847-f942-8c11291b8806.png" />
  </Frame>
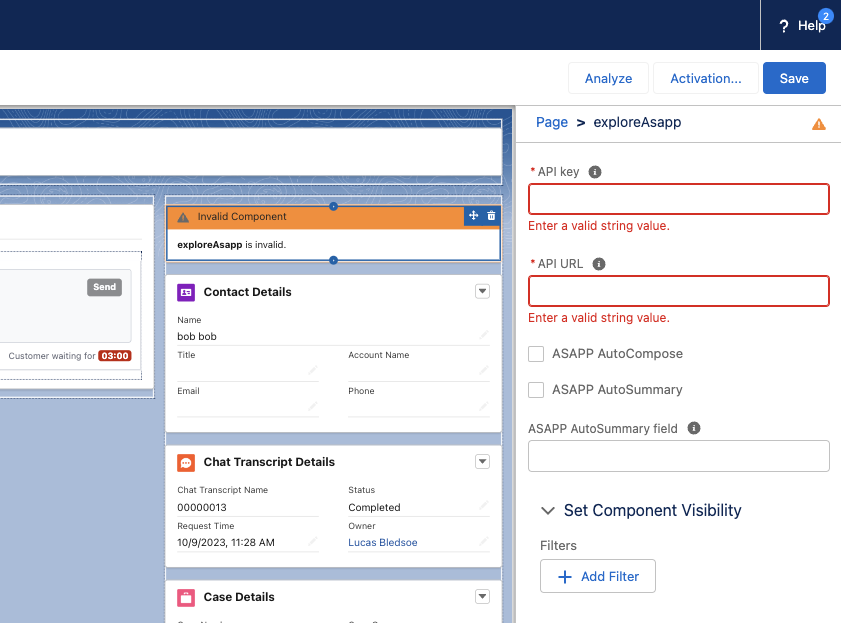
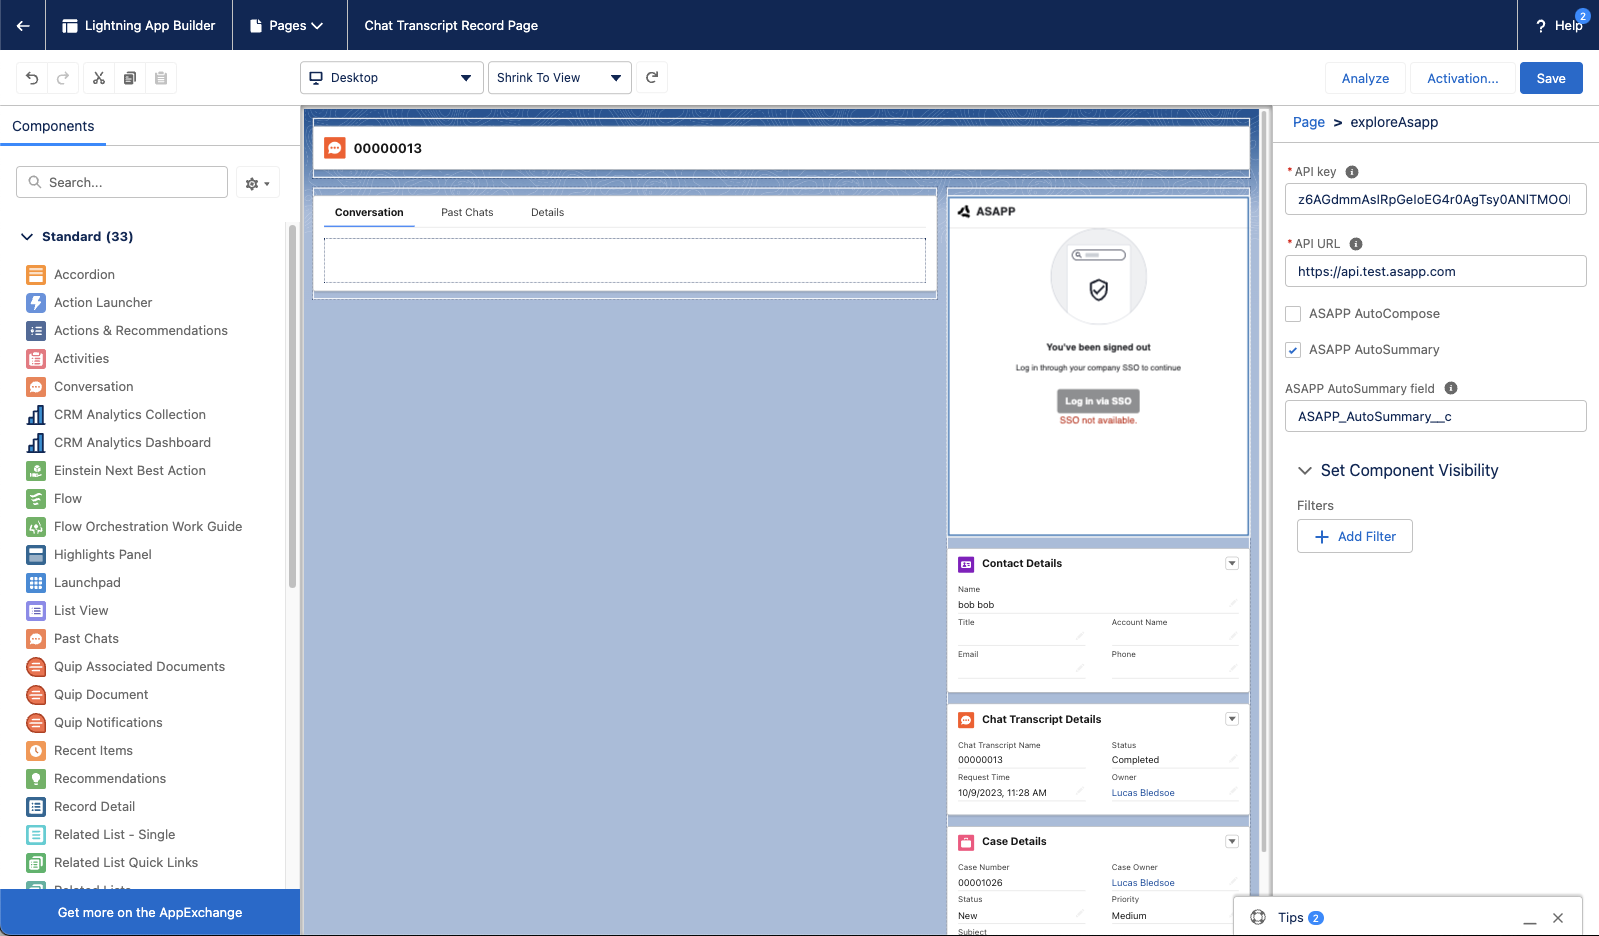
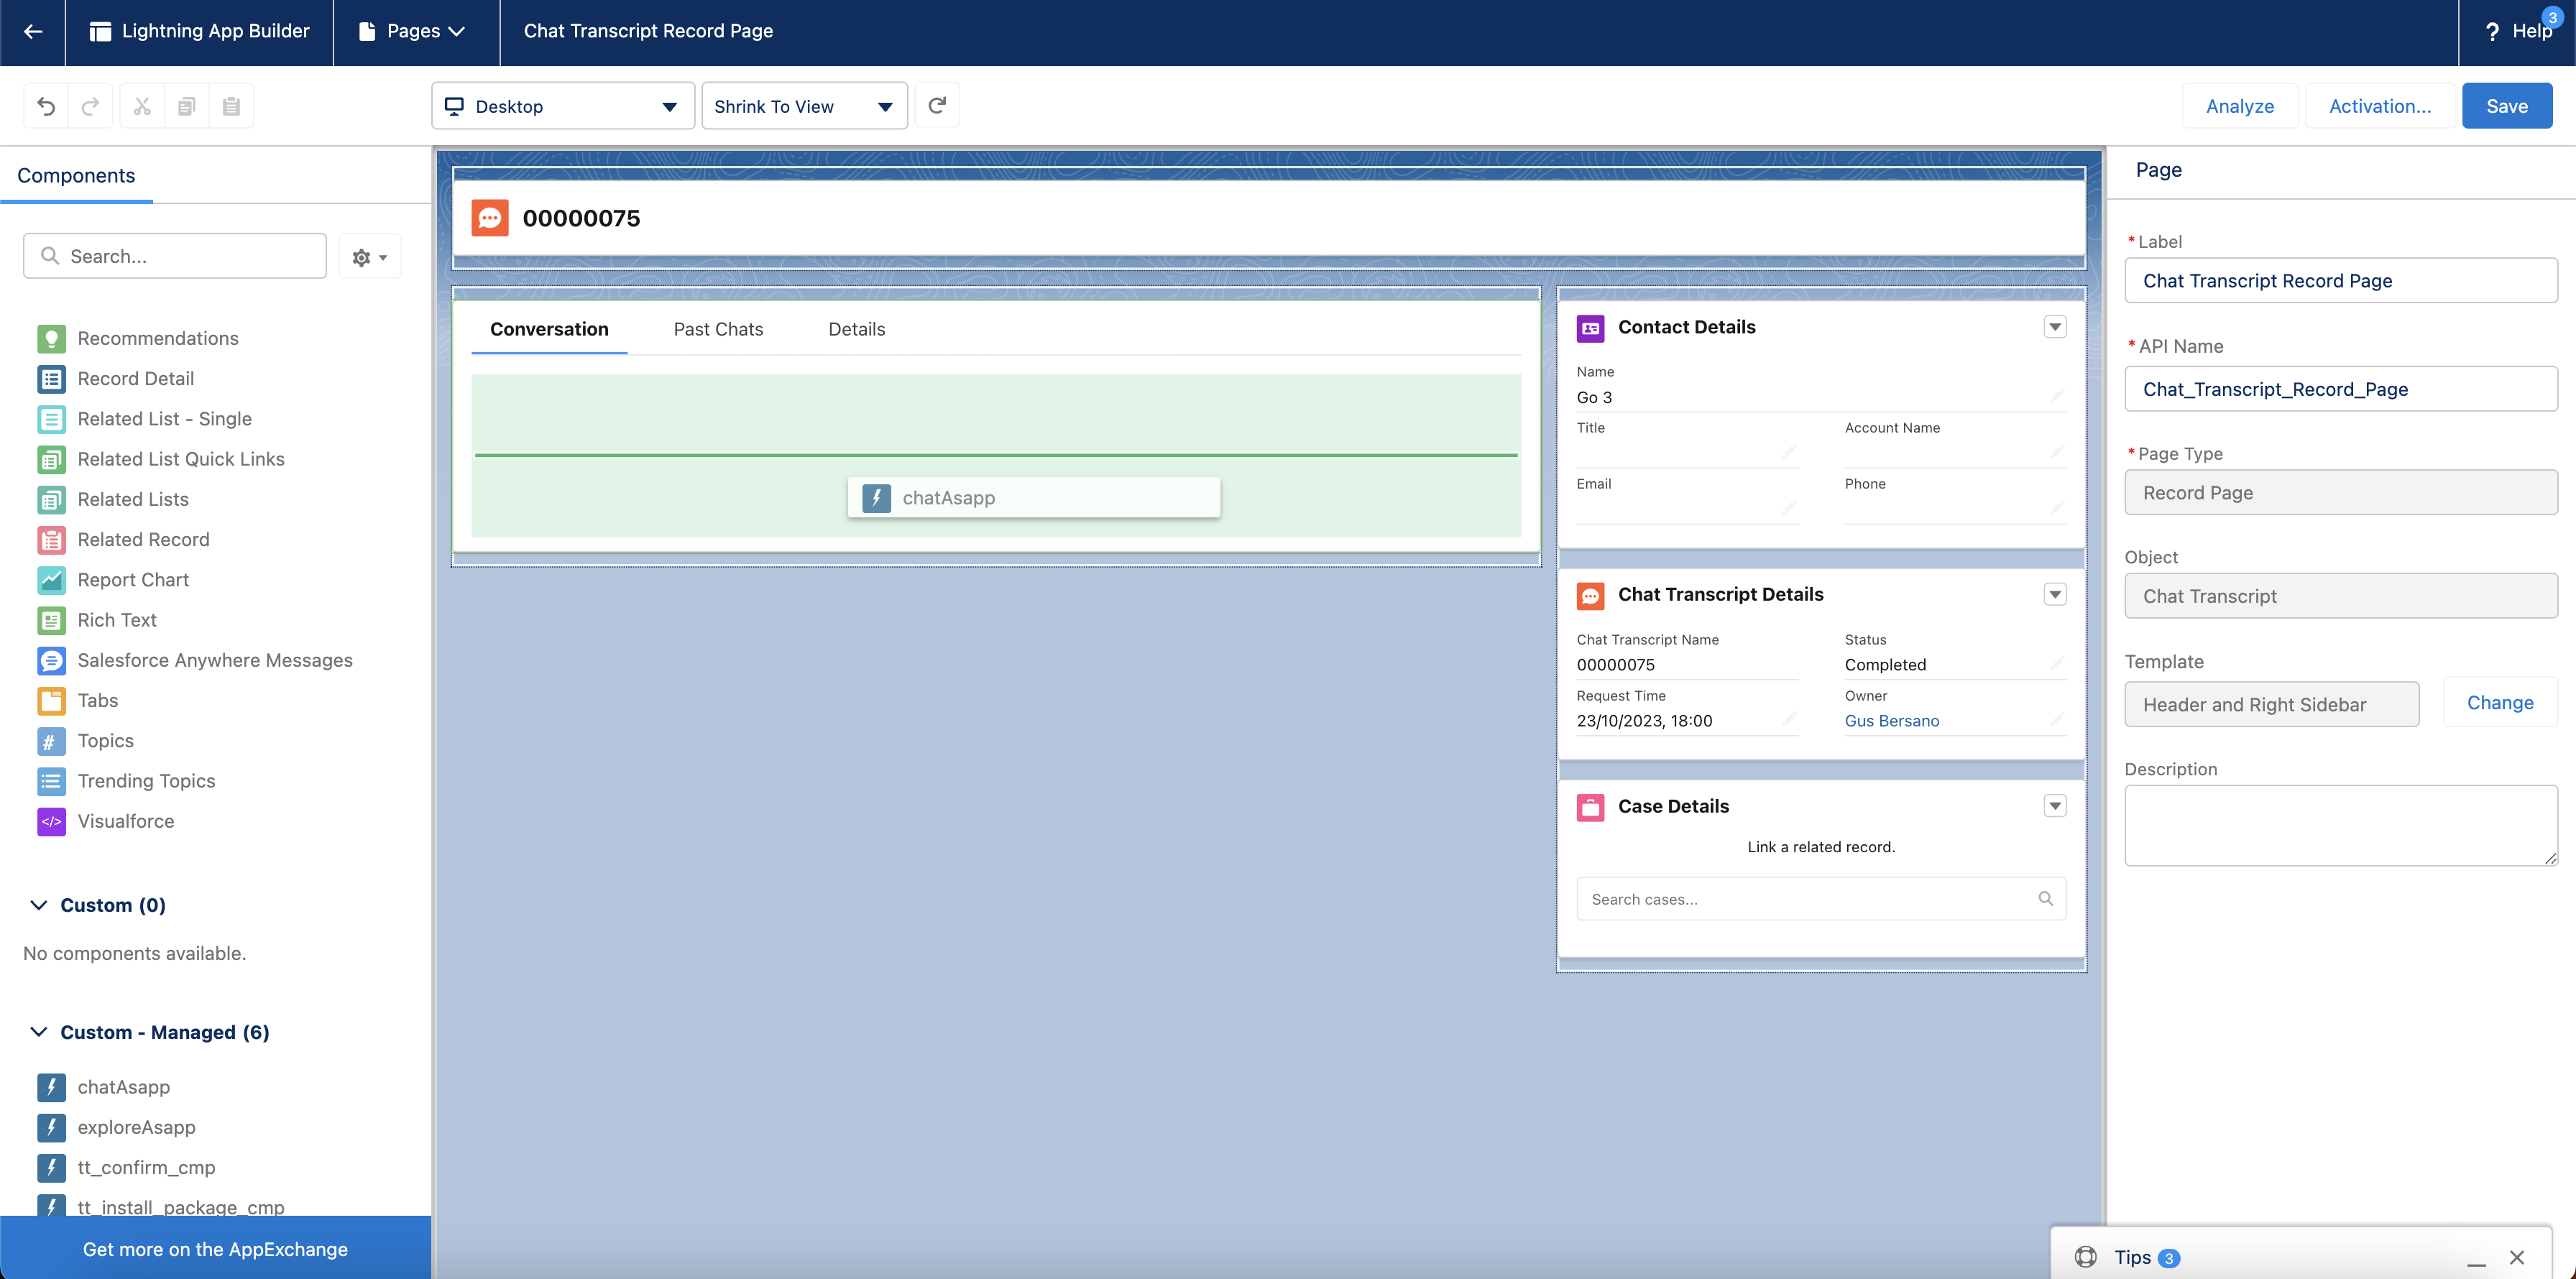
* Drag the **exploreAsapp** component (left), to the right column. Next, add your organization's **API key** and **API URL** (found in the ASAPP Developer Portal) in the rightmost panel:

<Note>
  The API key is labeled as **API Id** in the ASAPP Developer Portal. The API URL should be listed as `https://api.sandbox.asapp.com` for lower environments and `https://api.asapp.com` for production.
</Note>

<Frame>
  <img src="https://mintcdn.com/asapp/AXwA7-nbwQCJ8xte/image/uuid-cba02769-7bfd-4046-7b89-f6e99d6e26da.png?fit=max&auto=format&n=AXwA7-nbwQCJ8xte&q=85&s=5c7d7727374f04d8fa5c347bcf40e2c3" width="1916" height="974" data-path="image/uuid-cba02769-7bfd-4046-7b89-f6e99d6e26da.png" />
</Frame>

<Frame>
  <img src="https://mintcdn.com/asapp/V0FXHedP7HW51oOw/image/uuid-b9a621e7-75d9-7dfe-7e62-08dd68fc00b2.png?fit=max&auto=format&n=V0FXHedP7HW51oOw&q=85&s=ff25795d9228e39195dbf9c5b9237d57" width="841" height="623" data-path="image/uuid-b9a621e7-75d9-7dfe-7e62-08dd68fc00b2.png" />
</Frame>

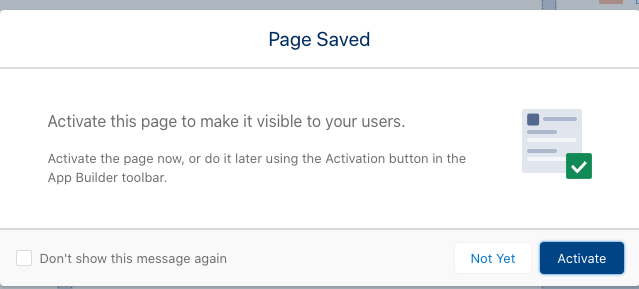
* Click **Save**, then click **Activate**
  <Frame>
    <img src="https://mintcdn.com/asapp/COy3KdZUtsAnzs_4/image/uuid-8d13377b-ee60-0196-c713-224ee04d65cc.png?fit=max&auto=format&n=COy3KdZUtsAnzs_4&q=85&s=90c6adbf461d6e286c22fdc2b291521e" width="639" height="289" data-path="image/uuid-8d13377b-ee60-0196-c713-224ee04d65cc.png" />
  </Frame>
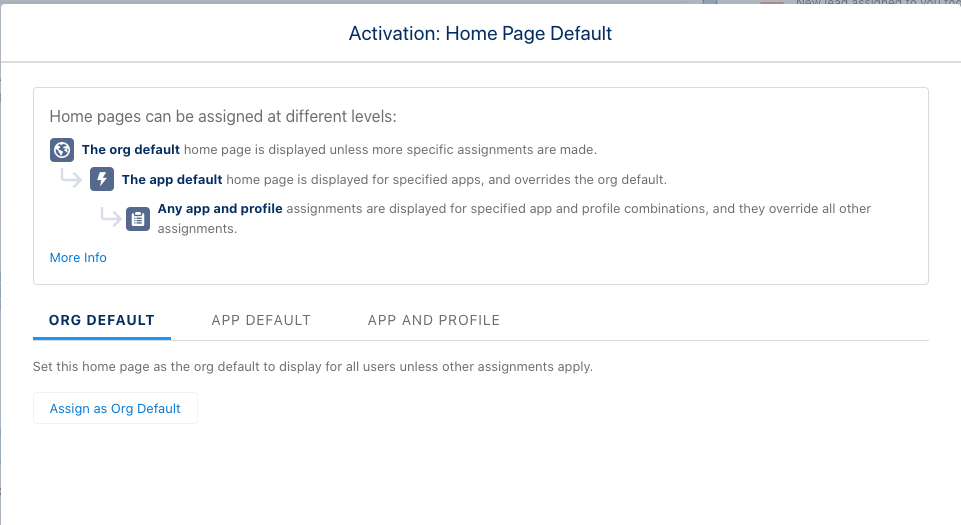
* Click **Assign as org default**.
  <Frame>
    <img src="https://mintcdn.com/asapp/AXwA7-nbwQCJ8xte/image/uuid-e2227892-55f8-1c17-16c7-61a1895bf19c.png?fit=max&auto=format&n=AXwA7-nbwQCJ8xte&q=85&s=a8afc23ad01706158397d073750e5fd2" width="961" height="525" data-path="image/uuid-e2227892-55f8-1c17-16c7-61a1895bf19c.png" />
  </Frame>
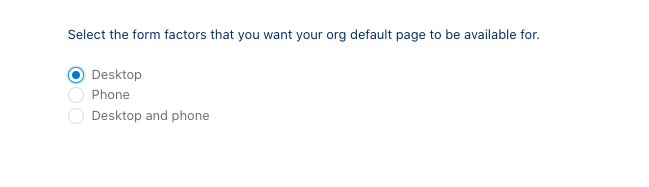
* Choose **Desktop** form factor, then click **Save**.
  <Frame>
    <img src="https://mintcdn.com/asapp/BoXlOITRW7VjgmOG/image/uuid-25a3c7b0-9a58-97be-28a4-799e4de6f3f3.png?fit=max&auto=format&n=BoXlOITRW7VjgmOG&q=85&s=896ff7c3620357aa1344554a8be3a597" width="649" height="187" data-path="image/uuid-25a3c7b0-9a58-97be-28a4-799e4de6f3f3.png" />
  </Frame>
* Return to the chat transcript page and refresh - the ASAPP composer should appear.
  <Frame>
    <img src="https://mintcdn.com/asapp/NE5s_J_rgoRPqQQt/image/uuid-419161db-4848-c498-a3b7-60faa0d0df6d.png?fit=max&auto=format&n=NE5s_J_rgoRPqQQt&q=85&s=54389209b9d389168ef13571c6303701" width="1916" height="974" data-path="image/uuid-419161db-4848-c498-a3b7-60faa0d0df6d.png" />
  </Frame>

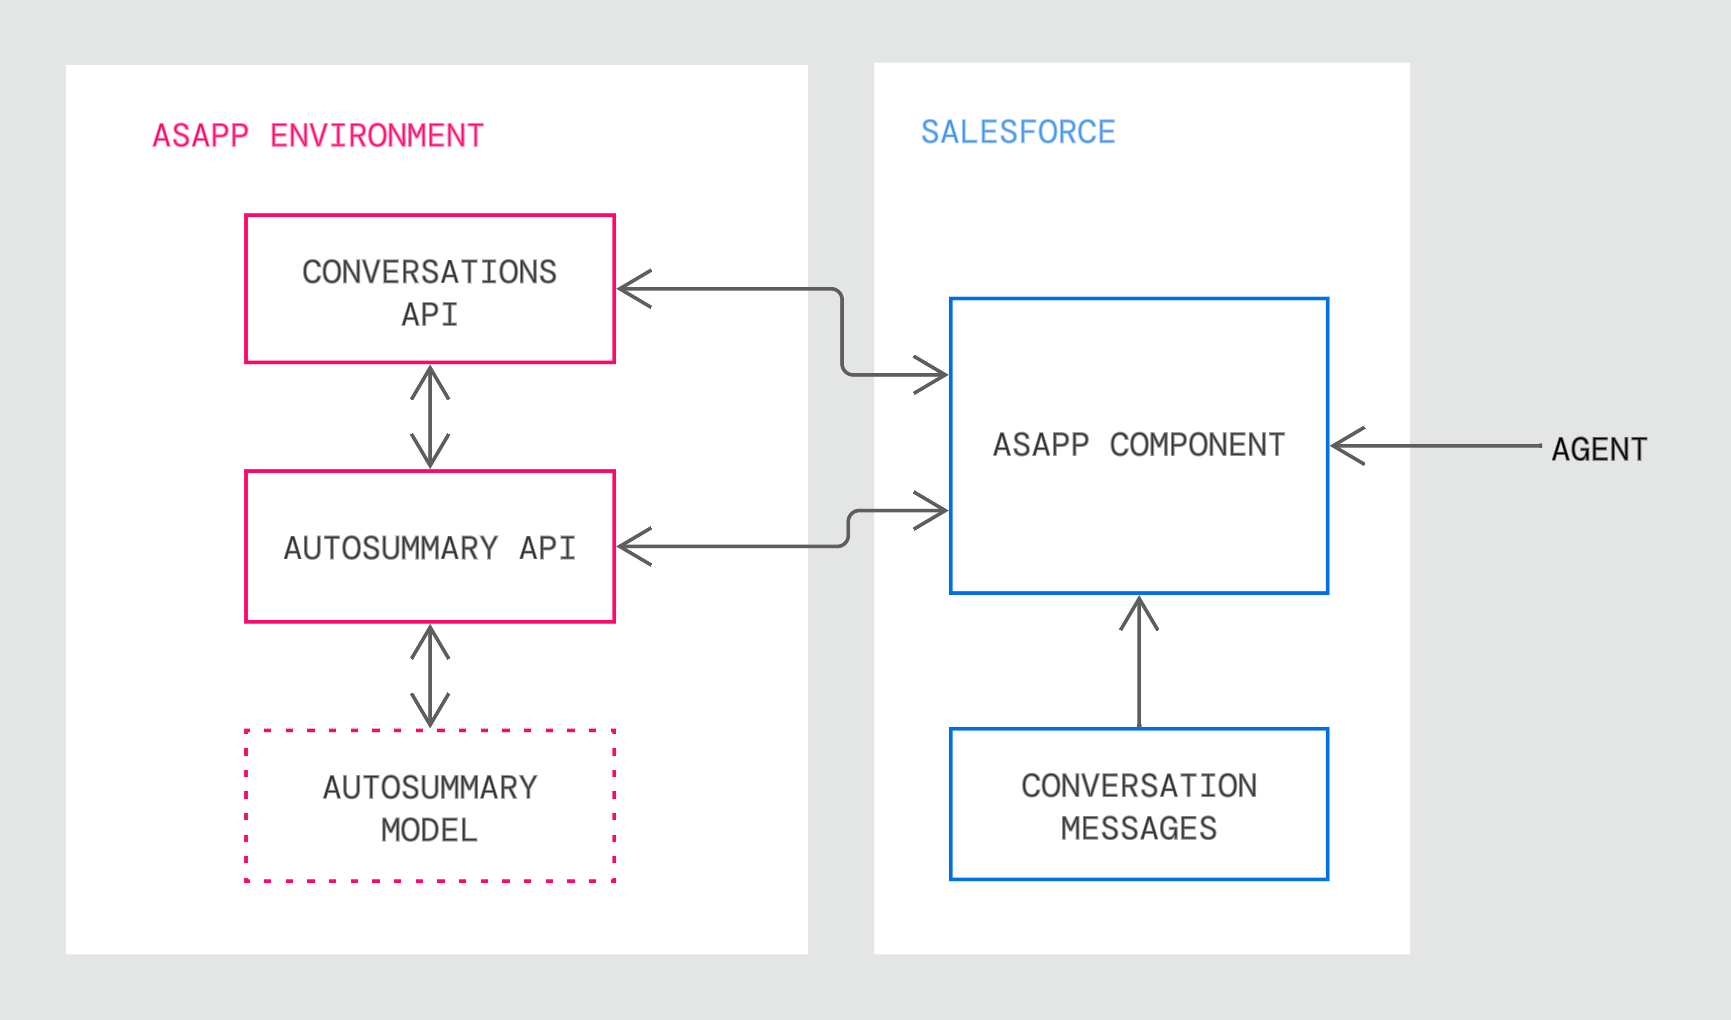
**3. Add a new Salesforce field to populate AI Summary results**
AI Summary writes only to the **Chat Transcript** object. You need to create a new field on the Chat Transcript object that will be used by the ASAPP component.

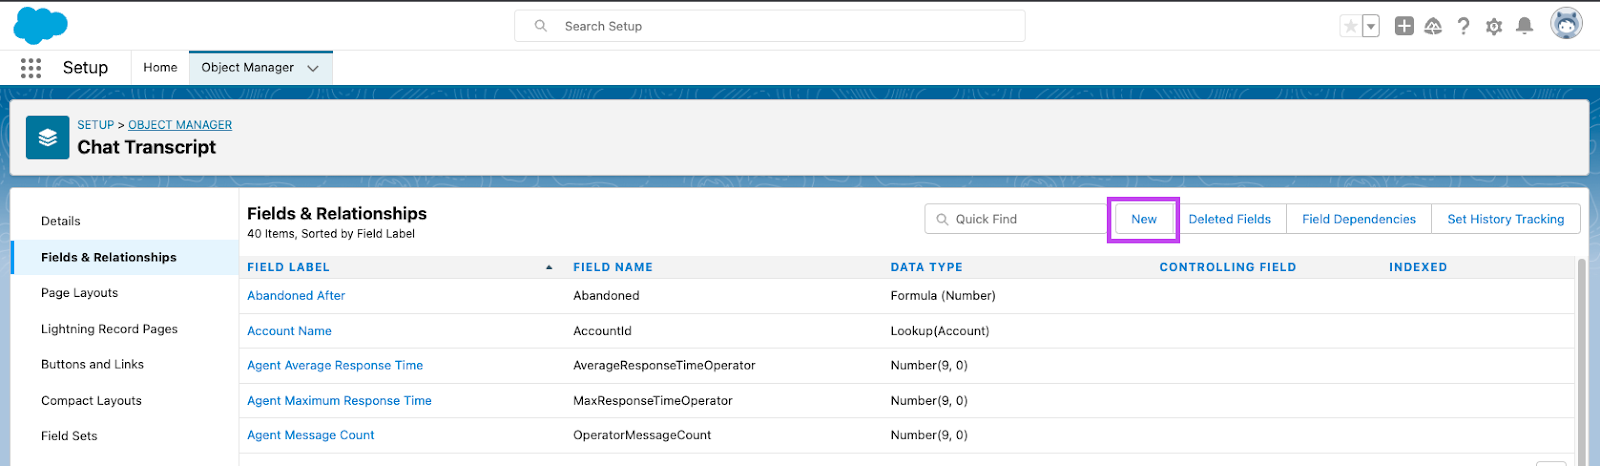
* Go to **Setup** > **Object Manager** > **Chat Transcript** > **Fields & Relationships** page (in this specific example, we choose to add the field for summarization on the Chat Transcript page).
* Click on the **New** button.
  <Frame>
    <img src="https://mintcdn.com/asapp/V0FXHedP7HW51oOw/image/uuid-a74eb43e-d0b8-3fdd-6c19-b7fe2b380301.png?fit=max&auto=format&n=V0FXHedP7HW51oOw&q=85&s=96e43b0e10add0745b11bec48c4b8d08" width="1600" height="466" data-path="image/uuid-a74eb43e-d0b8-3fdd-6c19-b7fe2b380301.png" />
  </Frame>
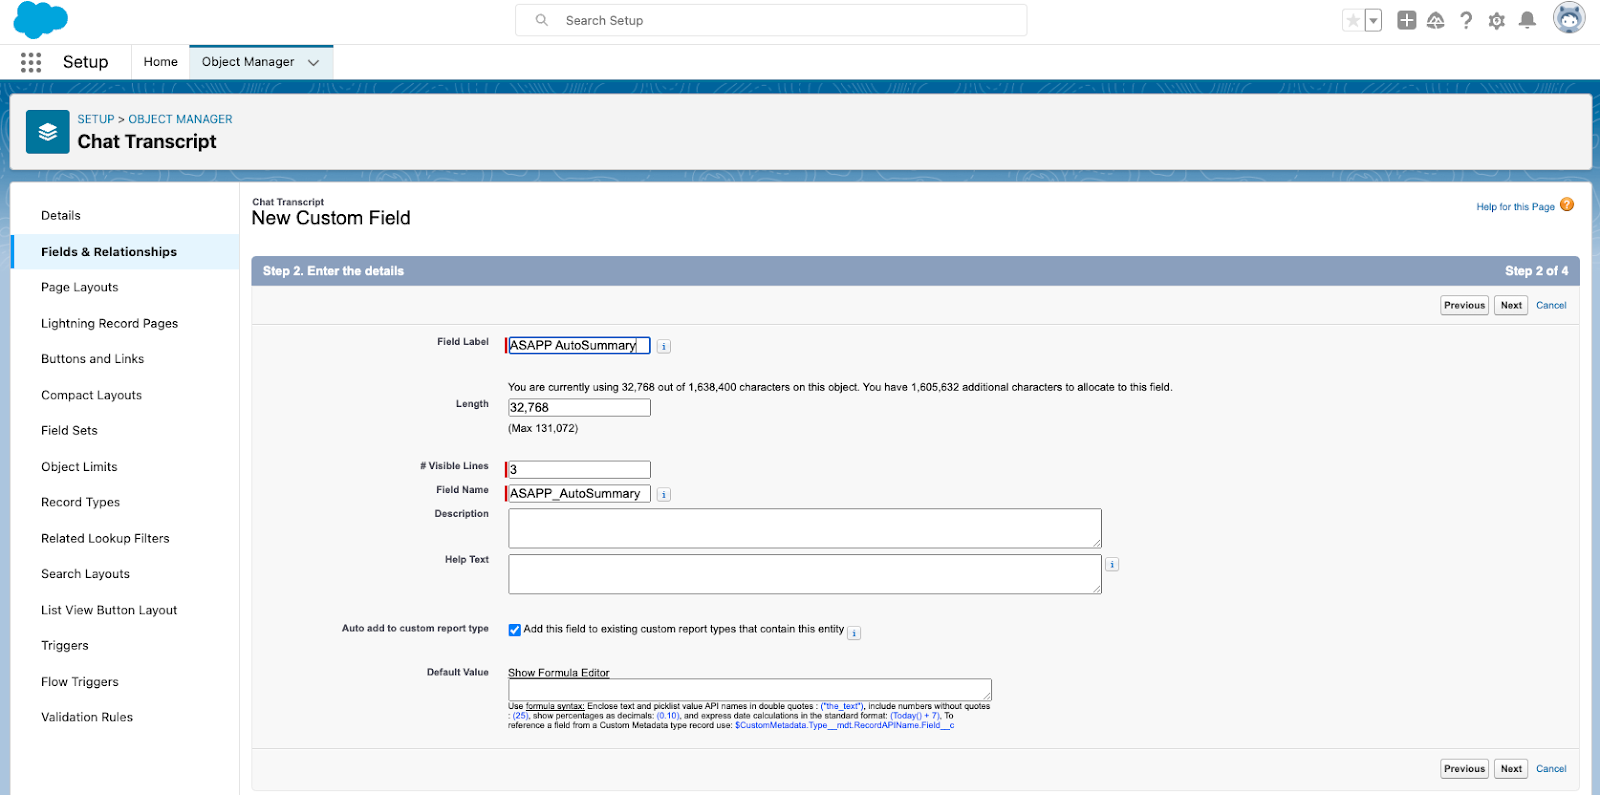
* **Choose the field type (Step 1)**: we suggest setting this field as **Text Area (Long)**. Once this radio button is selected, click on the **Next** button.
* **Enter the field details (Step 2)**: Add a **Field Label** and a **Field Name**. Click **Next**.

<Note>
  Take note of this **Field Name**, as it will be needed when setting up the AI Summary widget.
</Note>

<Frame>
  <img src="https://mintcdn.com/asapp/COy3KdZUtsAnzs_4/image/uuid-85e7878d-743e-852a-fdff-13534d84864c.png?fit=max&auto=format&n=COy3KdZUtsAnzs_4&q=85&s=b12357512d69402f3d9c376b9195f8da" width="1600" height="795" data-path="image/uuid-85e7878d-743e-852a-fdff-13534d84864c.png" />
</Frame>

* **Establish field-level security (Step 3)**: no need to modify anything. Click on **Next**.
* **Add to page layouts (Step 4)**: ensure to add the new field to page layouts for this implementation and then click **Save**.
* Once created, you will be able to see the field on the following page:
  <Frame>
    <img src="https://mintcdn.com/asapp/NE5s_J_rgoRPqQQt/image/uuid-3a15836c-3204-4032-82fc-1cf486a1532f.png?fit=max&auto=format&n=NE5s_J_rgoRPqQQt&q=85&s=8f73c918c5be01c9067b38639fbd715b" width="1600" height="521" data-path="image/uuid-3a15836c-3204-4032-82fc-1cf486a1532f.png" />
  </Frame>

**4. Configure AI Summary Widget**

* On the Service Console page, click on **Configuration** (gear icon) and then click **Edit Page**.
  <Frame>
    <img src="https://mintcdn.com/asapp/9jlDT2iVQhMOPce8/image/uuid-156e16ea-d143-b711-53ea-9da9667357fd.png?fit=max&auto=format&n=9jlDT2iVQhMOPce8&q=85&s=533089be02c29a2b76d4ed5adb0a1a70" width="1600" height="848" data-path="image/uuid-156e16ea-d143-b711-53ea-9da9667357fd.png" />
  </Frame>
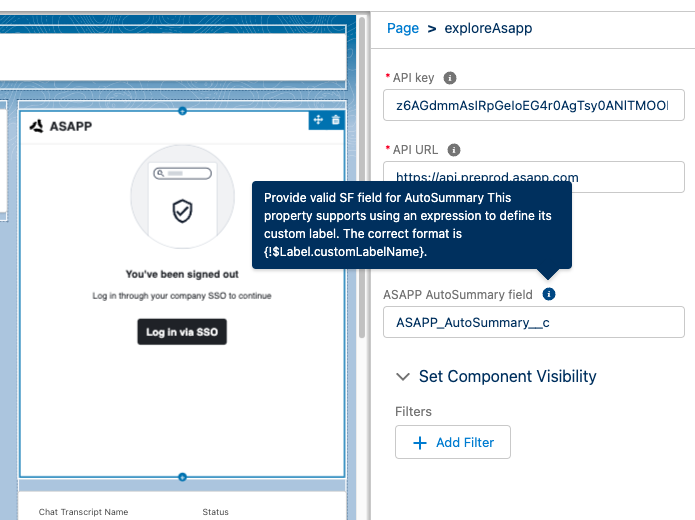
* Click the **ASAPP** panel. Then the configuration panel will appear on the right of the page. Enter the following information into the fields:
  * **API key**: this is the **API Id** found in the ASAPP Developer Portal.
  * **API URL**: this is found in the ASAPP Developer Portal; use `https://api.sandbox.asapp.com` in lower environments and `https://api.asapp.com`in production.
  * Select the checkbox for **ASAPP AI Summary**.
  * **ASAPP AI Summary field**: enter the **Field Name** created as part of Step 3. This is the field where the ASAPP-generated summary will appear.
  <Frame>
    <img src="https://mintcdn.com/asapp/COy3KdZUtsAnzs_4/image/uuid-8b35fadc-df1f-2b55-8428-d1918d2a4f3b.png?fit=max&auto=format&n=COy3KdZUtsAnzs_4&q=85&s=60ea6e6f6d35f50399f17700bd49951e" width="1599" height="936" data-path="image/uuid-8b35fadc-df1f-2b55-8428-d1918d2a4f3b.png" />
  </Frame>
  <Frame>
    <img src="https://mintcdn.com/asapp/COy3KdZUtsAnzs_4/image/uuid-96d8db8f-687d-5672-2a44-28c8021f4ef7.png?fit=max&auto=format&n=COy3KdZUtsAnzs_4&q=85&s=f56609585aaa9b7f190543665486c806" width="695" height="520" data-path="image/uuid-96d8db8f-687d-5672-2a44-28c8021f4ef7.png" />
  </Frame>
* Click on the **Save** button to apply the changes.
  These configuration steps add the AI Summary field to the Chat Transcript object. From this point forward, you may use this summary field as part of your agent-facing or internal summary data use case. A common use case is to display this field to the agent in the Record Detail widget.
  **5. Add Record Detail Widget (OPTIONAL)**
* If the Record Detail widget is not already on the Chat Transcript page, drag the **Record Detail** widget from the left panel and place it on the page.
* Click on the **Save** button to apply the changes.
* Refresh the page to see the changes applied to the page.
  The AI Summary field should now be visible under the **Transcription** section of the Record Detail widget. Once the conversation is ended, summarization will be displayed in this newly configured field in the Record Detail widget.

#### 2. Set Up Single Sign-On (SSO) User Authentication

ASAPP handles authentication through the customer's SSO service to confirm the identity of the agent.

ASAPP acts as the Service Provider (SP) with the customer acting as the Identity Provider (IDP). The customer's authentication system performs user authentication using their existing user credentials.

ASAPP supports SP-initiated SSO with either OIDC (preferred method) and SAML. Once the user initiates sign-in, ASAPP detects that the user is authenticated and requests an assertion from the customer's SSO service.

**Configuration Steps for OIDC (preferred method)**

1. Create a new IDP OIDC application with type `Web`
2. Set the following attributes for the app:

   | Attribute             | Value\*                                                                                                                                                                            |
   | :-------------------- | :--------------------------------------------------------------------------------------------------------------------------------------------------------------------------------- |
   | Grant Type            | authorization code                                                                                                                                                                 |
   | Sign-in Redirect URIs | <ul><li>Production: `https://api.asapp.com/auth/v1/callback/{company_marker}`</li><li>Sandbox: `https://api.sandbox.asapp.com/auth/v1/callback/{company_marker}-sandbox`</li></ul> |

   <Note> ASAPP to provide `company_marker` value</Note>
3. Save the application and send ASAPP the `Client ID` and `Client Secret` from the app through a secure communication channel
4. Set scopes for the OIDC application:
   * Required: `openid`
   * Preferred: `email`, `profile`
5. Tell ASAPP which end-user attribute should be used a unique identifier
6. Tell ASAPP your IDP domain name
   **Configuration Steps for SAML**
7. Create a new IDP SAML application.
8. Set the following attributes for the app:

   | Attribute            | Value\*                                                                                                                                                                                                                                                                                  |
   | :------------------- | :--------------------------------------------------------------------------------------------------------------------------------------------------------------------------------------------------------------------------------------------------------------------------------------- |
   | Single Sign On URL   | <ul><li>Production: `https://sso.asapp.com/auth/realms/standalone-{company_marker}-auth/broker/saml/endpoint/clients/asapp-saml`</li><li>Sandbox: `https://sso.asapp.com/auth/realms/standalone-{company_marker}-auth/broker/saml-sandbox/endpoint/clients/asapp-saml-sandbox`</li></ul> |
   | Recipient URL        | <ul><li>Production: `https://sso.asapp.com/auth/realms/standalone-{company_marker}-auth/broker/saml/endpoint/clients/asapp-saml`</li><li>Sandbox: `https://sso.asapp.com/auth/realms/standalone-{company_marker}-auth/broker/saml-sandbox/endpoint/clients/asapp-saml-sandbox`</li></ul> |
   | Destination URL      | <ul><li>Production: `https://sso.asapp.com/auth/realms/standalone-{company_marker}-auth/broker/saml/endpoint/clients/asapp-saml`</li><li>Sandbox: `https://sso.asapp.com/auth/realms/standalone-{company_marker}-auth/broker/saml-sandbox/endpoint/clients/asapp-saml-sandbox`</li></ul> |
   | Audience Restriction | <ul><li>Production: `https://sso.asapp.com/auth/realms/standalone-{company_marker}-auth/broker/saml/endpoint/clients/asapp-saml`</li><li>Sandbox: `https://sso.asapp.com/auth/realms/standalone-{company_marker}-auth/broker/saml-sandbox/endpoint/clients/asapp-saml-sandbox`</li></ul> |
   | Response             | Signed                                                                                                                                                                                                                                                                                   |
   | Assertion            | Signed                                                                                                                                                                                                                                                                                   |
   | Signature Algorithm  | RSA\_SHA256                                                                                                                                                                                                                                                                              |
   | Digest Algorithm     | SHA256                                                                                                                                                                                                                                                                                   |
   | Attribute Statements | externalUserId: {unique_id_to_identify_the_user}                                                                                                                                                                                                                                         |

   <Note> ASAPP to provide `company_marker` value</Note>
9. Save the application and send the Public Certificate to validate Signature for this app SAML payload to ASAPP team
10. Send ASAPP team the URL of the SAML application

## Usage

### Customization

#### Historical Transcripts for Summary Model Customization

ASAPP uses past agent conversations to generate a customized summary model that is tailored to a given use case. In order to create a customized summary model, ASAPP requires a minimum of 500 representative historical transcripts to generate free-text summaries. Transcripts should identify both the agent and customer messages.

<Note>
  Proper transcript formatting and sampling ensures data is usable for model training. Please ensure transcripts conform to the following:
  **Formatting**

  * Each utterance is clearly demarcated and sent by one identified sender
  * Utterances are in chronological order and complete, from beginning to very end of the conversation
  * Where possible, transcripts include the full content of the conversation rather than an abbreviated version. For example, in a digital messaging conversation:

      <table class="informaltable frame-void rules-rows">
        <thead>
          <tr>
            <th class="th"><p>Full</p></th>
            <th class="th"><p>Abbreviated</p></th>
          </tr>
        </thead>

        <tbody>
          <tr>
            <td class="td">
              <p><strong>Agent</strong>: Choose an option from the list below</p>
              <p><strong>Agent</strong>: (A) 1-way ticket (B) 2-way ticket (C) None of the above</p>
              <p><strong>Customer</strong>: (A) 1-way ticket</p>
            </td>

            <td class="td">
              <p><strong>Agent</strong>: Choose an option from the list below</p>
              <p><strong>Customer</strong>: (A)</p>
            </td>
          </tr>
        </tbody>
      </table>

  **Sampling**

  * Transcripts are from a wide range of dates to avoid seasonality effects; random sampling over a 12-month period is recommended
  * Transcripts mimic the production conversations on which models will be used - same types of participants, same channel (voice, messaging), same business unit
  * There are no duplicate transcripts
</Note>

For more information on how to transmit the conversation data, reach out to your ASAPP account contact.
Visit [Transmitting Data to SFTP](/reporting/send-sftp) for instructions on how to send historical transcripts to ASAPP.

#### Conversation Redaction

When message text in the conversation transcript is sent to ASAPP, ASAPP applies redaction to the message text to prevent transmission of sensitive information. Reach out to your ASAPP account contact for information on available redaction capabilities to configure for your implementation.

### Data Security

ASAPP's security protocols protect data at each point of transmission from first user authentication, to secure communications, to our auditing and logging system, all the way to securing the environment when data is at rest in the data logging system. Access to data by ASAPP teams is tightly constrained and monitored. Strict security protocols protect both ASAPP and our customers.
The following security controls are particularly relevant to AI Compose:

1. Client sessions are controlled using a time-limited authorization token. Privileges for each active session are controlled server-side to mitigate potential elevation-of-privilege and information disclosure risks.
2. To avoid unauthorized disclosure of information, unique, non-guessable IDs are used to identify conversations. These conversations can only be accessed using a valid client session.
3. Requests to API endpoints that can potentially receive sensitive data are put through a round of redaction to strip the request of sensitive data (like SSNs and phone numbers).
