> ## Documentation Index
> Fetch the complete documentation index at: https://docs.asapp.com/llms.txt
> Use this file to discover all available pages before exploring further.
# Configuring GenerativeAgent
> Learn how to configure GenerativeAgent
Configure how GenerativeAgent interacts with end users and define its behaviors and actions. You have full control over its capabilities and communication style.
When GenerativeAgent engages in a conversation, it draws on relevant Topic articles from the knowledge base each turn. Based on the conversation, it answers from article content, triggers a Handoff to route to a human agent, or switches into a Task to run a deterministic workflow.
Follow these steps to configure GenerativeAgent:
1. Define the scope for GenerativeAgent
2. Configure core conversation settings
3. Create Tasks
4. Create Functions for those Tasks
5. Connect your Knowledge Base
6. Deploy your changes
After configuration, use the [Previewer](/generativeagent/configuring/previewer) to test GenerativeAgent and make further refinements.
## Accessing the AI Console
Configuring GenerativeAgent requires access to our AI Console, our dashboard for configuring and managing ASAPP. You should have received login credentials from your ASAPP team. If not, please contact them for access.
## Step 1: Define the Scope
Define a clear scope to ensure GenerativeAgent provides safe and accurate assistance.
Consider and decide on:
* The voice or tone GenerativeAgent will use
* The types of issues or actions you want GenerativeAgent to handle (represented as **Tasks**)
* Which APIs your organization needs to expose for GenerativeAgent to address those Tasks (called **Functions**)
A **Task** is any issue or action you want GenerativeAgent to handle. Define a set of instructions in human language, and add one or **Functions**, which are the tools GenerativeAgent can use for that task.
A **Function** is an API call given to GenerativeAgent to fetch data or perform an action. Once you've mapped out the APIs, Functions, and Tasks, use the GenerativeAgent UI to enter your configuration.
## Step 2: Configure Core Conversation Settings
Configure the Core Conversation settings, including:
* Your company name for GenerativeAgent to use
* The welcome message for new customer connections
* How GenerativeAgent should refer to itself
* How your human agents are referred to
* A sentence explaining GenerativeAgent's desired tone
Work with your ASAPP team to configure these settings.
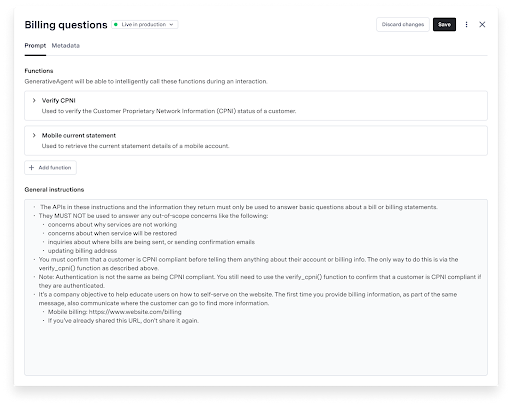
## Step 3: Create Tasks
Tasks are the foundation of how GenerativeAgent performs. This is often where you will spend most of your time when configuring GenerativeAgent. When analyzing a conversation, GenerativeAgent selects the appropriate task and follows its instructions.
To define a Task:
1. Navigate to the Tasks page
2. Click "Create task"
3. Provide the following information:
* Task name
* Task selector description
* Task message (optional)
* General Instructions
* Functions the task should use
You can specify knowledge base metadata to restrict GenerativeAgent to using only articles with matching metadata.
 ### Improving Tasks
As you configure tasks, refer to [Improving Tasks](/generativeagent/configuring/tasks-and-functions/improving) for strategies and tools to improve task performance.
## Step 4: Create Functions
Functions enable your GenerativeAgent to perform actions similar to a live agent. For example, an airline might need Functions to check refund eligibility and process refunds.
Functions must point to specific [API Connections](/generativeagent/configuring/connect-apis) and versions. API Connections contain technical details for connecting to specific API endpoints.
You can opt to point to a live API Connection later by choosing "integrate later" and use a Mock API
To create a function:
1. Navigate to the Functions page
2. Click "Create Function"
3. Provide the following information:
* Function name
* Description of how GenerativeAgent should use this function
* The API Connection to use (default is the latest version)
4. Choose the Function connection type
* **Connect to an API**: Enable GenerativeAgent to call an API to fetch data or perform an action
* **Create a Mock API Function**: Define an ideal API interaction for GenerativeAgent before connecting to a real API
* **Set Variable Functions**: Enable GenerativeAgent to store conversation data as reference variables for future use
* **System Transfer Functions**: Let GenerativeAgent signal that it's finished or needs to hand control back to an external system
Under "Choose an API":
1. Select one of your existing [API connections](/generativeagent/configuring/connect-apis).
* (Optional) Confirm or adjust which version of the API to use if multiple are available.
2. Save the Function.
* GenerativeAgent will call the real API during interactions.
You can define an ideal API interaction for GenerativeAgent before connecting to a real API.
Use a [Mock API Function](/generativeagent/configuring/tasks-and-functions/mock-api) to define data before using a real connection.
You can replace the Mock call with an existing API or [Create an API Connection](/generativeagent/configuring/connect-apis) at any time.
Under "Choose an API":
1. Click on “Integrate later”
2. Define your request parameters in JSON schema format
You can pick a template from the “Examples” dropdown or start with a blank schema.
Make sure your JSON is valid; GenerativeAgent will not let you save if the schema is invalid
3. Save your Function.
* You will see a preview of your defined parameters.
You can replace the Mock API schema with a real API connection at any time.
This makes for a seamless transition to live systems.
Save a value from the conversation with a [Variable Function](/generativeagent/configuring/tasks-and-functions/set-variable). This is helpful for storing data like a user's account number, or compute conditional logic (e.g., whether a child is eligible as a lap child).
1. Select "Set variable" function type.
2. Define the input GenerativeAgent should use when calling the function.
3. Add the variables you would like to set.
* This is defined as a string but allows for [Jinja templating](/generativeagent/configuring/tasks-and-functions/set-variable#step-5-specify-set-variables) for advanced use cases.
4. Save the Function.
Signal that control should be transferred from GenerativeAgent to an external system with a [System Transfer Function](/generativeagent/configuring/tasks-and-functions/system-transfer). This is helpful for ending conversations or handing control back to external systems with relevant conversation data.
1. Select "System transfer" function type.
2. Define the input GenerativeAgent should use when calling the function.
3. (Optionally) Add any variables you would like to set.
4. Save your Function.
* You will see a preview of your defined parameters.
## Step 5: Connect your Knowledge Base
Connect your [knowledge base](/generativeagent/configuring/connecting-your-knowledge-base) to ASAPP and determine what information GenerativeAgent should use when assisting users.
## Step 6: Deploy Changes
After configuring GenerativeAgent, deploy your changes. You have two environments and a draft mode:
* **Draft**: The system automatically makes changes available for testing with Previewer
* **Sandbox**: Test GenerativeAgent with your real APIs and perform end-to-end testing
* **Production**: Serve live traffic to your end users
## Next Steps
With a functioning GenerativeAgent, you're ready to support real users. Explore these sections to advance your integration:
### Improving Tasks
As you configure tasks, refer to [Improving Tasks](/generativeagent/configuring/tasks-and-functions/improving) for strategies and tools to improve task performance.
## Step 4: Create Functions
Functions enable your GenerativeAgent to perform actions similar to a live agent. For example, an airline might need Functions to check refund eligibility and process refunds.
Functions must point to specific [API Connections](/generativeagent/configuring/connect-apis) and versions. API Connections contain technical details for connecting to specific API endpoints.
You can opt to point to a live API Connection later by choosing "integrate later" and use a Mock API
To create a function:
1. Navigate to the Functions page
2. Click "Create Function"
3. Provide the following information:
* Function name
* Description of how GenerativeAgent should use this function
* The API Connection to use (default is the latest version)
4. Choose the Function connection type
* **Connect to an API**: Enable GenerativeAgent to call an API to fetch data or perform an action
* **Create a Mock API Function**: Define an ideal API interaction for GenerativeAgent before connecting to a real API
* **Set Variable Functions**: Enable GenerativeAgent to store conversation data as reference variables for future use
* **System Transfer Functions**: Let GenerativeAgent signal that it's finished or needs to hand control back to an external system
Under "Choose an API":
1. Select one of your existing [API connections](/generativeagent/configuring/connect-apis).
* (Optional) Confirm or adjust which version of the API to use if multiple are available.
2. Save the Function.
* GenerativeAgent will call the real API during interactions.
You can define an ideal API interaction for GenerativeAgent before connecting to a real API.
Use a [Mock API Function](/generativeagent/configuring/tasks-and-functions/mock-api) to define data before using a real connection.
You can replace the Mock call with an existing API or [Create an API Connection](/generativeagent/configuring/connect-apis) at any time.
Under "Choose an API":
1. Click on “Integrate later”
2. Define your request parameters in JSON schema format
You can pick a template from the “Examples” dropdown or start with a blank schema.
Make sure your JSON is valid; GenerativeAgent will not let you save if the schema is invalid
3. Save your Function.
* You will see a preview of your defined parameters.
You can replace the Mock API schema with a real API connection at any time.
This makes for a seamless transition to live systems.
Save a value from the conversation with a [Variable Function](/generativeagent/configuring/tasks-and-functions/set-variable). This is helpful for storing data like a user's account number, or compute conditional logic (e.g., whether a child is eligible as a lap child).
1. Select "Set variable" function type.
2. Define the input GenerativeAgent should use when calling the function.
3. Add the variables you would like to set.
* This is defined as a string but allows for [Jinja templating](/generativeagent/configuring/tasks-and-functions/set-variable#step-5-specify-set-variables) for advanced use cases.
4. Save the Function.
Signal that control should be transferred from GenerativeAgent to an external system with a [System Transfer Function](/generativeagent/configuring/tasks-and-functions/system-transfer). This is helpful for ending conversations or handing control back to external systems with relevant conversation data.
1. Select "System transfer" function type.
2. Define the input GenerativeAgent should use when calling the function.
3. (Optionally) Add any variables you would like to set.
4. Save your Function.
* You will see a preview of your defined parameters.
## Step 5: Connect your Knowledge Base
Connect your [knowledge base](/generativeagent/configuring/connecting-your-knowledge-base) to ASAPP and determine what information GenerativeAgent should use when assisting users.
## Step 6: Deploy Changes
After configuring GenerativeAgent, deploy your changes. You have two environments and a draft mode:
* **Draft**: The system automatically makes changes available for testing with Previewer
* **Sandbox**: Test GenerativeAgent with your real APIs and perform end-to-end testing
* **Production**: Serve live traffic to your end users
## Next Steps
With a functioning GenerativeAgent, you're ready to support real users. Explore these sections to advance your integration: