> ## Documentation Index
> Fetch the complete documentation index at: https://docs.asapp.com/llms.txt
> Use this file to discover all available pages before exploring further.
# Connect Your APIs
> Learn how to connect your APIs to GenerativeAgent with API Connections
GenerativeAgent can call your APIs to get data or perform actions through **API Connections**. These connections allow GenerativeAgent to handle complex tasks like looking up account information or booking flights.
Our API Connection tooling lets you transform your existing APIs into LLM-friendly interfaces that GenerativeAgent can use effectively. Unlike other providers that require you to create new simplified APIs specifically for LLM use, ASAPP's approach lets you leverage your current infrastructure without additional development work.
Typically, a developer or other technical user will create API Connections. If you need help, reach out to your ASAPP team.
## Understanding API Connections
API Connections are the bridge between your GenerativeAgent and your external APIs. They allow your agent to interact with your existing systems and services, just like a human agent would.
### How API Connections Fit In
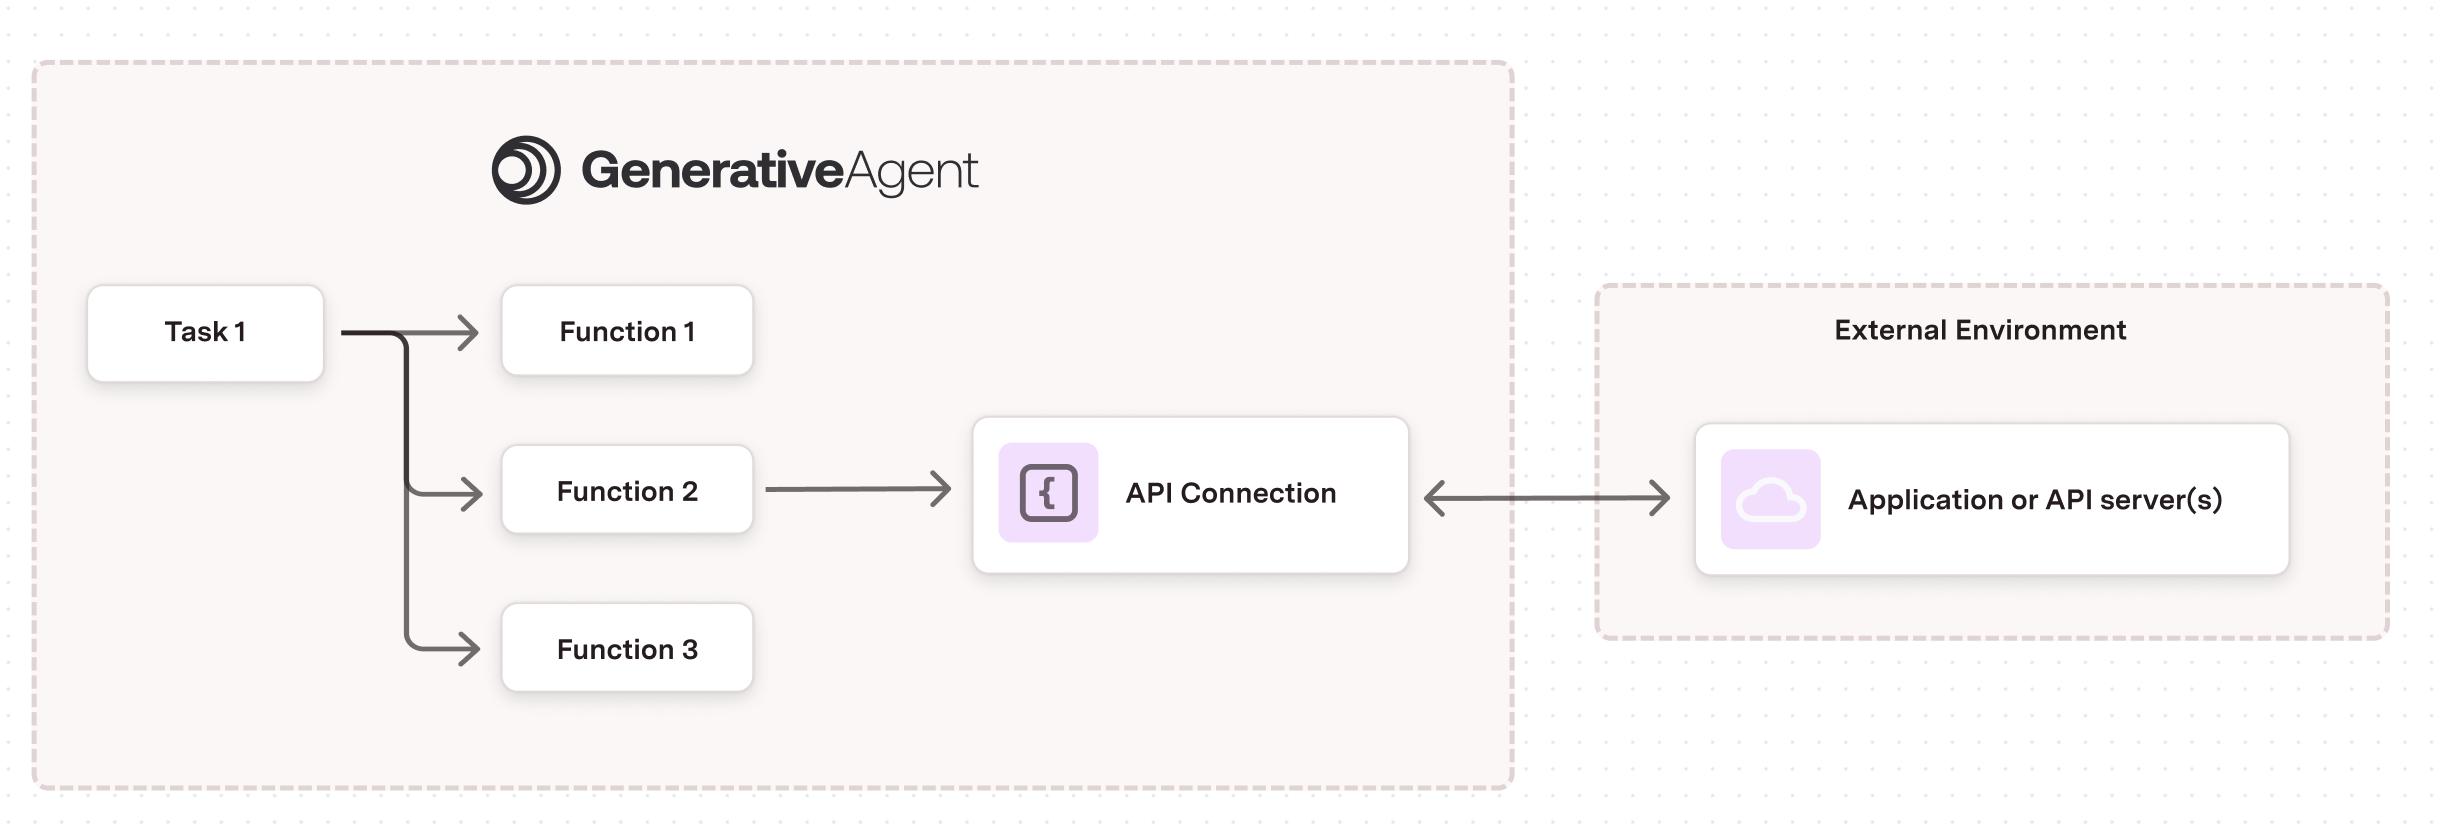
GenerativeAgent uses a hierarchical structure to organize its capabilities:
1. **Tasks**: High-level instructions that tell GenerativeAgent what to do. A task can have one or more functions.
2. **Functions**: Tools that help GenerativeAgent complete tasks. A function can point to a single API Connection.
3. **API Connections**: Configurations that enable Functions to interact with your APIs.
 ### Core Components
Each API Connection consists of three main parts that work together:
1. **API Source**:
* Handles the technical details of calling your API
* Manages authentication and security
* Configures environment-specific settings (sandbox/production)
2. **Request Interface**:
* Defines what information GenerativeAgent can send
* Transforms GenerativeAgent's requests into your API's format
* Includes testing tools to verify the transformation
3. **Response Interface**:
* Controls what data GenerativeAgent receives
* Transforms the API response to a GenerativeAgent friendly format
* Includes testing tools to verify the transformation
## Create an API Connection
To create an API Connection, you need to:
1. Navigate to **API Integration Hub** in your dashboard
2. Select the **API Connections** tab
3. Click the **Create Connection** button
Choose your API source type:
Every API Connection requires an [OpenAPI specification](https://spec.openapis.org/oas/latest.html) that defines your API endpoints and structure.
* Choose an existing API spec from your previously uploaded API Specs, or
* Upload a new OpenAPI specification file
We support any API that uses JSON for requests and responses.
Use an MCP (Model Context Protocol) server to connect tools designed for LLM interaction. See [Using MCP Servers](/generativeagent/configuring/connect-apis/mcp-server) for detailed instructions.
Use pre-built platform adapters (e.g., Salesforce, Slack, ServiceNow) to connect without defining APIs from scratch. See [Using Adapters](/generativeagent/configuring/connect-apis/adapters) for detailed instructions.
Provide the essential information for your connection:
* **Name**: A descriptive name for the API Connection
* **Description**: Brief explanation of the connection's purpose
* **Endpoint**: Select the specific API endpoint from your specification
We only support endpoints with JSON request and response bodies.
After creation, you'll be taken to the API Source configuration page. Here you'll need to:
1. Set up [authentication methods](#authentication)
2. Configure [environment settings](#environment-settings)
3. Define [error handling](#error-handling) rules
4. Add any required [static headers](#headers)
Configure how GenerativeAgent interacts with your API:
1. Define the [Request Interface](#request-interface):
* Specify the schema GenerativeAgent will use
* Create request transformations
* Test with sample requests
2. Configure the [Response Interface](#response-interface):
* Define the response schema
* Set up response transformations
* Validate with sample responses
Before finalizing your API Connection:
1. Run test requests in the sandbox environment
2. Verify transformations work as expected
3. Check error handling behavior
Once your API Connection is configured and tested, you can [reference it in a Function](/generativeagent/configuring#step-4-create-functions) to enable GenerativeAgent to use the API.
### Duplicate an API Connection
You can duplicate an existing API Connection from the list view. Open the overflow menu (⋮) on the connection and select **Duplicate**. The copy inherits the full configuration; you can customize it after creation.
## Request Interface
The Request Interface defines how GenerativeAgent interacts with your API. It consists of three key components that work together to enable effective API communication.
* [Request Schema](#request-schema): The schema of the data that GenerativeAgent can send to your API.
* [Request Transformation](#request-transformation): The transformation that will apply to the data before sending it to your API.
* [Testing Interface](#request-testing): The interface that allows you to test the request transformation with different inputs.
### Core Components
Each API Connection consists of three main parts that work together:
1. **API Source**:
* Handles the technical details of calling your API
* Manages authentication and security
* Configures environment-specific settings (sandbox/production)
2. **Request Interface**:
* Defines what information GenerativeAgent can send
* Transforms GenerativeAgent's requests into your API's format
* Includes testing tools to verify the transformation
3. **Response Interface**:
* Controls what data GenerativeAgent receives
* Transforms the API response to a GenerativeAgent friendly format
* Includes testing tools to verify the transformation
## Create an API Connection
To create an API Connection, you need to:
1. Navigate to **API Integration Hub** in your dashboard
2. Select the **API Connections** tab
3. Click the **Create Connection** button
Choose your API source type:
Every API Connection requires an [OpenAPI specification](https://spec.openapis.org/oas/latest.html) that defines your API endpoints and structure.
* Choose an existing API spec from your previously uploaded API Specs, or
* Upload a new OpenAPI specification file
We support any API that uses JSON for requests and responses.
Use an MCP (Model Context Protocol) server to connect tools designed for LLM interaction. See [Using MCP Servers](/generativeagent/configuring/connect-apis/mcp-server) for detailed instructions.
Use pre-built platform adapters (e.g., Salesforce, Slack, ServiceNow) to connect without defining APIs from scratch. See [Using Adapters](/generativeagent/configuring/connect-apis/adapters) for detailed instructions.
Provide the essential information for your connection:
* **Name**: A descriptive name for the API Connection
* **Description**: Brief explanation of the connection's purpose
* **Endpoint**: Select the specific API endpoint from your specification
We only support endpoints with JSON request and response bodies.
After creation, you'll be taken to the API Source configuration page. Here you'll need to:
1. Set up [authentication methods](#authentication)
2. Configure [environment settings](#environment-settings)
3. Define [error handling](#error-handling) rules
4. Add any required [static headers](#headers)
Configure how GenerativeAgent interacts with your API:
1. Define the [Request Interface](#request-interface):
* Specify the schema GenerativeAgent will use
* Create request transformations
* Test with sample requests
2. Configure the [Response Interface](#response-interface):
* Define the response schema
* Set up response transformations
* Validate with sample responses
Before finalizing your API Connection:
1. Run test requests in the sandbox environment
2. Verify transformations work as expected
3. Check error handling behavior
Once your API Connection is configured and tested, you can [reference it in a Function](/generativeagent/configuring#step-4-create-functions) to enable GenerativeAgent to use the API.
### Duplicate an API Connection
You can duplicate an existing API Connection from the list view. Open the overflow menu (⋮) on the connection and select **Duplicate**. The copy inherits the full configuration; you can customize it after creation.
## Request Interface
The Request Interface defines how GenerativeAgent interacts with your API. It consists of three key components that work together to enable effective API communication.
* [Request Schema](#request-schema): The schema of the data that GenerativeAgent can send to your API.
* [Request Transformation](#request-transformation): The transformation that will apply to the data before sending it to your API.
* [Testing Interface](#request-testing): The interface that allows you to test the request transformation with different inputs.
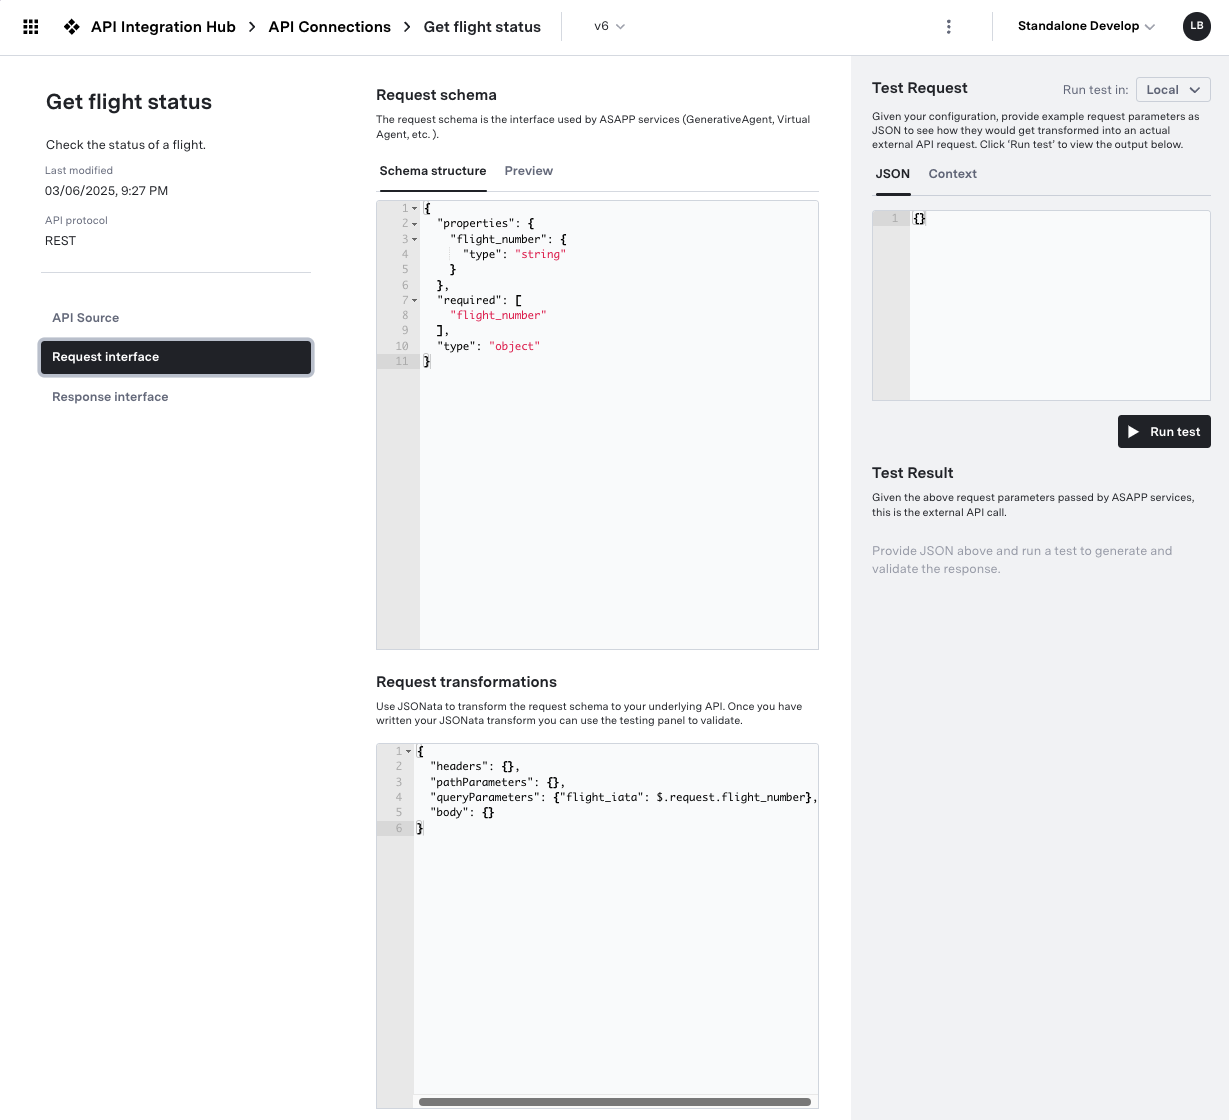 ### Request Schema
The Request Schema specifies the structure of data that GenerativeAgent can send to your API. This schema should be designed for optimal LLM interaction.
This schema is NOT the schema of the API. This is the schema that the system shows to GenerativeAgent.
**Best Practices for Schema Design**
```json theme={null}
// Good - Clear and descriptive
{
"type": "object",
"properties": {
"customer_name": {
"type": "string"
},
"order_date": {
"type": "string"
}
}
}
// Avoid - Cryptic or complex
{
"type": "object",
"properties": {
"cust_nm_001": {
"type": "string"
},
"ord_dt_timestamp": {
"type": "string"
}
}
}
```
```json theme={null}
// Good - Flat structure
{
"type": "object",
"properties": {
"shipping_street": {
"type": "string"
},
"shipping_city": {
"type": "string"
},
"shipping_country": {
"type": "string"
}
}
}
// Avoid - Deep nesting
{
"type": "object",
"properties": {
"shipping": {
"type": "object",
"properties": {
"address": {
"type": "object",
"properties": {
"street": {
"type": "string"
},
"city": {
"type": "string"
},
"country": {
"type": "string"
}
}
}
}
}
}
}
```
```json theme={null}
{
"properties": {
"order_status": {
"type": "string",
"description": "Current status of the order (pending, shipped, delivered)",
"enum": ["pending", "shipped", "delivered"]
}
}
}
```
* Keep only essential fields that GenerativeAgent needs
* Set `"additionalProperties": false` to prevent unexpected data
When first created, the Request Schema is a 1-1 mapping to the underlying API spec.
### Request Transformation
The Request Transformation converts GenerativeAgent's request into the format your API expects. This is done using [JSONata](https://jsonata.org/) expressions.
When first created, the Request Transformation is a 1-1 mapping to the underlying API spec.
**Common Transformation Patterns**
```javascript theme={null}
{
"headers": {
"Content-Type": "application/json"
},
"pathParameters": {
"userId": request.id
},
"queryParameters": {
"include": "details,preferences"
},
"body": {
"name": request.userName,
"email": request.userEmail
}
}
```
```javascript theme={null}
{
"body": {
// Convert date to ISO format
"timestamp": $toMillis(request.date),
// Uppercase a value
"region": $uppercase(request.country),
// Join array values
"tags": $join(request.categories, ",")
}
}
```
```javascript theme={null}
{
"body": {
// Include field only if present
"optional_field": $exists(request.someField) ? request.someField : undefined,
// Transform based on condition
"status": request.isActive = true ? "ACTIVE" : "INACTIVE"
}
}
```
The transformation can read the conversation context through `$.context`, alongside the `request` object. The context carries the active task name, the conversation's input and reference variables, and ASAPP identifiers. Reading these values here lets the connection use them directly, instead of relying on GenerativeAgent to pass them in as request parameters.
```javascript theme={null}
{
"body": {
"policyNumber": $.context.inputVariables.policy_number,
"tier": $.context.referenceVariables.customer_tier,
"task": $.context.taskName
}
}
```
See [Context Data](#context-data) for the full shape.
### Context Data
The conversation context is available to the Request Transformation through `$.context`. It carries the active task name, the conversation's input and reference variables, ASAPP identifiers, and any data written by earlier connections in the same conversation.
```json theme={null}
{
"externalCustomerId": "1234567890",
"asapp": {
"externalConversationId": "1234567890",
"conversationId": "1234567890"
},
"conversation": {
"myKey": "myValue"
},
"taskName": "schedule_appointment",
"inputVariables": {
"appointment_type": "annual"
},
"referenceVariables": {
"customer_tier": "gold"
}
}
```
The `externalCustomerId` and `asapp` fields are always present. `taskName` is the name of the task running the connection. `inputVariables` and `referenceVariables` hold the input and reference variables set on the conversation. The `conversation` key holds data persisted by earlier connections in the conversation.
### Request Testing
Thoroughly test your request transformations to ensure GenerativeAgent can send the correct data to your API.
The API Connection cannot be saved until the request transformation has a successful test.
**Testing Best Practices**
```json theme={null}
// Test 1: Minimal valid request
{
"customerId": "123",
"action": "view"
}
// Test 2: Full request with all fields
{
"customerId": "123",
"action": "update",
"data": {
"name": "John Doe",
"email": "john@example.com"
}
}
```
* Test with missing required fields
* Verify invalid data handling
* Check boundary conditions
By Default, the API Connection testing is local. You can test against actual API endpoints by setting "Run test in" to Sandbox.
* Test against actual API endpoints
* Verify complete request flow
* Check response handling
## Response Interface
The Response Interface determines how GenerativeAgent processes and presents API responses. A well-designed response interface makes it easier for GenerativeAgent to understand and use the API's data effectively.
There are three main components to the response interface:
* [Response Schema](#response-schema): The JSON schema for the data returned to GenerativeAgent from the API.
* [Response Transformation](#response-transformation): A JSONata transformation where the API response is transformed into the response given to GenerativeAgent.
* [Test Response](#response-testing): The testing panel to test the response transformation with different API responses and see the output.
### Request Schema
The Request Schema specifies the structure of data that GenerativeAgent can send to your API. This schema should be designed for optimal LLM interaction.
This schema is NOT the schema of the API. This is the schema that the system shows to GenerativeAgent.
**Best Practices for Schema Design**
```json theme={null}
// Good - Clear and descriptive
{
"type": "object",
"properties": {
"customer_name": {
"type": "string"
},
"order_date": {
"type": "string"
}
}
}
// Avoid - Cryptic or complex
{
"type": "object",
"properties": {
"cust_nm_001": {
"type": "string"
},
"ord_dt_timestamp": {
"type": "string"
}
}
}
```
```json theme={null}
// Good - Flat structure
{
"type": "object",
"properties": {
"shipping_street": {
"type": "string"
},
"shipping_city": {
"type": "string"
},
"shipping_country": {
"type": "string"
}
}
}
// Avoid - Deep nesting
{
"type": "object",
"properties": {
"shipping": {
"type": "object",
"properties": {
"address": {
"type": "object",
"properties": {
"street": {
"type": "string"
},
"city": {
"type": "string"
},
"country": {
"type": "string"
}
}
}
}
}
}
}
```
```json theme={null}
{
"properties": {
"order_status": {
"type": "string",
"description": "Current status of the order (pending, shipped, delivered)",
"enum": ["pending", "shipped", "delivered"]
}
}
}
```
* Keep only essential fields that GenerativeAgent needs
* Set `"additionalProperties": false` to prevent unexpected data
When first created, the Request Schema is a 1-1 mapping to the underlying API spec.
### Request Transformation
The Request Transformation converts GenerativeAgent's request into the format your API expects. This is done using [JSONata](https://jsonata.org/) expressions.
When first created, the Request Transformation is a 1-1 mapping to the underlying API spec.
**Common Transformation Patterns**
```javascript theme={null}
{
"headers": {
"Content-Type": "application/json"
},
"pathParameters": {
"userId": request.id
},
"queryParameters": {
"include": "details,preferences"
},
"body": {
"name": request.userName,
"email": request.userEmail
}
}
```
```javascript theme={null}
{
"body": {
// Convert date to ISO format
"timestamp": $toMillis(request.date),
// Uppercase a value
"region": $uppercase(request.country),
// Join array values
"tags": $join(request.categories, ",")
}
}
```
```javascript theme={null}
{
"body": {
// Include field only if present
"optional_field": $exists(request.someField) ? request.someField : undefined,
// Transform based on condition
"status": request.isActive = true ? "ACTIVE" : "INACTIVE"
}
}
```
The transformation can read the conversation context through `$.context`, alongside the `request` object. The context carries the active task name, the conversation's input and reference variables, and ASAPP identifiers. Reading these values here lets the connection use them directly, instead of relying on GenerativeAgent to pass them in as request parameters.
```javascript theme={null}
{
"body": {
"policyNumber": $.context.inputVariables.policy_number,
"tier": $.context.referenceVariables.customer_tier,
"task": $.context.taskName
}
}
```
See [Context Data](#context-data) for the full shape.
### Context Data
The conversation context is available to the Request Transformation through `$.context`. It carries the active task name, the conversation's input and reference variables, ASAPP identifiers, and any data written by earlier connections in the same conversation.
```json theme={null}
{
"externalCustomerId": "1234567890",
"asapp": {
"externalConversationId": "1234567890",
"conversationId": "1234567890"
},
"conversation": {
"myKey": "myValue"
},
"taskName": "schedule_appointment",
"inputVariables": {
"appointment_type": "annual"
},
"referenceVariables": {
"customer_tier": "gold"
}
}
```
The `externalCustomerId` and `asapp` fields are always present. `taskName` is the name of the task running the connection. `inputVariables` and `referenceVariables` hold the input and reference variables set on the conversation. The `conversation` key holds data persisted by earlier connections in the conversation.
### Request Testing
Thoroughly test your request transformations to ensure GenerativeAgent can send the correct data to your API.
The API Connection cannot be saved until the request transformation has a successful test.
**Testing Best Practices**
```json theme={null}
// Test 1: Minimal valid request
{
"customerId": "123",
"action": "view"
}
// Test 2: Full request with all fields
{
"customerId": "123",
"action": "update",
"data": {
"name": "John Doe",
"email": "john@example.com"
}
}
```
* Test with missing required fields
* Verify invalid data handling
* Check boundary conditions
By Default, the API Connection testing is local. You can test against actual API endpoints by setting "Run test in" to Sandbox.
* Test against actual API endpoints
* Verify complete request flow
* Check response handling
## Response Interface
The Response Interface determines how GenerativeAgent processes and presents API responses. A well-designed response interface makes it easier for GenerativeAgent to understand and use the API's data effectively.
There are three main components to the response interface:
* [Response Schema](#response-schema): The JSON schema for the data returned to GenerativeAgent from the API.
* [Response Transformation](#response-transformation): A JSONata transformation where the API response is transformed into the response given to GenerativeAgent.
* [Test Response](#response-testing): The testing panel to test the response transformation with different API responses and see the output.
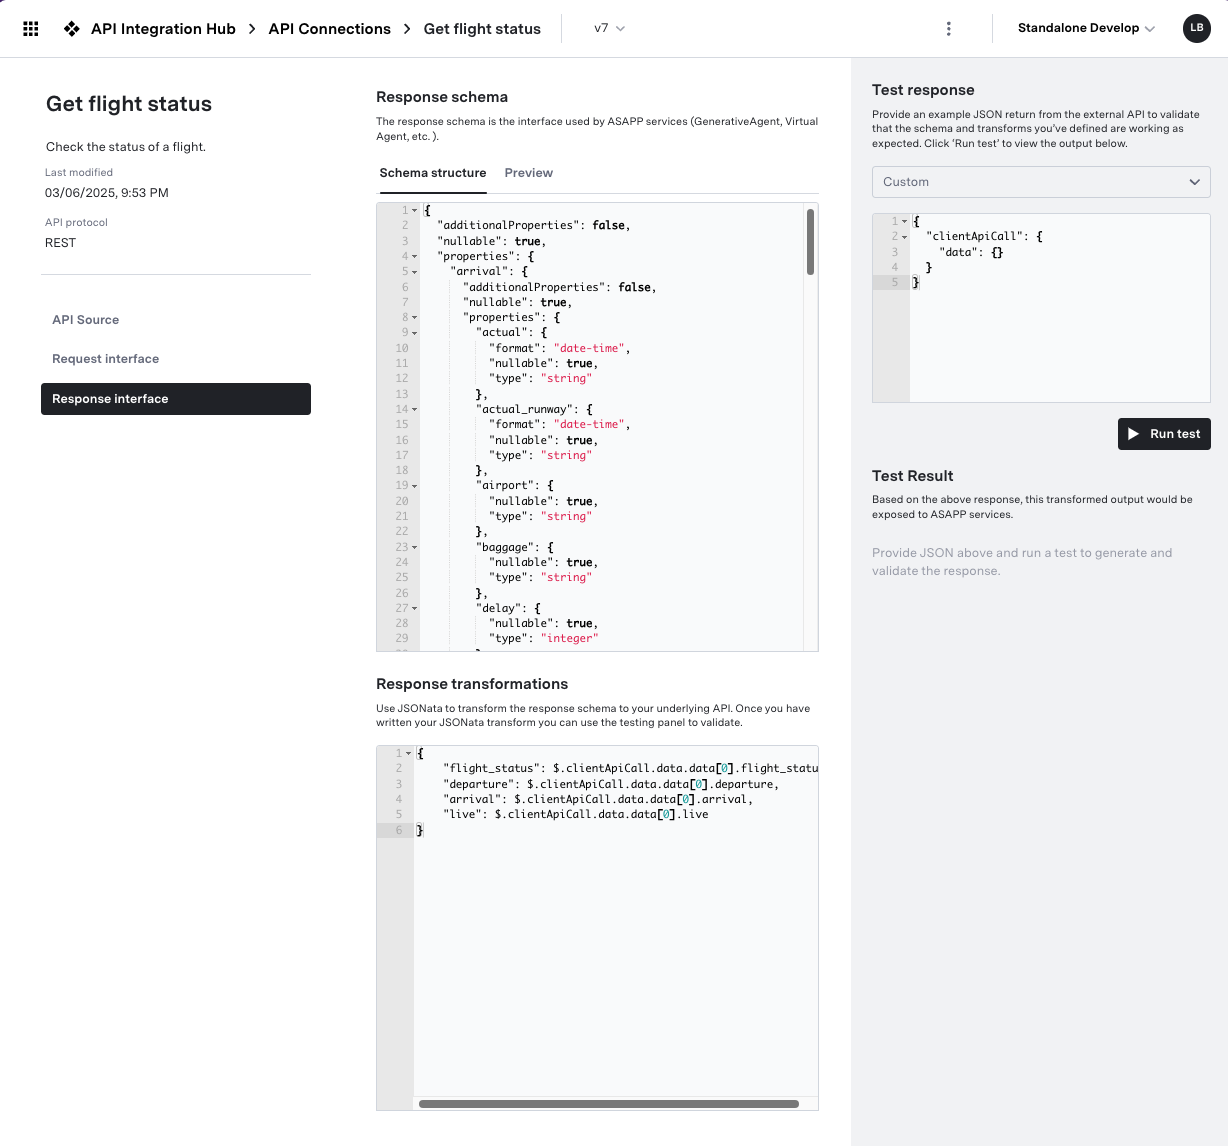 ### Response Schema
The Response Schema defines the structure of data that GenerativeAgent will receive. Focus on creating clear, simple schemas that are optimized for LLM processing.
The Response Schema is NOT the schema of the underlying API. This is the schema of what the system returns to GenerativeAgent.
**Schema Design Principles**
```json theme={null}
// Good - Only relevant fields
{
"orderStatus": "shipped",
"estimatedDelivery": "2024-03-20",
"trackingNumber": "1Z999AA1234567890"
}
// Avoid - Including unnecessary details
{
"orderStatus": "shipped",
"estimatedDelivery": "2024-03-20",
"trackingNumber": "1Z999AA1234567890",
"internalId": "ord_123",
"systemMetadata": { /* ... */ },
"auditLog": [ /* ... */ ]
}
```
```json theme={null}
{
"type": "object",
"properties": {
"temperature": {
"type": "number",
"description": "Current temperature in Celsius"
},
"isOpen": {
"type": "boolean",
"description": "Whether the store is currently open"
},
"lastUpdated": {
"type": "string",
"format": "date-time",
"description": "When this information was last updated"
}
}
}
```
* Use consistent date/time formats
* Normalize enumerated values
* Use standard units of measurement
When first created, the Response Schema is a 1-1 mapping to the underlying API spec.
### Response Transformation
Transform complex API responses into GenerativeAgent-friendly formats using JSONata. The goal is to simplify and standardize the data.
The Transformation's input is the raw API response. The output is the data that GenerativeAgent will receive and must match the Response Schema.
When first created, the Response Transformation is a 1-1 mapping to the underlying API spec.
**Transformation Examples**
```javascript theme={null}
{
// Extract and rename fields
"status": clientApiCall.data.orderStatus,
"items": clientApiCall.data.orderItems.length,
"total": clientApiCall.data.pricing.total
}
```
```javascript theme={null}
{
// Convert ISO timestamp to readable format
"orderDate": $fromMillis($toMillis(clientApiCall.data.created_at),
"[FNn], [MNn] [D1o], [Y]"),
// Format time in 12-hour clock
"deliveryTime": $fromMillis($toMillis(clientApiCall.data.delivery_eta),
"[h]:[m01] [P]")
}
```
```javascript theme={null}
{
// Calculate order summary
"orderSummary": {
"totalItems": $sum(clientApiCall.data.items[*].quantity),
"uniqueItems": $count(clientApiCall.data.items),
"hasGiftItems": $exists(clientApiCall.data.items[type="GIFT"])
},
// Format address components
"deliveryAddress": $join([
clientApiCall.data.address.street,
clientApiCall.data.address.city,
clientApiCall.data.address.state,
clientApiCall.data.address.zip
], ", ")
}
```
### Response Testing
Thoroughly test your response transformations to ensure GenerativeAgent receives well-formatted, useful data.
The API Connection cannot be saved until the response transformation has a successful test.
Use [API Mock Users](/generativeagent/configuring/connect-apis/mock-apis) to save responses from your server to use them in the response testing.
**Testing Strategies**
Make sure to test with different response types your server may respond with.
This should include happy paths, varied response types, and error paths.
* Check date/time formatting
* Verify numeric calculations
* Test string manipulations
* Handle null/undefined values
* Process empty arrays/objects
* Manage missing optional fields
## Saving Drafts
You can save your API Connection as a draft while you're working on it. This allows you to come back and finish the configuration later without losing your progress.
The draft will persist across sessions and page navigations, enabling you to work on the API Connection at your own pace.
The following features are available when working with drafts:
* **Save Draft**: Click the "Save Draft" button to save your current progress without validating the connection and without creating a new version.
* **Share Draft**: You can share the draft with other users who have access to the API Connections. They can view and edit the draft as needed.
* **Publish as Version**: Once you have completed the configuration and testing, you can publish the API Connection as a new version. Click the "Deploy Draft as Version" button to publish the draft, which will create a new version and delete the draft.
* **Draft Indicator**: When an API Connection is in draft mode, it will be clearly indicated in the AI Console with a "Draft" label. Similarly, you will see a "deployed version" label for the drafts that were published.
It is important to note that:
* Only one draft can exist for an API Connection at a time.
* Concurrent editing follows last-write-wins, so if multiple users are editing the same draft, the most recent changes will overwrite previous ones.
* Drafts that are not published will not be used by any Functions until they are published as a version.
## Redaction
You can redact sensitive fields from API Connection Logs and conversation details views. There are two types of redaction, each affecting different parts of the request/response flow:
* **Request/Response Interface**: The data that GenerativeAgent interacts with
* **Raw API Request/Response**: The actual data sent to and received from the underlying API
Redacting fields does not affect the data that GenerativeAgent can access. GenerativeAgent requires access to the data in order to perform its tasks. Redaction only impacts the views in the UI.
Redact fields in the request and response that GenerativeAgent uses. This redacts the transformed data that appears in conversations and API Connection Logs.
To redact request/response interface fields:
1. Add `x-redact` to the field in the Request Schema or Response Schema
2. Save the API connection to apply the changes
Redacting internal fields affects both API Connection Logs and conversations where GenerativeAgent uses the API.
Redact fields in the raw API request and response that are sent to and received from the underlying API. This redacts the underlying API data in API Connection Logs only.
To redact raw API fields:
1. Navigate to **API Integration Hub** > **API Specs**
2. Click on the relevant API Spec
3. Click on the **Parameters** tab
4. Per endpoint, click the fields you want to redact
Redacting raw API fields only affects the [API Connection Logs](#api-connection-logs) as the raw API data is not visible to GenerativeAgent.
## API Versioning
Every update to an API Connection requires a version change. This is to ensure that no change can be made to an API connection that impacts a live function.
If you make a change to an API connection, the Function that references that API connection will need to be explicitly updated to point to the new version.
## API Connection Logs
We log all requests and responses for API connections. This allows you to see the raw requests and responses, and the transformations that were applied.
Use the logs to debug and understand how API connections are working.
Logs are available in API Integration Hub > API Connection Logs.
## Configure API Connection Timeout
You can configure timeout for your API connections to ensure that GenerativeAgent does not wait indefinitely for a response from your API.
To configure timeout:
1. Go to **API Integration Hub** > **API Connections**
2. Click on the API Connection you want to configure
3. Click on the **API Source** tab
4. Under the **Timeout** section, you can set the timeout duration for API calls. It supports from 1 second to 50 seconds.
### Response Schema
The Response Schema defines the structure of data that GenerativeAgent will receive. Focus on creating clear, simple schemas that are optimized for LLM processing.
The Response Schema is NOT the schema of the underlying API. This is the schema of what the system returns to GenerativeAgent.
**Schema Design Principles**
```json theme={null}
// Good - Only relevant fields
{
"orderStatus": "shipped",
"estimatedDelivery": "2024-03-20",
"trackingNumber": "1Z999AA1234567890"
}
// Avoid - Including unnecessary details
{
"orderStatus": "shipped",
"estimatedDelivery": "2024-03-20",
"trackingNumber": "1Z999AA1234567890",
"internalId": "ord_123",
"systemMetadata": { /* ... */ },
"auditLog": [ /* ... */ ]
}
```
```json theme={null}
{
"type": "object",
"properties": {
"temperature": {
"type": "number",
"description": "Current temperature in Celsius"
},
"isOpen": {
"type": "boolean",
"description": "Whether the store is currently open"
},
"lastUpdated": {
"type": "string",
"format": "date-time",
"description": "When this information was last updated"
}
}
}
```
* Use consistent date/time formats
* Normalize enumerated values
* Use standard units of measurement
When first created, the Response Schema is a 1-1 mapping to the underlying API spec.
### Response Transformation
Transform complex API responses into GenerativeAgent-friendly formats using JSONata. The goal is to simplify and standardize the data.
The Transformation's input is the raw API response. The output is the data that GenerativeAgent will receive and must match the Response Schema.
When first created, the Response Transformation is a 1-1 mapping to the underlying API spec.
**Transformation Examples**
```javascript theme={null}
{
// Extract and rename fields
"status": clientApiCall.data.orderStatus,
"items": clientApiCall.data.orderItems.length,
"total": clientApiCall.data.pricing.total
}
```
```javascript theme={null}
{
// Convert ISO timestamp to readable format
"orderDate": $fromMillis($toMillis(clientApiCall.data.created_at),
"[FNn], [MNn] [D1o], [Y]"),
// Format time in 12-hour clock
"deliveryTime": $fromMillis($toMillis(clientApiCall.data.delivery_eta),
"[h]:[m01] [P]")
}
```
```javascript theme={null}
{
// Calculate order summary
"orderSummary": {
"totalItems": $sum(clientApiCall.data.items[*].quantity),
"uniqueItems": $count(clientApiCall.data.items),
"hasGiftItems": $exists(clientApiCall.data.items[type="GIFT"])
},
// Format address components
"deliveryAddress": $join([
clientApiCall.data.address.street,
clientApiCall.data.address.city,
clientApiCall.data.address.state,
clientApiCall.data.address.zip
], ", ")
}
```
### Response Testing
Thoroughly test your response transformations to ensure GenerativeAgent receives well-formatted, useful data.
The API Connection cannot be saved until the response transformation has a successful test.
Use [API Mock Users](/generativeagent/configuring/connect-apis/mock-apis) to save responses from your server to use them in the response testing.
**Testing Strategies**
Make sure to test with different response types your server may respond with.
This should include happy paths, varied response types, and error paths.
* Check date/time formatting
* Verify numeric calculations
* Test string manipulations
* Handle null/undefined values
* Process empty arrays/objects
* Manage missing optional fields
## Saving Drafts
You can save your API Connection as a draft while you're working on it. This allows you to come back and finish the configuration later without losing your progress.
The draft will persist across sessions and page navigations, enabling you to work on the API Connection at your own pace.
The following features are available when working with drafts:
* **Save Draft**: Click the "Save Draft" button to save your current progress without validating the connection and without creating a new version.
* **Share Draft**: You can share the draft with other users who have access to the API Connections. They can view and edit the draft as needed.
* **Publish as Version**: Once you have completed the configuration and testing, you can publish the API Connection as a new version. Click the "Deploy Draft as Version" button to publish the draft, which will create a new version and delete the draft.
* **Draft Indicator**: When an API Connection is in draft mode, it will be clearly indicated in the AI Console with a "Draft" label. Similarly, you will see a "deployed version" label for the drafts that were published.
It is important to note that:
* Only one draft can exist for an API Connection at a time.
* Concurrent editing follows last-write-wins, so if multiple users are editing the same draft, the most recent changes will overwrite previous ones.
* Drafts that are not published will not be used by any Functions until they are published as a version.
## Redaction
You can redact sensitive fields from API Connection Logs and conversation details views. There are two types of redaction, each affecting different parts of the request/response flow:
* **Request/Response Interface**: The data that GenerativeAgent interacts with
* **Raw API Request/Response**: The actual data sent to and received from the underlying API
Redacting fields does not affect the data that GenerativeAgent can access. GenerativeAgent requires access to the data in order to perform its tasks. Redaction only impacts the views in the UI.
Redact fields in the request and response that GenerativeAgent uses. This redacts the transformed data that appears in conversations and API Connection Logs.
To redact request/response interface fields:
1. Add `x-redact` to the field in the Request Schema or Response Schema
2. Save the API connection to apply the changes
Redacting internal fields affects both API Connection Logs and conversations where GenerativeAgent uses the API.
Redact fields in the raw API request and response that are sent to and received from the underlying API. This redacts the underlying API data in API Connection Logs only.
To redact raw API fields:
1. Navigate to **API Integration Hub** > **API Specs**
2. Click on the relevant API Spec
3. Click on the **Parameters** tab
4. Per endpoint, click the fields you want to redact
Redacting raw API fields only affects the [API Connection Logs](#api-connection-logs) as the raw API data is not visible to GenerativeAgent.
## API Versioning
Every update to an API Connection requires a version change. This is to ensure that no change can be made to an API connection that impacts a live function.
If you make a change to an API connection, the Function that references that API connection will need to be explicitly updated to point to the new version.
## API Connection Logs
We log all requests and responses for API connections. This allows you to see the raw requests and responses, and the transformations that were applied.
Use the logs to debug and understand how API connections are working.
Logs are available in API Integration Hub > API Connection Logs.
## Configure API Connection Timeout
You can configure timeout for your API connections to ensure that GenerativeAgent does not wait indefinitely for a response from your API.
To configure timeout:
1. Go to **API Integration Hub** > **API Connections**
2. Click on the API Connection you want to configure
3. Click on the **API Source** tab
4. Under the **Timeout** section, you can set the timeout duration for API calls. It supports from 1 second to 50 seconds.
 ## Default API Spec Settings
You can set default information in an API spec. These default settings serve as a template for newly created API connections, copying those settings for all API connections created for that API spec.
You can set the following defaults:
* Headers
* Sandbox Settings:
* Base URL
* Authentication Method
* Production Settings:
* Base URL
* Authentication Method
You can make further changes to API connections as necessary.
You can also change the defaults and it will not change existing API connections, though the system will use the new defaults on any new connections made with that Spec.
## Examples
Here are some examples of how to configure API connections for different scenarios.
This example demonstrates configuring an API connection for updating a passenger's name on a flight booking.
#### API Endpoint
```json theme={null}
PUT /flight/[flightId]/passenger/[passengerId]
{
"name": {
"first": [Passenger FirstName],
"last": [Passenger LastName]
}
}
```
#### API Response
```json theme={null}
{
"id": "pax-12345",
"flightId": "XZ2468",
"updatedAt": "2024-10-04T14:30:00Z",
"passenger": {
"id": "PSGR-56789",
"name": {
"first": "John",
"last": "Doe"
},
"seatAssignment": "14A",
"checkedIn": true,
"frequentFlyerNumber": "FF123456"
},
"status": "confirmed",
"specialRequests": ["wheelchair", "vegetarian_meal"],
"baggage": {
"checkedBags": 1,
"carryOn": 1
}
}
```
1. Request Schema:
```json theme={null}
{
"type": "object",
"properties": {
"externalCustomerId": {"type": "string"},
"passengerFirstName": {"type": "string"},
"passengerLastName": {"type": "string"},
"flightId": {"type": "string"}
},
"required": ["externalCustomerId", "passengerFirstName", "passengerLastName", "flightId"]
}
```
2. Request Transformation:
```javascript theme={null}
{
"headers": {},
"pathParameters": {
"flightId": request.flightId,
"passengerId": request.externalCustomerId
},
"queryParameters": {},
"body": {
"name": {
"first": request.passengerFirstName,
"last": request.passengerLastName
}
}
}
```
3. Sample Test Request:
```json theme={null}
{
"externalCustomerId": "CUST123",
"passengerFirstName": "Johnson",
"passengerLastName": "Doe",
"flightId": "XZ2468"
}
```
1. Response Schema:
```json theme={null}
{
"type": "object",
"properties": {
"success": {
"type": "boolean",
"description": "Whether the name update was successful"
}
},
"required": ["success"]
}
```
2. Response Transformation:
```javascript theme={null}
{
"success": $exists(clientApiCall.data.id) and
$exists(clientApiCall.data.passenger.name.first) and
$exists(clientApiCall.data.passenger.name.last) and
clientApiCall.data.status = "confirmed"
}
```
3. Sample Test Response:
```json theme={null}
{
"clientApiCall": {
"data": {
"id": "pax-12345",
"flightId": "XZ2468",
"updatedAt": "2024-10-04T14:30:00Z",
"passenger": {
"id": "PSGR-56789",
"name": {
"first": "John",
"last": "Doe"
},
"seatAssignment": "14A",
"checkedIn": true,
"frequentFlyerNumber": "FF123456"
},
"status": "confirmed",
"specialRequests": ["wheelchair", "vegetarian_meal"],
"baggage": {
"checkedBags": 1,
"carryOn": 1
}
}
}
}
```
This example shows how to simplify a complex flight status API response by removing unnecessary fields and flattening nested structures.
#### API Endpoint
```json theme={null}
GET /flights/[flightNumber]/status
```
#### API Response
```json theme={null}
{
"flightDetails": {
"flightNumber": "AA123",
"route": {
"origin": {
"code": "SFO",
"terminal": "2",
"gate": "A12",
"weather": { /* complex weather object */ }
},
"destination": {
"code": "JFK",
"terminal": "4",
"gate": "B34",
"weather": { /* complex weather object */ }
}
},
"schedule": {
"departure": {
"scheduled": "2024-03-15T10:30:00Z",
"estimated": "2024-03-15T10:45:00Z",
"actual": null
},
"arrival": {
"scheduled": "2024-03-15T19:30:00Z",
"estimated": "2024-03-15T19:45:00Z",
"actual": null
}
},
"status": "DELAYED",
"aircraft": { /* aircraft details */ }
}
}
```
1. Request Schema:
```json theme={null}
{
"type": "object",
"properties": {
"flightNumber": {
"type": "string",
"description": "The flight number to look up"
}
},
"required": ["flightNumber"]
}
```
2. Request Transformation:
```javascript theme={null}
{
"headers": {},
"pathParameters": {
"flightNumber": request.flightNumber
},
"queryParameters": {},
"body": {}
}
```
3. Sample Test Request:
```json theme={null}
{
"flightNumber": "AA123"
}
```
1. Response Schema:
```json theme={null}
{
"type": "object",
"properties": {
"flight_number": {
"type": "string",
"description": "The flight number"
},
"flight_status": {
"type": "string",
"description": "Current status of the flight"
},
"origin_airport_code": {
"type": "string",
"description": "Three-letter airport code for origin"
},
"destination_airport_code": {
"type": "string",
"description": "Three-letter airport code for destination"
},
"scheduled_departure_time": {
"type": "string",
"description": "Scheduled departure time"
},
"scheduled_arrival_time": {
"type": "string",
"description": "Scheduled arrival time"
},
"is_flight_delayed": {
"type": "boolean",
"description": "Whether the flight is delayed"
}
}
}
```
2. Response Transformation:
```javascript theme={null}
{
"flight_number": clientApiCall.data.flightDetails.flightNumber,
"flight_status": clientApiCall.data.flightDetails.status,
"origin_airport_code": clientApiCall.data.flightDetails.route.origin.code,
"destination_airport_code": clientApiCall.data.flightDetails.route.destination.code,
"scheduled_departure_time": clientApiCall.data.flightDetails.schedule.departure.estimated,
"scheduled_arrival_time": clientApiCall.data.flightDetails.schedule.arrival.estimated,
"is_flight_delayed": clientApiCall.data.flightDetails.status = "DELAYED"
}
```
This example demonstrates date formatting and complex object transformation for an appointment lookup API.
#### API Endpoint
```json theme={null}
GET /appointments/[appointmentId]
```
#### API Response
```json theme={null}
{
"id": "apt_123",
"type": "DENTAL_CLEANING",
"startTime": "2024-03-15T14:30:00Z",
"endTime": "2024-03-15T15:30:00Z",
"provider": "Dr. Sarah Smith",
"location": "Downtown Medical Center",
"patient": {
"id": "pat_456",
"name": "John Doe",
"dateOfBirth": "1985-06-15",
"contactInfo": {
"email": "john.doe@email.com",
"phone": "+1-555-0123"
}
},
"status": "confirmed",
"notes": "Regular cleaning and check-up",
"insuranceVerified": true,
"lastUpdated": "2024-03-01T10:15:00Z"
}
```
1. Request Schema:
```json theme={null}
{
"type": "object",
"properties": {
"appointmentId": {
"type": "string",
"description": "The ID of the appointment to look up"
}
},
"required": ["appointmentId"]
}
```
2. Request Transformation:
```javascript theme={null}
{
"headers": {},
"pathParameters": {
"appointmentId": request.appointmentId
},
"queryParameters": {},
"body": {}
}
```
3. Sample Test Request:
```json theme={null}
{
"appointmentId": "apt_123"
}
```
1. Response Schema:
```json theme={null}
{
"type": "object",
"properties": {
"appointmentType": {
"type": "string",
"description": "The type of appointment in a readable format"
},
"date": {
"type": "string",
"description": "The appointment date in a friendly format"
},
"startTime": {
"type": "string",
"description": "The appointment start time in 12-hour format"
},
"doctor": {
"type": "string",
"description": "The healthcare provider's name"
},
"clinic": {
"type": "string",
"description": "The location where the appointment will take place"
},
"status": {
"type": "string",
"description": "The current status of the appointment"
},
"patientName": {
"type": "string",
"description": "The name of the patient"
}
},
"required": ["appointmentType", "date", "startTime", "doctor", "clinic", "status", "patientName"]
}
```
2. Response Transformation:
```javascript theme={null}
{
/* Convert appointment type from UPPER_SNAKE_CASE to readable format */
"appointmentType": $replace(clientApiCall.data.type, "_", " ") ~> $lowercase(),
/* Format date as "Friday, March 15th, 2024" */
"date": $fromMillis($toMillis(clientApiCall.data.startTime), "[FNn], [MNn] [D1o], [Y]"),
/* Format start time as "2:30 PM" */
"startTime": $fromMillis($toMillis(clientApiCall.data.startTime), "[h]:[m01] [P]"),
/* Map provider and location directly */
"doctor": clientApiCall.data.provider,
"clinic": clientApiCall.data.location,
/* Map status and patient name */
"status": clientApiCall.data.status,
"patientName": clientApiCall.data.patient.name
}
```
3. Sample Transformed Response:
```json theme={null}
{
"appointmentType": "dental cleaning",
"date": "Friday, March 15th, 2024",
"startTime": "2:30 PM",
"doctor": "Dr. Sarah Smith",
"clinic": "Downtown Medical Center",
"status": "confirmed",
"patientName": "John Doe"
}
```
## Next Steps
Now that you've configured your API connections, GenerativeAgent can interact with your APIs just like a live agent. Here are some helpful resources for next steps:
## Default API Spec Settings
You can set default information in an API spec. These default settings serve as a template for newly created API connections, copying those settings for all API connections created for that API spec.
You can set the following defaults:
* Headers
* Sandbox Settings:
* Base URL
* Authentication Method
* Production Settings:
* Base URL
* Authentication Method
You can make further changes to API connections as necessary.
You can also change the defaults and it will not change existing API connections, though the system will use the new defaults on any new connections made with that Spec.
## Examples
Here are some examples of how to configure API connections for different scenarios.
This example demonstrates configuring an API connection for updating a passenger's name on a flight booking.
#### API Endpoint
```json theme={null}
PUT /flight/[flightId]/passenger/[passengerId]
{
"name": {
"first": [Passenger FirstName],
"last": [Passenger LastName]
}
}
```
#### API Response
```json theme={null}
{
"id": "pax-12345",
"flightId": "XZ2468",
"updatedAt": "2024-10-04T14:30:00Z",
"passenger": {
"id": "PSGR-56789",
"name": {
"first": "John",
"last": "Doe"
},
"seatAssignment": "14A",
"checkedIn": true,
"frequentFlyerNumber": "FF123456"
},
"status": "confirmed",
"specialRequests": ["wheelchair", "vegetarian_meal"],
"baggage": {
"checkedBags": 1,
"carryOn": 1
}
}
```
1. Request Schema:
```json theme={null}
{
"type": "object",
"properties": {
"externalCustomerId": {"type": "string"},
"passengerFirstName": {"type": "string"},
"passengerLastName": {"type": "string"},
"flightId": {"type": "string"}
},
"required": ["externalCustomerId", "passengerFirstName", "passengerLastName", "flightId"]
}
```
2. Request Transformation:
```javascript theme={null}
{
"headers": {},
"pathParameters": {
"flightId": request.flightId,
"passengerId": request.externalCustomerId
},
"queryParameters": {},
"body": {
"name": {
"first": request.passengerFirstName,
"last": request.passengerLastName
}
}
}
```
3. Sample Test Request:
```json theme={null}
{
"externalCustomerId": "CUST123",
"passengerFirstName": "Johnson",
"passengerLastName": "Doe",
"flightId": "XZ2468"
}
```
1. Response Schema:
```json theme={null}
{
"type": "object",
"properties": {
"success": {
"type": "boolean",
"description": "Whether the name update was successful"
}
},
"required": ["success"]
}
```
2. Response Transformation:
```javascript theme={null}
{
"success": $exists(clientApiCall.data.id) and
$exists(clientApiCall.data.passenger.name.first) and
$exists(clientApiCall.data.passenger.name.last) and
clientApiCall.data.status = "confirmed"
}
```
3. Sample Test Response:
```json theme={null}
{
"clientApiCall": {
"data": {
"id": "pax-12345",
"flightId": "XZ2468",
"updatedAt": "2024-10-04T14:30:00Z",
"passenger": {
"id": "PSGR-56789",
"name": {
"first": "John",
"last": "Doe"
},
"seatAssignment": "14A",
"checkedIn": true,
"frequentFlyerNumber": "FF123456"
},
"status": "confirmed",
"specialRequests": ["wheelchair", "vegetarian_meal"],
"baggage": {
"checkedBags": 1,
"carryOn": 1
}
}
}
}
```
This example shows how to simplify a complex flight status API response by removing unnecessary fields and flattening nested structures.
#### API Endpoint
```json theme={null}
GET /flights/[flightNumber]/status
```
#### API Response
```json theme={null}
{
"flightDetails": {
"flightNumber": "AA123",
"route": {
"origin": {
"code": "SFO",
"terminal": "2",
"gate": "A12",
"weather": { /* complex weather object */ }
},
"destination": {
"code": "JFK",
"terminal": "4",
"gate": "B34",
"weather": { /* complex weather object */ }
}
},
"schedule": {
"departure": {
"scheduled": "2024-03-15T10:30:00Z",
"estimated": "2024-03-15T10:45:00Z",
"actual": null
},
"arrival": {
"scheduled": "2024-03-15T19:30:00Z",
"estimated": "2024-03-15T19:45:00Z",
"actual": null
}
},
"status": "DELAYED",
"aircraft": { /* aircraft details */ }
}
}
```
1. Request Schema:
```json theme={null}
{
"type": "object",
"properties": {
"flightNumber": {
"type": "string",
"description": "The flight number to look up"
}
},
"required": ["flightNumber"]
}
```
2. Request Transformation:
```javascript theme={null}
{
"headers": {},
"pathParameters": {
"flightNumber": request.flightNumber
},
"queryParameters": {},
"body": {}
}
```
3. Sample Test Request:
```json theme={null}
{
"flightNumber": "AA123"
}
```
1. Response Schema:
```json theme={null}
{
"type": "object",
"properties": {
"flight_number": {
"type": "string",
"description": "The flight number"
},
"flight_status": {
"type": "string",
"description": "Current status of the flight"
},
"origin_airport_code": {
"type": "string",
"description": "Three-letter airport code for origin"
},
"destination_airport_code": {
"type": "string",
"description": "Three-letter airport code for destination"
},
"scheduled_departure_time": {
"type": "string",
"description": "Scheduled departure time"
},
"scheduled_arrival_time": {
"type": "string",
"description": "Scheduled arrival time"
},
"is_flight_delayed": {
"type": "boolean",
"description": "Whether the flight is delayed"
}
}
}
```
2. Response Transformation:
```javascript theme={null}
{
"flight_number": clientApiCall.data.flightDetails.flightNumber,
"flight_status": clientApiCall.data.flightDetails.status,
"origin_airport_code": clientApiCall.data.flightDetails.route.origin.code,
"destination_airport_code": clientApiCall.data.flightDetails.route.destination.code,
"scheduled_departure_time": clientApiCall.data.flightDetails.schedule.departure.estimated,
"scheduled_arrival_time": clientApiCall.data.flightDetails.schedule.arrival.estimated,
"is_flight_delayed": clientApiCall.data.flightDetails.status = "DELAYED"
}
```
This example demonstrates date formatting and complex object transformation for an appointment lookup API.
#### API Endpoint
```json theme={null}
GET /appointments/[appointmentId]
```
#### API Response
```json theme={null}
{
"id": "apt_123",
"type": "DENTAL_CLEANING",
"startTime": "2024-03-15T14:30:00Z",
"endTime": "2024-03-15T15:30:00Z",
"provider": "Dr. Sarah Smith",
"location": "Downtown Medical Center",
"patient": {
"id": "pat_456",
"name": "John Doe",
"dateOfBirth": "1985-06-15",
"contactInfo": {
"email": "john.doe@email.com",
"phone": "+1-555-0123"
}
},
"status": "confirmed",
"notes": "Regular cleaning and check-up",
"insuranceVerified": true,
"lastUpdated": "2024-03-01T10:15:00Z"
}
```
1. Request Schema:
```json theme={null}
{
"type": "object",
"properties": {
"appointmentId": {
"type": "string",
"description": "The ID of the appointment to look up"
}
},
"required": ["appointmentId"]
}
```
2. Request Transformation:
```javascript theme={null}
{
"headers": {},
"pathParameters": {
"appointmentId": request.appointmentId
},
"queryParameters": {},
"body": {}
}
```
3. Sample Test Request:
```json theme={null}
{
"appointmentId": "apt_123"
}
```
1. Response Schema:
```json theme={null}
{
"type": "object",
"properties": {
"appointmentType": {
"type": "string",
"description": "The type of appointment in a readable format"
},
"date": {
"type": "string",
"description": "The appointment date in a friendly format"
},
"startTime": {
"type": "string",
"description": "The appointment start time in 12-hour format"
},
"doctor": {
"type": "string",
"description": "The healthcare provider's name"
},
"clinic": {
"type": "string",
"description": "The location where the appointment will take place"
},
"status": {
"type": "string",
"description": "The current status of the appointment"
},
"patientName": {
"type": "string",
"description": "The name of the patient"
}
},
"required": ["appointmentType", "date", "startTime", "doctor", "clinic", "status", "patientName"]
}
```
2. Response Transformation:
```javascript theme={null}
{
/* Convert appointment type from UPPER_SNAKE_CASE to readable format */
"appointmentType": $replace(clientApiCall.data.type, "_", " ") ~> $lowercase(),
/* Format date as "Friday, March 15th, 2024" */
"date": $fromMillis($toMillis(clientApiCall.data.startTime), "[FNn], [MNn] [D1o], [Y]"),
/* Format start time as "2:30 PM" */
"startTime": $fromMillis($toMillis(clientApiCall.data.startTime), "[h]:[m01] [P]"),
/* Map provider and location directly */
"doctor": clientApiCall.data.provider,
"clinic": clientApiCall.data.location,
/* Map status and patient name */
"status": clientApiCall.data.status,
"patientName": clientApiCall.data.patient.name
}
```
3. Sample Transformed Response:
```json theme={null}
{
"appointmentType": "dental cleaning",
"date": "Friday, March 15th, 2024",
"startTime": "2:30 PM",
"doctor": "Dr. Sarah Smith",
"clinic": "Downtown Medical Center",
"status": "confirmed",
"patientName": "John Doe"
}
```
## Next Steps
Now that you've configured your API connections, GenerativeAgent can interact with your APIs just like a live agent. Here are some helpful resources for next steps: