> ## Documentation Index
> Fetch the complete documentation index at: https://docs.asapp.com/llms.txt
> Use this file to discover all available pages before exploring further.
# Create Test Scenarios
> Learn how to generate a Test Scenario from a description, build one from a production conversation, or create one manually.
There are three ways to create a [Test Scenario](/generativeagent/configuring/tasks-and-functions/test-scenarios): generate one from a description, build one from a production conversation, or define each section manually.
## Generate a Test Scenario from a description
Describe what you want to test in a few sentences and the complete Test Scenario is generated for you, including mock data, customer goals, and evaluations.
* **Faster test creation**: Write a simple description and get a full scenario test, with no need to build one field by field.
* **Ideal for new deployments**: Builders can create tests before any real production conversations exist.
* **Lower effort to scale test coverage**: Mock data, customer goals, and evaluations are auto-generated from the description, cutting manual setup work.
To generate a Test Scenario:
Go to the **Scenario Testing** page and click **"+ New test scenario"**.
Click **Generate** at the top of the scenario.
Add a description of what you want to test. This can be as simple as what the customer should be able to do, or as detailed as the specific evaluation criteria to apply.
Click **Save**. The complete Test Scenario is generated in a few seconds.
Save the generated scenario as-is, or edit any section before saving.
 ## Create a Test Scenario from a conversation
When GenerativeAgent behavior needs fixing, turn that production conversation into a test, make the change, and validate the change against the test.
* **Faster feedback loop**: Spot an issue in a live conversation and turn it into a test in a few clicks, instead of writing one from scratch.
* **Higher test accuracy**: Tests are grounded in real production conversations, so they reflect actual customer behavior.
* **Lower effort to scale test coverage**: Mock data, customer goals, and evaluations are auto-generated from the conversation, cutting manual setup work.
### From a full conversation
To create a Test Scenario from a conversation:
Find a conversation where GenerativeAgent behavior needs fixing.
Click **Create Scenario** at the top right of the conversation, then select the branch where the test should be created.
The test is created automatically, including the description, mock data, customer goals, and evaluations pulled from the conversation.
Make the necessary GenerativeAgent changes and validate them against the new test.
### From a specific point in a conversation
Instead of using the whole conversation, pick any single utterance to generate a test from that exact point.
Everything before that utterance is added as a conversation prefix, so the simulation picks up right where that moment happened.
To create a Test Scenario from a specific point in a conversation:
Find a conversation where GenerativeAgent behavior needs fixing.
Pick the single utterance from which you want to generate the test.
Click **Create Scenario** at the top right of the conversation, then select the branch where the test should be created.
The test is created automatically, including the description, mock data, customer goals, and evaluations pulled from the conversation.
Make the necessary GenerativeAgent changes and validate them against the new test.
Test Scenarios are scoped to the branch they are created in. See [Branch Scope](/generativeagent/configuring/tasks-and-functions/test-scenarios#branch-scope).
## Create a Test Scenario manually
If you want full control over every setting, define each section of the scenario yourself.
To create a Test Scenario manually:
Go to the **Scenario Testing** page in GenerativeAgent and click **"+ New test scenario"** to begin creating a new test scenario.
Start by providing the essential details that identify and describe your test scenario:
* **Test name**: A clear, descriptive name for your scenario
* **Description**: (Optional) A brief explanation of what you're testing and what you expect to achieve
* **Tags**: (Optional) Add relevant tags to categorize and easily find your scenario later
* **Test suite**: (Optional) Enable it if you want to add this scenario to a test suite - a group of related test scenarios that can be run together.
The data that GenerativeAgent uses plays a critical role in how it behaves. The User API Profile defines the mock data that will be provided to GenerativeAgent when using this test scenario.
You have two options to mock data: auto-generate it from a description, or define the functions yourself.
Auto-generate mock data creates function mocks using the scenario you describe and the schema of the functions in the main branch of the draft environment.
To auto-generate mock data:
1. Click **Generate**.
2. Describe your scenario in a few sentences.
3. Wait up to one minute for the profile to be created (you can close the dialog while you wait).
The system pulls mocked data schemas from the main branch of the draft environment. To test a new function, it needs to have been added to the main branch of the draft environment.
Adding details about what information the customer will have to share with GenerativeAgent and what GenerativeAgent will have to do will significantly improve the ability to auto-mock the appropriate APIs.
If you know the specific data you want to mock for a scenario, you can manually define the functions and mock data.
1. Click **+ Select functions**.
2. Choose the API calls you want to mock (e.g. `getAccountInfo`, `confirmCode`).
3. For each function, provide the mocked **request** and **response** in JSON.
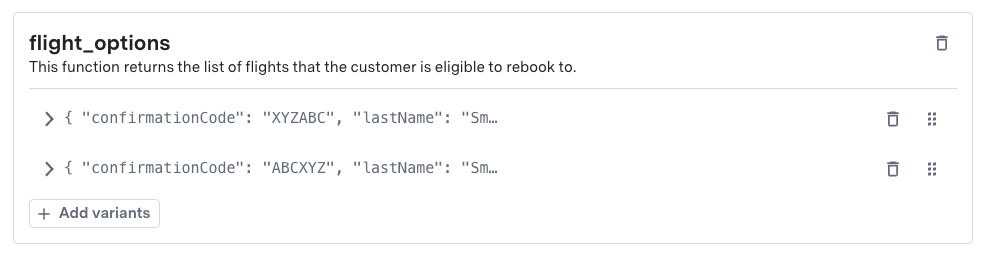
**Add variants to mocked data**
To simulate different API responses under the same function:
1. Click **+ Add variants** at the bottom of a function.
2. Define alternative request parameters and corresponding response schema.
3. Save to include the variant in your scenario.
## Create a Test Scenario from a conversation
When GenerativeAgent behavior needs fixing, turn that production conversation into a test, make the change, and validate the change against the test.
* **Faster feedback loop**: Spot an issue in a live conversation and turn it into a test in a few clicks, instead of writing one from scratch.
* **Higher test accuracy**: Tests are grounded in real production conversations, so they reflect actual customer behavior.
* **Lower effort to scale test coverage**: Mock data, customer goals, and evaluations are auto-generated from the conversation, cutting manual setup work.
### From a full conversation
To create a Test Scenario from a conversation:
Find a conversation where GenerativeAgent behavior needs fixing.
Click **Create Scenario** at the top right of the conversation, then select the branch where the test should be created.
The test is created automatically, including the description, mock data, customer goals, and evaluations pulled from the conversation.
Make the necessary GenerativeAgent changes and validate them against the new test.
### From a specific point in a conversation
Instead of using the whole conversation, pick any single utterance to generate a test from that exact point.
Everything before that utterance is added as a conversation prefix, so the simulation picks up right where that moment happened.
To create a Test Scenario from a specific point in a conversation:
Find a conversation where GenerativeAgent behavior needs fixing.
Pick the single utterance from which you want to generate the test.
Click **Create Scenario** at the top right of the conversation, then select the branch where the test should be created.
The test is created automatically, including the description, mock data, customer goals, and evaluations pulled from the conversation.
Make the necessary GenerativeAgent changes and validate them against the new test.
Test Scenarios are scoped to the branch they are created in. See [Branch Scope](/generativeagent/configuring/tasks-and-functions/test-scenarios#branch-scope).
## Create a Test Scenario manually
If you want full control over every setting, define each section of the scenario yourself.
To create a Test Scenario manually:
Go to the **Scenario Testing** page in GenerativeAgent and click **"+ New test scenario"** to begin creating a new test scenario.
Start by providing the essential details that identify and describe your test scenario:
* **Test name**: A clear, descriptive name for your scenario
* **Description**: (Optional) A brief explanation of what you're testing and what you expect to achieve
* **Tags**: (Optional) Add relevant tags to categorize and easily find your scenario later
* **Test suite**: (Optional) Enable it if you want to add this scenario to a test suite - a group of related test scenarios that can be run together.
The data that GenerativeAgent uses plays a critical role in how it behaves. The User API Profile defines the mock data that will be provided to GenerativeAgent when using this test scenario.
You have two options to mock data: auto-generate it from a description, or define the functions yourself.
Auto-generate mock data creates function mocks using the scenario you describe and the schema of the functions in the main branch of the draft environment.
To auto-generate mock data:
1. Click **Generate**.
2. Describe your scenario in a few sentences.
3. Wait up to one minute for the profile to be created (you can close the dialog while you wait).
The system pulls mocked data schemas from the main branch of the draft environment. To test a new function, it needs to have been added to the main branch of the draft environment.
Adding details about what information the customer will have to share with GenerativeAgent and what GenerativeAgent will have to do will significantly improve the ability to auto-mock the appropriate APIs.
If you know the specific data you want to mock for a scenario, you can manually define the functions and mock data.
1. Click **+ Select functions**.
2. Choose the API calls you want to mock (e.g. `getAccountInfo`, `confirmCode`).
3. For each function, provide the mocked **request** and **response** in JSON.
**Add variants to mocked data**
To simulate different API responses under the same function:
1. Click **+ Add variants** at the bottom of a function.
2. Define alternative request parameters and corresponding response schema.
3. Save to include the variant in your scenario.
 You may need to update the mock data after creating a Test Scenario. After creating a Test Scenario, ensure your mock data aligns with your testing needs.
This can be done by updating your scenario when auto-generating the mock data or manually adding the functions and mock data.
Often APIs have an implicit or explicit date and time when the system performs them. By default, GenerativeAgent assumes the customer interaction is happening at the date and time the scenario is run and updates timestamps in the API profile accordingly.
You can override the assumed timestamp of the interaction.
The **Input Context** defines the initial data and configuration that your system provides to GenerativeAgent when a conversation begins. This ensures your test scenarios accurately simulate real-world interactions.
The input context consists of two main components:
1. **[Input Variables](/generativeagent/configuring/tasks-and-functions/input-variables)**: JSON data that provides context about the customer, conversation, or session
2. **[Starting Task](/generativeagent/configuring/tasks-and-functions/enter-specific-task)**: The specific task or flow that GenerativeAgent should begin with
Ensure your input context matches exactly how your production system passes data to GenerativeAgent. This guarantees your test scenarios will match real conversations identically.
If you are using the automatic mode, configure the customer's behavior and goals in the simulation details. This is especially useful for testing how GenerativeAgent handles different customer personalities, levels of information, and goals.
* **Start of conversation**: Define who initiates the conversation: the customer or GenerativeAgent.
* **Customer Goals**: Define the motivations of the simulated customer. The customer will attempt each goal in sequence; if it fails, it may escalate or skip.
* **Information the customer knows**: Define the identity or account data the customer can provide. To test how GenerativeAgent will handle a customer who **does not** have their account number or a critical piece of information, just leave it off the list.
* **Customer personality**: Define the tone and style for your simulated customer (optional). eg. rude, insistent, confused, etc. Click **Revert to default personality** to restore.
* **Max number of turns**: Set the maximum number of conversation turns the simulation can run. By default, it is set to **15** turns, but you can adjust it based on your testing needs. This is especially useful for testing longer conversations or ensuring that the simulation runs until a specific outcome is reached.
Toggle evaluations **on** to run evaluation logic after the conversation ends.
Define preconditions or milestones that must be met in the conversation for the evaluation to run. This is useful to disqualify cases where the conversation didn't reach the part you're testing.
If left blank, the evaluation runs by default.
Example:
> "Customer asked for their bill amount"
Define one or more evaluation checks to apply to the conversation.
Examples:
> "The Agent provided the current month's bill amount of \$144.72"
> "The Agent did NOT offer a discount"
Evaluation results appear in the **Previewer**, side-by-side with the conversation after clicking on the **Results** button. If you update your evaluation or applicability criteria later, you can return to the same conversation in the Previewer and click **Run Eval Again** to re-run against the updated test.
After completing these steps, save your Test Scenario and [start running it](/generativeagent/configuring/tasks-and-functions/run-test-scenarios) in either manual or automatic simulation mode.
You may need to update the mock data after creating a Test Scenario. After creating a Test Scenario, ensure your mock data aligns with your testing needs.
This can be done by updating your scenario when auto-generating the mock data or manually adding the functions and mock data.
Often APIs have an implicit or explicit date and time when the system performs them. By default, GenerativeAgent assumes the customer interaction is happening at the date and time the scenario is run and updates timestamps in the API profile accordingly.
You can override the assumed timestamp of the interaction.
The **Input Context** defines the initial data and configuration that your system provides to GenerativeAgent when a conversation begins. This ensures your test scenarios accurately simulate real-world interactions.
The input context consists of two main components:
1. **[Input Variables](/generativeagent/configuring/tasks-and-functions/input-variables)**: JSON data that provides context about the customer, conversation, or session
2. **[Starting Task](/generativeagent/configuring/tasks-and-functions/enter-specific-task)**: The specific task or flow that GenerativeAgent should begin with
Ensure your input context matches exactly how your production system passes data to GenerativeAgent. This guarantees your test scenarios will match real conversations identically.
If you are using the automatic mode, configure the customer's behavior and goals in the simulation details. This is especially useful for testing how GenerativeAgent handles different customer personalities, levels of information, and goals.
* **Start of conversation**: Define who initiates the conversation: the customer or GenerativeAgent.
* **Customer Goals**: Define the motivations of the simulated customer. The customer will attempt each goal in sequence; if it fails, it may escalate or skip.
* **Information the customer knows**: Define the identity or account data the customer can provide. To test how GenerativeAgent will handle a customer who **does not** have their account number or a critical piece of information, just leave it off the list.
* **Customer personality**: Define the tone and style for your simulated customer (optional). eg. rude, insistent, confused, etc. Click **Revert to default personality** to restore.
* **Max number of turns**: Set the maximum number of conversation turns the simulation can run. By default, it is set to **15** turns, but you can adjust it based on your testing needs. This is especially useful for testing longer conversations or ensuring that the simulation runs until a specific outcome is reached.
Toggle evaluations **on** to run evaluation logic after the conversation ends.
Define preconditions or milestones that must be met in the conversation for the evaluation to run. This is useful to disqualify cases where the conversation didn't reach the part you're testing.
If left blank, the evaluation runs by default.
Example:
> "Customer asked for their bill amount"
Define one or more evaluation checks to apply to the conversation.
Examples:
> "The Agent provided the current month's bill amount of \$144.72"
> "The Agent did NOT offer a discount"
Evaluation results appear in the **Previewer**, side-by-side with the conversation after clicking on the **Results** button. If you update your evaluation or applicability criteria later, you can return to the same conversation in the Previewer and click **Run Eval Again** to re-run against the updated test.
After completing these steps, save your Test Scenario and [start running it](/generativeagent/configuring/tasks-and-functions/run-test-scenarios) in either manual or automatic simulation mode.
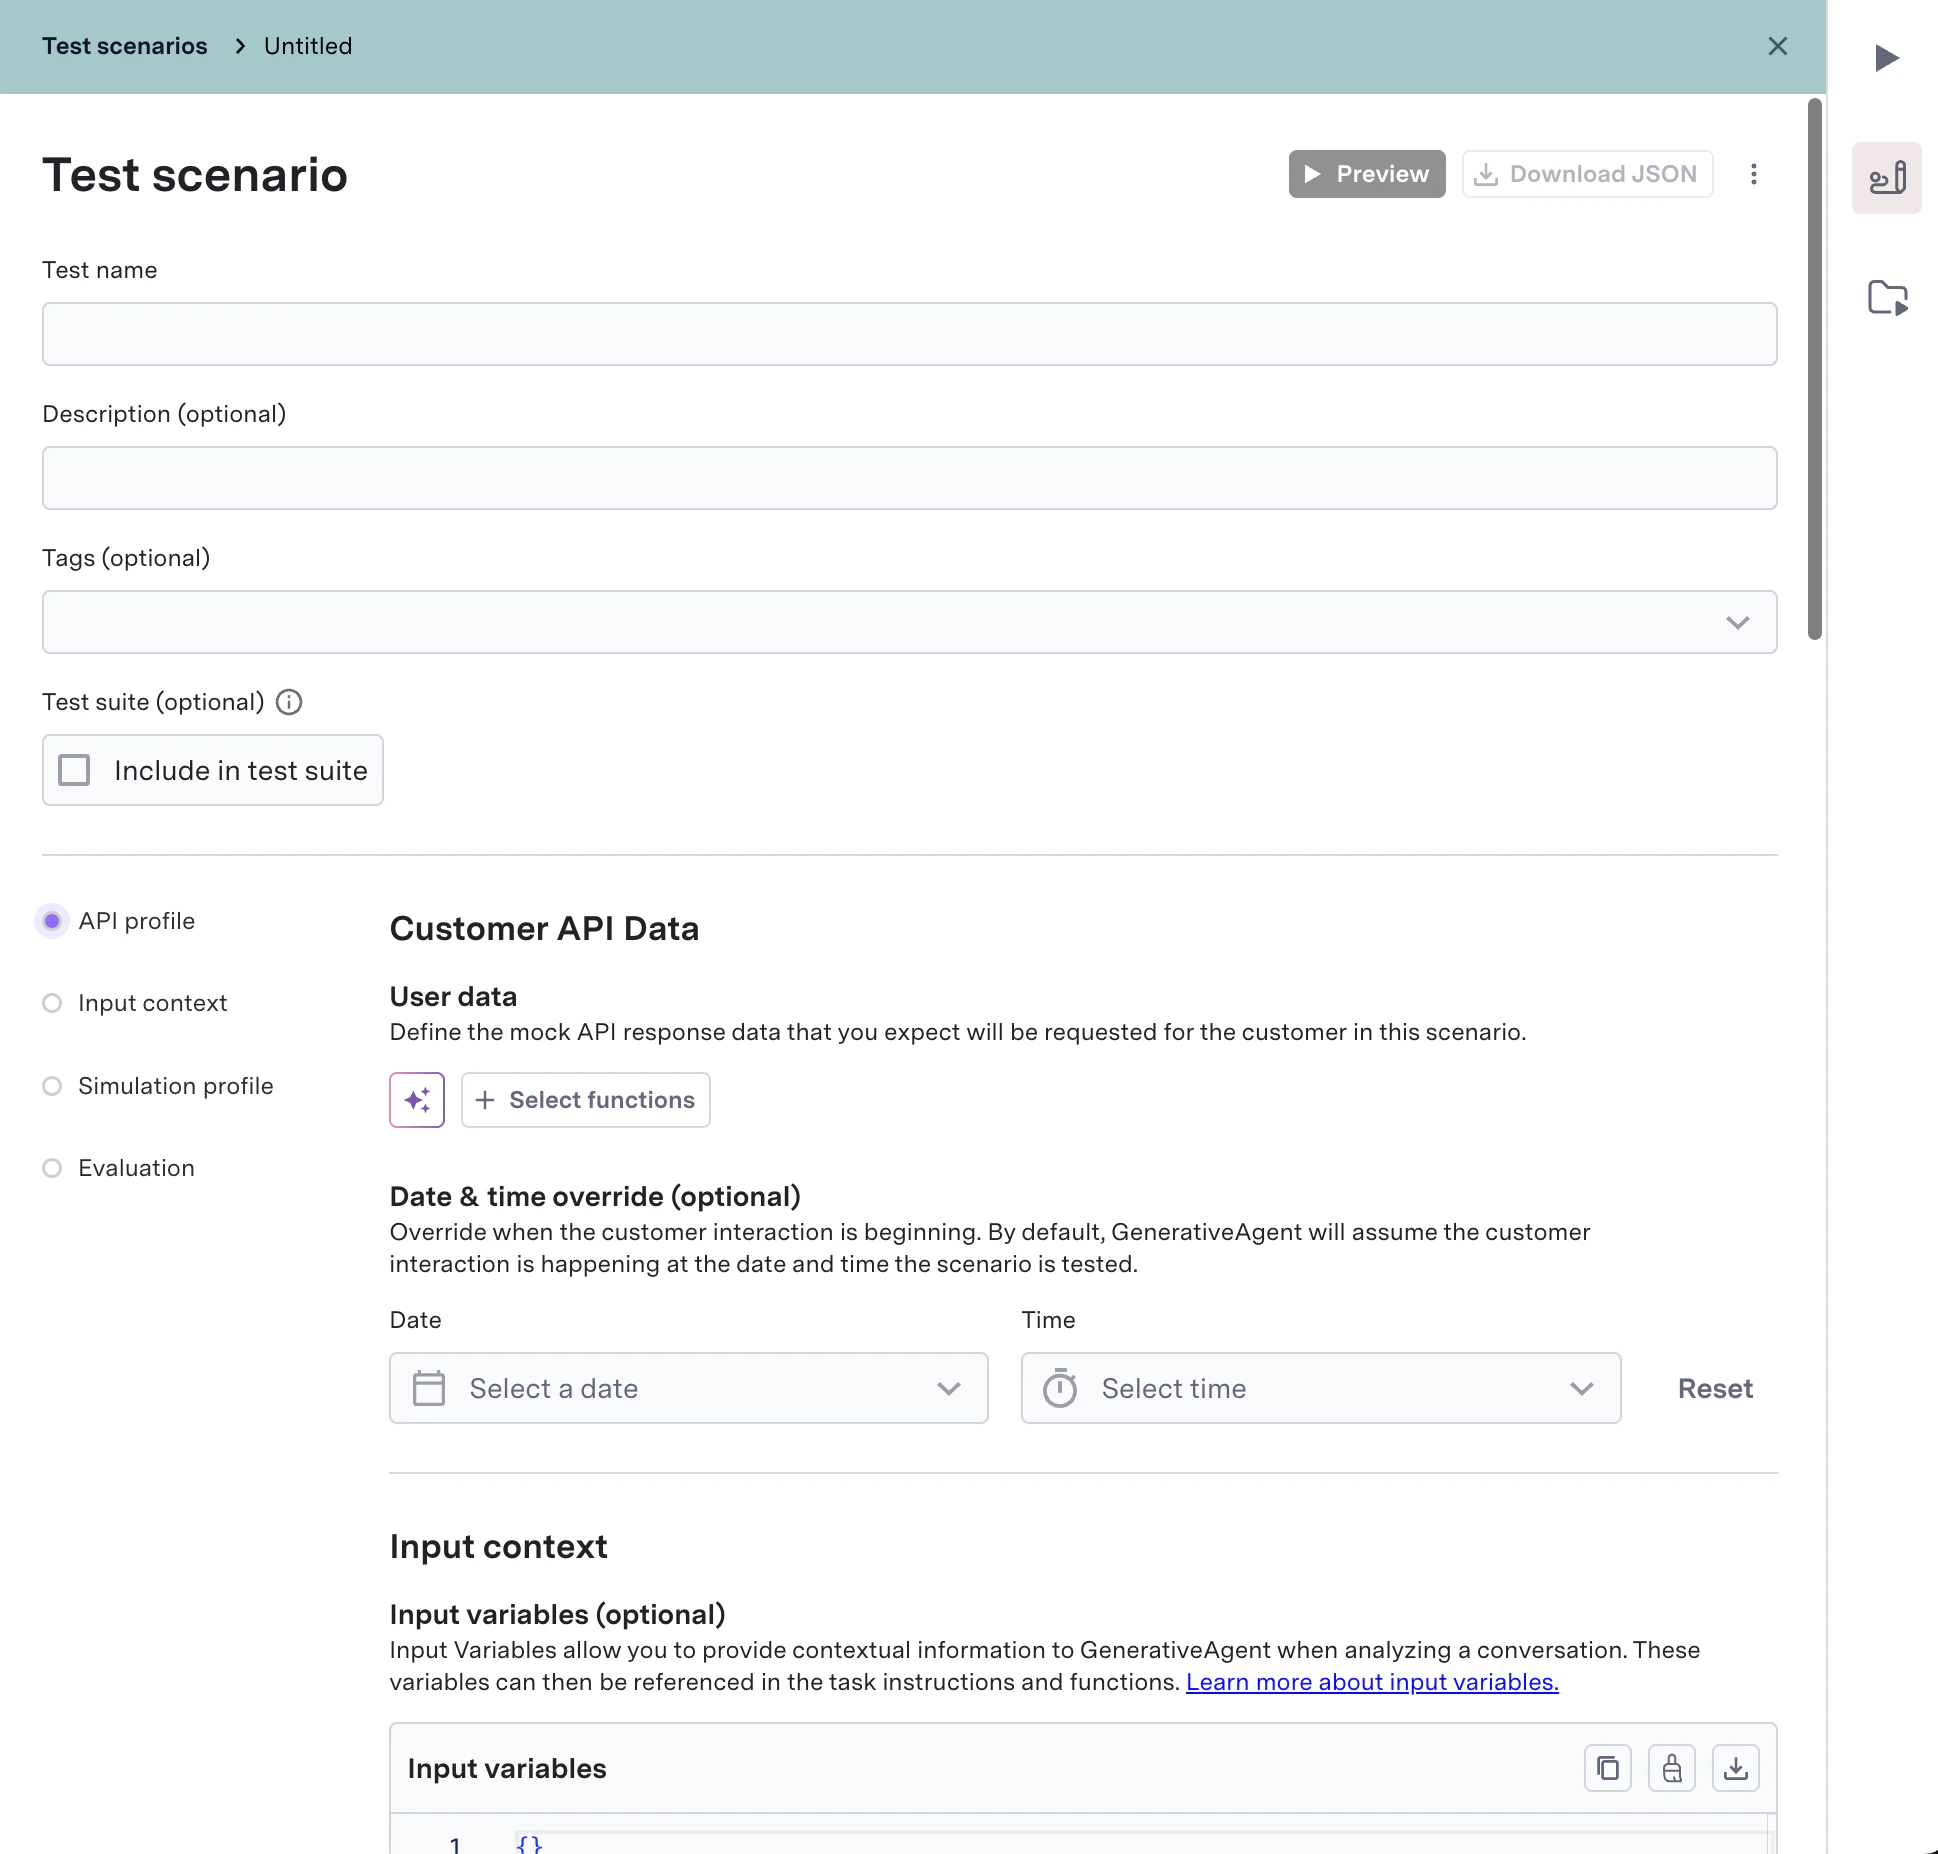 You can now preview the test scenario directly from the test file **after saving** your changes.
## Next steps
Learn how to run your Test Scenarios in the Scenario Runner and review the results.
Learn what a Test Scenario defines, how branch scope works, and how to export and import scenarios.
You can now preview the test scenario directly from the test file **after saving** your changes.
## Next steps
Learn how to run your Test Scenarios in the Scenario Runner and review the results.
Learn what a Test Scenario defines, how branch scope works, and how to export and import scenarios.