> ## Documentation Index
> Fetch the complete documentation index at: https://docs.asapp.com/llms.txt
> Use this file to discover all available pages before exploring further.
# Twilio Voice
> Learn how to integrate GenerativeAgent into Twilio using Twilio Media Stream
The Twilio Voice integration with ASAPP's GenerativeAgent allows callers in your Twilio environment to have conversations with GenerativeAgent while maintaining complete control over call handling throughout the interaction. This integration uses Twilio's Media Stream, allowing it to work with any Twilio integration strategy: Functions, Flows, custom webhooks, etc.
This guide demonstrates how to integrate GenerativeAgent using Twilio Media Stream inside Twilio Functions, showcasing how the various components work together.
See the [detailed integration flow](#detailed-integration-flow) for the general approach for how Twilio Media Stream connects to GenerativeAgent.
## How it works
At a high level, the Twilio Media Stream integration with GenerativeAgent works by streaming audio and managing conversations through your Twilio Functions:
1. **Stream the audio** to GenerativeAgent through Twilio Media Stream.
2. **GenerativeAgent handles the conversation** using the audio stream and responds to the caller.
Since calls remain within your Twilio infrastructure throughout the interaction, you maintain full control over call handling, including error scenarios and transfers.
3. **Return control back** to your Twilio flow when:
* The conversation is successfully completed
* The caller requests a human agent
* An error occurs
4. **Retrieve the call transfer state** after the conversation ends when GenerativeAgent ends the call.
If the caller hangs up, there is no call transfer state to retrieve.
This integration flow shows the general architecture of how Twilio and GenerativeAgent work together. Twilio provides multiple ways to initiate media streams, and this flow demonstrates the core components regardless of your specific implementation approach.
Your system requests a Twilio media stream URL from ASAPP to start streaming audio.
Use the [Get Twilio Media Stream URL API](/apis/genagent-media-gateway/get-twilio-media-stream-url) with your API credentials:
```shell theme={null}
curl --location 'https://api.sandbox.asapp.com/mg-genagent/v1/twilio-media-stream-url' \
--header 'asapp-api-id: ' \
--header 'asapp-api-secret: '
```
The API returns a short-lived WebSocket URL valid for 5 minutes. The same URL can be used for multiple concurrent sessions within this timeframe.
Your system instructs Twilio to initiate a bidirectional media stream to ASAPP Media Gateway components using the URL from the previous step. Twilio allows many methods to provide TwiML such as a webhook to your own server or via Twilio Functions (as shown in the integration walkthrough below).
See [Twilio documentation](https://www.twilio.com/docs/voice/media-streams) for ways to initiate bidirectional media streams.
Optionally, configure input session parameters:
* `asapp_callTransferId` - the call transfer ID
* `asapp_externalConversationId` - the external conversation ID
* `customerId` - the customer ID for the conversation
* `taskName` - used to [enter a specific task](/generativeagent/configuring/tasks-and-functions/enter-specific-task)
* Additional values are passed as [inputVariables](/generativeagent/configuring/tasks-and-functions/input-variables) for the GenerativeAgent conversation.
As an example, the following TwiML could be returned to initiate the bidirectional media stream with session parameters:
```xml Example TwiML Response theme={null}
```
When the call ends, your system retrieves the call transfer result and output context to determine next steps.
Call transfer results are only available when GenerativeAgent completes the conversation and transfers control back to your system. If the caller hangs up, there is no call transfer result to retrieve.
To retrieve the call transfer result, get the [Call Transfer](/apis/generativeagent/get-call-transfer) that would have been created with the `asapp_callTransferId` from the previous step:
```shell theme={null}
curl --location 'https://api.sandbox.asapp.com/generativeagent/v1/call-transfers/[Your Transfer Id]' \
--header 'asapp-api-id: ' \
--header 'asapp-api-secret: '
```
A successful request returns call transfer data including:
* **Status**: Indicates if the call was completed successfully (ACTIVE, ONGOING, COMPLETED, or EXPIRED)
* **outputContext**: Contains the conversation results and transfer variables
* **transferType**: Either `AGENT` (transfer to human agent) or `SYSTEM` (system transfer)
* **referenceVariables**: Context information about the customer and conversation
* **transferVariables**: Data to pass to the next system or agent
Use this information to handle the call according to your business logic, such as routing to an agent or handling call disposition.
## Before you Begin
Before using the GenerativeAgent integration with Twilio, you need:
* [Get your API Key and Secret](/getting-started/developers#access-api-credentials)
* Ensure your API key has been configured to access GenerativeAgent APIs. Reach out to your ASAPP team if you need access enabled.
* Have a Twilio account with:
* Access to Twilio Functions and Assets
* A phone number for testing
* Administrator permissions to configure phone numbers and functions
### Your Infrastructure, Your Control
This integration keeps calls within your Twilio infrastructure throughout the interaction. You maintain full control over call handling, including error scenarios and transfers. You may need to implement your own logic to handle the call transfer state and output context.
This integration walks you through setting up Twilio Functions and provides the code you need to get started. You can adapt, modify, or replace any part of this implementation to match your organization's specific requirements and business logic.
## Step 1: Create and Configure Your Twilio Function
You need to create a Twilio Function that will handle the integration with GenerativeAgent. This function will authenticate with ASAPP, obtain a media stream URL, and configure the audio streaming.
You need a Twilio service to contain your function. Select an existing service from Functions and Assets > Services, or create a new one using the steps below.
To create a new service, follow these steps:
First, you need to add the `Functions and Assets` tool in your Twilio Account Dashboard.
From Twilio Account Home, navigate to your Account Dashboard sidebar > Explore products > Developer Tools.
Find the `Functions and Assets` tool and click on the "pin to sidebar" icon.
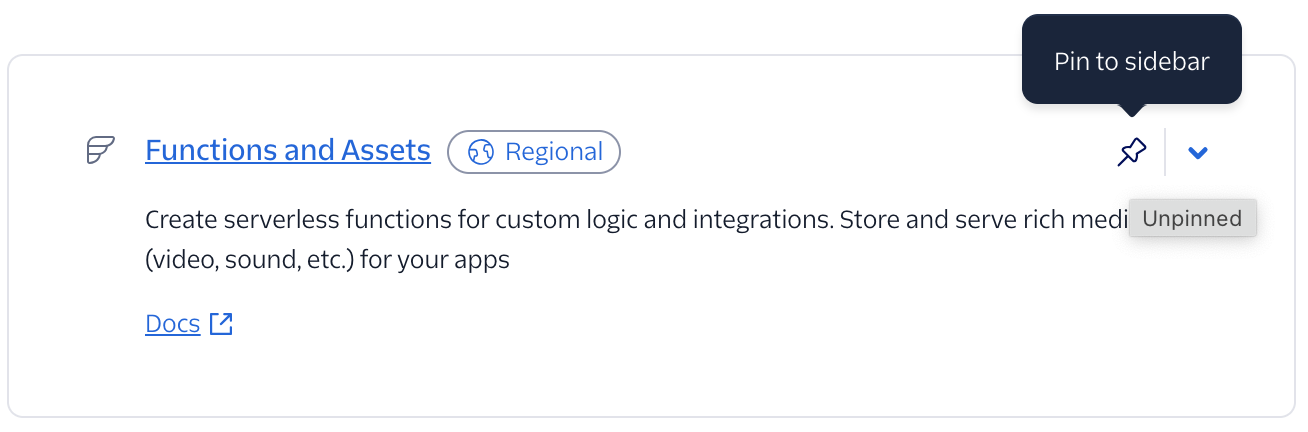 The tool will now appear in your Account Dashboard sidebar.
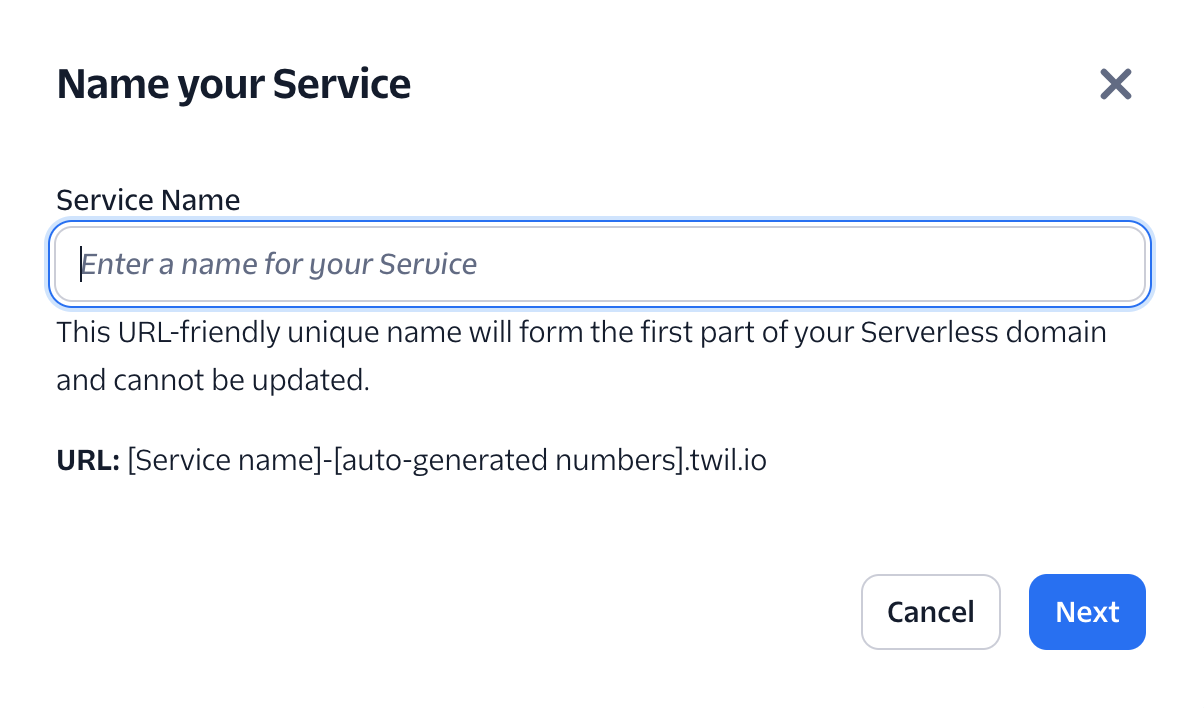
Go to the sidebar and click on Functions and Assets > Services. Click on `Create Service` button.
Select a name for your service, such as `GenerativeAgentService`, and click `Next`.
The tool will now appear in your Account Dashboard sidebar.
Go to the sidebar and click on Functions and Assets > Services. Click on `Create Service` button.
Select a name for your service, such as `GenerativeAgentService`, and click `Next`.
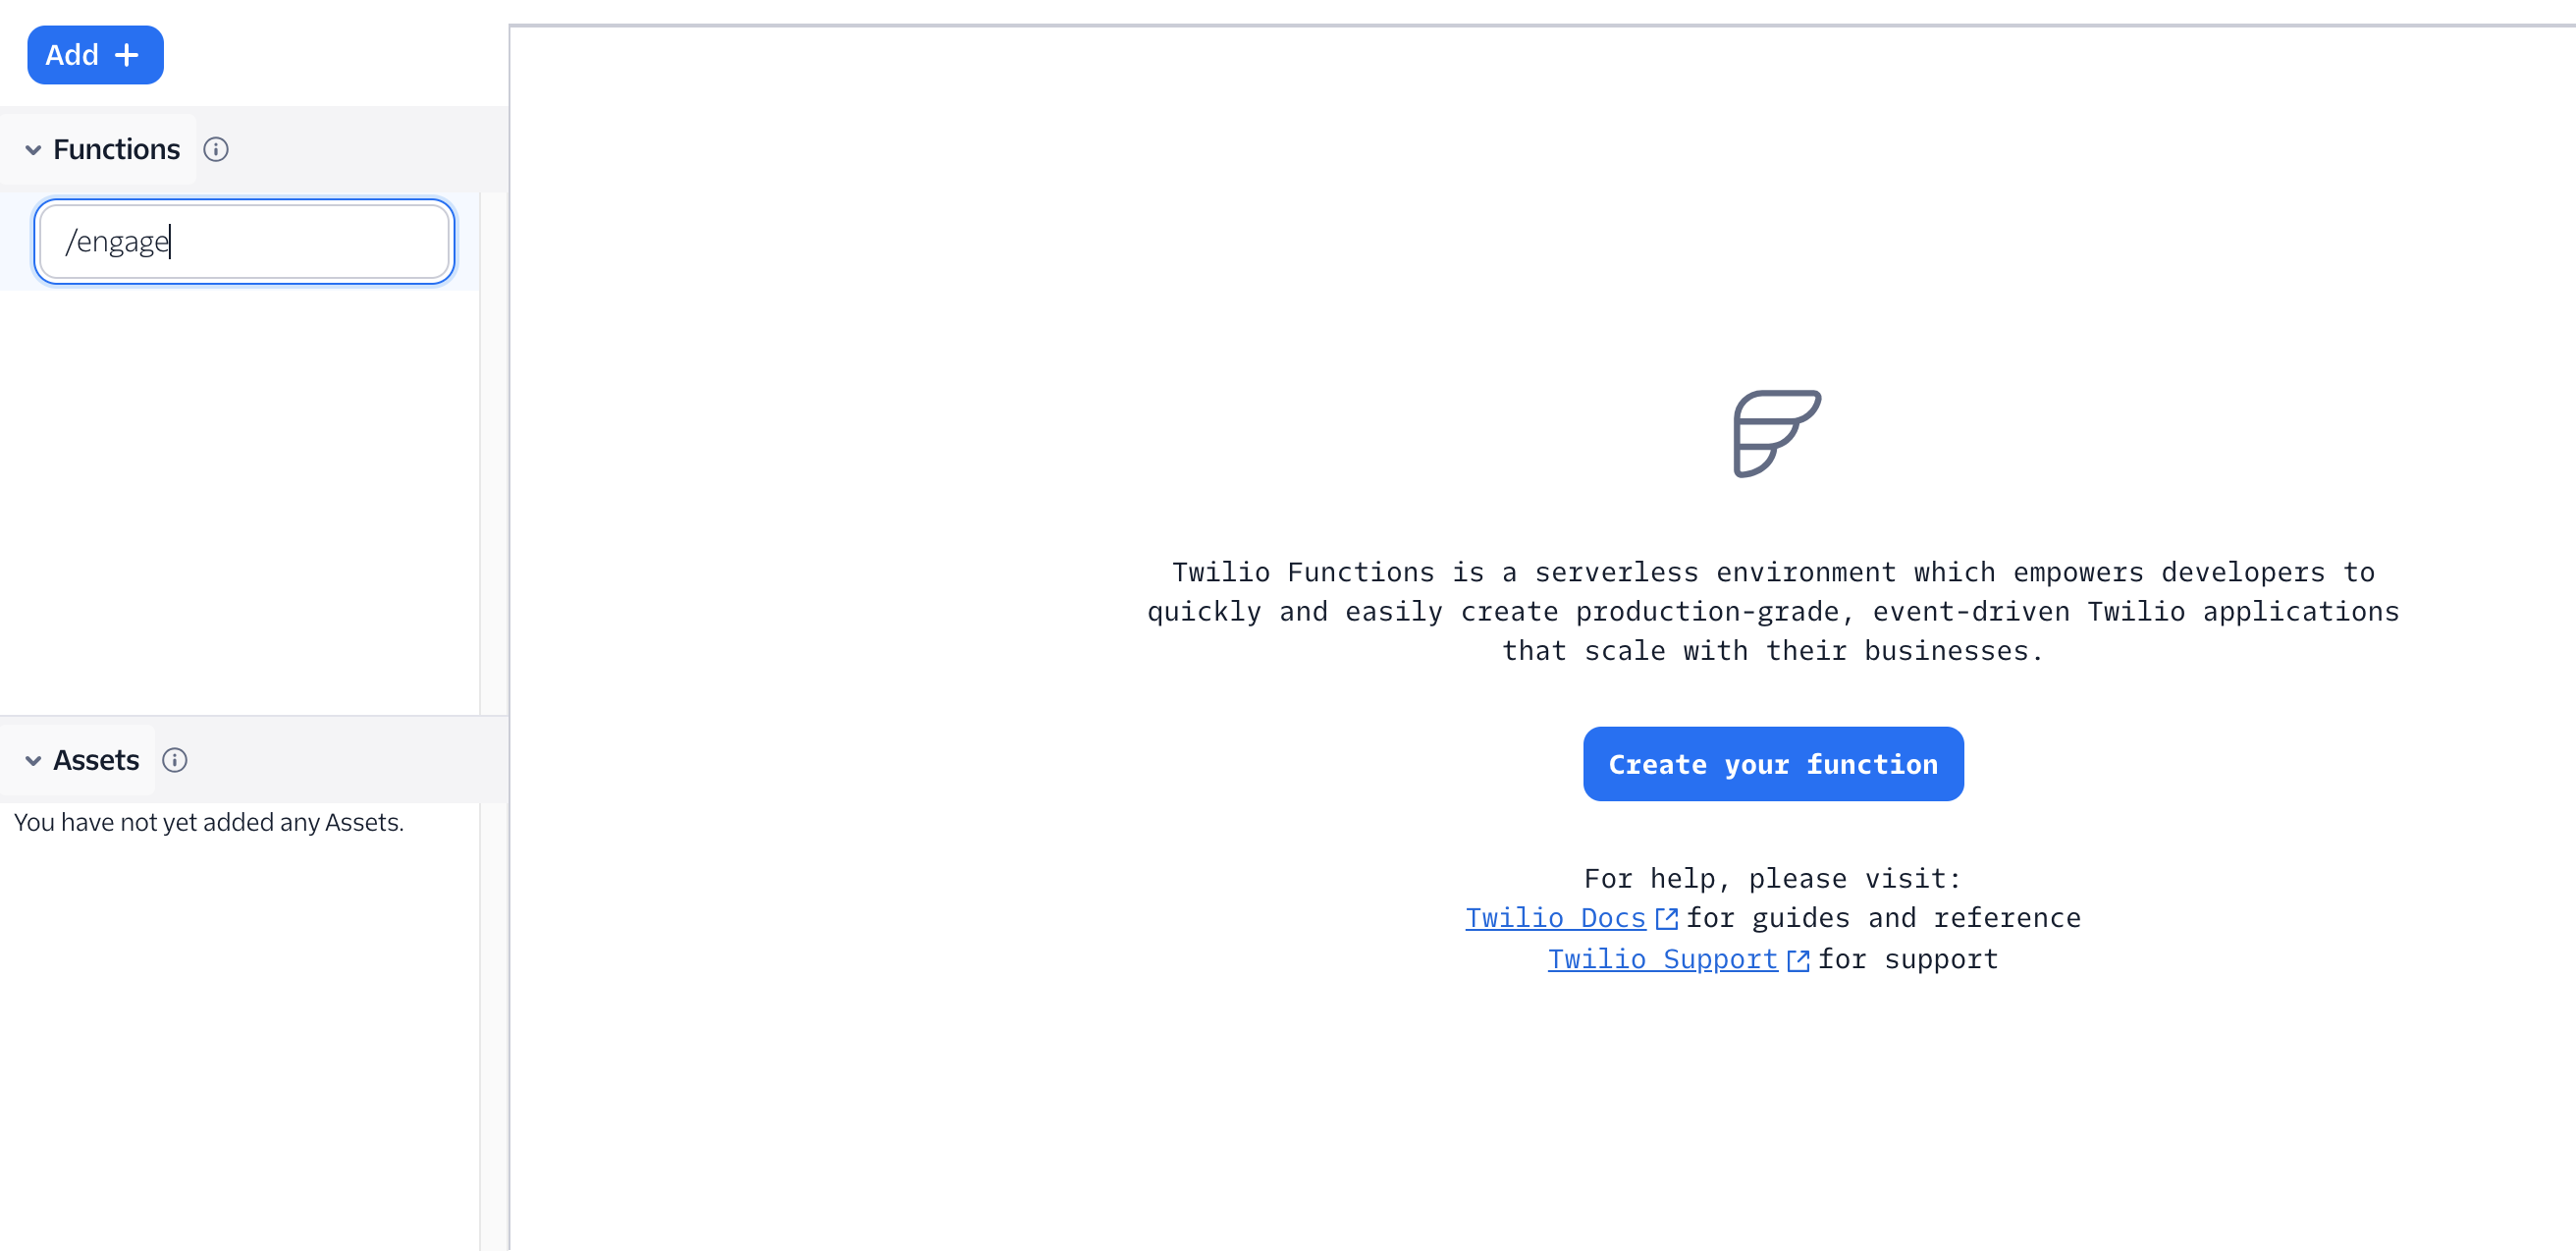
 Click on `Create your Function` button or click on `Add` > `Add Function` button. Pick a name for your function path, such as `/engage`.
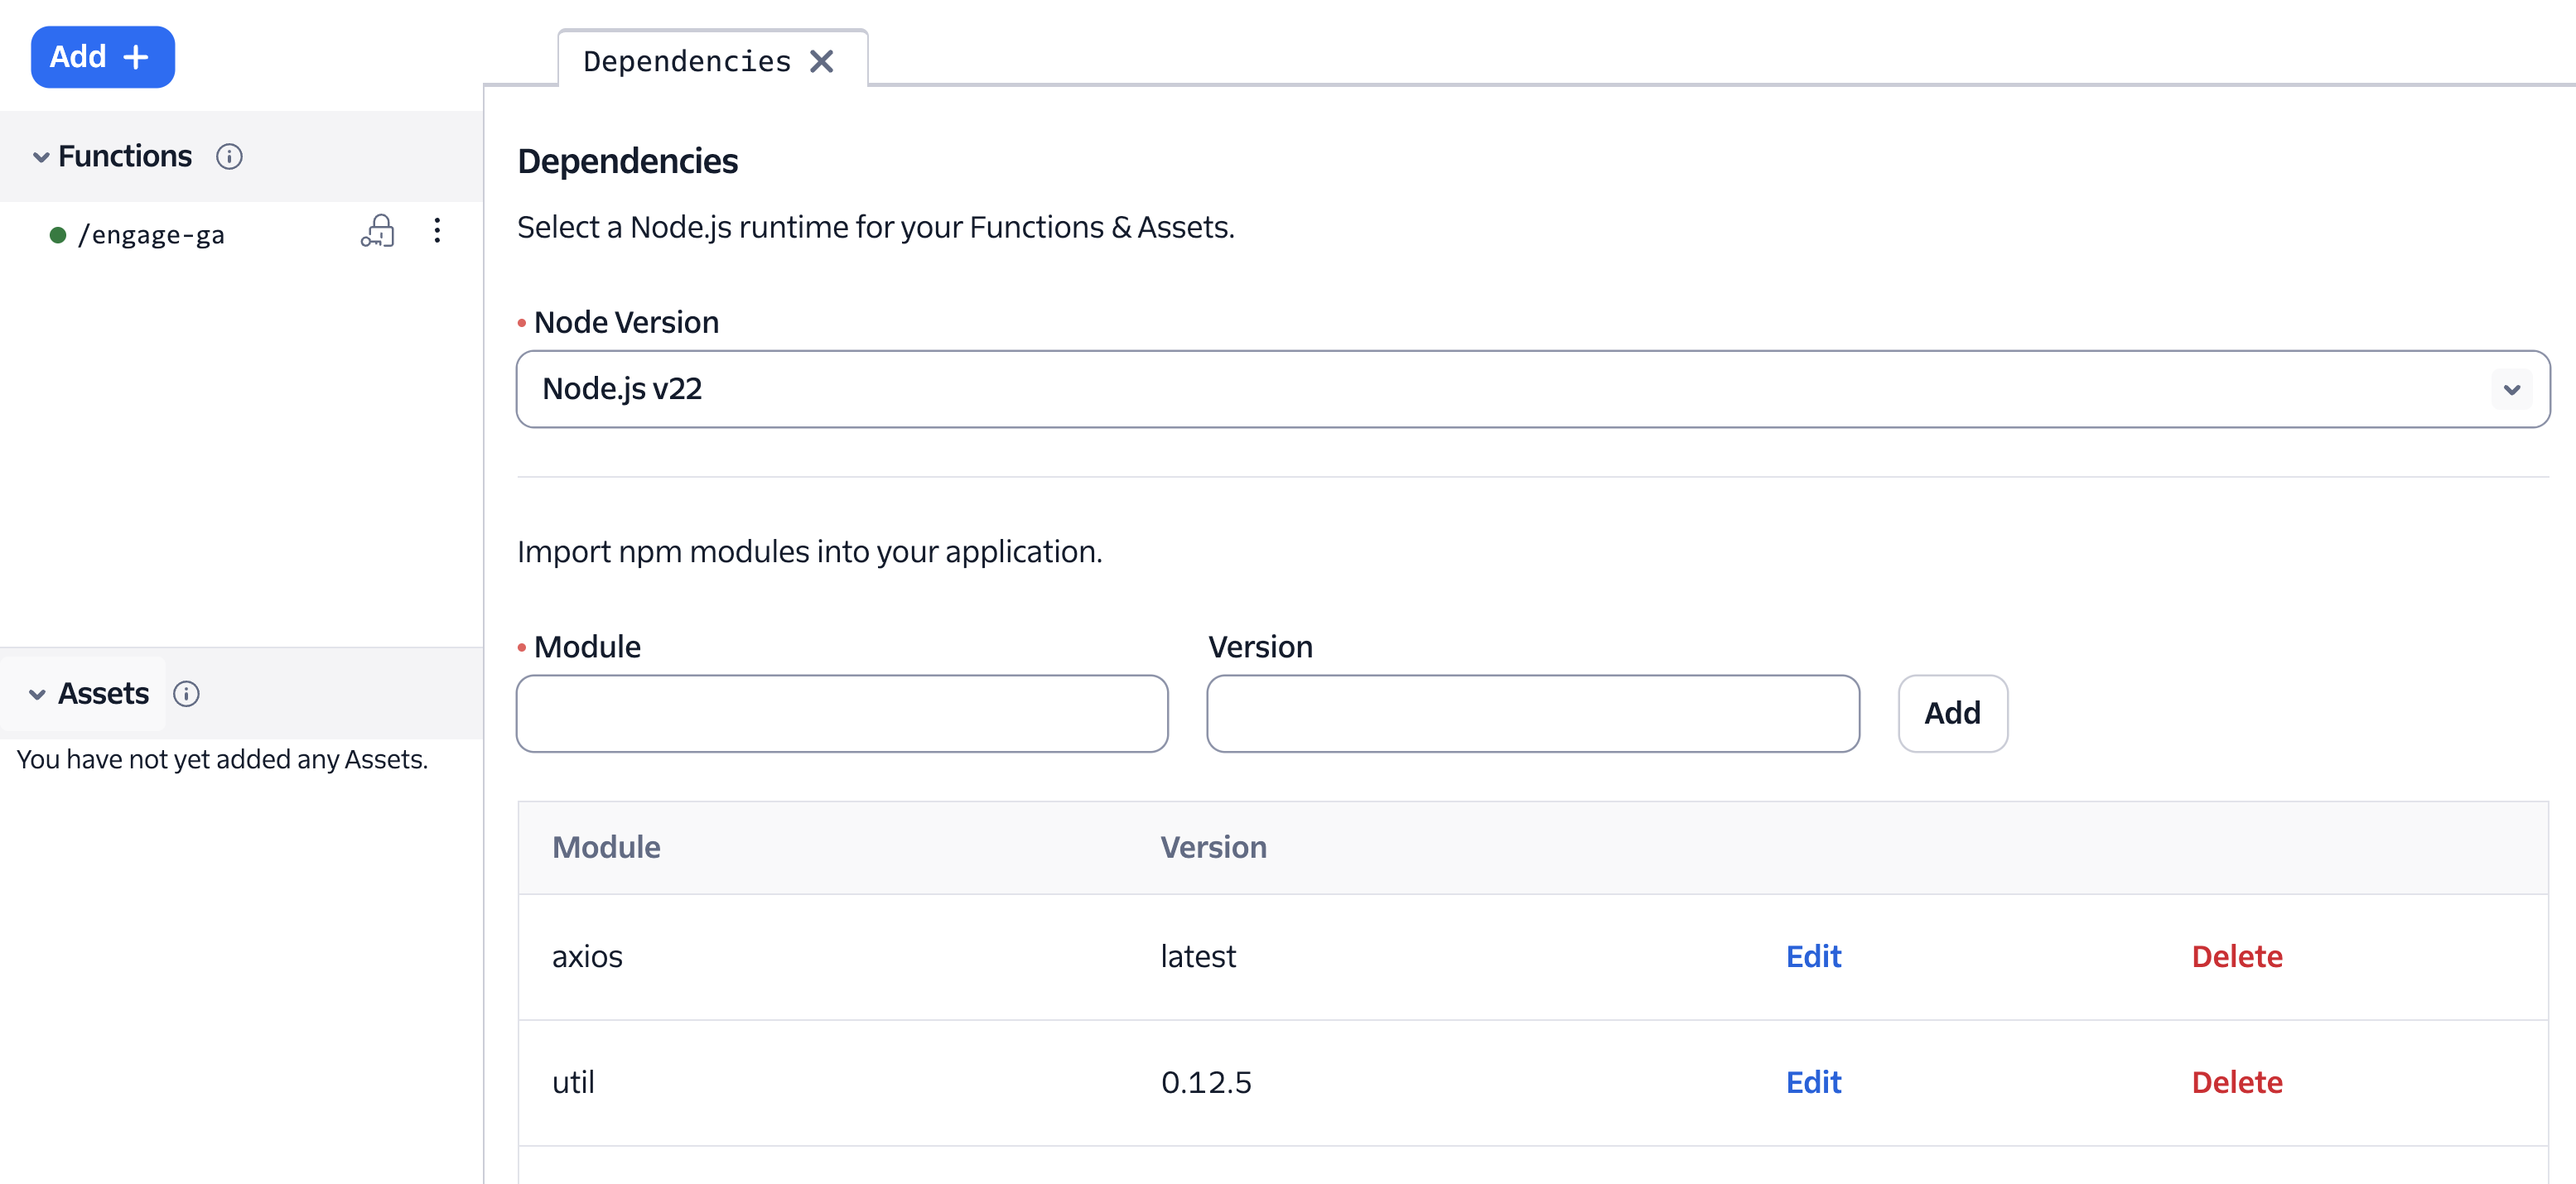
 Add axios dependency to the functions.
The function code will use axios to reach out to ASAPP APIs.
Add axios dependency to the functions.
The function code will use axios to reach out to ASAPP APIs.
 Create the `/engage` function. This function establishes the connection between Twilio and GenerativeAgent.
This function performs the following:
1. Obtains a Twilio Media Stream URL with the [Get Twilio Media Stream URL API](/apis/genagent-media-gateway/get-twilio-media-stream-url)
2. Configures the media stream with input parameters
* `asapp_callTransferId` is passed as the id of the call transfer.
* `asapp_externalConversationId` is passed as the external conversation id of the conversation.
* `customerId` is passed as the customer id for the conversation.
* `taskName` is used to [enter a specific task](/generativeagent/configuring/tasks-and-functions/enter-specific-task)
* All other values are used as passed as [inputVariables](/generativeagent/configuring/tasks-and-functions/input-variables) used for the GenerativeAgent conversation.
3. Specifies a TwiML connect action to trigger call completion function when call ends
4. Returns the TwiML response to Twilio
```javascript Engage Function expandable theme={null}
const axios = require('axios');
exports.handler = async function (context, event, callback) {
const asappApiId = context.ASAPP_API_ID;
const asappApiSecret = context.ASAPP_API_SECRET;
const asappApiHost = context.ASAPP_API_HOST;
// Authenticate with ASAPP to obtain a Twilio Media Stream URL
const url = `${asappApiHost}/mg-genagent/v1/twilio-media-stream-url`;
console.log('Call event:', event);
const twiml = new Twilio.twiml.VoiceResponse();
// Configure input parameters for the media stream
const inputParameters = {
"asapp_callTransferId": event.CallSid,
"asapp_externalConversationId": event.CallSid // Use CallSid as external conversation ID for tracking
// Add additional input parameters to be passed as inputVariables as needed:
// "customerId": "customer123",
// "taskName": "customer_support"
};
try {
// Request streaming URL from ASAPP
const res = await axios.get(url, {
headers: {
'asapp-api-id': asappApiId,
'asapp-api-secret': asappApiSecret,
'Content-Type': 'application/json'
}
});
if (res.status === 200) {
console.log('Streaming URL obtained:', res.data);
// Configure the media stream with the obtained URL
const connect = twiml.connect({
action: `https://${context.DOMAIN_NAME}/call-complete?callSid=${event.CallSid}`
});
const stream = connect.stream({ url: res.data.streamingUrl });
// Add input parameters as stream parameters
if (inputParameters) {
for (const name in inputParameters) {
stream.parameter({name: name, value: inputParameters[name]});
}
}
return callback(null, twiml);
} else {
console.error(`API request failed: ${res.status} ${res.statusText}`);
twiml.say('We are experiencing technical difficulties. Please try again later.');
return callback(null, twiml);
}
} catch (error) {
console.error('Error:', error);
twiml.say('We are experiencing technical difficulties. Please try again later.');
return callback(null, twiml);
}
};
```
Create the `/call-complete` function. This function retrieves the call transfer state after the conversation ends with the [Get Call Transfer API](/apis/generativeagent/get-call-transfer).
This example code just logs what transfer type occurred, you will need to implement your own business logic to handle what happens next.
```javascript Call Complete Function expandable theme={null}
const axios = require('axios');
exports.handler = async function (context, event, callback) {
const asappApiId = context.ASAPP_API_ID;
const asappApiSecret = context.ASAPP_API_SECRET;
const asappApiHost = context.ASAPP_API_HOST;
console.log('Call completed:', event);
try {
// Get call transfer state after call ends
const callSid = event.CallSid;
const resultUrl = `${asappApiHost}/generativeagent/v1/call-transfers/${callSid}`;
const resultRes = await axios.get(resultUrl, {
headers: {
'asapp-api-id': asappApiId,
'asapp-api-secret': asappApiSecret,
'Content-Type': 'application/json'
}
});
if (resultRes.status === 200) {
const result = resultRes.data;
console.log('Call transfer result:', result);
// Handle the result based on your business logic
if (result.outputContext) {
const transferType = result.outputContext.transferType;
const transferVariables = result.outputContext.transferVariables;
// Process based on transfer type
switch (transferType) {
case 'AGENT':
console.log('Transfer to agent required');
// Implement your agent transfer logic here
// Examples: Update CRM, send notification, route to queue
break;
case 'SYSTEM':
console.log('System transfer with variables:', transferVariables);
// Implement your system transfer logic here
// Examples: Update database, trigger follow-up actions
break;
default:
console.log('Conversation completed successfully');
}
}
}
} catch (error) {
console.error('Error fetching call transfer state:', error);
}
return callback(null, 'OK');
};
```
Add the required environment variables to your Twilio Function:
| Key | Value |
| ------------------ | ----------------------------------------------------------------------------------------------------------------------------------------------------------------------------- |
| ASAPP\_API\_HOST | The API host provided by ASAPP, e.g.: [https://api.sandbox.asapp.com](https://api.sandbox.asapp.com) (sandbox) or [https://api.asapp.com](https://api.asapp.com) (production) |
| ASAPP\_API\_ID | The API Key provided by ASAPP |
| ASAPP\_API\_SECRET | The API Secret provided by ASAPP |
| DOMAIN\_NAME | Your Twilio Function domain within the service (e.g., your-service-1234.twil.io) |
The streaming URL has a TTL (time-to-live) of 5 minutes. The same URL can be used to start multiple sessions within this timeframe, but you should obtain a new URL before the 5-minute expiration.
## Step 2: Configure Direct Phone Number Integration
This approach directly connects a phone number to your GenerativeAgent function, making it the simplest setup for testing or simple use cases.
Choose a phone number you want to connect to GenerativeAgent. You can use an existing number or buy a new one from Twilio.
In the `Configure` tab of your selected phone number, set these settings:
| Setting | Value |
| --------------- | ---------------------------------------------------------- |
| Configure With | "Webhook, TwiML Bin, Function, Studio Flow, Proxy Service" |
| A call comes in | "Function" |
| Service | The name of your service, e.g.: "GenerativeAgentService" |
| Environment | "ui" |
| Function Path | The name of your engagement function, e.g.: "/engage" |
Click `Save Configuration` when done.
We're using the "ui" environment for development. For production, you may want to deploy to specific environments (dev, staging, prod) and configure environment variables accordingly.
## Step 3: Validate and Deploy Your Integration
Before going live, thoroughly test your integration to ensure it works as expected and provides a good caller experience.
### Test Your Integration
Testing is essential to ensure the integration works as expected and provides a good caller experience.
Test the integration thoroughly:
* Make test calls through the phone number configured in Step 2.
Test various scenarios including normal conversations or requests for human agents.
* Verify audio streaming quality and reliability
* Test conversation handling
* Ensure GenerativeAgent understands and responds appropriately
* Test different caller accents and speech patterns
* Verify handling of background noise and interruptions
* Check error scenarios
* Verify error handling paths in your flow
## Twilio Flow Integration
If you are using Twilio Studio Flows, you can modify the above integration to work with Flows.
### Flow Integration Approach
When using flows, the integration is very similar but instead of relying on action callbacks to trigger the call transfer state function, you'll call the call transfer state function directly from your flow:
1. **Flow calls engage function via TwiML Redirect** - This connects GenerativeAgent to the conversation
2. **Flow calls call transfer state function** - Immediately after the call returns, call the function to get transfer state and output context
3. **Flow processes results** - Using the returned transfer data, you can implement your own logic for routing and other business objectives.
### Setting Up Flow Integration
For flow integration, you need to remove the action callback from the engagement function. Change from:
```javascript theme={null}
// FROM: With action callback (for direct phone integration)
const connect = twiml.connect({
action: `https://${context.DOMAIN_NAME}/call-complete?callSid=${event.CallSid}`
});
const stream = connect.stream({ url: res.data.streamingUrl });
```
To:
```javascript theme={null}
// TO: Without action callback (for flow integration)
const connect = twiml.connect();
const stream = connect.stream({ url: res.data.streamingUrl });
```
Update your call transfer state function to return the call transfer data that the flow can reference.
For this example, the function returns the call transfer status and output context from the GenerativeAgent API for the flow to use.
```javascript Call Transfer Function expandable theme={null}
const axios = require('axios');
exports.handler = async function (context, event, callback) {
const asappApiId = context.ASAPP_API_ID;
const asappApiSecret = context.ASAPP_API_SECRET;
const asappApiHost = context.ASAPP_API_HOST;
console.log('Call completed:', event);
try {
// Get call transfer state after call ends
const callSid = event.CallSid;
const resultUrl = `${asappApiHost}/generativeagent/v1/call-transfers/${callSid}`;
const resultRes = await axios.get(resultUrl, {
headers: {
'asapp-api-id': asappApiId,
'asapp-api-secret': asappApiSecret,
'Content-Type': 'application/json'
}
});
if (resultRes.status === 200) {
const result = resultRes.data;
console.log('Call transfer result:', result);
// Return call transfer data for the flow to use
const flowVariables = {
callTransferStatus: result.status, // Call status from API
transferType: null,
currentTaskName: null,
referenceVariables: null,
transferVariables: null
};
if (result.outputContext) {
flowVariables.transferType = result.outputContext.transferType;
flowVariables.currentTaskName = result.outputContext.currentTaskName;
flowVariables.referenceVariables = result.outputContext.referenceVariables;
flowVariables.transferVariables = result.outputContext.transferVariables;
}
// Return the call transfer data to the flow
return callback(null, flowVariables);
} else {
console.error(`API request failed: ${resultRes.status} ${resultRes.statusText}`);
return callback(new Error('Failed to fetch call transfer state'));
}
} catch (error) {
console.error('Error fetching call transfer state:', error);
return callback(error);
}
};
```
Reference the [call transfer API](/apis/generativeagent/get-call-transfer) to ensure you are capturing the data relevant to your flow.
In the flow you want to integrate GenerativeAgent:
1. Add a **Redirect** widget where you want to engage GenerativeAgent.
* The URL needs to be the URL of your engagement function, with a query parameter of `FlowEvent=return` e.g.: `https://your-service-1234.twil.io/engage?FlowEvent=return`.
2. Add a **Run Function** widget, specifying the function to fetch the call transfer state.
After the call transfer state function, add logic to handle the results using the returned call status and output context.
## Next Steps
Now that you have successfully integrated GenerativeAgent with Twilio, here are some important next steps to consider:
Learn how to configure GenerativeAgent's behaviors, tasks, and communication style
Configure your APIs to allow GenerativeAgent to access necessary data and perform actions
Connect and optimize your knowledge base to improve GenerativeAgent's responses
Follow the deployment checklist to launch GenerativeAgent in your production environment
Create the `/engage` function. This function establishes the connection between Twilio and GenerativeAgent.
This function performs the following:
1. Obtains a Twilio Media Stream URL with the [Get Twilio Media Stream URL API](/apis/genagent-media-gateway/get-twilio-media-stream-url)
2. Configures the media stream with input parameters
* `asapp_callTransferId` is passed as the id of the call transfer.
* `asapp_externalConversationId` is passed as the external conversation id of the conversation.
* `customerId` is passed as the customer id for the conversation.
* `taskName` is used to [enter a specific task](/generativeagent/configuring/tasks-and-functions/enter-specific-task)
* All other values are used as passed as [inputVariables](/generativeagent/configuring/tasks-and-functions/input-variables) used for the GenerativeAgent conversation.
3. Specifies a TwiML connect action to trigger call completion function when call ends
4. Returns the TwiML response to Twilio
```javascript Engage Function expandable theme={null}
const axios = require('axios');
exports.handler = async function (context, event, callback) {
const asappApiId = context.ASAPP_API_ID;
const asappApiSecret = context.ASAPP_API_SECRET;
const asappApiHost = context.ASAPP_API_HOST;
// Authenticate with ASAPP to obtain a Twilio Media Stream URL
const url = `${asappApiHost}/mg-genagent/v1/twilio-media-stream-url`;
console.log('Call event:', event);
const twiml = new Twilio.twiml.VoiceResponse();
// Configure input parameters for the media stream
const inputParameters = {
"asapp_callTransferId": event.CallSid,
"asapp_externalConversationId": event.CallSid // Use CallSid as external conversation ID for tracking
// Add additional input parameters to be passed as inputVariables as needed:
// "customerId": "customer123",
// "taskName": "customer_support"
};
try {
// Request streaming URL from ASAPP
const res = await axios.get(url, {
headers: {
'asapp-api-id': asappApiId,
'asapp-api-secret': asappApiSecret,
'Content-Type': 'application/json'
}
});
if (res.status === 200) {
console.log('Streaming URL obtained:', res.data);
// Configure the media stream with the obtained URL
const connect = twiml.connect({
action: `https://${context.DOMAIN_NAME}/call-complete?callSid=${event.CallSid}`
});
const stream = connect.stream({ url: res.data.streamingUrl });
// Add input parameters as stream parameters
if (inputParameters) {
for (const name in inputParameters) {
stream.parameter({name: name, value: inputParameters[name]});
}
}
return callback(null, twiml);
} else {
console.error(`API request failed: ${res.status} ${res.statusText}`);
twiml.say('We are experiencing technical difficulties. Please try again later.');
return callback(null, twiml);
}
} catch (error) {
console.error('Error:', error);
twiml.say('We are experiencing technical difficulties. Please try again later.');
return callback(null, twiml);
}
};
```
Create the `/call-complete` function. This function retrieves the call transfer state after the conversation ends with the [Get Call Transfer API](/apis/generativeagent/get-call-transfer).
This example code just logs what transfer type occurred, you will need to implement your own business logic to handle what happens next.
```javascript Call Complete Function expandable theme={null}
const axios = require('axios');
exports.handler = async function (context, event, callback) {
const asappApiId = context.ASAPP_API_ID;
const asappApiSecret = context.ASAPP_API_SECRET;
const asappApiHost = context.ASAPP_API_HOST;
console.log('Call completed:', event);
try {
// Get call transfer state after call ends
const callSid = event.CallSid;
const resultUrl = `${asappApiHost}/generativeagent/v1/call-transfers/${callSid}`;
const resultRes = await axios.get(resultUrl, {
headers: {
'asapp-api-id': asappApiId,
'asapp-api-secret': asappApiSecret,
'Content-Type': 'application/json'
}
});
if (resultRes.status === 200) {
const result = resultRes.data;
console.log('Call transfer result:', result);
// Handle the result based on your business logic
if (result.outputContext) {
const transferType = result.outputContext.transferType;
const transferVariables = result.outputContext.transferVariables;
// Process based on transfer type
switch (transferType) {
case 'AGENT':
console.log('Transfer to agent required');
// Implement your agent transfer logic here
// Examples: Update CRM, send notification, route to queue
break;
case 'SYSTEM':
console.log('System transfer with variables:', transferVariables);
// Implement your system transfer logic here
// Examples: Update database, trigger follow-up actions
break;
default:
console.log('Conversation completed successfully');
}
}
}
} catch (error) {
console.error('Error fetching call transfer state:', error);
}
return callback(null, 'OK');
};
```
Add the required environment variables to your Twilio Function:
| Key | Value |
| ------------------ | ----------------------------------------------------------------------------------------------------------------------------------------------------------------------------- |
| ASAPP\_API\_HOST | The API host provided by ASAPP, e.g.: [https://api.sandbox.asapp.com](https://api.sandbox.asapp.com) (sandbox) or [https://api.asapp.com](https://api.asapp.com) (production) |
| ASAPP\_API\_ID | The API Key provided by ASAPP |
| ASAPP\_API\_SECRET | The API Secret provided by ASAPP |
| DOMAIN\_NAME | Your Twilio Function domain within the service (e.g., your-service-1234.twil.io) |
The streaming URL has a TTL (time-to-live) of 5 minutes. The same URL can be used to start multiple sessions within this timeframe, but you should obtain a new URL before the 5-minute expiration.
## Step 2: Configure Direct Phone Number Integration
This approach directly connects a phone number to your GenerativeAgent function, making it the simplest setup for testing or simple use cases.
Choose a phone number you want to connect to GenerativeAgent. You can use an existing number or buy a new one from Twilio.
In the `Configure` tab of your selected phone number, set these settings:
| Setting | Value |
| --------------- | ---------------------------------------------------------- |
| Configure With | "Webhook, TwiML Bin, Function, Studio Flow, Proxy Service" |
| A call comes in | "Function" |
| Service | The name of your service, e.g.: "GenerativeAgentService" |
| Environment | "ui" |
| Function Path | The name of your engagement function, e.g.: "/engage" |
Click `Save Configuration` when done.
We're using the "ui" environment for development. For production, you may want to deploy to specific environments (dev, staging, prod) and configure environment variables accordingly.
## Step 3: Validate and Deploy Your Integration
Before going live, thoroughly test your integration to ensure it works as expected and provides a good caller experience.
### Test Your Integration
Testing is essential to ensure the integration works as expected and provides a good caller experience.
Test the integration thoroughly:
* Make test calls through the phone number configured in Step 2.
Test various scenarios including normal conversations or requests for human agents.
* Verify audio streaming quality and reliability
* Test conversation handling
* Ensure GenerativeAgent understands and responds appropriately
* Test different caller accents and speech patterns
* Verify handling of background noise and interruptions
* Check error scenarios
* Verify error handling paths in your flow
## Twilio Flow Integration
If you are using Twilio Studio Flows, you can modify the above integration to work with Flows.
### Flow Integration Approach
When using flows, the integration is very similar but instead of relying on action callbacks to trigger the call transfer state function, you'll call the call transfer state function directly from your flow:
1. **Flow calls engage function via TwiML Redirect** - This connects GenerativeAgent to the conversation
2. **Flow calls call transfer state function** - Immediately after the call returns, call the function to get transfer state and output context
3. **Flow processes results** - Using the returned transfer data, you can implement your own logic for routing and other business objectives.
### Setting Up Flow Integration
For flow integration, you need to remove the action callback from the engagement function. Change from:
```javascript theme={null}
// FROM: With action callback (for direct phone integration)
const connect = twiml.connect({
action: `https://${context.DOMAIN_NAME}/call-complete?callSid=${event.CallSid}`
});
const stream = connect.stream({ url: res.data.streamingUrl });
```
To:
```javascript theme={null}
// TO: Without action callback (for flow integration)
const connect = twiml.connect();
const stream = connect.stream({ url: res.data.streamingUrl });
```
Update your call transfer state function to return the call transfer data that the flow can reference.
For this example, the function returns the call transfer status and output context from the GenerativeAgent API for the flow to use.
```javascript Call Transfer Function expandable theme={null}
const axios = require('axios');
exports.handler = async function (context, event, callback) {
const asappApiId = context.ASAPP_API_ID;
const asappApiSecret = context.ASAPP_API_SECRET;
const asappApiHost = context.ASAPP_API_HOST;
console.log('Call completed:', event);
try {
// Get call transfer state after call ends
const callSid = event.CallSid;
const resultUrl = `${asappApiHost}/generativeagent/v1/call-transfers/${callSid}`;
const resultRes = await axios.get(resultUrl, {
headers: {
'asapp-api-id': asappApiId,
'asapp-api-secret': asappApiSecret,
'Content-Type': 'application/json'
}
});
if (resultRes.status === 200) {
const result = resultRes.data;
console.log('Call transfer result:', result);
// Return call transfer data for the flow to use
const flowVariables = {
callTransferStatus: result.status, // Call status from API
transferType: null,
currentTaskName: null,
referenceVariables: null,
transferVariables: null
};
if (result.outputContext) {
flowVariables.transferType = result.outputContext.transferType;
flowVariables.currentTaskName = result.outputContext.currentTaskName;
flowVariables.referenceVariables = result.outputContext.referenceVariables;
flowVariables.transferVariables = result.outputContext.transferVariables;
}
// Return the call transfer data to the flow
return callback(null, flowVariables);
} else {
console.error(`API request failed: ${resultRes.status} ${resultRes.statusText}`);
return callback(new Error('Failed to fetch call transfer state'));
}
} catch (error) {
console.error('Error fetching call transfer state:', error);
return callback(error);
}
};
```
Reference the [call transfer API](/apis/generativeagent/get-call-transfer) to ensure you are capturing the data relevant to your flow.
In the flow you want to integrate GenerativeAgent:
1. Add a **Redirect** widget where you want to engage GenerativeAgent.
* The URL needs to be the URL of your engagement function, with a query parameter of `FlowEvent=return` e.g.: `https://your-service-1234.twil.io/engage?FlowEvent=return`.
2. Add a **Run Function** widget, specifying the function to fetch the call transfer state.
After the call transfer state function, add logic to handle the results using the returned call status and output context.
## Next Steps
Now that you have successfully integrated GenerativeAgent with Twilio, here are some important next steps to consider:
Learn how to configure GenerativeAgent's behaviors, tasks, and communication style
Configure your APIs to allow GenerativeAgent to access necessary data and perform actions
Connect and optimize your knowledge base to improve GenerativeAgent's responses
Follow the deployment checklist to launch GenerativeAgent in your production environment