> ## Documentation Index
> Fetch the complete documentation index at: https://docs.asapp.com/llms.txt
> Use this file to discover all available pages before exploring further.
# Zendesk Talk
> Learn how to integrate GenerativeAgent with Zendesk Talk for automated call handling and ticket creation
The Zendesk Talk integration with ASAPP's GenerativeAgent allows callers in your Zendesk environment to have conversations with GenerativeAgent while automatically creating support tickets based on the conversation context. This integration provides phone numbers that you route within Zendesk (either through IVR menus or overflow routing) and uses SIP-IN lines to redirect calls back to Zendesk when needed.
This guide covers the customer configuration steps needed to set up the integration with your Zendesk Talk environment.
## How it works
At a high level, the Zendesk Talk integration with GenerativeAgent works by routing calls through GenerativeAgent and creating tickets based on conversation outcomes:
1. **Calls are routed to GenerativeAgent** through phone numbers configured in your Zendesk IVR menu or overflow routing
2. **GenerativeAgent handles the conversation** using voice interaction and determines the appropriate response
3. **Calls are redirected back to Zendesk** via SIP-IN when GenerativeAgent needs to transfer to a live agent or complete the call
4. **Tickets are automatically created** in Zendesk based on the conversation context and outcome
The integration maintains your existing Zendesk Talk workflows while adding GenerativeAgent capabilities for automated call handling and ticket creation.
## Before you Begin
Before setting up the Zendesk Talk integration, you need:
* [Get your API Key and Secret](/getting-started/developers#access-api-credentials)
* Ensure your API key has been configured to access GenerativeAgent APIs. Reach out to your ASAPP team if you need access enabled.
* A Zendesk account with:
* Admin access to configure Talk settings
* Ability to create SIP-IN lines
* Access to configure triggers and business rules
* The following information to provide to ASAPP:
* **Zendesk API Token** - For ticket creation and management
* **Zendesk Subdomain** - Your Zendesk instance subdomain
* **Zendesk User Email** - Email associated with the API token
* The following information to obtain from ASAPP:
* **ASAPP SIP IP Address** - For configuring your SIP-IN line
* **ASAPP Overflow Phone Numbers** - For routing calls to GenerativeAgent
You may have both sandbox and production environments. Be careful not to mix production phone numbers with Zendesk sandbox or vice versa. See [Zendesk sandbox environments](https://support.zendesk.com/hc/en-us/articles/6150628316058-About-Zendesk-sandbox-environments) for more information.
## Understanding Your Routing Options
Zendesk Talk only allows routing via Phone numbers. We enable this for GenerativeAgent by providing you with **one or more phone numbers** that are **mapped to specific GenerativeAgent tasks**. You need to route these phone numbers within your Zendesk environment.
The routing approach you choose depends on how you want callers to interact with GenerativeAgent:
* **IVR Menu Routing**: Use Zendesk Talks' IVR Menu to route calls to GenerativeAgent based on the caller's input.
* **Overflow Routing**: Use Zendesk Talks' Overflow Routing to route calls to GenerativeAgent when you want GenerativeAgent to be the primary point of contact.
Work with your ASAPP team to determine which routing approach works best for your specific requirements and the tasks you want GenerativeAgent to handle.
## Step 1: Configure Zendesk SIP-IN Line
You need to create a SIP-IN line in Zendesk Talk to receive calls redirected back from GenerativeAgent.
The SIP-IN line is used to receive calls redirected back from GenerativeAgent.
Go to **Talk** → **Lines** → **Add SIP Line** in your Zendesk admin panel.
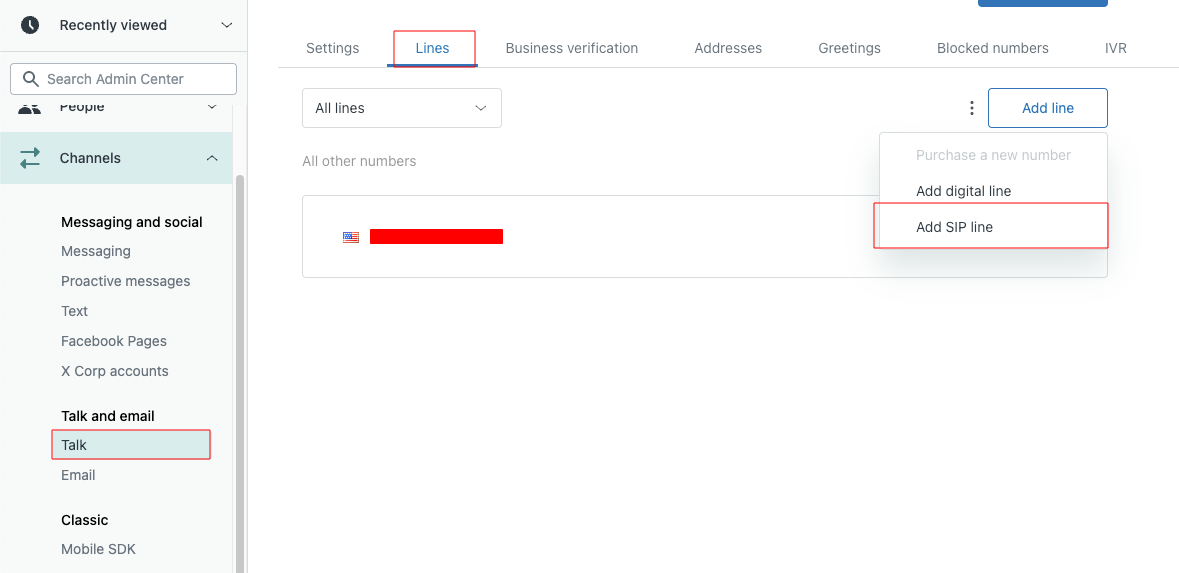 Follow the [Zendesk documentation for adding a SIP-IN line](https://support.zendesk.com/hc/en-us/articles/8397091234586-Adding-a-SIP-IN-line) to complete this step.
Configure your SIP-IN line to allow the ASAPP SIP IP address that you obtained from your ASAPP team.
This allows calls to be redirected back to your Zendesk Talk environment from GenerativeAgent.
Follow the [Zendesk documentation for adding a SIP-IN line](https://support.zendesk.com/hc/en-us/articles/8397091234586-Adding-a-SIP-IN-line) to complete this step.
Configure your SIP-IN line to allow the ASAPP SIP IP address that you obtained from your ASAPP team.
This allows calls to be redirected back to your Zendesk Talk environment from GenerativeAgent.
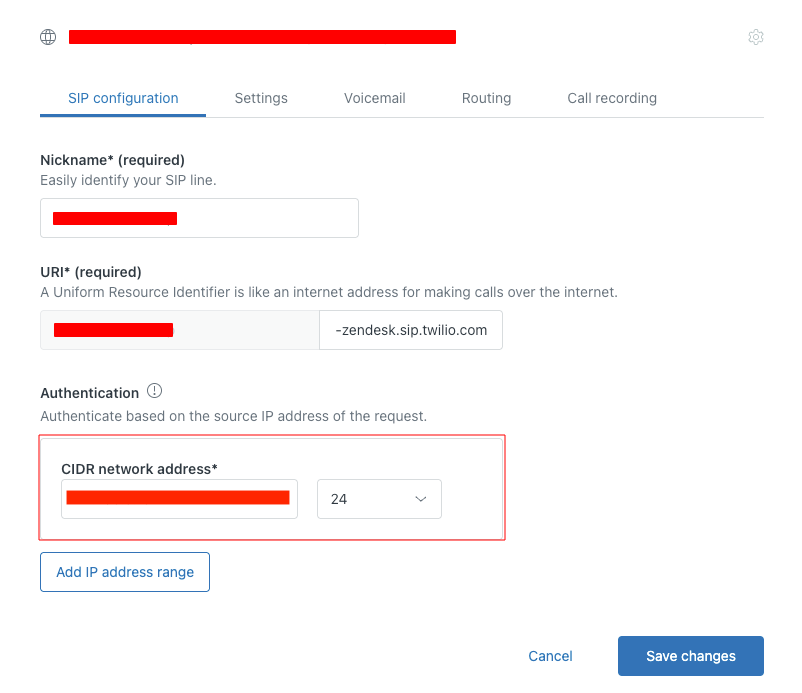 After creating the SIP-IN line, you'll receive a SIP destination address. Provide this SIP destination to your ASAPP team along with the other required information (API token, subdomain, and user email) for the integration configuration.
## Step 2: Configure Phone Number Routing
Follow the steps for your chosen routing approach:
Add GenerativeAgent as an option in your existing IVR menu:
1. Go to **Routing** → **IVR Menu** in your Zendesk admin panel
2. Select your existing IVR menu or create a new one
3. Add the GenerativeAgent phone number(s) as menu options
4. Configure the menu prompts to include GenerativeAgent as a choice
5. Follow the [Zendesk IVR documentation](https://support.zendesk.com/hc/en-us/articles/4408885628698-Routing-incoming-calls-with-IVR) for detailed setup
Make GenerativeAgent the primary point of contact:
1. Go to **Talk** → **Lines** → Select your primary entry number
2. Configure the number for call overflow using the [Zendesk overflow call routing guide](https://support.zendesk.com/hc/en-us/articles/4408832017690-Managing-overflow-calls-and-after-hours-call-routing)
3. Set the overflow destination to your GenerativeAgent phone number
For each GenerativeAgent phone number, disable voicemail:
1. Go to **Talk** → **Lines** → Select each GenerativeAgent overflow number
2. Disable voicemail to ensure calls are properly handled by the integration
Configure each GenerativeAgent phone number as an overflow number:
1. Go to **Talk** → **Lines** → Select each GenerativeAgent overflow number
2. Set up the overflow number configuration (provided by ASAPP)
For each GenerativeAgent phone number, decide whether to record overflowed calls:
1. Go to **Talk** → **Lines** → Select each GenerativeAgent overflow number
2. Configure call recording based on your organization's requirements
Create an empty group to ensure calls overflow immediately to GenerativeAgent:
1. Go to **Admin Center** → **People** → **Groups** in your Zendesk admin panel
2. Click **Add group**
3. Name the group (e.g., "GenAgent" or "Overflow")
4. **Do not add any agents to this group** - it should remain empty
5. Save the group
1. Go to **Talk** → **Lines** → Select the GenerativeAgent overflow number
2. In the **Routing** section, assign the overflow number to the empty group you created
3. This removes waiting time since no agents are in the queue and overflow triggers automatically
Set up automatic ticket management for overflow calls:
1. Go to **Objects and rules** → **Business rules** → **Triggers** in your Zendesk admin panel
2. Click on **Ticket** → **Create trigger**
3. Configure the trigger:
* **Trigger name**: Choose a descriptive name (e.g., "Close Overflow Tickets")
* **Description**: Optional description for the trigger
* **Category**: Choose an appropriate category
4. Set the conditions:
* **Ticket contains the tag**: `call_overflow`
* **Status is not**: `solved`
5. Set the action:
* **Ticket status**: `solved`
This automatically closes tickets created from overflow calls to keep your ticket queue clean and prevent confusion with regular support tickets.
## Step 3: Create System Transfer
The system transfer function is how GenerativeAgent passes calls back to Zendesk and creates tickets in your Zendesk system during that process. This function is configured in the AI Console and defines the schema for ticket creation.
You need to create a system transfer function in the AI Console that defines how tickets are created in Zendesk.
1. Go to **AI Console** → **GenerativeAgent** → **Functions**
2. Select **Create function** → **System Transfer**
3. Create a function with the following schema:
```json theme={null}
{
"type": "object",
"required": [
"subject",
"priority",
"type",
"status",
"comment"
],
"properties": {
"subject": {
"type": "string",
"description": "Request subject based on the conversation"
},
"priority": {
"type": "string",
"enum": ["urgent", "high", "normal", "low"],
"description": "Ticket priority based on the conversation"
},
"type": {
"type": "string",
"enum": ["problem", "incident", "question", "task"],
"description": "The type of the request based on the conversation"
},
"status": {
"type": "string",
"enum": ["new", "open", "pending", "hold", "solved", "closed"],
"description": "The state of the request"
},
"comment": {
"type": "string",
"description": "Detail summary of the conversation containing all the relevant information provided by the customer"
}
}
}
```
This schema defines the ticket fields that will be created in Zendesk when GenerativeAgent completes a call.
Tickets created through live agent escalation will not include the detailed conversation context that tickets created through successful GenerativeAgent completion will have.
Add this system transfer function to all relevant GenerativeAgent tasks, including instructions on how to complete these fields based on the conversation context.
The Zendesk ticket will be successfully created if GenerativeAgent calls this system transfer function. If live agent escalation happens, a ticket is also created, but without the detailed conversation context.
## Step 4: Test Your Integration
Before going live, thoroughly test your integration to ensure it works as expected:
Test scenarios such as:
* **Normal conversation flow** - Verify GenerativeAgent can handle typical customer inquiries
* **Live agent transfer** - Test that calls can be properly transferred to human agents when needed
* **Overflow handling** - Ensure calls are properly routed through the overflow system
* **Ticket creation** - Verify that tickets are created with correct information and formatting
* **Different call types** - Test various types of customer inquiries and requests
## Next Steps
Once your Zendesk Talk integration is set up and tested, consider these next steps:
Learn how to configure GenerativeAgent's behaviors, tasks, and communication style
Configure your APIs to allow GenerativeAgent to access necessary data and perform actions
Connect and optimize your knowledge base to improve GenerativeAgent's responses
Follow the deployment checklist to launch GenerativeAgent in your production environment
After creating the SIP-IN line, you'll receive a SIP destination address. Provide this SIP destination to your ASAPP team along with the other required information (API token, subdomain, and user email) for the integration configuration.
## Step 2: Configure Phone Number Routing
Follow the steps for your chosen routing approach:
Add GenerativeAgent as an option in your existing IVR menu:
1. Go to **Routing** → **IVR Menu** in your Zendesk admin panel
2. Select your existing IVR menu or create a new one
3. Add the GenerativeAgent phone number(s) as menu options
4. Configure the menu prompts to include GenerativeAgent as a choice
5. Follow the [Zendesk IVR documentation](https://support.zendesk.com/hc/en-us/articles/4408885628698-Routing-incoming-calls-with-IVR) for detailed setup
Make GenerativeAgent the primary point of contact:
1. Go to **Talk** → **Lines** → Select your primary entry number
2. Configure the number for call overflow using the [Zendesk overflow call routing guide](https://support.zendesk.com/hc/en-us/articles/4408832017690-Managing-overflow-calls-and-after-hours-call-routing)
3. Set the overflow destination to your GenerativeAgent phone number
For each GenerativeAgent phone number, disable voicemail:
1. Go to **Talk** → **Lines** → Select each GenerativeAgent overflow number
2. Disable voicemail to ensure calls are properly handled by the integration
Configure each GenerativeAgent phone number as an overflow number:
1. Go to **Talk** → **Lines** → Select each GenerativeAgent overflow number
2. Set up the overflow number configuration (provided by ASAPP)
For each GenerativeAgent phone number, decide whether to record overflowed calls:
1. Go to **Talk** → **Lines** → Select each GenerativeAgent overflow number
2. Configure call recording based on your organization's requirements
Create an empty group to ensure calls overflow immediately to GenerativeAgent:
1. Go to **Admin Center** → **People** → **Groups** in your Zendesk admin panel
2. Click **Add group**
3. Name the group (e.g., "GenAgent" or "Overflow")
4. **Do not add any agents to this group** - it should remain empty
5. Save the group
1. Go to **Talk** → **Lines** → Select the GenerativeAgent overflow number
2. In the **Routing** section, assign the overflow number to the empty group you created
3. This removes waiting time since no agents are in the queue and overflow triggers automatically
Set up automatic ticket management for overflow calls:
1. Go to **Objects and rules** → **Business rules** → **Triggers** in your Zendesk admin panel
2. Click on **Ticket** → **Create trigger**
3. Configure the trigger:
* **Trigger name**: Choose a descriptive name (e.g., "Close Overflow Tickets")
* **Description**: Optional description for the trigger
* **Category**: Choose an appropriate category
4. Set the conditions:
* **Ticket contains the tag**: `call_overflow`
* **Status is not**: `solved`
5. Set the action:
* **Ticket status**: `solved`
This automatically closes tickets created from overflow calls to keep your ticket queue clean and prevent confusion with regular support tickets.
## Step 3: Create System Transfer
The system transfer function is how GenerativeAgent passes calls back to Zendesk and creates tickets in your Zendesk system during that process. This function is configured in the AI Console and defines the schema for ticket creation.
You need to create a system transfer function in the AI Console that defines how tickets are created in Zendesk.
1. Go to **AI Console** → **GenerativeAgent** → **Functions**
2. Select **Create function** → **System Transfer**
3. Create a function with the following schema:
```json theme={null}
{
"type": "object",
"required": [
"subject",
"priority",
"type",
"status",
"comment"
],
"properties": {
"subject": {
"type": "string",
"description": "Request subject based on the conversation"
},
"priority": {
"type": "string",
"enum": ["urgent", "high", "normal", "low"],
"description": "Ticket priority based on the conversation"
},
"type": {
"type": "string",
"enum": ["problem", "incident", "question", "task"],
"description": "The type of the request based on the conversation"
},
"status": {
"type": "string",
"enum": ["new", "open", "pending", "hold", "solved", "closed"],
"description": "The state of the request"
},
"comment": {
"type": "string",
"description": "Detail summary of the conversation containing all the relevant information provided by the customer"
}
}
}
```
This schema defines the ticket fields that will be created in Zendesk when GenerativeAgent completes a call.
Tickets created through live agent escalation will not include the detailed conversation context that tickets created through successful GenerativeAgent completion will have.
Add this system transfer function to all relevant GenerativeAgent tasks, including instructions on how to complete these fields based on the conversation context.
The Zendesk ticket will be successfully created if GenerativeAgent calls this system transfer function. If live agent escalation happens, a ticket is also created, but without the detailed conversation context.
## Step 4: Test Your Integration
Before going live, thoroughly test your integration to ensure it works as expected:
Test scenarios such as:
* **Normal conversation flow** - Verify GenerativeAgent can handle typical customer inquiries
* **Live agent transfer** - Test that calls can be properly transferred to human agents when needed
* **Overflow handling** - Ensure calls are properly routed through the overflow system
* **Ticket creation** - Verify that tickets are created with correct information and formatting
* **Different call types** - Test various types of customer inquiries and requests
## Next Steps
Once your Zendesk Talk integration is set up and tested, consider these next steps:
Learn how to configure GenerativeAgent's behaviors, tasks, and communication style
Configure your APIs to allow GenerativeAgent to access necessary data and perform actions
Connect and optimize your knowledge base to improve GenerativeAgent's responses
Follow the deployment checklist to launch GenerativeAgent in your production environment