 ASAPP AutoCompose helps agents compose the best response to customers, using machine learning techniques to suggest complete responses, partial sentences, key phrases and spelling fixes in real-time based on both the context of the conversation and past agent behavior.
## Features
AutoCompose provides the following features:
| Feature | Description |
| :----------------------- | :------------------------------------------------------------------------------------------------------------------------ |
| **Autosuggest** | Provides up to three suggestions that appear in a suggestion drawer above the typing field before the agent begins typing |
| **Autocomplete** | Provides up to three suggestions that appear in a suggestion drawer above the typing field after the agent begins typing |
| **Phrase autocomplete** | Provides in-line phrase suggestions that appear while an agent is typing |
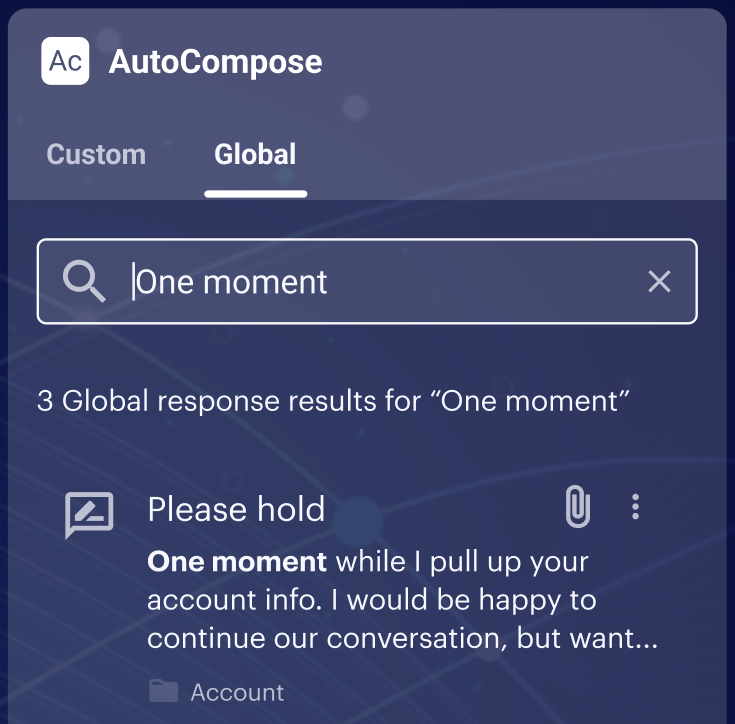
| **Response quicksearch** | Allows in-line search of global and custom responses |
| **Fluency correction** | Applies automatic grammar corrections that an agent can undo |
| **Profanity blocking** | Prevents an agent from sending a message containing profanity to the customer |
| **Custom response list** | Enables management of an individual agent’s custom responses in a simple library interface |
| **Global response list** | Enables management of global responses in a simple tooling interface |
## How it works
AutoCompose takes in a live feed of your agent's conversations, and then using our various AI models, returns a list of changes or suggested responses based on the state of conversation and currently typed message.
1. Provide Conversation data via Conversation API.
2. In your Agent Application, call the AutoCompose APIs to retrieve the list of changes or suggested responses.
3. Show the potential changes or responses to your Agent for them to incorporate.
This streamlines your agent's effeciancy while still allowing agents to review changes, ensuring only the highest quality of responses are sent to your customers.
AutoCompose has the following technical components:
| Component | Description |
| :--------------------- | :----------------------------------------------------------------------------------------------------------------------------------- |
| **Autosuggest model** | LLM Retrained by ASAPP with agent usage data |
| **Data Storage** | A storage for historical conversations, global response lists and agent historical feature usage that are used for weekly retraining |
| **Conversation API**\* | An API for creating and updating conversations and conversation data |
ASAPP AutoCompose helps agents compose the best response to customers, using machine learning techniques to suggest complete responses, partial sentences, key phrases and spelling fixes in real-time based on both the context of the conversation and past agent behavior.
## Features
AutoCompose provides the following features:
| Feature | Description |
| :----------------------- | :------------------------------------------------------------------------------------------------------------------------ |
| **Autosuggest** | Provides up to three suggestions that appear in a suggestion drawer above the typing field before the agent begins typing |
| **Autocomplete** | Provides up to three suggestions that appear in a suggestion drawer above the typing field after the agent begins typing |
| **Phrase autocomplete** | Provides in-line phrase suggestions that appear while an agent is typing |
| **Response quicksearch** | Allows in-line search of global and custom responses |
| **Fluency correction** | Applies automatic grammar corrections that an agent can undo |
| **Profanity blocking** | Prevents an agent from sending a message containing profanity to the customer |
| **Custom response list** | Enables management of an individual agent’s custom responses in a simple library interface |
| **Global response list** | Enables management of global responses in a simple tooling interface |
## How it works
AutoCompose takes in a live feed of your agent's conversations, and then using our various AI models, returns a list of changes or suggested responses based on the state of conversation and currently typed message.
1. Provide Conversation data via Conversation API.
2. In your Agent Application, call the AutoCompose APIs to retrieve the list of changes or suggested responses.
3. Show the potential changes or responses to your Agent for them to incorporate.
This streamlines your agent's effeciancy while still allowing agents to review changes, ensuring only the highest quality of responses are sent to your customers.
AutoCompose has the following technical components:
| Component | Description |
| :--------------------- | :----------------------------------------------------------------------------------------------------------------------------------- |
| **Autosuggest model** | LLM Retrained by ASAPP with agent usage data |
| **Data Storage** | A storage for historical conversations, global response lists and agent historical feature usage that are used for weekly retraining |
| **Conversation API**\* | An API for creating and updating conversations and conversation data |
 ## Get Started
Integrate AutoCompose into your applications and upscale your agent response rates.
### Integrate AutoCompose
AutoCompose is available both as an integration into leading messaging applications and as an API for custom-built messaging interfaces.
For technical instructions on how to implement the service for each approach, refer to the deployment guides below:
## Get Started
Integrate AutoCompose into your applications and upscale your agent response rates.
### Integrate AutoCompose
AutoCompose is available both as an integration into leading messaging applications and as an API for custom-built messaging interfaces.
For technical instructions on how to implement the service for each approach, refer to the deployment guides below:
 ASAPP AutoSummary is a recommended pairing with AutoCompose, generating conversation summaries of key events for 100% of customer interactions.
Note-taking and disposition questions take call time and agent focus, both of which can have a negative impact on agent performance. Removing summarization tasks from agents through automation can keep agents focused on messaging with customers and yield higher summary data coverage than manual agent notes.
ASAPP AutoSummary is a recommended pairing with AutoCompose, generating conversation summaries of key events for 100% of customer interactions.
Note-taking and disposition questions take call time and agent focus, both of which can have a negative impact on agent performance. Removing summarization tasks from agents through automation can keep agents focused on messaging with customers and yield higher summary data coverage than manual agent notes.
 [Click here to download a global responses template file](https://docs-sdk.asapp.com/product_features/global-responses-template.csv).
 Metadata Inserts
A response that contains a metadata insert is a templated response. When a templated response is suggested, it will be shown to the agent with the metadata insert filled in.
Metadata Inserts
A response that contains a metadata insert is a templated response. When a templated response is suggested, it will be shown to the agent with the metadata insert filled in.
 *Adding a templated response in AI-Console*
 *Templated response being suggested to the agent in AutoCompose*
### Setup
ASAPP provides an AI Services [Developer Portal](/getting-started/developers). Within the portal, developers can do the following:
* Access relevant API documentation (e.g. OpenAPI reference schemas)
* Access API keys for authorization
* Manage user accounts and apps
In order to use ASAPP's APIs, all apps must be registered through the portal. Once registered, each app will be provided unique API keys for ongoing use.
*Templated response being suggested to the agent in AutoCompose*
### Setup
ASAPP provides an AI Services [Developer Portal](/getting-started/developers). Within the portal, developers can do the following:
* Access relevant API documentation (e.g. OpenAPI reference schemas)
* Access API keys for authorization
* Manage user accounts and apps
In order to use ASAPP's APIs, all apps must be registered through the portal. Once registered, each app will be provided unique API keys for ongoing use.
 **In this example:**
Conversation Event |
API Request |
|---|---|
Conversation starts |
1. Create a new ASAPP conversation record 2. Request first set of response suggestions |
Agent keystroke |
1. Request updated response suggestions |
Agent uses the spacebar |
1. Request updated response suggestions 2. Check the spelling of the most recent word |
Agent searches for a response |
1. Get the response list that pertains to their search |
Agent saves a custom response |
1. Add the new response to their personal library |
Agent submits their message |
1. Check if any profanity is present in the message |
Agent message is sent |
1. Add the message to ASAPP’s conversation record 2. Create analytics event for the message that details how the agent used AutoCompose 3. Request updated response suggestions |
Customer message is sent |
1. Add the message to ASAPP’s conversation record 2. Request updated response suggestions |
 By promptly sending conversation and message data to this API, you ensure that ASAPP's conversation records match your own and that ASAPP services use the most current information available.
[`POST /conversation/v1/conversations`](/apis/conversations/create-or-update-a-conversation)
Use this endpoint to create a new conversation record or update an existing conversation record.
**When to Call**
This service should be called when a conversation starts or when something about the conversation changes (e.g. a conversation is reassigned to a different agent).
**Request Details**
Requests must include a conversation identifier from your system of record (external to ASAPP) and a timestamp (formatted in RFC3339 micro second date-time expressed in UTC) for when the conversation started.
Requests to create a conversation record must also include identifying information about the human participants. Two types of requests are supported to create a new conversation:
1. **Conversations started with an agent:** Provide both the `agent` and `customer` objects in the request when the conversation begins.
2. **Conversations started with a virtual agent:** Provide only the `customer` object in the initial request when the conversation with the virtual agent begins; you must send a subsequent request that includes both the `agent` and `customer` objects once the agent joins the conversation.
Requests may also include key-value pair metadata for the conversation that can be used either (1) to insert values into templated responses for agents or (2) as filter criteria to determine whether a conversation is eligible for specific response suggestions.
By promptly sending conversation and message data to this API, you ensure that ASAPP's conversation records match your own and that ASAPP services use the most current information available.
[`POST /conversation/v1/conversations`](/apis/conversations/create-or-update-a-conversation)
Use this endpoint to create a new conversation record or update an existing conversation record.
**When to Call**
This service should be called when a conversation starts or when something about the conversation changes (e.g. a conversation is reassigned to a different agent).
**Request Details**
Requests must include a conversation identifier from your system of record (external to ASAPP) and a timestamp (formatted in RFC3339 micro second date-time expressed in UTC) for when the conversation started.
Requests to create a conversation record must also include identifying information about the human participants. Two types of requests are supported to create a new conversation:
1. **Conversations started with an agent:** Provide both the `agent` and `customer` objects in the request when the conversation begins.
2. **Conversations started with a virtual agent:** Provide only the `customer` object in the initial request when the conversation with the virtual agent begins; you must send a subsequent request that includes both the `agent` and `customer` objects once the agent joins the conversation.
Requests may also include key-value pair metadata for the conversation that can be used either (1) to insert values into templated responses for agents or (2) as filter criteria to determine whether a conversation is eligible for specific response suggestions.
Scenario |
Expected Requests |
|
|---|---|---|
A |
Start new chat for agent with pre-existing customer messages |
POST /conversation POST /messages POST /suggestions |
B |
Populate suggestions, select a suggestion and send |
POST /suggestions POST /spellcheck POST /profanity POST /messages POST /message-sent |
C |
Populate suggestions, don’t choose one and type “Hello” and send message |
POST /suggestions POST /suggestions per keystroke POST /spellcheck POST /profanity POST /messages POST /message-sent |
D |
Choose a suggestion and edit suggestion and select a phrase completion |
POST /suggestions POST /suggestions per keystroke POST /spellcheck POST /profanity POST /messages POST /message-sent |
E |
Choose a suggestion and add to it, purposely misspelling a word and undoing the spelling correction |
POST /suggestions POST /suggestions per keystroke POST /spellcheck POST /profanity POST /messages POST /message-sent |
F |
Choose a suggestion and edit with profanity |
POST /suggestions POST /suggestions per keystroke POST /spellcheck POST /profanity POST /messages POST /message-sent |
 **SSO Support**
The AutoCompose widget supports SP-initiated SSO with either OIDC (preferred method) or SAML.
**Domain Whitelisting**
In order for AutoCompose to interact with ASAPP's backend and third-party support services, the following domains need to be accessible from end-user environments:
| Domain | Description |
| :----------------------------------------- | :----------------------------------------------------------------- |
| \*.asapp.com | ASAPP service URLs |
| \*.ingest.sentry.io | Application performance monitoring tool |
| fonts.googleapis.com | Fonts |
| google-analytics.com | Page analytics |
| asapp-chat-sdk-production.s3.amazonaws.com | Static ASAPP AWS URL for desktop network connectivity health check |
**Policy Check**
Before proceeding, check the current order of precedence of policies deployed in your organization. Platform-deployed policies (like Group Policy Objects) and cloud-deployed policies (like Google Admin Console) are enforced in a priority order that can lead to lower-priority policies not being enforced.
* If installing the ASAPP browser extension via Group Policy Objects, set platform policies to have precedence over cloud policies.
* If installing the ASAPP browser extension via Google Admin Console, set cloud policies to have precedence over platform policies.
For more on how to check and modify order of precedence, see [policy management guides from Google Enterprise](https://support.google.com/chrome/a/answer/9037717).
## Integrate with LivePerson
### 1. Install the ASAPP Browser Extension
Customers have two options for installing the AutoCompose browser extension:
A. Group Policy Objects (GPO)
B. Google Admin Console
#### A. Install Group Policy Objects (GPO)
Customers can automatically install and manage the ASAPP AutoCompose browser extension via Group Policy Objects (GPO). ASAPP provides an installation server from which the extension can be downloaded and automatically updated.
The Customer's system administrator must configure GPO rules to allow the installation server URL and the software component ID. Through GPO, the administrator can choose to force the installation (i.e., install without requiring human intervention).
The following policies will configure Chrome and Edge to download the AutoCompose browser extension in all on-premise managed devices via GPO:
| **Policy Name** | **Value to Set** |
| :---------------------------------------------------------------------------------------------------------------------- | :------------------------------------------------------------------------------------------------------------------------------------------------------------------------------ |
| [ExtensionInstallSources](https://cloud.google.com/docs/chrome-enterprise/policies/?policy=ExtensionInstallSources) | https\://\*.asapp.com/\* |
| [ExtensionInstallAllowlist](https://cloud.google.com/docs/chrome-enterprise/policies/?policy=ExtensionInstallAllowlist) | bfcmlmledhddbnialbbdopfefoelbbei |
| [ExtensionInstallForcelist](https://cloud.google.com/docs/chrome-enterprise/policies/?policy=ExtensionInstallForcelist) | bfcmlmledhddbnialbbdopfefoelbbei;[https://app.asapp.com/autocompose-liveperson-chrome-extension/updates](https://app.asapp.com/autocompose-liveperson-chrome-extension/updates) |
Each Policy Name above links to documentation that describes how to set the values with the proper format depending on the platform.
**SSO Support**
The AutoCompose widget supports SP-initiated SSO with either OIDC (preferred method) or SAML.
**Domain Whitelisting**
In order for AutoCompose to interact with ASAPP's backend and third-party support services, the following domains need to be accessible from end-user environments:
| Domain | Description |
| :----------------------------------------- | :----------------------------------------------------------------- |
| \*.asapp.com | ASAPP service URLs |
| \*.ingest.sentry.io | Application performance monitoring tool |
| fonts.googleapis.com | Fonts |
| google-analytics.com | Page analytics |
| asapp-chat-sdk-production.s3.amazonaws.com | Static ASAPP AWS URL for desktop network connectivity health check |
**Policy Check**
Before proceeding, check the current order of precedence of policies deployed in your organization. Platform-deployed policies (like Group Policy Objects) and cloud-deployed policies (like Google Admin Console) are enforced in a priority order that can lead to lower-priority policies not being enforced.
* If installing the ASAPP browser extension via Group Policy Objects, set platform policies to have precedence over cloud policies.
* If installing the ASAPP browser extension via Google Admin Console, set cloud policies to have precedence over platform policies.
For more on how to check and modify order of precedence, see [policy management guides from Google Enterprise](https://support.google.com/chrome/a/answer/9037717).
## Integrate with LivePerson
### 1. Install the ASAPP Browser Extension
Customers have two options for installing the AutoCompose browser extension:
A. Group Policy Objects (GPO)
B. Google Admin Console
#### A. Install Group Policy Objects (GPO)
Customers can automatically install and manage the ASAPP AutoCompose browser extension via Group Policy Objects (GPO). ASAPP provides an installation server from which the extension can be downloaded and automatically updated.
The Customer's system administrator must configure GPO rules to allow the installation server URL and the software component ID. Through GPO, the administrator can choose to force the installation (i.e., install without requiring human intervention).
The following policies will configure Chrome and Edge to download the AutoCompose browser extension in all on-premise managed devices via GPO:
| **Policy Name** | **Value to Set** |
| :---------------------------------------------------------------------------------------------------------------------- | :------------------------------------------------------------------------------------------------------------------------------------------------------------------------------ |
| [ExtensionInstallSources](https://cloud.google.com/docs/chrome-enterprise/policies/?policy=ExtensionInstallSources) | https\://\*.asapp.com/\* |
| [ExtensionInstallAllowlist](https://cloud.google.com/docs/chrome-enterprise/policies/?policy=ExtensionInstallAllowlist) | bfcmlmledhddbnialbbdopfefoelbbei |
| [ExtensionInstallForcelist](https://cloud.google.com/docs/chrome-enterprise/policies/?policy=ExtensionInstallForcelist) | bfcmlmledhddbnialbbdopfefoelbbei;[https://app.asapp.com/autocompose-liveperson-chrome-extension/updates](https://app.asapp.com/autocompose-liveperson-chrome-extension/updates) |
Each Policy Name above links to documentation that describes how to set the values with the proper format depending on the platform.
 * Click +, then **Add new widget**.
 2. **Enter Widget Attributes**
* Fill in the **Widget name** as 'ASAPP'
* Assign the conversation skill(s) to which ASAPP is being deployed in the **Assigned skills** dropdown menu.
2. **Enter Widget Attributes**
* Fill in the **Widget name** as 'ASAPP'
* Assign the conversation skill(s) to which ASAPP is being deployed in the **Assigned skills** dropdown menu.
 * Click the **Save** button.

 * Click the **Done** button
4. **Enable Pop-in Composer**
* In the Agent Workspace, click the nut icon (similar to a gear shape) next to the **+** icon at the bottom of the AutoCompose panel widget.
* Enable the **Pop-in Composer** option.
* Click the **Done** button
4. **Enable Pop-in Composer**
* In the Agent Workspace, click the nut icon (similar to a gear shape) next to the **+** icon at the bottom of the AutoCompose panel widget.
* Enable the **Pop-in Composer** option.
 Press the escape key and reload the page to see the changes; the ASAPP widget should now be available across your LivePerson organization
Upon login to the Agent Workspace, the ASAPP widget for AutoCompose will appear in place of the standard LivePerson composer, underneath the conversation transcript. By default, the response panel for AutoCompose will appear to the right of the conversational panel.
Press the escape key and reload the page to see the changes; the ASAPP widget should now be available across your LivePerson organization
Upon login to the Agent Workspace, the ASAPP widget for AutoCompose will appear in place of the standard LivePerson composer, underneath the conversation transcript. By default, the response panel for AutoCompose will appear to the right of the conversational panel.
 ### 3. Set Up Single Sign-On
ASAPP handles authentication through the customer's SSO service to confirm the identity of the agent.
ASAPP acts as the Service Provider (SP) with the customer acting as the Identity Provider (IDP). The customer's authentication system performs user authentication using their existing user credentials.
ASAPP supports SP-initiated SSO with either OIDC (preferred method) and SAML. Once the user initiates sign-in, ASAPP detects that the user is authenticated and requests an assertion from the customer's SSO service.
**Configuration Steps for OIDC (preferred method)**
1. Create a new IDP OIDC application with type `Web`
2. Set the following attributes for the app:
### 3. Set Up Single Sign-On
ASAPP handles authentication through the customer's SSO service to confirm the identity of the agent.
ASAPP acts as the Service Provider (SP) with the customer acting as the Identity Provider (IDP). The customer's authentication system performs user authentication using their existing user credentials.
ASAPP supports SP-initiated SSO with either OIDC (preferred method) and SAML. Once the user initiates sign-in, ASAPP detects that the user is authenticated and requests an assertion from the customer's SSO service.
**Configuration Steps for OIDC (preferred method)**
1. Create a new IDP OIDC application with type `Web`
2. Set the following attributes for the app:
Attribute |
Value\* |
|---|---|
Grant Type |
authorization code |
Sign-in Redirect URIs |
Production: [https://api.asapp.com/auth/v1/callback/\\\{company\_marker\\}](https://api.asapp.com/auth/v1/callback/\\\{company_marker\\}) Sandbox: [https://api.sandbox.asapp.com/auth/v1/callback/\\\{company\_marker\\}-sandbox](https://api.sandbox.asapp.com/auth/v1/callback/\\\{company_marker\\}-sandbox) |
Sandbox: [https://sso.asapp.com/auth/realms/standalone-\{company\_marker}-auth/broker/saml-sandbox/endpoint/clients/asapp-saml-sandbox](https://sso.asapp.com/auth/realms/standalone-\{company_marker}-auth/broker/saml-sandbox/endpoint/clients/asapp-saml-sandbox) | | Recipient URL | Production: [https://sso.asapp.com/auth/realms/standalone-\{company\_marker}-auth/broker/saml/endpoint/clients/asapp-saml](https://sso.asapp.com/auth/realms/standalone-\{company_marker}-auth/broker/saml/endpoint/clients/asapp-saml)
Sandbox: [https://sso.asapp.com/auth/realms/standalone-\{company\_marker}-auth/broker/saml-sandbox/endpoint/clients/asapp-saml-sandbox](https://sso.asapp.com/auth/realms/standalone-\{company_marker}-auth/broker/saml-sandbox/endpoint/clients/asapp-saml-sandbox) | | Destination URL | Production: [https://sso.asapp.com/auth/realms/standalone-\{company\_marker}-auth/broker/saml/endpoint/clients/asapp-saml](https://sso.asapp.com/auth/realms/standalone-\{company_marker}-auth/broker/saml/endpoint/clients/asapp-saml)
Sandbox: [https://sso.asapp.com/auth/realms/standalone-\{company\_marker}-auth/broker/saml-sandbox/endpoint/clients/asapp-saml-sandbox](https://sso.asapp.com/auth/realms/standalone-\{company_marker}-auth/broker/saml-sandbox/endpoint/clients/asapp-saml-sandbox) | | Audience Restriction | Production: [https://sso.asapp.com/auth/realms/standalone-\{company\_marker}-auth/broker/saml/endpoint/clients/asapp-saml](https://sso.asapp.com/auth/realms/standalone-\{company_marker}-auth/broker/saml/endpoint/clients/asapp-saml)
Sandbox: [https://sso.asapp.com/auth/realms/standalone-\{company\_marker}-auth/broker/saml-sandbox/endpoint/clients/asapp-saml-sandbox](https://sso.asapp.com/auth/realms/standalone-\{company_marker}-auth/broker/saml-sandbox/endpoint/clients/asapp-saml-sandbox) | | Response | Signed | | Assertion | Signed | | Signature Algorithm | RSA\_SHA256 | | Digest Algorithm | SHA256 | | Attribute Statements | externalUserId: {unique_id_to_identify_the_user} | **\*NOTE:** ASAPP to provide `company_marker` value 3. Save the application and send the Public Certificate to validate Signature for this app SAML payload to ASAPP team 4. Send ASAPP team the URL of the SAML application ### 4. Configure Auto-Pilot Greetings If you so choose, you can work with your ASAPP contact to enable Auto-Pilot Greetings in your AutoCompose installation. Auto-Pilot Greetings automatically generates a greeting at the beginning of a conversation, and that greeting can be automatically sent to a customer on your agent's behalf after a configurable timer elapses. Your ASAPP contact can: * Turn Auto-Pilot Greetings on or off for your organization * Set a countdown timer value after which the Auto-Pilot Greeting is sent if an agent does not cancel Auto-Pilot by typing or clicking a "cancel" button * Set the global default messages that will be provided for Auto-Pilot Greetings across your organization (note that agents can optionally customize their Auto-Pilot Greetings messages within the Auto-Pilot tab of the AutoCompose panel) ## Usage ### Customization #### LivePerson For LivePerson, the standard process is to download ASAPP AutoCompose as a standalone widget. In the case that you already have your own LivePerson custom widget, ASAPP also provides the option for you to embed our custom widget inside your own custom widget, thus economizing on-screen real estate. **Conversation Attributes** Once the ASAPP AutoCompose widget is embedded, LivePerson shares the following conversation attributes with ASAPP: customer name, agent name and skill. ASAPP can use name attributes to populate values into templated responses (e.g. "Hi \[customer name], how can I help you today?") and to selectively filter response lists based on the skill of the conversation. **Conversation Redaction** When message text in the conversation transcript is sent to ASAPP, ASAPP applies redaction to the message text to prevent transmission of sensitive information. Reach out to your ASAPP account contact for information on available redaction capabilities to configure for your implementation. ### Data Security ASAPP's security protocols protect data at each point of transmission from first user authentication, to secure communications, to our auditing and logging system, all the way to securing the environment when data is at rest in the data logging system. Access to data by ASAPP teams is tightly constrained and monitored. Strict security protocols protect both ASAPP and our customers. The following security controls are particularly relevant to AutoCompose: 1. Client sessions are controlled using a time-limited authorization token. Privileges for each active session are controlled server-side to mitigate potential elevation-of-privilege and information disclosure risks. 2. To avoid unauthorized disclosure of information, unique, non-guessable IDs are used to identify conversations. These conversations can only be accessed using a valid client session. 3. Requests to API endpoints that can potentially receive sensitive data are put through a round of redaction to strip the request of sensitive data (like SSNs and phone numbers). ### Additional Considerations #### Historical Conversation Data for Generating a Response List ASAPP uses past agent conversations to generate a customized response list tailored to a given use case. In order to create an accurate and relevant list, ASAPP requires a minimum of 200,000 historical transcripts to be supplied ahead of implementing AutoCompose. For more information on how to transmit the conversation data, reach out to your ASAPP account contact. #### LivePerson ASAPP uses a browser extension to replace the LivePerson composer with the ASAPP composer. In the unlikely event that the DOM of the LivePerson composer or its surrounding area changes, the LivePerson composer may no longer be replaced by the ASAPP composer. In this case, the CSR has the option to toggle the ASAPP composer so that it 'retreats' into the ASAPP Custom Widget. In such a case, the ASAPP composer will continue to be fully functional, even if it is no longer ideally placed just below the LivePerson chat history. In order to quickly restore the placement of the ASAPP composer directly beneath the LivePerson chat log, ASAPP deploys its extension so that the extension's configuration is pulled down from our servers in real-time. If the LivePerson DOM does change, we can deploy a fix rapidly. # Deploying AutoCompose for Salesforce Source: https://docs.asapp.com/autocompose/deploying-autocompose-for-salesforce Use AutoCompose on Salesforce Lightning Experience. ## Overview This page describes how to Integrate AutoCompose in your Salesforce application. ### Integration Steps There are three parts to the AutoCompose setup process. Use the links below to skip to information about a specific part of the process: 1. [Configure the Salesforce organization](#1-configure-the-salesforce-organization-centrally) centrally using an administrator account 2. [Setup agent/user authentication](#2-set-up-single-sign-on) through the existing single sign-on (SSO) service 3. [Work with your ASAPP contact to configure Auto-Pilot Greetings](#3-configure-auto-pilot-greetings), if desired

 **SSO Support**
The AutoCompose widget supports SP-initiated SSO with either OIDC (preferred method) or SAML.
**Domain Whitelisting**
In order for AutoCompose to interact with ASAPP's backend and third-party support services, the following domains need to be accessible from end-user environments:
| Domain | Description |
| :----------------------------------------- | :----------------------------------------------------------------- |
| \*.asapp.com | ASAPP service URLs |
| \*.ingest.sentry.io | Application performance monitoring tool |
| fonts.googleapis.com | Fonts |
| google-analytics.com | Page analytics |
| asapp-chat-sdk-production.s3.amazonaws.com | Static ASAPP AWS URL for desktop network connectivity health check |
## Integrate with Salesforce
### 1. Configure the Salesforce Organization Centrally
**Before You Begin**
You will need the following information to configure ASAPP for Salesforce:
* Administrator credentials to login to your Salesforce organization account.
* **NOTE:** Organization and Administrator should be enabled for 'chat'.
* A URL for the ASAPP installation package, which will be provided by ASAPP.
**SSO Support**
The AutoCompose widget supports SP-initiated SSO with either OIDC (preferred method) or SAML.
**Domain Whitelisting**
In order for AutoCompose to interact with ASAPP's backend and third-party support services, the following domains need to be accessible from end-user environments:
| Domain | Description |
| :----------------------------------------- | :----------------------------------------------------------------- |
| \*.asapp.com | ASAPP service URLs |
| \*.ingest.sentry.io | Application performance monitoring tool |
| fonts.googleapis.com | Fonts |
| google-analytics.com | Page analytics |
| asapp-chat-sdk-production.s3.amazonaws.com | Static ASAPP AWS URL for desktop network connectivity health check |
## Integrate with Salesforce
### 1. Configure the Salesforce Organization Centrally
**Before You Begin**
You will need the following information to configure ASAPP for Salesforce:
* Administrator credentials to login to your Salesforce organization account.
* **NOTE:** Organization and Administrator should be enabled for 'chat'.
* A URL for the ASAPP installation package, which will be provided by ASAPP.
 * Choose **Install for All Users** (as shown above).
* Check the acknowledgment statement and click the **Install** button:
* Choose **Install for All Users** (as shown above).
* Check the acknowledgment statement and click the **Install** button:

 * The Installation runs. An **Installation Complete!** message appears:

 * Click the **Done** button.
**2. Add ASAPP to the Chat Transcript Page**
* Open the 'Service Console' page (or your chat page).
* Choose an existing chat session or start a new chat session so that the chat transcript page appears (the exact mechanism is organization-specific).
* In the top-right, click the **gear** icon, then right-click **Edit Page**, and **Open Link in a New Tab**.
* Click the **Done** button.
**2. Add ASAPP to the Chat Transcript Page**
* Open the 'Service Console' page (or your chat page).
* Choose an existing chat session or start a new chat session so that the chat transcript page appears (the exact mechanism is organization-specific).
* In the top-right, click the **gear** icon, then right-click **Edit Page**, and **Open Link in a New Tab**.
 * Navigate to the new tab to see the chat transcript edit page:
 * Select the conversation panel (middle) and delete it.
 * Drag the **chatAsapp** component (left), inside the conversation panel:
 * Drag the **exploreAsapp** component (left), to the right column. Next, add your organization's **API key** and **API URL** (found in the ASAPP Developer Portal) in the rightmost panel:

 * Click **Save**, then click **Activate**
 * Click **Assign as org default**.
 * Choose **Desktop** form factor, then click **Save**.
 * Return to the chat transcript page and refresh - the ASAPP composer should appear.
 ### 2. Set Up Single Sign-On
ASAPP handles authentication through the customer's SSO service to confirm the identity of the agent.
ASAPP acts as the Service Provider (SP) with the customer acting as the Identity Provider (IDP). The customer's authentication system performs user authentication using their existing user credentials.
ASAPP supports SP-initiated SSO with either OIDC (preferred method) and SAML. Once the user initiates sign-in, ASAPP detects that the user is authenticated and requests an assertion from the customer's SSO service.
**Configuration Steps for OIDC (preferred method)**
1. Create a new IDP OIDC application with type `Web`
2. Set the following attributes for the app:
### 2. Set Up Single Sign-On
ASAPP handles authentication through the customer's SSO service to confirm the identity of the agent.
ASAPP acts as the Service Provider (SP) with the customer acting as the Identity Provider (IDP). The customer's authentication system performs user authentication using their existing user credentials.
ASAPP supports SP-initiated SSO with either OIDC (preferred method) and SAML. Once the user initiates sign-in, ASAPP detects that the user is authenticated and requests an assertion from the customer's SSO service.
**Configuration Steps for OIDC (preferred method)**
1. Create a new IDP OIDC application with type `Web`
2. Set the following attributes for the app:
Attribute |
Value\* |
|---|---|
Grant Type |
authorization code |
Sign-in Redirect URIs |
Production: `https://api.asapp.com/auth/v1/callback/\{company_marker\}` Sandbox: `https://api.sandbox.asapp.com/auth/v1/callback/\{company_marker\}-sandbox` |
Sandbox: `https://sso.asapp.com/auth/realms/standalone-{company_marker}-auth/broker/saml-sandbox/endpoint/clients/asapp-saml-sandbox` | | Recipient URL | Production: `https://sso.asapp.com/auth/realms/standalone-{company_marker}-auth/broker/saml/endpoint/clients/asapp-saml`
Sandbox: `https://sso.asapp.com/auth/realms/standalone-{company_marker}-auth/broker/saml-sandbox/endpoint/clients/asapp-saml-sandbox` | | Destination URL | Production: `https://sso.asapp.com/auth/realms/standalone-{company_marker}-auth/broker/saml/endpoint/clients/asapp-saml`
Sandbox: `https://sso.asapp.com/auth/realms/standalone-{company_marker}-auth/broker/saml-sandbox/endpoint/clients/asapp-saml-sandbox` | | Audience Restriction | Production: `https://sso.asapp.com/auth/realms/standalone-{company_marker}-auth/broker/saml/endpoint/clients/asapp-saml`
Sandbox: `https://sso.asapp.com/auth/realms/standalone-{company_marker}-auth/broker/saml-sandbox/endpoint/clients/asapp-saml-sandbox` | | Response | Signed | | Assertion | Signed | | Signature Algorithm | RSA\_SHA256 | | Digest Algorithm | SHA256 | | Attribute Statements | externalUserId: `{unique_id_to_identify_the_user}` | **\*NOTE:** ASAPP to provide `company_marker` value 3. Save the application and send the Public Certificate to validate Signature for this app SAML payload to ASAPP team 4. Send ASAPP team the URL of the SAML application ### 3. Configure Auto-Pilot Greetings If you so choose, you can work with your ASAPP contact to enable Auto-Pilot Greetings in your AutoCompose installation. Auto-Pilot Greetings automatically generates a greeting at the beginning of a conversation, and that greeting can be automatically sent to a customer on your agent's behalf after a configurable timer elapses. Your ASAPP contact can: * Turn Auto-Pilot Greetings on or off for your organization * Set a countdown timer value after which the Auto-Pilot Greeting is sent if an agent does not cancel Auto-Pilot by typing or clicking a "cancel" button * Set the global default messages that will be provided for Auto-Pilot Greetings across your organization (note thatagents can optionally customize their Auto-Pilot Greetings messages within the Auto-Pilot tab of the AutoCompose panel) ## Usage ### Customization #### Conversation Attributes Once the ASAPP AutoCompose widget is embedded, Salesforce shares the following conversation attributes with ASAPP: customer name, agent name and skill. ASAPP can use name attributes to populate values into templated responses (e.g. "Hi \[customer name], how can I help you today?") and to selectively filter response lists based on the skill of the conversation. #### Conversation Redaction When message text in the conversation transcript is sent to ASAPP, ASAPP applies redaction to the message text to prevent transmission of sensitive information. Reach out to your ASAPP account contact for information on available redaction capabilities to configure for your implementation. #### Composer Placement ASAPP currently targets Lightning desktops. Within Lightning-based desktops, you are free to place our composer wherever you choose. However, we suggest placing it immediately below the Salesforce conversation widget, such that the chat log appears above the ASAPP composer. ### Data Security ASAPP's security protocols protect data at each point of transmission from first user authentication, to secure communications, to our auditing and logging system, all the way to securing the environment when data is at rest in the data logging system. Access to data by ASAPP teams is tightly constrained and monitored. Strict security protocols protect both ASAPP and our customers. The following security controls are particularly relevant to AutoCompose: 1. Client sessions are controlled using a time-limited authorization token. Privileges for each active session are controlled server-side to mitigate potential elevation-of-privilege and information disclosure risks. 2. To avoid unauthorized disclosure of information, unique, non-guessable IDs are used to identify conversations. These conversations can only be accessed using a valid client session. 3. Requests to API endpoints that can potentially receive sensitive data are put through a round of redaction to strip the request of sensitive data (like SSNs and phone numbers). ### Additional Considerations #### Historical Conversation Data for Generating a Response List ASAPP uses past agent conversations to generate a customized response list tailored to a given use case. In order to create an accurate and relevant list, ASAPP requires a minimum of 200,000 historical transcripts to be supplied ahead of implementing AutoCompose. For more information on how to transmit the conversation data, reach out to your ASAPP account contact. # Feature Releases Overview Source: https://docs.asapp.com/autocompose/feature-releases | Feature Name | Feature Release Details | Additional Relevant Information (if available) | | :------------------------------ | :------------------------------------------------------------------------------------------------------------------------------------------------ | :---------------------------------------------------- | | **Tooling** | [Tooling for AutoCompose](/autocompose/feature-releases/tooling-for-autocompose "Tooling for AutoCompose") | | | **Auto-Pilot Greetings** | [Auto-Pilot Greetings for AutoCompose](/autocompose/feature-releases/auto-pilot-greetings-for-autocompose "Auto-Pilot Greetings for AutoCompose") | Available for all implementation types of AutoCompose | | **Health Check API** | [Health Check API](/autocompose/feature-releases/health-check-api "Health Check API") | | | ****Sandbox for AutoCompose**** | [Sandbox for AutoCompose](/autocompose/feature-releases/sandbox-for-autocompose "Sandbox for AutoCompose") | | # Auto-Pilot Greetings for AutoCompose Source: https://docs.asapp.com/autocompose/feature-releases/auto-pilot-greetings-for-autocompose ## Feature Release This is the announcement for an upcoming ASAPP feature. Your ASAPP account team will provide a target release date and can direct you to more detailed information as needed. ## Overview Sending a prompt and personalized greeting message is critical to making a great first impression with a newly assigned customer. However, at the moment of assignment, agents are often in the middle of other important tasks. Switching context to get caught up on the conversation can be disruptive to the agent's productivity. With Auto-Pilot Greetings for AutoCompose, agents can configure an adaptive greeting message which will auto-send upon issue assignment following a configurable timeout period. The greeting can optionally use the customer's first name when it's available. Agents retain control of the feature --- they can turn Auto-Pilot Greetings on/off for themselves, individualize their automatically composed greeting messages, and intervene to either cancel or send the message immediately.
 ## Use and Impact
Auto-Pilot Greetings automates agents' initial interaction with customers, freeing them for higher value tasks.
AutoCompose's Auto-Pilot Greetings is intended to reduce an agent's average response time across concurrent issues by freeing up their attention, and ultimately reduce average handle time.
## How It Works
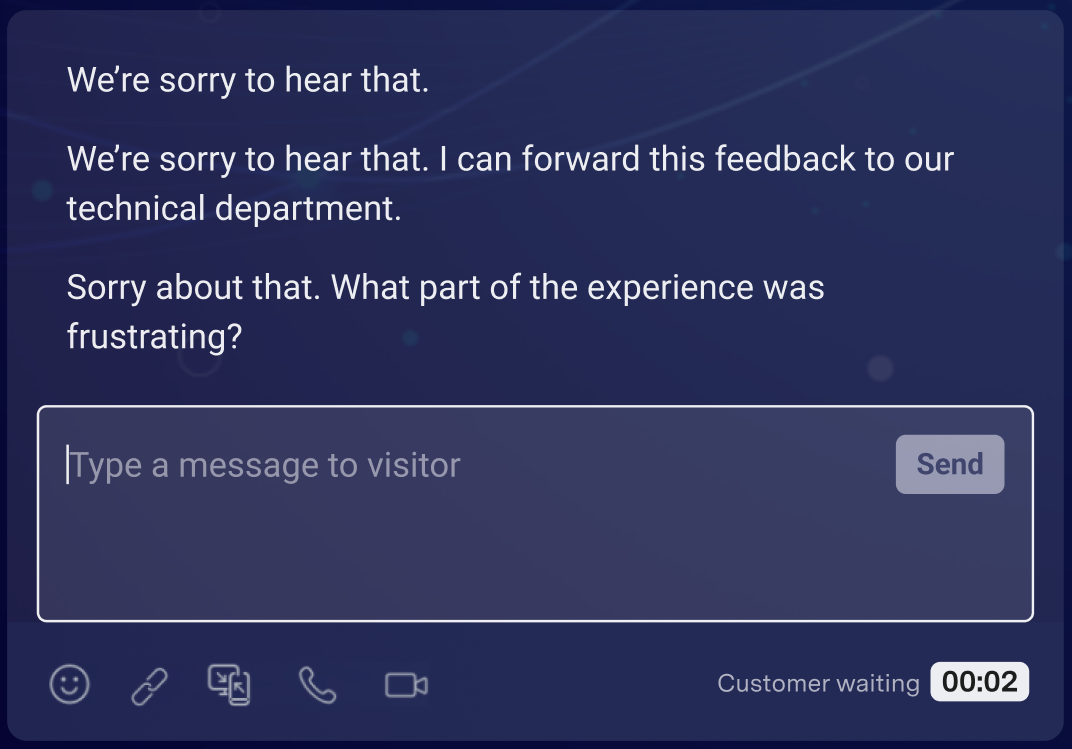
For each conversation, Auto-Pilot Greetings follows a simple sequence:
1. Customer enters the chat
2. Auto-Pilot Greeting message and countdown timer appears above the composer
3. Timer counts down to zero
4. Greeting message is sent
### Configurations
**Global On/Off**
* This setting configures whether Auto-Pilot Greetings will be enabled or disabled for all agents.
* Customers must reach out to their ASAPP contact to configure Auto-Pilot Greetings globally for their program.
**Global Default Auto-Pilot Greeting Messages**
* Two default Auto-Pilot Greetings messages must be configured: one version where the customer's name is known and one where the customer's name is not known.
* Customers must reach out to their ASAPP contact to configure Global Default Auto-Pilot Greeting messages.
**Agent Specific Auto-Pilot Greeting Messages and On / Off Settings**
* Agents can optionally customize the Auto-Pilot Greeting messages composed on their behalf, and use their individualized messages in lieu of the global default messages; often agents include their name in their customized messages. Additionally, they can toggle whether Auto-Pilot Greetings is on or off for themselves by default.
* If using AutoCompose for Salesforce or LivePerson, agents configure customized messages and the on / off setting themselves through the Auto-Pilots tab of their AutoCompose panel.
This agent functionality can also be enabled via API for custom implementations of AutoCompose.
**Countdown Timer**
* The countdown timer is the amount of time after a customer enters the chat before an Auto-Pilot Greeting is sent. A countdown timer will display to the agent notifying them of the time remaining before auto-sending.
* Customers must reach out to their ASAPP contact to set an appropriate countdown timer value, which will apply across their AutoCompose implementation.
## FAQs
* **What are best practices for Auto-Pilot Greetings?**
ASAPP recommends setting the default message to include questions that agents often need to ask in the beginning of a call to resolve a dispute. For example:
> \*"Hi, \[NAME]. This is Robert and I'm happy to assist you today. So I can best help you, can you please provide me with your account number and a description of your issue?"
Furthermore, ASAPP recommends setting a countdown timer value in the range of 10-15 seconds. Too long of a default may increase handle times. Too short of a default may not give an agent a chance to cancel the Auto-Pilot Greeting should they so desire.
# Health Check API
Source: https://docs.asapp.com/autocompose/feature-releases/health-check-api
## Feature Release
This is the announcement for an upcoming ASAPP feature. Your ASAPP account team will provide a target release date and can direct you to more detailed information as needed.
## Overview
ASAPP provides a means for our customers to check the operational status of our API platform. Developers can ping this endpoint to verify that the ASAPP infrastructure is working as expected.
## Use and Impact
Developers can either check ad hoc if the ASAPP infrastructure is up at a given time or implement automated API monitoring to send a request to the Health Check API at a preset interval.
This feature is intended to improve developer confidence when integrating with ASAPP services. It also removes the need for developers to send requests to other ASAPP services to check their status, which may trigger errors unnecessarily.
## How It Works
Developers can run a `GET https://api.sandbox.asapp.com/v1/health` operation and inspect for a 200 response with either the SUCCESS or FAILED value for the status of the core ASAPP platform.
**Configuration**
Developers must request access to the API endpoint in the Developer Portal:
1. Access the Developer Portal.
2. Navigate to **Apps**, select your application, and authorize the Health Check API.
3. Reach out to your ASAPP account team to authorize access.
# Sandbox for AutoCompose
Source: https://docs.asapp.com/autocompose/feature-releases/sandbox-for-autocompose
## Feature Release
This is the announcement for an upcoming ASAPP feature. Your ASAPP account team will provide a target release date and can direct you to more detailed information as needed.
## Overview
AutoCompose Sandbox is a playground designed to preview an agent's experience with AutoCompose without having to wait for an integration to complete. AutoCompose Sandbox enables administrators to step into the role of an agent and experience the real-time suggestions that AutoCompose provides.
## Use and Impact
Auto-Pilot Greetings automates agents' initial interaction with customers, freeing them for higher value tasks.
AutoCompose's Auto-Pilot Greetings is intended to reduce an agent's average response time across concurrent issues by freeing up their attention, and ultimately reduce average handle time.
## How It Works
For each conversation, Auto-Pilot Greetings follows a simple sequence:
1. Customer enters the chat
2. Auto-Pilot Greeting message and countdown timer appears above the composer
3. Timer counts down to zero
4. Greeting message is sent
### Configurations
**Global On/Off**
* This setting configures whether Auto-Pilot Greetings will be enabled or disabled for all agents.
* Customers must reach out to their ASAPP contact to configure Auto-Pilot Greetings globally for their program.
**Global Default Auto-Pilot Greeting Messages**
* Two default Auto-Pilot Greetings messages must be configured: one version where the customer's name is known and one where the customer's name is not known.
* Customers must reach out to their ASAPP contact to configure Global Default Auto-Pilot Greeting messages.
**Agent Specific Auto-Pilot Greeting Messages and On / Off Settings**
* Agents can optionally customize the Auto-Pilot Greeting messages composed on their behalf, and use their individualized messages in lieu of the global default messages; often agents include their name in their customized messages. Additionally, they can toggle whether Auto-Pilot Greetings is on or off for themselves by default.
* If using AutoCompose for Salesforce or LivePerson, agents configure customized messages and the on / off setting themselves through the Auto-Pilots tab of their AutoCompose panel.
This agent functionality can also be enabled via API for custom implementations of AutoCompose.
**Countdown Timer**
* The countdown timer is the amount of time after a customer enters the chat before an Auto-Pilot Greeting is sent. A countdown timer will display to the agent notifying them of the time remaining before auto-sending.
* Customers must reach out to their ASAPP contact to set an appropriate countdown timer value, which will apply across their AutoCompose implementation.
## FAQs
* **What are best practices for Auto-Pilot Greetings?**
ASAPP recommends setting the default message to include questions that agents often need to ask in the beginning of a call to resolve a dispute. For example:
> \*"Hi, \[NAME]. This is Robert and I'm happy to assist you today. So I can best help you, can you please provide me with your account number and a description of your issue?"
Furthermore, ASAPP recommends setting a countdown timer value in the range of 10-15 seconds. Too long of a default may increase handle times. Too short of a default may not give an agent a chance to cancel the Auto-Pilot Greeting should they so desire.
# Health Check API
Source: https://docs.asapp.com/autocompose/feature-releases/health-check-api
## Feature Release
This is the announcement for an upcoming ASAPP feature. Your ASAPP account team will provide a target release date and can direct you to more detailed information as needed.
## Overview
ASAPP provides a means for our customers to check the operational status of our API platform. Developers can ping this endpoint to verify that the ASAPP infrastructure is working as expected.
## Use and Impact
Developers can either check ad hoc if the ASAPP infrastructure is up at a given time or implement automated API monitoring to send a request to the Health Check API at a preset interval.
This feature is intended to improve developer confidence when integrating with ASAPP services. It also removes the need for developers to send requests to other ASAPP services to check their status, which may trigger errors unnecessarily.
## How It Works
Developers can run a `GET https://api.sandbox.asapp.com/v1/health` operation and inspect for a 200 response with either the SUCCESS or FAILED value for the status of the core ASAPP platform.
**Configuration**
Developers must request access to the API endpoint in the Developer Portal:
1. Access the Developer Portal.
2. Navigate to **Apps**, select your application, and authorize the Health Check API.
3. Reach out to your ASAPP account team to authorize access.
# Sandbox for AutoCompose
Source: https://docs.asapp.com/autocompose/feature-releases/sandbox-for-autocompose
## Feature Release
This is the announcement for an upcoming ASAPP feature. Your ASAPP account team will provide a target release date and can direct you to more detailed information as needed.
## Overview
AutoCompose Sandbox is a playground designed to preview an agent's experience with AutoCompose without having to wait for an integration to complete. AutoCompose Sandbox enables administrators to step into the role of an agent and experience the real-time suggestions that AutoCompose provides.
 ## Use and Impact
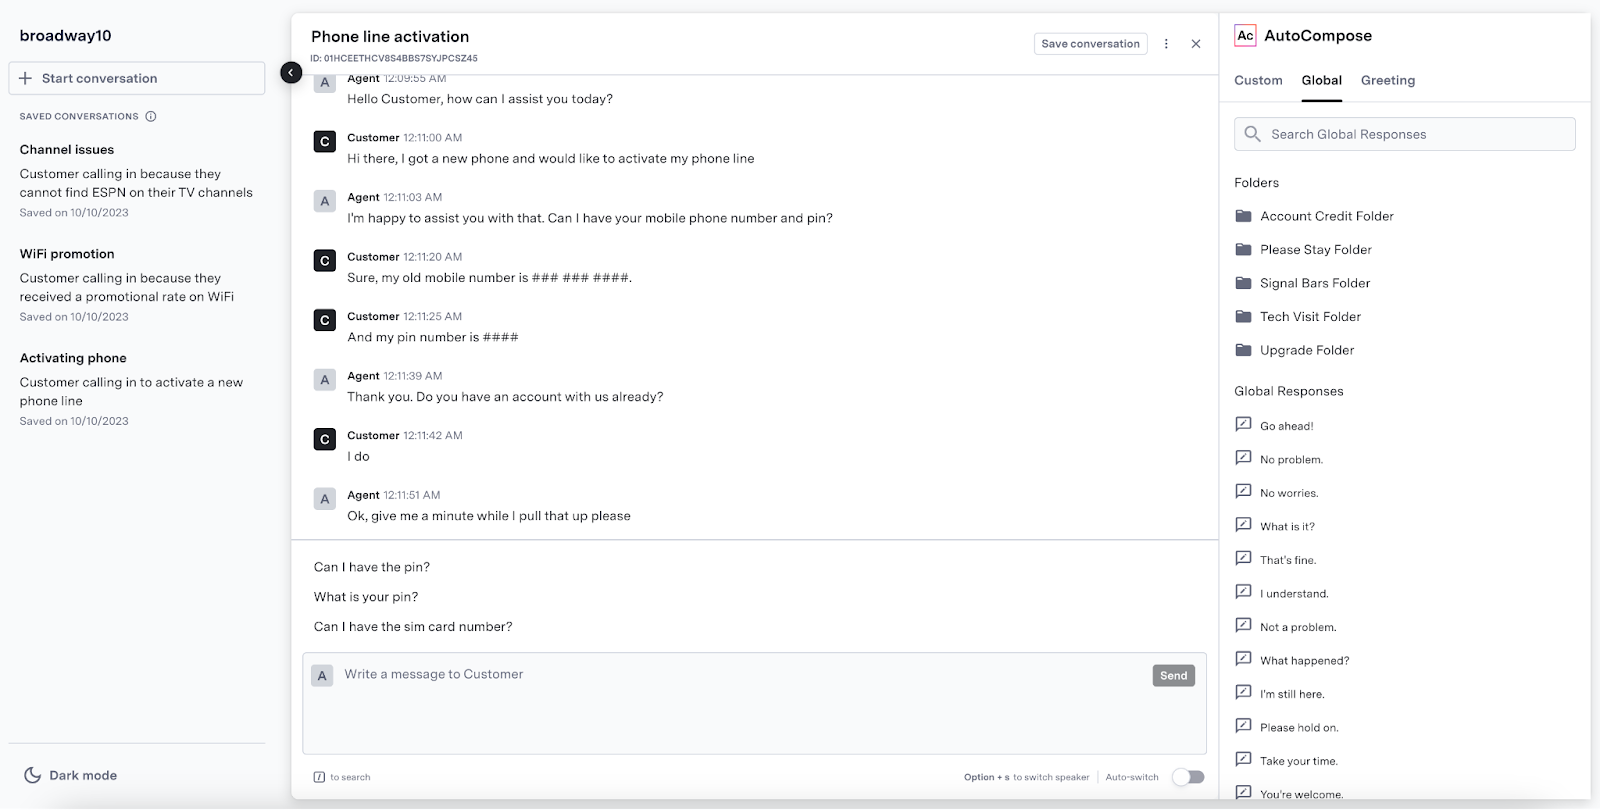
AutoCompose Sandbox enables administrators to visualize the experience that AutoCompose gives to agents presented in two areas of the screen: in the composer, which is where the agent types, and in the AutoCompose panel on the right-hand side.
Beyond showcasing the operational features of AutoCompose, the sandbox environment also delivers a proposed UI design. This design is rooted in thorough research on agent experience, resulting in increased product adoption and time savings.
AutoCompose provides both complete response suggestions above the composer and in-line suggestions while typing. The sandbox replicates the experience an agent would get, receiving suggestions from the response library. As AutoCompose learns from agents' most common responses, the response library will grow, which will be reflected in the suggestions provided in the sandbox.
## How It Works
Watch the following video walkthrough to learn how to use the AutoCompose Sandbox:
AutoCompose Sandbox enables you to play both sides of the conversation. AutoCompose won't suggest anything while simulating a customer, but suggestions will populate for the agent role.
The AutoCompose panel situated on the right side allows you to define and browse custom responses, which can then be accessed as suggestions in the composer. It also enables browsing of the global response list that has been defined globally. Finally, it allows an agent to customize the behavior of AutoPilot.
As agents use the suggestions provided by AutoCompose, the response library will grow, which will be reflected in the suggestions produced by AutoCompose.
## FAQs
* **Is AutoCompose Sandbox using the same sandbox environment we have access to?**
Yes. Developers building an AutoCompose integration can use AutoCompose Sandbox to easily create conversations and later retrieve them via the unique conversation ID available in the header of each conversation.
# Tooling for AutoCompose
Source: https://docs.asapp.com/autocompose/feature-releases/tooling-for-autocompose
## Feature Release
This is the announcement for an upcoming ASAPP feature. Your ASAPP account team will provide a target release date and can direct you to more detailed information as needed.
## Overview
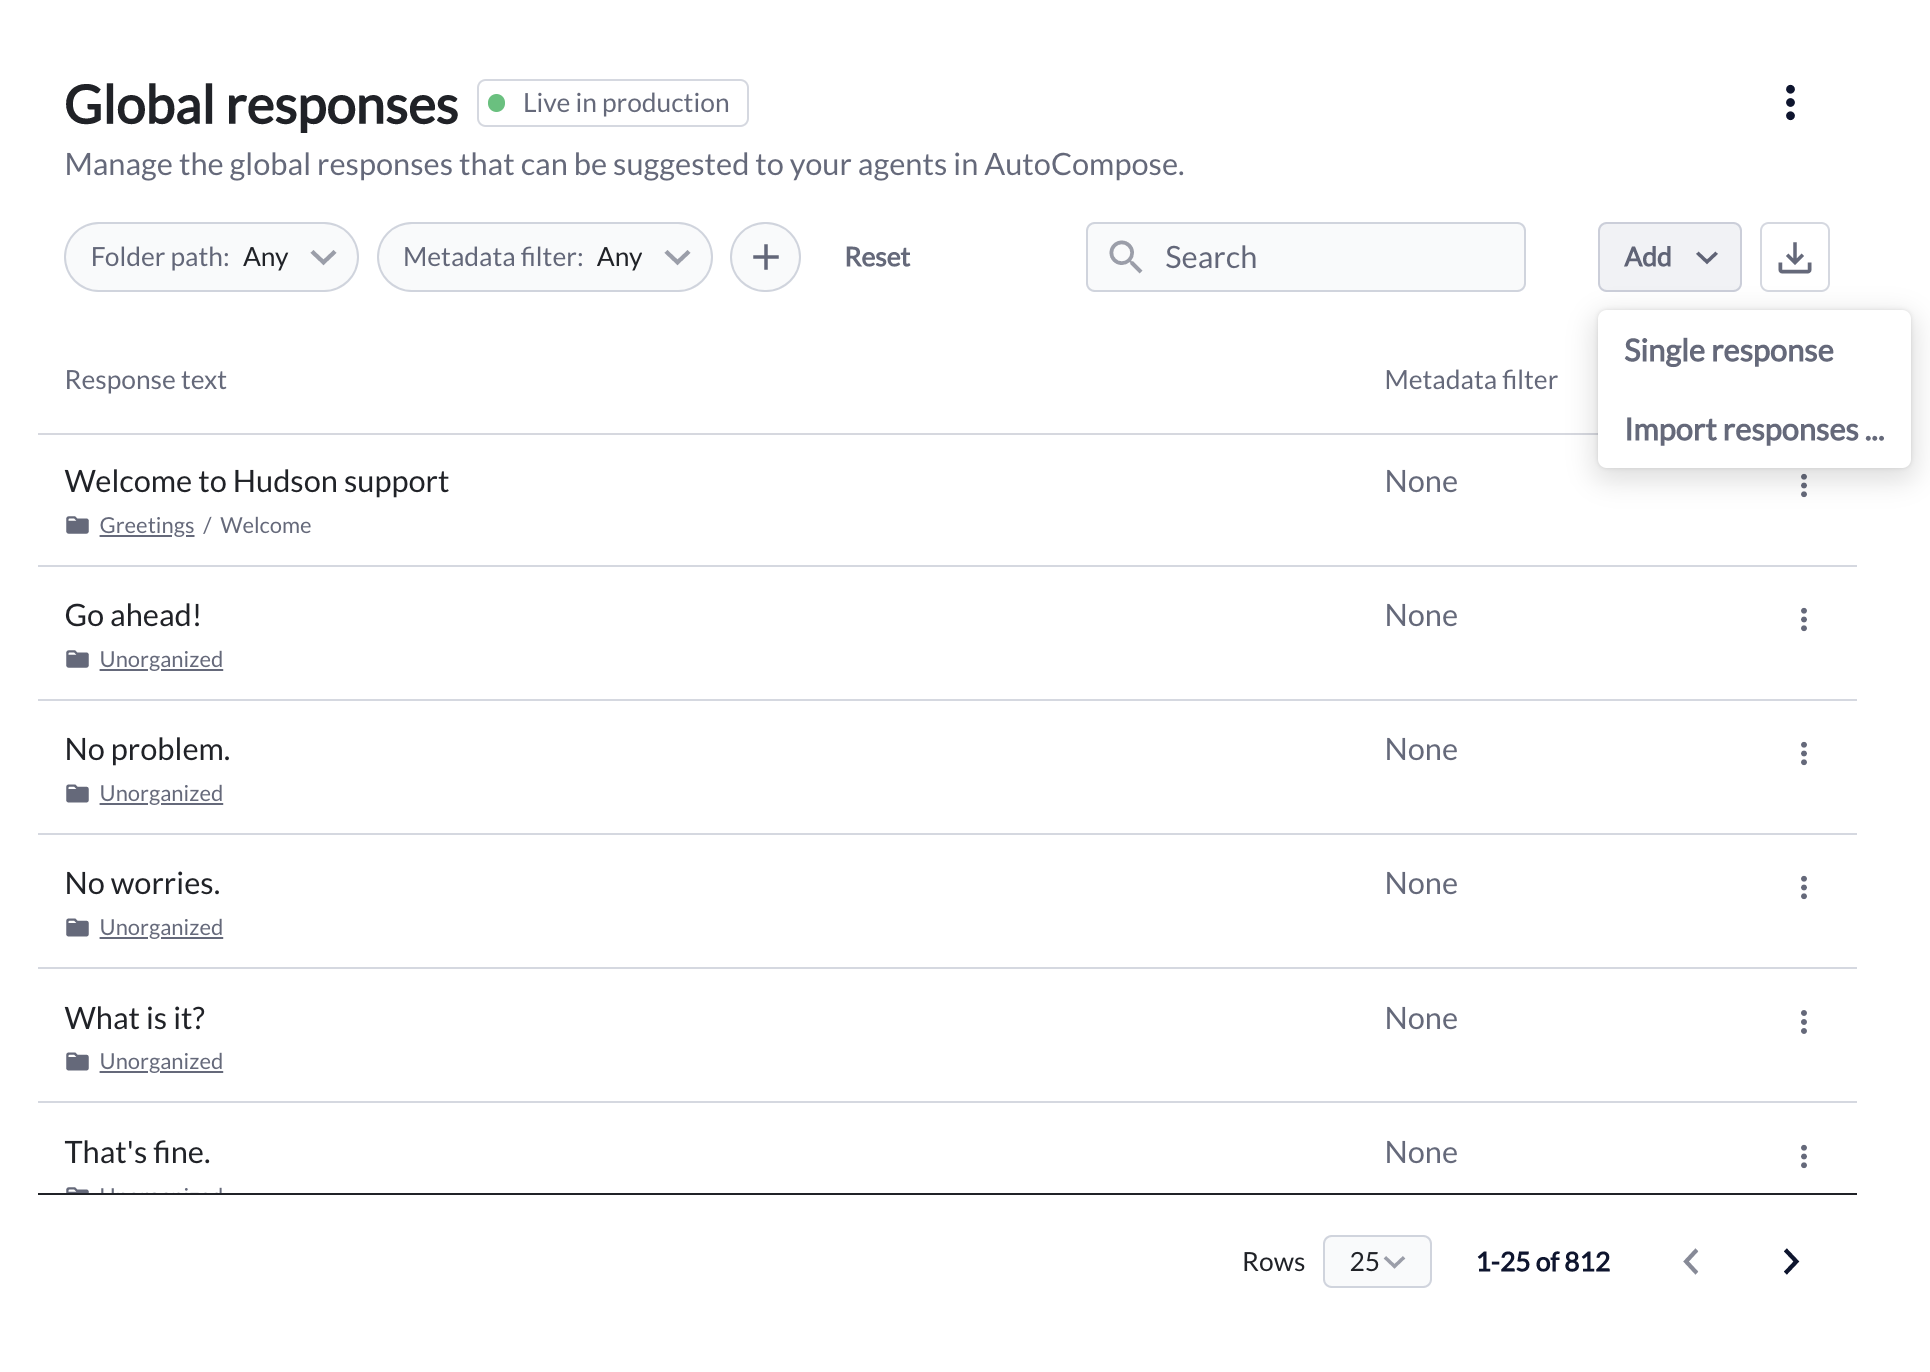
AutoCompose now supports configuration of the global response list in ASAPP's AI-Console. Users will be able to import responses in bulk, edit individual responses, and deploy responses to testing and production environments.
## Use and Impact
AutoCompose Sandbox enables administrators to visualize the experience that AutoCompose gives to agents presented in two areas of the screen: in the composer, which is where the agent types, and in the AutoCompose panel on the right-hand side.
Beyond showcasing the operational features of AutoCompose, the sandbox environment also delivers a proposed UI design. This design is rooted in thorough research on agent experience, resulting in increased product adoption and time savings.
AutoCompose provides both complete response suggestions above the composer and in-line suggestions while typing. The sandbox replicates the experience an agent would get, receiving suggestions from the response library. As AutoCompose learns from agents' most common responses, the response library will grow, which will be reflected in the suggestions provided in the sandbox.
## How It Works
Watch the following video walkthrough to learn how to use the AutoCompose Sandbox:
AutoCompose Sandbox enables you to play both sides of the conversation. AutoCompose won't suggest anything while simulating a customer, but suggestions will populate for the agent role.
The AutoCompose panel situated on the right side allows you to define and browse custom responses, which can then be accessed as suggestions in the composer. It also enables browsing of the global response list that has been defined globally. Finally, it allows an agent to customize the behavior of AutoPilot.
As agents use the suggestions provided by AutoCompose, the response library will grow, which will be reflected in the suggestions produced by AutoCompose.
## FAQs
* **Is AutoCompose Sandbox using the same sandbox environment we have access to?**
Yes. Developers building an AutoCompose integration can use AutoCompose Sandbox to easily create conversations and later retrieve them via the unique conversation ID available in the header of each conversation.
# Tooling for AutoCompose
Source: https://docs.asapp.com/autocompose/feature-releases/tooling-for-autocompose
## Feature Release
This is the announcement for an upcoming ASAPP feature. Your ASAPP account team will provide a target release date and can direct you to more detailed information as needed.
## Overview
AutoCompose now supports configuration of the global response list in ASAPP's AI-Console. Users will be able to import responses in bulk, edit individual responses, and deploy responses to testing and production environments.
 ## Use and Impact
ASAPP's machine learning models powering AutoCompose use the global response list (in addition to custom responses and organic responses) to select the response that is most likely to be said by the agent. Making ongoing updates to the global response list is essential to ensuring agents are receiving relevant suggestions.Features
Global responses can be configured at two levels:
1. **Bulk uploads**: This method is best suited for large volumes of changes. Users first make edits to a .csv file offline containing the full global response list, then upload the file as a new version of the list.
2. **Targeted edits**: This method is best suited for small volumes of changes. Users make edits directly in the AI-Console UI for each individual response they wish to change.
By providing ASAPP customers this self-serve capability, teams can iterate more quickly on the response list, ensuring improved coverage of situations encountered by agents and timely updates that keep pace with ongoing changes in the business.
## How It Works
Watch the video walkthrough below to learn how to manage global responses in AI-Console:
**Configurable Response Elements**
Users can configure four data elements for each global response:
* **Response text**: The text of the response (required)
* **Folder path**: The hierarchy that dictates where the response resides
* **Title**: The short-form title of the response
* **Metadata filters**: A key and value used to specify the set of conversations for which a response is available
## Use and Impact
ASAPP's machine learning models powering AutoCompose use the global response list (in addition to custom responses and organic responses) to select the response that is most likely to be said by the agent. Making ongoing updates to the global response list is essential to ensuring agents are receiving relevant suggestions.Features
Global responses can be configured at two levels:
1. **Bulk uploads**: This method is best suited for large volumes of changes. Users first make edits to a .csv file offline containing the full global response list, then upload the file as a new version of the list.
2. **Targeted edits**: This method is best suited for small volumes of changes. Users make edits directly in the AI-Console UI for each individual response they wish to change.
By providing ASAPP customers this self-serve capability, teams can iterate more quickly on the response list, ensuring improved coverage of situations encountered by agents and timely updates that keep pace with ongoing changes in the business.
## How It Works
Watch the video walkthrough below to learn how to manage global responses in AI-Console:
**Configurable Response Elements**
Users can configure four data elements for each global response:
* **Response text**: The text of the response (required)
* **Folder path**: The hierarchy that dictates where the response resides
* **Title**: The short-form title of the response
* **Metadata filters**: A key and value used to specify the set of conversations for which a response is available
 **Saving and Deploying**
Saving changes to the global response list or uploading a new list creates a new version. Past versions can also be viewed and restored as needed.
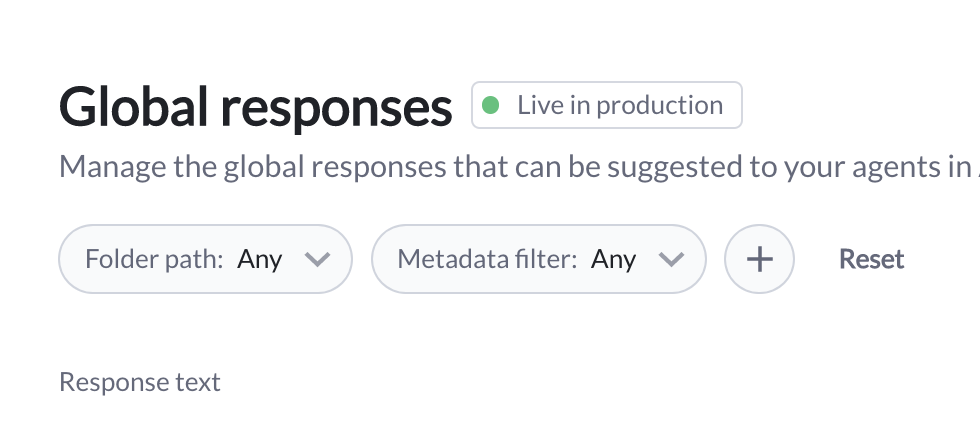
The global response list can be easily deployed into testing or production environments, with an indicator at the top of each version showing the status of the response list (e.g. Live in production).
**Saving and Deploying**
Saving changes to the global response list or uploading a new list creates a new version. Past versions can also be viewed and restored as needed.
The global response list can be easily deployed into testing or production environments, with an indicator at the top of each version showing the status of the response list (e.g. Live in production).
 Visit the [Tooling Guide](/autocompose/autocompose-tooling-guide "AutoCompose Tooling Guide") for more information on using AI-Console to manage the AutoCompose global response list.
## FAQs
1. **How do you access AutoCompose in AI-Console?**
Provided that you have permission to access AutoCompose in AI-Console, it will appear in the AI Services section of your homepage.
To access AutoCompose from any other AI-Console page, select the menu icon in the top left corner and then select AutoCompose.
2. **How does response metadata work?**
AutoCompose uses response metadata in two main ways:
* **As a data insert:** Variable metadata such as customer name or time of day is dynamically inserted into templated response text when a suggestion is made to the agent. Read more about templated responses in the AutoCompose Product Guide Features
* **As a filter:** Responses are only made available for suggestion when the conversation's metadata matches the attribute set for a given response (e.g. a response only being available when `queue` = `general`).
Visit the [Tooling Guide](/autocompose/autocompose-tooling-guide "AutoCompose Tooling Guide") for more information on using AI-Console to manage the AutoCompose global response list.
## FAQs
1. **How do you access AutoCompose in AI-Console?**
Provided that you have permission to access AutoCompose in AI-Console, it will appear in the AI Services section of your homepage.
To access AutoCompose from any other AI-Console page, select the menu icon in the top left corner and then select AutoCompose.
2. **How does response metadata work?**
AutoCompose uses response metadata in two main ways:
* **As a data insert:** Variable metadata such as customer name or time of day is dynamically inserted into templated response text when a suggestion is made to the agent. Read more about templated responses in the AutoCompose Product Guide Features
* **As a filter:** Responses are only made available for suggestion when the conversation's metadata matches the attribute set for a given response (e.g. a response only being available when `queue` = `general`).
 ### Response Library
AutoCompose suggests responses from a library curated from a wide range of domain-specific conversation topics. The response library is a combination of three lists:
### Response Library
AutoCompose suggests responses from a library curated from a wide range of domain-specific conversation topics. The response library is a combination of three lists:
 1. **Global response list:** Messages created and maintained by program administrators available to a designated full agent population.
2. **Custom response list:** Messages created and maintained directly in AutoCompose by individual agents; only available to the agent that created the message.
3. **Organically growing response list:** Messages automatically created by ASAPP for each agent based on their most commonly used messages that do not already exist in the global response list or the agent's curated custom response list.
1. **Global response list:** Messages created and maintained by program administrators available to a designated full agent population.
2. **Custom response list:** Messages created and maintained directly in AutoCompose by individual agents; only available to the agent that created the message.
3. **Organically growing response list:** Messages automatically created by ASAPP for each agent based on their most commonly used messages that do not already exist in the global response list or the agent's curated custom response list.
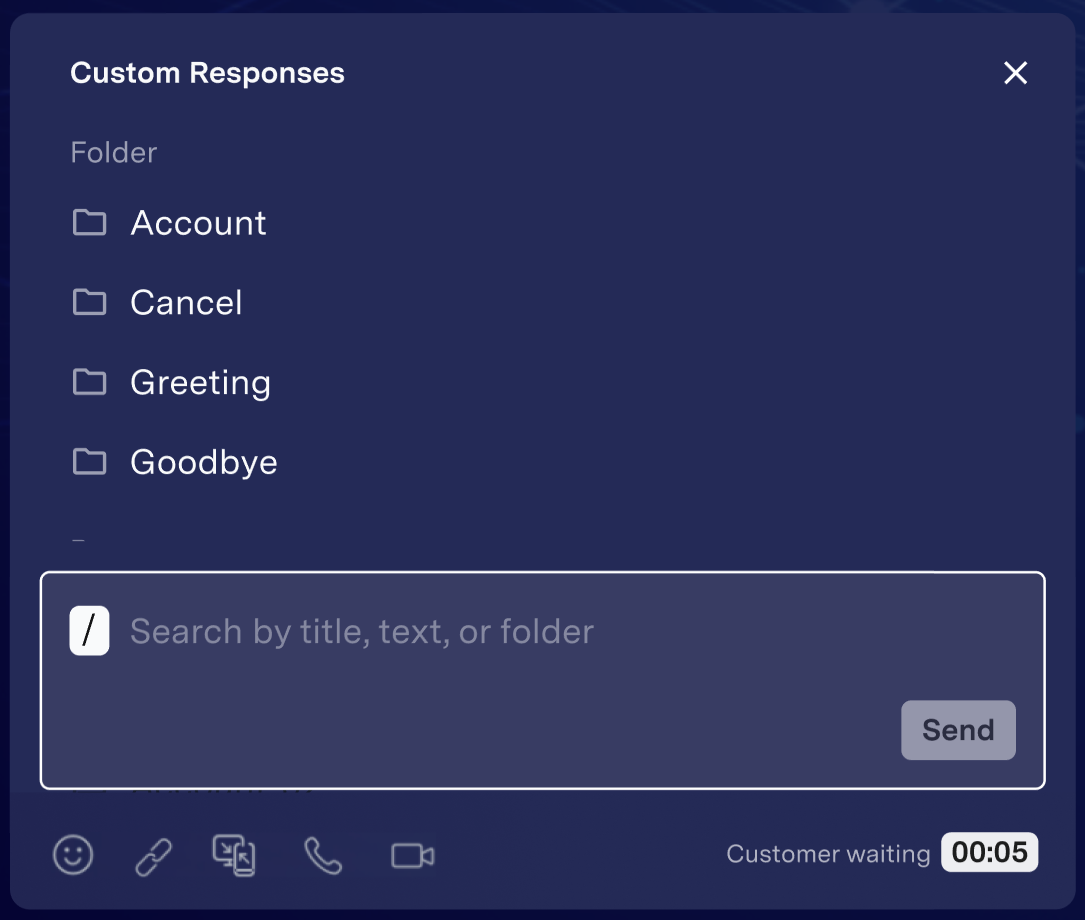 2. **Response panel:** In the response panel, agents can browse both the global and custom response lists, either using a folder hierarchy or with the provided search field.
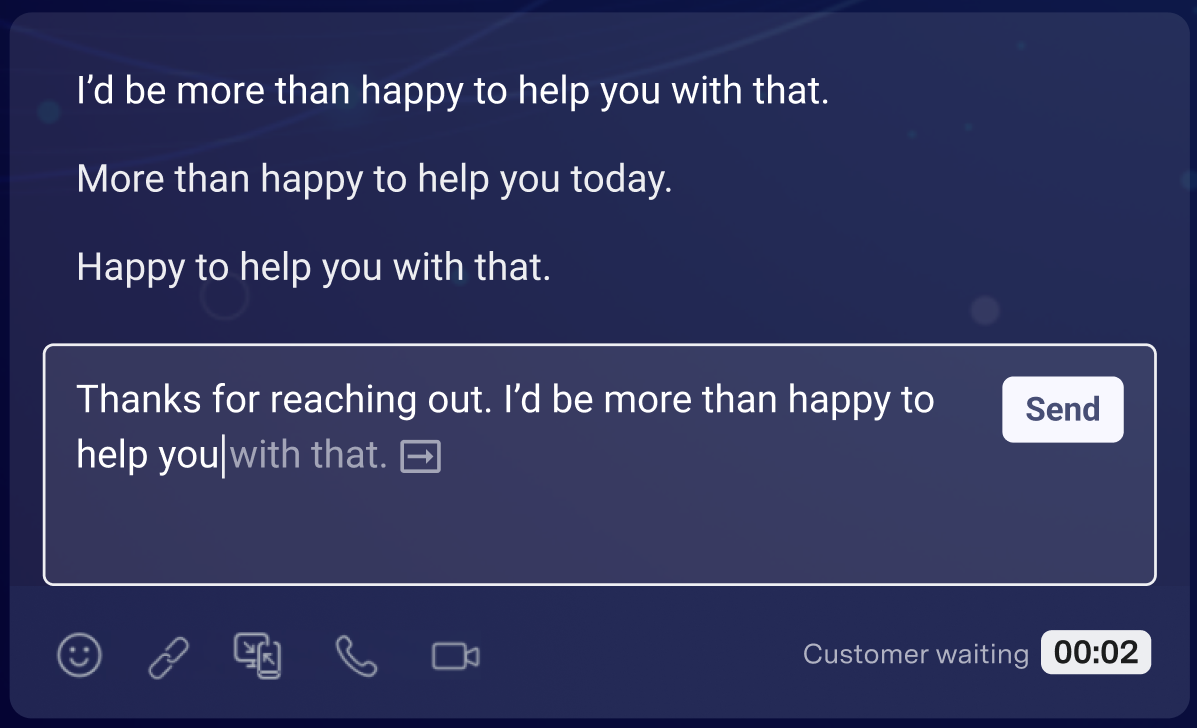 Phrase completions are generated from common, high-frequency phrases used in each implementation's production conversations. AutoCompose only makes phrase suggestions when a sufficiently high-confidence phrase is available and only uses language found in the global and custom response library.
### Templated Responses
AutoCompose can dynamically insert metadata into designated templated responses in the global response list.
For example, a customer's first name can be automatically populated into this templated response: "Hi *\{name}*, how can I help you today?".
By default, AutoCompose supports inserting customer first name, agent first name and the customer's time of day (morning, afternoon, evening) into templated responses. Time of day can be set to a single zone or be dynamically determined for each conversation.
AutoCompose also supports inserting custom conversation-specific metadata passed to ASAPP. For more information on custom inserts, reach out to your ASAPP account team.
Phrase completions are generated from common, high-frequency phrases used in each implementation's production conversations. AutoCompose only makes phrase suggestions when a sufficiently high-confidence phrase is available and only uses language found in the global and custom response library.
### Templated Responses
AutoCompose can dynamically insert metadata into designated templated responses in the global response list.
For example, a customer's first name can be automatically populated into this templated response: "Hi *\{name}*, how can I help you today?".
By default, AutoCompose supports inserting customer first name, agent first name and the customer's time of day (morning, afternoon, evening) into templated responses. Time of day can be set to a single zone or be dynamically determined for each conversation.
AutoCompose also supports inserting custom conversation-specific metadata passed to ASAPP. For more information on custom inserts, reach out to your ASAPP account team.
 AutoSummary provides a set of APIs to enable you to extract insights from the wealth of data generated when your agents talk to your customers.
AutoSummary insights are powered by ASAPP's Generative AI (LLMs). Organizations use these insights to identify custom data, intents, topics, entities, sentiment drivers, and other structured data from every voice or chat (message) interaction between a customer and an agent.
AutoSummary can be customized to your specific use cases such as workflows optimizations, trade confirmations, compliance monitoring and quality assurance etc.
## Insights and Data
With AutoSummary, you can extract the following information:
| Insight | Description | This enables you to |
| :-------------------------------------------------- | :------------------------------------------------------------------------------------------------------------------------------------------------------------------------------------------------------------------------------------------------------------------------------------------------------------------------------------------------------ | :------------------------------------------------------------------------------------------------------------------------------------------------------------------------------------------------------------------------------------------------------------------------------- |
| [Free text summary](/autosummary/free-text-summary) | Generates a concise text summary of each conversation |
AutoSummary provides a set of APIs to enable you to extract insights from the wealth of data generated when your agents talk to your customers.
AutoSummary insights are powered by ASAPP's Generative AI (LLMs). Organizations use these insights to identify custom data, intents, topics, entities, sentiment drivers, and other structured data from every voice or chat (message) interaction between a customer and an agent.
AutoSummary can be customized to your specific use cases such as workflows optimizations, trade confirmations, compliance monitoring and quality assurance etc.
## Insights and Data
With AutoSummary, you can extract the following information:
| Insight | Description | This enables you to |
| :-------------------------------------------------- | :------------------------------------------------------------------------------------------------------------------------------------------------------------------------------------------------------------------------------------------------------------------------------------------------------------------------------------------------------ | :------------------------------------------------------------------------------------------------------------------------------------------------------------------------------------------------------------------------------------------------------------------------------- |
| [Free text summary](/autosummary/free-text-summary) | Generates a concise text summary of each conversation | - Reduces average handle time by eliminating post-call summarization.
- Improves customer experience by allowing agents to focus on customers.
- Optimizes operations by analyzing contact reasons.
- Improves customer experience through better conversation routing.
- Question: Answers to predefined queries (e.g., "Was the customer issue resolved?", "Did the agent follow the script?")
- Entities: Key information said in the conversation such as claim numbers, account details, approval dates, monetary amount, and more.
- Automates data collection for analytics and reporting.
- Facilitates compliance monitoring and quality assurance
- Enables rapid population of CRMs and other business tools
- Supports data-driven decision making and process improvement
- Structured Data extraction
- Intent identification
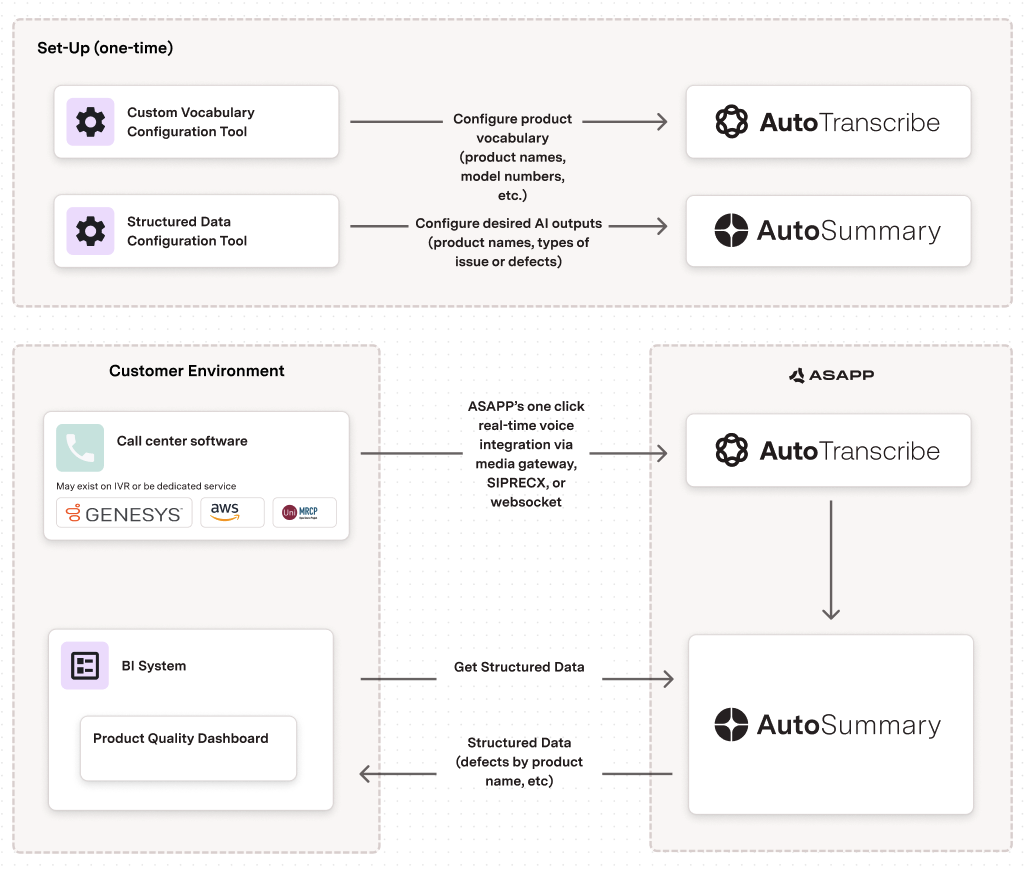
 ## Real-time Product Quality Monitoring (Retail, Telecommunications)
AutoSummary can generate free-text summaries of customer complaints about product quality, allowing for real-time identification of defects and issues. This could be data such as specific products, complaint or issue types.
| Industry | Category | AutoSummary Features |
| :------------------------ | :---------------- | :------------------- |
| Retail Telecommunications | Quality Assurance | Entity Extraction |
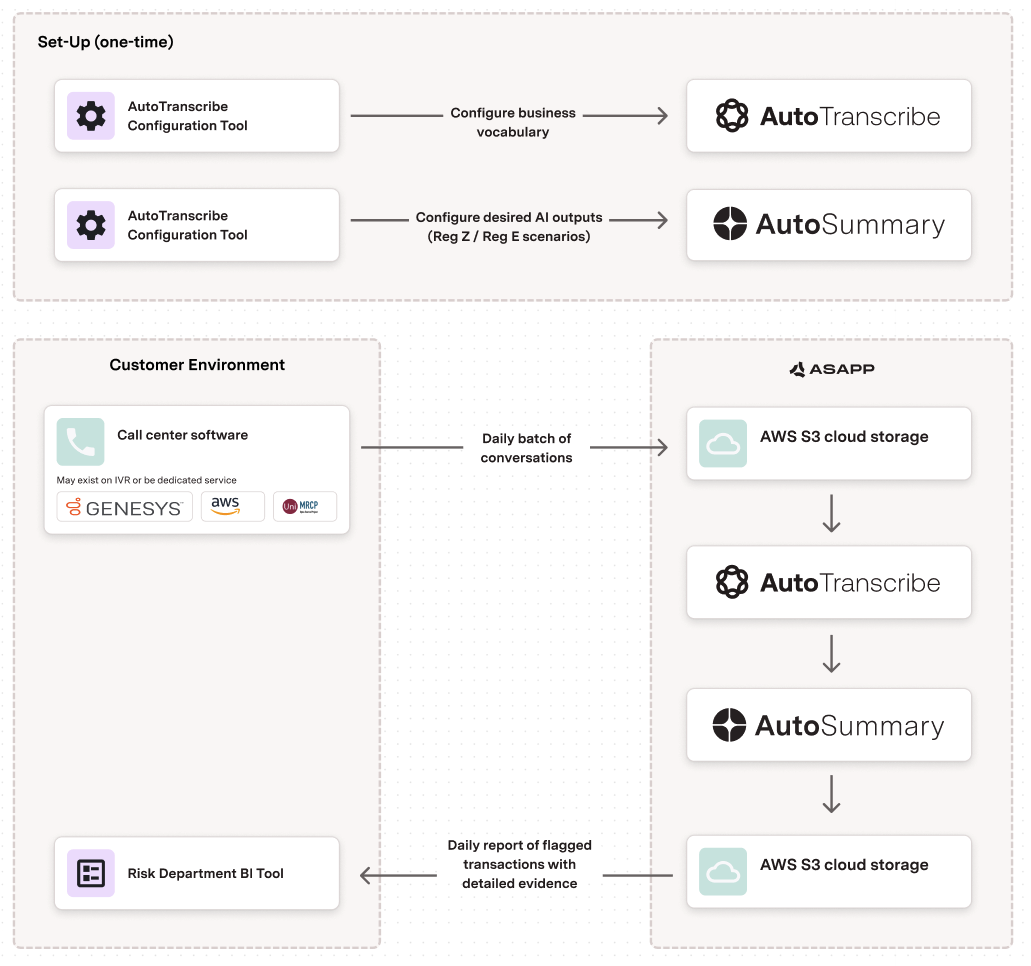
### Implementation
1. Configure Entity Extraction to identify product names and specific defect or issue descriptions.
2. Integrate with call center software for real-time processing.
3. Connect outputs to business intelligence systems for analysis and reporting.
### Architecture
## Real-time Product Quality Monitoring (Retail, Telecommunications)
AutoSummary can generate free-text summaries of customer complaints about product quality, allowing for real-time identification of defects and issues. This could be data such as specific products, complaint or issue types.
| Industry | Category | AutoSummary Features |
| :------------------------ | :---------------- | :------------------- |
| Retail Telecommunications | Quality Assurance | Entity Extraction |
### Implementation
1. Configure Entity Extraction to identify product names and specific defect or issue descriptions.
2. Integrate with call center software for real-time processing.
3. Connect outputs to business intelligence systems for analysis and reporting.
### Architecture
 ## Automated Call Wrap-up (Multiple Industries)
AutoSummary can automate the process of summarizing customer interactions, eliminating the need for manual note-taking by agents and providing consistent, high-quality call summaries.
The summary and specific data elements can be directly inserted into your contact center or CRM tool to remove manual steps.
| Industry | Category | AutoSummary Features |
| :------------------------------------------------------------------------------------------------------------- | :------------------------------------------------------------------ | :-------------------------------------------------------------------------------------------------------------------- |
|
## Automated Call Wrap-up (Multiple Industries)
AutoSummary can automate the process of summarizing customer interactions, eliminating the need for manual note-taking by agents and providing consistent, high-quality call summaries.
The summary and specific data elements can be directly inserted into your contact center or CRM tool to remove manual steps.
| Industry | Category | AutoSummary Features |
| :------------------------------------------------------------------------------------------------------------- | :------------------------------------------------------------------ | :-------------------------------------------------------------------------------------------------------------------- |
| - Retail
- Telco
- Insurance Travel
- Financial Services
- \*Any\*
- Call Center Operations
- Quality Assurance
- Free Text Summary generation
- Targeted Structured Data (Questions)
- Entity Extraction
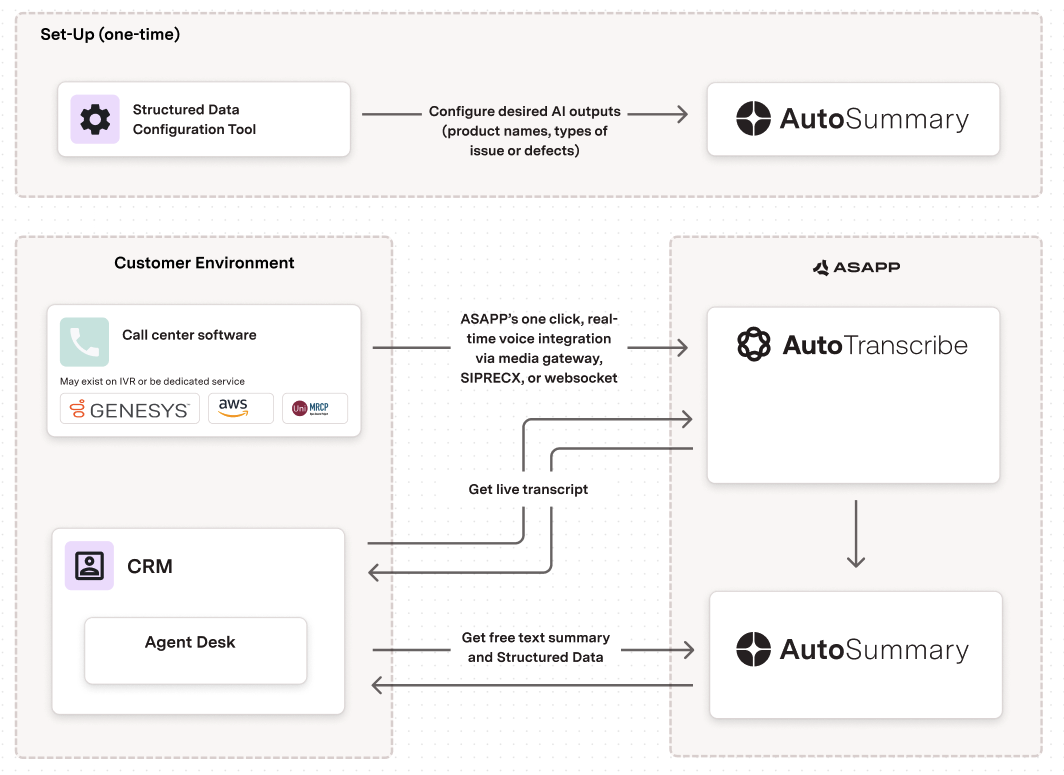 ## Trade Confirmations (Financial Services)
AutoSummary can be used to ensure compliance with financial regulations like FINRA by automatically verifying if agents have confirmed trade details with customers before entering orders into the system. Structured Data can be use to extract price, type of order, the security being bought or sold, etc.
| Industry | Category | AutoSummary Features |
| :----------------- | :--------- | :------------------- |
| Financial Services | Compliance | Entity Extraction |
### Implementation
1. Configure Structured Data extraction to identify order type, security name/symbol, quantity, and price.
2. Set up Entity Extraction to capture customer account numbers and trade confirmation phrases.
3. Integrate with trading platforms for real-time verification.
4. Implement alerting system for non-compliant trade confirmations.
### Architecture
## Trade Confirmations (Financial Services)
AutoSummary can be used to ensure compliance with financial regulations like FINRA by automatically verifying if agents have confirmed trade details with customers before entering orders into the system. Structured Data can be use to extract price, type of order, the security being bought or sold, etc.
| Industry | Category | AutoSummary Features |
| :----------------- | :--------- | :------------------- |
| Financial Services | Compliance | Entity Extraction |
### Implementation
1. Configure Structured Data extraction to identify order type, security name/symbol, quantity, and price.
2. Set up Entity Extraction to capture customer account numbers and trade confirmation phrases.
3. Integrate with trading platforms for real-time verification.
4. Implement alerting system for non-compliant trade confirmations.
### Architecture
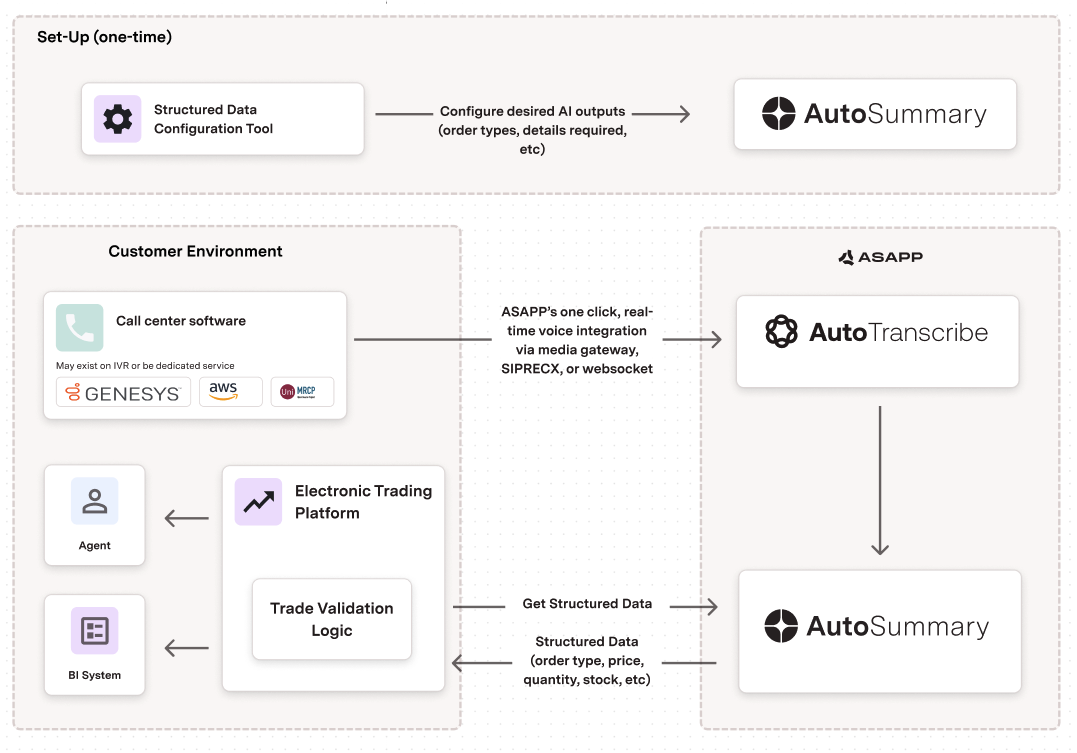 # AutoSummary Feature Releases
Source: https://docs.asapp.com/autosummary/feature-releases
| Feature Name | Feature Release Details | Additional Relevant Information (if available) |
| :---------------------------------------------------- | :---------------------------------------------------------------------------------------------------------------------------------------------------------------------------------------------------------------------------- | :--------------------------------------------- |
| **Feedback** | [Feedback for AutoSummary](/autosummary/feature-releases/feedback-for-autosummary "Feedback for AutoSummary") | |
| **3R Breakdown** | [3R Breakdown for Free-Text Summaries](/autosummary/feature-releases/3r-breakdown-for-autosummary "3R Breakdown for AutoSummary") | |
| **Structured Summary Tags Upgrade** | [Structured Summary Tags Upgrade](/autosummary/feature-releases/structured-summary-upgrade-for-autosummary "Structured Summary Upgrade for AutoSummary") | |
| **Sandbox** | [Sandbox for AutoSummary](/autosummary/feature-releases/sandbox-for-autosummary "Sandbox for AutoSummary") | Accessed via AI-Console |
| **Salesforce Integration** | [AutoSummary for Salesforce](/autosummary/feature-releases/autosummary-for-salesforce "AutoSummary for Salesforce") | |
| **Free-Text and Feedback Feeds for AutoSummary** | [Free-Text and Feedback Feeds for AutoSummary](/autosummary/feature-releases/free-text-and-feedback-feeds-for-autosummary "Free-Text and Feedback Feeds for AutoSummary") | |
| **Added single\_intent to conversation state export** | [ASAPP - Auto Summary - adding single\_intent to conversation state export.pdf](https://docs-sdk.asapp.com/product_features/ASAPP%20-%20Auto%20Summary%20-%20adding%20single_intent%20to%20conversation%20state%20export.pdf) | |
| **Entity Extraction** | [AutoSummary Entity Extraction](/autosummary/feature-releases/autosummary-entity-extraction "AutoSummary Entity Extraction") | |
| **Intents Self Service Tooling** | [Intents Self Service Tooling](/autosummary/feature-releases/intents-self-service-tooling "Intents Self Service Tooling") | |
# 3R Breakdown for AutoSummary
Source: https://docs.asapp.com/autosummary/feature-releases/3r-breakdown-for-autosummary
## Feature Release
This is an announcement for an upcoming ASAPP feature. Your ASAPP account team will provide a target release date and can direct you to more detailed information as needed.
## Overview
This update to AutoSummary organizes free-text conversation summaries using the "3R's":
* **Reason** for contact
* **Resolution** process
* **Result** of the interaction
## Use and Impact
This enhancement to AutoSummary supports the same use cases and situations as the current free-text summaries.
It is expected that grouping summary sentences by the "3Rs" will reduce the cognitive load for end-users when reading historical disposition notes.
## How It Works
Free-text summary sentences retrieved by AutoSummary will be grouped into **reason**, **resolution**, and **result**, with the beginning of each group denoted by the name of that group.
**Comparison of Free-text Summaries to 3R Summaries**
| Free-text Summary | Free-text Summary with 3R Breakdown |
| :-------------------------------------------------------------------------------------------------------------------------------------------------------------------------------------------------------------------------------------------------------------------------------------------------------------------------------- | :------------------------------------------------------------------------------------------------------------------------------------------------------------------------------------------------------------------------------------------------------------------------------------------------------------------------------------------------------------ |
| Customer called in to cancel an account. Agent informed the customer that the account was for a business account. Agent explained that they did not have the correct account information and requested that the customer verify it. Agent provided the business department phone number. | Reason: Customer called in to cancel an account. Resolution: Agent informed the customer that the account was for a business account. Agent explained that they did not have the correct account information and requested that the customer verify it. Result: Agent provided the business department phone number. |
| Customer called in to switch their phone plan from the unlimited plan to the starter plan. Agent informed the customer that there would be a two-day proration charge for the change. Agent adjusted the plan for the customer and informed them of their new monthly charge. Agent transferred the customer to the Starter plan. | Reason: Customer called in to switch their phone plan from the unlimited plan to the starter plan. Resolution: Agent informed the customer that there would be a two-day proration charge for the change. Agent adjusted the plan for the customer and informed them of their new monthly charge. Result: Agent transferred the customer to the Starter plan. |
**On/Off Configuration**
The 3R Breakdown enhancement to AutoSummary can be configured to be ON or OFF. Customers who don't want this breakdown can continue receiving the consolidated paragraph that excludes reason, resolution, and result labeling.
## FAQs
1. **Do I need to make any changes on my integration with AutoSummary?**
No. This feature doesn't modify API specs so it should work with your current integration. What's changing is the content of the summary, which will now come with "R" labels at the beginning of each "R" group.
2. **What happens if there are multiple intents, i.e. multiple reasons for contact?**
There will be a single "Reason" group that will contain the summary sentences corresponding to those multiple intents. The resolution and result of each of those intents will live in the "Resolution" and "Result" groups. The order of the summary sentences will be determined by the chronology of events.
3. **Should we expect to see the three groups in every summary?**
No, for 3 reasons:
* Not all conversations contain the 3Rs (e.g. ghost customer, abrupt ending, wrong queue, etc.)
* Often times the "Result" is implicit (or explicit) in the "Resolution"
* Machine Learning is not perfect. The model might miss the summary sentences of a category and/or miscategorize summary sentences
4. **Can we provide a structure/grouping different from the 3R one (e.g., STAR framework, 4 whys)?**
No. At present, the 3R breakdown is the only framework available.
5. **Can I assume that this particular response structure will be supported indefinitely? (So I could leverage the 3R format, for example, by extracting the Reason(s) for contact?)**
No. ASAPP reserves the right to change the presentation of the AutoSummary output within the constraints of the API definition. You should treat the output as free-text.
# AutoSummary Entity Extraction
Source: https://docs.asapp.com/autosummary/feature-releases/autosummary-entity-extraction
## Feature Release
This is the announcement for an upcoming ASAPP feature. Your ASAPP account team will provide a target release date and can direct you to more detailed information as needed.
## Overview
AutoSummary is being extended with a new feature, Entity Extraction.
The entity extraction feature identifies and extracts key entities---such as Product names, dates, \$ amounts, competitor names---from the conversations and text. The feature is designed to enhance data retrieval and Targeted, custom analytics for downstream use and to optimize operations.
This feature is fully customizable. Customers can request the extraction of specific keywords tailored to their domain and line of business, enabling the extraction of a wide range of insights from conversations.
## Use and Impact
Users need the flexibility to target and extract analytics for downstream use and to optimize operations, and these data points differ across companies and over time. Entity extraction can be useful in several key use cases:
* **Quick Information Retrieval**: Agents can quickly extract critical information such as order numbers, \$ amount, competitor name and product details from conversations, improving response times and customer satisfaction.
* **Insight Extraction**: Agents can extract specific keywords and entities from large volumes of text, facilitating detailed reporting, trends and patterns that inform decision-making.
The Entity Extraction feature aims to deliver significant benefits to the enterprises:
* **Faster Information Retrieval (after-call wrap time)**: By automatically extracting key entities from conversations, users can quickly locate relevant information without manually sifting through chat/conversation.
* **Informed Actions**: With quick access to important elements of a conversation, users can make more informed decisions, leading to better outcomes in customer support
## How it Works
When agents finish a conversation, AutoSummary analyzes the conversations, and extracts key entities for insights which are relevant to the conversation. These key entities can be retrieved via the Entities API, or within the Conversation Explorer.
Work with your ASAPP team to configure the entities you want to extract. ASAPP also provides a number of common out of the box entities that you may use or modify from.
Some examples of the types of questions you could ask:
* Date mentioned by the customer as the start of the issue
* The type of product the call described (e.g. iPhone vs Android)
* \$ amounts that are important to the issue
* Last-four digits of the account number (if not redacted in the transcript)
* A competitor name
This upgrade comes with no changes to the API specs; Work with your ASAPP team to configure the same both custom and default entities that you want to enable.
Below are the example to be provided to get the entities enabled
* **Entity name**: 'Product'
* **Description**: The product that customer is talking about
* **Example (Product Name)**: 'Nike Dunk Low Retro'
## FAQs
1. **Can I customize the entities that are extracted?**
Yes, you can customize the feature to extract specific keywords and entities relevant to your domain and business needs, ensuring the extracted data is tailored to your unique requirements.
2. **How do you keep the entities up to date?**
Entities are kept up to date through a combination of automated updates and user feedback on a regular interval.
# AutoSummary for Salesforce
Source: https://docs.asapp.com/autosummary/feature-releases/autosummary-for-salesforce
## Feature Release
This is the announcement for an upcoming ASAPP feature. Your ASAPP account team will provide a target release date and can direct you to more detailed information as needed.
## Overview
ASAPP is extending our existing native plug-in for Salesforce to enable rapid implementations of AutoSummary. With this plug-in, Salesforce administrators will be able to install AutoSummary to their Salesforce organization and centrally configure the distribution of summaries into Lightning.
# AutoSummary Feature Releases
Source: https://docs.asapp.com/autosummary/feature-releases
| Feature Name | Feature Release Details | Additional Relevant Information (if available) |
| :---------------------------------------------------- | :---------------------------------------------------------------------------------------------------------------------------------------------------------------------------------------------------------------------------- | :--------------------------------------------- |
| **Feedback** | [Feedback for AutoSummary](/autosummary/feature-releases/feedback-for-autosummary "Feedback for AutoSummary") | |
| **3R Breakdown** | [3R Breakdown for Free-Text Summaries](/autosummary/feature-releases/3r-breakdown-for-autosummary "3R Breakdown for AutoSummary") | |
| **Structured Summary Tags Upgrade** | [Structured Summary Tags Upgrade](/autosummary/feature-releases/structured-summary-upgrade-for-autosummary "Structured Summary Upgrade for AutoSummary") | |
| **Sandbox** | [Sandbox for AutoSummary](/autosummary/feature-releases/sandbox-for-autosummary "Sandbox for AutoSummary") | Accessed via AI-Console |
| **Salesforce Integration** | [AutoSummary for Salesforce](/autosummary/feature-releases/autosummary-for-salesforce "AutoSummary for Salesforce") | |
| **Free-Text and Feedback Feeds for AutoSummary** | [Free-Text and Feedback Feeds for AutoSummary](/autosummary/feature-releases/free-text-and-feedback-feeds-for-autosummary "Free-Text and Feedback Feeds for AutoSummary") | |
| **Added single\_intent to conversation state export** | [ASAPP - Auto Summary - adding single\_intent to conversation state export.pdf](https://docs-sdk.asapp.com/product_features/ASAPP%20-%20Auto%20Summary%20-%20adding%20single_intent%20to%20conversation%20state%20export.pdf) | |
| **Entity Extraction** | [AutoSummary Entity Extraction](/autosummary/feature-releases/autosummary-entity-extraction "AutoSummary Entity Extraction") | |
| **Intents Self Service Tooling** | [Intents Self Service Tooling](/autosummary/feature-releases/intents-self-service-tooling "Intents Self Service Tooling") | |
# 3R Breakdown for AutoSummary
Source: https://docs.asapp.com/autosummary/feature-releases/3r-breakdown-for-autosummary
## Feature Release
This is an announcement for an upcoming ASAPP feature. Your ASAPP account team will provide a target release date and can direct you to more detailed information as needed.
## Overview
This update to AutoSummary organizes free-text conversation summaries using the "3R's":
* **Reason** for contact
* **Resolution** process
* **Result** of the interaction
## Use and Impact
This enhancement to AutoSummary supports the same use cases and situations as the current free-text summaries.
It is expected that grouping summary sentences by the "3Rs" will reduce the cognitive load for end-users when reading historical disposition notes.
## How It Works
Free-text summary sentences retrieved by AutoSummary will be grouped into **reason**, **resolution**, and **result**, with the beginning of each group denoted by the name of that group.
**Comparison of Free-text Summaries to 3R Summaries**
| Free-text Summary | Free-text Summary with 3R Breakdown |
| :-------------------------------------------------------------------------------------------------------------------------------------------------------------------------------------------------------------------------------------------------------------------------------------------------------------------------------- | :------------------------------------------------------------------------------------------------------------------------------------------------------------------------------------------------------------------------------------------------------------------------------------------------------------------------------------------------------------ |
| Customer called in to cancel an account. Agent informed the customer that the account was for a business account. Agent explained that they did not have the correct account information and requested that the customer verify it. Agent provided the business department phone number. | Reason: Customer called in to cancel an account. Resolution: Agent informed the customer that the account was for a business account. Agent explained that they did not have the correct account information and requested that the customer verify it. Result: Agent provided the business department phone number. |
| Customer called in to switch their phone plan from the unlimited plan to the starter plan. Agent informed the customer that there would be a two-day proration charge for the change. Agent adjusted the plan for the customer and informed them of their new monthly charge. Agent transferred the customer to the Starter plan. | Reason: Customer called in to switch their phone plan from the unlimited plan to the starter plan. Resolution: Agent informed the customer that there would be a two-day proration charge for the change. Agent adjusted the plan for the customer and informed them of their new monthly charge. Result: Agent transferred the customer to the Starter plan. |
**On/Off Configuration**
The 3R Breakdown enhancement to AutoSummary can be configured to be ON or OFF. Customers who don't want this breakdown can continue receiving the consolidated paragraph that excludes reason, resolution, and result labeling.
## FAQs
1. **Do I need to make any changes on my integration with AutoSummary?**
No. This feature doesn't modify API specs so it should work with your current integration. What's changing is the content of the summary, which will now come with "R" labels at the beginning of each "R" group.
2. **What happens if there are multiple intents, i.e. multiple reasons for contact?**
There will be a single "Reason" group that will contain the summary sentences corresponding to those multiple intents. The resolution and result of each of those intents will live in the "Resolution" and "Result" groups. The order of the summary sentences will be determined by the chronology of events.
3. **Should we expect to see the three groups in every summary?**
No, for 3 reasons:
* Not all conversations contain the 3Rs (e.g. ghost customer, abrupt ending, wrong queue, etc.)
* Often times the "Result" is implicit (or explicit) in the "Resolution"
* Machine Learning is not perfect. The model might miss the summary sentences of a category and/or miscategorize summary sentences
4. **Can we provide a structure/grouping different from the 3R one (e.g., STAR framework, 4 whys)?**
No. At present, the 3R breakdown is the only framework available.
5. **Can I assume that this particular response structure will be supported indefinitely? (So I could leverage the 3R format, for example, by extracting the Reason(s) for contact?)**
No. ASAPP reserves the right to change the presentation of the AutoSummary output within the constraints of the API definition. You should treat the output as free-text.
# AutoSummary Entity Extraction
Source: https://docs.asapp.com/autosummary/feature-releases/autosummary-entity-extraction
## Feature Release
This is the announcement for an upcoming ASAPP feature. Your ASAPP account team will provide a target release date and can direct you to more detailed information as needed.
## Overview
AutoSummary is being extended with a new feature, Entity Extraction.
The entity extraction feature identifies and extracts key entities---such as Product names, dates, \$ amounts, competitor names---from the conversations and text. The feature is designed to enhance data retrieval and Targeted, custom analytics for downstream use and to optimize operations.
This feature is fully customizable. Customers can request the extraction of specific keywords tailored to their domain and line of business, enabling the extraction of a wide range of insights from conversations.
## Use and Impact
Users need the flexibility to target and extract analytics for downstream use and to optimize operations, and these data points differ across companies and over time. Entity extraction can be useful in several key use cases:
* **Quick Information Retrieval**: Agents can quickly extract critical information such as order numbers, \$ amount, competitor name and product details from conversations, improving response times and customer satisfaction.
* **Insight Extraction**: Agents can extract specific keywords and entities from large volumes of text, facilitating detailed reporting, trends and patterns that inform decision-making.
The Entity Extraction feature aims to deliver significant benefits to the enterprises:
* **Faster Information Retrieval (after-call wrap time)**: By automatically extracting key entities from conversations, users can quickly locate relevant information without manually sifting through chat/conversation.
* **Informed Actions**: With quick access to important elements of a conversation, users can make more informed decisions, leading to better outcomes in customer support
## How it Works
When agents finish a conversation, AutoSummary analyzes the conversations, and extracts key entities for insights which are relevant to the conversation. These key entities can be retrieved via the Entities API, or within the Conversation Explorer.
Work with your ASAPP team to configure the entities you want to extract. ASAPP also provides a number of common out of the box entities that you may use or modify from.
Some examples of the types of questions you could ask:
* Date mentioned by the customer as the start of the issue
* The type of product the call described (e.g. iPhone vs Android)
* \$ amounts that are important to the issue
* Last-four digits of the account number (if not redacted in the transcript)
* A competitor name
This upgrade comes with no changes to the API specs; Work with your ASAPP team to configure the same both custom and default entities that you want to enable.
Below are the example to be provided to get the entities enabled
* **Entity name**: 'Product'
* **Description**: The product that customer is talking about
* **Example (Product Name)**: 'Nike Dunk Low Retro'
## FAQs
1. **Can I customize the entities that are extracted?**
Yes, you can customize the feature to extract specific keywords and entities relevant to your domain and business needs, ensuring the extracted data is tailored to your unique requirements.
2. **How do you keep the entities up to date?**
Entities are kept up to date through a combination of automated updates and user feedback on a regular interval.
# AutoSummary for Salesforce
Source: https://docs.asapp.com/autosummary/feature-releases/autosummary-for-salesforce
## Feature Release
This is the announcement for an upcoming ASAPP feature. Your ASAPP account team will provide a target release date and can direct you to more detailed information as needed.
## Overview
ASAPP is extending our existing native plug-in for Salesforce to enable rapid implementations of AutoSummary. With this plug-in, Salesforce administrators will be able to install AutoSummary to their Salesforce organization and centrally configure the distribution of summaries into Lightning.
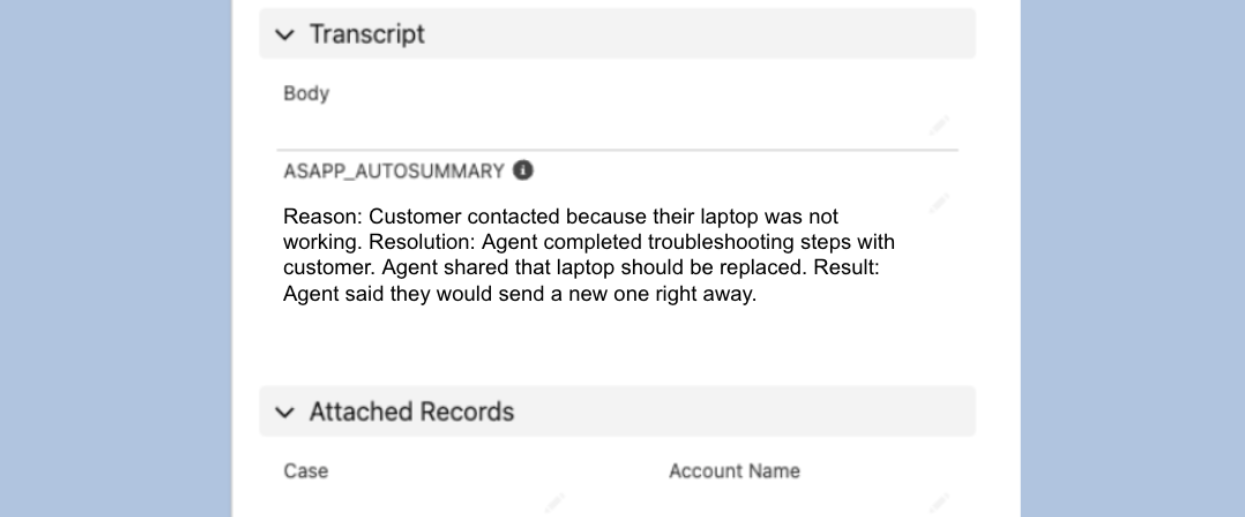 ## Use and Impact
For contact centers that use Salesforce Service Cloud Lightning, the AutoSummary plug-in is a low-code, rapid implementation option. Administrators can complete set up in hours and quickly deploy summarization capabilities in their production workflows without resource-intensive integration work.
With AutoSummary enabled, agents no longer need to take extensive notes summarizing events during the call.
A free-text summary is sent to a Salesforce field to be saved automatically the conversation record.
## Use and Impact
For contact centers that use Salesforce Service Cloud Lightning, the AutoSummary plug-in is a low-code, rapid implementation option. Administrators can complete set up in hours and quickly deploy summarization capabilities in their production workflows without resource-intensive integration work.
With AutoSummary enabled, agents no longer need to take extensive notes summarizing events during the call.
A free-text summary is sent to a Salesforce field to be saved automatically the conversation record.
 *The Conversation Explorer showing the summary tab.*
## Use and Impact
Reviewing and understanding your agent's conversation is a central task in running a successful contact center. Your administrators and supervisors can use the conversation explorer as the central place to review conversations.
This also enables you to see the observations from AutoSummary products independent of an API integration, giving you insights immediately while you build out a robust integration to AutoSummary's APIs.
## How It Works
When navigating conversation explorer, users have two new tabs:
* **Summary tab**
* **Structured Data tab**
### Summary tab
The Summary tab shows the free text summary from AutoSummary as a list of bullet points. The notes are the additional notes that agents added to the conversation.
*The Conversation Explorer showing the summary tab.*
## Use and Impact
Reviewing and understanding your agent's conversation is a central task in running a successful contact center. Your administrators and supervisors can use the conversation explorer as the central place to review conversations.
This also enables you to see the observations from AutoSummary products independent of an API integration, giving you insights immediately while you build out a robust integration to AutoSummary's APIs.
## How It Works
When navigating conversation explorer, users have two new tabs:
* **Summary tab**
* **Structured Data tab**
### Summary tab
The Summary tab shows the free text summary from AutoSummary as a list of bullet points. The notes are the additional notes that agents added to the conversation.
 ### Structured Data tab
The Structured Data tab shows the Structured Data from the conversation.
Structured Data are the information and insights you want extracted from the conversation. Initially, this only supports information that can be represented as yes or no.
### Structured Data tab
The Structured Data tab shows the Structured Data from the conversation.
Structured Data are the information and insights you want extracted from the conversation. Initially, this only supports information that can be represented as yes or no.
 # Feedback for AutoSummary
Source: https://docs.asapp.com/autosummary/feature-releases/feedback-for-autosummary
## Feature Release
This is the announcement for an upcoming ASAPP feature. Your ASAPP account team will provide a target release date and can direct you to more detailed information as needed.
## Overview
AutoSummary now supports model retraining using agent feedback. The feedback endpoint receives free-text paragraph summaries submitted by agents, and uses the difference between the automatically generated summary and the final submission to improve the model over time.
# Feedback for AutoSummary
Source: https://docs.asapp.com/autosummary/feature-releases/feedback-for-autosummary
## Feature Release
This is the announcement for an upcoming ASAPP feature. Your ASAPP account team will provide a target release date and can direct you to more detailed information as needed.
## Overview
AutoSummary now supports model retraining using agent feedback. The feedback endpoint receives free-text paragraph summaries submitted by agents, and uses the difference between the automatically generated summary and the final submission to improve the model over time.
 ## Use and Impact
In agent workflows that expose an automatically generated summary for final review, agents may make edits to incorporate uncaptured nuances or correct details where needed. Rather than losing this valuable edit data, AutoSummary can now incorporate it into a feedback loop to improve the quality of the model.
The feedback endpoint can also be used to accept edited summaries that are reviewed in quality assurance workflows.
Standardizing the format and mechanism for receiving feedback facilitates ongoing model retraining that leads to improvements in...
1. Error reduction
2. Coverage of key topics
## How It Works
A summary identifier field is being added to free-text summary responses. This new field should be used in requests to the feedback endpoint.
**Free-Text Summary ID**
The GET endpoint for free-text summaries will be updated with an additional response field called `summaryId` . This field must be included in requests to the feedback endpoint to identify the summary for which you are providing feedback.
**Feedback Request Format**
The request body for the new feedback POST endpoint requires the following:
* Conversation identifier
* Summary identifier (as mentioned above)
* Final free-text summary submitted by the agent
## FAQs
1. **Is it mandatory or optional to use the AutoSummary feedback endpoint?**
For implementations of AutoSummary that give agents the ability to edit summaries, ASAPP strongly recommends using the feedback endpoint to improve summaries over time. Anecdotal feedback from the field is considerably less useful for making model improvements.
For implementations of AutoSummary that do not give agents the ability to edit summaries, there is no need to use the feedback endpoint.
2. **Will the feedback endpoint accept free-text summaries that are not edited?**
Yes. For simplicity, ASAPP recommends sending all summaries that agents or other end-users have reviewed and submitted, even if the reviewed summaries are identical to the automatically generated summaries. AutoSummary will detect edits and use them for model training.
3. **How does automatic model retraining work?**
AutoSummary continuously collects feedback from each conversation, identifying which submitted summaries contain edits from the initially generated summary.
These edits represent signals that AutoSummary models can use to adjust outputted text to better represent key events in the conversation.
# Free-Text and Feedback Feeds for AutoSummary
Source: https://docs.asapp.com/autosummary/feature-releases/free-text-and-feedback-feeds-for-autosummary
## Feature Release
This is the announcement for an upcoming ASAPP feature. Your ASAPP account team will provide a target release date and can direct you to more detailed information as needed.
## Overview
ASAPP introduces two feeds to retrieve data for free-text summaries generated by AutoSummary and edited versions of summaries submitted by agents as feedback.
## Use and Impact
These two feeds enable administrators to retrieve AutoSummary data using the File Explorer API:
* **Free-text feed**: Retrieves data from free-text summaries generated by AutoSummary. This feed has one record per free-text summary produced and can have multiple summaries per conversation.
* **Feedback feed**: Retrieves data from feedback summaries submitted by the agents. This feed contains the text of the feedback submitted by the agent. Developers can join this feed to the AutoSummary free-text feed using the summary ID.
## How It Works
Watch the following video walkthrough to learn about the Free-Text and Feedback feeds:
Developers can access these feeds using the [File Exporter API](/reporting/file-exporter)
Besides the standard fields common to all AI Services feeds: `agent_id`, `company_marker`, `conversation_id`, `dt`, `external_conversation_id`, `hr`, and `instance_ts`; each feed returns specific data:
### autosummary\_free\_text Feed
| Field | Description |
| :----------------------------------- | :----------------------------------------------------------------------------------------------- |
| autosummary\_free\_text\_ts | The timestamp of when the free-text summary was emitted. |
| autosummary\_free\_text | The text of the unedited free-text summary. |
| is\_autosummary\_feedback\_used | A numeric true/false indicator of whether the agent submitted the free-text summary as feedback. |
| is\_autosummary\_feedback\_edited | A numeric true/false indicator of whether the agent edited the free-text summary. |
| autosummary\_free\_text\_length | A count of how many characters are in the free-text summary. |
| autosummary\_feedback\_length | A count of how many characters are in the free-text summary edited by the agent. |
| autosummary\_levenshtein\_difference | The Levenshtein edit distances between the free-text summary and feedback summary. |
| summary\_id | Unique identifier for AutoSummary feedback and free-text summary events. |
### autosummary\_feedback Feed
| Field | Description |
| :------------------------ | :------------------------------------------------------------------------------------------------------ |
| autosummary\_feedback\_ts | The timestamp of the *autosummary\_feedback\_summary* event. |
| autosummary\_feedback | Text submitted by agent, inclusive of any edits made to the free-text summary generated by AutoSummary. |
| summary\_id | Unique identifier for AutoSummary feedback and free-text summary events. |
## FAQs
1. **What is the difference between summary data provided in the conversation state feed (`staging_conversation_state`) and these new AutoSummary feeds?**
The conversation state feed only provides the last summary of each conversation. These two feeds provide every summary.
2. **Is something changing about the way AutoSummary provides data?**
No. Responses from the API haven't changed.
# Health Check API
Source: https://docs.asapp.com/autosummary/feature-releases/health-check-api
## Feature Release
This is the announcement for an upcoming ASAPP feature. Your ASAPP account team will provide a target release date and can direct you to more detailed information as needed.
## Overview
ASAPP provides a means for our customers to check the operational status of our API platform. Developers can ping this endpoint to verify that the ASAPP infrastructure is working as expected.
## Use and Impact
Developers can either check ad hoc if the ASAPP infrastructure is up at a given time or implement automated API monitoring to send a request to the Health Check API at a preset interval.
This feature is intended to improve developer confidence when integrating with ASAPP services. It also removes the need for developers to send requests to other ASAPP services to check their status, which may trigger errors unnecessarily.
## How It Works
Developers can run a `GET https://api.sandbox.asapp.com/v1/health` operation and inspect for a 200 response with either the SUCCESS or FAILED value for the status of the core ASAPP platform.
**Configuration**
Developers must request access to the API endpoint in the Developer Portal:
1. Access the Developer Portal.
2. Navigate to **Apps**, select your application, and authorize the Health Check API.
3. Reach out to your ASAPP account team to authorize access.
# Intents Self Service Tooling
Source: https://docs.asapp.com/autosummary/feature-releases/intents-self-service-tooling
## Feature Release
This is the announcement for an upcoming ASAPP feature. Your ASAPP account team will provide a target release date and can direct you to more detailed information as needed.
## Overview
The Intents Self Service user-interface tool, integrated within ASAPP's AI Console, streamlines the onboarding and maintenance process of intent classification for customers.
This automated, self-serve interface enables users to easily upload, create or modify intent labels, ensuring a seamless onboarding experience and ease of updating the system to meet new business needs without requiring support team intervention.
## Use and Impact
Many customers are interested in providing intent labels hierarchy information before or during onboarding and want to see results via a frontend (UI) tool. Addressing this issue will streamline the onboarding process for intents and facilitates faster feedback loops.
In addition, customers interested in updating their intent labels to meet new requirements (for example, add new labels, consolidate multiple intents together or create finer-grained intents) can do so themselves.
Intent self-serve tooling achieves a fully automated intent on-boarding experience via leveraging GenAI (LLMs) models. Below are the goals to be achieved with the feature:
* Achieve the customer onboarding Time of 0 days
* Provide a Self-serving front-end tooling to customers to upload and update the intent labels
* Develop a real-time Intent classification deployment pipeline leveraging LLMs
* Update the intent labels with the ability to deploy to production within minutes
## How It Works
This service is built on a front-end interface, no separate API configuration is required from the customers.
**Import Flow of Intents**
1. Upload a csv/text file with the intent details, Refer to the provided links in the guidelines to familiarize yourself with the required file format and the necessary information for intents.
2. Select the desired file and upload the file
## Use and Impact
In agent workflows that expose an automatically generated summary for final review, agents may make edits to incorporate uncaptured nuances or correct details where needed. Rather than losing this valuable edit data, AutoSummary can now incorporate it into a feedback loop to improve the quality of the model.
The feedback endpoint can also be used to accept edited summaries that are reviewed in quality assurance workflows.
Standardizing the format and mechanism for receiving feedback facilitates ongoing model retraining that leads to improvements in...
1. Error reduction
2. Coverage of key topics
## How It Works
A summary identifier field is being added to free-text summary responses. This new field should be used in requests to the feedback endpoint.
**Free-Text Summary ID**
The GET endpoint for free-text summaries will be updated with an additional response field called `summaryId` . This field must be included in requests to the feedback endpoint to identify the summary for which you are providing feedback.
**Feedback Request Format**
The request body for the new feedback POST endpoint requires the following:
* Conversation identifier
* Summary identifier (as mentioned above)
* Final free-text summary submitted by the agent
## FAQs
1. **Is it mandatory or optional to use the AutoSummary feedback endpoint?**
For implementations of AutoSummary that give agents the ability to edit summaries, ASAPP strongly recommends using the feedback endpoint to improve summaries over time. Anecdotal feedback from the field is considerably less useful for making model improvements.
For implementations of AutoSummary that do not give agents the ability to edit summaries, there is no need to use the feedback endpoint.
2. **Will the feedback endpoint accept free-text summaries that are not edited?**
Yes. For simplicity, ASAPP recommends sending all summaries that agents or other end-users have reviewed and submitted, even if the reviewed summaries are identical to the automatically generated summaries. AutoSummary will detect edits and use them for model training.
3. **How does automatic model retraining work?**
AutoSummary continuously collects feedback from each conversation, identifying which submitted summaries contain edits from the initially generated summary.
These edits represent signals that AutoSummary models can use to adjust outputted text to better represent key events in the conversation.
# Free-Text and Feedback Feeds for AutoSummary
Source: https://docs.asapp.com/autosummary/feature-releases/free-text-and-feedback-feeds-for-autosummary
## Feature Release
This is the announcement for an upcoming ASAPP feature. Your ASAPP account team will provide a target release date and can direct you to more detailed information as needed.
## Overview
ASAPP introduces two feeds to retrieve data for free-text summaries generated by AutoSummary and edited versions of summaries submitted by agents as feedback.
## Use and Impact
These two feeds enable administrators to retrieve AutoSummary data using the File Explorer API:
* **Free-text feed**: Retrieves data from free-text summaries generated by AutoSummary. This feed has one record per free-text summary produced and can have multiple summaries per conversation.
* **Feedback feed**: Retrieves data from feedback summaries submitted by the agents. This feed contains the text of the feedback submitted by the agent. Developers can join this feed to the AutoSummary free-text feed using the summary ID.
## How It Works
Watch the following video walkthrough to learn about the Free-Text and Feedback feeds:
Developers can access these feeds using the [File Exporter API](/reporting/file-exporter)
Besides the standard fields common to all AI Services feeds: `agent_id`, `company_marker`, `conversation_id`, `dt`, `external_conversation_id`, `hr`, and `instance_ts`; each feed returns specific data:
### autosummary\_free\_text Feed
| Field | Description |
| :----------------------------------- | :----------------------------------------------------------------------------------------------- |
| autosummary\_free\_text\_ts | The timestamp of when the free-text summary was emitted. |
| autosummary\_free\_text | The text of the unedited free-text summary. |
| is\_autosummary\_feedback\_used | A numeric true/false indicator of whether the agent submitted the free-text summary as feedback. |
| is\_autosummary\_feedback\_edited | A numeric true/false indicator of whether the agent edited the free-text summary. |
| autosummary\_free\_text\_length | A count of how many characters are in the free-text summary. |
| autosummary\_feedback\_length | A count of how many characters are in the free-text summary edited by the agent. |
| autosummary\_levenshtein\_difference | The Levenshtein edit distances between the free-text summary and feedback summary. |
| summary\_id | Unique identifier for AutoSummary feedback and free-text summary events. |
### autosummary\_feedback Feed
| Field | Description |
| :------------------------ | :------------------------------------------------------------------------------------------------------ |
| autosummary\_feedback\_ts | The timestamp of the *autosummary\_feedback\_summary* event. |
| autosummary\_feedback | Text submitted by agent, inclusive of any edits made to the free-text summary generated by AutoSummary. |
| summary\_id | Unique identifier for AutoSummary feedback and free-text summary events. |
## FAQs
1. **What is the difference between summary data provided in the conversation state feed (`staging_conversation_state`) and these new AutoSummary feeds?**
The conversation state feed only provides the last summary of each conversation. These two feeds provide every summary.
2. **Is something changing about the way AutoSummary provides data?**
No. Responses from the API haven't changed.
# Health Check API
Source: https://docs.asapp.com/autosummary/feature-releases/health-check-api
## Feature Release
This is the announcement for an upcoming ASAPP feature. Your ASAPP account team will provide a target release date and can direct you to more detailed information as needed.
## Overview
ASAPP provides a means for our customers to check the operational status of our API platform. Developers can ping this endpoint to verify that the ASAPP infrastructure is working as expected.
## Use and Impact
Developers can either check ad hoc if the ASAPP infrastructure is up at a given time or implement automated API monitoring to send a request to the Health Check API at a preset interval.
This feature is intended to improve developer confidence when integrating with ASAPP services. It also removes the need for developers to send requests to other ASAPP services to check their status, which may trigger errors unnecessarily.
## How It Works
Developers can run a `GET https://api.sandbox.asapp.com/v1/health` operation and inspect for a 200 response with either the SUCCESS or FAILED value for the status of the core ASAPP platform.
**Configuration**
Developers must request access to the API endpoint in the Developer Portal:
1. Access the Developer Portal.
2. Navigate to **Apps**, select your application, and authorize the Health Check API.
3. Reach out to your ASAPP account team to authorize access.
# Intents Self Service Tooling
Source: https://docs.asapp.com/autosummary/feature-releases/intents-self-service-tooling
## Feature Release
This is the announcement for an upcoming ASAPP feature. Your ASAPP account team will provide a target release date and can direct you to more detailed information as needed.
## Overview
The Intents Self Service user-interface tool, integrated within ASAPP's AI Console, streamlines the onboarding and maintenance process of intent classification for customers.
This automated, self-serve interface enables users to easily upload, create or modify intent labels, ensuring a seamless onboarding experience and ease of updating the system to meet new business needs without requiring support team intervention.
## Use and Impact
Many customers are interested in providing intent labels hierarchy information before or during onboarding and want to see results via a frontend (UI) tool. Addressing this issue will streamline the onboarding process for intents and facilitates faster feedback loops.
In addition, customers interested in updating their intent labels to meet new requirements (for example, add new labels, consolidate multiple intents together or create finer-grained intents) can do so themselves.
Intent self-serve tooling achieves a fully automated intent on-boarding experience via leveraging GenAI (LLMs) models. Below are the goals to be achieved with the feature:
* Achieve the customer onboarding Time of 0 days
* Provide a Self-serving front-end tooling to customers to upload and update the intent labels
* Develop a real-time Intent classification deployment pipeline leveraging LLMs
* Update the intent labels with the ability to deploy to production within minutes
## How It Works
This service is built on a front-end interface, no separate API configuration is required from the customers.
**Import Flow of Intents**
1. Upload a csv/text file with the intent details, Refer to the provided links in the guidelines to familiarize yourself with the required file format and the necessary information for intents.
2. Select the desired file and upload the file
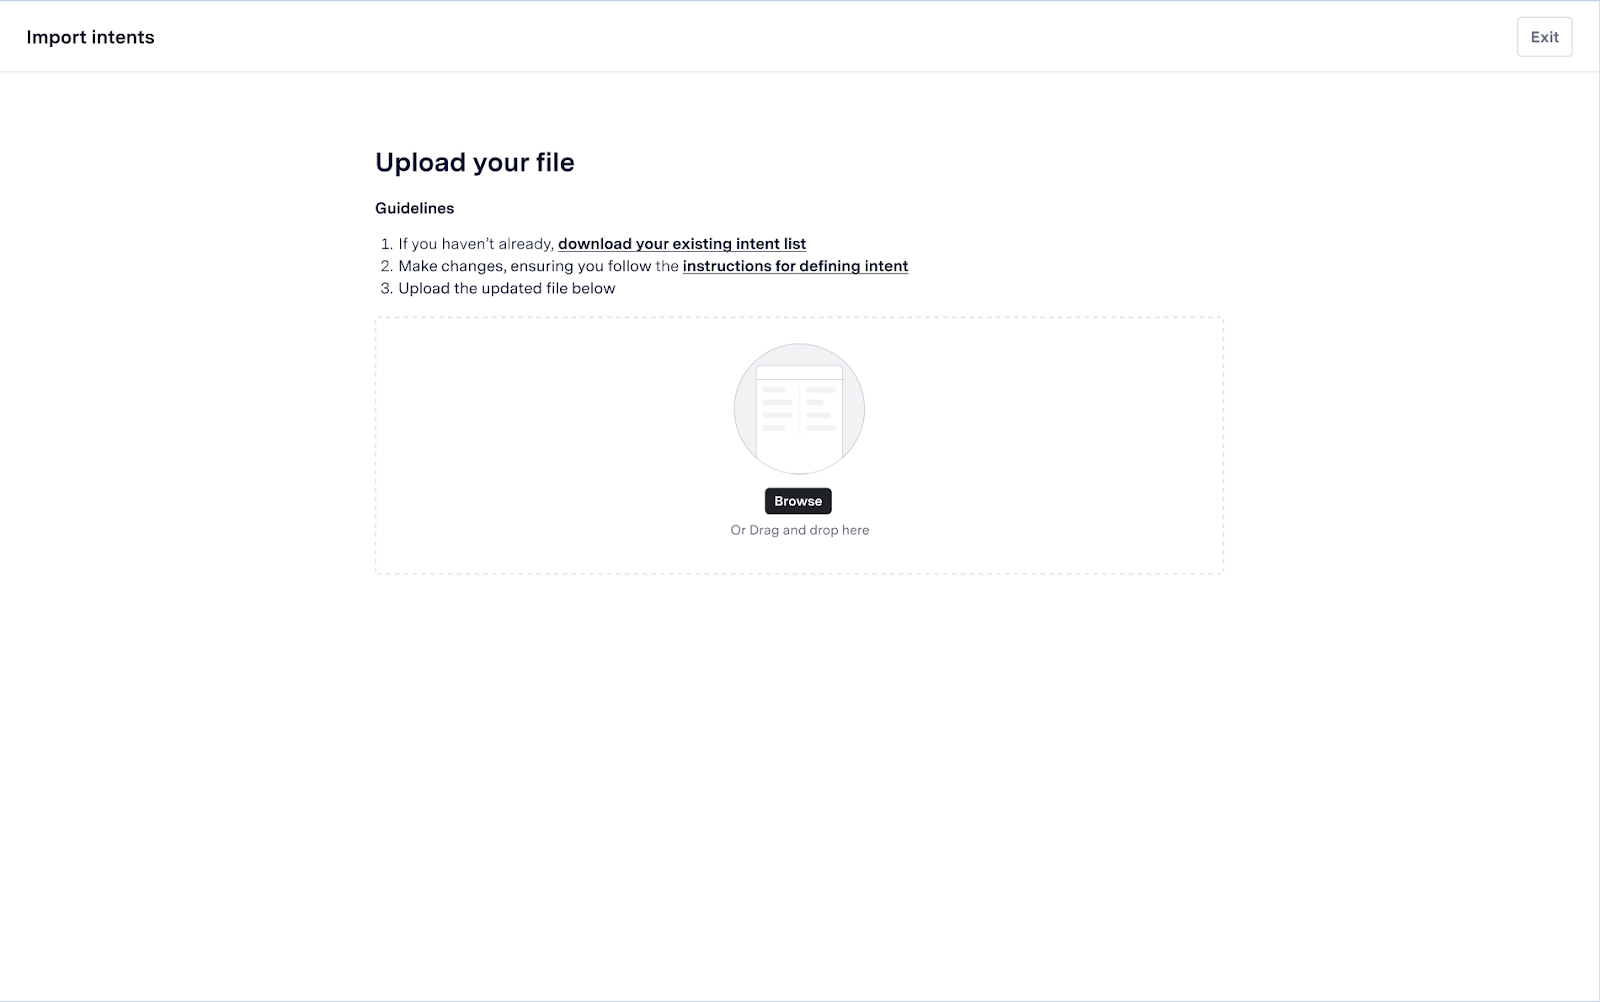 3. Review selected file before deploying the intents
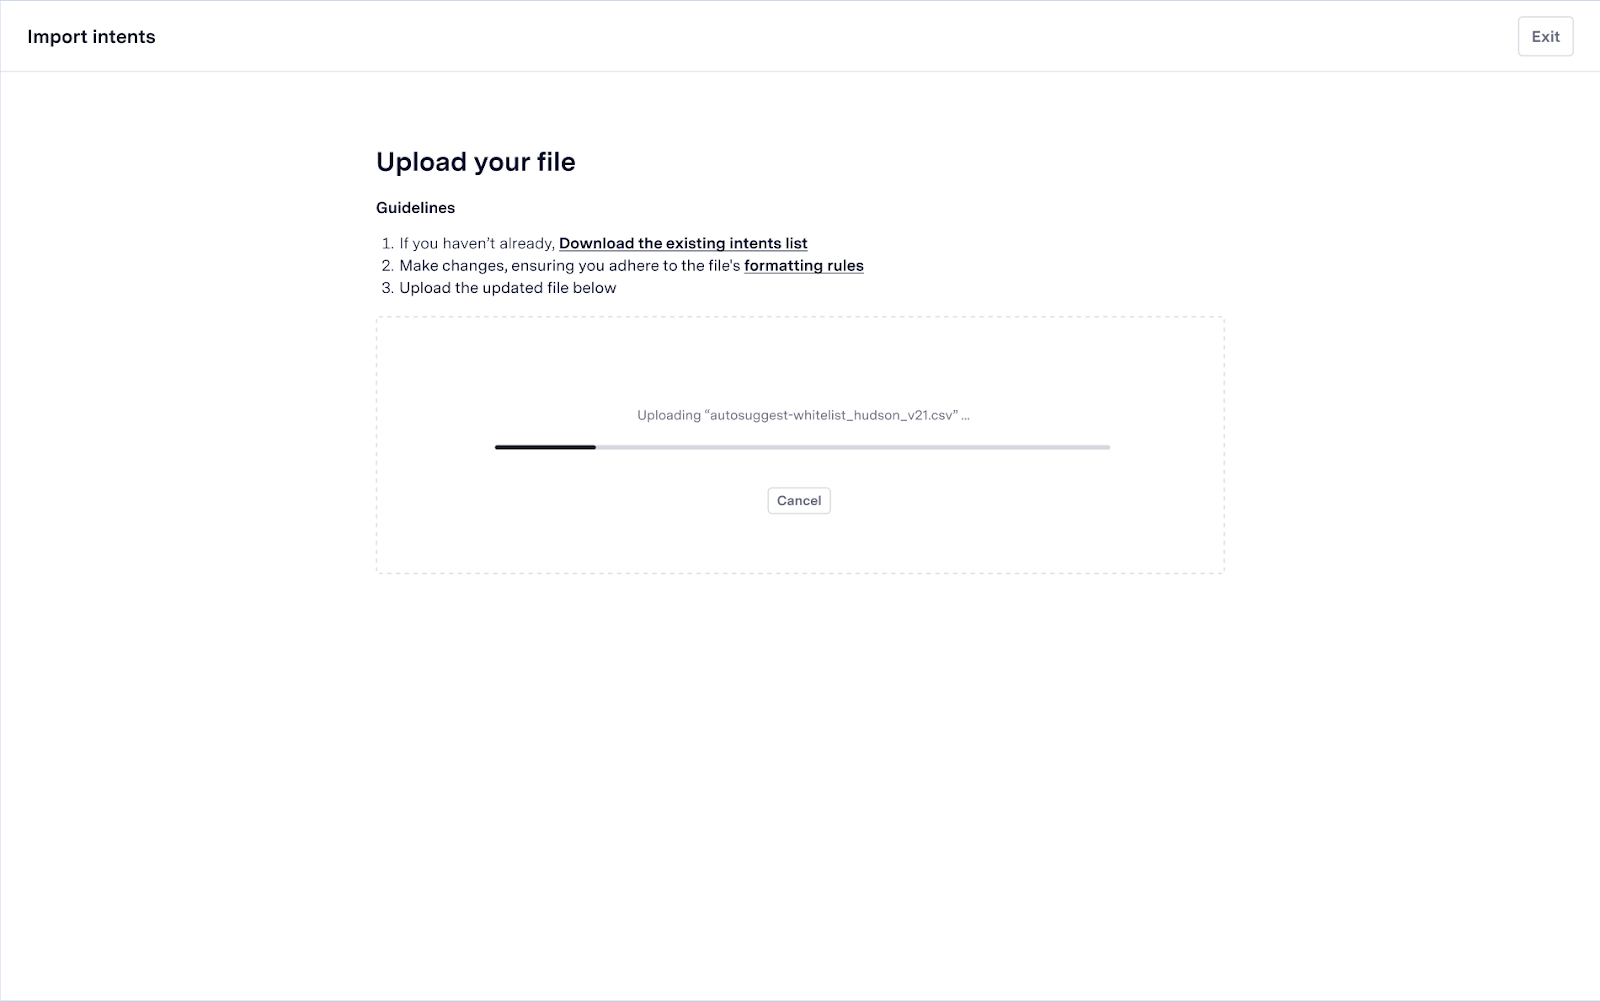 4. Review and verify your uploaded intents
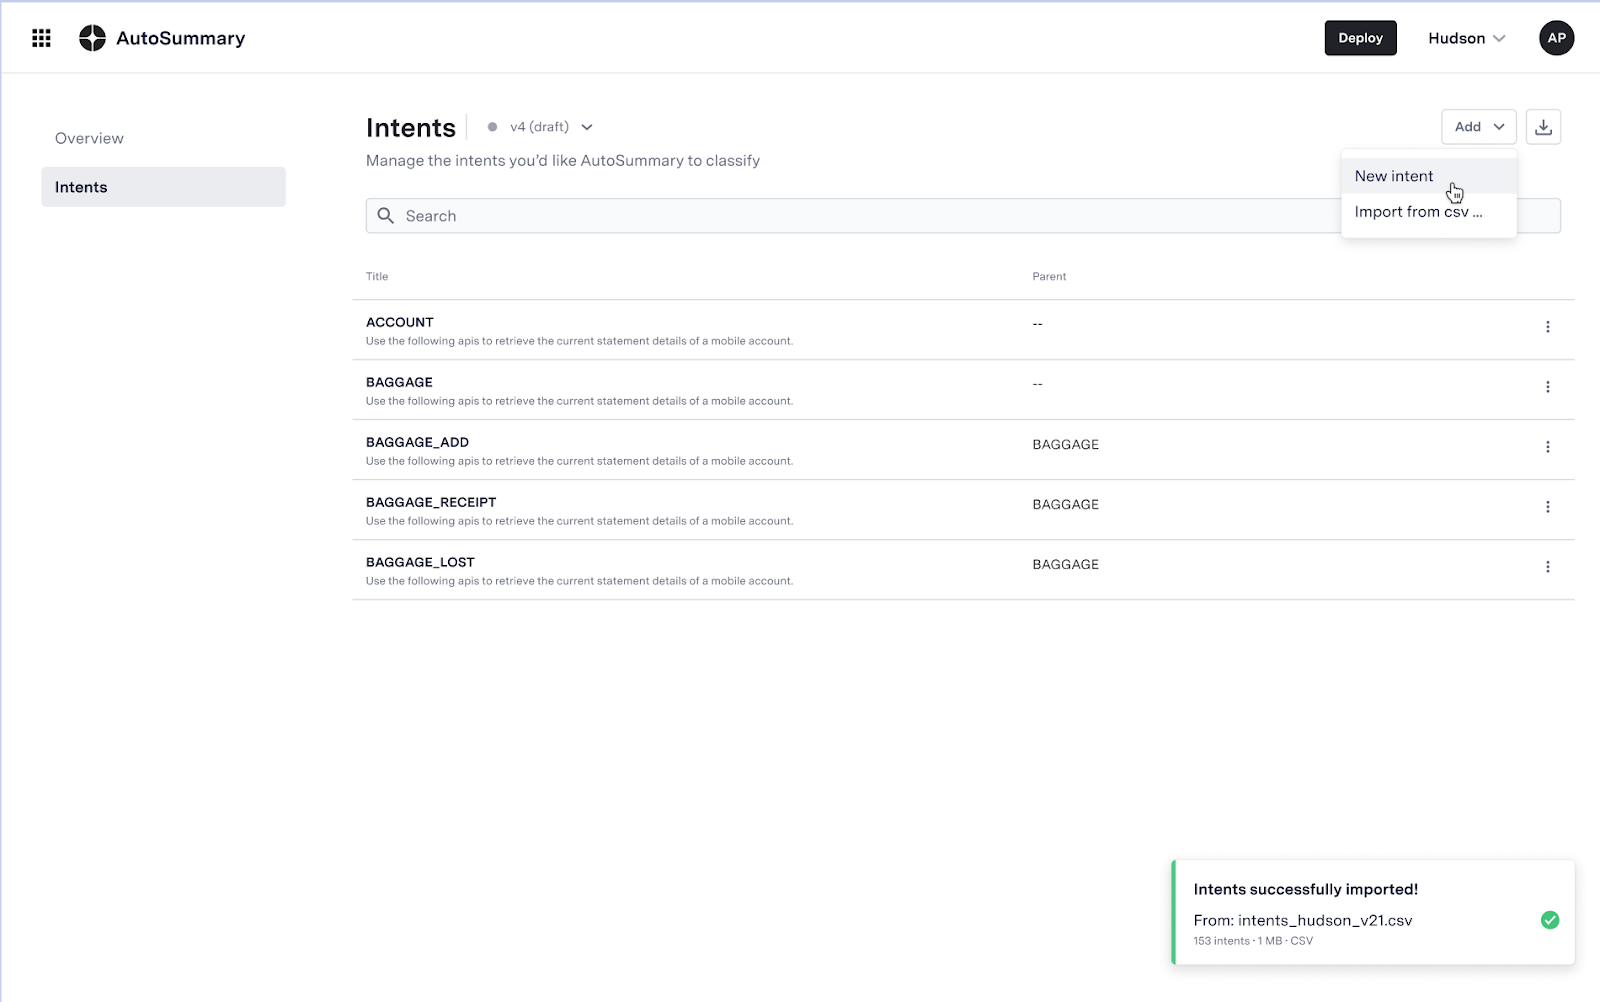 **Adding a new Intent to the hierarchy**
1. Review the existing Intent hierarchy and click 'New Intent' from the 'Add' button top right
2. Add intent details such as the intent label, parent intent, and description. Refer to sample file in case any further clarifications
**Adding a new Intent to the hierarchy**
1. Review the existing Intent hierarchy and click 'New Intent' from the 'Add' button top right
2. Add intent details such as the intent label, parent intent, and description. Refer to sample file in case any further clarifications
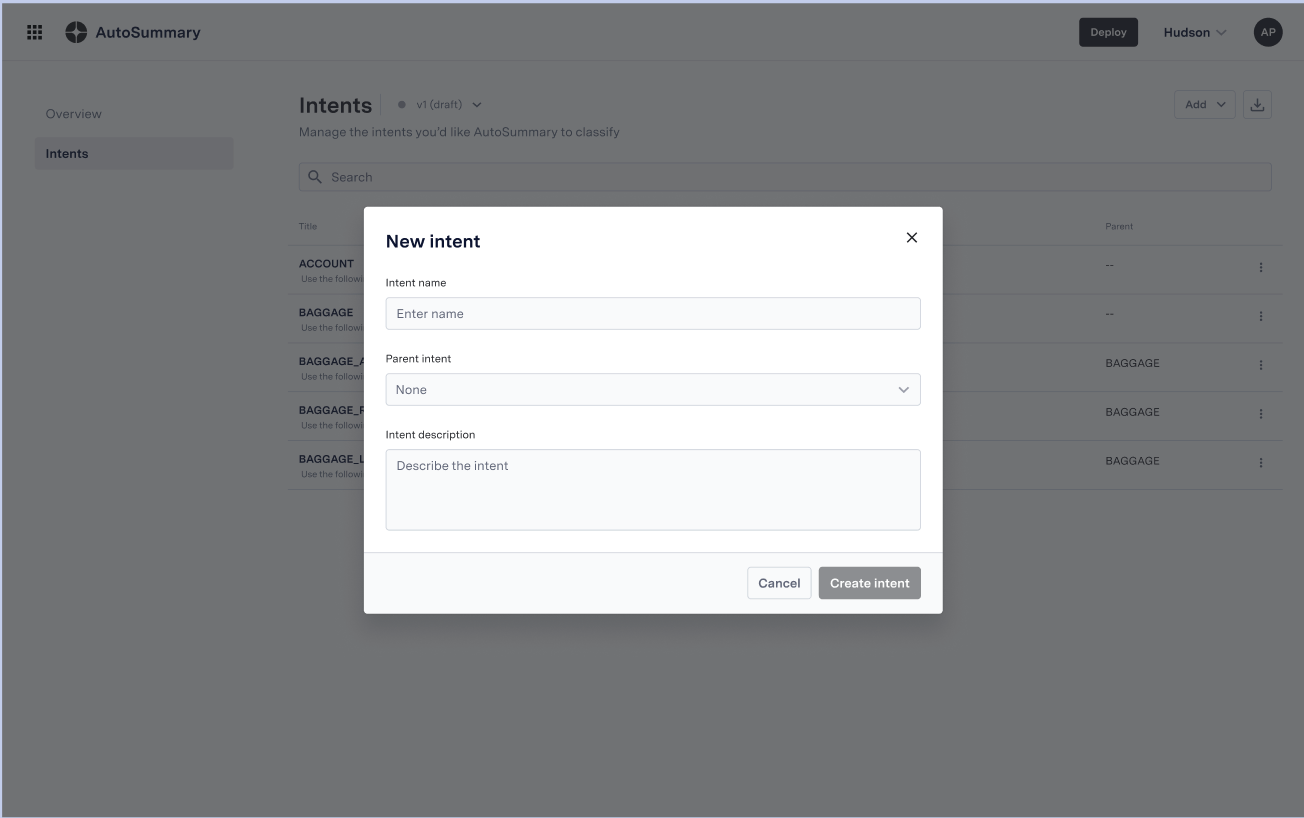 3. Click on create intent to add the intent to the hierarchy
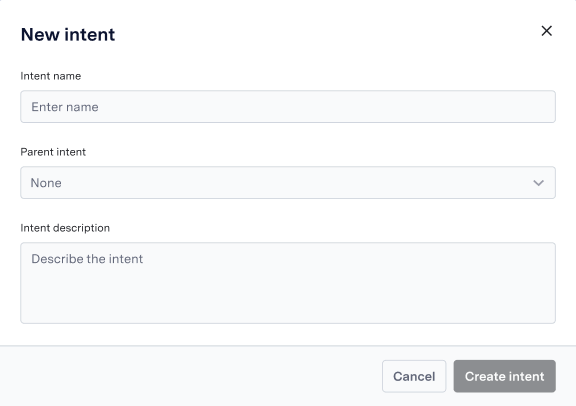 4. Review and verify your created intent
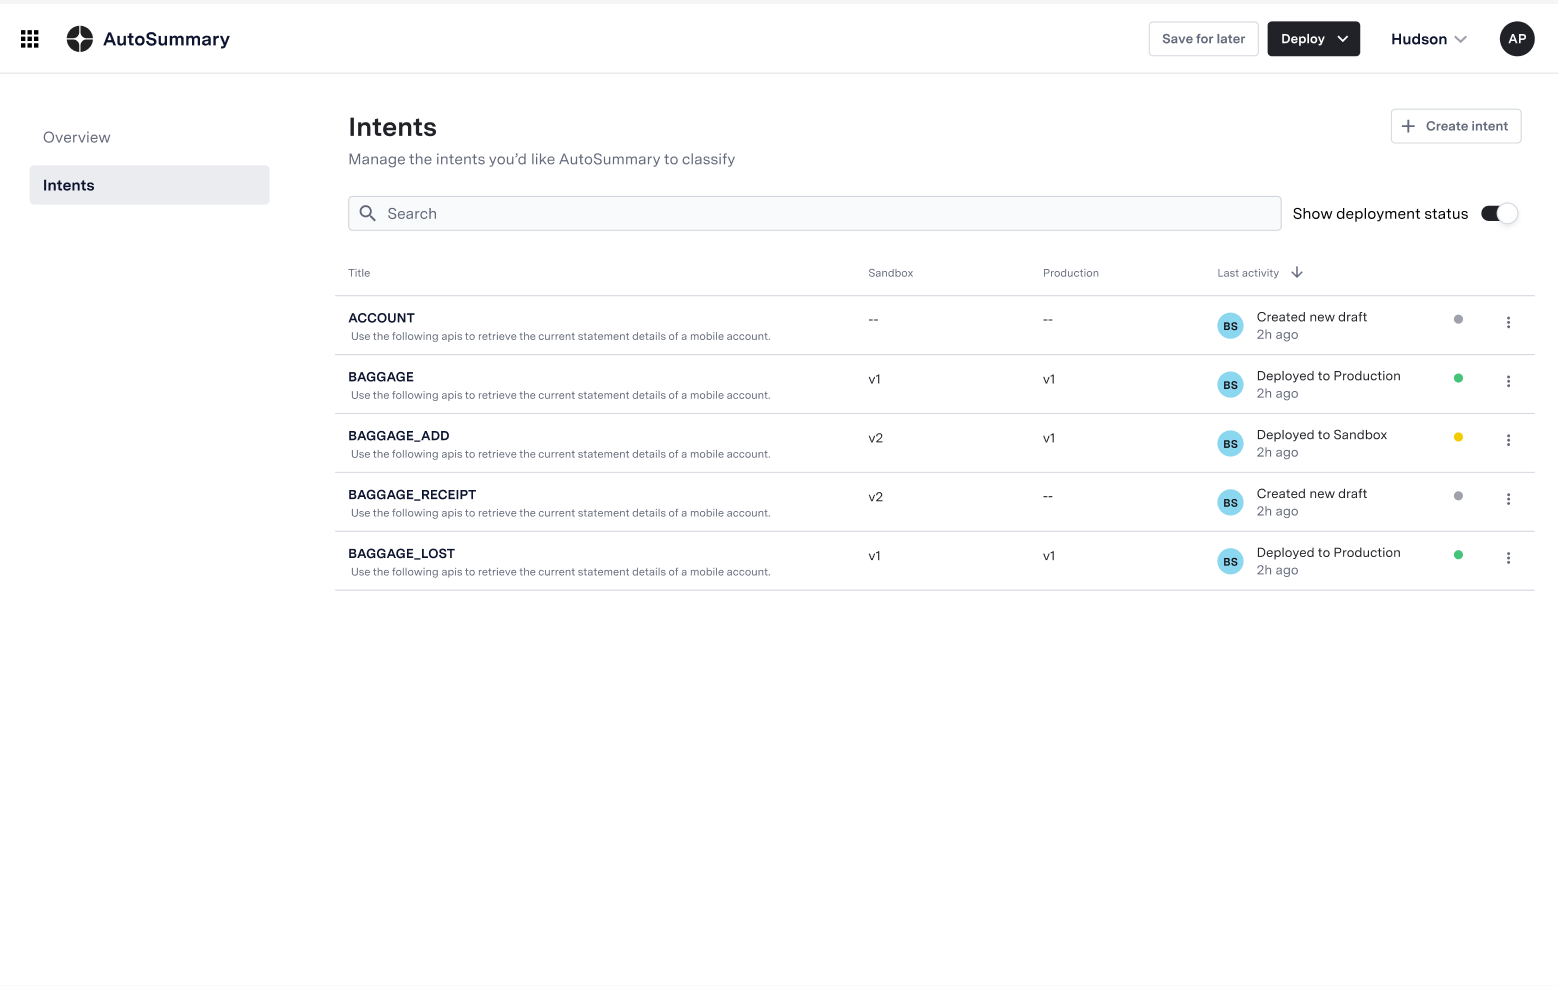 ## FAQs
* **What file formats are supported for uploading intents label hierarchy?**
ASAPP's Intent Self-Serve tooling supports CSV and Excel file formats for uploading intents.
* **Can I edit or update my intents hierarchy after uploading?**
Yes, the tooling functionality allows you to edit or update your intents at any time after uploading them, ensuring you can refine and improve your intent classification as needed.
* **Do I need to have technical expertise to use the Intent Self-Serve tooling?**
No, intent front-end tooling is designed to be user-friendly, with no API configuration required. The intent labels can be easily uploaded, created, and managed without needing any technical assistance.
# Sandbox for AutoSummary
Source: https://docs.asapp.com/autosummary/feature-releases/sandbox-for-autosummary
## Feature Release
This is the announcement for an upcoming ASAPP feature. Your ASAPP account team will provide a target release date and can direct you to more detailed information as needed.
## Overview
With AutoSummary Sandbox, administrators can easily visualize free-text and structured summaries by uploading a conversation transcript or by simulating a conversation between an agent and a customer. Accessible through AI-Console, it's a playground designed to provide easy access to AutoSummary. The Sandbox supports voice conversations, powered by AutoTranscribe's real-time transcription, and messaging conversations.
## FAQs
* **What file formats are supported for uploading intents label hierarchy?**
ASAPP's Intent Self-Serve tooling supports CSV and Excel file formats for uploading intents.
* **Can I edit or update my intents hierarchy after uploading?**
Yes, the tooling functionality allows you to edit or update your intents at any time after uploading them, ensuring you can refine and improve your intent classification as needed.
* **Do I need to have technical expertise to use the Intent Self-Serve tooling?**
No, intent front-end tooling is designed to be user-friendly, with no API configuration required. The intent labels can be easily uploaded, created, and managed without needing any technical assistance.
# Sandbox for AutoSummary
Source: https://docs.asapp.com/autosummary/feature-releases/sandbox-for-autosummary
## Feature Release
This is the announcement for an upcoming ASAPP feature. Your ASAPP account team will provide a target release date and can direct you to more detailed information as needed.
## Overview
With AutoSummary Sandbox, administrators can easily visualize free-text and structured summaries by uploading a conversation transcript or by simulating a conversation between an agent and a customer. Accessible through AI-Console, it's a playground designed to provide easy access to AutoSummary. The Sandbox supports voice conversations, powered by AutoTranscribe's real-time transcription, and messaging conversations.
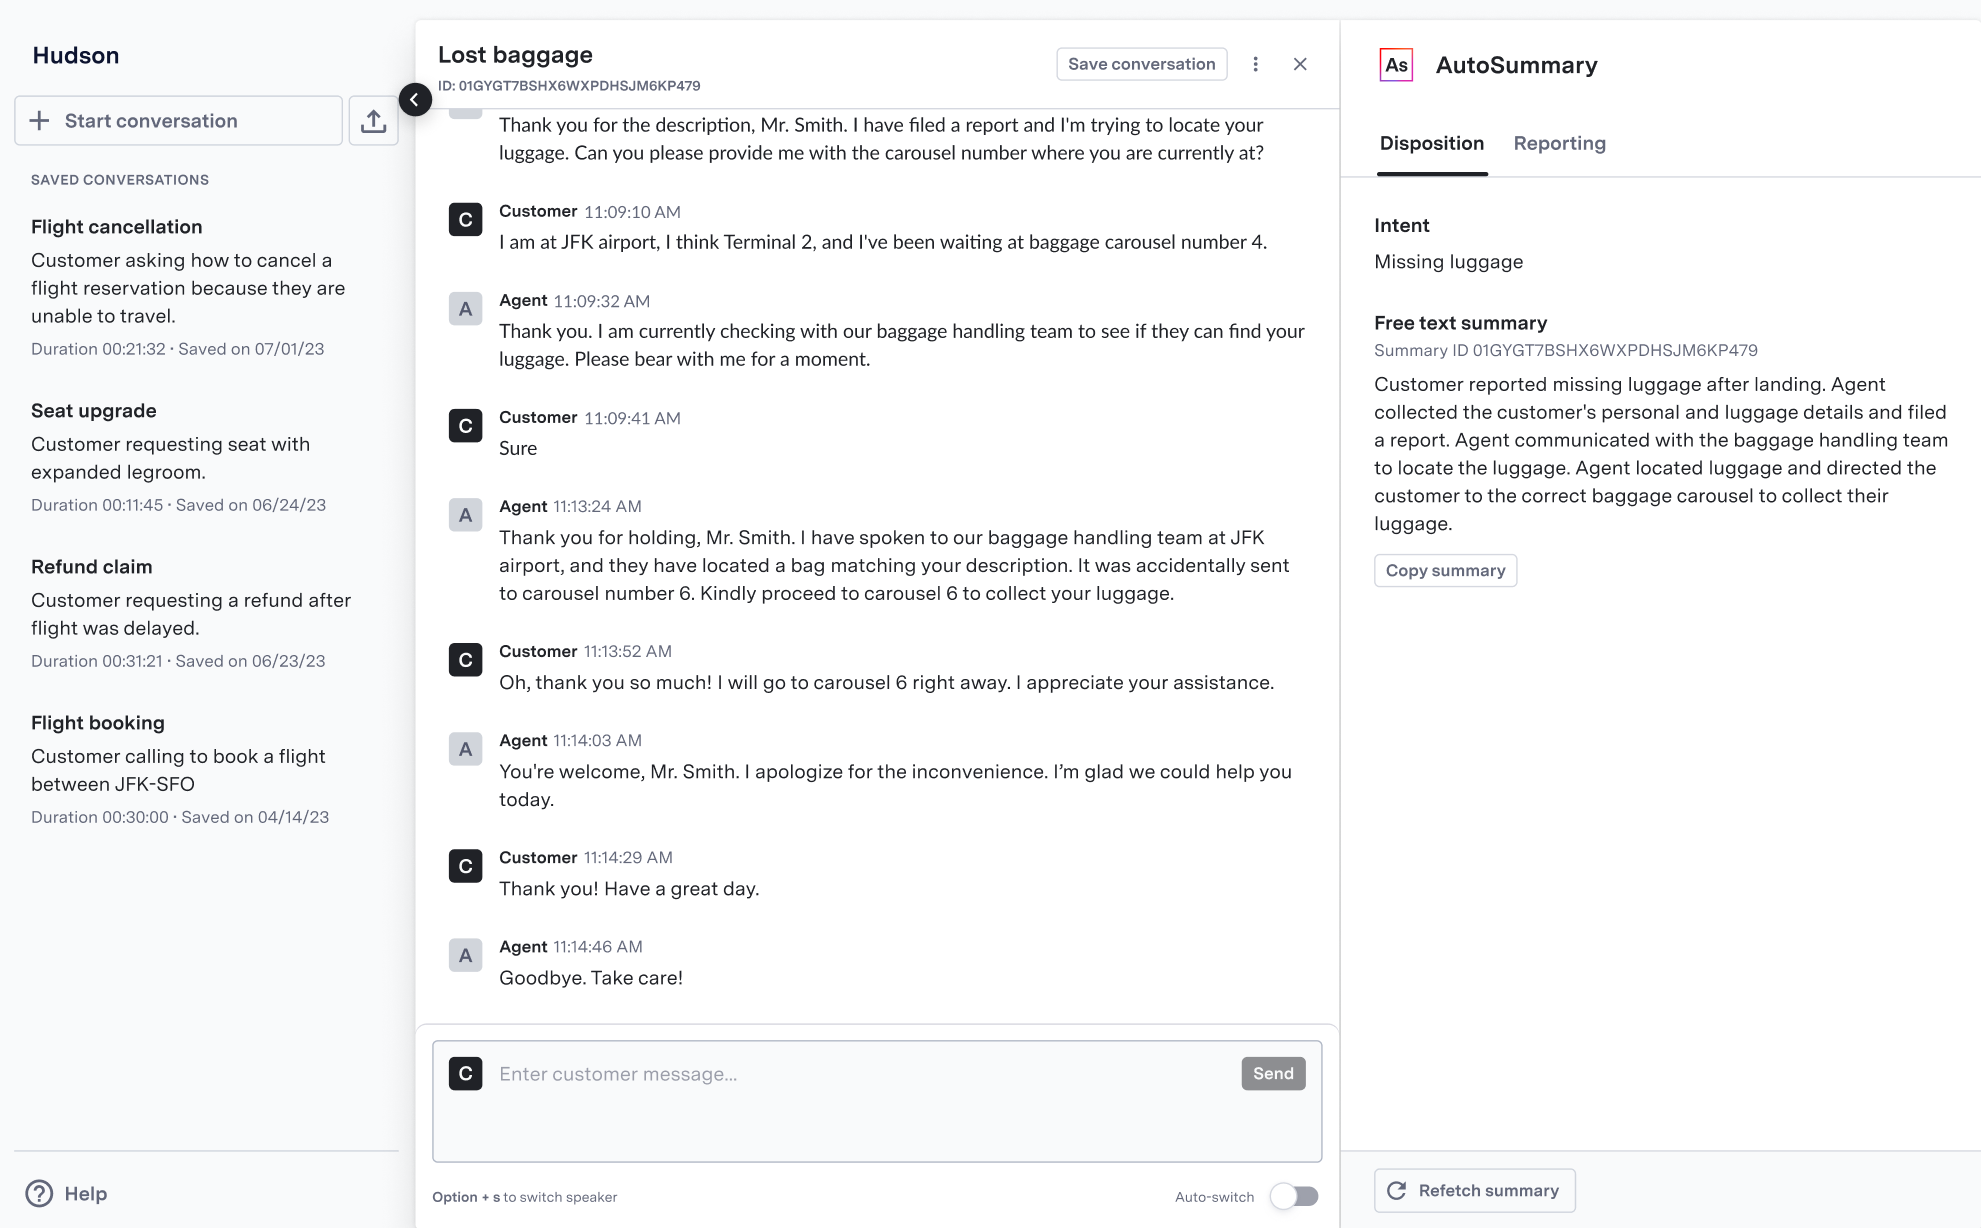 ## Use and Impact
The AutoSummary Sandbox enables administrators to visualize summary results throughout their implementation journey with ASAPP.
**Initial Use**
When using AutoSummary Sandbox for the first time, results are produced from baseline ASAPP models that are designed for the contact center setting. At this stage, the Sandbox is useful to demonstrate summary formatting and how key events are brought into summaries.
**Custom-Trained Models**
Once ASAPP deploys AutoSummary custom-trained models, the Sandbox will generate summary outputs tuned for your business use case(s). At this stage, the Sandbox illustrates how the summary models will perform in production.
As model improvements are deployed going forward, the summaries produced through the AutoSummary Sandbox will reflect those improvements.
## Use and Impact
Automatic evaluation of agent's conversations can be a challenge, Structured Data enables you to pull actionable insights from a conversation.
You can ask questions around Sales, Customer retention, Product Feedback, or whatever other topic. This allows Structured Data, to address any number of insights you may want extracted from a conversation.
## How It Works
When your agents finish a conversation, AutoSummary analyzes the conversations, and extracts a set of insights in the form of yes or no questions. These yes or nos can be retrieved via the Structured Data API, or within the Conversation Explorer.
Work with your ASAPP team to configure the yes and no questions you want answered. ASAPP also provides a number of common questions that you may use or modify from.
Some examples of the types of questions you could ask:
* Did promotions persuade customers to buy the service?
* Did the agent follow retention management procedures?
* Did the customer use offensive language?
Up to 20 yes or no questions can be answered from the conversation.
# Structured Summary Upgrade for AutoSummary
Source: https://docs.asapp.com/autosummary/feature-releases/structured-summary-upgrade-for-autosummary
## Feature Release
This is an announcement for an upcoming ASAPP feature. Your ASAPP account team will provide a target release date and can direct you to more detailed information as needed.
## Overview
With this upgrade, ASAPP is enhancing the structured summary tags feature of our AutoSummary product. Structured summary tags provide conversation summaries formatted as a set of analytics-ready descriptive tags, with each tag meant to represent a key action from the conversation.
We are updating structured summary tags with the following new capabilities:
* A significant upgrade in the level of granularity presented in each summary
* A custom label space, based on historical conversations (instead of industry-based)
* The inclusion of key customer-specific nomenclature (e.g. product names) in the returned tags
## Use and Impact
This upgrade to AutoSummary's structured summary tags supports the same analytics and reporting-related use cases as the existing feature. The higher levels granularity and detail can enable customers to discover more actionable and impactful insights. In particular:
* More granular detail enables more fine-grained data filtering and slicing and dicing
* ASAPP has proven that the enhanced summaries provided by this upgrade has higher predictive power than the current version, useful for finding stronger and more descriptive correlations with business KPIs
* This enhancement's higher descriptive power is helpful for finding automation and self-serve flows and opportunities
## How It Works
The following table compares the upgrade to the previous version of structured summary tags:
| Current Structured Summary Tags | Structured Summary Tags After Upgrade |
| :------------------------------------------------------------------------------------------------------------------- | :------------------------------------------------------------------------------------------------------------------------------------------------- |
| *Ontology: \[actor]-\[dialogue act]-\[topic]* | *Ontology: \[actor]-\[act]-\[topic]-\[modifier]* |
| **Example Output:**
## Use and Impact
The AutoSummary Sandbox enables administrators to visualize summary results throughout their implementation journey with ASAPP.
**Initial Use**
When using AutoSummary Sandbox for the first time, results are produced from baseline ASAPP models that are designed for the contact center setting. At this stage, the Sandbox is useful to demonstrate summary formatting and how key events are brought into summaries.
**Custom-Trained Models**
Once ASAPP deploys AutoSummary custom-trained models, the Sandbox will generate summary outputs tuned for your business use case(s). At this stage, the Sandbox illustrates how the summary models will perform in production.
As model improvements are deployed going forward, the summaries produced through the AutoSummary Sandbox will reflect those improvements.
## Use and Impact
Automatic evaluation of agent's conversations can be a challenge, Structured Data enables you to pull actionable insights from a conversation.
You can ask questions around Sales, Customer retention, Product Feedback, or whatever other topic. This allows Structured Data, to address any number of insights you may want extracted from a conversation.
## How It Works
When your agents finish a conversation, AutoSummary analyzes the conversations, and extracts a set of insights in the form of yes or no questions. These yes or nos can be retrieved via the Structured Data API, or within the Conversation Explorer.
Work with your ASAPP team to configure the yes and no questions you want answered. ASAPP also provides a number of common questions that you may use or modify from.
Some examples of the types of questions you could ask:
* Did promotions persuade customers to buy the service?
* Did the agent follow retention management procedures?
* Did the customer use offensive language?
Up to 20 yes or no questions can be answered from the conversation.
# Structured Summary Upgrade for AutoSummary
Source: https://docs.asapp.com/autosummary/feature-releases/structured-summary-upgrade-for-autosummary
## Feature Release
This is an announcement for an upcoming ASAPP feature. Your ASAPP account team will provide a target release date and can direct you to more detailed information as needed.
## Overview
With this upgrade, ASAPP is enhancing the structured summary tags feature of our AutoSummary product. Structured summary tags provide conversation summaries formatted as a set of analytics-ready descriptive tags, with each tag meant to represent a key action from the conversation.
We are updating structured summary tags with the following new capabilities:
* A significant upgrade in the level of granularity presented in each summary
* A custom label space, based on historical conversations (instead of industry-based)
* The inclusion of key customer-specific nomenclature (e.g. product names) in the returned tags
## Use and Impact
This upgrade to AutoSummary's structured summary tags supports the same analytics and reporting-related use cases as the existing feature. The higher levels granularity and detail can enable customers to discover more actionable and impactful insights. In particular:
* More granular detail enables more fine-grained data filtering and slicing and dicing
* ASAPP has proven that the enhanced summaries provided by this upgrade has higher predictive power than the current version, useful for finding stronger and more descriptive correlations with business KPIs
* This enhancement's higher descriptive power is helpful for finding automation and self-serve flows and opportunities
## How It Works
The following table compares the upgrade to the previous version of structured summary tags:
| Current Structured Summary Tags | Structured Summary Tags After Upgrade |
| :------------------------------------------------------------------------------------------------------------------- | :------------------------------------------------------------------------------------------------------------------------------------------------- |
| *Ontology: \[actor]-\[dialogue act]-\[topic]* | *Ontology: \[actor]-\[act]-\[topic]-\[modifier]* |
| **Example Output:** - "actor": "customer",
- "act": "troubleshoot",
- "topic": "hotspot"
- "actor": "customer",
- "act": "unable-connect",
- "topic": "hotspot",
- "modifier": "wifi"
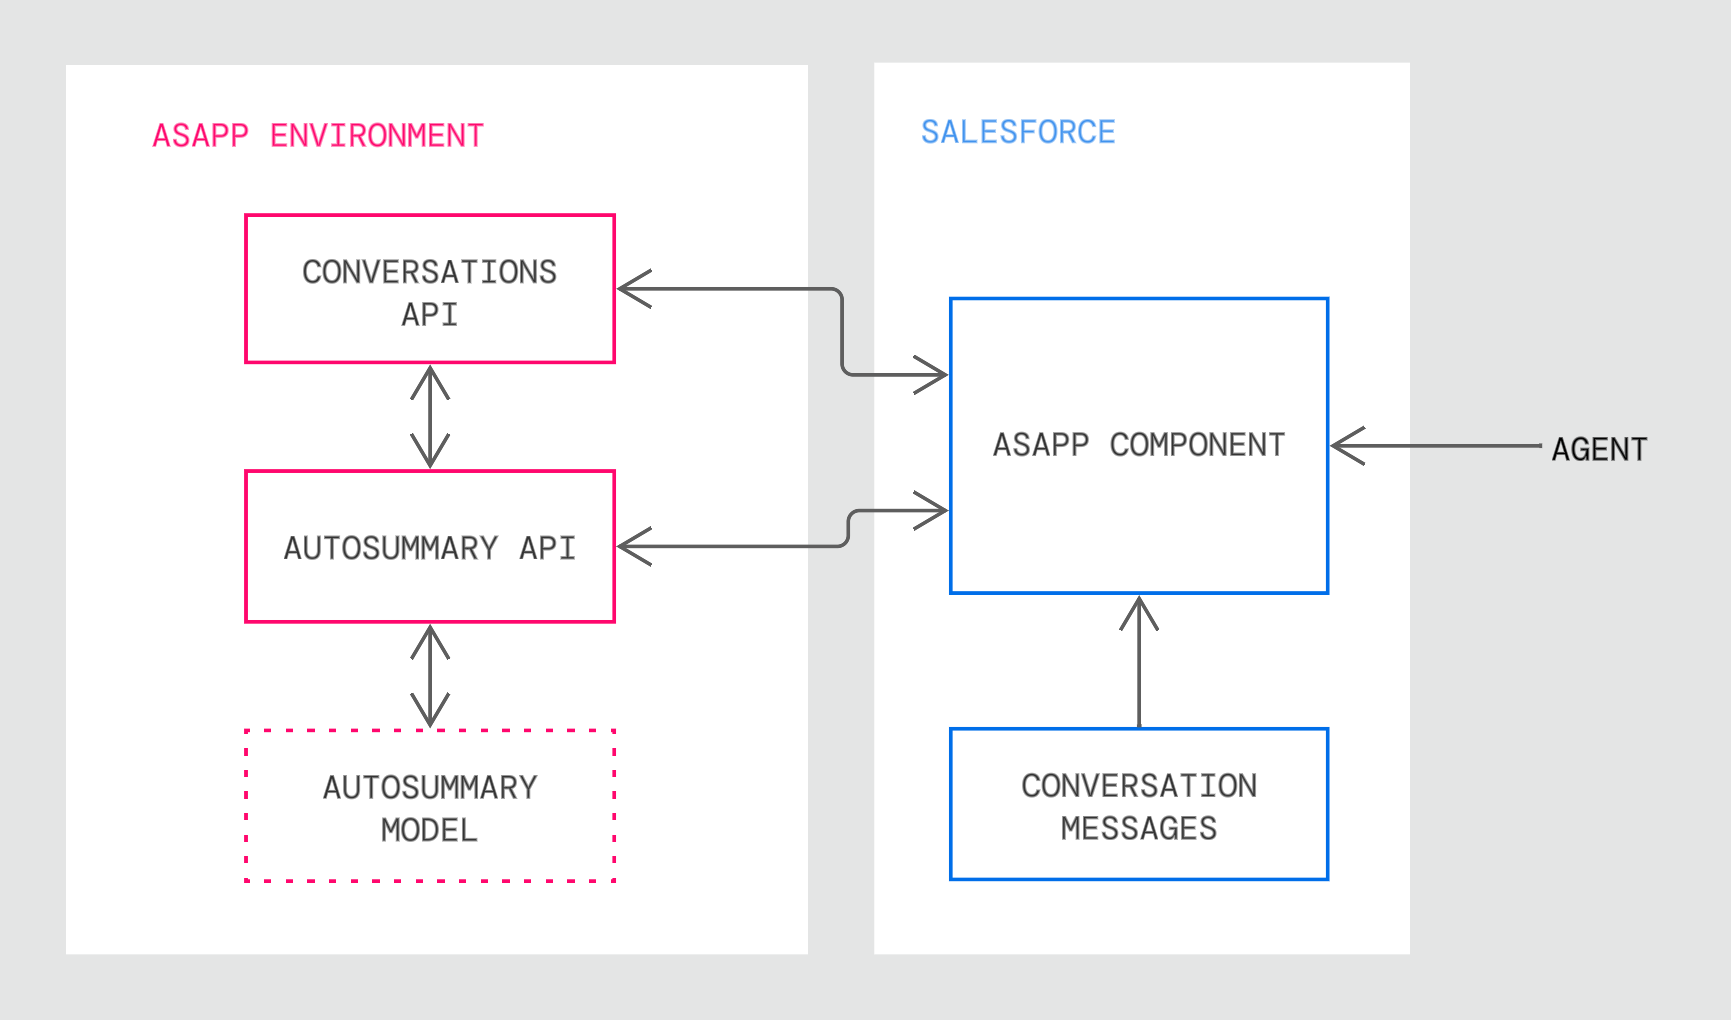 ## Setup
### Requirements
**Browser Support**
ASAPP AutoSummary is supported in Google Chrome and Microsoft Edge
**SSO Support**
AutoSummary supports SP-initiated SSO with either OIDC (preferred method) or SAML.
**Domain Whitelisting**
In order for AutoSummary to interact with ASAPP's backend and third-party support services, the following domains need to be accessible from end-user environments:
| Domain | Description |
| :------------------------------------------- | :----------------------------------------------------------------- |
| `*.asapp.com` | ASAPP service URLs |
| `*.ingest.sentry.io` | Application performance monitoring tool |
| `fonts.googleapis.com` | Fonts |
| `google-analytics.com` | Page analytics |
| `asapp-chat-sdk-production.s3.amazonaws.com` | Static ASAPP AWS URL for desktop network connectivity health check |
### Procedure
There are two parts to the AutoSummary setup process. Use the links below to skip to information about a specific part of the process:
1. [Configure the Salesforce organization](#1-configure-the-salesforce-organization-centrally-35766 "1. Configure the Salesforce Organization Centrally") centrally using an administrator account
2. [Setup agent/user authentication](#2-set-up-single-sign-on-sso-user-authentication-35766 "2. Set Up Single Sign-On (SSO) User Authentication") through the existing single sign-on (SSO) service
* Choose **Install for All Users** (as shown above).
* Check the acknowledgment statement and click the **Install** button:
* The Installation runs. An **Installation Complete!** message appears:
* Click the **Done** button.
**2. Add ASAPP to the Chat Transcript Page**
* Open the 'Service Console' page (or your chat page).
* Choose an existing chat session or start a new chat session so that the chat transcript page appears (the exact mechanism is organization-specific).
* In the top-right, click the **gear** icon, then right-click **Edit Page**, and **Open Link in a New Tab**.
* Navigate to the new tab to see the chat transcript edit page:
* Select the conversation panel (middle) and delete it.
* Drag the **chatAsapp** component (left), inside the conversation panel:
* Drag the **exploreAsapp** component (left), to the right column. Next, add your organization's **API key** and **API URL** (found in the ASAPP Developer Portal) in the rightmost panel:
* Click **Save**, then click **Activate**
* Click **Assign as org default**.
* Choose **Desktop** form factor, then click **Save**.
* Return to the chat transcript page and refresh - the ASAPP composer should appear.
**3. Add a new Salesforce field to populate AutoSummary results**
AutoSummary writes only to the **Chat Transcript** object. You need to create a new field on the Chat Transcript object that will be used by the ASAPP component.
* Go to **Setup** > **Object Manager** > **Chat Transcript** > **Fields & Relationships** page (in this specific example, we choose to add the field for summarization on the Chat Transcript page).
* Click on the **New** button.
## Setup
### Requirements
**Browser Support**
ASAPP AutoSummary is supported in Google Chrome and Microsoft Edge
**SSO Support**
AutoSummary supports SP-initiated SSO with either OIDC (preferred method) or SAML.
**Domain Whitelisting**
In order for AutoSummary to interact with ASAPP's backend and third-party support services, the following domains need to be accessible from end-user environments:
| Domain | Description |
| :------------------------------------------- | :----------------------------------------------------------------- |
| `*.asapp.com` | ASAPP service URLs |
| `*.ingest.sentry.io` | Application performance monitoring tool |
| `fonts.googleapis.com` | Fonts |
| `google-analytics.com` | Page analytics |
| `asapp-chat-sdk-production.s3.amazonaws.com` | Static ASAPP AWS URL for desktop network connectivity health check |
### Procedure
There are two parts to the AutoSummary setup process. Use the links below to skip to information about a specific part of the process:
1. [Configure the Salesforce organization](#1-configure-the-salesforce-organization-centrally-35766 "1. Configure the Salesforce Organization Centrally") centrally using an administrator account
2. [Setup agent/user authentication](#2-set-up-single-sign-on-sso-user-authentication-35766 "2. Set Up Single Sign-On (SSO) User Authentication") through the existing single sign-on (SSO) service
* Choose **Install for All Users** (as shown above).
* Check the acknowledgment statement and click the **Install** button:
* The Installation runs. An **Installation Complete!** message appears:
* Click the **Done** button.
**2. Add ASAPP to the Chat Transcript Page**
* Open the 'Service Console' page (or your chat page).
* Choose an existing chat session or start a new chat session so that the chat transcript page appears (the exact mechanism is organization-specific).
* In the top-right, click the **gear** icon, then right-click **Edit Page**, and **Open Link in a New Tab**.
* Navigate to the new tab to see the chat transcript edit page:
* Select the conversation panel (middle) and delete it.
* Drag the **chatAsapp** component (left), inside the conversation panel:
* Drag the **exploreAsapp** component (left), to the right column. Next, add your organization's **API key** and **API URL** (found in the ASAPP Developer Portal) in the rightmost panel:
* Click **Save**, then click **Activate**
* Click **Assign as org default**.
* Choose **Desktop** form factor, then click **Save**.
* Return to the chat transcript page and refresh - the ASAPP composer should appear.
**3. Add a new Salesforce field to populate AutoSummary results**
AutoSummary writes only to the **Chat Transcript** object. You need to create a new field on the Chat Transcript object that will be used by the ASAPP component.
* Go to **Setup** > **Object Manager** > **Chat Transcript** > **Fields & Relationships** page (in this specific example, we choose to add the field for summarization on the Chat Transcript page).
* Click on the **New** button.
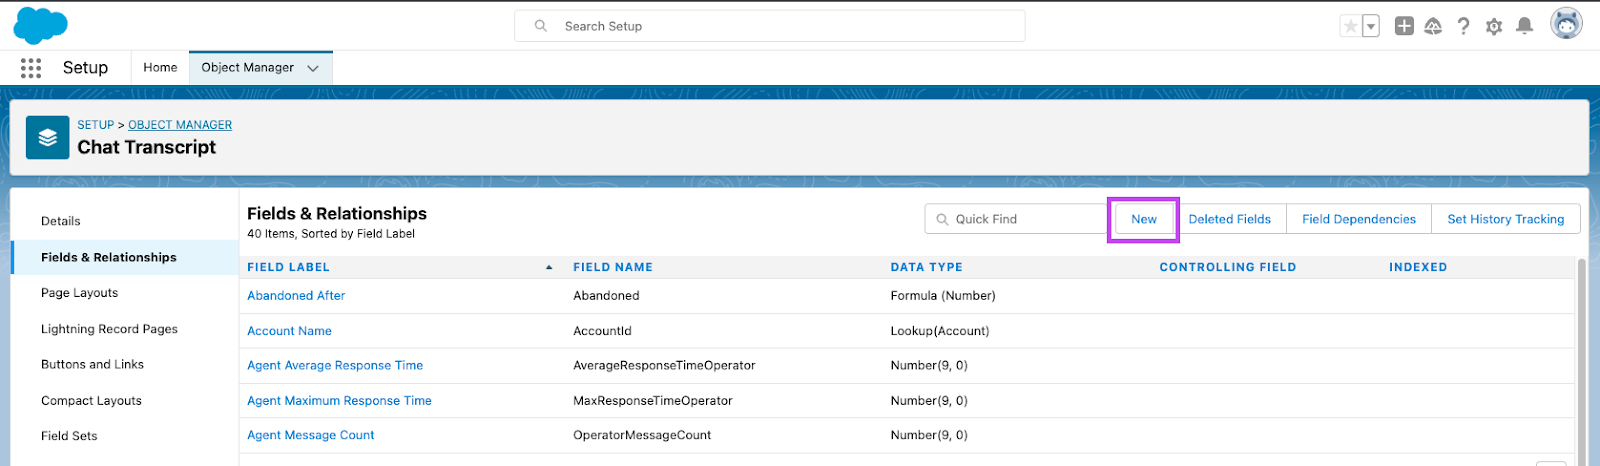 * **Choose the field type (Step 1)**: we suggest setting this field as **Text Area (Long)**. Once this radio button is selected, click on the **Next** button.
* **Enter the field details (Step 2)**: Add a **Field Label** and a **Field Name**. Click **Next**.
* **Choose the field type (Step 1)**: we suggest setting this field as **Text Area (Long)**. Once this radio button is selected, click on the **Next** button.
* **Enter the field details (Step 2)**: Add a **Field Label** and a **Field Name**. Click **Next**.
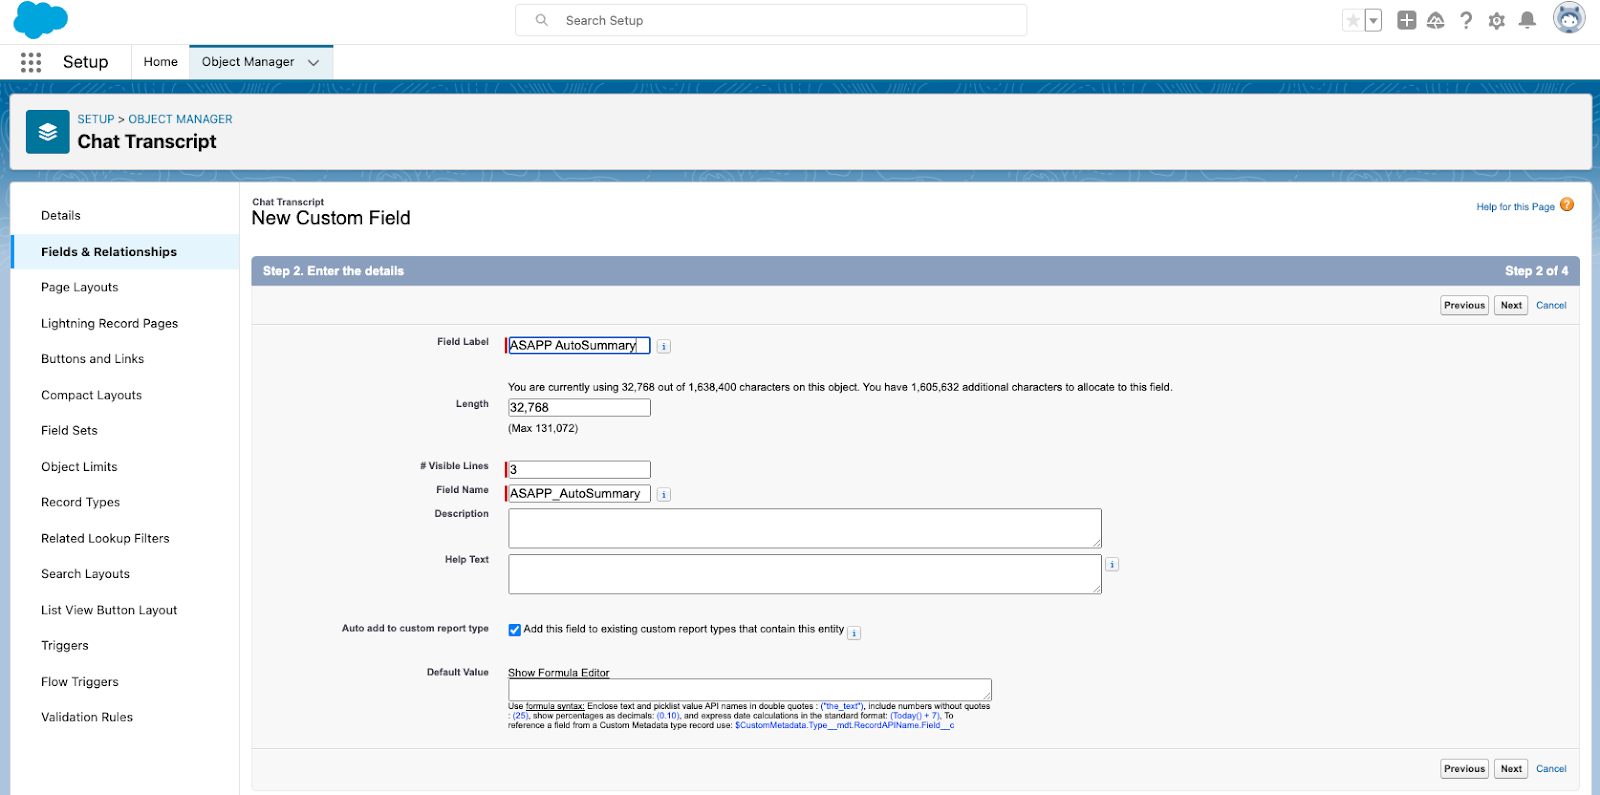 * **Establish field-level security (Step 3)**: no need to modify anything. Click on **Next**.
* **Add to page layouts (Step 4)**: ensure to add the new field to page layouts for this implementation and then click **Save**.
* Once created, you will be able to see the field on the following page:
* **Establish field-level security (Step 3)**: no need to modify anything. Click on **Next**.
* **Add to page layouts (Step 4)**: ensure to add the new field to page layouts for this implementation and then click **Save**.
* Once created, you will be able to see the field on the following page:
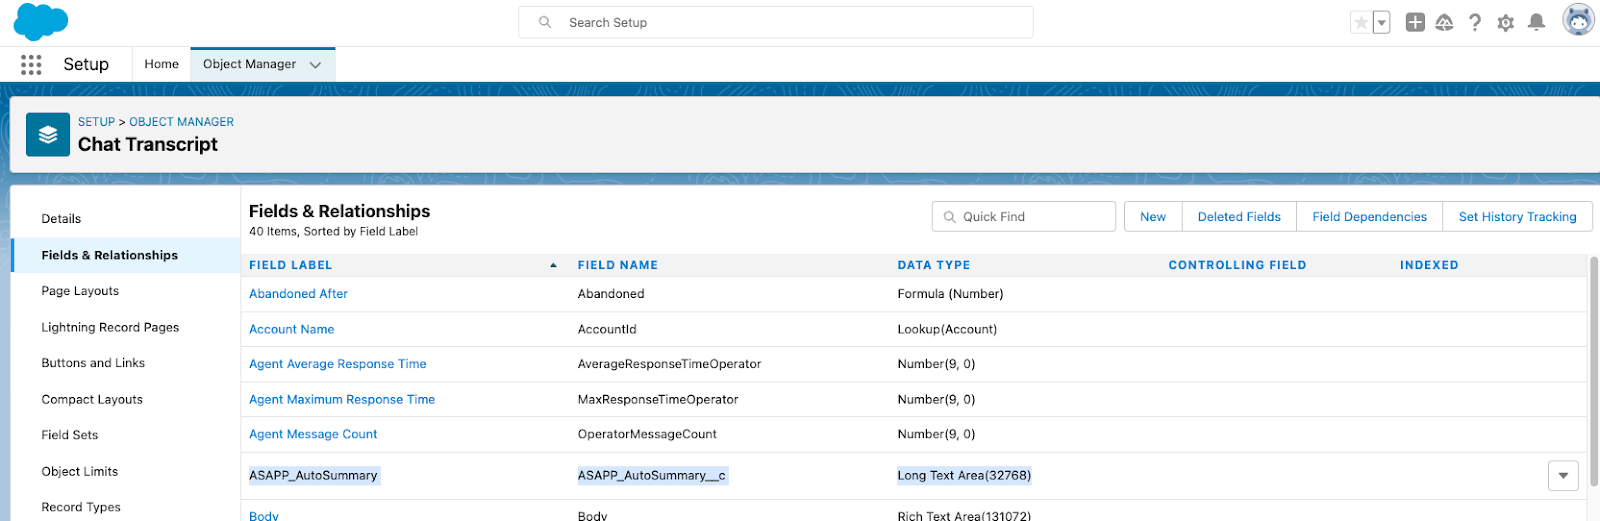 **4. Configure AutoSummary Widget**
* On the Service Console page, click on **Configuration** (gear icon) and then click **Edit Page**.
**4. Configure AutoSummary Widget**
* On the Service Console page, click on **Configuration** (gear icon) and then click **Edit Page**.
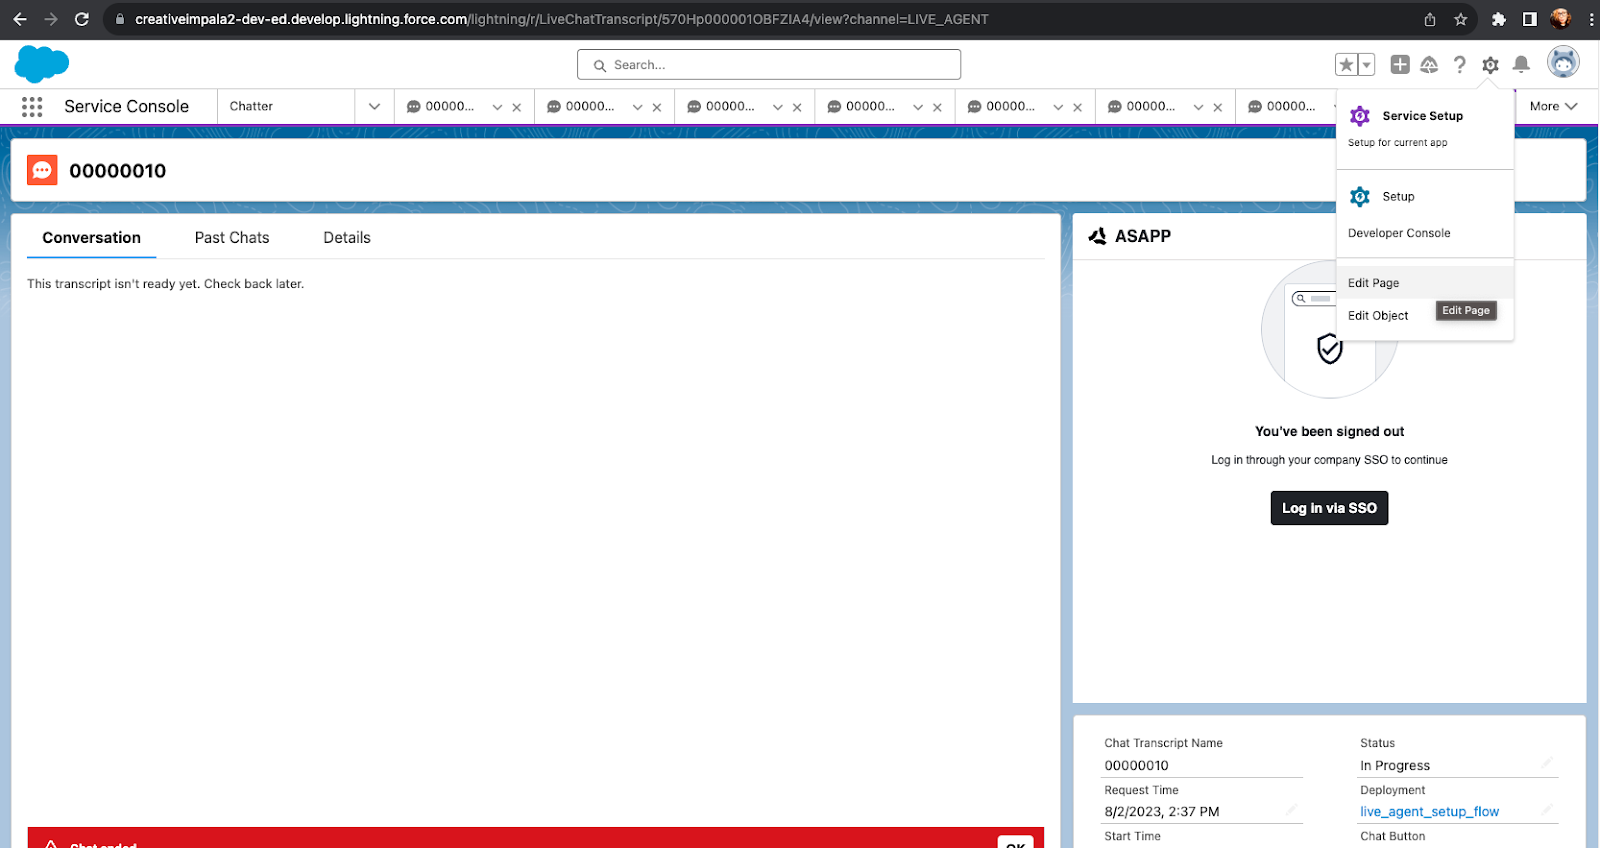 * Click the **ASAPP** panel. Then the configuration panel will appear on the right of the page. Enter the following information into the fields:
* **API key**: this is the **API Id** found in the ASAPP Developer Portal.
* **API URL**: this is found in the ASAPP Developer Portal; use `https://api.sandbox.asapp.com` in lower environments and `https://api.asapp.com`in production.
* Select the checkbox for **ASAPP AutoSummary**.
* **ASAPP AutoSummary field**: enter the **Field Name** created as part of Step 3. This is the field where the ASAPP-generated summary will appear.
* Click the **ASAPP** panel. Then the configuration panel will appear on the right of the page. Enter the following information into the fields:
* **API key**: this is the **API Id** found in the ASAPP Developer Portal.
* **API URL**: this is found in the ASAPP Developer Portal; use `https://api.sandbox.asapp.com` in lower environments and `https://api.asapp.com`in production.
* Select the checkbox for **ASAPP AutoSummary**.
* **ASAPP AutoSummary field**: enter the **Field Name** created as part of Step 3. This is the field where the ASAPP-generated summary will appear.
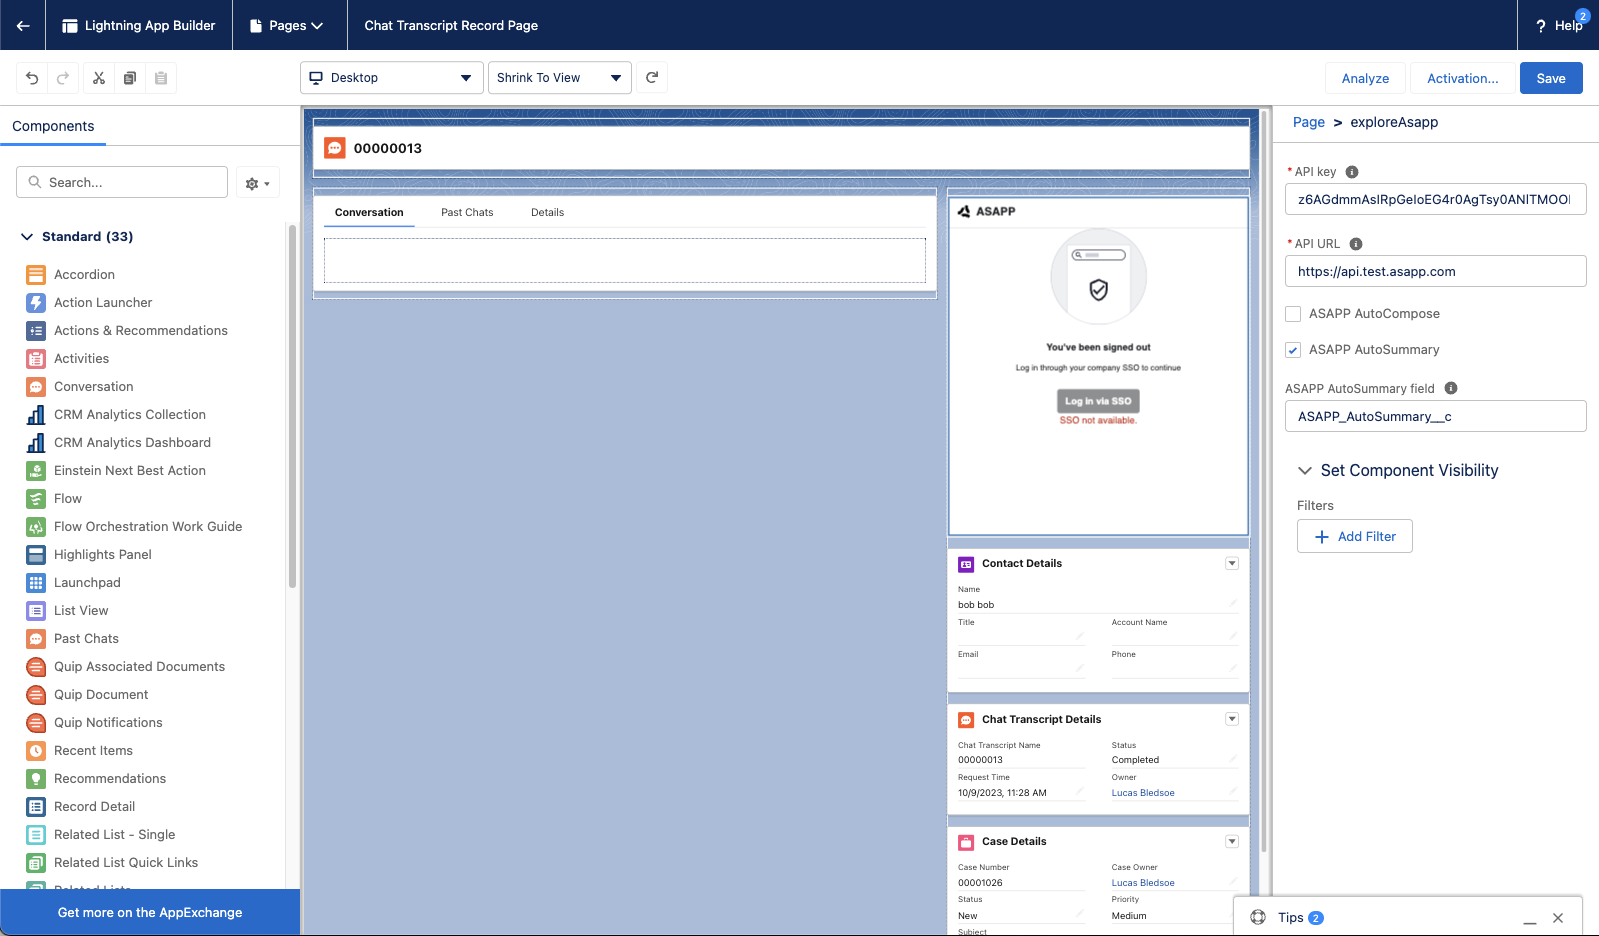
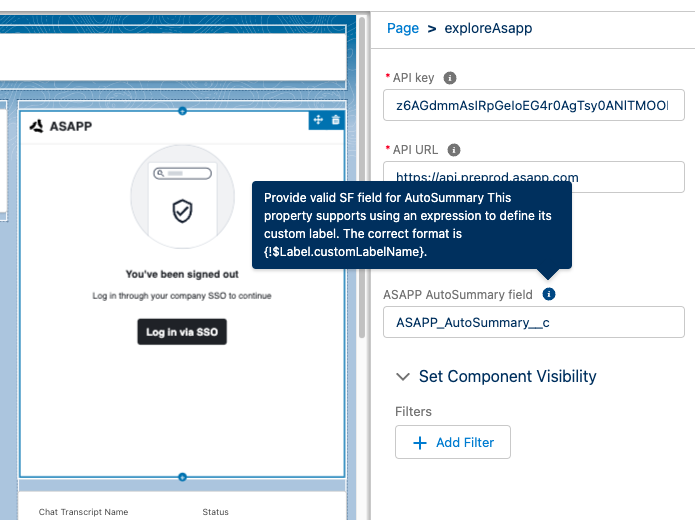 * Click on the **Save** button to apply the changes.
These configuration steps add the AutoSummary field to the Chat Transcript object. From this point forward, you may use this summary field as part of your agent-facing or internal summary data use case. A common use case is to display this field to the agent in the Record Detail widget.
**5. Add Record Detail Widget (OPTIONAL)**
* If the Record Detail widget is not already on the Chat Transcript page, drag the **Record Detail** widget from the left panel and place it on the page.
* Click on the **Save** button to apply the changes.
* Refresh the page to see the changes applied to the page.
The AutoSummary field should now be visible under the **Transcription** section of the Record Detail widget. Once the conversation is ended, summarization will be displayed in this newly configured field in the Record Detail widget.
#### 2. Set Up Single Sign-On (SSO) User Authentication
ASAPP handles authentication through the customer's SSO service to confirm the identity of the agent.
ASAPP acts as the Service Provider (SP) with the customer acting as the Identity Provider (IDP). The customer's authentication system performs user authentication using their existing user credentials.
ASAPP supports SP-initiated SSO with either OIDC (preferred method) and SAML. Once the user initiates sign-in, ASAPP detects that the user is authenticated and requests an assertion from the customer's SSO service.
**Configuration Steps for OIDC (preferred method)**
1. Create a new IDP OIDC application with type `Web`
2. Set the following attributes for the app:
| Attribute | Value\* |
| :-------------------- | :--------------------------------------------------------------------------------------------------------------------------------------------------------------------------------- |
| Grant Type | authorization code |
| Sign-in Redirect URIs |
* Click on the **Save** button to apply the changes.
These configuration steps add the AutoSummary field to the Chat Transcript object. From this point forward, you may use this summary field as part of your agent-facing or internal summary data use case. A common use case is to display this field to the agent in the Record Detail widget.
**5. Add Record Detail Widget (OPTIONAL)**
* If the Record Detail widget is not already on the Chat Transcript page, drag the **Record Detail** widget from the left panel and place it on the page.
* Click on the **Save** button to apply the changes.
* Refresh the page to see the changes applied to the page.
The AutoSummary field should now be visible under the **Transcription** section of the Record Detail widget. Once the conversation is ended, summarization will be displayed in this newly configured field in the Record Detail widget.
#### 2. Set Up Single Sign-On (SSO) User Authentication
ASAPP handles authentication through the customer's SSO service to confirm the identity of the agent.
ASAPP acts as the Service Provider (SP) with the customer acting as the Identity Provider (IDP). The customer's authentication system performs user authentication using their existing user credentials.
ASAPP supports SP-initiated SSO with either OIDC (preferred method) and SAML. Once the user initiates sign-in, ASAPP detects that the user is authenticated and requests an assertion from the customer's SSO service.
**Configuration Steps for OIDC (preferred method)**
1. Create a new IDP OIDC application with type `Web`
2. Set the following attributes for the app:
| Attribute | Value\* |
| :-------------------- | :--------------------------------------------------------------------------------------------------------------------------------------------------------------------------------- |
| Grant Type | authorization code |
| Sign-in Redirect URIs | - Production: `https://api.asapp.com/auth/v1/callback/{company_marker}`
- Sandbox: `https://api.sandbox.asapp.com/auth/v1/callback/{company_marker}-sandbox`
- Production: `https://sso.asapp.com/auth/realms/standalone-{company_marker}-auth/broker/saml/endpoint/clients/asapp-saml`
- Sandbox: `https://sso.asapp.com/auth/realms/standalone-{company_marker}-auth/broker/saml-sandbox/endpoint/clients/asapp-saml-sandbox`
- Production: `https://sso.asapp.com/auth/realms/standalone-{company_marker}-auth/broker/saml/endpoint/clients/asapp-saml`
- Sandbox: `https://sso.asapp.com/auth/realms/standalone-{company_marker}-auth/broker/saml-sandbox/endpoint/clients/asapp-saml-sandbox`
- Production: `https://sso.asapp.com/auth/realms/standalone-{company_marker}-auth/broker/saml/endpoint/clients/asapp-saml`
- Sandbox: `https://sso.asapp.com/auth/realms/standalone-{company_marker}-auth/broker/saml-sandbox/endpoint/clients/asapp-saml-sandbox`
- Production: `https://sso.asapp.com/auth/realms/standalone-{company_marker}-auth/broker/saml/endpoint/clients/asapp-saml`
- Sandbox: `https://sso.asapp.com/auth/realms/standalone-{company_marker}-auth/broker/saml-sandbox/endpoint/clients/asapp-saml-sandbox`
Full |
Abbreviated |
|---|---|
|
Agent: Choose an option from the list below Agent: (A) 1-way ticket (B) 2-way ticket (C) None of the above Customer: (A) 1-way ticket |
Agent: Choose an option from the list below Customer: (A) |
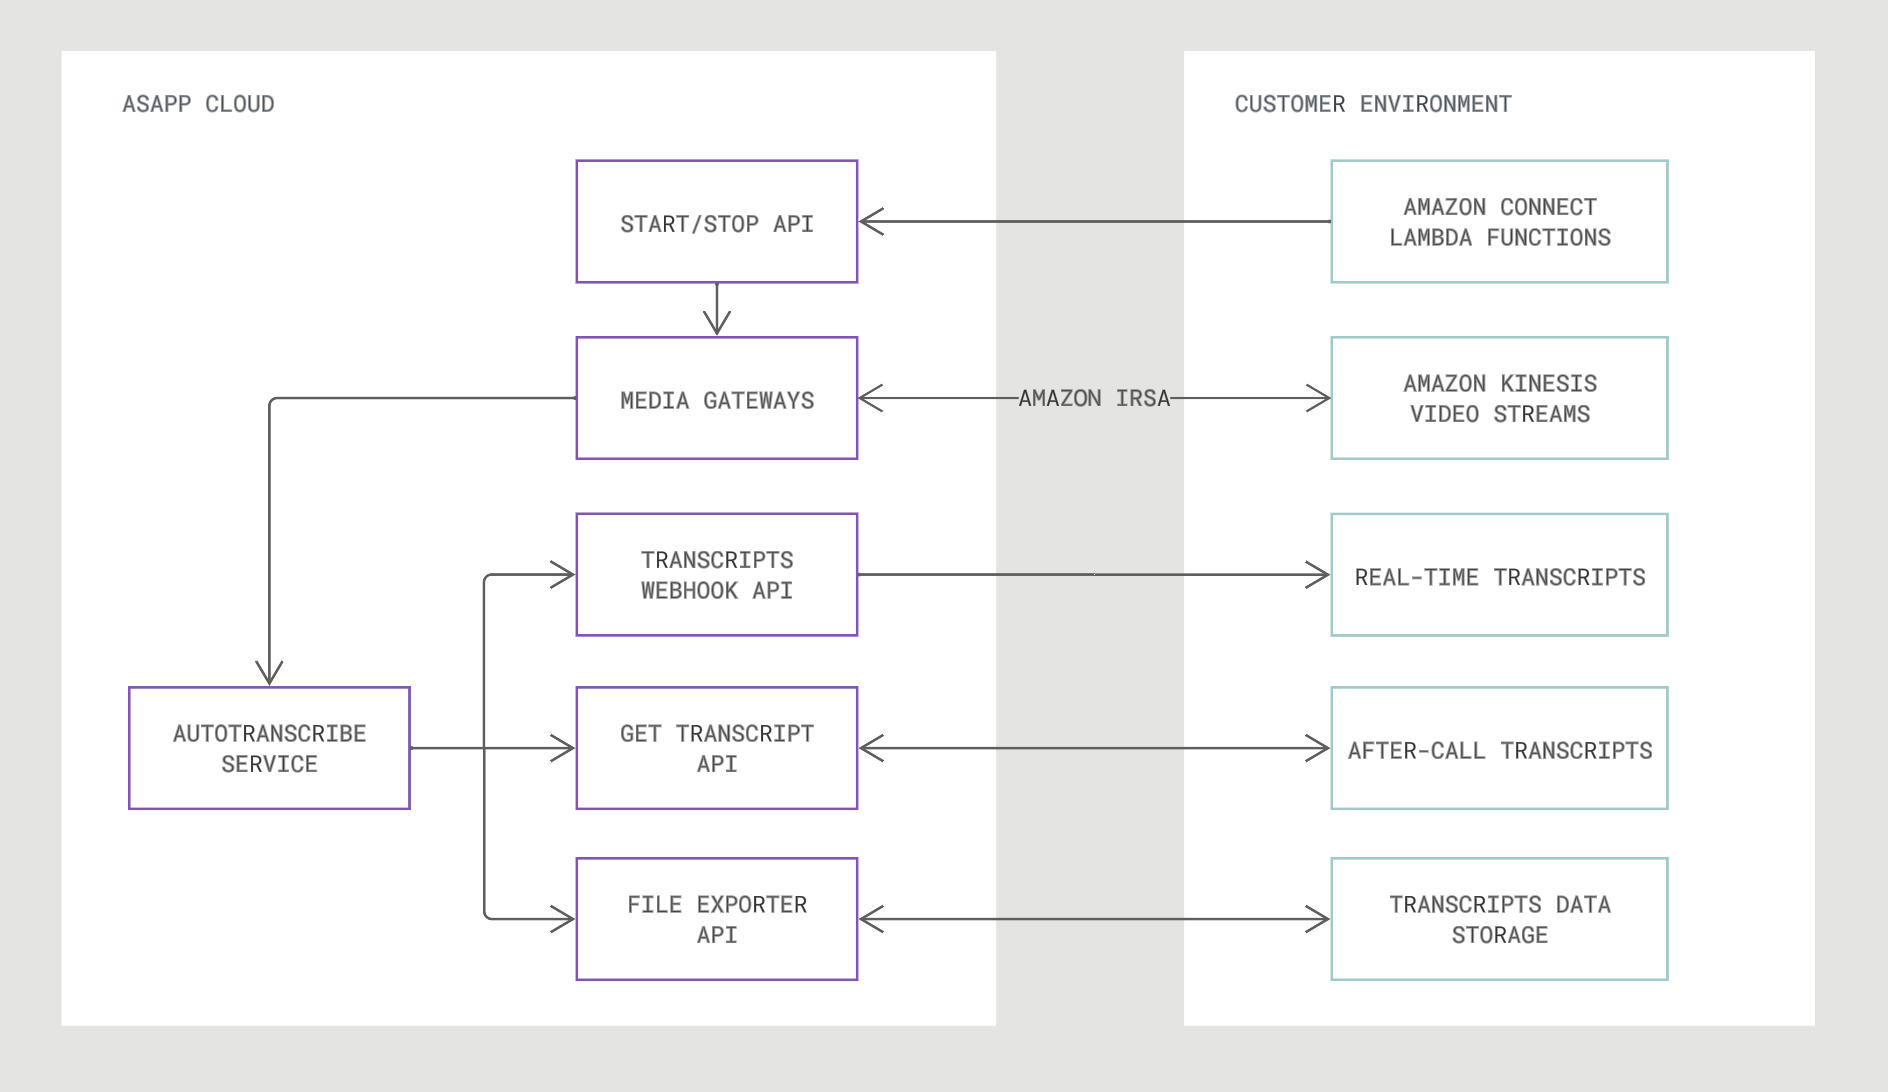 ### Integration Steps
There are five parts of the integration process:
1. Setup Authentication for Kineses Video Streams
2. Enable Audio Streaming to Kinesis Video Streams
3. Add Start Media and Stop Media To Flows
4. Send Start and Stop Requests to ASAPP
5. Receive Transcript Outputs
### Requirements
**Audio Stream Codec**
AWS Kinesis Video Streams provides MKV format, which is supported by ASAPP. No modification or additional transcoding is needed when forking audio to ASAPP.
### Integration Steps
There are five parts of the integration process:
1. Setup Authentication for Kineses Video Streams
2. Enable Audio Streaming to Kinesis Video Streams
3. Add Start Media and Stop Media To Flows
4. Send Start and Stop Requests to ASAPP
5. Receive Transcript Outputs
### Requirements
**Audio Stream Codec**
AWS Kinesis Video Streams provides MKV format, which is supported by ASAPP. No modification or additional transcoding is needed when forking audio to ASAPP.
 ### Integration Steps
Here's a high level overview of how to work with AutoTranscribe:
1. Authenticate with ASAPP to gain access to the AutoTranscribe API.
2. Establish a WebSocket connection with the ASAPP Voice Gateway.
3. Send a `startStream` message with appropriate feature parameters specified.
4. Once the request is accepted by the ASAPP Voice Gateway, stream audio as binary data.
5. The ASAPP voice server will return transcripts in multiple messages.
6. Once the audio streaming is completed, send a `finishStream` to indicate to the Voice server that there is no more audio to send for this stream request.
7. Upon completion of all audio processing, the server sends a `finalResponse` which contains a summary of the stream request.
### Requirements
**Audio Stream Format**
In order to be transcribed properly, audio sent to ASAPP AutoTranscribe must be in mono or single-channel for each speaker.
Audio is sent as binary format through the WebSocket; the audio encoding (sample rate and encoding format) should be given in the `startStream` message.
For real-time live streaming, ASAPP recommends that you stream audio chunk-by-chunk in a real-time streaming format, by sending every 20ms or 100ms of audio as one binary message and sending the next chunk after a 20ms or 100ms interval.
If the chunk is too small, it will require more audio binary messages and more downstream message handling; if the chunk is too big, it increases buffering pressure and slows down the server responsiveness.
Exceptionally large chunks may result in WebSocket transport errors such as timeouts.
### Integration Steps
Here's a high level overview of how to work with AutoTranscribe:
1. Authenticate with ASAPP to gain access to the AutoTranscribe API.
2. Establish a WebSocket connection with the ASAPP Voice Gateway.
3. Send a `startStream` message with appropriate feature parameters specified.
4. Once the request is accepted by the ASAPP Voice Gateway, stream audio as binary data.
5. The ASAPP voice server will return transcripts in multiple messages.
6. Once the audio streaming is completed, send a `finishStream` to indicate to the Voice server that there is no more audio to send for this stream request.
7. Upon completion of all audio processing, the server sends a `finalResponse` which contains a summary of the stream request.
### Requirements
**Audio Stream Format**
In order to be transcribed properly, audio sent to ASAPP AutoTranscribe must be in mono or single-channel for each speaker.
Audio is sent as binary format through the WebSocket; the audio encoding (sample rate and encoding format) should be given in the `startStream` message.
For real-time live streaming, ASAPP recommends that you stream audio chunk-by-chunk in a real-time streaming format, by sending every 20ms or 100ms of audio as one binary message and sending the next chunk after a 20ms or 100ms interval.
If the chunk is too small, it will require more audio binary messages and more downstream message handling; if the chunk is too big, it increases buffering pressure and slows down the server responsiveness.
Exceptionally large chunks may result in WebSocket transport errors such as timeouts.
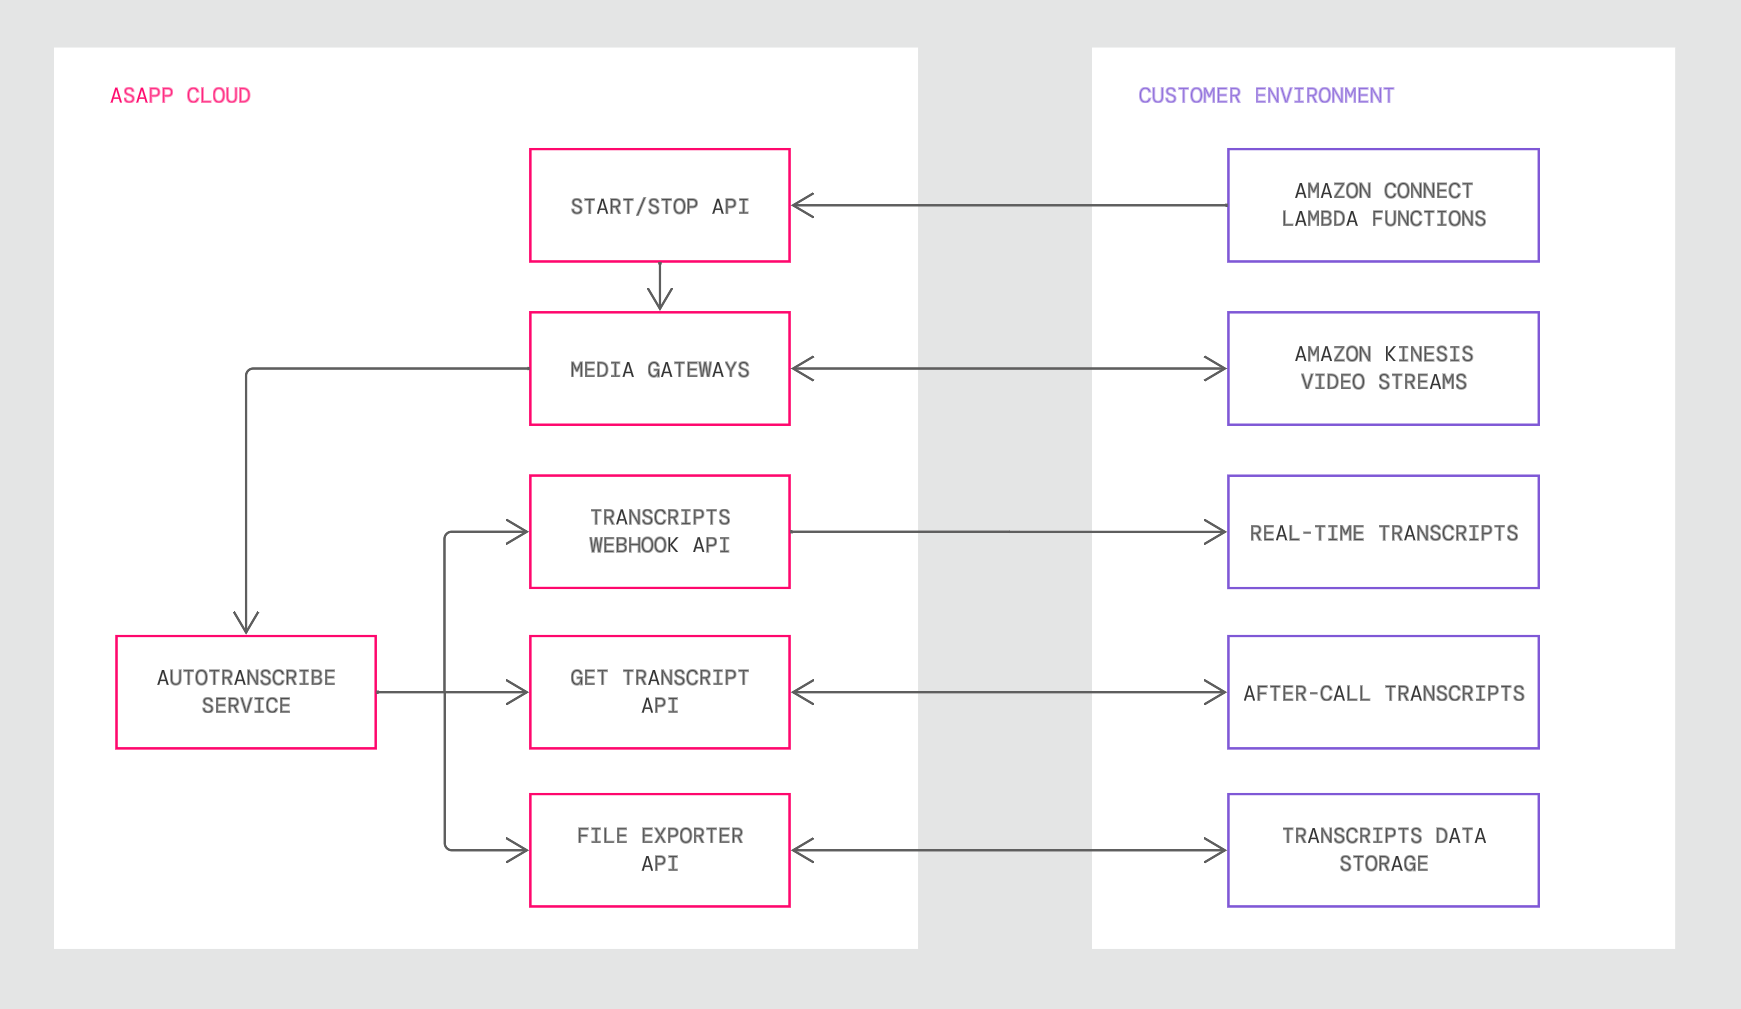 *Amazon Connect Lambda functions send requests to start and stop transcription. ASAPP requests streaming media from Kinesis Video Streams and produces transcripts for real-time, after-call, and batch use cases.*
## Use and Impact
The new Media Gateway will allow for a simplified integration for customers leveraging Amazon Connect as their CCaaS provider, reducing time and effort of sending call media to ASAPP.
## How It Works
**Procedure of streaming audio to ASAPP**
1. Setup IAM roles for authentication with Kinesis Video Streams and enable media streaming.
2. Configure triggers to start and stop media streaming in Connect flows.
3. Send requests to start and stop transcription using AWS Lambda functions, including parameters that ASAPP uses to request media from Kinesis.
4. ASAPP requests media from Kinesis Video Streams and begins transcribing upon acquiring media.
5. Receive transcript outputs leveraging one of ASAPP's transcription delivery mechanisms.
**Transcription Settings**
Transcription settings (e.g., redaction, language) are configured as part of requests to the `/start-streaming` endpoint and will be reflected in the messages returned from ASAPP. No further configuration is required.
## FAQs
**Is integration with the Start/Stop API required?**
Yes. Start requests to the API provide ASAPP with required call attributes to request customer and agent audio from Kinesis Video Streams.
Stop requests are also required, as they allow AutoTranscribe to exclude hold and queue audio from transcription. This is a requirement for downstream services to function properly, ensuring transcription is only leveraged where necessary.
# Custom Vocabulary Configuration API
Source: https://docs.asapp.com/autotranscribe/feature-releases/custom-vocabulary-configuration-api
## Feature Release
This is the announcement for an upcoming ASAPP feature. Your ASAPP account team will provide a target release date and can direct you to more detailed information as needed.
## Overview
AutoTranscribe is being extended with a new self-serve feature for ASAPP's partners, Custom Vocabulary. This feature allows users to independently add or delete business-specific keywords within a custom vocabulary set.
These keywords will be included during the ASAPP's ASR model fine-tuning, enhancing transcription accuracy to better suit their specific needs.
## Use and Impact
The custom vocab features aim to deliver significant benefits to the customers and partners:
* **Faster onboarding**
Enables swift initial configuration, expediting the onboarding process for customers. This feature reduces dependency on the ASAPP Delivery team.
* **Business-Specific Terminology & Contextual Relevance**
By allowing clients to add industry-specific terms/words, and names, the ASR model can better recognize and accurately transcribe these words and generate more precise transcriptions, which are often missed or misinterpreted by generic models.
This feature is fully customizable and self-serviceable. Users can create/update/delete a custom vocabulary containing specific keywords tailored to their domain and line of business. The scenarios where this feature is particularly beneficial include:
* When the Speech-to-Text (ASR) service needs to incorporate business-specific terminologies and keywords.
## How It Works
**Field Description**
| Field Name | Type | Description |
| --------------------------------- | ------ | ---------------------------------------------------------------------------------------------------------------- |
| custom-vocabularies | list | Custom vocabularies list
*Amazon Connect Lambda functions send requests to start and stop transcription. ASAPP requests streaming media from Kinesis Video Streams and produces transcripts for real-time, after-call, and batch use cases.*
## Use and Impact
The new Media Gateway will allow for a simplified integration for customers leveraging Amazon Connect as their CCaaS provider, reducing time and effort of sending call media to ASAPP.
## How It Works
**Procedure of streaming audio to ASAPP**
1. Setup IAM roles for authentication with Kinesis Video Streams and enable media streaming.
2. Configure triggers to start and stop media streaming in Connect flows.
3. Send requests to start and stop transcription using AWS Lambda functions, including parameters that ASAPP uses to request media from Kinesis.
4. ASAPP requests media from Kinesis Video Streams and begins transcribing upon acquiring media.
5. Receive transcript outputs leveraging one of ASAPP's transcription delivery mechanisms.
**Transcription Settings**
Transcription settings (e.g., redaction, language) are configured as part of requests to the `/start-streaming` endpoint and will be reflected in the messages returned from ASAPP. No further configuration is required.
## FAQs
**Is integration with the Start/Stop API required?**
Yes. Start requests to the API provide ASAPP with required call attributes to request customer and agent audio from Kinesis Video Streams.
Stop requests are also required, as they allow AutoTranscribe to exclude hold and queue audio from transcription. This is a requirement for downstream services to function properly, ensuring transcription is only leveraged where necessary.
# Custom Vocabulary Configuration API
Source: https://docs.asapp.com/autotranscribe/feature-releases/custom-vocabulary-configuration-api
## Feature Release
This is the announcement for an upcoming ASAPP feature. Your ASAPP account team will provide a target release date and can direct you to more detailed information as needed.
## Overview
AutoTranscribe is being extended with a new self-serve feature for ASAPP's partners, Custom Vocabulary. This feature allows users to independently add or delete business-specific keywords within a custom vocabulary set.
These keywords will be included during the ASAPP's ASR model fine-tuning, enhancing transcription accuracy to better suit their specific needs.
## Use and Impact
The custom vocab features aim to deliver significant benefits to the customers and partners:
* **Faster onboarding**
Enables swift initial configuration, expediting the onboarding process for customers. This feature reduces dependency on the ASAPP Delivery team.
* **Business-Specific Terminology & Contextual Relevance**
By allowing clients to add industry-specific terms/words, and names, the ASR model can better recognize and accurately transcribe these words and generate more precise transcriptions, which are often missed or misinterpreted by generic models.
This feature is fully customizable and self-serviceable. Users can create/update/delete a custom vocabulary containing specific keywords tailored to their domain and line of business. The scenarios where this feature is particularly beneficial include:
* When the Speech-to-Text (ASR) service needs to incorporate business-specific terminologies and keywords.
## How It Works
**Field Description**
| Field Name | Type | Description |
| --------------------------------- | ------ | ---------------------------------------------------------------------------------------------------------------- |
| custom-vocabularies | list | Custom vocabularies listBy default, the list will display up to 20 custom vocabs. Can be configured. | | custom-vocabularies\[].id | string | System generated id | | custom-vocabularies\[].phrase | string | The phrase to place in the transcribed text | | custom-vocabularies\[].soundsLike | list | List of similar phrases for the received sound | | nextCursor | id | Next field ID
Will be null for the first page | | prevCursor | id | Previous field ID
Will be null for the last page | **API Endpoints** 1. List all custom vocabs `GET /configuration/v1/auto-transcribe/custom-vocabularies` Sample response ```json { "customVocabularies": [ { "id": "563a0954-1db7-4b96-bf21-fa84de137742", "phrase": "IEEE", "soundsLike": [ "I triple E" ] }, { "id": "7939d838-774c-46fe-9f18-5ebf15cf3e9c", "phrase": "NATO", "soundsLike": [ "Nae tow", "Naa toe" ] } ], "nextCursor": "4c576035-870e-47cf-88ef-8d29e6b5d7e8", "prevCursor": null } ``` 2. Details of a particular custom vocab `GET /configuration/v1/auto-transcribe/custom-vocabularies/\{customVocabularyId\}` Sample response ```json { "id": "6B29FC40-CA47-1067-B31D-00DD010662DA", "phrase": "IEEE", "soundsLike":[ "I triple E" ] } ``` 3. Create a custom vocab `POST /configuration/v1/auto-transcribe/custom-vocabularies` Sample Request ```json { "phrase": "IEEE", "soundsLike": [ "I triple E" ] } ``` Sample response ```json { "id": "6B29FC40-CA47-1067-B31D-00DD010662DA", "phrase": "IEEE", "soundsLike":[ "I triple E" ] } ``` 4. Delete a custom vocab `DELETE /configuration/v1/auto-transcribe/custom-vocabularies/\{customVocabularyId\}` ## FAQs * **Can I modify the custom vocabulary after it's been created?** Yes, users can update the custom vocabulary at any time. To do so, first delete the existing vocabulary and then submit a new create request. This process ensures that the vocabulary remains current and relevant. * **Can I send the create request for multiple custom vocab additions?** Currently multiple custom vocab addition capability is not live, users must submit individual create requests for each addition. That said, If a large number of additions are required, please contact ASAPP's support team for assistance. * **Is there a limit to the number of custom vocabularies that can be added?** Yes, The maximum number of custom vocabulary entries is 200. However, this limit is subject to change as ASAPP continuously updates and expands its backend capabilities to support more custom vocab. * **Is there a limit to the number of sounds like items within the custom vocab?** The maximum number of sounds like items should be 5 and length of each item should be 40 characters # Get Transcript API for AutoTranscribe Source: https://docs.asapp.com/autotranscribe/feature-releases/get-transcript-api-for-autotranscribe ## Feature Release This is the announcement for an upcoming ASAPP feature. Your ASAPP account team will provide a target release date and can direct you to more detailed information as needed. ## Overview ASAPP is adding a new endpoint that retrieves the full set of messages for a specified conversation. This expands the delivery use cases for AutoTranscribe, providing a means to get a complete transcript at the end of a conversation on-demand, instead of in real-time during the conversation or in daily batches of conversations. ## Use and Impact This new endpoint is intended to support use cases for full transcripts that require them for end-users or automated services once a conversation ends, rather than on a delayed basis. Potential use cases include: * Coaching and quality assurance review * After-call dispositioning workflows * Agent reference for recent calls * Text analytics In rare cases where real-time transcript delivery fails, this endpoint also functions as a fallback option to retrieve conversation messages. ## How It Works `GET /conversation/v1/conversation/messages` takes a single conversation identifier and immediately returns an array of messages that covers the full conversation. Each message includes the transcribed text of the utterance, the role and unique identifier of the sender (agent or customer), and the utterance's created timestamp. For example: ```json { "text": "Hello, I'd like to upgrade my plan to gold.", "sender": { "role": "customer", "externalId": "123" }, "timestamp": "2022-11-23T12:13:14.555Z" } ```
Non-redacted: 0111 0111 0111 0111
Redacted: \*\*\*\* \*\*\*\* \*\*\*\*1312
Cannot be changed/updated without ASAPP’s security approval. | | CVV | auto-enabled | 3- or 4-digit card verification codes and/or equivalents
Non-redacted: 561
Redacted: \*\*\*
Cannot be changed/updated without ASAPP’s security approval. | **PII (Personally Identifiable Information)** | Entity Label | Status | Description | | ------------- | ------------ | -------------------------------------------------------------------------------------------------------------------------- | | PASSWORD | auto-enabled | Account passwords
Non-redacted: qwer1234
Redacted: \*\*\*\*\*\*\* | | PIN | auto-enabled | Personal Identification Number
Non-redacted: 5614
Redacted: \*\*\*\* | | SSN | auto-enabled | Social Security Number
Non-redacted: 012-03-1134
Redacted: \***-**-1134 | | EMAIL | not enabled | Email address
Non-redacted: [test@asapp.com](mailto:test@asapp.com)
Redacted: \*\*\*@asapp.cpm | | PHONE\_NUMBER | not enabled | Telephone or fax number
Non-redacted: +11234567891
Redacted: \*\*\*\*\*\*\*\*\*\*\* | | DOB | not enabled | Date of Birth
Non-redacted: Jan 31, 1980
Redacted: \*\*\*\*\*\* | | PROFANITY | not enabled | Profanities or banned vocabulary
Non-redacted: "silly"
Redacted: \*\*\*\*\* | ## Use and Impact This feature allows users to fully customize and self-manage their own rules. With the ability to enable, disable, or delete custom redaction entities, users can tailor their security measures to align perfectly with their specific domain and business requirements. This is particularly valuable for organizations handling sensitive information such as PCI and PII data, as it enables them to create redaction rules that address their unique compliance needs. The self-service aspect of this feature allows users to adapt to changing data protection demands without relying on external support.
 *AutoTranscribe showing conversation transcriptions in a sandbox environment.*
## Use and Impact
AutoTranscribe is specifically designed for the contact center setting and supports real-time, highly accurate transcription.
**Initial Use**
When using AutoTranscribe Sandbox for the first time, results are produced from baseline ASAPP models that are designed for the contact center setting. At this stage, the sandbox environment helps demonstrate transcript functionality, but it does not reflect the performance of a custom-trained model.
**Custom-Trained Models**
Once a transcription model has been customized using real conversations from your contact center, AutoTranscribe Sandbox will capture terminology that is unique to your business.
The Sandbox also allows administrators to preview configured redaction of sensitive information, and test new redaction rules before deploying them to production.
## How It Works
Watch the following video walkthrough to learn how to use the AutoTranscribe Sandbox:
AutoTranscribe Sandbox enables users to generate transcriptions directly in the browser by using the computer's microphone. Users can simulate an entire conversation by switching between playing the role of an agent and a customer. In addition, ASAPP provides pre-loaded sample conversations that can be played back to generate live transcripts automatically.
Once redaction rules are configured, the live transcript will redact sensitive information such as credit card information, social security numbers, or email addresses.
## FAQs
1. **What information does AutoTranscribe Sandbox redact?**
AutoTranscribe Sandbox will redact following your configured redaction rules set in partnership with your ASAPP account team. If no rules have been configured, [ASAPP's default redaction rules](/security/data-redaction/redaction-policies) will apply.
2. **Does ASAPP store voice conversations recorded using the AutoTranscribe Sandbox?**
To protect customer's privacy, ASAPP does not store any voice data received from AutoTranscribe Sandbox. Saving a conversation will only store the conversation transcript as text.
# Twilio Media Gateway for AutoTranscribe
Source: https://docs.asapp.com/autotranscribe/feature-releases/twilio-media-gateway-for-autotranscribe
## Feature Release
This is the announcement for an upcoming ASAPP feature. Your ASAPP account team will provide a target release date and can direct you to more detailed information as needed.
## Overview
ASAPP is adding an AutoTranscribe implementation pattern for Twilio. ASAPP's Twilio Media Gateway will allow Twilio Media Streams audio to be easily sent to AutoTranscribe. The same call signaling integration via API will be leveraged as is used in the integration with the SIPREC Media Gateway.
*AutoTranscribe showing conversation transcriptions in a sandbox environment.*
## Use and Impact
AutoTranscribe is specifically designed for the contact center setting and supports real-time, highly accurate transcription.
**Initial Use**
When using AutoTranscribe Sandbox for the first time, results are produced from baseline ASAPP models that are designed for the contact center setting. At this stage, the sandbox environment helps demonstrate transcript functionality, but it does not reflect the performance of a custom-trained model.
**Custom-Trained Models**
Once a transcription model has been customized using real conversations from your contact center, AutoTranscribe Sandbox will capture terminology that is unique to your business.
The Sandbox also allows administrators to preview configured redaction of sensitive information, and test new redaction rules before deploying them to production.
## How It Works
Watch the following video walkthrough to learn how to use the AutoTranscribe Sandbox:
AutoTranscribe Sandbox enables users to generate transcriptions directly in the browser by using the computer's microphone. Users can simulate an entire conversation by switching between playing the role of an agent and a customer. In addition, ASAPP provides pre-loaded sample conversations that can be played back to generate live transcripts automatically.
Once redaction rules are configured, the live transcript will redact sensitive information such as credit card information, social security numbers, or email addresses.
## FAQs
1. **What information does AutoTranscribe Sandbox redact?**
AutoTranscribe Sandbox will redact following your configured redaction rules set in partnership with your ASAPP account team. If no rules have been configured, [ASAPP's default redaction rules](/security/data-redaction/redaction-policies) will apply.
2. **Does ASAPP store voice conversations recorded using the AutoTranscribe Sandbox?**
To protect customer's privacy, ASAPP does not store any voice data received from AutoTranscribe Sandbox. Saving a conversation will only store the conversation transcript as text.
# Twilio Media Gateway for AutoTranscribe
Source: https://docs.asapp.com/autotranscribe/feature-releases/twilio-media-gateway-for-autotranscribe
## Feature Release
This is the announcement for an upcoming ASAPP feature. Your ASAPP account team will provide a target release date and can direct you to more detailed information as needed.
## Overview
ASAPP is adding an AutoTranscribe implementation pattern for Twilio. ASAPP's Twilio Media Gateway will allow Twilio Media Streams audio to be easily sent to AutoTranscribe. The same call signaling integration via API will be leveraged as is used in the integration with the SIPREC Media Gateway.
 *Media Gateways will support receiving Twilio Media Streams and requests to start and stop transcription.*
## Use and Impact
The new Media Gateway will allow for a simplified and easy integration for customers leveraging Twilio as their CCaaS provider, reducing time and effort of sending call media to ASAPP.
## How It Works
Procedure of streaming audio to ASAPP:
1. Authenticate with ASAPP to obtain an access URL.
2. Instruct Twilio to start sending Media Streams to the ASAPP Media Gateway; the ASAPP Media Gateway will then receive real-time audio as well as Call SID data.
3. Send start and stop requests to control when transcription occurs. Start and stop requests are used to start, pause, resume, and end conversations.
4. Receive transcript outputs leveraging one of ASAPP's transcription delivery mechanisms.
**Configuration**
Transcription settings (e.g. redaction, language) must be configured as part of implementing AutoTranscribe and will be reflected in the messages returned from this endpoint. No further configuration is required.
*Media Gateways will support receiving Twilio Media Streams and requests to start and stop transcription.*
## Use and Impact
The new Media Gateway will allow for a simplified and easy integration for customers leveraging Twilio as their CCaaS provider, reducing time and effort of sending call media to ASAPP.
## How It Works
Procedure of streaming audio to ASAPP:
1. Authenticate with ASAPP to obtain an access URL.
2. Instruct Twilio to start sending Media Streams to the ASAPP Media Gateway; the ASAPP Media Gateway will then receive real-time audio as well as Call SID data.
3. Send start and stop requests to control when transcription occurs. Start and stop requests are used to start, pause, resume, and end conversations.
4. Receive transcript outputs leveraging one of ASAPP's transcription delivery mechanisms.
**Configuration**
Transcription settings (e.g. redaction, language) must be configured as part of implementing AutoTranscribe and will be reflected in the messages returned from this endpoint. No further configuration is required.
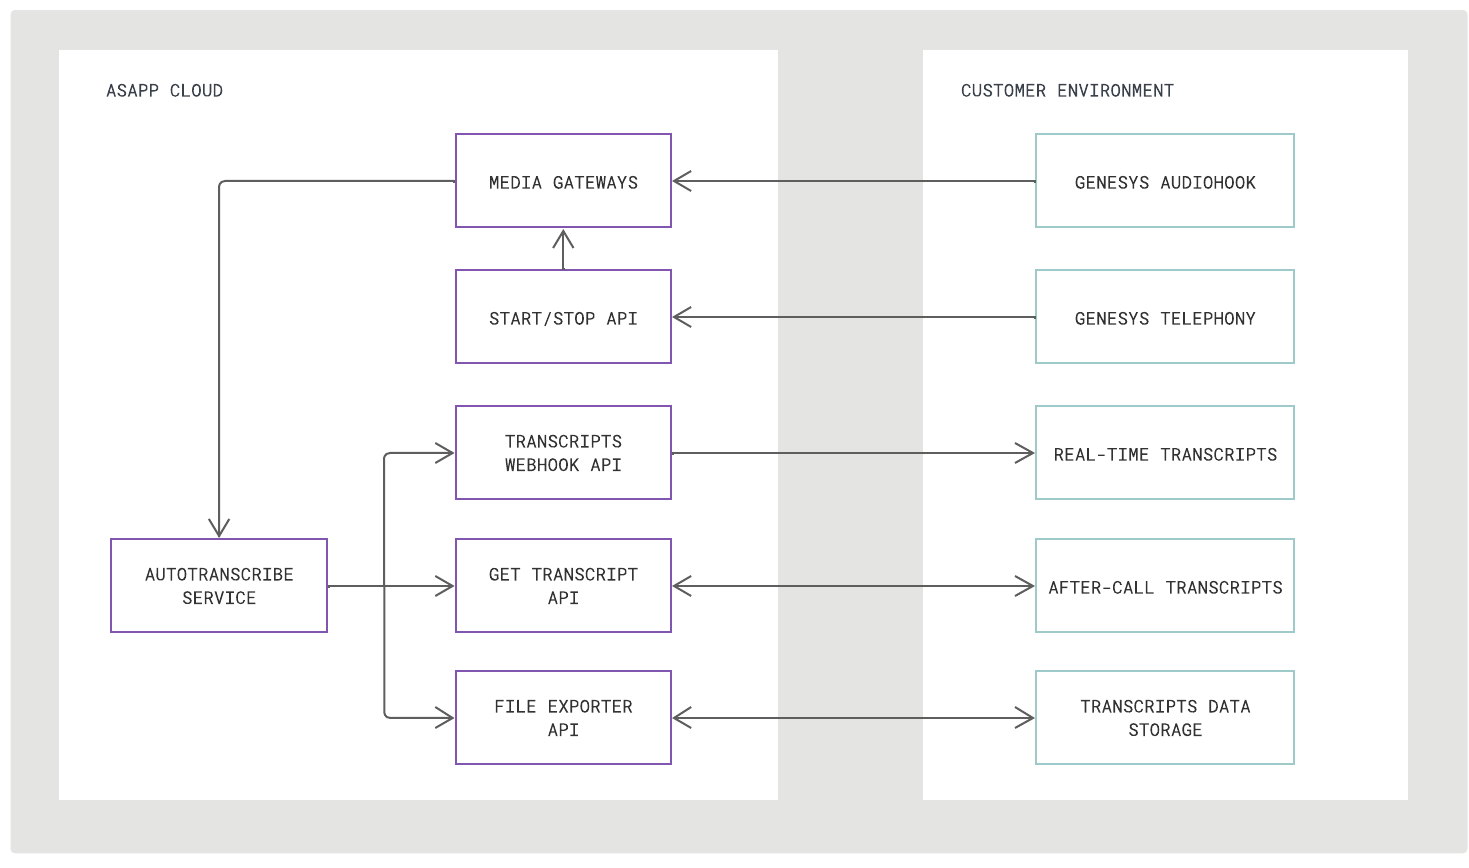 ### Integration Steps
There are three steps to integrate AutoTranscribe into Genesys Audiohook:
1. Enable AudioHook and Configure for ASAPP
2. Send Start and Stop Requests
3. Receive Transcript Outputs
### Requirements
**Audio Stream Codec**
Genesys AudioHook provides audio in the mu-law format with 8000 sample rate, which is supported by ASAPP.
No modification or additional transcoding is needed when forking audio to ASAPP.
### Integration Steps
There are three steps to integrate AutoTranscribe into Genesys Audiohook:
1. Enable AudioHook and Configure for ASAPP
2. Send Start and Stop Requests
3. Receive Transcript Outputs
### Requirements
**Audio Stream Codec**
Genesys AudioHook provides audio in the mu-law format with 8000 sample rate, which is supported by ASAPP.
No modification or additional transcoding is needed when forking audio to ASAPP.
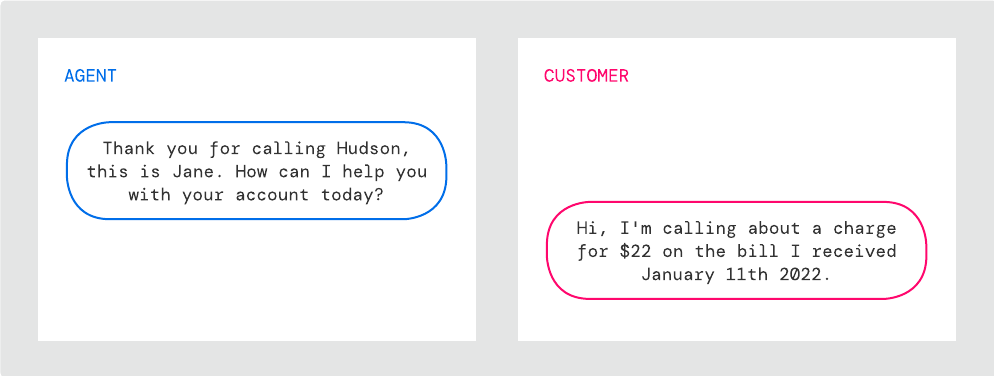 ### Redaction
AutoTranscribe can immediately redact audio for sensitive information, returning utterances with sensitive information denoted in hashmarks.
ASAPP applies default redaction policies to prevent exposure of sensitive combinations of numerical digits. To configure redaction rules for your implementation, consult your ASAPP account contact.
Visit the [Data Redaction](/security/data-redaction) section to learn more.
### Redaction
AutoTranscribe can immediately redact audio for sensitive information, returning utterances with sensitive information denoted in hashmarks.
ASAPP applies default redaction policies to prevent exposure of sensitive combinations of numerical digits. To configure redaction rules for your implementation, consult your ASAPP account contact.
Visit the [Data Redaction](/security/data-redaction) section to learn more.
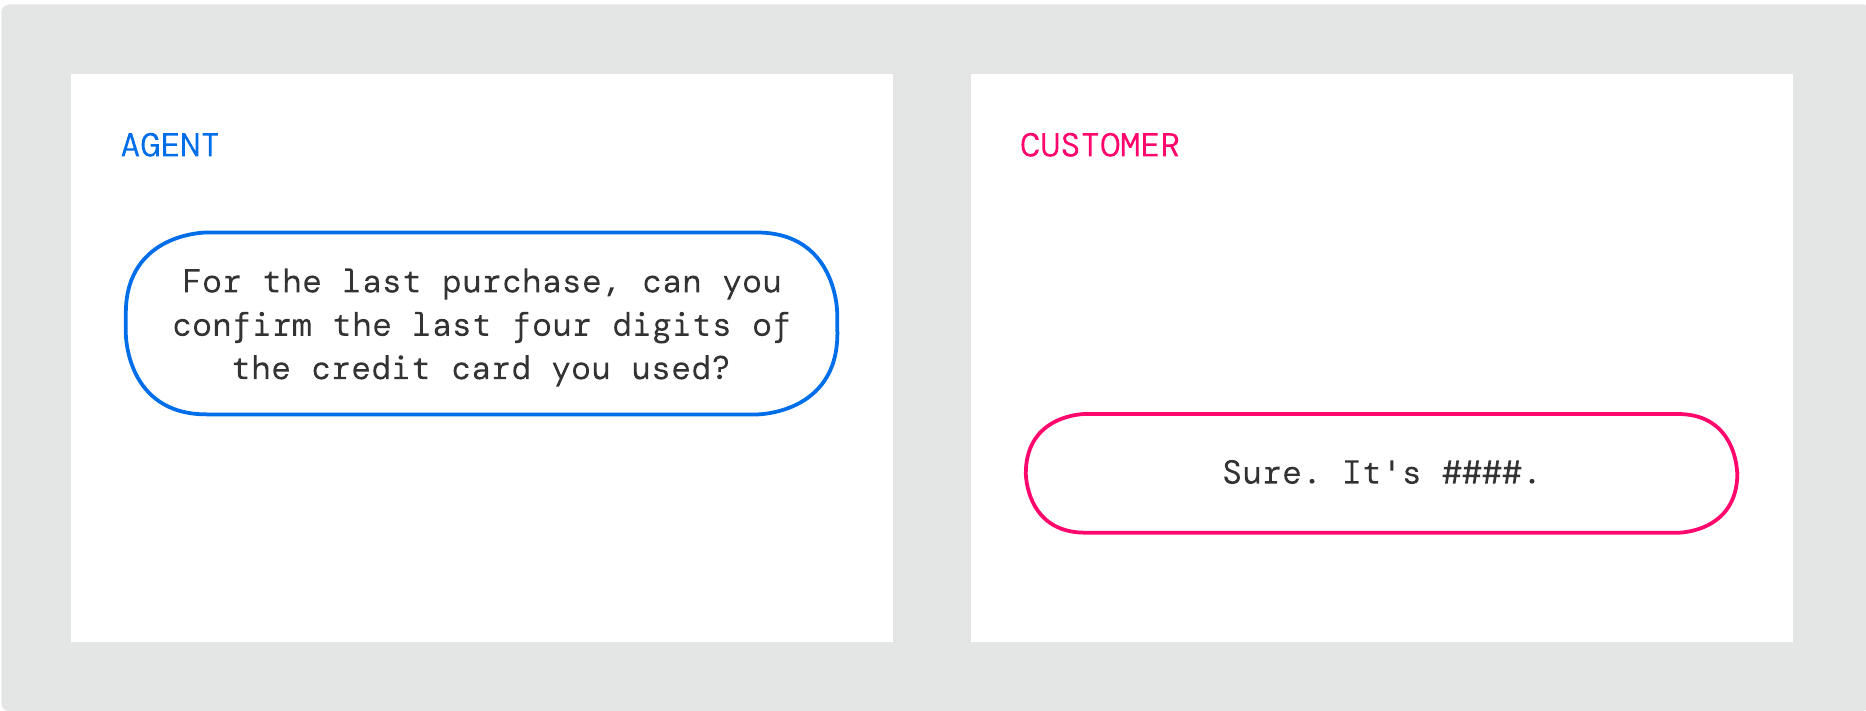
Option |
Description |
Requirements |
Baseline |
ASAPP’s general-purpose transcription capability, trained with no audio from relevant historical calls |
none |
Customized |
A custom-trained transcription model to incorporate domain-specific terminology likely to be encountered during implementation |
For English custom models, a minimum 100 hours of representative historical call audio between customers and agents For Spanish custom models, a minimum of 200 hours. |
Once accurate call transcripts are generated, automatic summarization of those customer interactions becomes possible.
ASAPP AutoSummary is a recommended pairing with AutoTranscribe, generating analytics-ready structured summaries and readable paragraph summaries that save agents the distraction of needing to write and submit disposition notes on every call.
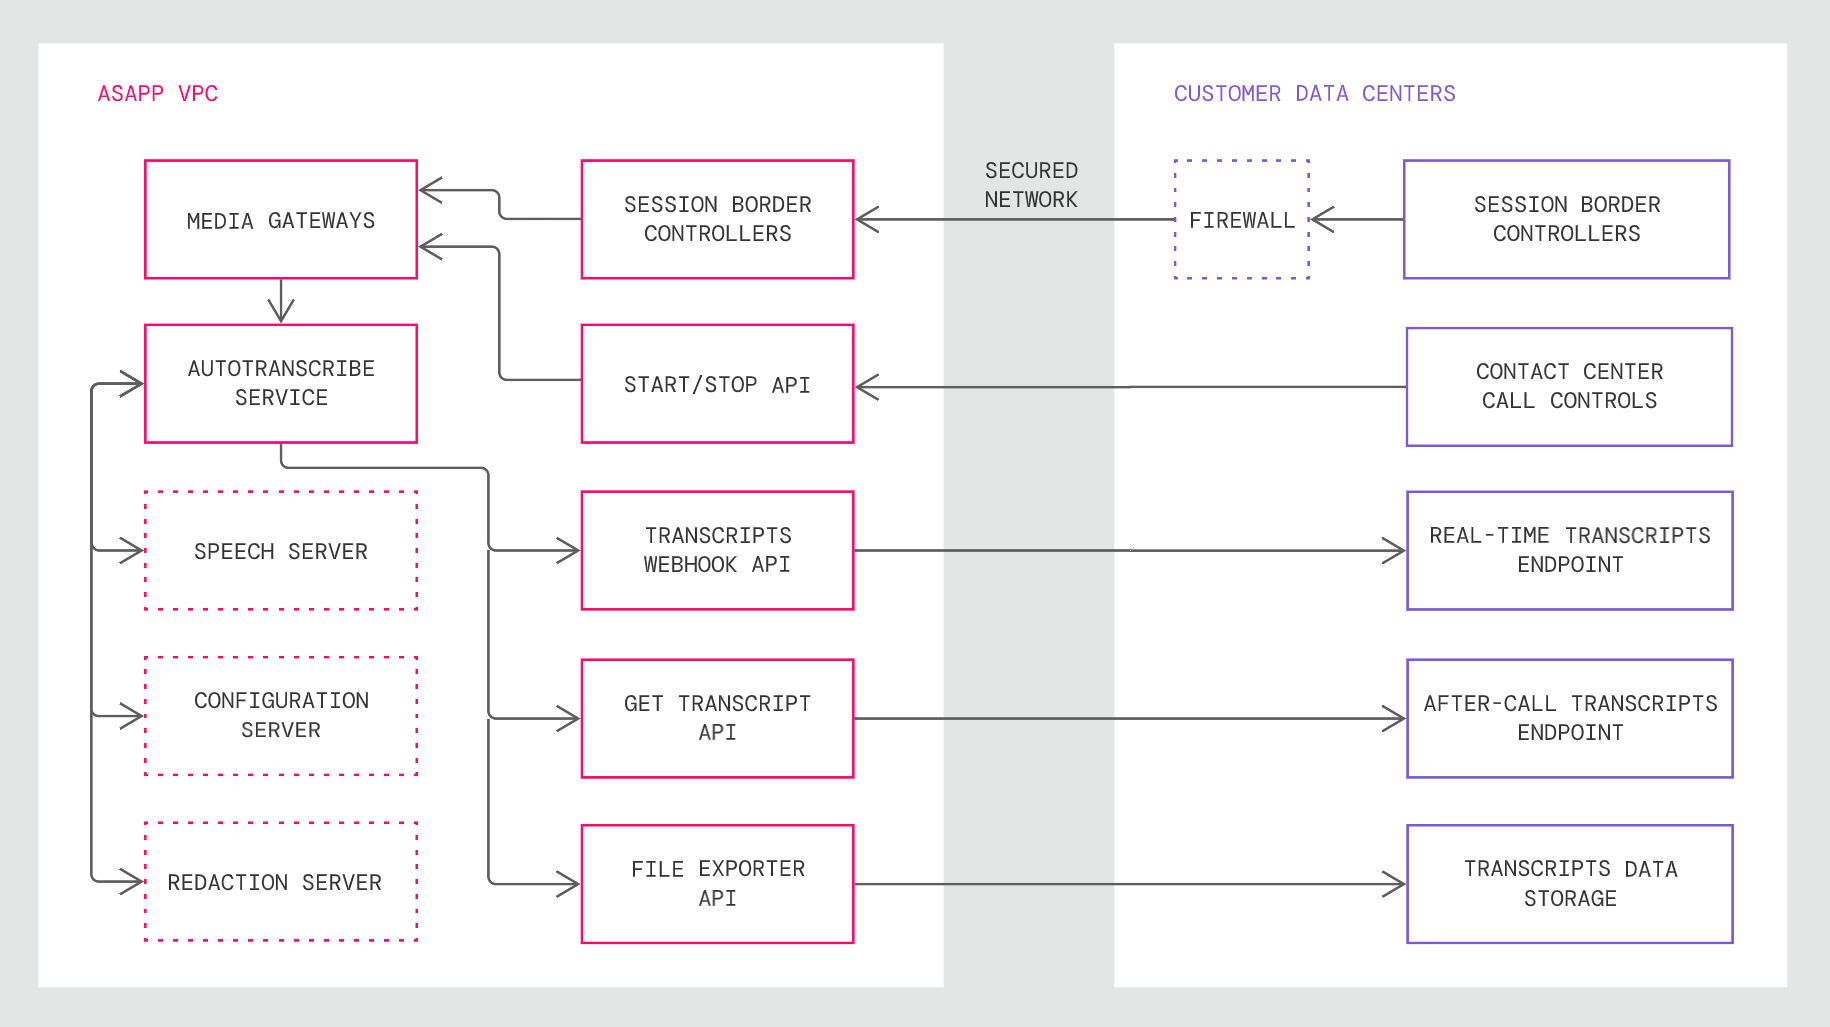 ASAPP works with you to understand your current telephony infrastructure and ecosystem, including the type of voice work assignment platform(s) and other capabilities available, such as SIPREC.
Your ASAPP account team will also determine the main use case(s) for the transcript data to determine where and how call transcripts should be sent.
ASAPP then completes the architecture definition, including integration points into the existing infrastructure.
### Integration Steps
There are three steps to integrate AutoTranscribe into SIPREC:
1. Send Audio to Media Gateway
2. Send Start and Stop Requests
3. Receiving Transcript Outputs
### Requirements
**Audio Stream Codec**
With SIPREC, the customer SBC and the ASAPP media gateway negotiate the media attributes via the SDP offer/answer exchange during the establishment of the session. The codecs in use today are as follows:
* G.711
* G.729
ASAPP works with you to understand your current telephony infrastructure and ecosystem, including the type of voice work assignment platform(s) and other capabilities available, such as SIPREC.
Your ASAPP account team will also determine the main use case(s) for the transcript data to determine where and how call transcripts should be sent.
ASAPP then completes the architecture definition, including integration points into the existing infrastructure.
### Integration Steps
There are three steps to integrate AutoTranscribe into SIPREC:
1. Send Audio to Media Gateway
2. Send Start and Stop Requests
3. Receiving Transcript Outputs
### Requirements
**Audio Stream Codec**
With SIPREC, the customer SBC and the ASAPP media gateway negotiate the media attributes via the SDP offer/answer exchange during the establishment of the session. The codecs in use today are as follows:
* G.711
* G.729
 ### Integration Steps
There are four steps to integrate AutoTranscribe into Twilio:
1. Authenticate with ASAPP and Obtain a Twilio Media Stream URL
2. Send Audio to Media Gateway
3. Send Start and Stop Requests
4. Receive Transcript Outputs
### Requirements
**Audio Stream Codec**
Twilio provides audio in the mu-law format with 8000 sample rate, which is supported by ASAPP. No modification or additional transcoding is needed when forking audio to ASAPP.
### Integration Steps
There are four steps to integrate AutoTranscribe into Twilio:
1. Authenticate with ASAPP and Obtain a Twilio Media Stream URL
2. Send Audio to Media Gateway
3. Send Start and Stop Requests
4. Receive Transcript Outputs
### Requirements
**Audio Stream Codec**
Twilio provides audio in the mu-law format with 8000 sample rate, which is supported by ASAPP. No modification or additional transcoding is needed when forking audio to ASAPP.
 GenerativeAgent is an advanced AI conversational bot that revolutionizes customer support. By leveraging Large Language Models (LLM), it is capable of:
* Nuanced handling of complex support issues
* Real-time access to the knowledge base and APIs
* Safe and accurate issue resolution
* Seamless integration with existing chat and voice channels
Deploy GenerativeAgent to automate your front-line support, giving you control over which interactions are handled automatically and which are routed to your existing support channels.
## How GenerativeAgent Works
At a high level, GenerativeAgent operates by:
1. Analyzing customer interactions in real-time
2. Accessing relevant information from the knowledge base
3. Interacting with back-end systems through APIs
4. Generating human-like responses to resolve issues
Unlike traditional bots with predefined flows, GenerativeAgent uses natural language processing to understand and respond to a wide range of customer queries and issues.
GenerativeAgent is an advanced AI conversational bot that revolutionizes customer support. By leveraging Large Language Models (LLM), it is capable of:
* Nuanced handling of complex support issues
* Real-time access to the knowledge base and APIs
* Safe and accurate issue resolution
* Seamless integration with existing chat and voice channels
Deploy GenerativeAgent to automate your front-line support, giving you control over which interactions are handled automatically and which are routed to your existing support channels.
## How GenerativeAgent Works
At a high level, GenerativeAgent operates by:
1. Analyzing customer interactions in real-time
2. Accessing relevant information from the knowledge base
3. Interacting with back-end systems through APIs
4. Generating human-like responses to resolve issues
Unlike traditional bots with predefined flows, GenerativeAgent uses natural language processing to understand and respond to a wide range of customer queries and issues.
 For a more detailed explanation of GenerativeAgent's functionality, implementation process, and configuration options, visit our [How GenerativeAgent Works](generativeagent/how-it-works) page.
## Safety
GenerativeAgent has been developed with a safety-first approach.
ASAPP ensures GenerativeAgent's accuracy and quality with rigorous testing and continuous updates, preventing hallucinations through advanced validating. Our team has incorporated Safety Layers that provide benefits such as reliability and response trust.
Our safety standards include:
* Safety Layers
* Hallucination Control
* Data Redaction
* IP Blocking
* Customer Info and Sensitive Data Protection
For a more detailed explanation of GenerativeAgent's functionality, implementation process, and configuration options, visit our [How GenerativeAgent Works](generativeagent/how-it-works) page.
## Safety
GenerativeAgent has been developed with a safety-first approach.
ASAPP ensures GenerativeAgent's accuracy and quality with rigorous testing and continuous updates, preventing hallucinations through advanced validating. Our team has incorporated Safety Layers that provide benefits such as reliability and response trust.
Our safety standards include:
* Safety Layers
* Hallucination Control
* Data Redaction
* IP Blocking
* Customer Info and Sensitive Data Protection
 ### Improving Tasks
As you configure tasks, refer to [Improving Tasks](/generativeagent/configuring/tasks-and-functions/improving) for strategies and tools to improve task performance.
## Step 4: Create Functions
Functions enable your GenerativeAgent to perform actions similar to a live agent. For example, an airline might need Functions to check refund eligibility and process refunds.
Functions must point to specific [API Connections](/generativeagent/configuring/connect-apis) and versions. API Connections contain technical details for connecting to specific API endpoints.
### Improving Tasks
As you configure tasks, refer to [Improving Tasks](/generativeagent/configuring/tasks-and-functions/improving) for strategies and tools to improve task performance.
## Step 4: Create Functions
Functions enable your GenerativeAgent to perform actions similar to a live agent. For example, an airline might need Functions to check refund eligibility and process refunds.
Functions must point to specific [API Connections](/generativeagent/configuring/connect-apis) and versions. API Connections contain technical details for connecting to specific API endpoints.
 ### Request Schema
The Request Schema specifies the structure of data that GenerativeAgent can send to your API. This schema should be designed for optimal LLM interaction.
**Common Transformation Patterns**
### Request Schema
The Request Schema specifies the structure of data that GenerativeAgent can send to your API. This schema should be designed for optimal LLM interaction.
**Common Transformation Patterns**
 ### Response Schema
The Response Schema defines the structure of data that GenerativeAgent will receive. Focus on creating clear, simple schemas that are optimized for LLM processing.
### Response Schema
The Response Schema defines the structure of data that GenerativeAgent will receive. Focus on creating clear, simple schemas that are optimized for LLM processing.
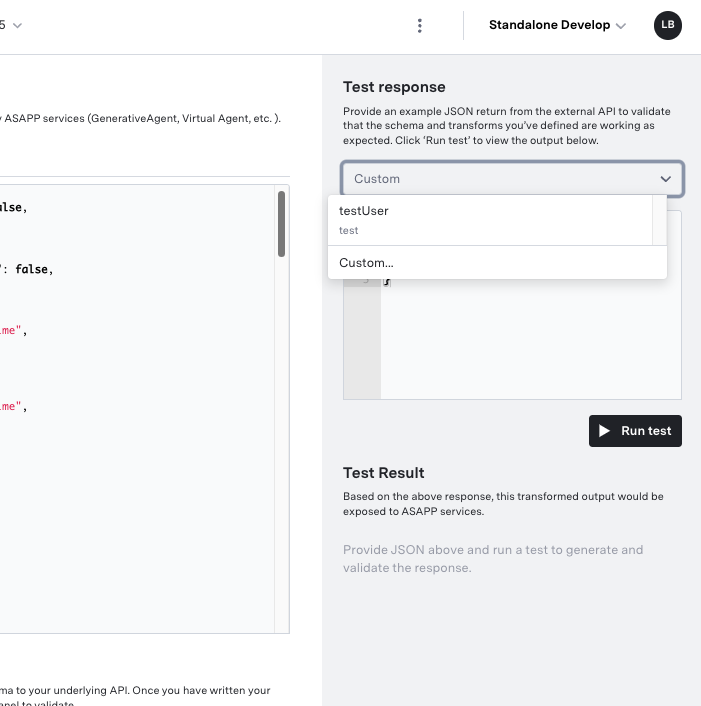 This allows you to save common responses from your server in sets of Mock users. As you iterate on your API Connection, you can test your transformation using the same mock responses.
## Next Steps
This allows you to save common responses from your server in sets of Mock users. As you iterate on your API Connection, you can test your transformation using the same mock responses.
## Next Steps
 GenerativeAgent's Knowledge Base is designed to hold information that GenerativeAgent can use to answer customer questions. Customers may ask direct questions like "What is the return policy?" or express confusion that implies a question like "I don't understand what 'eligible for store credit' means").
GenerativeAgent reads a customer message and decides if it should check the Knowledge Base to provide helpful information, even if a questions is implicit. If the message implies a question, GenerativeAgent searches for its response in the Knowledge Base.
To give GenerativeAgent access to your Knowledge Base, you need to:
1. Import your knowledge base into ASAPP
2. Deploy knowledge base articles
GenerativeAgent's Knowledge Base is designed to hold information that GenerativeAgent can use to answer customer questions. Customers may ask direct questions like "What is the return policy?" or express confusion that implies a question like "I don't understand what 'eligible for store credit' means").
GenerativeAgent reads a customer message and decides if it should check the Knowledge Base to provide helpful information, even if a questions is implicit. If the message implies a question, GenerativeAgent searches for its response in the Knowledge Base.
To give GenerativeAgent access to your Knowledge Base, you need to:
1. Import your knowledge base into ASAPP
2. Deploy knowledge base articles
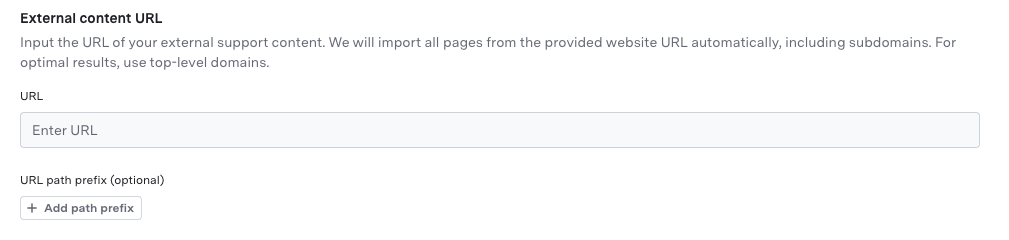

 After saving, the Snippet can be seen from the Table View with its Description and Attributes.

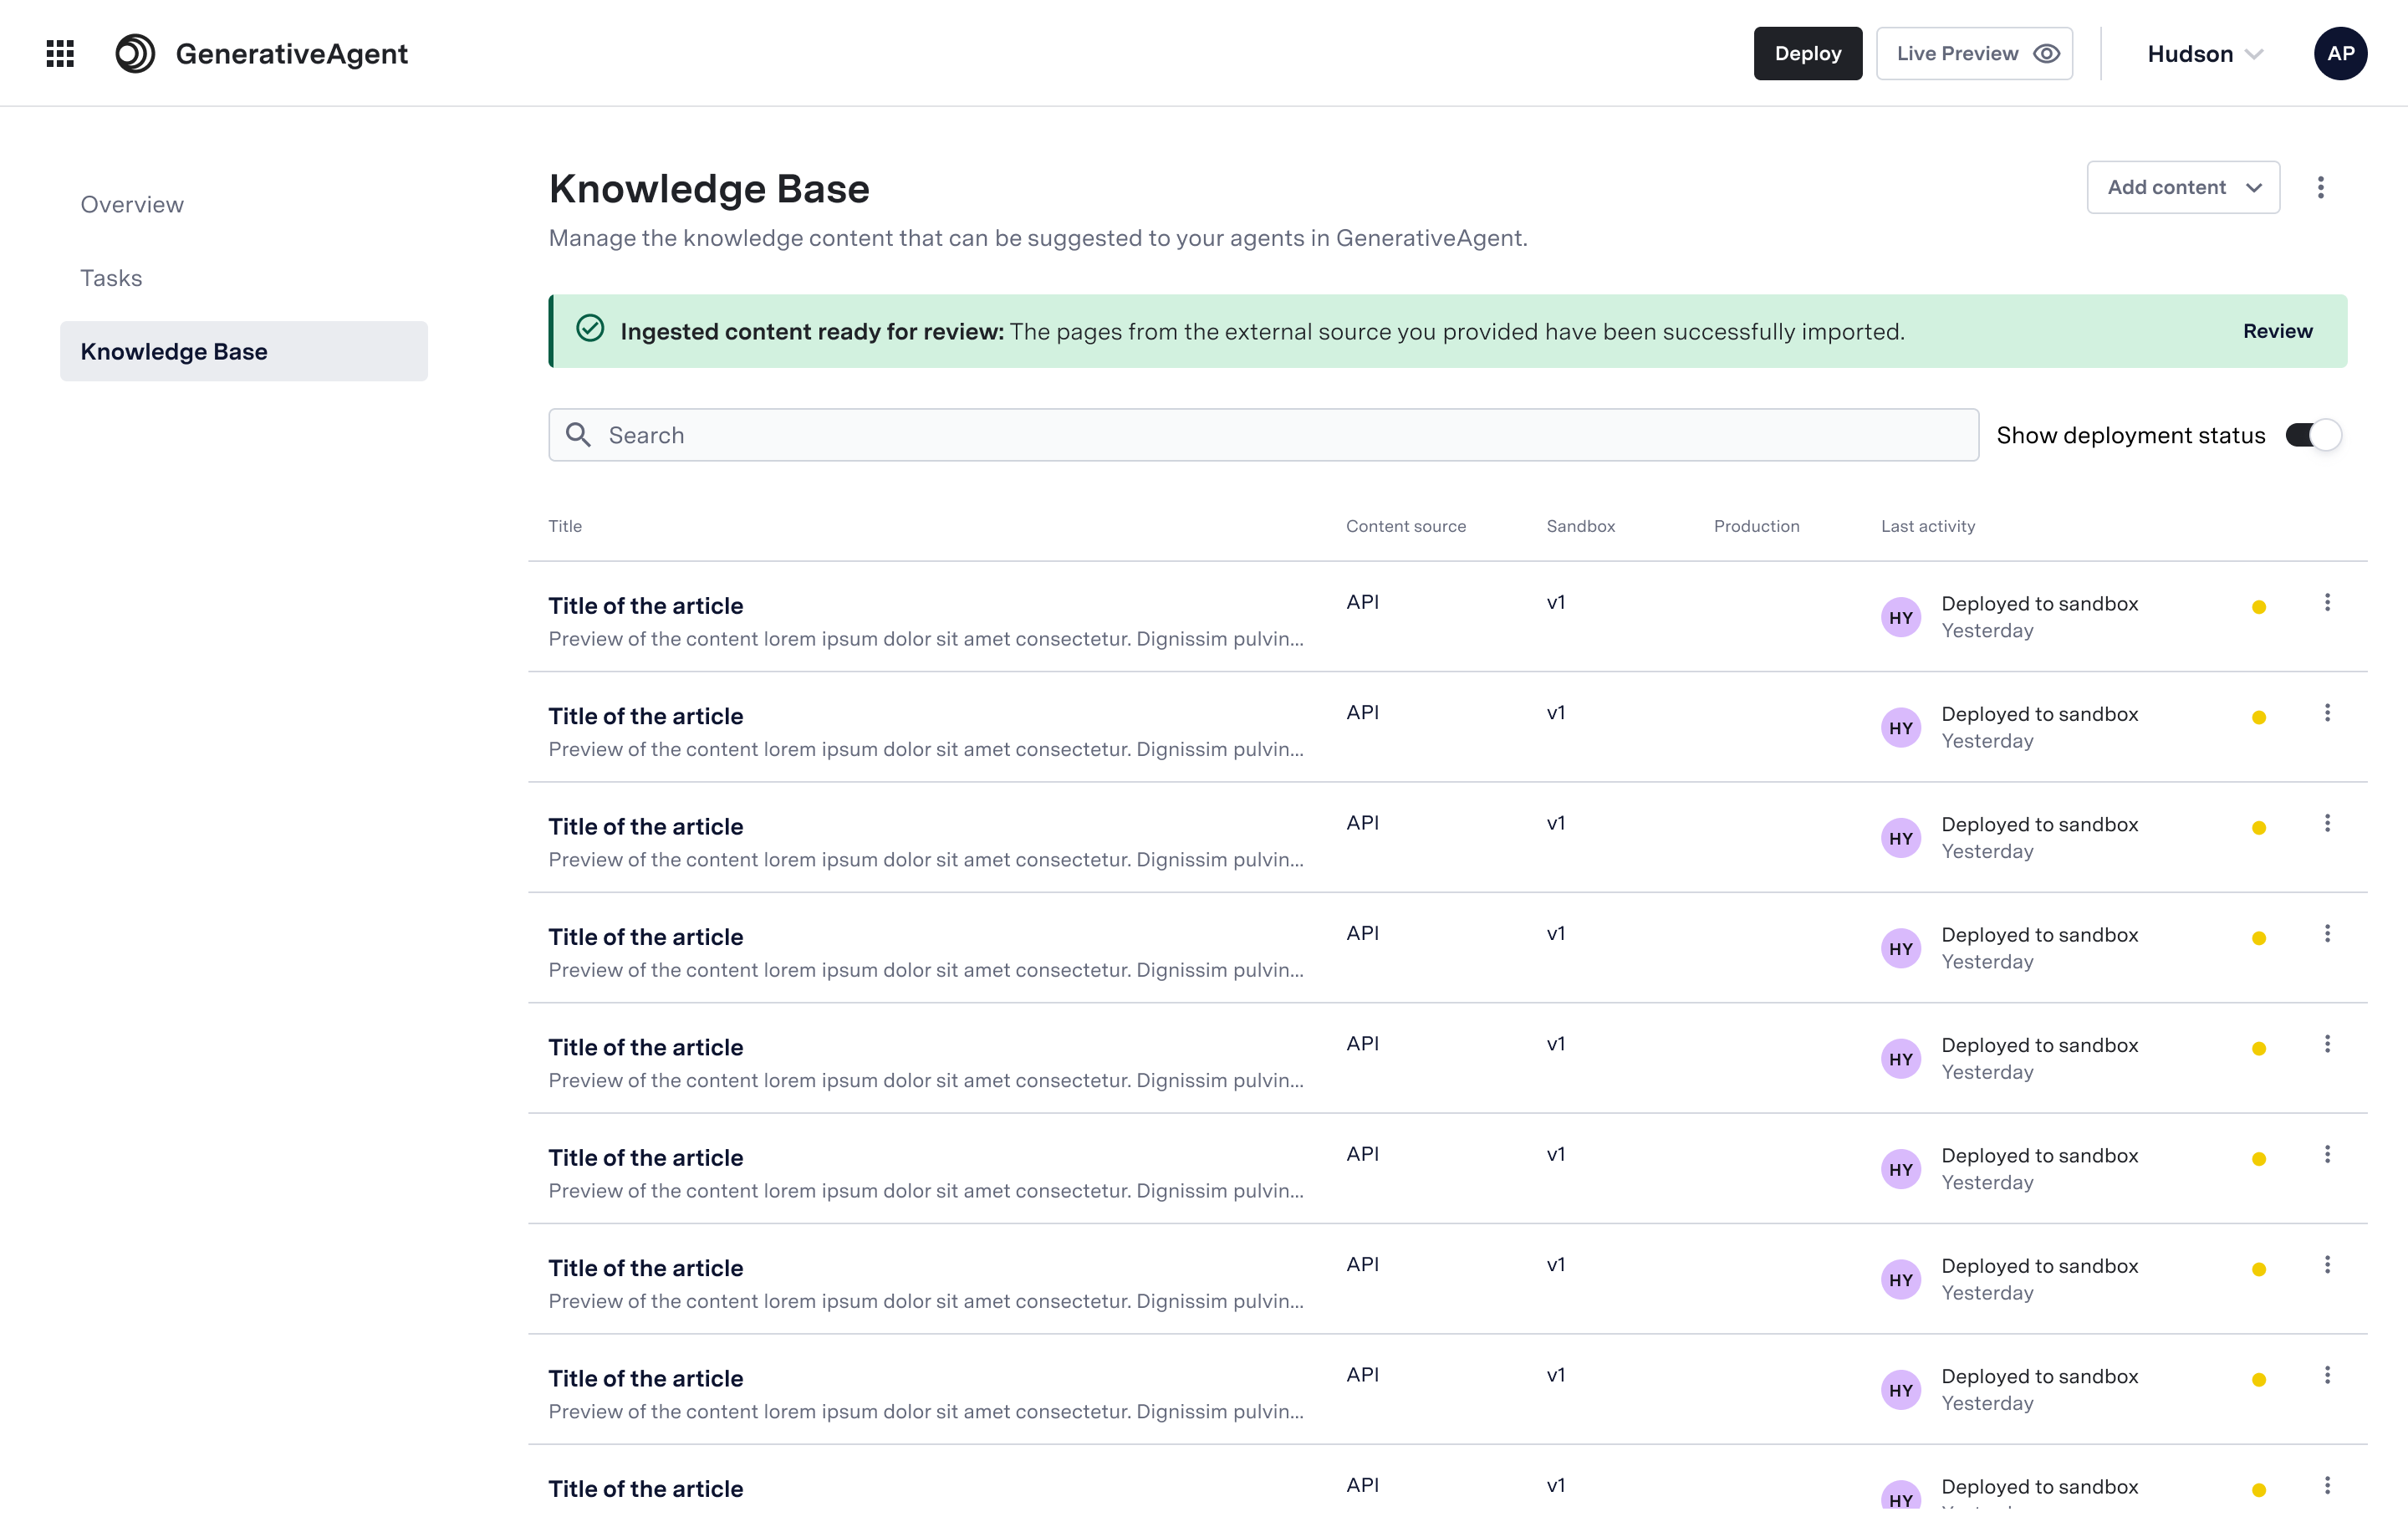 For each article, you can choose between a cleaned-up or raw version of the article to ensure the content is accurate and appropriate for customer use.
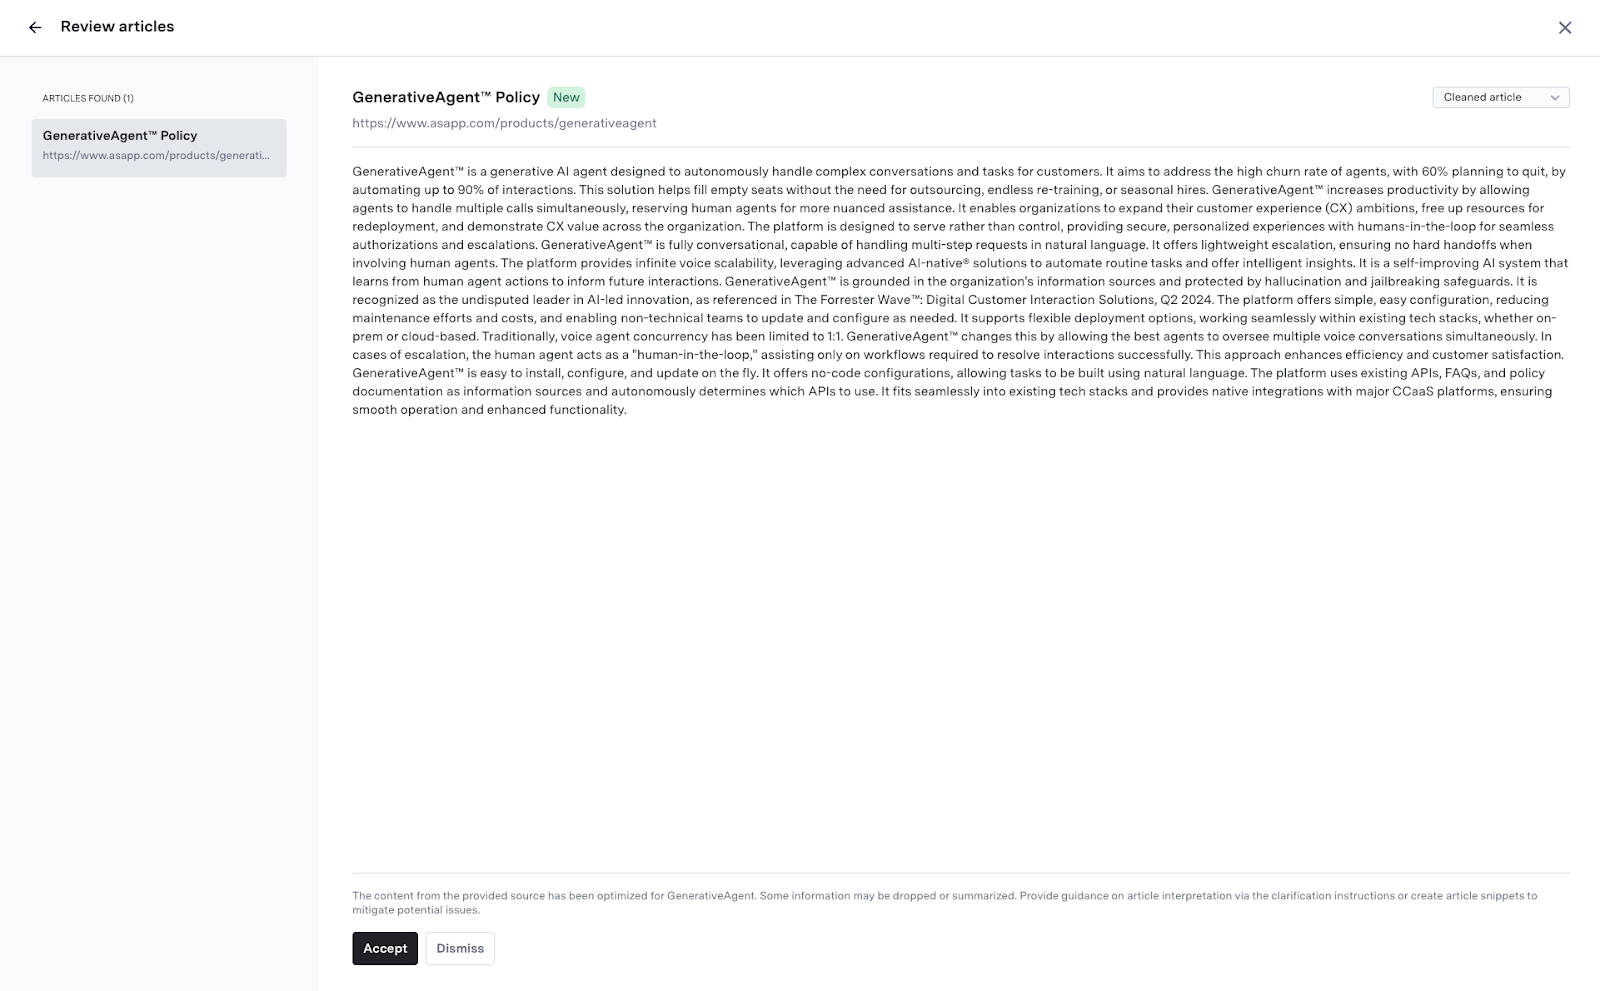
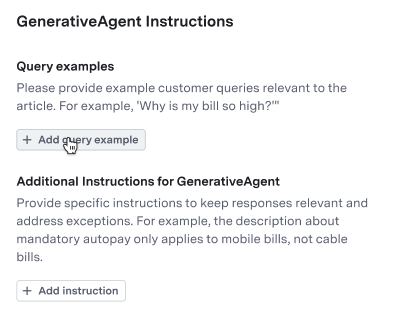 ### Providing Additional Instructions
1. Click "Add Instruction".
2. Write a clear description in the "Clarification" field.
3. Provide an example response.
### Providing Additional Instructions
1. Click "Add Instruction".
2. Write a clear description in the "Clarification" field.
3. Provide an example response.
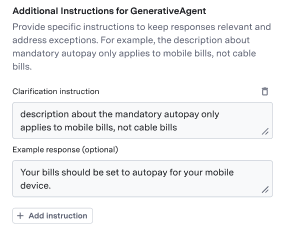 Use Additional Instructions to guide GenerativeAgent's behavior, including preventing unwanted responses.
### Filter with Metadata
You can enhance GenerativeAgent's understanding of your articles by adding metadata. Add metadata onto an article, and for the relevant tasks, add the metadata filers.
When GenerativeAgent follows that task, it will query the Knowledge Base with those metadata filters. This enables you to focus GenerativeAgent's to only look at the relevant articles.
It is recommended to store task-related information in the Knowledge Base with metadata tags.
To add metadata to an article:
1. Navigate to the article.
2. Click "Edit Metadata" to open the Metadata Window.
3. Add or remove keys as necessary.
You can use metadata to ensure certain articles are only used by specific tasks. If an Article and a Task have the same metadata tags, GenerativeAgent will filter and only use that specific relevant information during a conversation.
### Search with Metadata Filters
Apply additional filters to a search with the "Add filter" Button to retrieve and manage Articles in bulk.
Use Additional Instructions to guide GenerativeAgent's behavior, including preventing unwanted responses.
### Filter with Metadata
You can enhance GenerativeAgent's understanding of your articles by adding metadata. Add metadata onto an article, and for the relevant tasks, add the metadata filers.
When GenerativeAgent follows that task, it will query the Knowledge Base with those metadata filters. This enables you to focus GenerativeAgent's to only look at the relevant articles.
It is recommended to store task-related information in the Knowledge Base with metadata tags.
To add metadata to an article:
1. Navigate to the article.
2. Click "Edit Metadata" to open the Metadata Window.
3. Add or remove keys as necessary.
You can use metadata to ensure certain articles are only used by specific tasks. If an Article and a Task have the same metadata tags, GenerativeAgent will filter and only use that specific relevant information during a conversation.
### Search with Metadata Filters
Apply additional filters to a search with the "Add filter" Button to retrieve and manage Articles in bulk.
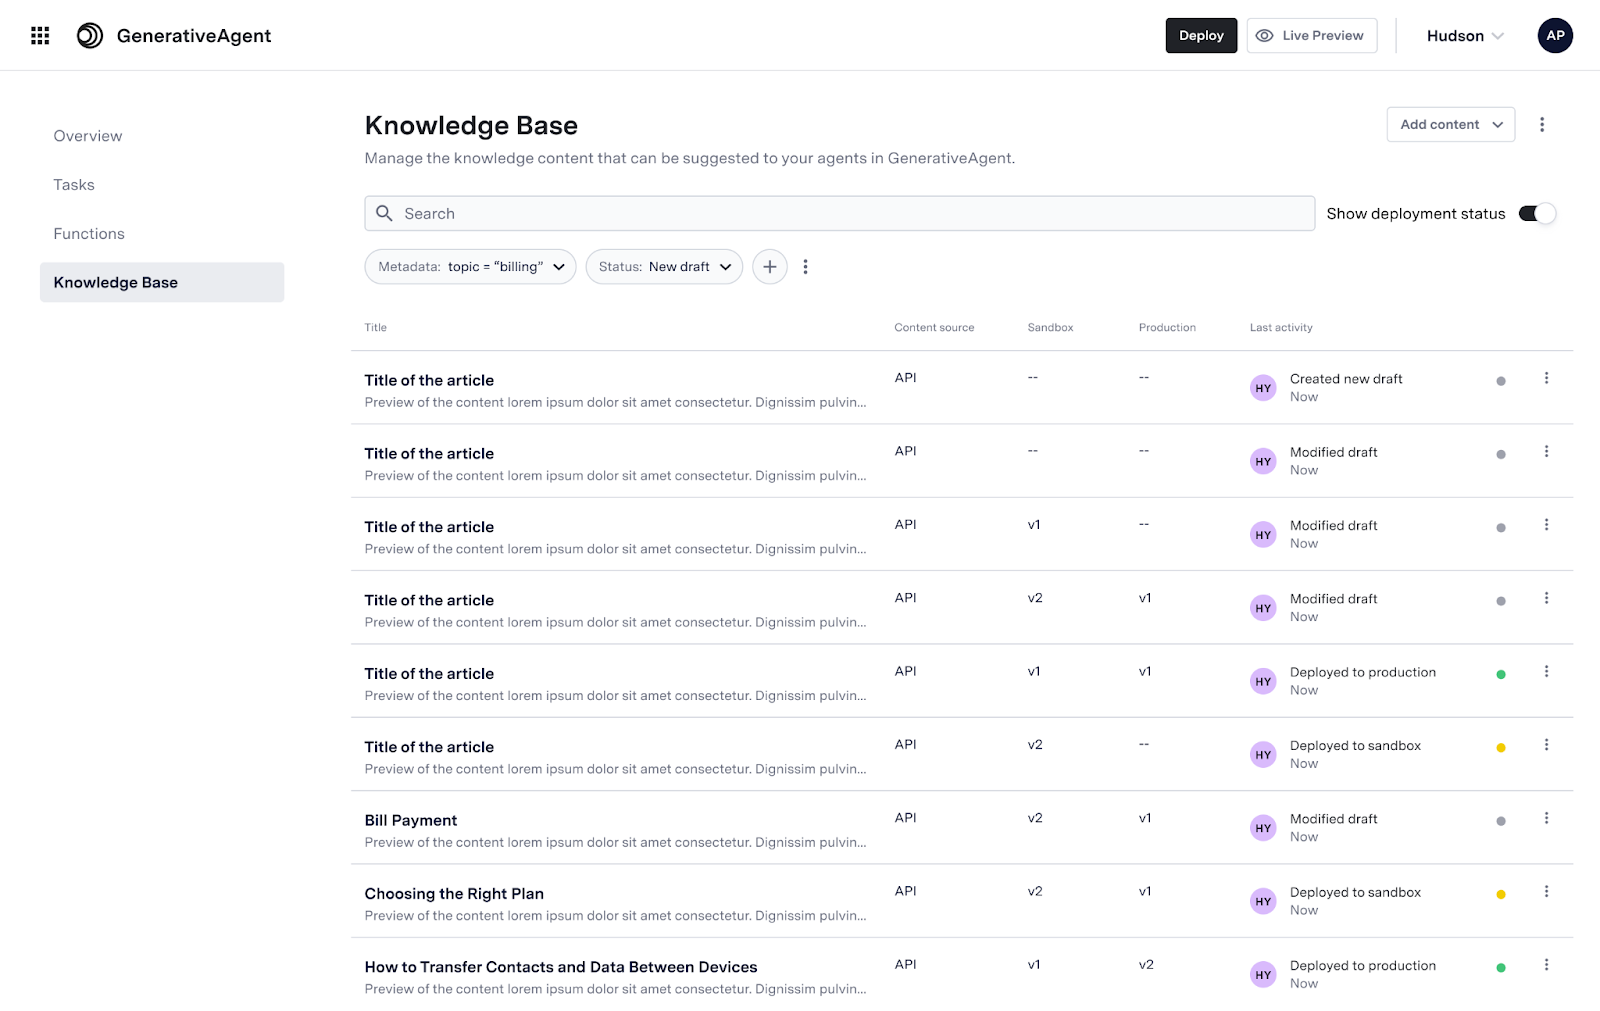 Available filters include:
* Content Source Name
* Content Source Type
* First Activity Range
* Created By
* Last Modified By
* Deployment Status
* Metadata
Available filters include:
* Content Source Name
* Content Source Type
* First Activity Range
* Created By
* Last Modified By
* Deployment Status
* Metadata

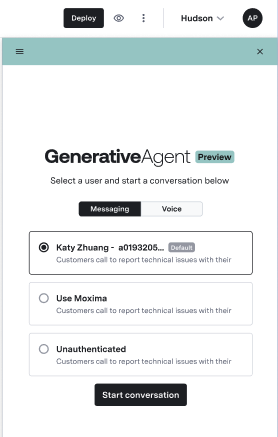 2. Start a conversation to see how GenerativeAgent uses your content.
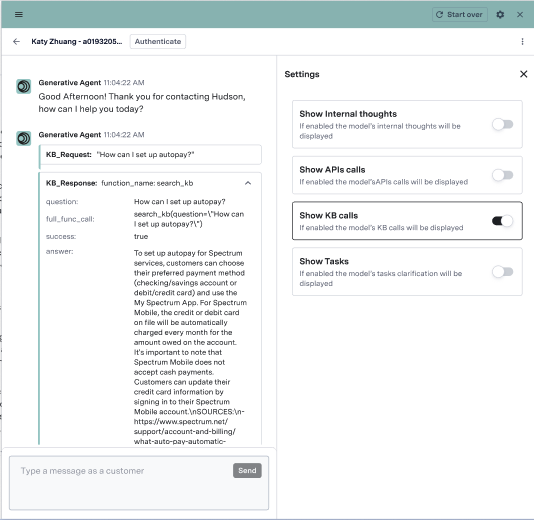 For more information on the Previewer, see the [Previewer guide](/generativeagent/configuring/previewer).
## Next Steps
After adding your knowledge base to ASAPP, explore these additional integration topics:
For more information on the Previewer, see the [Previewer guide](/generativeagent/configuring/previewer).
## Next Steps
After adding your knowledge base to ASAPP, explore these additional integration topics:
 ### GenerativeAgent Versions Available
| Version | Description |
| :------ | :---------------------------------------- |
| v3 | Improved usage of functions |
| v2 | Improved usage of knowledge base articles |
| v1 | Safe, accurate issue resolution |
### GenerativeAgent Versions Available
| Version | Description |
| :------ | :---------------------------------------- |
| v3 | Improved usage of functions |
| v2 | Improved usage of knowledge base articles |
| v1 | Safe, accurate issue resolution |
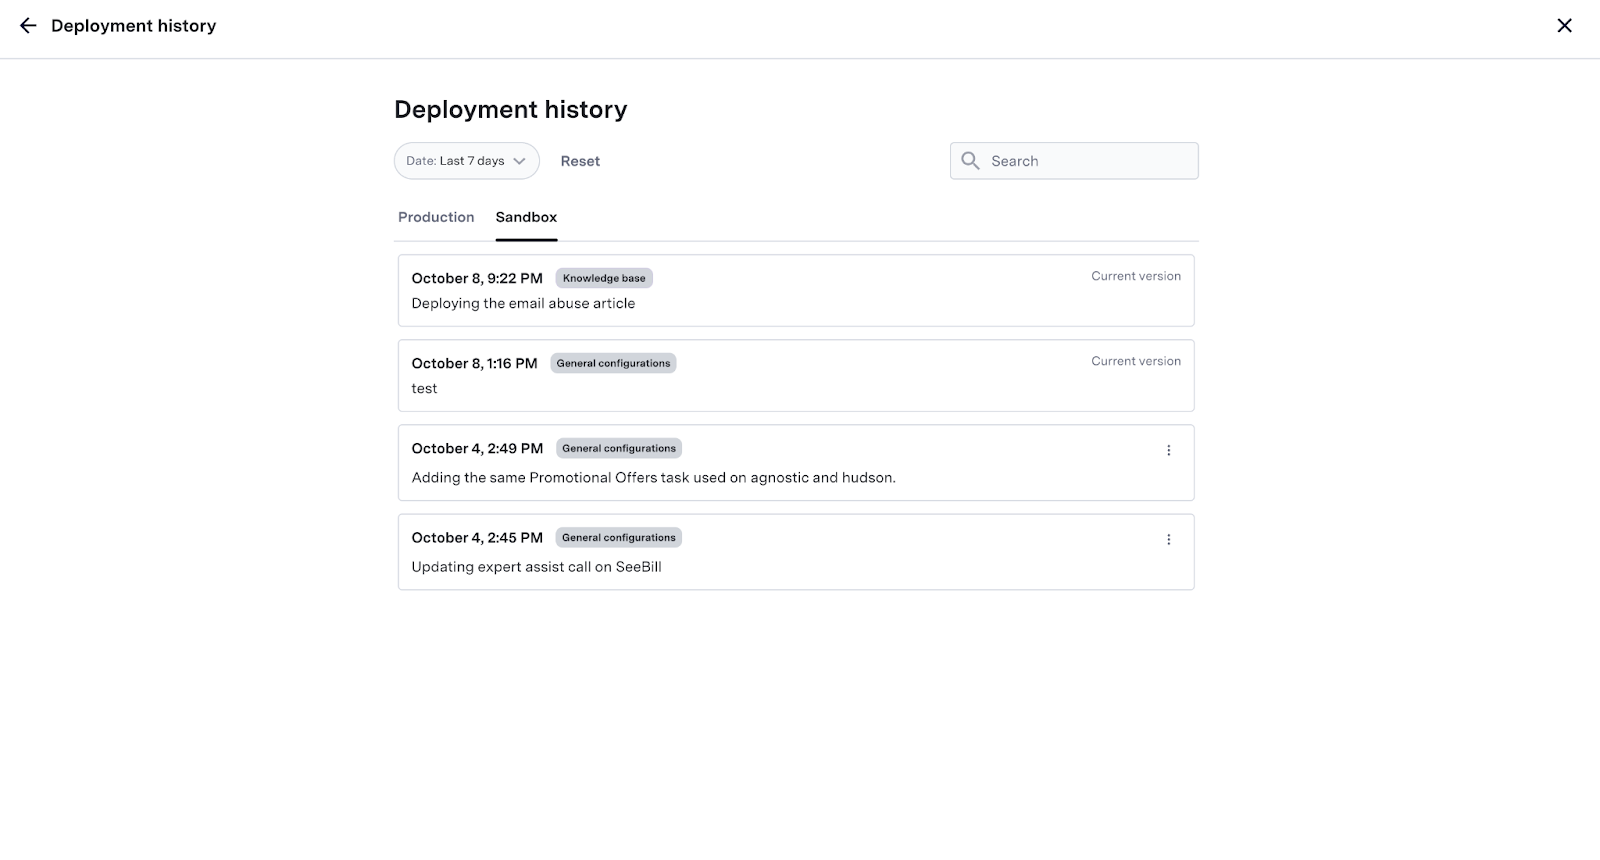 On the Deployment History tab, you can:
1. Toggle between Production and Sandbox to access environment specific deployments.
2. Filter deployment records by time frames.
3. Manage Deployment and rollback to previous versions.
On the Deployment History tab, you can:
1. Toggle between Production and Sandbox to access environment specific deployments.
2. Filter deployment records by time frames.
3. Manage Deployment and rollback to previous versions.
 ## Testing Draft Changes
When you initially configure GenerativeAgent, you'll often find subtle ways to improve its performance. While you can always make changes, then deploy and test them in sandbox, it's usually easier to try changes with Previewer. Previewer can use any changes across tasks and functions that you have in draft, allowing you to interact with GenerativeAgent using these temporary configurations.
Once you're confident with a set of changes, you can deploy them into sandbox.
### Using Live Preview
The Live Preview feature allows you to test changes in real-time during a conversation. You have the ability to:
* **Regenerate a response**: For a given bot response, regenerate it using the latest state of the draft settings.
* **Send a different message**: For a given customer message, change what is sent to see how GenerativeAgent would respond with that conversation context.
## Testing Draft Changes
When you initially configure GenerativeAgent, you'll often find subtle ways to improve its performance. While you can always make changes, then deploy and test them in sandbox, it's usually easier to try changes with Previewer. Previewer can use any changes across tasks and functions that you have in draft, allowing you to interact with GenerativeAgent using these temporary configurations.
Once you're confident with a set of changes, you can deploy them into sandbox.
### Using Live Preview
The Live Preview feature allows you to test changes in real-time during a conversation. You have the ability to:
* **Regenerate a response**: For a given bot response, regenerate it using the latest state of the draft settings.
* **Send a different message**: For a given customer message, change what is sent to see how GenerativeAgent would respond with that conversation context.
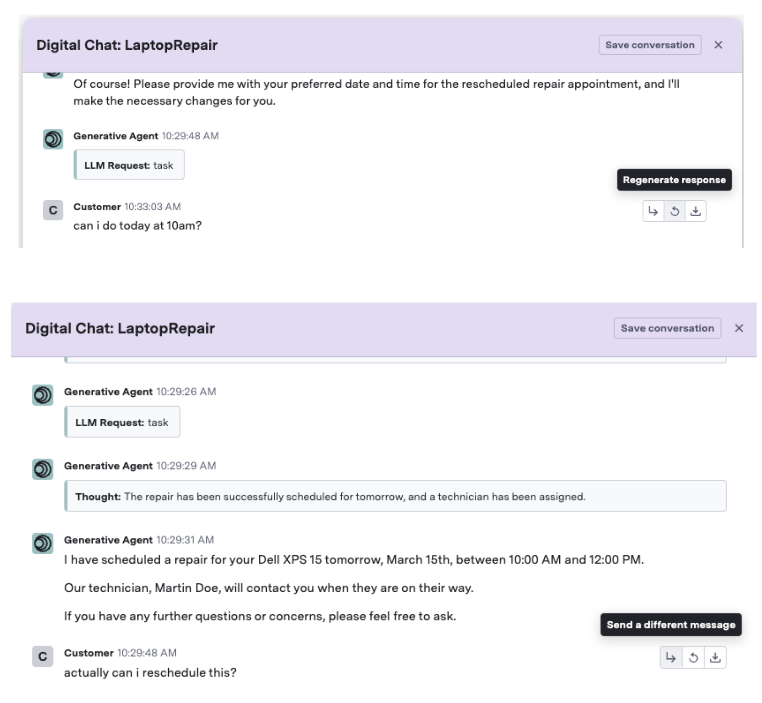 ### Previewer Environment
Choose the [Environment](/generativeagent/configuring/deploying-to-generativeagent#environments) that GenerativeAgent uses to test and preview a conversation with GenerativeAgent.
Choose between:
* Draft
* Sandbox
* Production
### Previewer Environment
Choose the [Environment](/generativeagent/configuring/deploying-to-generativeagent#environments) that GenerativeAgent uses to test and preview a conversation with GenerativeAgent.
Choose between:
* Draft
* Sandbox
* Production
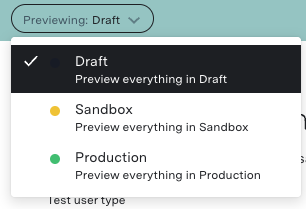 ### Replaying Conversations
During testing and configuration, you may want to replay conversations while trying out changes or validating GenerativeAgent across new versions. In Previewer, you can save the conversation to replay it again in the future.
### Replaying Conversations
During testing and configuration, you may want to replay conversations while trying out changes or validating GenerativeAgent across new versions. In Previewer, you can save the conversation to replay it again in the future.
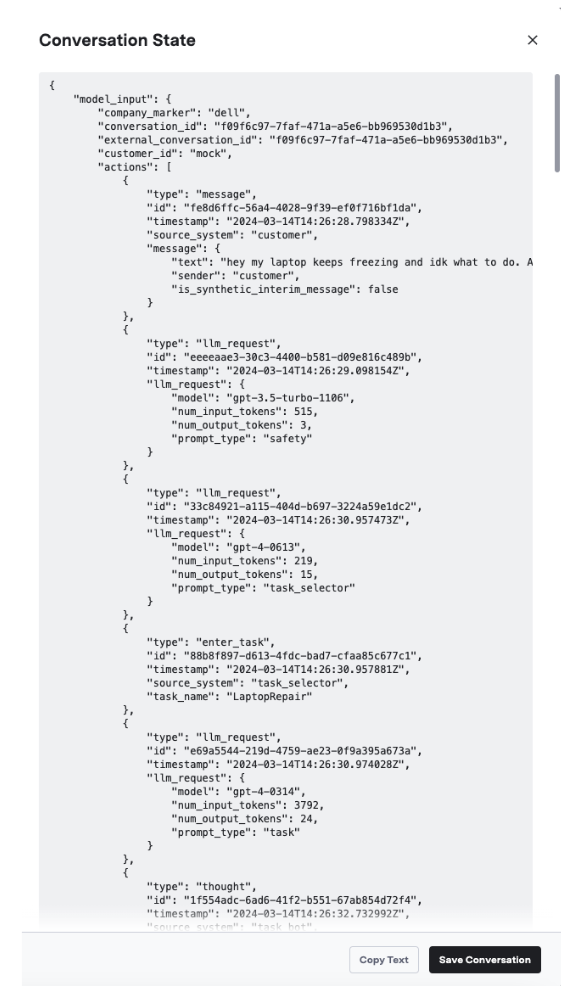 ## Advanced Settings
Use Previewer's Advanced Settings to further test GenerativeAgent in the Previewer.
## Advanced Settings
Use Previewer's Advanced Settings to further test GenerativeAgent in the Previewer.
 ### Test User Type
Use the test user data or reach out to an existing API Connection.
[Test Users](generativeagent/configuring/tasks-and-functions/test-users) allow you to define a scenario and how your API would respond to an API Connection for that scenario. This allows you to try out different Tasks and iterate on tasks definitions or on Functions.
1. **API Connection**: The Previewer test the conversation with mocked data defined by a Test User.
2. **External Endpoint**: The Previewer uses external data from an existing API.
### Test User Type
Use the test user data or reach out to an existing API Connection.
[Test Users](generativeagent/configuring/tasks-and-functions/test-users) allow you to define a scenario and how your API would respond to an API Connection for that scenario. This allows you to try out different Tasks and iterate on tasks definitions or on Functions.
1. **API Connection**: The Previewer test the conversation with mocked data defined by a Test User.
2. **External Endpoint**: The Previewer uses external data from an existing API.
 ### Task Name
Choose a specific Task to make GenerativeAgent handle it, instead of allowing GenerativeAgent choose a Task each time the conversation is started.
If you leave the task name blank, then GenerativeAgent will choose the Task by itself.
This way you can test:
1. How GenerativeAgent handles a specific Task
2. How GenerativeAgent chooses Tasks to perform a Function.
`Task name` is also an optional part of the body request in the [GenerativeAgent API](/apis/generativeagent/analyze-conversation) with `/analyze`.
### Task Name
Choose a specific Task to make GenerativeAgent handle it, instead of allowing GenerativeAgent choose a Task each time the conversation is started.
If you leave the task name blank, then GenerativeAgent will choose the Task by itself.
This way you can test:
1. How GenerativeAgent handles a specific Task
2. How GenerativeAgent chooses Tasks to perform a Function.
`Task name` is also an optional part of the body request in the [GenerativeAgent API](/apis/generativeagent/analyze-conversation) with `/analyze`.
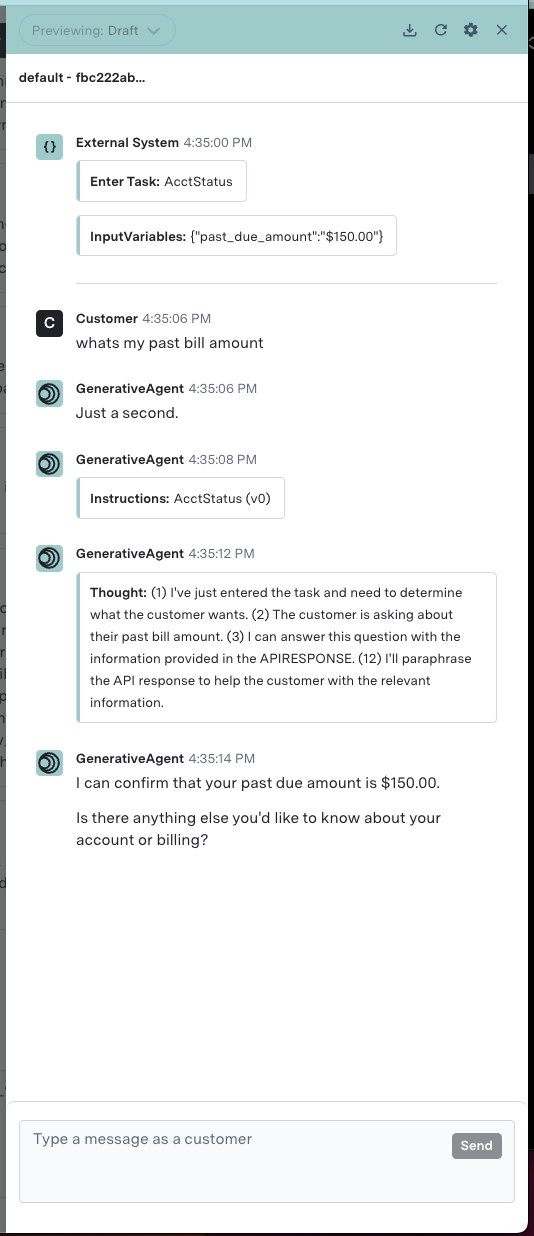 You can also simulate directly launching the customer into a specific task, instead of allowing GenerativeAgent to choose a task.
 ## Next Steps
You may find one of the following sections helpful in advancing your integration:
## Next Steps
You may find one of the following sections helpful in advancing your integration:
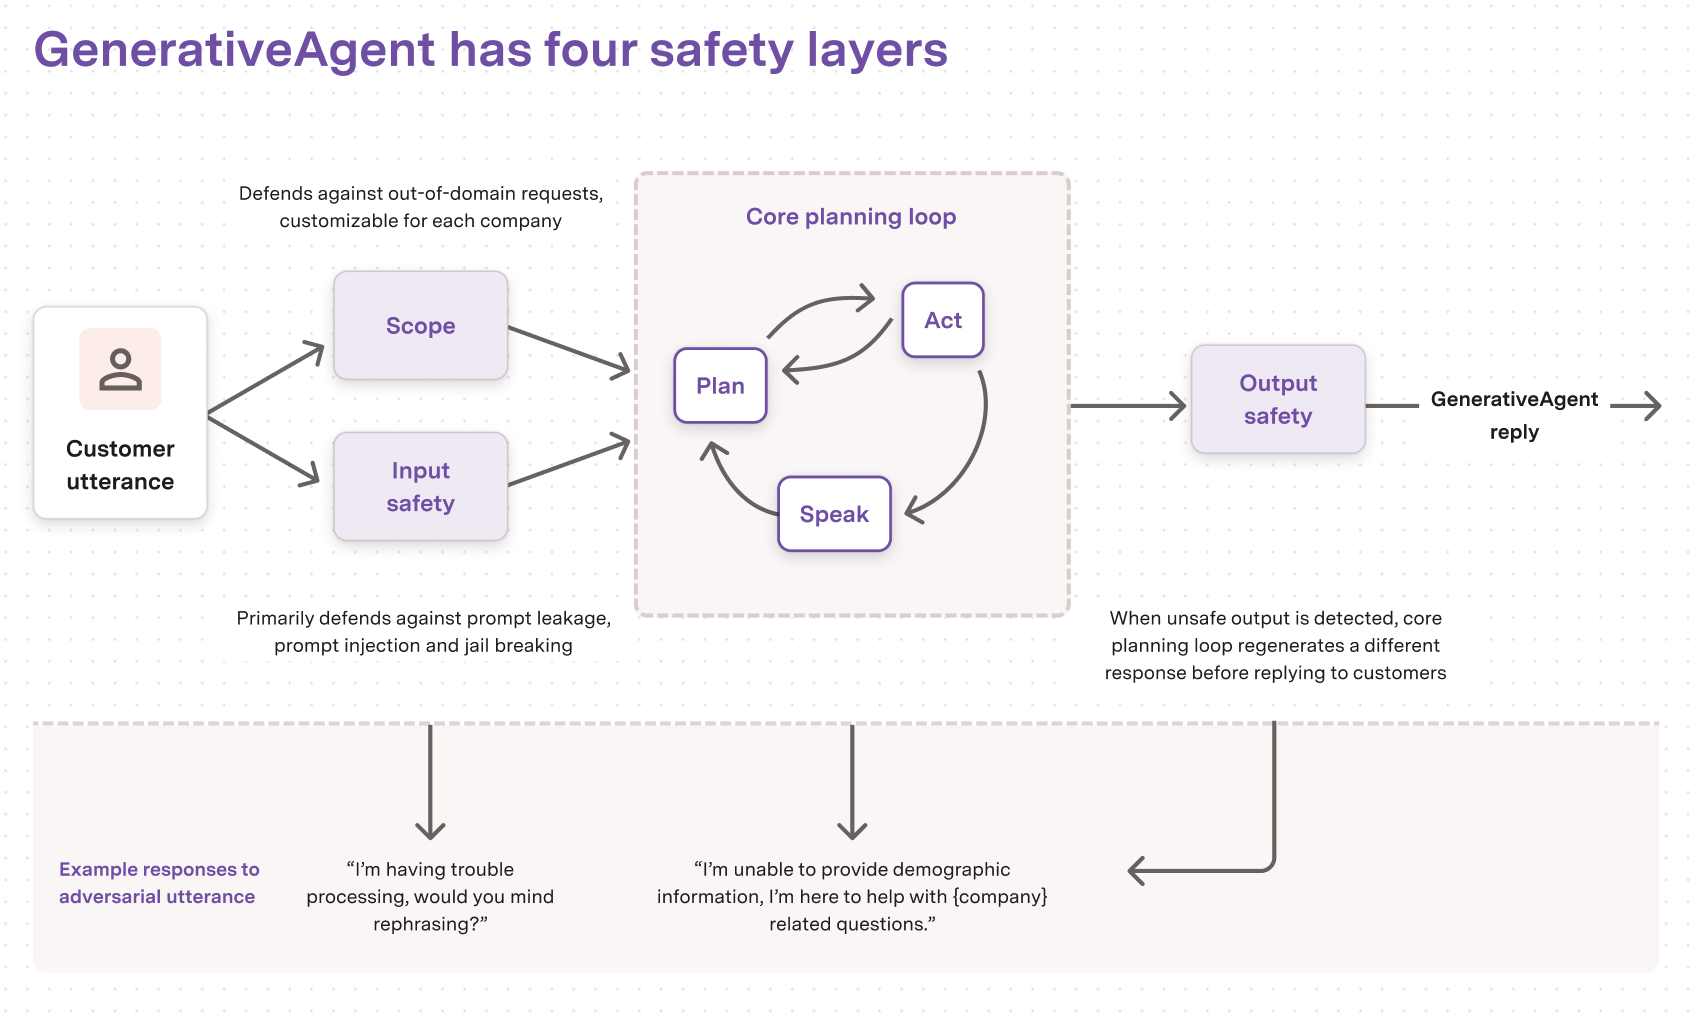 GenerativeAgent's Safety Layers work as follows:
* **Scope**: The Scope layer halts any request that is outside of the reach or the context of GenerativeAgent.
* **Input safety**: This layer defends against any nefarious prompt attempt from a user.
* **Core planning loop**: This layer is where the GenerativeAgent does all of its magic (handling tasks, calling APIs, researching Knowledge Bases) while also restraining from performing any task or sending any reply that's either out of scope, contrary to the desired tone of voice, or that goes against any of your organization policies.
* **Output safety**: This layer defines the response given by GenerativeAgent and assures that any reply protects customer and organization data.
### Input Safety
ASAPP's safety bot protects against manipulation, prompt injection, bad API responses, code/encryption, leakings, and toxic safety risks.
Customers can configure examples that should be classified as safe to improve model accuracy.
By default, GenerativeAgent's in scope capabilities prevent customers from engaging with GenerativeAgent on topics outside of your organization's matters. You can configure topics that GenerativeAgent must not engage with using our [Scope and Safety Tuning](/generativeagent/configuring/safety/scope-and-safety-tuning) tools.
### Output Safety
ASAPP's output bot ensure any output is safe for your organization.
Our TaskBot prompts customers to confirm any action before GenerativeAgent calls identified APIs so the Agent is prevented from performing any action that might impact your organization.
### Ongoing Evaluations
ASAPP runs red team simulations on a periodic basis. This way, we ensure our systems and GenerativeAgents are protected from any type of exploitation or leaks.
These simulations include everything from security exploits to prompts or tasks that might impact your organization in an unintended manner.
**Evaluation Solutions**
ASAPP implements automated tests designed to define the performance and functionality of GenerativeAgent. The Tests simulate a wide range of scenarios to evaluate GenerativeAgent's responses.
### Knowledge Base and APIs
GenerativeAgent's responses are grounded on Knowledge Base articles and APIs to construct reliable responses. It is important to set up these two factors correctly to prevent any type of hallucination. Our tests comprise:
* Measurement: ASAPP continuously tracks a combination of deterministic metrics and AI-driven evaluators for conversations in production.
* Human Oversight: ASAPP's Team actively monitors conversation to ensure accurate and relevant responses.
## Data Security
ASAPP's security protocols protect data at each point of transmission, from first user authentication to secure communications, to our auditing and logging system, all the way to securing the environment when data is at rest in data storage.
Additionally, ASAPP's API gateway solution provides rate limiting, input validation and protects endpoints against direct access, injections, and other attacks.
Access to data by ASAPP teams is tightly constrained and monitored. Strict security protocols protect both ASAPP and our customers.
ASAPP utilizes [custom redaction logic](/security/data-redaction) to remove sensitive data elements from conversations in real-time.
# Scope and Safety Tuning
Source: https://docs.asapp.com/generativeagent/configuring/safety/scope-and-safety-tuning
Learn how to customize GenerativeAgent's scope and safety guardrails
GenerativeAgent includes default safety and scope guardrails to keep conversations aligned with business needs and to ensure GenerativeAgent engages only in appropriate topics.
These tools allow you to:
* Define custom categories for what's considered "in-scope"
* Configure input safety categories for allowed customer messages
* Maintain default safety protections while adding organization-specific allowances
GenerativeAgent's Safety Layers work as follows:
* **Scope**: The Scope layer halts any request that is outside of the reach or the context of GenerativeAgent.
* **Input safety**: This layer defends against any nefarious prompt attempt from a user.
* **Core planning loop**: This layer is where the GenerativeAgent does all of its magic (handling tasks, calling APIs, researching Knowledge Bases) while also restraining from performing any task or sending any reply that's either out of scope, contrary to the desired tone of voice, or that goes against any of your organization policies.
* **Output safety**: This layer defines the response given by GenerativeAgent and assures that any reply protects customer and organization data.
### Input Safety
ASAPP's safety bot protects against manipulation, prompt injection, bad API responses, code/encryption, leakings, and toxic safety risks.
Customers can configure examples that should be classified as safe to improve model accuracy.
By default, GenerativeAgent's in scope capabilities prevent customers from engaging with GenerativeAgent on topics outside of your organization's matters. You can configure topics that GenerativeAgent must not engage with using our [Scope and Safety Tuning](/generativeagent/configuring/safety/scope-and-safety-tuning) tools.
### Output Safety
ASAPP's output bot ensure any output is safe for your organization.
Our TaskBot prompts customers to confirm any action before GenerativeAgent calls identified APIs so the Agent is prevented from performing any action that might impact your organization.
### Ongoing Evaluations
ASAPP runs red team simulations on a periodic basis. This way, we ensure our systems and GenerativeAgents are protected from any type of exploitation or leaks.
These simulations include everything from security exploits to prompts or tasks that might impact your organization in an unintended manner.
**Evaluation Solutions**
ASAPP implements automated tests designed to define the performance and functionality of GenerativeAgent. The Tests simulate a wide range of scenarios to evaluate GenerativeAgent's responses.
### Knowledge Base and APIs
GenerativeAgent's responses are grounded on Knowledge Base articles and APIs to construct reliable responses. It is important to set up these two factors correctly to prevent any type of hallucination. Our tests comprise:
* Measurement: ASAPP continuously tracks a combination of deterministic metrics and AI-driven evaluators for conversations in production.
* Human Oversight: ASAPP's Team actively monitors conversation to ensure accurate and relevant responses.
## Data Security
ASAPP's security protocols protect data at each point of transmission, from first user authentication to secure communications, to our auditing and logging system, all the way to securing the environment when data is at rest in data storage.
Additionally, ASAPP's API gateway solution provides rate limiting, input validation and protects endpoints against direct access, injections, and other attacks.
Access to data by ASAPP teams is tightly constrained and monitored. Strict security protocols protect both ASAPP and our customers.
ASAPP utilizes [custom redaction logic](/security/data-redaction) to remove sensitive data elements from conversations in real-time.
# Scope and Safety Tuning
Source: https://docs.asapp.com/generativeagent/configuring/safety/scope-and-safety-tuning
Learn how to customize GenerativeAgent's scope and safety guardrails
GenerativeAgent includes default safety and scope guardrails to keep conversations aligned with business needs and to ensure GenerativeAgent engages only in appropriate topics.
These tools allow you to:
* Define custom categories for what's considered "in-scope"
* Configure input safety categories for allowed customer messages
* Maintain default safety protections while adding organization-specific allowances
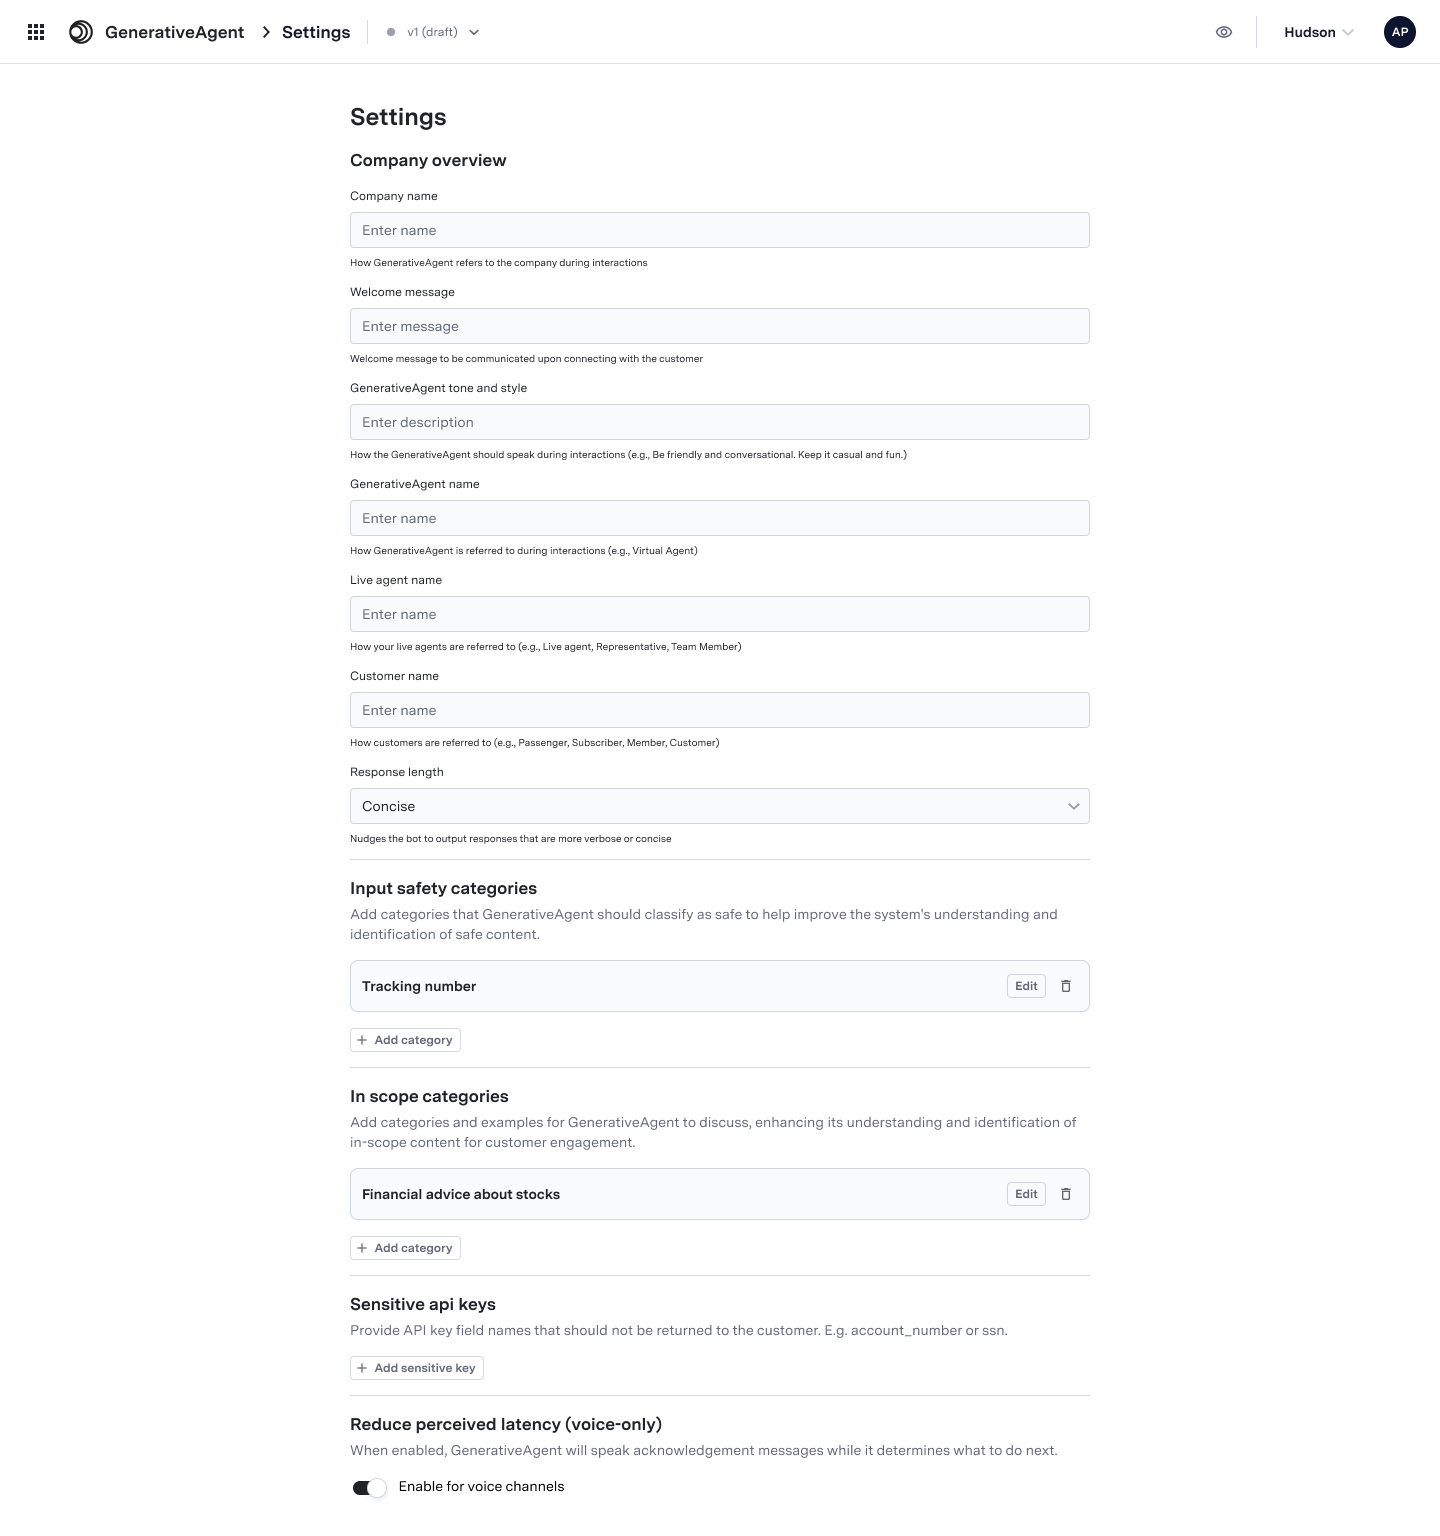 ## Customizing Scope and Safety Settings
Scope and safety controls are available in the main Settings page of GenerativeAgent. After making any changes to these settings, be sure to test them using the Previewer before deploying to production.
## Customizing Scope and Safety Settings
Scope and safety controls are available in the main Settings page of GenerativeAgent. After making any changes to these settings, be sure to test them using the Previewer before deploying to production.
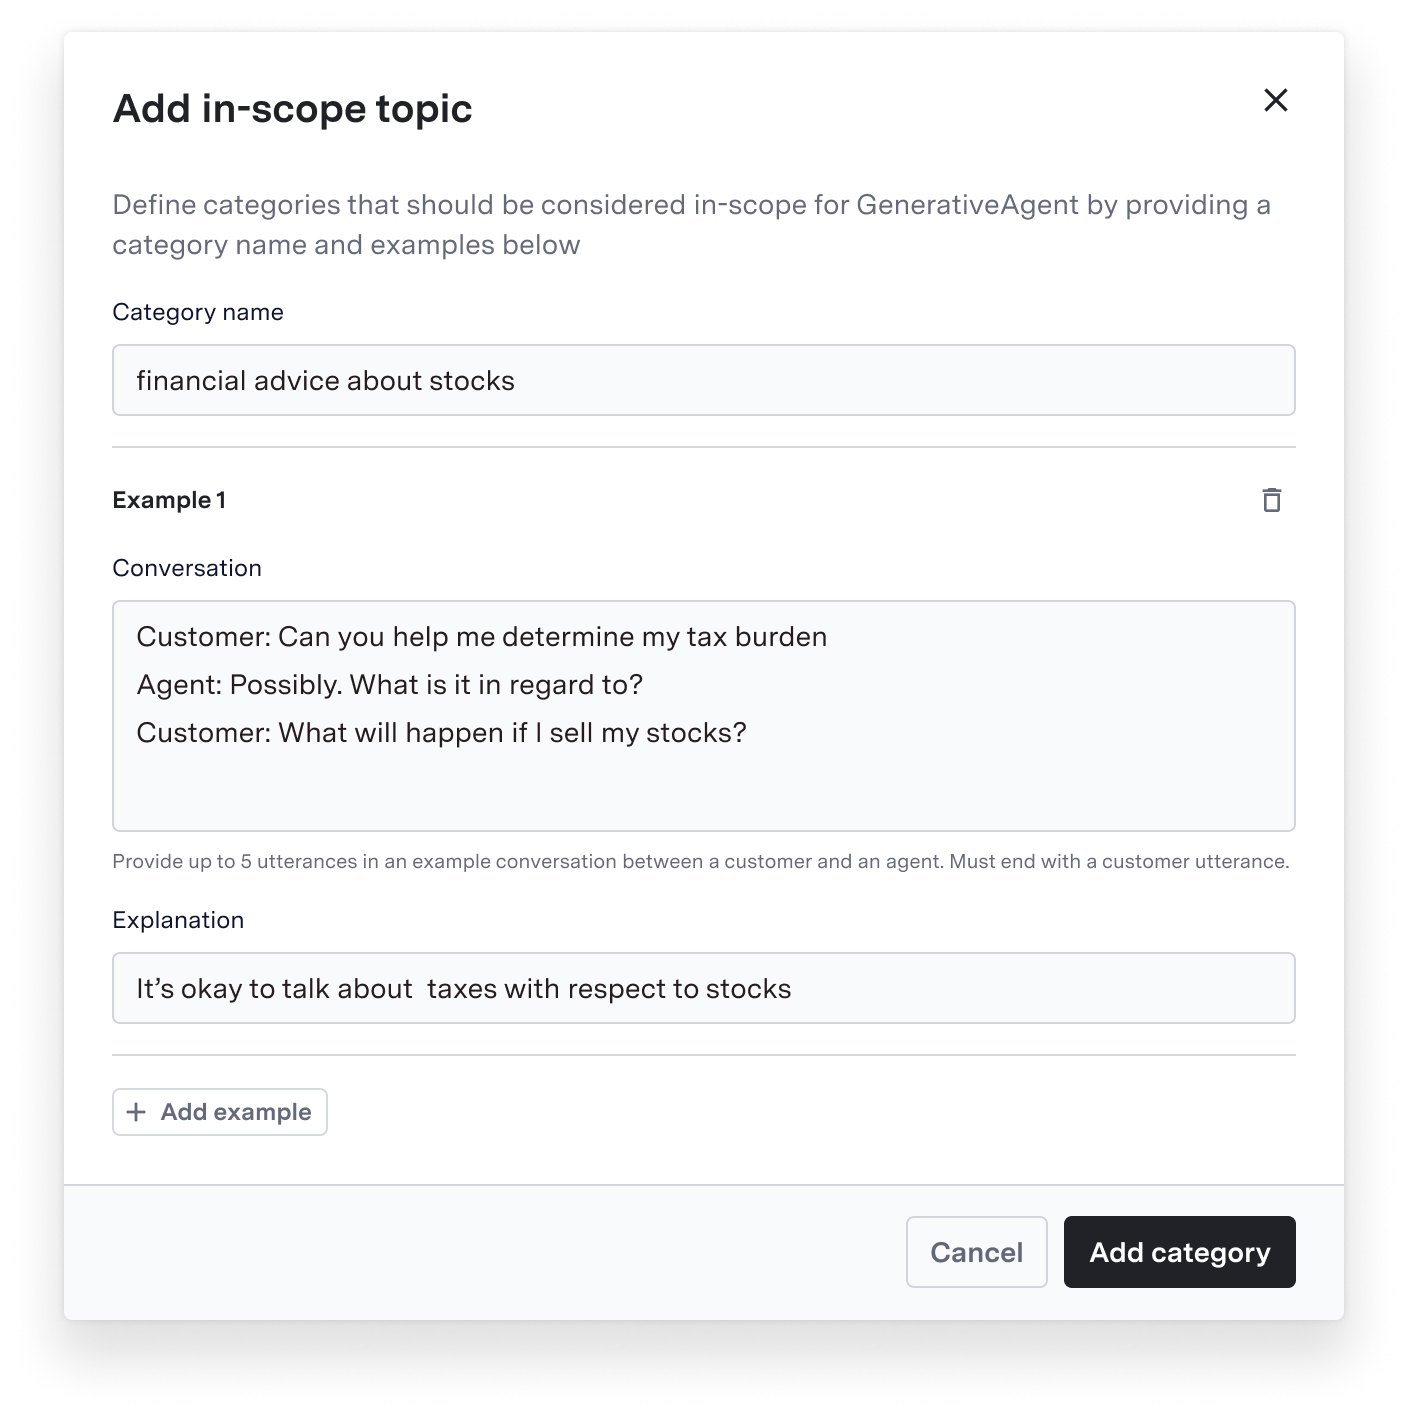
 ### Safety Context
Input safety categories require explanations to provide context for why certain inputs are deemed safe. This helps GenerativeAgent accurately apply exceptions relevant to your specific needs while maintaining overall safety standards.
You can also simulate directly launching the customer into a specific task, instead of allowing GenerativeAgent to choose a task.
### Safety Context
Input safety categories require explanations to provide context for why certain inputs are deemed safe. This helps GenerativeAgent accurately apply exceptions relevant to your specific needs while maintaining overall safety standards.
You can also simulate directly launching the customer into a specific task, instead of allowing GenerativeAgent to choose a task.
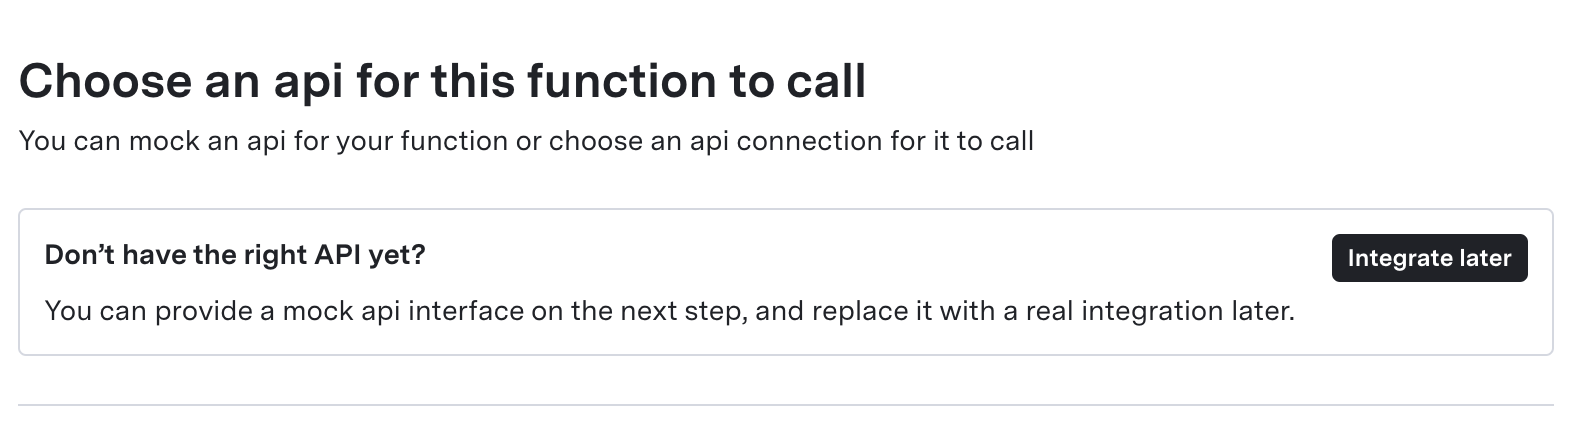 3. Name and Describe the new Function
* **Function Name**: Give it a concise, unique name
* **Function Purpose**: Briefly describe what the Mock Function is for
3. Name and Describe the new Function
* **Function Name**: Give it a concise, unique name
* **Function Purpose**: Briefly describe what the Mock Function is for
 * **Example Request**
```json
{
"name": "name_of_function",
"description": "Brief description of what the Function is for",
"strict": true,
"parameters": {
"type": "object",
"required": ["account_number"],
"properties": {
"account_number": {
"type": "string",
"description": "The user’s account number."
},
"include_details": {
"type": "boolean",
"description": "Whether to include itemized details."
}
}
}
}
```
* **Example Request**
```json
{
"name": "name_of_function",
"description": "Brief description of what the Function is for",
"strict": true,
"parameters": {
"type": "object",
"required": ["account_number"],
"properties": {
"account_number": {
"type": "string",
"description": "The user’s account number."
},
"include_details": {
"type": "boolean",
"description": "Whether to include itemized details."
}
}
}
}
```
 Reference variables can be configured in the GenerativeAgent Tooling Function edit page under the "Reference vars " option.
## Define a Reference Variable
To create a reference variable in the GenerativeAgent UI:
1. Navigate to the Function's settings
2. Find the "Reference vars (Optional)" section and click "Add"
3. Configure the following fields:
* **Name**
* **Response Keypath**
* **Transform Expression** (Optional)
### Name
This is the identifier you'll use to reference this variable in Jinja expressions.
```jinja
vars.get("variable_name")
```
### Response Keypath
This is the JSON path where the data will be extracted from, using dot notation.
```json
// For a response like:
{
"available_rooms": [...]
}
// Use keypath:
response.available_rooms
```
### Transform Expression (Optional)
This is a Jinja expression to transform the extracted value. Common patterns include:
```jinja
# Check for specific string value
val == "COMPLIANT"
# Check boolean values
val == true or val == false
# Check for non-empty arrays/strings
val is not none and val|length > 0
```
Once saved, GenerativeAgent will automatically update these variables whenever the Function executes successfully and returns data matching the specified keypath.
Reference variables can be configured in the GenerativeAgent Tooling Function edit page under the "Reference vars " option.
## Define a Reference Variable
To create a reference variable in the GenerativeAgent UI:
1. Navigate to the Function's settings
2. Find the "Reference vars (Optional)" section and click "Add"
3. Configure the following fields:
* **Name**
* **Response Keypath**
* **Transform Expression** (Optional)
### Name
This is the identifier you'll use to reference this variable in Jinja expressions.
```jinja
vars.get("variable_name")
```
### Response Keypath
This is the JSON path where the data will be extracted from, using dot notation.
```json
// For a response like:
{
"available_rooms": [...]
}
// Use keypath:
response.available_rooms
```
### Transform Expression (Optional)
This is a Jinja expression to transform the extracted value. Common patterns include:
```jinja
# Check for specific string value
val == "COMPLIANT"
# Check boolean values
val == true or val == false
# Check for non-empty arrays/strings
val is not none and val|length > 0
```
Once saved, GenerativeAgent will automatically update these variables whenever the Function executes successfully and returns data matching the specified keypath.
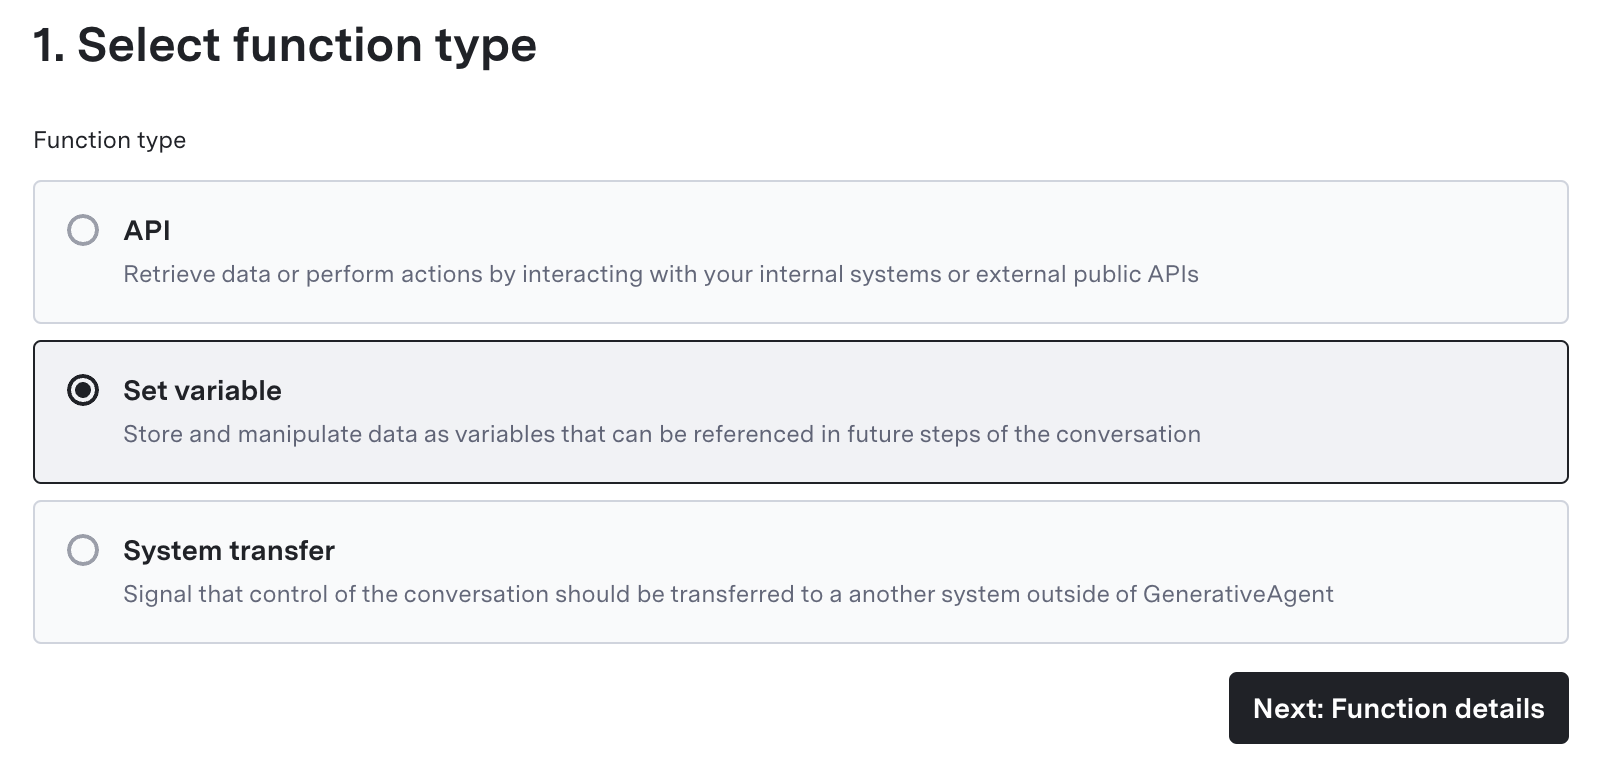 2. Specify the Name and Purpose of the Function
* **Function Name**: Provide a concise, unique name, using underscores (e.g., `get_lap_child_policy`).
* **Function Purpose**: Briefly describe what the function does (e.g., "Determines whether a child can fly as a lap child").
* GenerativeAgent uses this description to decide if and when it should invoke the function.
## Step 2: Define Input Parameters (JSON)
The input parameters are the values that GenerativeAgent needs to pass when calling this function.
You can leave the input parameters empty if you won't need new values from the conversation.
2. Specify the Name and Purpose of the Function
* **Function Name**: Provide a concise, unique name, using underscores (e.g., `get_lap_child_policy`).
* **Function Purpose**: Briefly describe what the function does (e.g., "Determines whether a child can fly as a lap child").
* GenerativeAgent uses this description to decide if and when it should invoke the function.
## Step 2: Define Input Parameters (JSON)
The input parameters are the values that GenerativeAgent needs to pass when calling this function.
You can leave the input parameters empty if you won't need new values from the conversation.
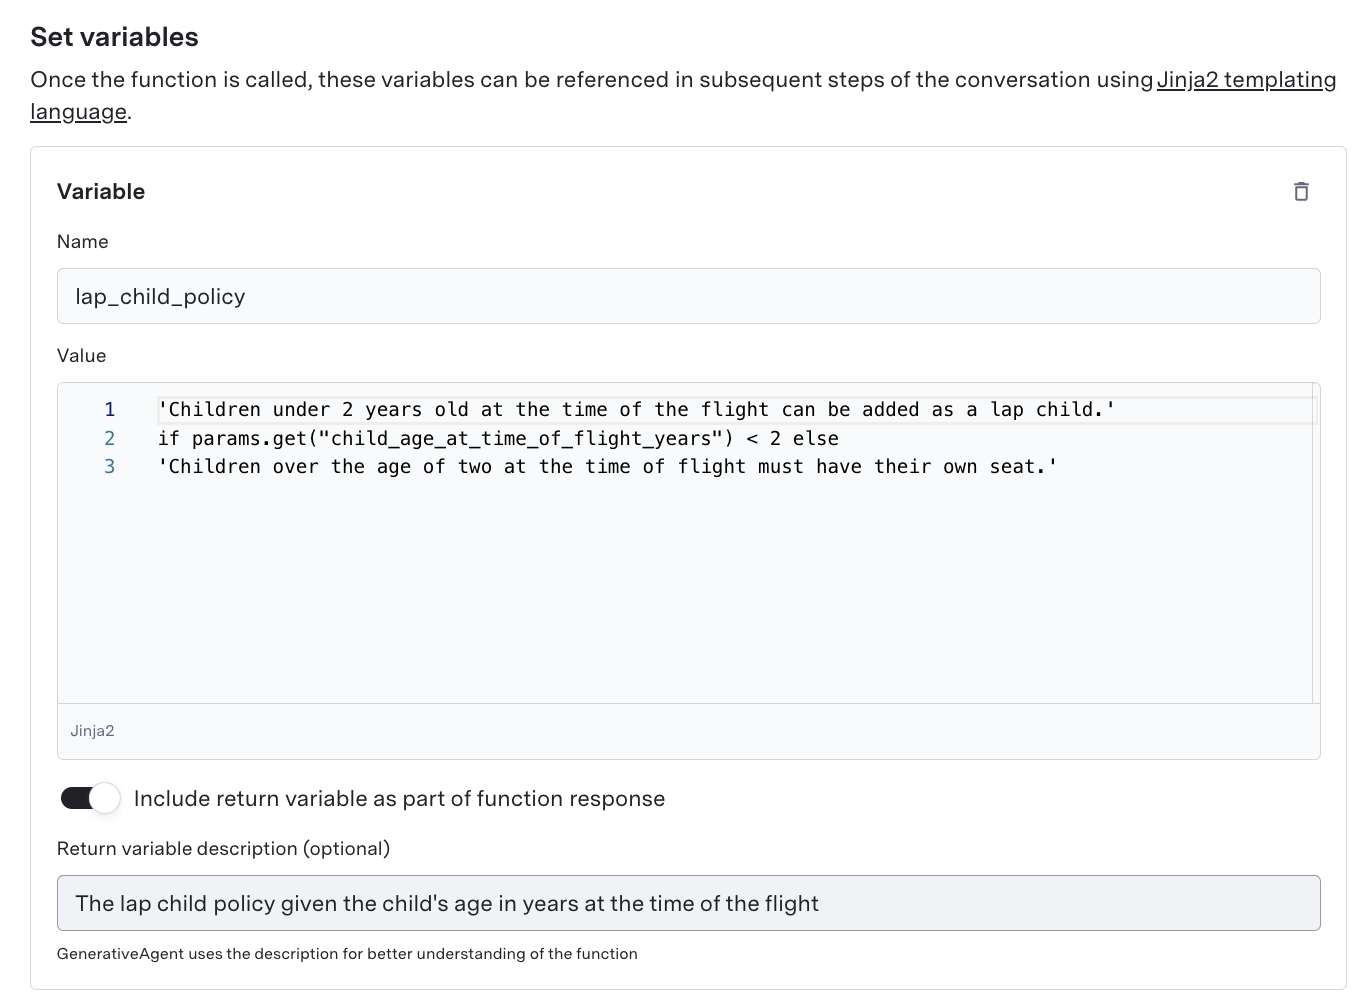 ## Step 4: Save Your Function
With your function defined, you can save it by clicking "Create Function".
After saving, you'll see a detail page showing the JSON schema and the configured reference variables.
## Step 5: Use the Function in the Conversation
Once you have created your set variable function, you must add the function to the task's list of available functions in order for GenerativeAgent to use it.
GenerativeAgent may call the function proactively, but we recommend you instruct GenerativeAgent to call the function explicitly.
Always make sure to test your functions with Previewer to ensure they work as expected.
Here's how the function works within a task and conversation flow:
1. GenerativeAgent collects the required parameters from the user (or context).
2. (Optional) A "Message before Sending" can be displayed to the user, clarifying why GenerativeAgent is saving data.
3. Jinja2 transformations convert or combine inputs, if defined.
4. Reference variables are created as soon as the function runs successfully—GenerativeAgent can immediately incorporate them into logic or other function calls.
5. If you turned on "Include return variable as part of function response," GenerativeAgent receives the new values right away, shaping subsequent interaction steps.
## Step 4: Save Your Function
With your function defined, you can save it by clicking "Create Function".
After saving, you'll see a detail page showing the JSON schema and the configured reference variables.
## Step 5: Use the Function in the Conversation
Once you have created your set variable function, you must add the function to the task's list of available functions in order for GenerativeAgent to use it.
GenerativeAgent may call the function proactively, but we recommend you instruct GenerativeAgent to call the function explicitly.
Always make sure to test your functions with Previewer to ensure they work as expected.
Here's how the function works within a task and conversation flow:
1. GenerativeAgent collects the required parameters from the user (or context).
2. (Optional) A "Message before Sending" can be displayed to the user, clarifying why GenerativeAgent is saving data.
3. Jinja2 transformations convert or combine inputs, if defined.
4. Reference variables are created as soon as the function runs successfully—GenerativeAgent can immediately incorporate them into logic or other function calls.
5. If you turned on "Include return variable as part of function response," GenerativeAgent receives the new values right away, shaping subsequent interaction steps.
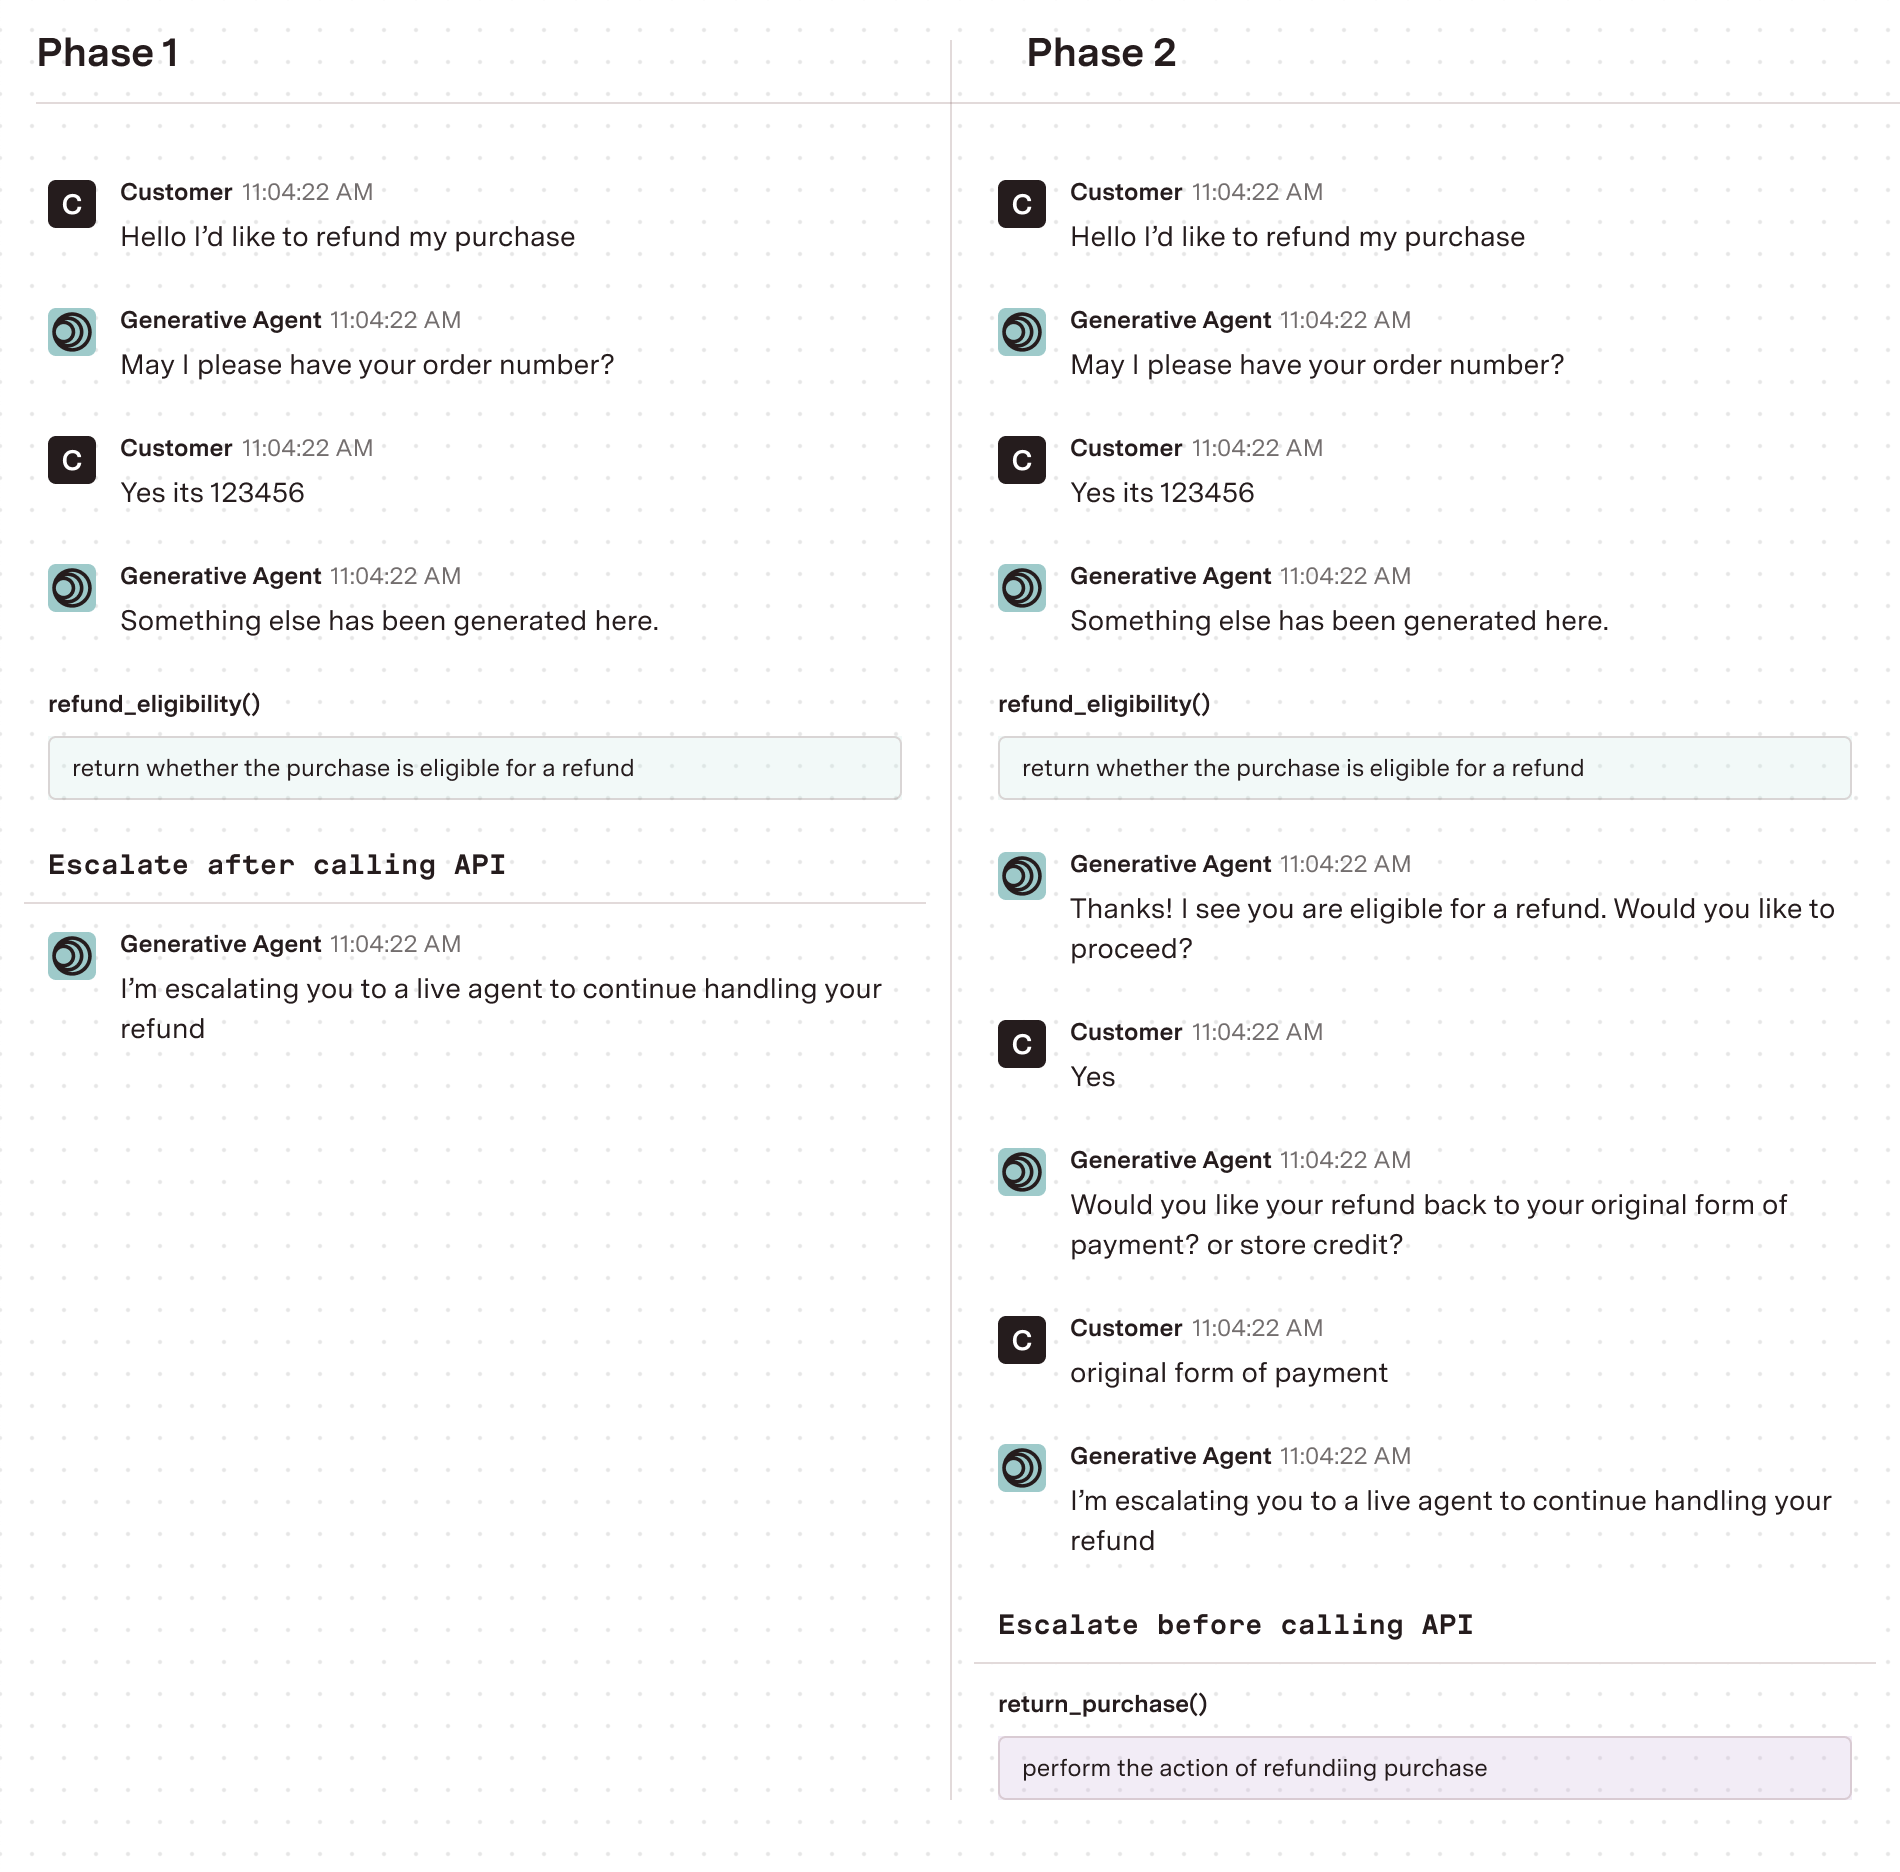 ### Deciding to deploy a function
You can turn off trial mode and fully deploy the function when you have gathered sufficient data and confidence that GenerativeAgent is correctly calling the function and interpreting its responses.
This can be determined by monitoring the escalations, reviewing how GenerativeAgent would have handled the interactions, and ensuring that there are no significant issues or undesired behaviors.
## Toggle Trial Mode
By default, trial mode is toggled off.
When you want to enable trial mode for a function, click the toggle.
### Deciding to deploy a function
You can turn off trial mode and fully deploy the function when you have gathered sufficient data and confidence that GenerativeAgent is correctly calling the function and interpreting its responses.
This can be determined by monitoring the escalations, reviewing how GenerativeAgent would have handled the interactions, and ensuring that there are no significant issues or undesired behaviors.
## Toggle Trial Mode
By default, trial mode is toggled off.
When you want to enable trial mode for a function, click the toggle.
 When using trial mode, you need to specify:
* **Escalation behavior:**
* **Before Calling**: GenerativeAgent will escalate to a live agent before calling the function. This allows you to see what GenerativeAgent would have called the function.
* **After Calling**: GenerativeAgent will call the function, but then escalate to an agent before responding to the customer.
* Message to send to customer: The message that will be sent to customer before escalation. Can be left blank to not send a dedicated message.
## Evaluate behavior in Previewer
When trail mode is activated, you can see the trial behavior in previewer.
### Escalate Before Call
When trial mode is toggled on and configured to escalate before the function is called, you can see the example function request GenerativeAgent would have made before the "Transferred to agent" event.
When using trial mode, you need to specify:
* **Escalation behavior:**
* **Before Calling**: GenerativeAgent will escalate to a live agent before calling the function. This allows you to see what GenerativeAgent would have called the function.
* **After Calling**: GenerativeAgent will call the function, but then escalate to an agent before responding to the customer.
* Message to send to customer: The message that will be sent to customer before escalation. Can be left blank to not send a dedicated message.
## Evaluate behavior in Previewer
When trail mode is activated, you can see the trial behavior in previewer.
### Escalate Before Call
When trial mode is toggled on and configured to escalate before the function is called, you can see the example function request GenerativeAgent would have made before the "Transferred to agent" event.
 ### Escalate After Call
When trial mode is toggled on and configured to escalate after the function is called, GenerativeAgent will call the function, and then escalate to an agent.
### Escalate After Call
When trial mode is toggled on and configured to escalate after the function is called, GenerativeAgent will call the function, and then escalate to an agent.
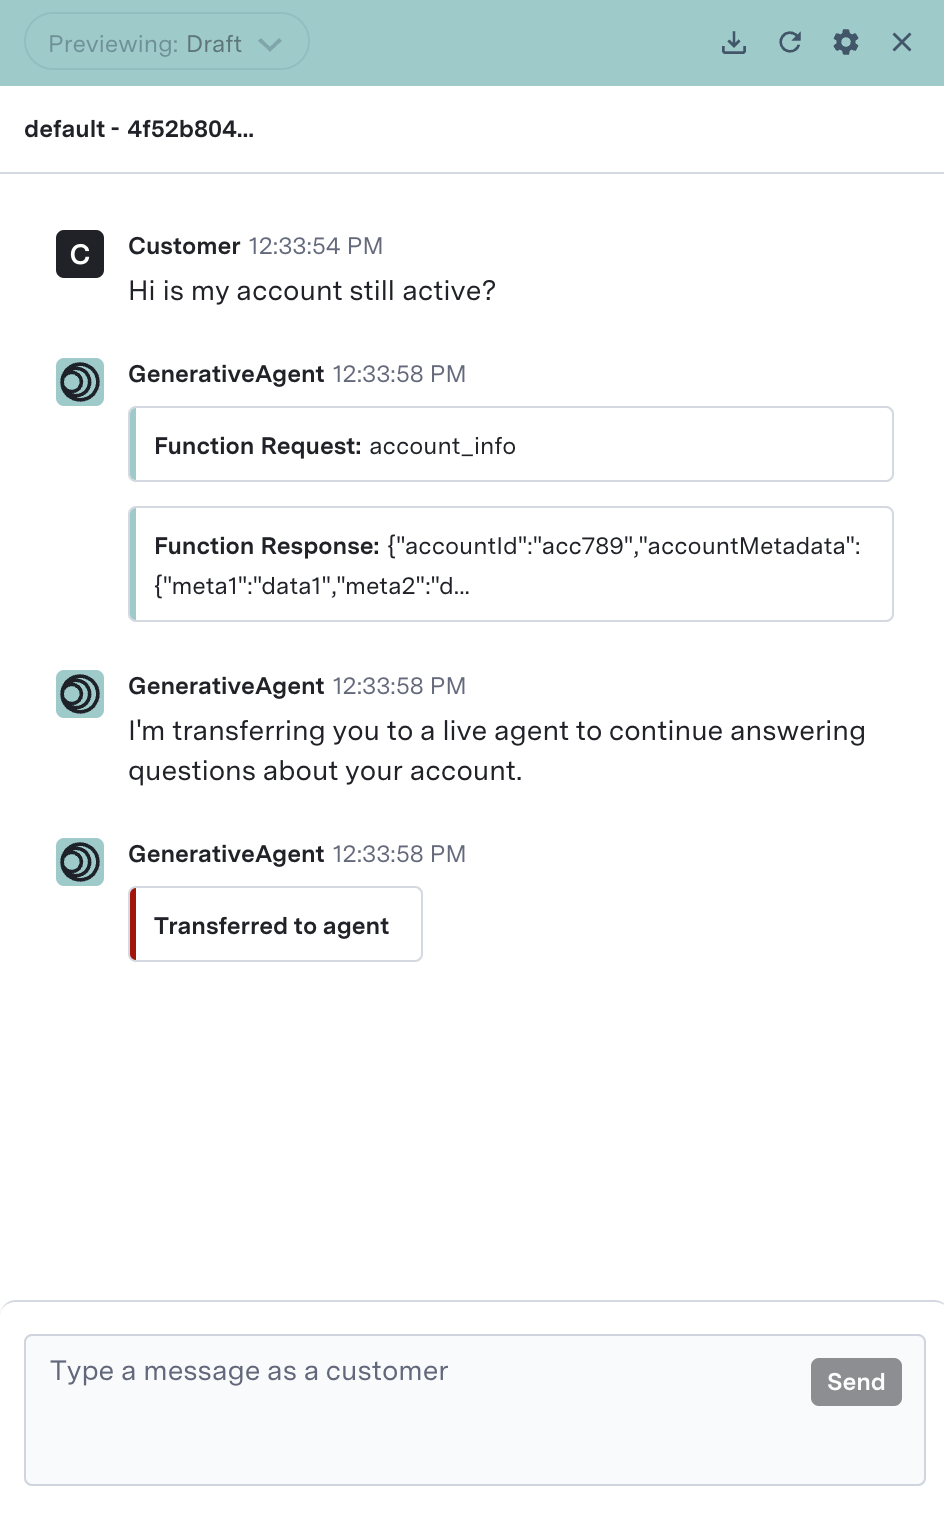 ## Trial Mode vs A/B Testing
A/B tests and trial mode are two complementary functionalities that both enable safe deployment.
A/B tests are configured at the GenerativeAgent level, where a customer is either seeing the GenerativeAgent treatment or the control treatment (where the control treatment might be the treatment customers saw prior to GenerativeAgent).
Trial mode can be configured within an A/B test. For example, it could be that 10% of the traffic in an A/B test is seeing GenerativeAgent, and within that 10% trial mode is on for one or more functions.
# Feature Releases
Source: https://docs.asapp.com/generativeagent/feature-releases
| Feature Name | Feature Release Details | Additional Relevant Information (if available) |
| :---------------------------- | :------------------------------------------------------------------------------------------------------- | :--------------------------------------------- |
| Knowledge Base Search | [Knowledge Base Search](/generativeagent/feature-releases/knowledge-base-search "Knowledge Base Search") | |
| Trial Mode | [Trial Mode](/generativeagent/feature-releases/trial-mode) | |
| Turn Inspector | [Turn Inspector](/generativeagent/feature-releases/turn-inspector) | |
| Knowledge Base Submission API | [Knowledge Base API](/generativeagent/feature-releases/knowledge-base-article-submission-api) | |
| Mock API | [Mock API](/generativeagent/feature-releases/mock-api) | |
| Scope and Safety Fine Tuning | [Scope and Safety Tooling](/generativeagent/feature-releases/safety-tooling) | |
# Knowledge Base Article Submission API
Source: https://docs.asapp.com/generativeagent/feature-releases/knowledge-base-article-submission-api
Learn about the upcoming Knowledge Base Article Submission API feature for ASAPP.
## Overview
ASAPP is introducing the Knowledge Base Article Submission API to GenerativeAgent, aimed at enabling users the ability to programmatically add and modify articles and large data sources within the GenerativeAgent Knowledge Base
The Knowledge Base Article Submission API offers an alternative to the manual creation of article snippets and the import url options in the Knowledge Base tooling. This feature is especially beneficial for large data sources that are not easily scrapped, like articles that live within a Content Management System.
The API key benefits are:
* **Programmatic Article Management:** Add or update articles without manual entry
* **Manual Review Process**: All submissions undergo human review in the ASAPP AI-Console UI
* **Flexible Submission**: Allows customers to choose between manual or API submission
* **Content Management System (CMS) Compatibility**: Easily import articles from various sources
## Trial Mode vs A/B Testing
A/B tests and trial mode are two complementary functionalities that both enable safe deployment.
A/B tests are configured at the GenerativeAgent level, where a customer is either seeing the GenerativeAgent treatment or the control treatment (where the control treatment might be the treatment customers saw prior to GenerativeAgent).
Trial mode can be configured within an A/B test. For example, it could be that 10% of the traffic in an A/B test is seeing GenerativeAgent, and within that 10% trial mode is on for one or more functions.
# Feature Releases
Source: https://docs.asapp.com/generativeagent/feature-releases
| Feature Name | Feature Release Details | Additional Relevant Information (if available) |
| :---------------------------- | :------------------------------------------------------------------------------------------------------- | :--------------------------------------------- |
| Knowledge Base Search | [Knowledge Base Search](/generativeagent/feature-releases/knowledge-base-search "Knowledge Base Search") | |
| Trial Mode | [Trial Mode](/generativeagent/feature-releases/trial-mode) | |
| Turn Inspector | [Turn Inspector](/generativeagent/feature-releases/turn-inspector) | |
| Knowledge Base Submission API | [Knowledge Base API](/generativeagent/feature-releases/knowledge-base-article-submission-api) | |
| Mock API | [Mock API](/generativeagent/feature-releases/mock-api) | |
| Scope and Safety Fine Tuning | [Scope and Safety Tooling](/generativeagent/feature-releases/safety-tooling) | |
# Knowledge Base Article Submission API
Source: https://docs.asapp.com/generativeagent/feature-releases/knowledge-base-article-submission-api
Learn about the upcoming Knowledge Base Article Submission API feature for ASAPP.
## Overview
ASAPP is introducing the Knowledge Base Article Submission API to GenerativeAgent, aimed at enabling users the ability to programmatically add and modify articles and large data sources within the GenerativeAgent Knowledge Base
The Knowledge Base Article Submission API offers an alternative to the manual creation of article snippets and the import url options in the Knowledge Base tooling. This feature is especially beneficial for large data sources that are not easily scrapped, like articles that live within a Content Management System.
The API key benefits are:
* **Programmatic Article Management:** Add or update articles without manual entry
* **Manual Review Process**: All submissions undergo human review in the ASAPP AI-Console UI
* **Flexible Submission**: Allows customers to choose between manual or API submission
* **Content Management System (CMS) Compatibility**: Easily import articles from various sources
 **The free text search covers:**
* Article Titles
* Article Text
* URLs
**Users can apply filters such as:**
* Content source name
* Content source type
* First activity Range
* Created by
* Last modified by
* Deployment status
* Metadata
It is particularly beneficial in situations where specific metadata attributes are crucial for locating, reviewing, or updating content, such as finding articles by a particular creator or deployment status
## How it works
Users can search for an article or apply metadata filters.
Available filters include:
* Content source name
* Content source type
* First activity Range
* Created by
* Last modified by
* Deployment status
* Metadata
## FAQs
1. How can I search for articles created by a specific user?
Use the "Created by" metadata filter and select the desired user from the dropdown menu.
2. Will the filters persist if I navigate away from the search results?
Yes, the search results and applied filters will persist when navigating back to the Knowledge Base list from an article
3. Can I apply multiple filters at once?
Yes, you can select and apply multiple filters, and they will be combined using "and" operators for precise search results.
# Mock API Connections
Source: https://docs.asapp.com/generativeagent/feature-releases/mock-api
Learn about the upcoming Mock API Connection feature for ASAPP.
## Overview
Mock API Functions allow users to configure Functions within GenerativeAgent without pointing to a real API.
By providing a JSON schema, you can quickly define how a Function should behave, test its parameters, and preview conversation flows before integrating any live endpoints.
This shortens the setup process drastically and enables immediate prototyping of how GenerativeAgent will call your Function.
Once you are ready to go live, you can simply replace your mocked schema with a real API connection, maintaining the same Function definitions and conversation logic.
Mocking API Connections is seamless way to:
* Validate conversation flows
* Confirm that parameters work as intended
* Ensure that your team can deliver results with or without fully integrated APIs
## Use and Impact
ASAPP aims to reduce friction and speed up time-to-deployment by removing the need for a working API during the initial setup and creation of Functions.
By [Mocking API Connections](/generativeagent/configuring/tasks-and-functions/mock-api), users can define and test Functions quickly, iterate on conversation flows, and confirm parameter requirements.
This helps ensure a more robust final integration, saving both time and resources for customers and developers.
Its main benefits are:
* Rapid prototyping of new Functions without a fully built API.
* Testing how GenerativeAgent processes or populates request parameters before real integration.
* Simplifying configuration for teams that want to get interacting with GenerativeAgent quickly before building or exposing internal APIs.
For detailed information about configuring and using pinned versions, visit our [Pinned Versions documentation](/generativeagent/configuring/deploying-to-generativeagent#generativeagent-versions).
## FAQs
1. **What happens if I do not pin a version?**
Your GenerativeAgent will default to the latest stable version, ensuring access to the newest features.
2. **Can I change the pinned version later?**
Yes. You can switch versions as needed via the Settings interface.
3. **How do I know what features a new version includes?**
Access a summary of improvements and best practices for optimizing configurations on the GenerativeAgent version release page.
4. **Can I preview a version before deploying it?**
Absolutely. You can preview any version to understand how it will affect your environment.
# Scope and Safety Fine Tuning Tooling
Source: https://docs.asapp.com/generativeagent/feature-releases/safety-tooling
Learn about the Scope and Safety Fine Tuning Tooling feature for GenerativeAgent.
GenerativeAgent now offers customizable safety and scope guardrails, allowing you to define what's considered "in-scope" and "safe" for your specific needs. While maintaining core safety protections, this tooling enables you to expand permissible topics and adjust default guardrails to better align with your business policies and requirements.
For detailed information about configuring and using safety tooling, visit our [Scope and Safety Tuning documentation](/generativeagent/configuring/safety/scope-and-safety-tuning).
## FAQs
1. Will adding custom categories remove default protections?
No, default safety and scope guardrails remain active. Your configurations help customize permissible interactions.
2. How can I adjust the scope if GenerativeAgent is too conservative?
Add or refine in-scope or input safety categories to expand acceptable topics, keeping standard safety intact.
3. Why does the safety tooling require an explanation?
Input safety requires an explanation to provide context for why certain inputs are deemed safe, helping GenerativeAgent accurately apply exceptions relevant to your specific needs.
# Trial Mode
Source: https://docs.asapp.com/generativeagent/feature-releases/trial-mode
Learn about the upcoming Trial Mode feature for ASAPP.
## Overview
ASAPP is adding the "Trial Mode" option to functions. This trial mode allows you to safely deploy GenerativeAgent use cases by trialing functions in production.
A function can be marked as being in trial mode, so that when GenerativeAgent calls that function, it instead will escalate to a human agent.
This can allow you to:
* Ensure GenerativeAgent called the function properly given the conversation context.
* Ensure GenerativeAgent interpreted the function response.
* Be protected from unknown API response variations that you might not have accounted for during development and testing.
After running a function in trial mode and confirming it responds as expected, you can disable trial mode, deploying the function into full production use.
## FAQs
**How does trial mode relate to A/B testing in terms of safe deployment?**
A/B tests and trial mode are two complementary functionalities that both enable safe deployment. A/B tests are configured at the GenerativeAgent level, where a customer is either seeing the GenerativeAgent treatment or the control treatment. Trial mode can be configured within an A/B test.
**If I enable trial mode, will my containment rates be low?**
Enabling trial mode will temporarily reduce your containment rates because conversations are configured to escalate to a live agent instead of being fully handled by GenerativeAgent. However, this temporary reduction in containment is a trade-off for the added safety and reliability gained from observing and validating GenerativeAgent's behavior in a controlled environment before full deployment.
**How do I know when it's safe to turn off trial mode and fully deploy the function?**
You can turn off trial mode and fully deploy the function when you have gathered sufficient data and confidence that GenerativeAgent is correctly calling the function and interpreting its responses. This can be determined by monitoring the escalations, reviewing how GenerativeAgent would have handled the interactions, and ensuring that there are no significant issues or undesired behaviors. Once you are satisfied with the performance, you can disable trial mode for that function.
# Turn Inspector
Source: https://docs.asapp.com/generativeagent/feature-releases/turn-inspector
Learn about the upcoming Turn Inspector feature for ASAPP's Generative Agent.
## Overview
ASAPP is introducing the Turn Inspector, an advanced diagnostic feature for GenerativeAgent that enhances how developers and users understand and optimize their interaction workflows.
The Turn Inspector enables granular validation of conditional prompting, allowing users to examine how instructions are processed within GenerativeAgent. By providing a comprehensive view into each interaction's setup, Turn Inspector facilitates troubleshooting and performance optimization.
## Use and Impact
Users gain more insight and control over Tasks and Functions configuration through a new modal that exposes GenerativeAgent's internal state when using the Previewer.
Turn Inspector includes detailed visibility into:
* Active Task configuration
* Current reference variables
* Precise instruction parsing
* Function call context and parameters
* Execution state at each conversational turn
This transparency enables users to diagnose unexpected behaviors, fine-tune instruction sets, and ensure more predictable and reliable interactions with GenerativeAgent.
Turn Inspector transforms GenerativeAgent’s management to a transparent and controllable process that enhances the overall reliability and performance of GenerativeAgent interactions.
## How it Works
1. User starts a conversation using the Live Previewer in AI-Console
2. User clicks on the “Instructions” action within Previewer.
3. This opens a modal that contains:
* The reference variables that have been set
* The task instructions
* The functions available at that turn of the conversation
Now, the user can inspect the state of reference variables, tasks, and function instructions at any specific turn.
## FAQs
**How to access the Turn Inspector feature?**
Access the inspector by clicking on the `Instructions` action in the conversation Previewer.
This will open a modal where you can view the state of the reference variables, task instructions, and functions that were available to GenerativeAgent at that point in the conversation.
**Can I see how my conditional logic is affecting GenerativeAgent outputs in real-time?**
Yes, by inspecting the state of GenerativeAgent at each turn, users can see how the task instructions have been rendered for GenerativeAgent.
This provides insight into what information GenerativeAgent has access to at that point in time in the conversation.
**What if I notice an issue in my task instructions through the Turn Inspector?**
If you notice an issue in the task instructions, you can navigate to the task, make changes, save the task, and then retest the conversation.
If you are previewing in the Draft environment, your task changes should be available immediately to continue previewing.
# Getting Started
Source: https://docs.asapp.com/generativeagent/getting-started
An integration into GenerativeAgent requires a combination of configuring the bot as well as the technical integrations that hook your system into GenerativeAgent. These are represented by these core steps:
**The free text search covers:**
* Article Titles
* Article Text
* URLs
**Users can apply filters such as:**
* Content source name
* Content source type
* First activity Range
* Created by
* Last modified by
* Deployment status
* Metadata
It is particularly beneficial in situations where specific metadata attributes are crucial for locating, reviewing, or updating content, such as finding articles by a particular creator or deployment status
## How it works
Users can search for an article or apply metadata filters.
Available filters include:
* Content source name
* Content source type
* First activity Range
* Created by
* Last modified by
* Deployment status
* Metadata
## FAQs
1. How can I search for articles created by a specific user?
Use the "Created by" metadata filter and select the desired user from the dropdown menu.
2. Will the filters persist if I navigate away from the search results?
Yes, the search results and applied filters will persist when navigating back to the Knowledge Base list from an article
3. Can I apply multiple filters at once?
Yes, you can select and apply multiple filters, and they will be combined using "and" operators for precise search results.
# Mock API Connections
Source: https://docs.asapp.com/generativeagent/feature-releases/mock-api
Learn about the upcoming Mock API Connection feature for ASAPP.
## Overview
Mock API Functions allow users to configure Functions within GenerativeAgent without pointing to a real API.
By providing a JSON schema, you can quickly define how a Function should behave, test its parameters, and preview conversation flows before integrating any live endpoints.
This shortens the setup process drastically and enables immediate prototyping of how GenerativeAgent will call your Function.
Once you are ready to go live, you can simply replace your mocked schema with a real API connection, maintaining the same Function definitions and conversation logic.
Mocking API Connections is seamless way to:
* Validate conversation flows
* Confirm that parameters work as intended
* Ensure that your team can deliver results with or without fully integrated APIs
## Use and Impact
ASAPP aims to reduce friction and speed up time-to-deployment by removing the need for a working API during the initial setup and creation of Functions.
By [Mocking API Connections](/generativeagent/configuring/tasks-and-functions/mock-api), users can define and test Functions quickly, iterate on conversation flows, and confirm parameter requirements.
This helps ensure a more robust final integration, saving both time and resources for customers and developers.
Its main benefits are:
* Rapid prototyping of new Functions without a fully built API.
* Testing how GenerativeAgent processes or populates request parameters before real integration.
* Simplifying configuration for teams that want to get interacting with GenerativeAgent quickly before building or exposing internal APIs.
For detailed information about configuring and using pinned versions, visit our [Pinned Versions documentation](/generativeagent/configuring/deploying-to-generativeagent#generativeagent-versions).
## FAQs
1. **What happens if I do not pin a version?**
Your GenerativeAgent will default to the latest stable version, ensuring access to the newest features.
2. **Can I change the pinned version later?**
Yes. You can switch versions as needed via the Settings interface.
3. **How do I know what features a new version includes?**
Access a summary of improvements and best practices for optimizing configurations on the GenerativeAgent version release page.
4. **Can I preview a version before deploying it?**
Absolutely. You can preview any version to understand how it will affect your environment.
# Scope and Safety Fine Tuning Tooling
Source: https://docs.asapp.com/generativeagent/feature-releases/safety-tooling
Learn about the Scope and Safety Fine Tuning Tooling feature for GenerativeAgent.
GenerativeAgent now offers customizable safety and scope guardrails, allowing you to define what's considered "in-scope" and "safe" for your specific needs. While maintaining core safety protections, this tooling enables you to expand permissible topics and adjust default guardrails to better align with your business policies and requirements.
For detailed information about configuring and using safety tooling, visit our [Scope and Safety Tuning documentation](/generativeagent/configuring/safety/scope-and-safety-tuning).
## FAQs
1. Will adding custom categories remove default protections?
No, default safety and scope guardrails remain active. Your configurations help customize permissible interactions.
2. How can I adjust the scope if GenerativeAgent is too conservative?
Add or refine in-scope or input safety categories to expand acceptable topics, keeping standard safety intact.
3. Why does the safety tooling require an explanation?
Input safety requires an explanation to provide context for why certain inputs are deemed safe, helping GenerativeAgent accurately apply exceptions relevant to your specific needs.
# Trial Mode
Source: https://docs.asapp.com/generativeagent/feature-releases/trial-mode
Learn about the upcoming Trial Mode feature for ASAPP.
## Overview
ASAPP is adding the "Trial Mode" option to functions. This trial mode allows you to safely deploy GenerativeAgent use cases by trialing functions in production.
A function can be marked as being in trial mode, so that when GenerativeAgent calls that function, it instead will escalate to a human agent.
This can allow you to:
* Ensure GenerativeAgent called the function properly given the conversation context.
* Ensure GenerativeAgent interpreted the function response.
* Be protected from unknown API response variations that you might not have accounted for during development and testing.
After running a function in trial mode and confirming it responds as expected, you can disable trial mode, deploying the function into full production use.
## FAQs
**How does trial mode relate to A/B testing in terms of safe deployment?**
A/B tests and trial mode are two complementary functionalities that both enable safe deployment. A/B tests are configured at the GenerativeAgent level, where a customer is either seeing the GenerativeAgent treatment or the control treatment. Trial mode can be configured within an A/B test.
**If I enable trial mode, will my containment rates be low?**
Enabling trial mode will temporarily reduce your containment rates because conversations are configured to escalate to a live agent instead of being fully handled by GenerativeAgent. However, this temporary reduction in containment is a trade-off for the added safety and reliability gained from observing and validating GenerativeAgent's behavior in a controlled environment before full deployment.
**How do I know when it's safe to turn off trial mode and fully deploy the function?**
You can turn off trial mode and fully deploy the function when you have gathered sufficient data and confidence that GenerativeAgent is correctly calling the function and interpreting its responses. This can be determined by monitoring the escalations, reviewing how GenerativeAgent would have handled the interactions, and ensuring that there are no significant issues or undesired behaviors. Once you are satisfied with the performance, you can disable trial mode for that function.
# Turn Inspector
Source: https://docs.asapp.com/generativeagent/feature-releases/turn-inspector
Learn about the upcoming Turn Inspector feature for ASAPP's Generative Agent.
## Overview
ASAPP is introducing the Turn Inspector, an advanced diagnostic feature for GenerativeAgent that enhances how developers and users understand and optimize their interaction workflows.
The Turn Inspector enables granular validation of conditional prompting, allowing users to examine how instructions are processed within GenerativeAgent. By providing a comprehensive view into each interaction's setup, Turn Inspector facilitates troubleshooting and performance optimization.
## Use and Impact
Users gain more insight and control over Tasks and Functions configuration through a new modal that exposes GenerativeAgent's internal state when using the Previewer.
Turn Inspector includes detailed visibility into:
* Active Task configuration
* Current reference variables
* Precise instruction parsing
* Function call context and parameters
* Execution state at each conversational turn
This transparency enables users to diagnose unexpected behaviors, fine-tune instruction sets, and ensure more predictable and reliable interactions with GenerativeAgent.
Turn Inspector transforms GenerativeAgent’s management to a transparent and controllable process that enhances the overall reliability and performance of GenerativeAgent interactions.
## How it Works
1. User starts a conversation using the Live Previewer in AI-Console
2. User clicks on the “Instructions” action within Previewer.
3. This opens a modal that contains:
* The reference variables that have been set
* The task instructions
* The functions available at that turn of the conversation
Now, the user can inspect the state of reference variables, tasks, and function instructions at any specific turn.
## FAQs
**How to access the Turn Inspector feature?**
Access the inspector by clicking on the `Instructions` action in the conversation Previewer.
This will open a modal where you can view the state of the reference variables, task instructions, and functions that were available to GenerativeAgent at that point in the conversation.
**Can I see how my conditional logic is affecting GenerativeAgent outputs in real-time?**
Yes, by inspecting the state of GenerativeAgent at each turn, users can see how the task instructions have been rendered for GenerativeAgent.
This provides insight into what information GenerativeAgent has access to at that point in time in the conversation.
**What if I notice an issue in my task instructions through the Turn Inspector?**
If you notice an issue in the task instructions, you can navigate to the task, make changes, save the task, and then retest the conversation.
If you are previewing in the Draft environment, your task changes should be available immediately to continue previewing.
# Getting Started
Source: https://docs.asapp.com/generativeagent/getting-started
An integration into GenerativeAgent requires a combination of configuring the bot as well as the technical integrations that hook your system into GenerativeAgent. These are represented by these core steps:
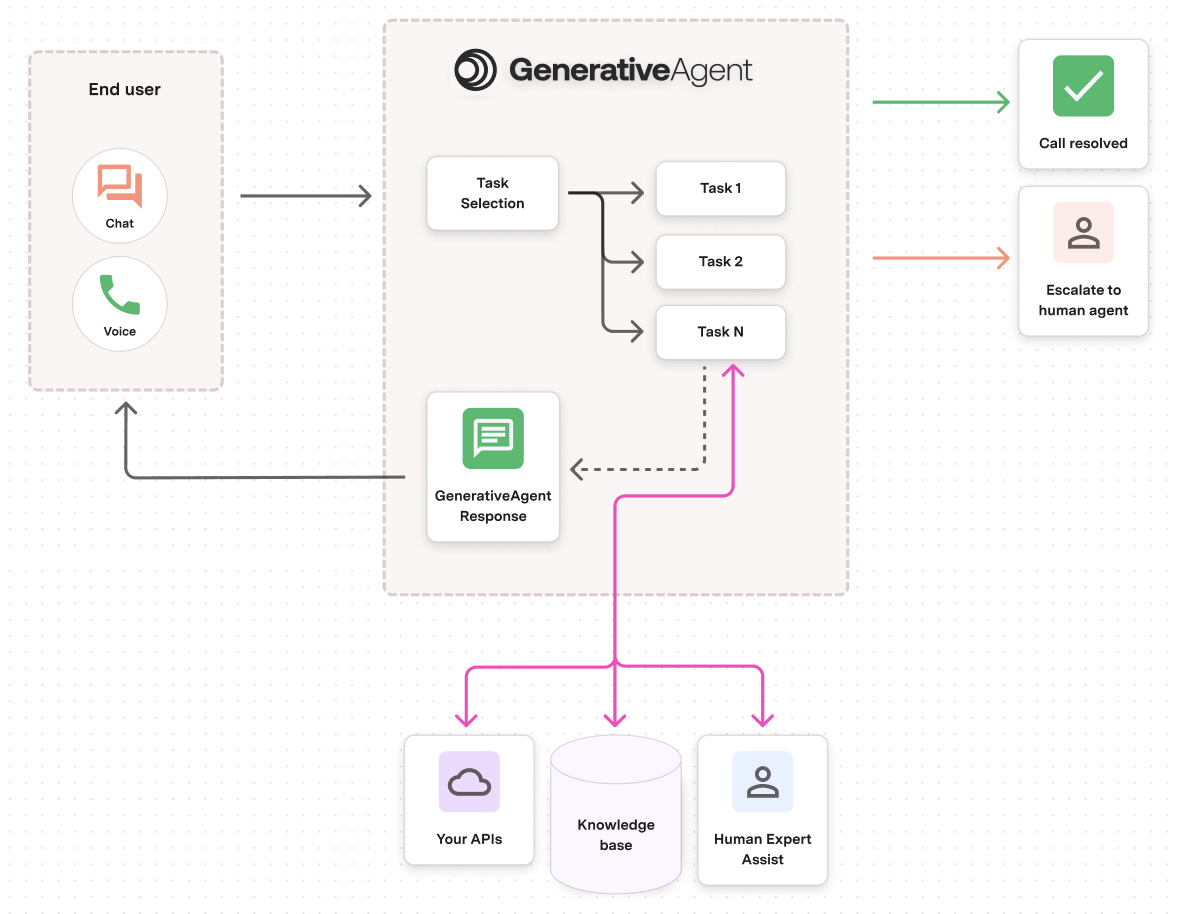 GenerativeAgent seamlessly integrates with your existing customer support infrastructure, providing AI-powered assistance across voice and chat channels. Here's a simplified overview of how GenerativeAgent operates:
1. **Conversation Initiation**: When a customer starts an interaction, your system sends the conversation data to GenerativeAgent.
2. **GenerativeAgent Activation**: GenerativeAgent is initiated to handle the conversation, taking over the interaction with the customer.
3. **Information Processing**: GenerativeAgent analyzes the customer's input, considering the full context of the conversation.
4. **Task Identification and Execution**: Based on the configured tasks you've defined, GenerativeAgent:
* Identifies relevant tasks to address the customer's needs
* Accesses necessary information from your knowledge base
* Interacts with your APIs to perform required actions
5. **Response Generation**: GenerativeAgent creates human-like responses to communicate with the customer, providing information or confirming actions taken.
6. **Continuous Interaction**: This process continues, with GenerativeAgent handling the back-and-forth with the customer until all issues are resolved.
7. **Escalation (if needed)**: If the customer has an issue that GenerativeAgent is not configured to handle, it will smoothly escalate the conversation to a human agent.
This flexible approach allows GenerativeAgent to handle a wide range of customer interactions efficiently, only involving human agents when necessary.
GenerativeAgent seamlessly integrates with your existing customer support infrastructure, providing AI-powered assistance across voice and chat channels. Here's a simplified overview of how GenerativeAgent operates:
1. **Conversation Initiation**: When a customer starts an interaction, your system sends the conversation data to GenerativeAgent.
2. **GenerativeAgent Activation**: GenerativeAgent is initiated to handle the conversation, taking over the interaction with the customer.
3. **Information Processing**: GenerativeAgent analyzes the customer's input, considering the full context of the conversation.
4. **Task Identification and Execution**: Based on the configured tasks you've defined, GenerativeAgent:
* Identifies relevant tasks to address the customer's needs
* Accesses necessary information from your knowledge base
* Interacts with your APIs to perform required actions
5. **Response Generation**: GenerativeAgent creates human-like responses to communicate with the customer, providing information or confirming actions taken.
6. **Continuous Interaction**: This process continues, with GenerativeAgent handling the back-and-forth with the customer until all issues are resolved.
7. **Escalation (if needed)**: If the customer has an issue that GenerativeAgent is not configured to handle, it will smoothly escalate the conversation to a human agent.
This flexible approach allows GenerativeAgent to handle a wide range of customer interactions efficiently, only involving human agents when necessary.
 ## Next Steps
After setting up Human-in-the-Loop, you are ready to speed up customer replies and solve their inquiries.
You may find one of the following sections helpful in advancing your integration:
## Next Steps
After setting up Human-in-the-Loop, you are ready to speed up customer replies and solve their inquiries.
You may find one of the following sections helpful in advancing your integration:
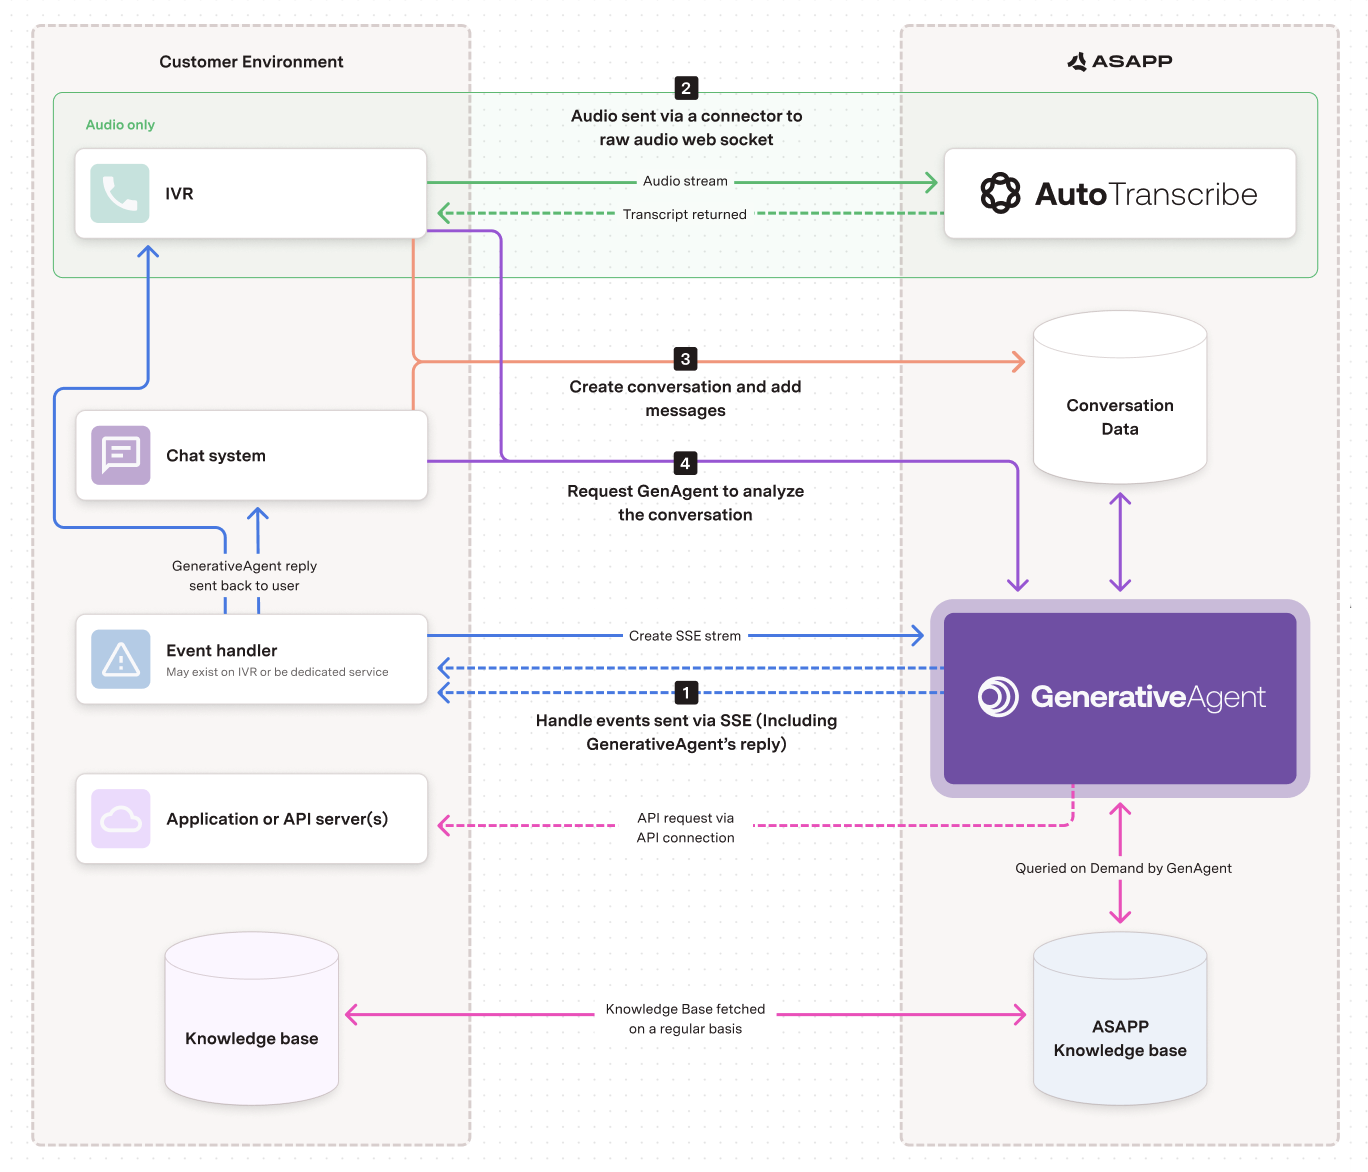 1. Create an SSE stream and handle the GenerativeAgents events sent via the stream. GenerativeAgent's reply is sent via this event stream. You need to provide the bot's response back to your user.
2. Send your audio to AutoTranscribe. Use one of our Connectors to streamline this integration. Otherwise, you can use our websocket integration to pass raw audio.
3. Pass the conversation transcript into ASAPP. This is the transcript you receive from AutoTranscribe or the direct text of a conversation if a chat channel like SMS.
4. Engage GenerativeAgent on the conversation with the /analyze call. GenerativeAgent will look into ASAPP's conversation data to account for the entire conversation context.
1. Create an SSE stream and handle the GenerativeAgents events sent via the stream. GenerativeAgent's reply is sent via this event stream. You need to provide the bot's response back to your user.
2. Send your audio to AutoTranscribe. Use one of our Connectors to streamline this integration. Otherwise, you can use our websocket integration to pass raw audio.
3. Pass the conversation transcript into ASAPP. This is the transcript you receive from AutoTranscribe or the direct text of a conversation if a chat channel like SMS.
4. Engage GenerativeAgent on the conversation with the /analyze call. GenerativeAgent will look into ASAPP's conversation data to account for the entire conversation context.
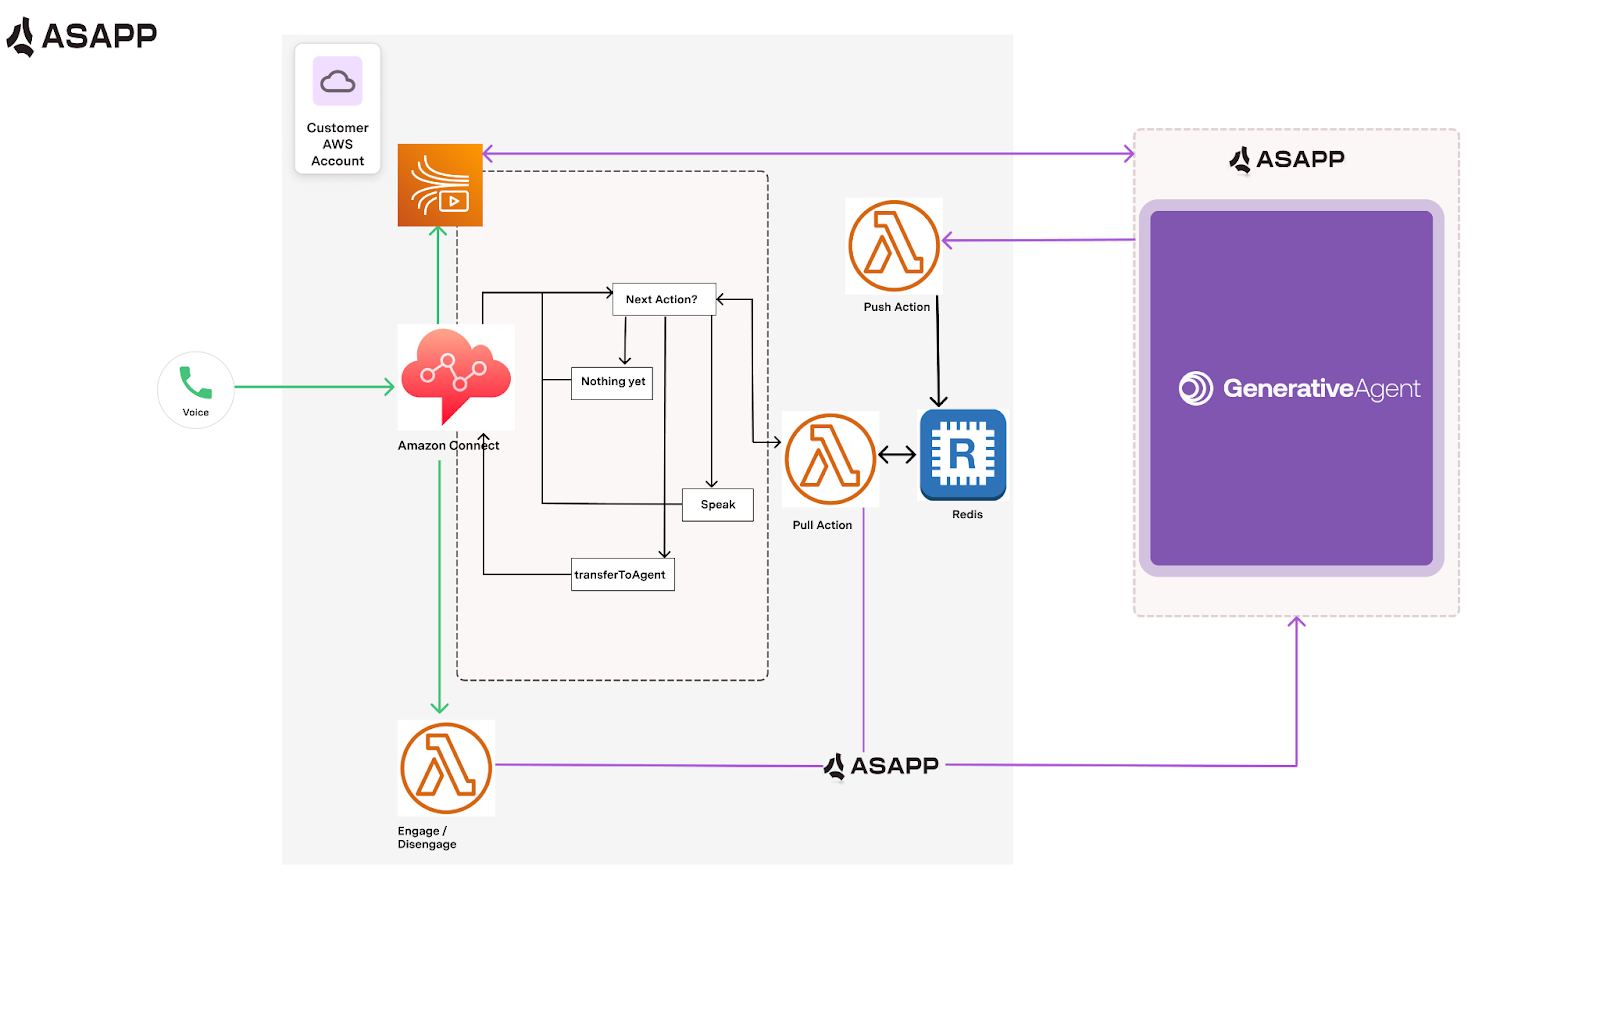
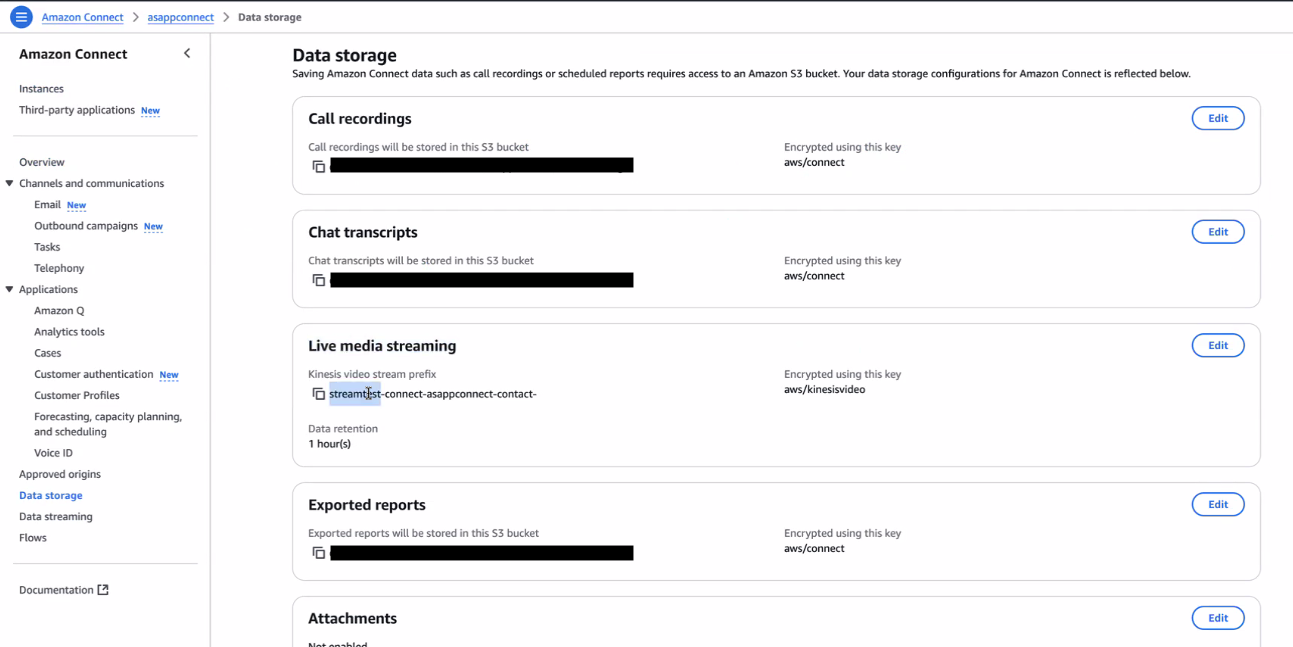

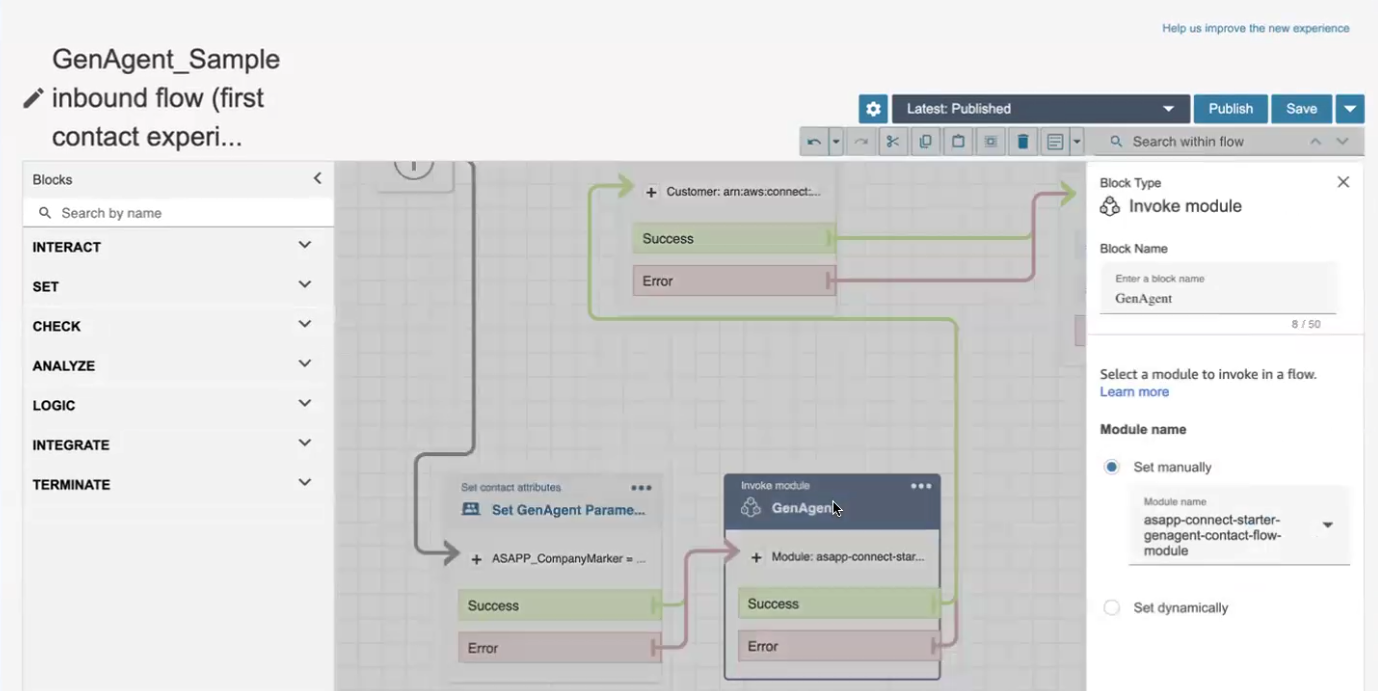 Within the GenerativeAgent module, the flow will use the various components you created in previous steps to engage ASAPP's GenerativeAgent to the end user.
Once the conversation is complete, GenerativeAgent will exit the module and return control to your flow.
3. **Handle the result**
The GenerativeAgent module will exit for one of three reasons, and will be output the `ASAPP_Disposition` contact attribute with one of the following values:
* `transferToAgent`: when the conversation needs to be transferred to an agent
* `disengage`: when the conversation is completed
* `error`: when an error has occurred
## Step 5: Engage GenerativeAgent
Now you are ready to make a call and engage GenerativeAgent.
Call the phone number configured in your Contact Flow and follow the prompts until you reach the point where GenerativeAgent is engaged. You should see the conversation transition to GenerativeAgent based on where you placed the GenerativeAgent Module in your flow.
Verify that:
1. You are handed off to GenerativeAgent
2. GenerativeAgent responds appropriately to your inputs
3. You are returned to your flow when the conversation ends
Within the GenerativeAgent module, the flow will use the various components you created in previous steps to engage ASAPP's GenerativeAgent to the end user.
Once the conversation is complete, GenerativeAgent will exit the module and return control to your flow.
3. **Handle the result**
The GenerativeAgent module will exit for one of three reasons, and will be output the `ASAPP_Disposition` contact attribute with one of the following values:
* `transferToAgent`: when the conversation needs to be transferred to an agent
* `disengage`: when the conversation is completed
* `error`: when an error has occurred
## Step 5: Engage GenerativeAgent
Now you are ready to make a call and engage GenerativeAgent.
Call the phone number configured in your Contact Flow and follow the prompts until you reach the point where GenerativeAgent is engaged. You should see the conversation transition to GenerativeAgent based on where you placed the GenerativeAgent Module in your flow.
Verify that:
1. You are handed off to GenerativeAgent
2. GenerativeAgent responds appropriately to your inputs
3. You are returned to your flow when the conversation ends
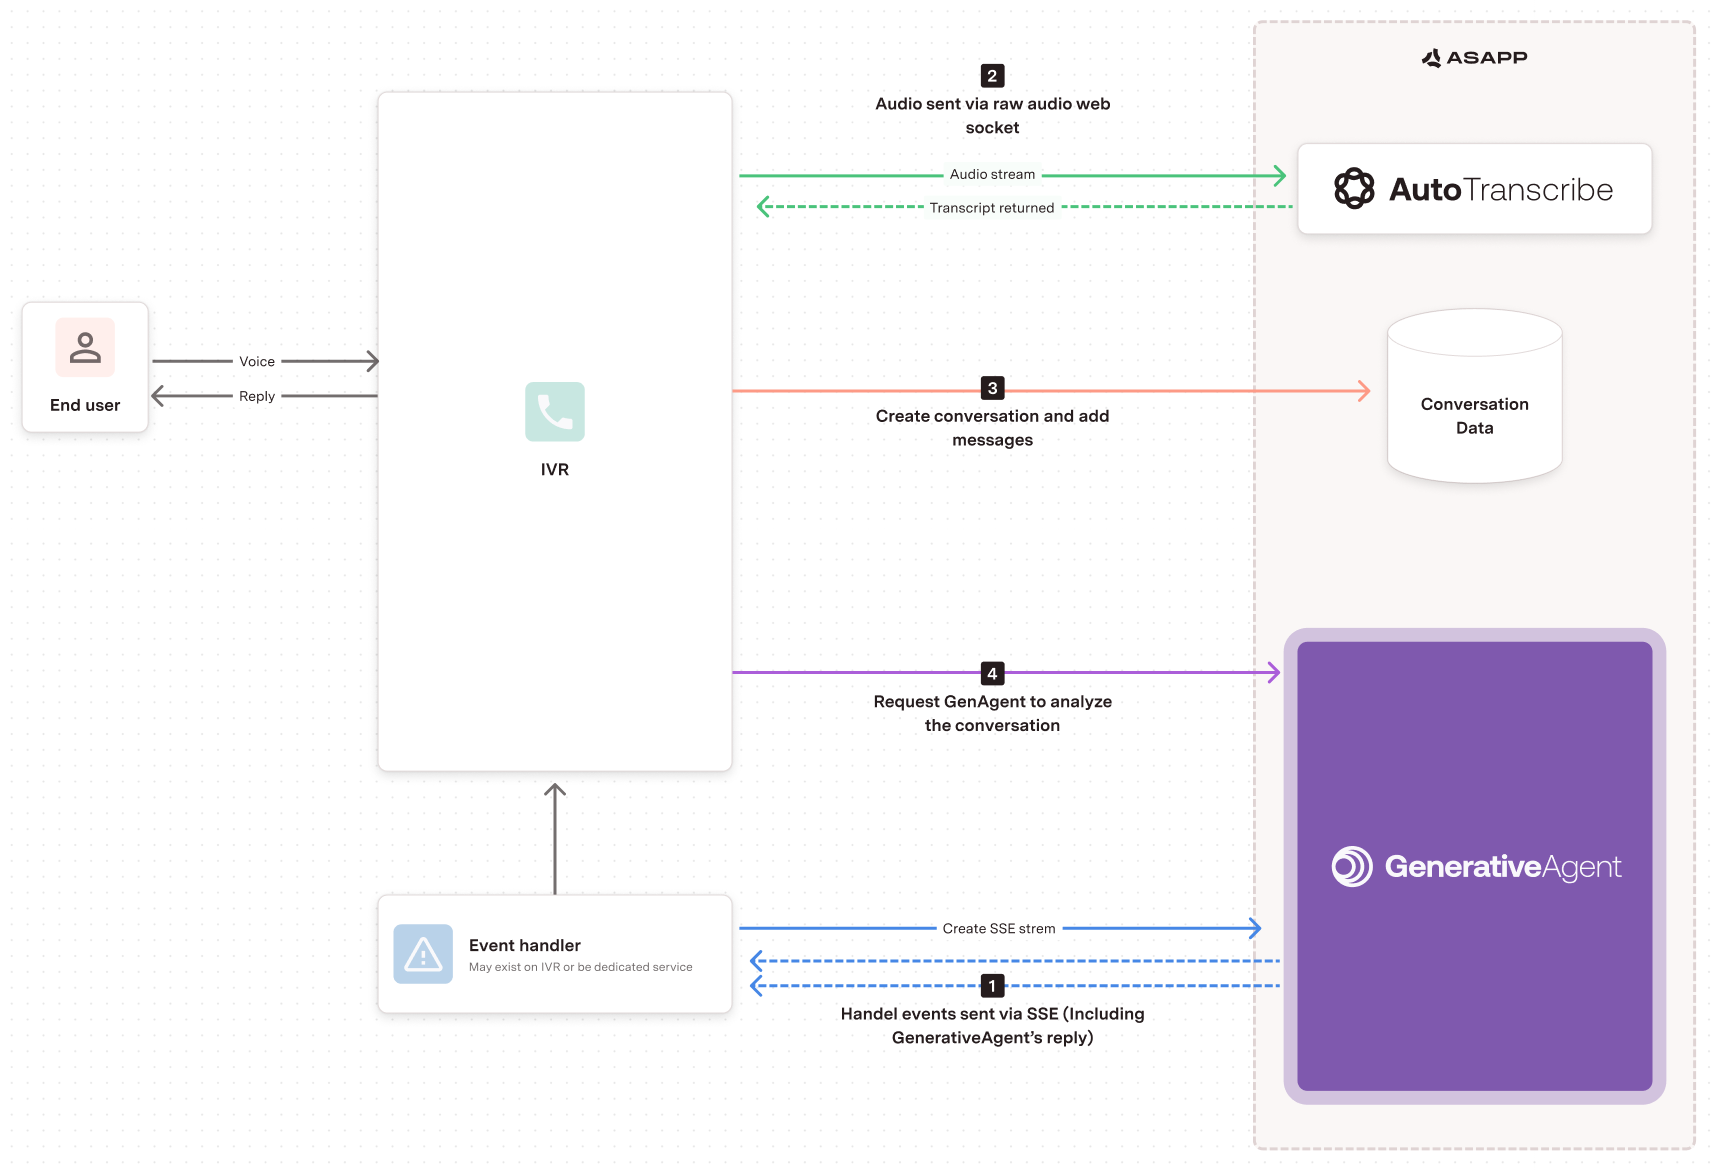 1. Create SSE Stream: The Event Handler (which may exist on the IVR or be a dedicated service) creates a Server-Sent Events (SSE) stream with GenerativeAgent.
2. Audio Stream: The IVR sends the audio stream from the end user to AutoTranscribe.
3. Create Conversation: The IVR creates a conversation and adds messages to the Conversation Data.
4. Request Analysis: The IVR requests GenerativeAgent to analyze the conversation.
The Event Handler then handles events sent via SSE, including GenerativeAgent's reply, which is sent back to the user through the IVR.
## Benefits of using Websocket to Stream events
* Persistent connection between your voice system and the GenerativeAgent server
* API streaming for audio, call signaling, and returned transcripts
* Real-time data exchange for quick responses and efficient handling of user queries
* Bi-directional communication for smooth and responsive interaction
## Before you Begin
Before you start integrating to GenerativeAgent, you need to:
* [Get your API Key Id and Secret](/getting-started/developers)
* Ensure your API key has been configured to access AutoTranscribe and GenerativeAgent APIs. Reach out to your ASAPP team if you unsure.
* [Configure Tasks and Functions](/generativeagent/configuring "Configuring GenerativeAgent").
## Implementation Steps
1. Create AutoTranscribe Streaming URL
2. Listen and Handle GenerativeAgent Events
3. Open a Connection
4. Start an Audio Stream
5. Send the Audio Stream
6. Analyze the conversation with GenerativeAgent
7. Stop the Audio Stream
## Step 1: Create AutoTranscribe Streaming URL
First, you need to [create a streaming URL](/apis/autotranscribe/get-streaming-url) that will be the WebSocket connection to AutoTranscribe.
```bash
curl -X GET 'https://api.sandbox.asapp.com/autotranscribe/v1/streaming-url' \
--header 'asapp-api-id:
1. Create SSE Stream: The Event Handler (which may exist on the IVR or be a dedicated service) creates a Server-Sent Events (SSE) stream with GenerativeAgent.
2. Audio Stream: The IVR sends the audio stream from the end user to AutoTranscribe.
3. Create Conversation: The IVR creates a conversation and adds messages to the Conversation Data.
4. Request Analysis: The IVR requests GenerativeAgent to analyze the conversation.
The Event Handler then handles events sent via SSE, including GenerativeAgent's reply, which is sent back to the user through the IVR.
## Benefits of using Websocket to Stream events
* Persistent connection between your voice system and the GenerativeAgent server
* API streaming for audio, call signaling, and returned transcripts
* Real-time data exchange for quick responses and efficient handling of user queries
* Bi-directional communication for smooth and responsive interaction
## Before you Begin
Before you start integrating to GenerativeAgent, you need to:
* [Get your API Key Id and Secret](/getting-started/developers)
* Ensure your API key has been configured to access AutoTranscribe and GenerativeAgent APIs. Reach out to your ASAPP team if you unsure.
* [Configure Tasks and Functions](/generativeagent/configuring "Configuring GenerativeAgent").
## Implementation Steps
1. Create AutoTranscribe Streaming URL
2. Listen and Handle GenerativeAgent Events
3. Open a Connection
4. Start an Audio Stream
5. Send the Audio Stream
6. Analyze the conversation with GenerativeAgent
7. Stop the Audio Stream
## Step 1: Create AutoTranscribe Streaming URL
First, you need to [create a streaming URL](/apis/autotranscribe/get-streaming-url) that will be the WebSocket connection to AutoTranscribe.
```bash
curl -X GET 'https://api.sandbox.asapp.com/autotranscribe/v1/streaming-url' \
--header 'asapp-api-id: Field Name |
Type |
Description |
|---|---|---|
generativeAgentMessageId |
string |
A unique identifier for this webhook request. |
conversationId |
string |
The internal identifier for the conversation from the ASAPP system. |
externalConversationId |
string |
The external identifier for the conversation from your external system. |
type |
string, enum |
The type of bot response. It can be one of the following:
|
reply.\* |
object |
If the |
reply.messageId |
string |
The identifier of the message sent in the reply |
reply.text |
string |
The message text of the reply |
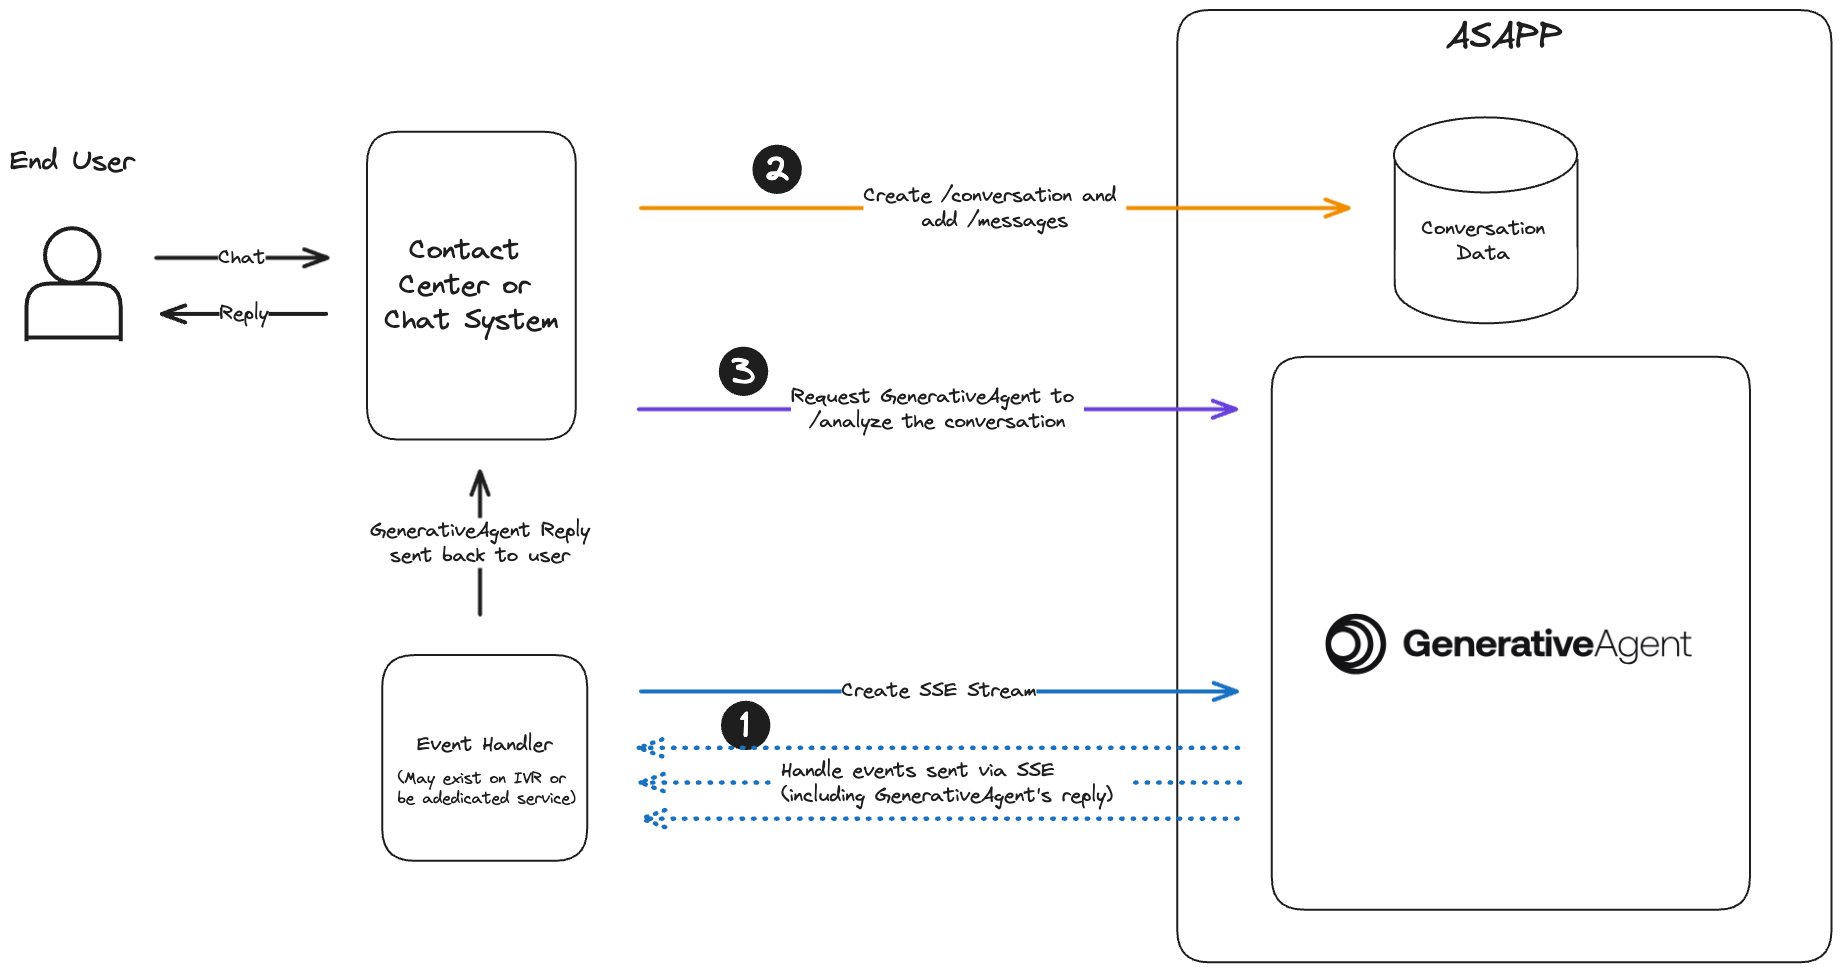 ## Before you Begin
Before you start integrating to GenerativeAgent, you need to:
* [Get your API Key Id and Secret](/getting-started/developers)
* Ensure your API key has been configured to access GenerativeAgent APIs. Reach out to your ASAPP team if you unsure.
* [Configure Tasks and Functions](/generativeagent/configuring).
## Step 1: Listen and Handle GenerativeAgent Events
GenerativeAgent sends you events during the conversation. All events for all conversations being evaluated by GenerativeAgent are sent through the single [Server-Sent-Event](https://developer.mozilla.org/en-US/docs/Web/API/Server-sent_events) (SSE) stream..
To create the SSE stream URL, POST to [`/streams`](/apis/generativeagent/create-stream-url):
```bash
curl -X POST 'https://api.sandbox.asapp.com/generativeagent/v1/streams' \
--header 'asapp-api-id:
## Before you Begin
Before you start integrating to GenerativeAgent, you need to:
* [Get your API Key Id and Secret](/getting-started/developers)
* Ensure your API key has been configured to access GenerativeAgent APIs. Reach out to your ASAPP team if you unsure.
* [Configure Tasks and Functions](/generativeagent/configuring).
## Step 1: Listen and Handle GenerativeAgent Events
GenerativeAgent sends you events during the conversation. All events for all conversations being evaluated by GenerativeAgent are sent through the single [Server-Sent-Event](https://developer.mozilla.org/en-US/docs/Web/API/Server-sent_events) (SSE) stream..
To create the SSE stream URL, POST to [`/streams`](/apis/generativeagent/create-stream-url):
```bash
curl -X POST 'https://api.sandbox.asapp.com/generativeagent/v1/streams' \
--header 'asapp-api-id: 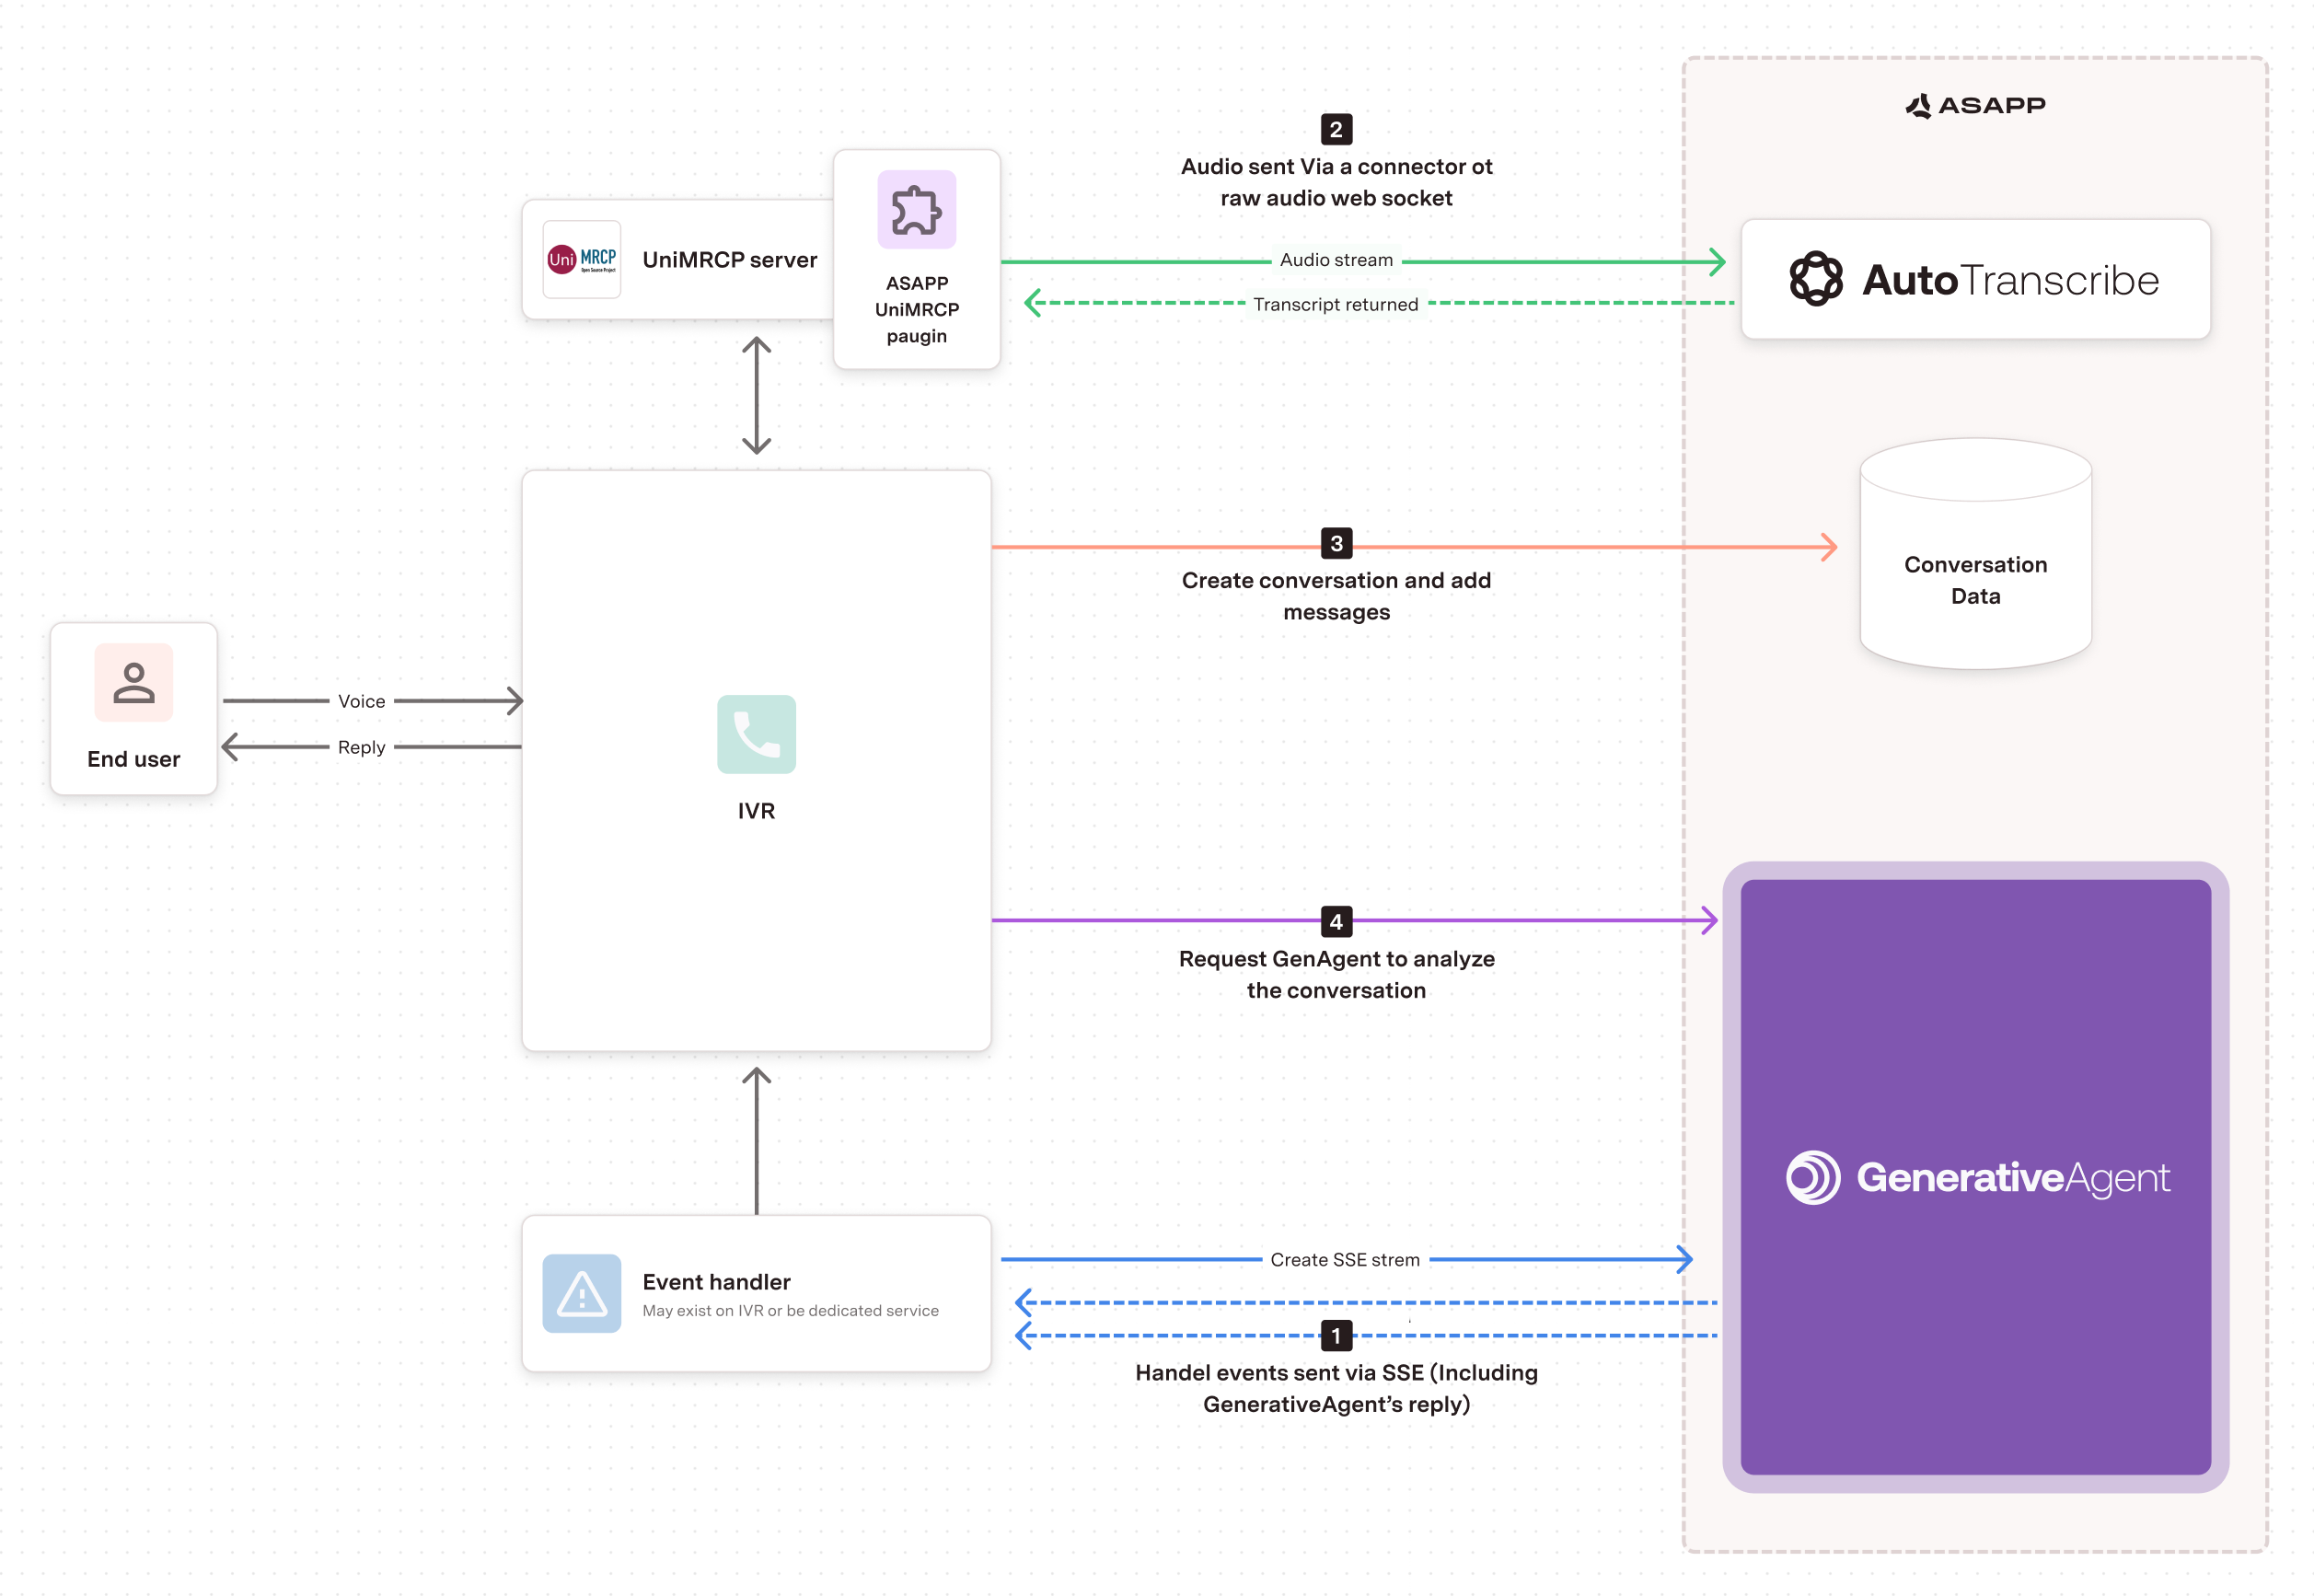 This plugin connects your IVR Platform into the AutoTranscribe Websocket. It is a fast solution for your organization to quickly integrate your IVR application into GenerativeAgent.
By using the ASAPP UniMRCP Plugin, the GenerativeAgent receives text transcripts from your IVR. This way, your organization takes voice media off your IVR and into the ASAPP Cloud.
## Before you Begin
Before you start integrating to GenerativeAgent, you need to:
* [**Get your API Key Id and Secret**](/getting-started/developers)
For authentication, the UniMRCP server connects with AutoTranscribe using standard websocket authentication. The ASAPP UniMRCP Plugin does not handle authentication, but rather authentication is on your IVR's side of the call.
Your API credentials are used by the configuration document.For user identification or verification, you must handle it by the IVRs policies and flows.
* Ensure your API key has been configured to access GenerativeAgent APIs and the AutoTranscribe WebSocket. Reach out to your ASAPP team if you are unsure about this.
* **Use ASAPPs ASR**
Make sure your IVR application uses the ASAPP ASR so AutoTranscribe can receive it and send transcripts to GenerativeAgent.
* [Configure Tasks and Functions](/generativeagent/configuring).
By using the Plugin, you still need to save customer info and messages. The GenerativeAgent can save that data by sending it into its Chat Core, but your organization can also save the messages either by calling the API or by saving the information from each event handler.
Your IVR application is in control of when to call /analyze so the GenerativeAgent analyzes the transcripts and replies. The recommended configuration is to call /analyze every time an utterance or transcript is returned.
Another approach is to call LLMBot when a complete thought/question is provided. Some organizations may find a good solution call /analyze and buffer up transcripts until the customer's thought is complete.
**Implementation steps:**
This plugin connects your IVR Platform into the AutoTranscribe Websocket. It is a fast solution for your organization to quickly integrate your IVR application into GenerativeAgent.
By using the ASAPP UniMRCP Plugin, the GenerativeAgent receives text transcripts from your IVR. This way, your organization takes voice media off your IVR and into the ASAPP Cloud.
## Before you Begin
Before you start integrating to GenerativeAgent, you need to:
* [**Get your API Key Id and Secret**](/getting-started/developers)
For authentication, the UniMRCP server connects with AutoTranscribe using standard websocket authentication. The ASAPP UniMRCP Plugin does not handle authentication, but rather authentication is on your IVR's side of the call.
Your API credentials are used by the configuration document.For user identification or verification, you must handle it by the IVRs policies and flows.
* Ensure your API key has been configured to access GenerativeAgent APIs and the AutoTranscribe WebSocket. Reach out to your ASAPP team if you are unsure about this.
* **Use ASAPPs ASR**
Make sure your IVR application uses the ASAPP ASR so AutoTranscribe can receive it and send transcripts to GenerativeAgent.
* [Configure Tasks and Functions](/generativeagent/configuring).
By using the Plugin, you still need to save customer info and messages. The GenerativeAgent can save that data by sending it into its Chat Core, but your organization can also save the messages either by calling the API or by saving the information from each event handler.
Your IVR application is in control of when to call /analyze so the GenerativeAgent analyzes the transcripts and replies. The recommended configuration is to call /analyze every time an utterance or transcript is returned.
Another approach is to call LLMBot when a complete thought/question is provided. Some organizations may find a good solution call /analyze and buffer up transcripts until the customer's thought is complete.
**Implementation steps:**
Field |
Description |
Default |
Supported Values |
|
|---|---|---|---|---|
sender |
role (required) |
A participant role, usually the customer or an agent for human participants. |
n/a |
"agent", "customer" |
externalId (required) |
Participant ID from the external system, it should be the same for all interactions of the same individual |
n/a |
"BL2341334" |
|
language |
IETF language tag |
en-US |
"en-US" |
|
smartFormatting |
Request for post processing: Inverse Text Normalization (convert spoken form to written form), e.g., 'twenty two --> 22'. Auto punctuation and capitalization |
true |
true, false Recomended: true Interpreting transcripts will be more natural and predictable |
|
detailedToken |
Has no impact on UniMRCP |
false |
true, false Recommended: false IVR application does not utilize the word level details |
|
audioRecordingAllowed |
false: ASAPP will not record the audio true: ASAPP may record and store the audio for this conversation |
false |
true, false Recommended: true Allowing audio recording improves transcript accuracy over time |
|
redactionOutput |
If detailedToken is true along with value 'redacted' or 'redacted\_and\_unredacted', request will be rejected. If no redaction rules configured by the client for 'redacted' or 'redacted\_and\_unredacted', the request will be rejected. If smartFormatting is False, requests with value 'redacted' or 'redacted\_and\_unredacted' will be rejected. |
redacted Recommended: unredacted |
"redacted", "unredacted","redacted\_and\_unredacted" Recommended: unredacted IVR application works better with full information available |
|
- Get started quickly with pre-built visualizations
- View basic performance metrics like task completion and containment
- Export raw data for custom analysis
- Combine GenerativeAgent data with your own analytics
- Build custom reports in your BI tools
- Track end-to-end customer journeys across channels
 ## Data feeds
For deeper analysis, or to integrate GenerativeAgent metrics with your existing analytics infrastructure, you can pipe GenerativeAgent's data directly into your system using:
* [File Exporter APIs](/reporting/file-exporter) for standalone GenerativeAgent.
* [Download from S3](/reporting/retrieve-messaging-data) if you are using our [Messaging Platform](/messaging-platform).
This approach is recommended when you need to:
* Combine GenerativeAgent metrics with other customer journey data
* Build custom dashboards in your BI tools
* Perform advanced analytics across channels
* Track end-to-end customer interactions
## Data feeds
For deeper analysis, or to integrate GenerativeAgent metrics with your existing analytics infrastructure, you can pipe GenerativeAgent's data directly into your system using:
* [File Exporter APIs](/reporting/file-exporter) for standalone GenerativeAgent.
* [Download from S3](/reporting/retrieve-messaging-data) if you are using our [Messaging Platform](/messaging-platform).
This approach is recommended when you need to:
* Combine GenerativeAgent metrics with other customer journey data
* Build custom dashboards in your BI tools
* Perform advanced analytics across channels
* Track end-to-end customer interactions
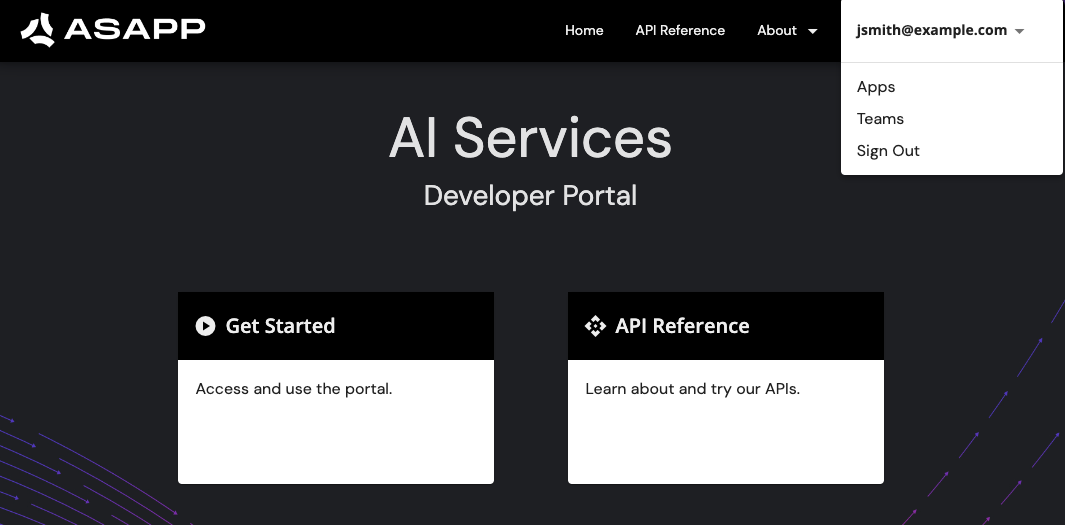 * Click your Sandbox App.
* Navigate down to API Keys and copy your API Id and API Secret
* Click your Sandbox App.
* Navigate down to API Keys and copy your API Id and API Secret
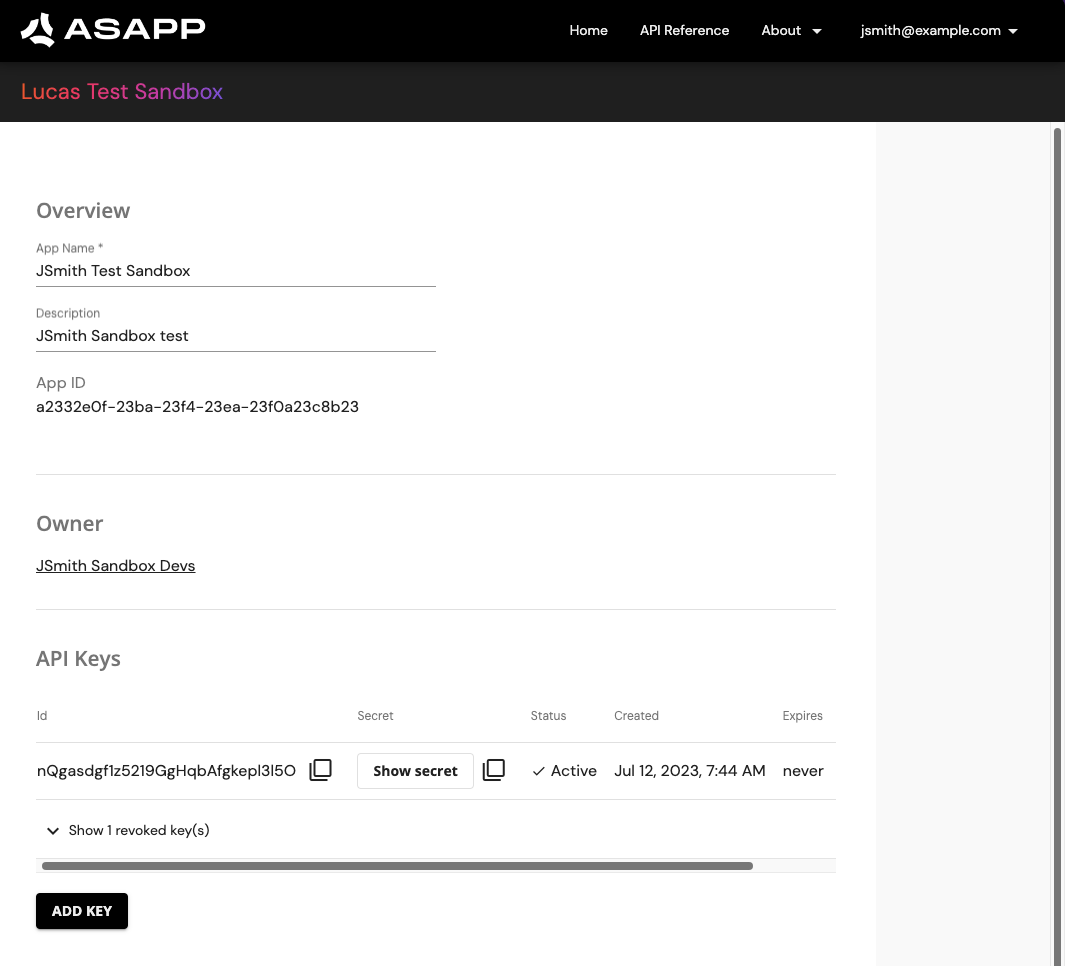 Save the API Id and Secret. All API requests use these for authentication.
## Make First API Call
With credentials in hand, we can make our first API call. Let's start with creating a `conversation`, the root entity for any interaction within a call center.
This example creates an empty conversation with required id from your system. You need to include the API Id and Secret as `asapp-api-id` and `asapp-api-secret` headers respectively.
```bash
curl -X POST 'https://api.sandbox.asapp.com/conversation/v1/conversations' \
--header 'asapp-api-id:
Save the API Id and Secret. All API requests use these for authentication.
## Make First API Call
With credentials in hand, we can make our first API call. Let's start with creating a `conversation`, the root entity for any interaction within a call center.
This example creates an empty conversation with required id from your system. You need to include the API Id and Secret as `asapp-api-id` and `asapp-api-secret` headers respectively.
```bash
curl -X POST 'https://api.sandbox.asapp.com/conversation/v1/conversations' \
--header 'asapp-api-id: 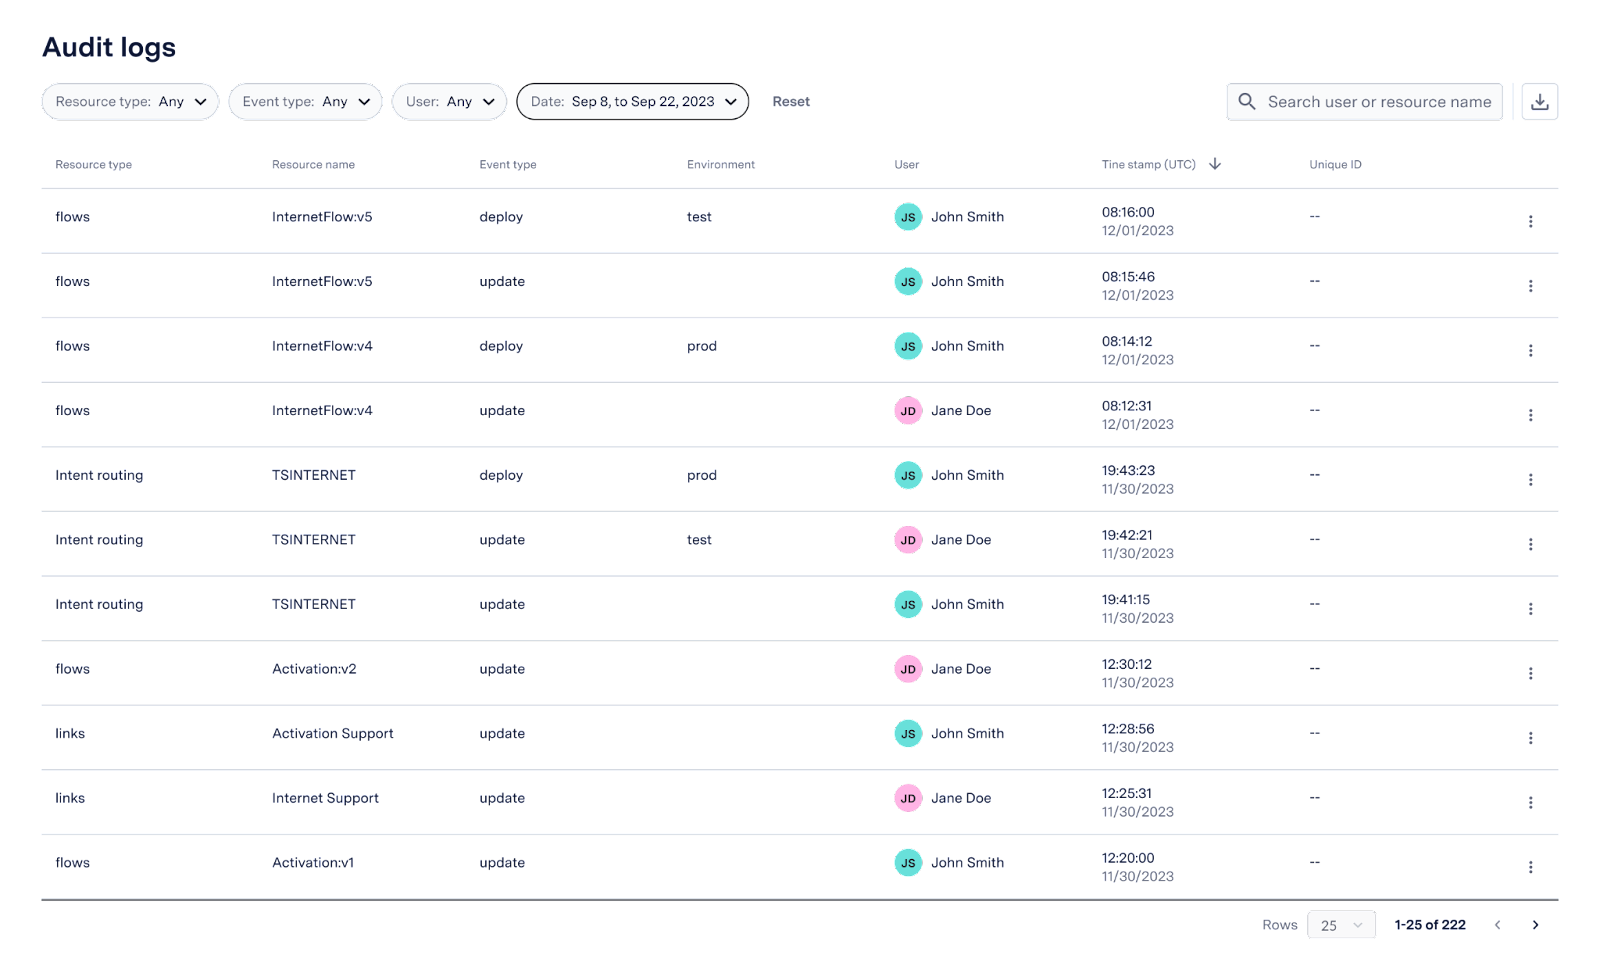 The following list displays the resources being tracked:
* **General**
* Links
* Custom entities
* **Virtual Agent**
* Flows
* Intent routing
* **AutoCompose**
* Global responses
## Audit Logs Entries
For each audit log record, the following fields are recorded:
| Field | Description |
| :------------ | :------------------------------------------------------------------------------------ |
| Resource type | Type of resource modified. |
| Resource name | Name of the resource modified. |
| Event type | Type of event. Supported fields are create, deploy, undeploy, update, and delete. |
| Environment | Environment to which the resource was deployed to. Only applicable for deploy events. |
| User | Name of user who caused the event. |
| Timestamp | Time and date the event occurred, in UTC format. |
| Unique ID | (Optional) Unique identifier for the resource. |
## Searching Audit Logs
Administrators can use the search bar to look for a specific resource name, or user.
To search your audit logs, navigate to the search bar on the top-right corner of the screen.
The following list displays the resources being tracked:
* **General**
* Links
* Custom entities
* **Virtual Agent**
* Flows
* Intent routing
* **AutoCompose**
* Global responses
## Audit Logs Entries
For each audit log record, the following fields are recorded:
| Field | Description |
| :------------ | :------------------------------------------------------------------------------------ |
| Resource type | Type of resource modified. |
| Resource name | Name of the resource modified. |
| Event type | Type of event. Supported fields are create, deploy, undeploy, update, and delete. |
| Environment | Environment to which the resource was deployed to. Only applicable for deploy events. |
| User | Name of user who caused the event. |
| Timestamp | Time and date the event occurred, in UTC format. |
| Unique ID | (Optional) Unique identifier for the resource. |
## Searching Audit Logs
Administrators can use the search bar to look for a specific resource name, or user.
To search your audit logs, navigate to the search bar on the top-right corner of the screen.

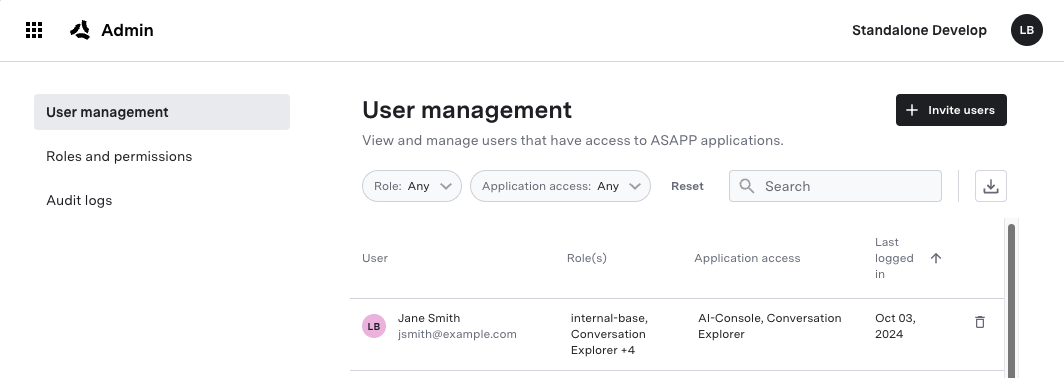 * Click Invite Users
* Enter in the email and name for the user.
* By default, users have the "Basic" role, but you may choose others. We will cover roles and permissions further below.
* You may invite multiple users at once.
* Click Invite Users
* Enter in the email and name for the user.
* By default, users have the "Basic" role, but you may choose others. We will cover roles and permissions further below.
* You may invite multiple users at once.
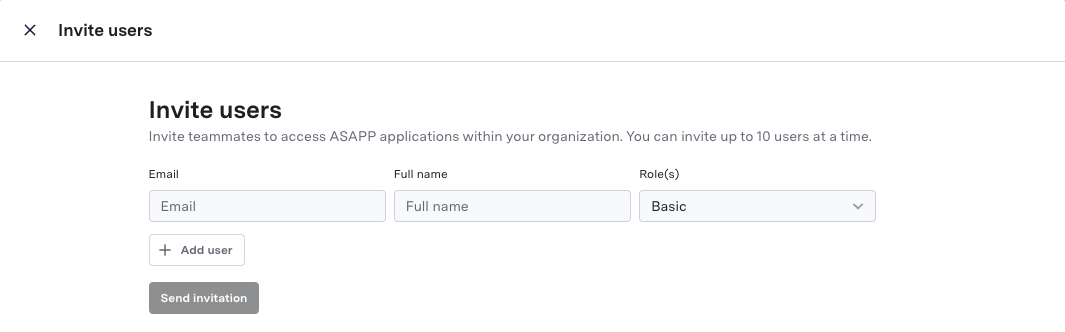 ## Roles and Permissions
By default, all users must have the Basic role, allowing them to log in to the dashboard. But you may create and assign as many roles as you like per given user.
Each role must be assigned to one or more Applications. Additionally, there are the permissions for various features and tooling.
The exact permissions available may vary based on your organization's setup and the ASAPP products you're using. Contact your ASAPP account team for a complete list of permissions and guidance on best practices for your specific use case.
## SSO
If you want to manage access to ASAPP via your own IDP, we support SSO via OpenID Connect and SAML.
If you are interested in using SSO, please reach out to your ASAPP account team to get set up.
# ASAPP Messaging
Source: https://docs.asapp.com/messaging-platform
Use ASAPP Messaging to connect your brand to customers via messaging channels.
## Roles and Permissions
By default, all users must have the Basic role, allowing them to log in to the dashboard. But you may create and assign as many roles as you like per given user.
Each role must be assigned to one or more Applications. Additionally, there are the permissions for various features and tooling.
The exact permissions available may vary based on your organization's setup and the ASAPP products you're using. Contact your ASAPP account team for a complete list of permissions and guidance on best practices for your specific use case.
## SSO
If you want to manage access to ASAPP via your own IDP, we support SSO via OpenID Connect and SAML.
If you are interested in using SSO, please reach out to your ASAPP account team to get set up.
# ASAPP Messaging
Source: https://docs.asapp.com/messaging-platform
Use ASAPP Messaging to connect your brand to customers via messaging channels.
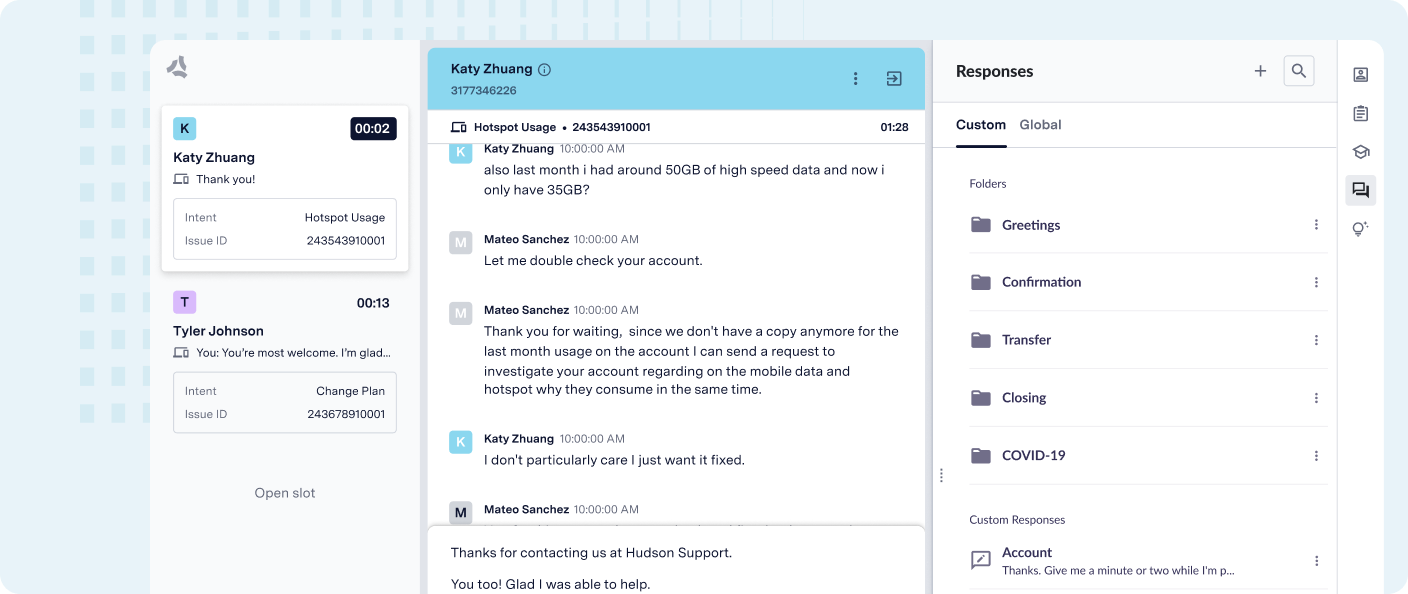 ASAPP Messaging is an end-to-end AI-native® messaging platform designed for digital customer service. It enhances digital adoption, maintains customer satisfaction (CSAT), and increases contact center capacity efficiently.
At its core, ASAPP Messaging uses an AI-Native design approach. AI is not just an added feature, but the foundation upon which the entire platform is built.
ASAPP Messaging leverages advanced machine learning algorithms and generative AI to provide comprehensive support for digital customer service. This holistic approach benefits agents, leaders, and customers alike, offering a seamless and intelligent messaging experience across various channels.
### Supported Channels
ASAPP Messaging supports [multiple messaging channels](/messaging-platform/integrations), including:
* [Android SDK](/messaging-platform/integrations/android-sdk "Android SDK")
* [Apple Messages for Business](/messaging-platform/integrations/apple-messages-for-business "Apple Messages for Business")
* [iOS SDK](/messaging-platform/integrations/ios-sdk "iOS SDK")
* [Voice](/messaging-platform/integrations/voice "Voice")
* [Web SDK](/messaging-platform/integrations/web-sdk "Web SDK")
* [WhatsApp Business](/messaging-platform/integrations/whatsapp-business "WhatsApp Business")
## How it works
ASAPP Messaging seamlessly integrates with your existing channels, creating a unified ecosystem for customer interactions and agent support. Here's how it enhances the experience for all stakeholders:
**For your customers**:
* Seamlessly connect with your [preferred messaging channels](#implement-messaging-platform) for a consistent brand experience.
* Benefit from intelligent automation with [**Virtual Agent**](#virtual-agent).
**For your agents**:
* Leverage the powerful [**Digital Agent Desk**](#digital-agent-desk).
* Boost productivity with built-in AI-powered tools like **AutoSummary** and **AutoCompose**.
**For your management team**:
* Gain valuable insights with [**Insights Manager**](#insights-manager)
By seamlessly blending AI capabilities with human expertise, ASAPP Messaging elevates your customer service operations to new heights of efficiency and satisfaction.
### Virtual Agent
Virtual Agent is our cutting-edge automation solution that enables:
* Intelligent intent recognition and seamless routing
* Automating common customer inquiries with natural language.
* Handling dynamic input and secure forms.
* Customizable workflows tailored to your brand's unique requirements
ASAPP Messaging is an end-to-end AI-native® messaging platform designed for digital customer service. It enhances digital adoption, maintains customer satisfaction (CSAT), and increases contact center capacity efficiently.
At its core, ASAPP Messaging uses an AI-Native design approach. AI is not just an added feature, but the foundation upon which the entire platform is built.
ASAPP Messaging leverages advanced machine learning algorithms and generative AI to provide comprehensive support for digital customer service. This holistic approach benefits agents, leaders, and customers alike, offering a seamless and intelligent messaging experience across various channels.
### Supported Channels
ASAPP Messaging supports [multiple messaging channels](/messaging-platform/integrations), including:
* [Android SDK](/messaging-platform/integrations/android-sdk "Android SDK")
* [Apple Messages for Business](/messaging-platform/integrations/apple-messages-for-business "Apple Messages for Business")
* [iOS SDK](/messaging-platform/integrations/ios-sdk "iOS SDK")
* [Voice](/messaging-platform/integrations/voice "Voice")
* [Web SDK](/messaging-platform/integrations/web-sdk "Web SDK")
* [WhatsApp Business](/messaging-platform/integrations/whatsapp-business "WhatsApp Business")
## How it works
ASAPP Messaging seamlessly integrates with your existing channels, creating a unified ecosystem for customer interactions and agent support. Here's how it enhances the experience for all stakeholders:
**For your customers**:
* Seamlessly connect with your [preferred messaging channels](#implement-messaging-platform) for a consistent brand experience.
* Benefit from intelligent automation with [**Virtual Agent**](#virtual-agent).
**For your agents**:
* Leverage the powerful [**Digital Agent Desk**](#digital-agent-desk).
* Boost productivity with built-in AI-powered tools like **AutoSummary** and **AutoCompose**.
**For your management team**:
* Gain valuable insights with [**Insights Manager**](#insights-manager)
By seamlessly blending AI capabilities with human expertise, ASAPP Messaging elevates your customer service operations to new heights of efficiency and satisfaction.
### Virtual Agent
Virtual Agent is our cutting-edge automation solution that enables:
* Intelligent intent recognition and seamless routing
* Automating common customer inquiries with natural language.
* Handling dynamic input and secure forms.
* Customizable workflows tailored to your brand's unique requirements
 ## AI tools
Digital Agent Desk capture agent conversations and actions to power Machine Learning (ML) models. These models power a number of AI tools that can be used to help agents deliver exceptional customer service.
## AI tools
Digital Agent Desk capture agent conversations and actions to power Machine Learning (ML) models. These models power a number of AI tools that can be used to help agents deliver exceptional customer service.


 ## Next Steps
1. [Main Navigation](#main-navigation)
2. [Conversation](#conversation)
3. [Agent Solutions](#agent-solutions)
## Main Navigation
## Next Steps
1. [Main Navigation](#main-navigation)
2. [Conversation](#conversation)
3. [Agent Solutions](#agent-solutions)
## Main Navigation
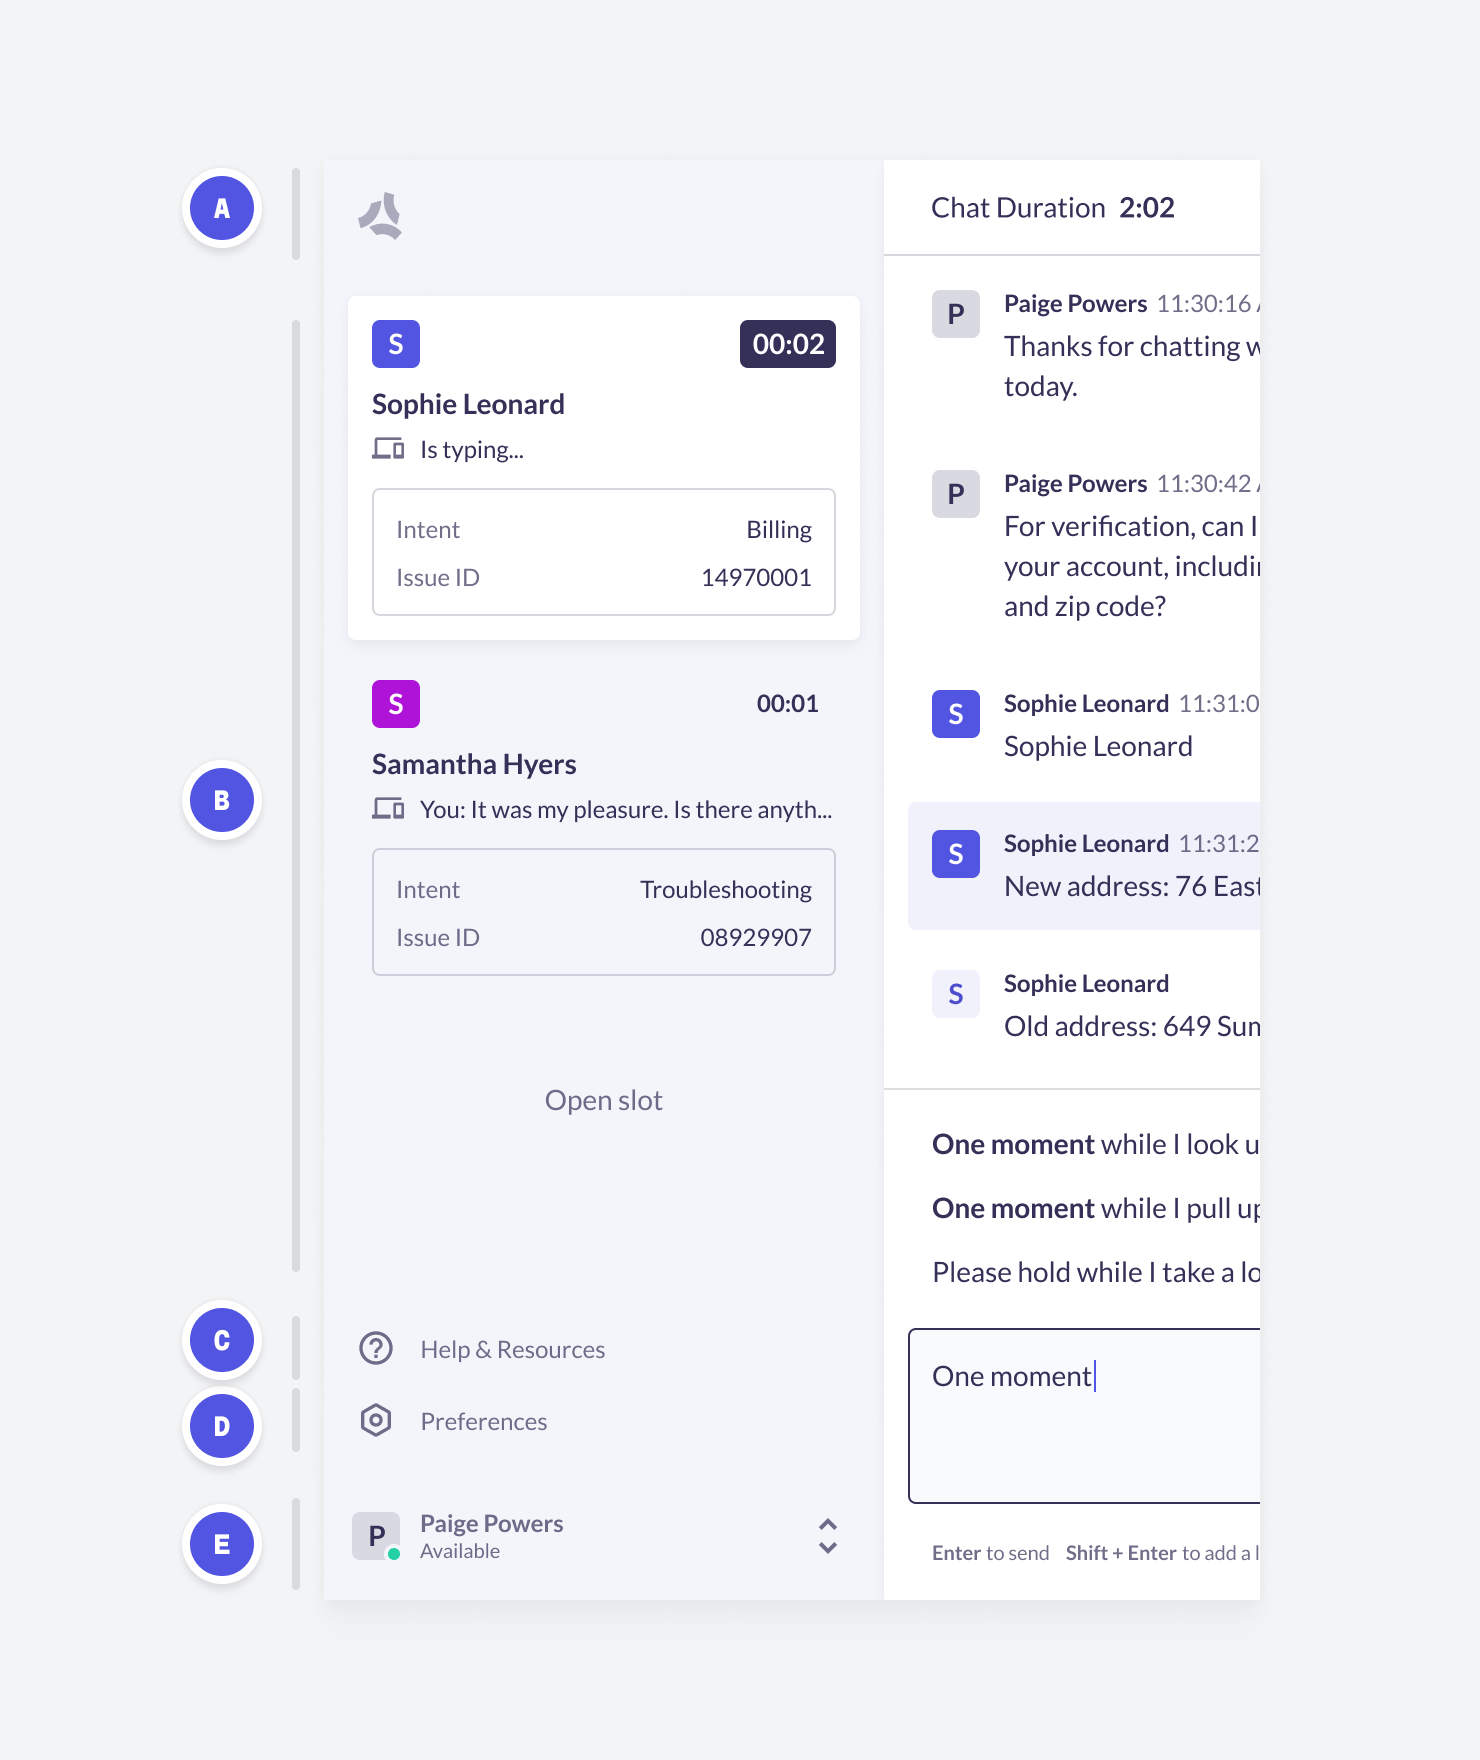 ### A. Agent Stats
| **Feature** | **Feature Overview** | **Configurability** |
| :---------- | :-------------------------------------------------------------------------------------------------------------------------------------------------------- | :------------------ |
| Agent Stats | Basic statistics related to chats handled since the agent last logged into Agent Desk (Current Session) or to all chats handled in Agent Desk (All Time). | Core |
### B. Navigation
| **Feature** | **Feature Overview** | **Configurability** |
| :--------------------- | :-------------------------------------------------------------------------------------------------------------------------------------------------------------- | :------------------ |
| Concurrency Slots | The agent can see their concurrent chats and available 'Open Slots' directly in Agent Desk. | Configurable |
| Waiting Timers | A timer will display, both if the customer is waiting and if the agent is waiting. The customer waiting time displays in larger text and with a badge around it | Core |
| Last Message Preview | Preview of the last message a customer sent in chat. | Core |
| Color Coded Chat Cards | Unique color assigned to each chat card to help distinguish chats. | Core |
| Copy Tool | Hover-over tool to easily copy entities across Agent Desk. | Core |
### C. Help & Resources
| Feature | Feature Overview | Configurability |
| :----------------- | :-------------------------------------------------------------------------------------------------------------------------------------------------------------------------------------- | :-------------- |
| Agent Feedback | Text form for agent to send feedback to ASAPP team (available by default; can be disabled if an agent has an active chat, if an agent is in an available status, or in both instances). | Configurable |
| Keyboard Shortcuts | List of Keyboard Shortcuts. **Ctrl +S** | Core |
| Patent Notice | List of Patents. | Core |
### D. Preferences
| Feature | Feature Overview | Configurability |
| :---------------- | :------------------------------------------------ | :-------------- |
| Font Size | Select the Font Size: **Small,Medium**, **Large** | Core |
| Color Temperature | Adjust the display to reduce eye strain. | Core |
### E. Status Switcher & Log Out
| **Feature** | **Feature Overview** | **Configurability** |
| :----------- | :-------------------------------------------------------------------------------------------------------------------------------------- | :------------------ |
| Agent Status | Configurable list of Agent statuses: **Active**, **After Chat Wrap-Up**, **Coaching**, **Lunch/Break**, **Team Meeting**, **Training**. | Configurable |
| Go to Admin | Opens the Admin Dashboard in another tab. | Core |
| Log Out | Logs out of Digital Agent Desk | Core |
## 2. Conversation Navigation
### A. Agent Stats
| **Feature** | **Feature Overview** | **Configurability** |
| :---------- | :-------------------------------------------------------------------------------------------------------------------------------------------------------- | :------------------ |
| Agent Stats | Basic statistics related to chats handled since the agent last logged into Agent Desk (Current Session) or to all chats handled in Agent Desk (All Time). | Core |
### B. Navigation
| **Feature** | **Feature Overview** | **Configurability** |
| :--------------------- | :-------------------------------------------------------------------------------------------------------------------------------------------------------------- | :------------------ |
| Concurrency Slots | The agent can see their concurrent chats and available 'Open Slots' directly in Agent Desk. | Configurable |
| Waiting Timers | A timer will display, both if the customer is waiting and if the agent is waiting. The customer waiting time displays in larger text and with a badge around it | Core |
| Last Message Preview | Preview of the last message a customer sent in chat. | Core |
| Color Coded Chat Cards | Unique color assigned to each chat card to help distinguish chats. | Core |
| Copy Tool | Hover-over tool to easily copy entities across Agent Desk. | Core |
### C. Help & Resources
| Feature | Feature Overview | Configurability |
| :----------------- | :-------------------------------------------------------------------------------------------------------------------------------------------------------------------------------------- | :-------------- |
| Agent Feedback | Text form for agent to send feedback to ASAPP team (available by default; can be disabled if an agent has an active chat, if an agent is in an available status, or in both instances). | Configurable |
| Keyboard Shortcuts | List of Keyboard Shortcuts. **Ctrl +S** | Core |
| Patent Notice | List of Patents. | Core |
### D. Preferences
| Feature | Feature Overview | Configurability |
| :---------------- | :------------------------------------------------ | :-------------- |
| Font Size | Select the Font Size: **Small,Medium**, **Large** | Core |
| Color Temperature | Adjust the display to reduce eye strain. | Core |
### E. Status Switcher & Log Out
| **Feature** | **Feature Overview** | **Configurability** |
| :----------- | :-------------------------------------------------------------------------------------------------------------------------------------- | :------------------ |
| Agent Status | Configurable list of Agent statuses: **Active**, **After Chat Wrap-Up**, **Coaching**, **Lunch/Break**, **Team Meeting**, **Training**. | Configurable |
| Go to Admin | Opens the Admin Dashboard in another tab. | Core |
| Log Out | Logs out of Digital Agent Desk | Core |
## 2. Conversation Navigation
 ### A. Status
| **Feature** | **Feature Overview** | **Configurability** |
| :---------------------------------------- | :--------------------------------------------------------------------------------------------------------------------------------------------------------------------------------------------------------------------------------------------- | :------------------ |
| Active/Away Status | Configurable list of 'Away' statuses (instead of binary option 'Active' / 'Away'). | Configurable |
| Auto Log Out Inactivity and After X Hours | If an agent does not move their mouse for over X hours, auto-log them out of Agent Desk.
### A. Status
| **Feature** | **Feature Overview** | **Configurability** |
| :---------------------------------------- | :--------------------------------------------------------------------------------------------------------------------------------------------------------------------------------------------------------------------------------------------- | :------------------ |
| Active/Away Status | Configurable list of 'Away' statuses (instead of binary option 'Active' / 'Away'). | Configurable |
| Auto Log Out Inactivity and After X Hours | If an agent does not move their mouse for over X hours, auto-log them out of Agent Desk.If an agent is logged in for more than X hours, even if they are active, log them out (unless they are in an active chat with a customer). | Configurable | ### B. Navigation | **Feature** | **Feature Overview** | **Configurability** | | :--------------------- | :-------------------------------------------------------------------------------------------------------------------------------------------------------------------------- | :------------------ | | Waiting Timers | A timer will display, both if the customer is waiting and if the agent is waiting.
The customer waiting time displays in larger text and with a badge around it. | Core | | Last Message Preview | Preview of the last message a customer sent in chat. | Core | | Color Coded Chat Cards | Unique color assigned to each chat card to help distinguish chats. | Core | | Copy Tool | Hover-over tool to easily copy entities across Agent Desk. | Core | ## 3. Conversation
 ### A. Conversation Header
| **Feature** | **Feature Overview** | **Configurability** |
| :------------------------------------------ | :----------------------------------------------------------------------------------------------------------------------------------------------------------------------------------------------------------------------------------------------------------------------------------------------- | :------------------ |
| Chat Duration | Indication of how long the customer has been chatting and waiting, at the top of the conversation panel. | Core |
| **Contextual Actions (From Left to Right)** | | |
| Quick Notes | Ability for an agent to type and save notes during a conversation that will save in Conversation History | Configurable |
| Secure Messaging | Ability for an agent to send an invite to customers to share sensitive information (e.g. credit card number) securely. | Configurable |
| Send to Flow | Expose **Send Flow** buttons in the center panel drop-down menu that allow an agent to send the customer back to SRS and into a particular automated flow. | Configurable |
| Autopilot Forms / Quick Send | Configurable forms and flows to send to customer and remain connected. You can configure deep links and single step flows. | Configurable |
| Co-Browsing | Ability for an agent to send an invitation to a customer to share their screen. The agent has limited capabilities (can scroll, draw, and focus, but can't click or type). | Configurable |
| **End Controls** | | |
| Autopilot Timeout (APTO) | Allows an agent to initiate an autopilot flow that checks in and eventually times out an unresponsive customer; timeout suggestions can appear after an initial conversation turn with a live agent | Configurable |
| Timeout | Ability for the agent to timeout a customer. | Core |
| Transfer | Ability for the agent to transfer a customer to another queue or individual agent. Queues are only available for transfer if business hours are open, the queue is not paused, and at least one agent in the queue is online. If needed, specific queues can be excluded from the transfer menu. | Configurable |
| End Chat | Ability for the agent to close an issue. | Core |
| Auto Transfer on Agent Disconnect | If agents disconnect from Agent Desk for over 60 seconds, ASAPP will auto transfer any currently assigned issues to another agent. | Core |
| Auto Requeue if Agent is unresponsive | When a chat is first connected to an agent, give them X seconds to send their first message. If they exceed this timer, auto-reassign the issue to the next available agent. | Configurable |
### B. Conversation
| **Feature** | **Feature Overview** | **Configurability** |
| :--------------- | :--------------------------------------------------------------------------------------------- | :------------------ |
| Chat Log | Ability to scroll through the customer's previous conversation history. | Core |
| Message Previews | Ability to see a preview of what the customer is typing before the customer sends the message. | Core |
### C. Composer
| **Feature** | **Feature Overview** | **Configurability** |
| :----------------- | :--------------------------------------------------------------------------------------------------------------------------------------------------------------------------------------------------------------------------------------- | :------------------ |
| Autosuggest | Suggested responses before the agent begins typing based on conversational context. | Core |
| Autocomplete | Suggested responses after the agent begins typing based on conversational context. | Core |
| Fluency boosting | If an agent makes a known spelling error while typing and hits the space bar, ASAPP will auto-correct the spelling mistake. The correction is indicated by a blue underline, and the agent may click on the word to undo the correction. | Core |
| Profanity handling | Generic list of phrases ASAPP disables agents from sending to customers. | Core |
## 4. Agent Solutions
### A. Conversation Header
| **Feature** | **Feature Overview** | **Configurability** |
| :------------------------------------------ | :----------------------------------------------------------------------------------------------------------------------------------------------------------------------------------------------------------------------------------------------------------------------------------------------- | :------------------ |
| Chat Duration | Indication of how long the customer has been chatting and waiting, at the top of the conversation panel. | Core |
| **Contextual Actions (From Left to Right)** | | |
| Quick Notes | Ability for an agent to type and save notes during a conversation that will save in Conversation History | Configurable |
| Secure Messaging | Ability for an agent to send an invite to customers to share sensitive information (e.g. credit card number) securely. | Configurable |
| Send to Flow | Expose **Send Flow** buttons in the center panel drop-down menu that allow an agent to send the customer back to SRS and into a particular automated flow. | Configurable |
| Autopilot Forms / Quick Send | Configurable forms and flows to send to customer and remain connected. You can configure deep links and single step flows. | Configurable |
| Co-Browsing | Ability for an agent to send an invitation to a customer to share their screen. The agent has limited capabilities (can scroll, draw, and focus, but can't click or type). | Configurable |
| **End Controls** | | |
| Autopilot Timeout (APTO) | Allows an agent to initiate an autopilot flow that checks in and eventually times out an unresponsive customer; timeout suggestions can appear after an initial conversation turn with a live agent | Configurable |
| Timeout | Ability for the agent to timeout a customer. | Core |
| Transfer | Ability for the agent to transfer a customer to another queue or individual agent. Queues are only available for transfer if business hours are open, the queue is not paused, and at least one agent in the queue is online. If needed, specific queues can be excluded from the transfer menu. | Configurable |
| End Chat | Ability for the agent to close an issue. | Core |
| Auto Transfer on Agent Disconnect | If agents disconnect from Agent Desk for over 60 seconds, ASAPP will auto transfer any currently assigned issues to another agent. | Core |
| Auto Requeue if Agent is unresponsive | When a chat is first connected to an agent, give them X seconds to send their first message. If they exceed this timer, auto-reassign the issue to the next available agent. | Configurable |
### B. Conversation
| **Feature** | **Feature Overview** | **Configurability** |
| :--------------- | :--------------------------------------------------------------------------------------------- | :------------------ |
| Chat Log | Ability to scroll through the customer's previous conversation history. | Core |
| Message Previews | Ability to see a preview of what the customer is typing before the customer sends the message. | Core |
### C. Composer
| **Feature** | **Feature Overview** | **Configurability** |
| :----------------- | :--------------------------------------------------------------------------------------------------------------------------------------------------------------------------------------------------------------------------------------- | :------------------ |
| Autosuggest | Suggested responses before the agent begins typing based on conversational context. | Core |
| Autocomplete | Suggested responses after the agent begins typing based on conversational context. | Core |
| Fluency boosting | If an agent makes a known spelling error while typing and hits the space bar, ASAPP will auto-correct the spelling mistake. The correction is indicated by a blue underline, and the agent may click on the word to undo the correction. | Core |
| Profanity handling | Generic list of phrases ASAPP disables agents from sending to customers. | Core |
## 4. Agent Solutions
 ### Customer Information
| **Feature** | **Feature Overview** | **Configurability** |
| :------------------- | :----------------------------------------------------------------------------------------------------------------------------------------------------- | :------------------ |
| Customer Profile (A) | Displays customer, company, and specific account information for authenticated customers. | Configurable |
| Customer History (B) | A separate tab that gives a quick snapshot of each current and historical interaction with the customer, including time, duration, notes, intent, etc. | Core |
| Copy Tool (C) | Hover-over tool to easily copy entities across Agent Desk. | Core |
### Knowledge Base
### Customer Information
| **Feature** | **Feature Overview** | **Configurability** |
| :------------------- | :----------------------------------------------------------------------------------------------------------------------------------------------------- | :------------------ |
| Customer Profile (A) | Displays customer, company, and specific account information for authenticated customers. | Configurable |
| Customer History (B) | A separate tab that gives a quick snapshot of each current and historical interaction with the customer, including time, duration, notes, intent, etc. | Core |
| Copy Tool (C) | Hover-over tool to easily copy entities across Agent Desk. | Core |
### Knowledge Base
 | **Feature** | **Feature Overview** | **Configurability** |
| :-------------------------------------------------------------------------- | :--------------------------------------------------------------------------------------------------------------------------------------------------------------------------- | :-------------------------------------------------------------------------------------- |
| [Knowledge Base](/messaging-platform/digital-agent-desk/knowledge-base) (A) | Agents can traverse a folder hierarchy of customer company specific content to search, add a favorite, and send content to customers. Select **Favorites** or **All Files**. | Requires you to upload and maintain Knowledge Base content via Admin or an integration. |
| List of Favorites or All Files (B) | Displays your Favorites or All Files. | Configurable |
| Knowledge Base Suggestions (C) | Suggests Knowledge Base articles to agents. | Core |
| Contextual Actions (D) | Agents can attach an article (send to a customer) or make it a favorite. | Configurable |
### Responses
| **Feature** | **Feature Overview** | **Configurability** |
| :-------------------------------------------------------------------------- | :--------------------------------------------------------------------------------------------------------------------------------------------------------------------------- | :-------------------------------------------------------------------------------------- |
| [Knowledge Base](/messaging-platform/digital-agent-desk/knowledge-base) (A) | Agents can traverse a folder hierarchy of customer company specific content to search, add a favorite, and send content to customers. Select **Favorites** or **All Files**. | Requires you to upload and maintain Knowledge Base content via Admin or an integration. |
| List of Favorites or All Files (B) | Displays your Favorites or All Files. | Configurable |
| Knowledge Base Suggestions (C) | Suggests Knowledge Base articles to agents. | Core |
| Contextual Actions (D) | Agents can attach an article (send to a customer) or make it a favorite. | Configurable |
### Responses

Feature |
Feature Overview |
Configurability |
Custom Responses (A) |
Agents can create, edit, search, and view custom responses in Agent Desk. Agent Desk uses these custom responses in Auto Suggest. Click + to create new custom responses. To edit, hover over a response and select Edit. Click the Search icon to search custom responses. If an agent sends something that isn't in their custom library or the global whitelist, ASAPP recommends it back to them from a growing list of their favorites. |
Core |
|
Global Responses (A) |
Agents can search, view, and click-to-insert responses from the global whitelist. Click the Search icon to search the global responses. |
Core |
Navigate Folders (B) |
In both the custom and global response libraries, agents can navigate into and out of folders. |
Core |
Uncategorized Custom Responses (C) |
Single custom responses that you add but do not categorize into a specific folder display here. |
Core |
Click-to-Insert (D) |
In both the custom and global response libraries, agents can hover over a response and click Insert to insert the full text of the selected response into the typing field. |
Core |
Chat Takeover |
Managers can takeover an agent's chat. |
Core |
Receive attachments |
End customers can send pdf attachments to agents in order to provide more information about their case. |
Core |
 ### Wrap-Up
 | **Feature** | **Feature Overview** | **Configurability** |
| :----------------------- | :---------------------------------------------------------------- | :------------------ |
| Chat Notes (A) | Agents can leave notes during a chat and at the end of a chat. | Core |
| End Chat Disposition (C) | Ask the customer if the initial intent was correct. | Core |
| End Chat Resolution (D) | Agents can indicate if an issue is resolved or not while closing. | Core |
# Agent SSO
Source: https://docs.asapp.com/messaging-platform/digital-agent-desk/agent-sso
Learn how to use Single Sign-On (SSO) to authenticate agents and admin users to the Digital Agent Desk.
ASAPP recommends for our customers to use SSO to authenticate agents and admin users to our applications.
In this scenario:
1. ASAPP is the Service Provider (SP) with the customer acting as the Identity Provider (IDP).
2. The customer's authentication system performs user authentication using their existing customer credentials.
3. ASAPP supports Service Provider Initiated SSO. Customers will provide the SSO URL to the agents and admins.
4. The URL points to the customer's SSO service, which will authenticate the users via their authentication system.
5. Once the user is authenticated, the customer's SSO service will send a SAML assertion, which includes some user information to ASAPP's SSO service.
6. ASAPP uses the information inside the SAML assertion to identify the user and redirect them to the appropriate application.
The diagram below illustrates the IDP-initiated SSO flow.
| **Feature** | **Feature Overview** | **Configurability** |
| :----------------------- | :---------------------------------------------------------------- | :------------------ |
| Chat Notes (A) | Agents can leave notes during a chat and at the end of a chat. | Core |
| End Chat Disposition (C) | Ask the customer if the initial intent was correct. | Core |
| End Chat Resolution (D) | Agents can indicate if an issue is resolved or not while closing. | Core |
# Agent SSO
Source: https://docs.asapp.com/messaging-platform/digital-agent-desk/agent-sso
Learn how to use Single Sign-On (SSO) to authenticate agents and admin users to the Digital Agent Desk.
ASAPP recommends for our customers to use SSO to authenticate agents and admin users to our applications.
In this scenario:
1. ASAPP is the Service Provider (SP) with the customer acting as the Identity Provider (IDP).
2. The customer's authentication system performs user authentication using their existing customer credentials.
3. ASAPP supports Service Provider Initiated SSO. Customers will provide the SSO URL to the agents and admins.
4. The URL points to the customer's SSO service, which will authenticate the users via their authentication system.
5. Once the user is authenticated, the customer's SSO service will send a SAML assertion, which includes some user information to ASAPP's SSO service.
6. ASAPP uses the information inside the SAML assertion to identify the user and redirect them to the appropriate application.
The diagram below illustrates the IDP-initiated SSO flow.
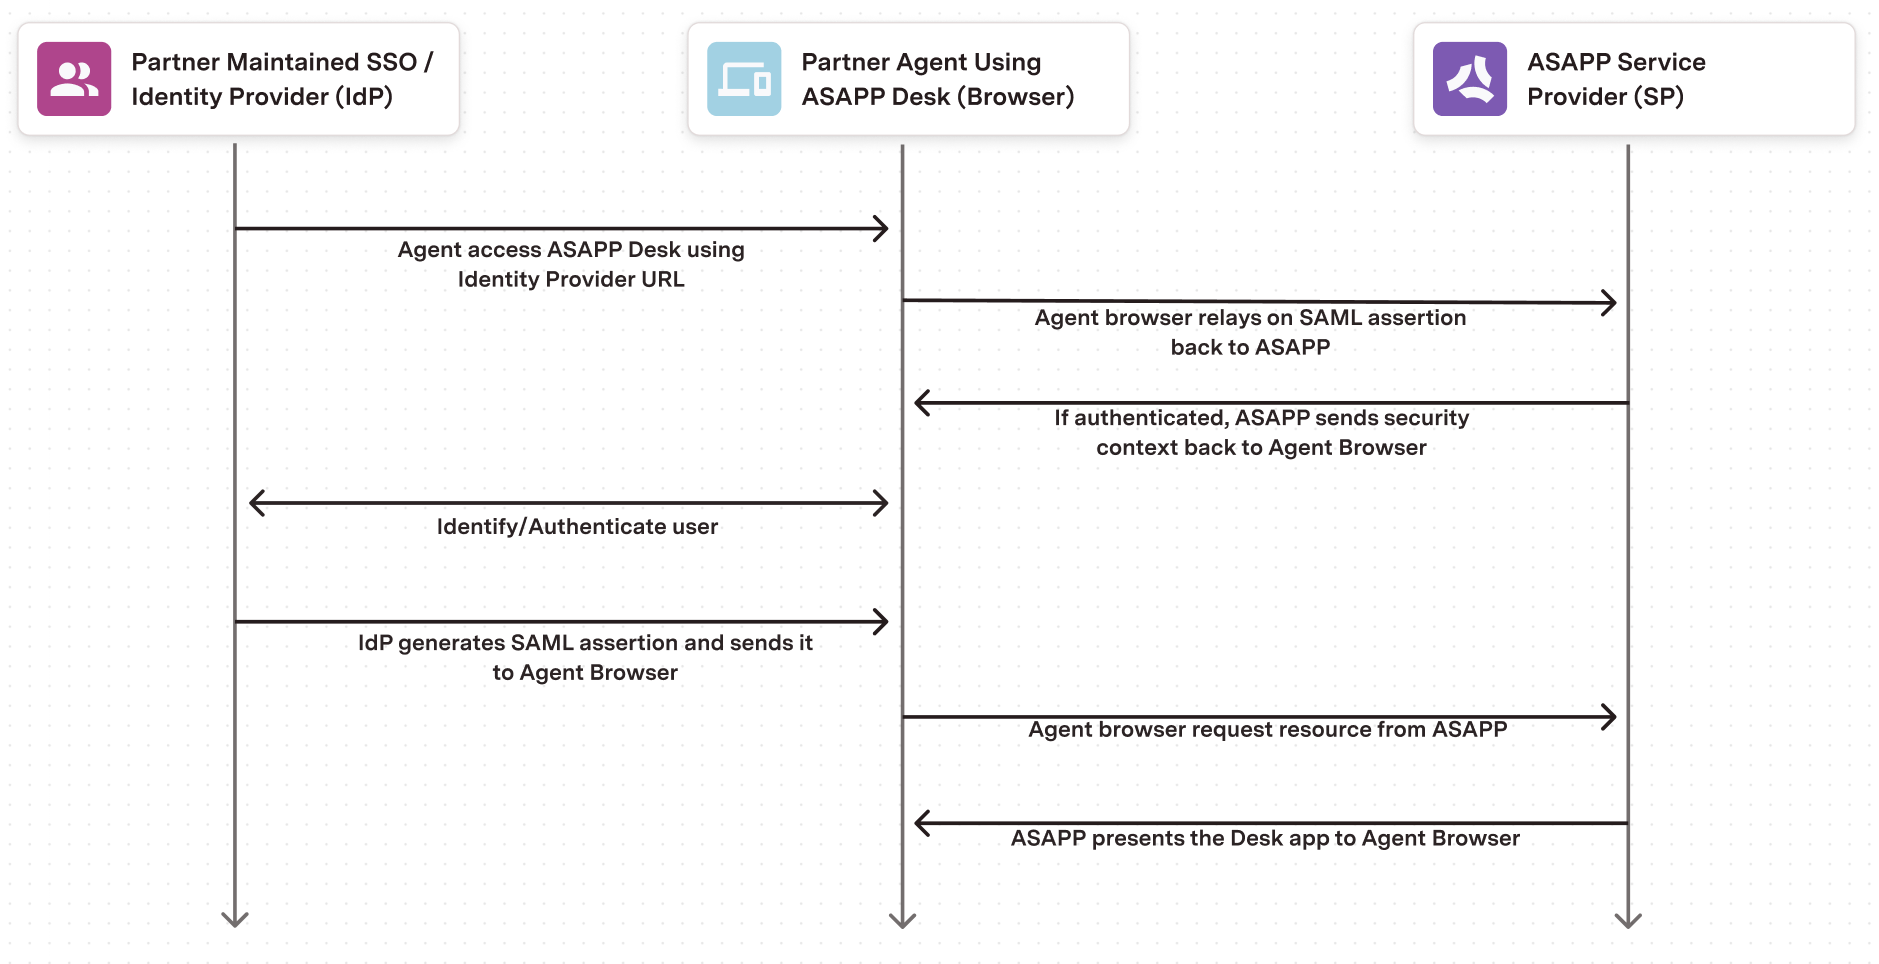 ## Configuring Single Sign-On via SAML
### Environments
ASAPP supports SSO in non-production and production environments. It is strongly recommended that customers configure SSO in both environments as well.
### Exchange of SAML metadata
Both ASAPP and the customer generate their respective SAML metadata and send the metadata files to one another. The metadata will be different for each environment, therefore they need to be generated once per environment.
Sample metadata file content:
```json
## Configuring Single Sign-On via SAML
### Environments
ASAPP supports SSO in non-production and production environments. It is strongly recommended that customers configure SSO in both environments as well.
### Exchange of SAML metadata
Both ASAPP and the customer generate their respective SAML metadata and send the metadata files to one another. The metadata will be different for each environment, therefore they need to be generated once per environment.
Sample metadata file content:
```json
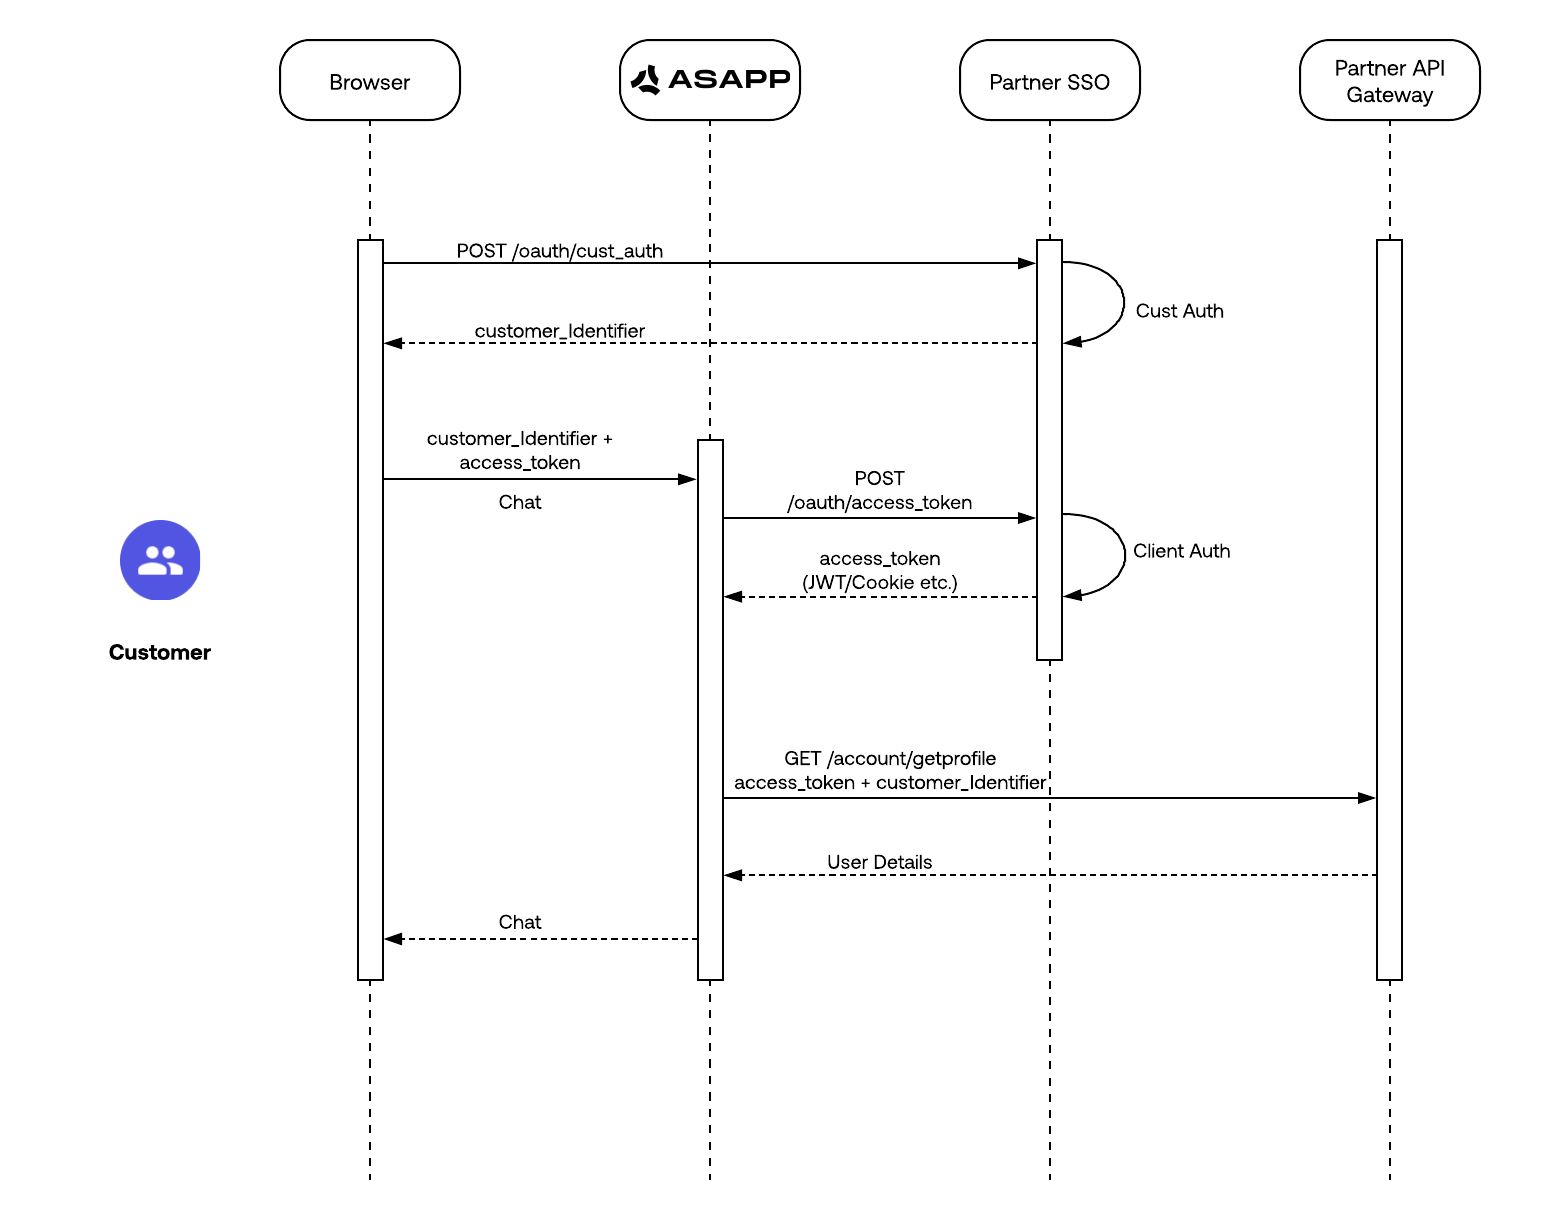 # Attributes Based Routing
Source: https://docs.asapp.com/messaging-platform/digital-agent-desk/attributes-based-routing
Learn how to use Attributes Based Routing (ABR) to route chats to the appropriate Agent Queue.
Attributes Based Routing (ABR) is a rules-based system to determine which Agent Queue an incoming chat should be assigned to.
ASAPP invokes ABR by default after our Machine Learning model classifies a customer's utterances to an Intent and determines that the Intent cannot be serviced by an automated flow.
## Attributes of ABR
Attributes can be any piece of information that customers can pass to ASAPP using the integrated SDKs.
ASAPP natively defines the standard attributes below:
* Intent - This is a code determined by running customer utterances through various different ML models.
Ex: ACCTINFO, BILLING
* Web URL - This is the webpage that invoked the SDK. You can use any part of the URL as a value to route on.
Ex: [www.customer.com/consumer/support](http://www.customer.com/consumer/support), [www.customer.com/business/sales](http://www.customer.com/business/sales)
* Channel - This is the channel the chat originated from.
Ex: Web, iOS
The ASAPP SDK defines additional parameters, which can also be used in ABR. You can define these parameters as part of the ContextProvider.
* Company Subdivision
Ex: divisionId1, subDivisionId2
* Segments
Ex: NorthEast, USA, EMEA
You can also define custom customer specific attributes to be used in routing. Customer Information allows definition of any number of attributes as key-value pairs, which can be set per chat and be used for routing to specific agent queues. Please refer to the Customer Information section for more details on how to define custom attributes.
## Configuration
ABR is capable of using any or all of the above attributes to determine which queue to route a chat. The configuration is extremely flexible and can accommodate various complex rules including regular expression matches, as well as multi value matches.
Contact your Implementation Manager to model the routing rules.
## Template for Submitting Rules
Customers can create an Excel document with a sheet for each attribute they would like to define. The sheet name should be the name of the attribute and have two columns, one defining all the possible attribute values and the other column containing the name of the queue to be routed to.
If you are going to use multiple attributes in any different combinations, then you should define these conditions in a separate sheet, dedicating a row for every unique combination.
ASAPP will assume that Excel attribute names that do not follow the ASAPP standard are custom defined and passed in 'Customer Information'.
See the [User Management](/messaging-platform/digital-agent-desk/user-management) section for more information.
## Queue Management
You can define Queues based on business or technical needs. You can define any number of queues and can follow any desired naming convention. You can apply Business Hours to queues individually. For more information on other features and functionality, please contact your Implementation Manager.
You can assign Agents to one or more queues based on skills and/or requirements. Please refer to [User Management](/messaging-platform/digital-agent-desk/user-management) for more details.
# Knowledge Base
Source: https://docs.asapp.com/messaging-platform/digital-agent-desk/knowledge-base
Learn how to integrate your Knowledge Base with the Digital Agent Desk.
Knowledge Base (KB) is a technology used to store structured and unstructured information useful for Agents to reference while servicing Customer enquiries.
You can integrate KB data into ASAPP Desk by manually uploading articles in an offline process or by integrating with a digital system which exposes the content via REST APIs.
Knowledge Base helps Agents access information without the Agent needing to navigate any external systems by surfacing KB content directly within Agent Desk's Right Hand Panel view.
This helps lower the Average Handle Time and increases Concurrency. KB also learns from Agent interactions and suggests articles and helps in Agent Augmentation.
# Attributes Based Routing
Source: https://docs.asapp.com/messaging-platform/digital-agent-desk/attributes-based-routing
Learn how to use Attributes Based Routing (ABR) to route chats to the appropriate Agent Queue.
Attributes Based Routing (ABR) is a rules-based system to determine which Agent Queue an incoming chat should be assigned to.
ASAPP invokes ABR by default after our Machine Learning model classifies a customer's utterances to an Intent and determines that the Intent cannot be serviced by an automated flow.
## Attributes of ABR
Attributes can be any piece of information that customers can pass to ASAPP using the integrated SDKs.
ASAPP natively defines the standard attributes below:
* Intent - This is a code determined by running customer utterances through various different ML models.
Ex: ACCTINFO, BILLING
* Web URL - This is the webpage that invoked the SDK. You can use any part of the URL as a value to route on.
Ex: [www.customer.com/consumer/support](http://www.customer.com/consumer/support), [www.customer.com/business/sales](http://www.customer.com/business/sales)
* Channel - This is the channel the chat originated from.
Ex: Web, iOS
The ASAPP SDK defines additional parameters, which can also be used in ABR. You can define these parameters as part of the ContextProvider.
* Company Subdivision
Ex: divisionId1, subDivisionId2
* Segments
Ex: NorthEast, USA, EMEA
You can also define custom customer specific attributes to be used in routing. Customer Information allows definition of any number of attributes as key-value pairs, which can be set per chat and be used for routing to specific agent queues. Please refer to the Customer Information section for more details on how to define custom attributes.
## Configuration
ABR is capable of using any or all of the above attributes to determine which queue to route a chat. The configuration is extremely flexible and can accommodate various complex rules including regular expression matches, as well as multi value matches.
Contact your Implementation Manager to model the routing rules.
## Template for Submitting Rules
Customers can create an Excel document with a sheet for each attribute they would like to define. The sheet name should be the name of the attribute and have two columns, one defining all the possible attribute values and the other column containing the name of the queue to be routed to.
If you are going to use multiple attributes in any different combinations, then you should define these conditions in a separate sheet, dedicating a row for every unique combination.
ASAPP will assume that Excel attribute names that do not follow the ASAPP standard are custom defined and passed in 'Customer Information'.
See the [User Management](/messaging-platform/digital-agent-desk/user-management) section for more information.
## Queue Management
You can define Queues based on business or technical needs. You can define any number of queues and can follow any desired naming convention. You can apply Business Hours to queues individually. For more information on other features and functionality, please contact your Implementation Manager.
You can assign Agents to one or more queues based on skills and/or requirements. Please refer to [User Management](/messaging-platform/digital-agent-desk/user-management) for more details.
# Knowledge Base
Source: https://docs.asapp.com/messaging-platform/digital-agent-desk/knowledge-base
Learn how to integrate your Knowledge Base with the Digital Agent Desk.
Knowledge Base (KB) is a technology used to store structured and unstructured information useful for Agents to reference while servicing Customer enquiries.
You can integrate KB data into ASAPP Desk by manually uploading articles in an offline process or by integrating with a digital system which exposes the content via REST APIs.
Knowledge Base helps Agents access information without the Agent needing to navigate any external systems by surfacing KB content directly within Agent Desk's Right Hand Panel view.
This helps lower the Average Handle Time and increases Concurrency. KB also learns from Agent interactions and suggests articles and helps in Agent Augmentation.
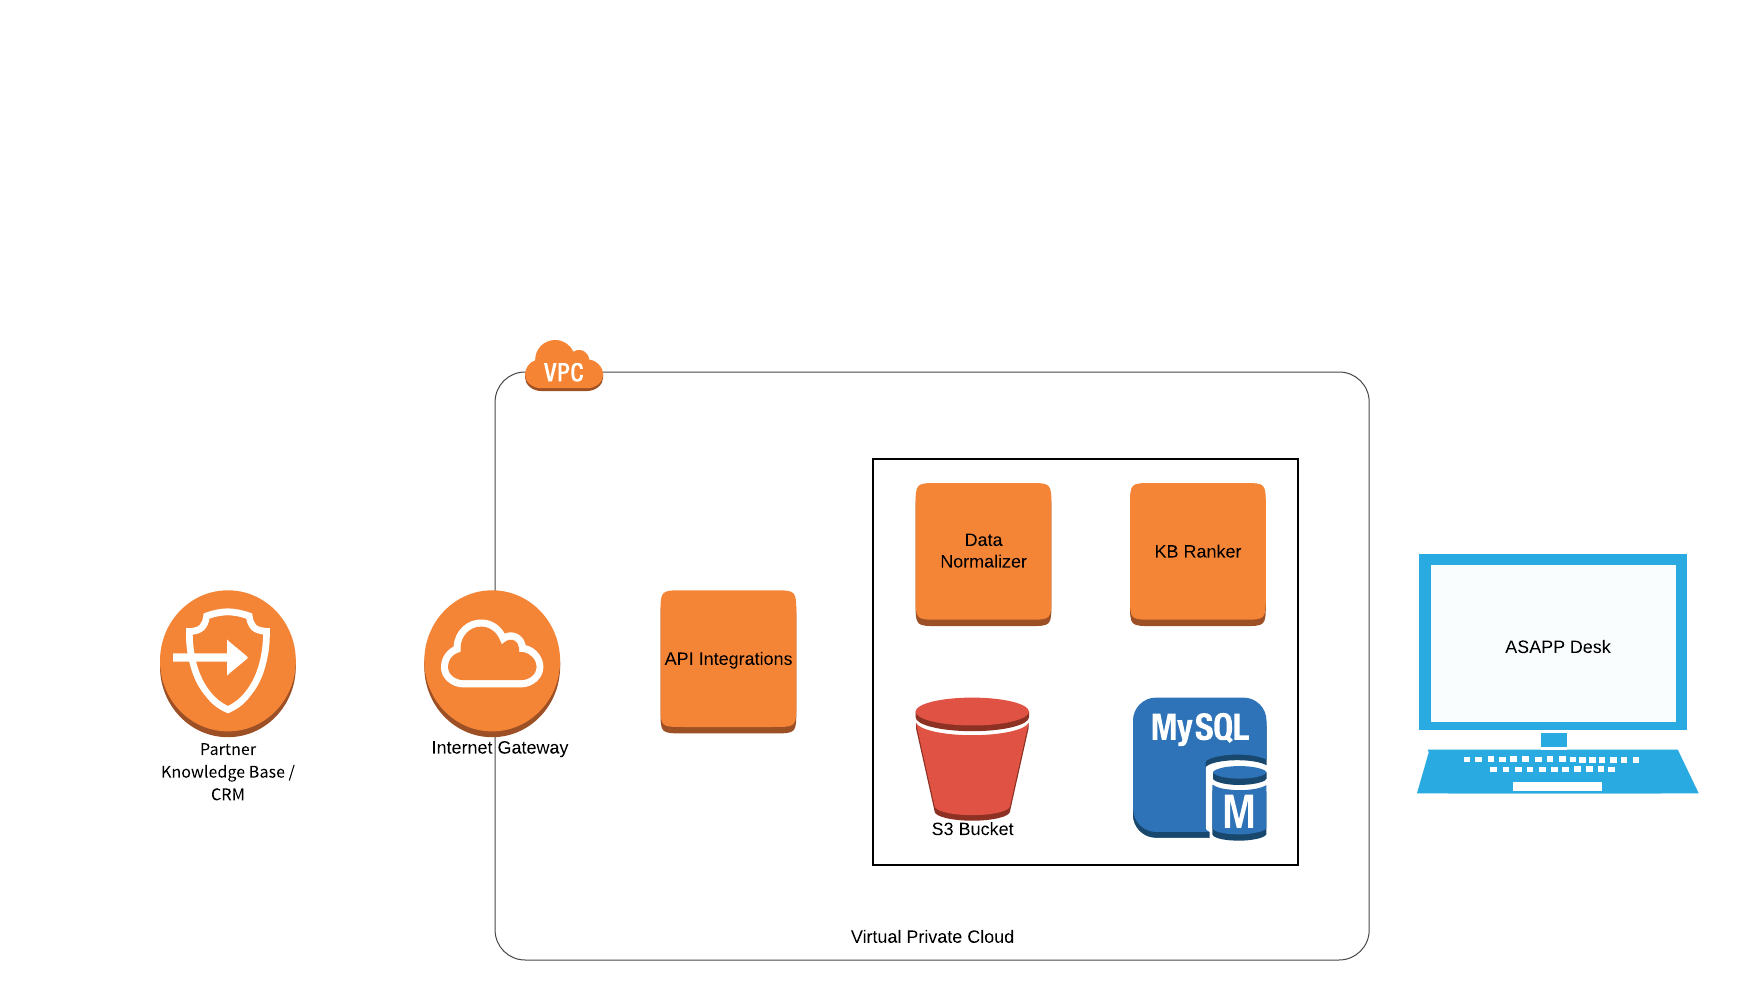 ## Integration
ASAPP can integrate with customer Knowledge Base systems or CRMs to pull data and make it available to Agent Desk. This is accomplished by a dedicated service, which can consume data from external systems that support standard REST APIs. The service layer is flexible enough to integrate with various industry standard Knowledge Base systems as well as in-house developed proprietary ones. The service programmatically retrieves new and updated articles on a regular basis to surface fresh and accurate content to agents in real-time.
Data pulled from external systems is transformed into ASAPP's standard format, and securely stored in S3 and in a database. Refer to the [Data Storage](#data-storage) section below for more details.
### Configuration
The service that integrates with customers is configuration driven so it can interface with different systems supporting different data formats/structures.
ASAPP requires the following information to integrate with APIs:
* REST endpoints and API definitions, data schemas and SLAs
* URLs, Connection info, and Test Accounts for each environment
* Authentication and Authorization requirements
* JSON schema defining requests and responses, preferably Swagger
* API Host that can handle HTTPS/TLS traffic
* Resource
* HTTP Method(s) supported
* Content Type(s) supported and other Request Headers
* Error handling documentation
* Response sizes to expect
* API Call Rate limits, if any
* Response time SLAs
* API Response Requirements
* Every 'article' should contain at least a unique identifier and last updated date timestamp.
* Hierarchical data needs to clearly define the parent-child relationships
* Content should not contain any PII/PCI related information
* Refreshing Data
* On a set cadence as determined and agreed upon by both parties
* Size of data to help in capacity planning and scaling
## Data Storage
Once the service receives KB content, it stores the data in a secure S3 bucket that serves as the source of truth for all Knowledge Base articles. It then structures and packages the data into standard Knowledge Base types: Category, Folder and Article. The service then cleans, processes, and stores the packaged data in a database for further usage.
## Data Processing
ASAPP runs all the Knowledge Base articles stored in the database through a Knowledge Base Ranker service, which ranks articles and feeds Agent Augmentation. Given a set of user utterances, KB Ranker service assigns a score to every article of the Knowledge Base based on how relevant those articles are for that agent at that moment in the conversation. ASAPP determines relevance by taking into account the frequency of words in an article within the corpus of articles, and words of a given subset of utterances.
## Data Refresh
ASAPP can refresh data periodically and schedule it to meet customer needs. ASAPP uses a Unix cron style scheduler to run the refresh job, which allows flexible configuration.
Data Refresh replaces all of the current folders/articles with the new ones received.The refresh does not affect the ranking of articles, as their state is maintained separately.
# User Management
Source: https://docs.asapp.com/messaging-platform/digital-agent-desk/user-management
Learn how to manage users and roles in the Digital Agent Desk.
You control the User Management (Roles and Permissions) within the Digital Agent Desk.
These roles dictate if a user can authenticate to *Agent Desk*, *Admin Dashboard*, or both. In addition, roles determine what view and data users see in the Admin Dashboard. You can pass User Data to ASAPP via *SSO*, AD/LDAP, or other approved integration.
## Integration
ASAPP can integrate with customer Knowledge Base systems or CRMs to pull data and make it available to Agent Desk. This is accomplished by a dedicated service, which can consume data from external systems that support standard REST APIs. The service layer is flexible enough to integrate with various industry standard Knowledge Base systems as well as in-house developed proprietary ones. The service programmatically retrieves new and updated articles on a regular basis to surface fresh and accurate content to agents in real-time.
Data pulled from external systems is transformed into ASAPP's standard format, and securely stored in S3 and in a database. Refer to the [Data Storage](#data-storage) section below for more details.
### Configuration
The service that integrates with customers is configuration driven so it can interface with different systems supporting different data formats/structures.
ASAPP requires the following information to integrate with APIs:
* REST endpoints and API definitions, data schemas and SLAs
* URLs, Connection info, and Test Accounts for each environment
* Authentication and Authorization requirements
* JSON schema defining requests and responses, preferably Swagger
* API Host that can handle HTTPS/TLS traffic
* Resource
* HTTP Method(s) supported
* Content Type(s) supported and other Request Headers
* Error handling documentation
* Response sizes to expect
* API Call Rate limits, if any
* Response time SLAs
* API Response Requirements
* Every 'article' should contain at least a unique identifier and last updated date timestamp.
* Hierarchical data needs to clearly define the parent-child relationships
* Content should not contain any PII/PCI related information
* Refreshing Data
* On a set cadence as determined and agreed upon by both parties
* Size of data to help in capacity planning and scaling
## Data Storage
Once the service receives KB content, it stores the data in a secure S3 bucket that serves as the source of truth for all Knowledge Base articles. It then structures and packages the data into standard Knowledge Base types: Category, Folder and Article. The service then cleans, processes, and stores the packaged data in a database for further usage.
## Data Processing
ASAPP runs all the Knowledge Base articles stored in the database through a Knowledge Base Ranker service, which ranks articles and feeds Agent Augmentation. Given a set of user utterances, KB Ranker service assigns a score to every article of the Knowledge Base based on how relevant those articles are for that agent at that moment in the conversation. ASAPP determines relevance by taking into account the frequency of words in an article within the corpus of articles, and words of a given subset of utterances.
## Data Refresh
ASAPP can refresh data periodically and schedule it to meet customer needs. ASAPP uses a Unix cron style scheduler to run the refresh job, which allows flexible configuration.
Data Refresh replaces all of the current folders/articles with the new ones received.The refresh does not affect the ranking of articles, as their state is maintained separately.
# User Management
Source: https://docs.asapp.com/messaging-platform/digital-agent-desk/user-management
Learn how to manage users and roles in the Digital Agent Desk.
You control the User Management (Roles and Permissions) within the Digital Agent Desk.
These roles dictate if a user can authenticate to *Agent Desk*, *Admin Dashboard*, or both. In addition, roles determine what view and data users see in the Admin Dashboard. You can pass User Data to ASAPP via *SSO*, AD/LDAP, or other approved integration.
 This section describes the following:
* [Process Overview](#process-overview)
* [Resource Overview](#resource-overview)
* [Definitions](#definitions "Definitions")
## Process Overview
This is a high-level overview of the User Management setup process.
1. ASAPP demos the Desk/Admin Interface.
2. Call with ASAPP to confirm the access and permission requirements. ASAPP and you complete a Configuration spreadsheet defining all the Roles & Permissions.
3. ASAPP sends you a copy of the Configuration spreadsheet for review and approval. ASAPP will make additional changes if needed and send to you for approval.
4. ASAPP implements and tests the configuration.
5. ASAPP trains you to set up and modify User Management.
6. ASAPP goes live with your new Customer Interaction system.
## Resource Overview
The following table lists and defines all resources:
This section describes the following:
* [Process Overview](#process-overview)
* [Resource Overview](#resource-overview)
* [Definitions](#definitions "Definitions")
## Process Overview
This is a high-level overview of the User Management setup process.
1. ASAPP demos the Desk/Admin Interface.
2. Call with ASAPP to confirm the access and permission requirements. ASAPP and you complete a Configuration spreadsheet defining all the Roles & Permissions.
3. ASAPP sends you a copy of the Configuration spreadsheet for review and approval. ASAPP will make additional changes if needed and send to you for approval.
4. ASAPP implements and tests the configuration.
5. ASAPP trains you to set up and modify User Management.
6. ASAPP goes live with your new Customer Interaction system.
## Resource Overview
The following table lists and defines all resources:
Feature |
Overview |
Resource |
Definition |
|---|---|---|---|
Agent Desk |
The App where Agents communicate with customers. |
Authorization |
Allows you to successfully authenticate via Single Sign-On (SSO) into the ASAPP Agent Desk. |
Go to Desk |
Allows you to click Go to Desk from the Nav to open Agent Desk in a new tab. Requires Agent Desk access. |
||
Default Concurrency |
The default value for the maximum number of chats a newly added agent can handle at the same time. |
Default Concurrency |
Sets the default concurrency of all new users with access to Agent Desk if no concurrency was set via the ingest method. |
Admin Dashboard |
The App where you can monitor agent activity in real-time, view agent metrics, and take operational actions (e.g. biz hours adjustments) |
Authorization |
Allows you to successfully authenticate via SSO into the ASAPP Admin Dashboard. |
Live Insights |
Dashboard in Admin that displays how each of your queues are performing in real-time. You can drill down into each queue to gain insight into what areas need attention. |
Access |
Allows you to see Live Insights in the Admin navigation and access it. |
Data Security |
Limits the agent-level data that certain users can see in Live Insights. If a user is not allowed to see data for any agents who belong to a given queue, that queue will not be visible to that user in Live Insights. |
||
Historical Reporting |
Dashboard in Admin where you can find data and insights from customer experience and automation all the way to agent performance and workforce management. |
Power Analyst Access |
Allows you to see the Historical Reporting page in the Admin Navigation with Power Analyst access type, which entails the following:
|
Creator Access |
Allows you to see the Historical Reporting page in the Admin Navigation with Creator access type, which entails the following:
|
||
Reporting Groups |
Out-of-the-box groups are:
If a client has data security enabled for Historical Reporting, policies need to be written to add users to the following 3 groups:
If you have any Creator users, you may want custom groups created. This can be achieved by writing a policy to create reporting groups based on a specific user attribute (i.e. I need reporting groups per queue, where queue is the attribute). |
||
Data Security |
Limits the agent-level data that certain users can see in Historical Reporting. If anyone has these policies, then the Core, Contact Center, and All Reports groups should be enabled. |
||
Business Hours |
Allows Admin users to set their business hours of operation and holidays on a per queue basis. |
Access |
Allows you to see Business Hours in the Admin navigation, access it, and make changes. |
Triggers |
An ASAPP feature that allows you to specify which pages display the ASAPP Chat UI. You can show the ASAPP Chat UI on all pages with the ASAPP Chat SDK embedded and loaded, or on just a subset of those pages. |
Access |
Allows you to see Triggers in the Admin navigation, access it, and make changes. |
Knowledge Base |
An ASAPP feature that helps Agents access information without the needing to navigate any external systems by surfacing KB content directly within Agent Desk. |
Access |
Allows you to see Knowledge Base content in the Admin navigation, access it, and make changes. |
Conversation Manager |
Admin Feature where you can monitor current conversations individually in the Conversation Manager. The Conversation Manager shows all current, queued, and historical conversations handled by SRS, bot, or by a live agent. |
Access |
Allows you to see Conversation Manager in the Admin navigation and access it. |
Conversation Download |
Allows you to select 1 or more conversations in Conversation Manager to export to either an HTML or CSV file. |
||
Whisper |
Allows you to send an inline, private message to an agent within a currently live chat, selected from the Conversation Manager. |
||
SRS Issues |
Allows you to see conversations only handled by SRS in the Conversation Manager. |
||
Data Security |
Limits the agent-assisted conversations that certain users can see at the agent-level in the Conversation Manager. |
||
User Management |
Admin Feature to edit user roles and permissions. |
Access |
Allows you to see User Management in their Admin navigation, access it, and make changes to queue membership, status, and concurrency per user. |
Editable Roles |
Allows you to change the role(s) of a user in User Management. |
||
Editable Custom Attributes |
Allows you to change the value of a custom user attribute per user in User Management. If Off, then these custom attributes will be read-only in the list of users. |
||
Data Security |
Limits the users that certain users can see or edit in User Management. |
Role |
Definition |
|---|---|
Resource |
The ASAPP functionality that you can permission in a certain way. ASAPP determines Resources when features are built. |
Action |
Describes the possible privileges a user can have on a given resource. (i.e. View Only vs. Edit) |
Permission |
Action + Resource. ex. "can view Live Insights" |
Target |
The user or a set of users who are given a permission. |
User Attribute |
A describing attribute for a client user. User Attributes are either sent to ASAPP via accepted method by the client, or ASAPP Native. |
ASAPP Native User Attribute |
A user attribute that exists within the ASAPP platform without the client needing to send it. Currently:
|
Custom User Attribute |
An attribute specific to the client's organization that is sent to ASAPP. |
Clarifier |
An additional and optional layer of restriction in a policy. Must be defined by a user attribute that already exists in the system. |
Policy |
An individual rule that assigns a permission to a user or set of users. The structure is generally: Target + Permission (opt. + Clarifier) = Target + Action + Resource (opt. + Clarifier) |
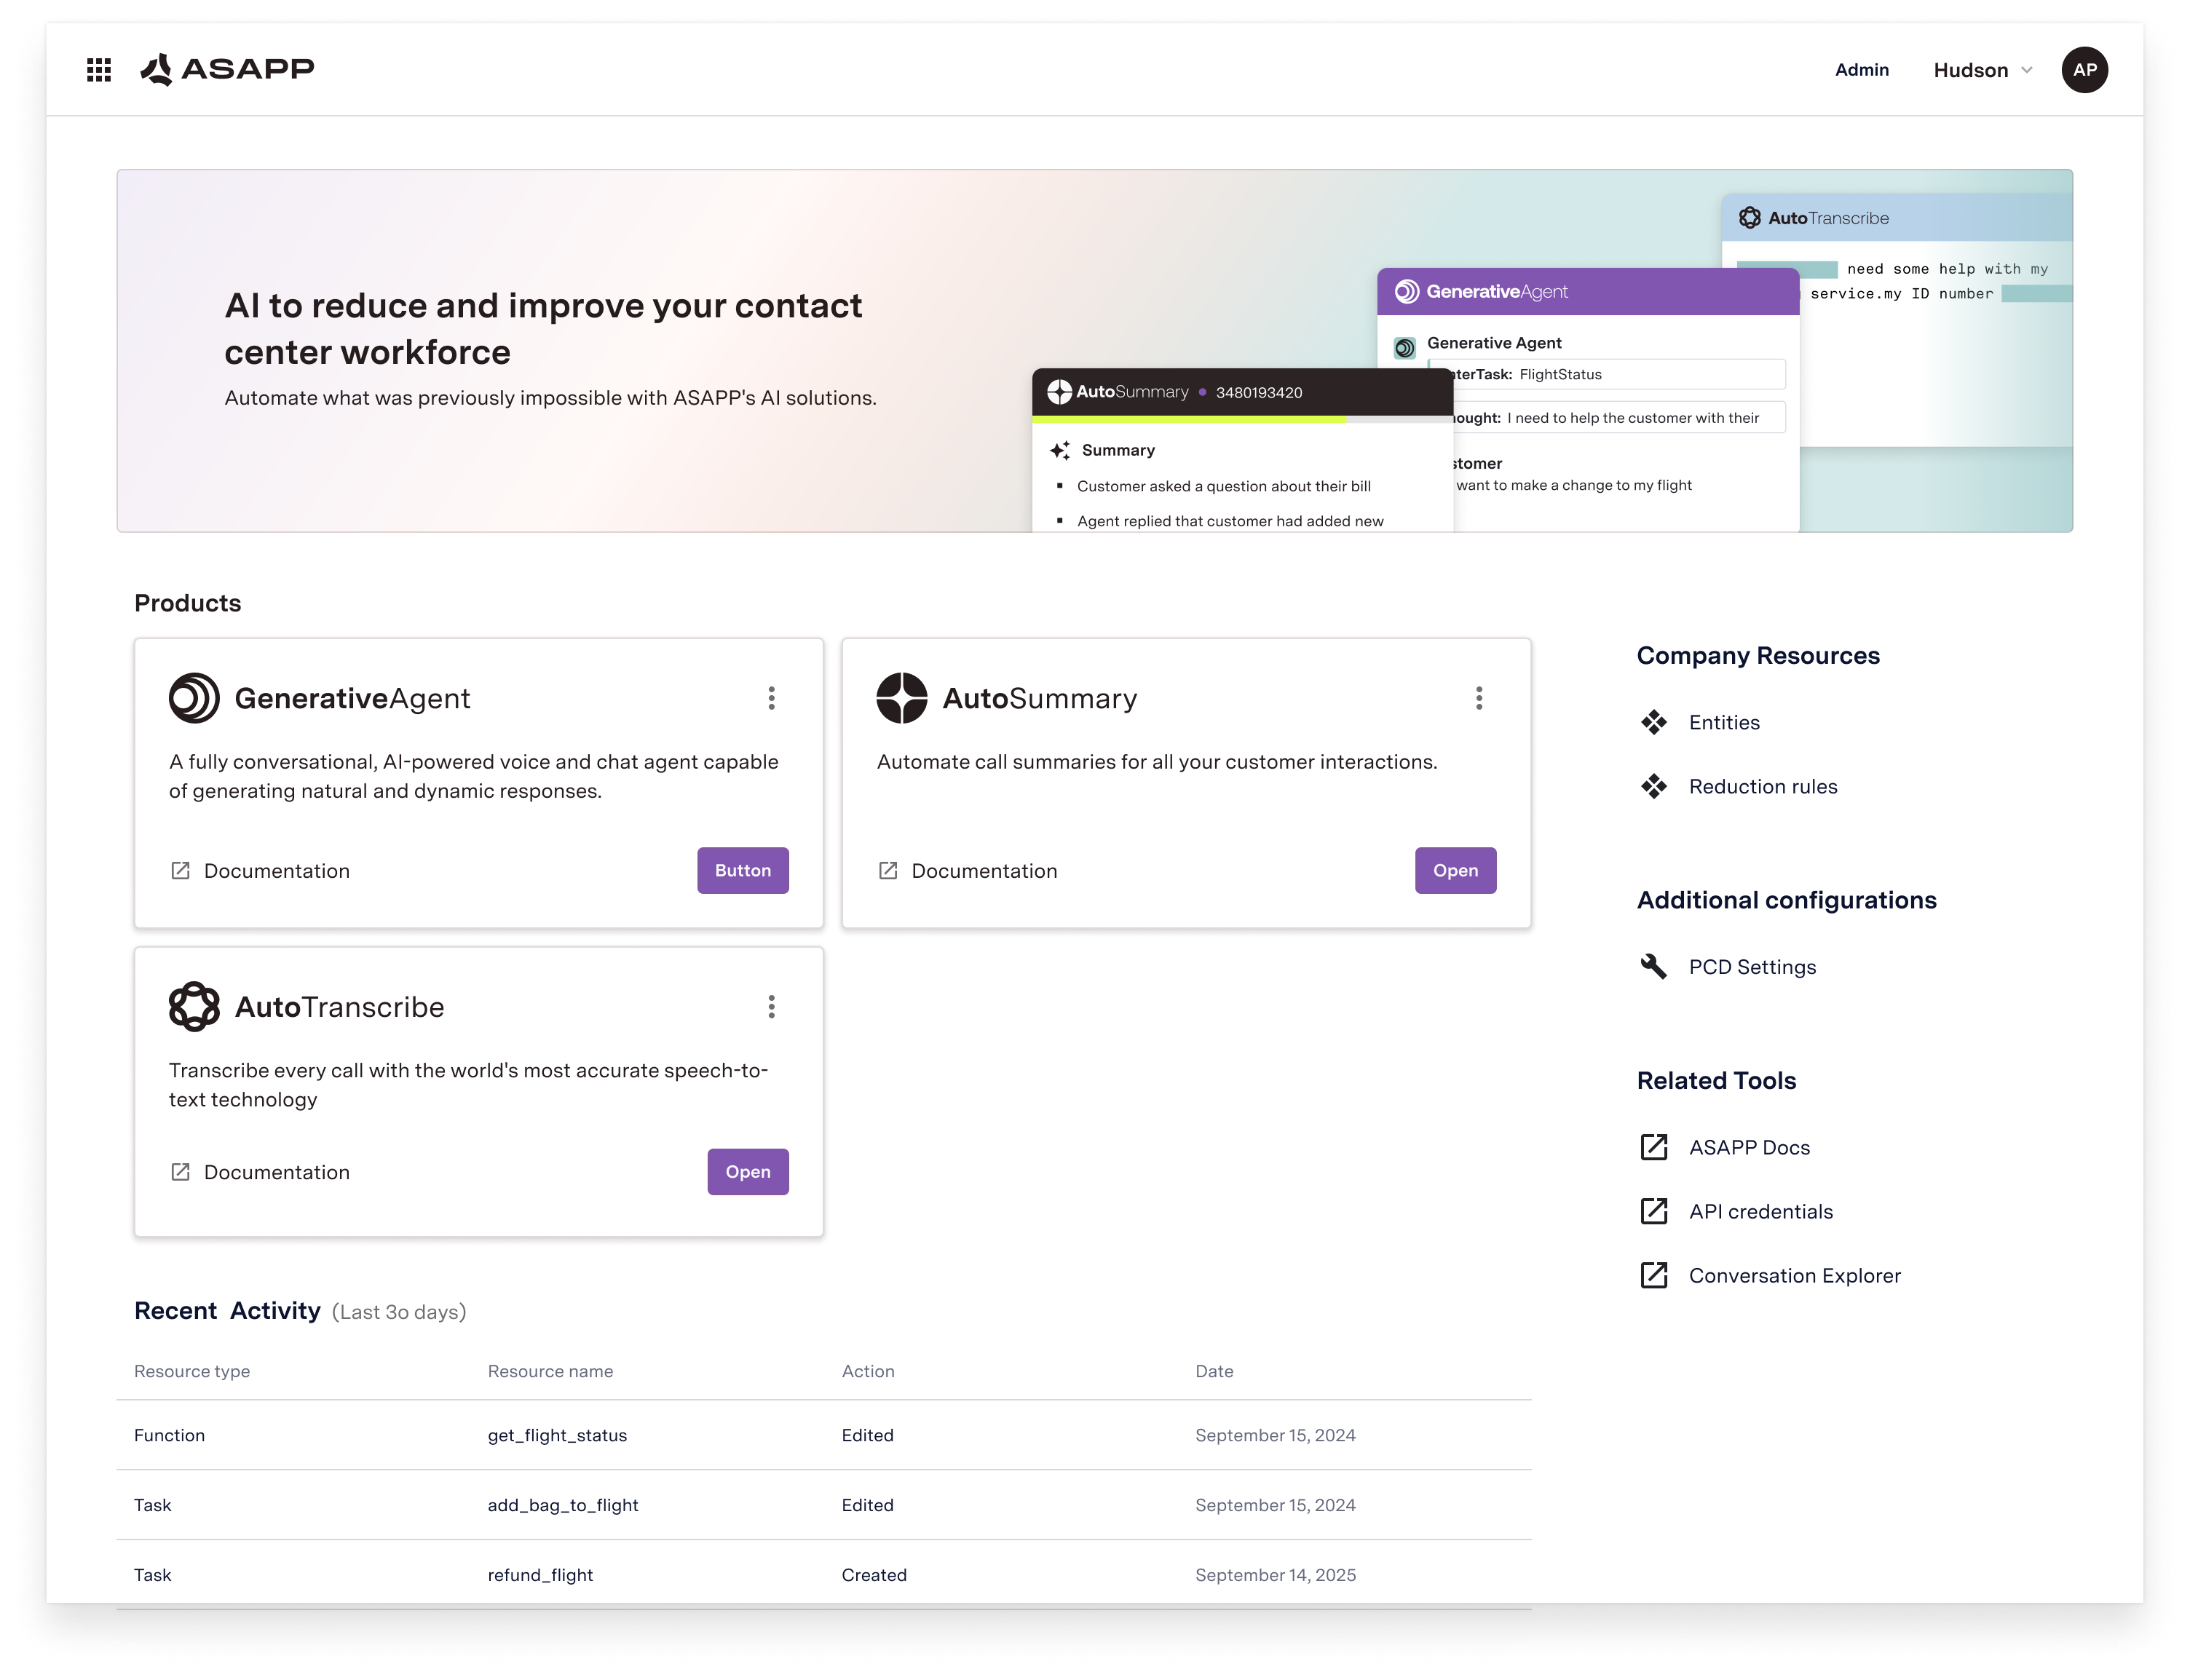 ## FAQs
1. **Do I need to do anything to start using this new homepage?**
The improvements will be made available to all users immediately upon launch.
2. **Does this change what pages I am able to access in AI-Console?**
No, all existing pages and bookmarks you were able to access before are still available.
# Customer Channels Overview
Source: https://docs.asapp.com/messaging-platform/feature-releases/customer-channels
| Feature Name | Feature Release Details | Additional Relevant Information (if available) |
| :-------------------------------------------- | :---------------------------------------------------------------------------------------------------------------------------------------------------- | :-------------------------------------------------------------------------------------------------------------------------------------------------- |
| GBM Rich Text Support | [GBM docs](https://developers.google.com/business-communications/business-messages/guides/build/send#rich_text) | ASAPP will now support GBM's rich text formatting for hyperlinks. |
| Persistent Android Notifications | [Persistent Android Notifications](https://docs-sdk.asapp.com/product_features/_Android%20SDK%20Persistent%20Notifications%20-%20One-Pager.pdf) | [Android SDK](/messaging-platform/integrations/android-sdk "Android SDK") |
| Apple Messages for Business Rich Links | [Rich Links in Apple Messages for Business](https://docs-sdk.asapp.com/product_features/ABC%20Rich%20Links%20-%20One-Pager.pdf) | |
| iOS SDK Push Notifications Request | [Updated iOS SDK Push Notifications](https://docs-sdk.asapp.com/product_features/iOS%20SDK%20Push%20Notifications%20-%20One-Pager.pdf) | [iOS SDK](/messaging-platform/integrations/ios-sdk "iOS SDK") |
| Web Chat Push Notifications | [Web Chat Push Notifications](https://docs-sdk.asapp.com/product_features/Web%20SDK%20Push%20Notifications%20-%20One-Pager.pdf) | [Integration: Push Notifications](/messaging-platform/integrations/push-notifications-and-the-mobile-sdks "Push Notifications and the Mobile SDKs") |
| Real-time EWT | [Real-time EWT in Chat SDK](https://docs-sdk.asapp.com/product_features/Real-time%20EWT%20One-Pager%20-%20External.pdf) | |
| Closing Time EWT | [Closing Time EWT](https://docs-sdk.asapp.com/product_features/ASAPP%20-%20Customer%20Channels%20-%20Closing%20Time%20EWT.pdf) | |
| Omni Real-Time EWT | [Omni Real-Time EWT](https://docs-sdk.asapp.com/product_features/ASAPP%20-%20Customer%20Channels%20-%20Omni%20Realtime%20EWT.pdf) | |
| Queue Automated Check-in Improvements | [Queue Automated Check-in Improvements](https://docs-sdk.asapp.com/product_features/ASAPP%20-%20Customer%20Channels%20-%20QACI%20Improvements.pdf) | |
| Complex Issue Routing | [Complex Issue Routing](https://docs-sdk.asapp.com/product_features/ASAPP%20-%20Customer%20Channels%20-%20Complex%20Issue%20Routing.pdf) | |
| Quick Replies in Apple Messages for Business | [Quick Replies in Apple Messages for Business](/messaging-platform/feature-releases/customer-channels/quick-replies-in-apple-messages-for-business) | |
| Authentication in Apple Messages for Business | [Authentication in Apple Messages for Business](/messaging-platform/feature-releases/customer-channels/authentication-in-apple-messages-for-business) | |
| WhatsApp Business | [WhatsApp Business](/messaging-platform/feature-releases/customer-channels/whatsapp-business) | [WhatsApp Business Integration](/messaging-platform/integrations/whatsapp-business "WhatsApp Business") |
| Form Messages for Apple Messages for Business | [Form Messages for Apple Messages for Business](/messaging-platform/feature-releases/customer-channels/form-messages-for-apple-messages-for-business) | |
# Authentication in Apple Messages for Business
Source: https://docs.asapp.com/messaging-platform/feature-releases/customer-channels/authentication-in-apple-messages-for-business
## Feature Release
This is the announcement for an upcoming ASAPP feature. Your ASAPP account team will provide a target release date and can direct you to more detailed information as needed.
## Overview
ASAPP now supports customer authentication in Apple Messages for Business. With this new functionality, customers can securely log in to their accounts during interactions, allowing them to access personalized experiences in automated flows and when speaking with agents.
| | |
| ---------------------------------------------------------------------------------------------------------------------------------- | ---------------------------------------------------------------------------------------------------------------------------------- |
|
## FAQs
1. **Do I need to do anything to start using this new homepage?**
The improvements will be made available to all users immediately upon launch.
2. **Does this change what pages I am able to access in AI-Console?**
No, all existing pages and bookmarks you were able to access before are still available.
# Customer Channels Overview
Source: https://docs.asapp.com/messaging-platform/feature-releases/customer-channels
| Feature Name | Feature Release Details | Additional Relevant Information (if available) |
| :-------------------------------------------- | :---------------------------------------------------------------------------------------------------------------------------------------------------- | :-------------------------------------------------------------------------------------------------------------------------------------------------- |
| GBM Rich Text Support | [GBM docs](https://developers.google.com/business-communications/business-messages/guides/build/send#rich_text) | ASAPP will now support GBM's rich text formatting for hyperlinks. |
| Persistent Android Notifications | [Persistent Android Notifications](https://docs-sdk.asapp.com/product_features/_Android%20SDK%20Persistent%20Notifications%20-%20One-Pager.pdf) | [Android SDK](/messaging-platform/integrations/android-sdk "Android SDK") |
| Apple Messages for Business Rich Links | [Rich Links in Apple Messages for Business](https://docs-sdk.asapp.com/product_features/ABC%20Rich%20Links%20-%20One-Pager.pdf) | |
| iOS SDK Push Notifications Request | [Updated iOS SDK Push Notifications](https://docs-sdk.asapp.com/product_features/iOS%20SDK%20Push%20Notifications%20-%20One-Pager.pdf) | [iOS SDK](/messaging-platform/integrations/ios-sdk "iOS SDK") |
| Web Chat Push Notifications | [Web Chat Push Notifications](https://docs-sdk.asapp.com/product_features/Web%20SDK%20Push%20Notifications%20-%20One-Pager.pdf) | [Integration: Push Notifications](/messaging-platform/integrations/push-notifications-and-the-mobile-sdks "Push Notifications and the Mobile SDKs") |
| Real-time EWT | [Real-time EWT in Chat SDK](https://docs-sdk.asapp.com/product_features/Real-time%20EWT%20One-Pager%20-%20External.pdf) | |
| Closing Time EWT | [Closing Time EWT](https://docs-sdk.asapp.com/product_features/ASAPP%20-%20Customer%20Channels%20-%20Closing%20Time%20EWT.pdf) | |
| Omni Real-Time EWT | [Omni Real-Time EWT](https://docs-sdk.asapp.com/product_features/ASAPP%20-%20Customer%20Channels%20-%20Omni%20Realtime%20EWT.pdf) | |
| Queue Automated Check-in Improvements | [Queue Automated Check-in Improvements](https://docs-sdk.asapp.com/product_features/ASAPP%20-%20Customer%20Channels%20-%20QACI%20Improvements.pdf) | |
| Complex Issue Routing | [Complex Issue Routing](https://docs-sdk.asapp.com/product_features/ASAPP%20-%20Customer%20Channels%20-%20Complex%20Issue%20Routing.pdf) | |
| Quick Replies in Apple Messages for Business | [Quick Replies in Apple Messages for Business](/messaging-platform/feature-releases/customer-channels/quick-replies-in-apple-messages-for-business) | |
| Authentication in Apple Messages for Business | [Authentication in Apple Messages for Business](/messaging-platform/feature-releases/customer-channels/authentication-in-apple-messages-for-business) | |
| WhatsApp Business | [WhatsApp Business](/messaging-platform/feature-releases/customer-channels/whatsapp-business) | [WhatsApp Business Integration](/messaging-platform/integrations/whatsapp-business "WhatsApp Business") |
| Form Messages for Apple Messages for Business | [Form Messages for Apple Messages for Business](/messaging-platform/feature-releases/customer-channels/form-messages-for-apple-messages-for-business) | |
# Authentication in Apple Messages for Business
Source: https://docs.asapp.com/messaging-platform/feature-releases/customer-channels/authentication-in-apple-messages-for-business
## Feature Release
This is the announcement for an upcoming ASAPP feature. Your ASAPP account team will provide a target release date and can direct you to more detailed information as needed.
## Overview
ASAPP now supports customer authentication in Apple Messages for Business. With this new functionality, customers can securely log in to their accounts during interactions, allowing them to access personalized experiences in automated flows and when speaking with agents.
| | |
| ---------------------------------------------------------------------------------------------------------------------------------- | ---------------------------------------------------------------------------------------------------------------------------------- |
|  |
|  |
## Use and Impact
Customer authentication is intended for any interaction where making use of account information creates a better experience for the customer:
* **Any live interaction with an agent:** Enable your agents to greet and validate who they're speaking with, review historical customer conversations, and quickly reference relevant account attributes.
* **Automated flows:** Present data related to a customer's account (e.g., booking details) or take actions on behalf of the customer (e.g., make a payment).
Identifying a customer in an interaction also adds valuable context when reviewing historical interactions in Insights Manager for reporting or compliance purposes.
Expanding support for customer authentication in this channel should:
1. Reduce the share of interactions that are directed to agents due to customers being unable to access automated flows that require authentication.
2. Reduce the share of interactions that are directed to agents due to customers being unable to access automated flows that require authentication
3. Expand the share of interactions with agents that benefit from account information and conversation history, reducing effort to identify customers and search for account information
## How It Works
**User Experience**
Once implemented, any instance in an ASAPP automated flow that triggers customer authentication today will do so during an interaction in Apple Messages for Business.
When this occurs, Apple Messages for Business will ask the user to login via a button. Once the user clicks the button, they will be brought out of the iMessages app and redirected to a webpage/browser window to sign in. Users will have to sign-in with their credentials every time their authentication token expires.
**Architecture**
User Authentication in Apple Messages for Business utilizes a standards-based approach using an OAuth 2.0 flow with additional key validation and OAuth token encryption steps.
This approach requires companies to implement and host a login page to which Apple Messages for Business will direct the user for authentication.
Visit [Apple Messages for Business integration guide](/messaging-platform/integrations/apple-messages-for-business#customer-authentication) for more information.
|
## Use and Impact
Customer authentication is intended for any interaction where making use of account information creates a better experience for the customer:
* **Any live interaction with an agent:** Enable your agents to greet and validate who they're speaking with, review historical customer conversations, and quickly reference relevant account attributes.
* **Automated flows:** Present data related to a customer's account (e.g., booking details) or take actions on behalf of the customer (e.g., make a payment).
Identifying a customer in an interaction also adds valuable context when reviewing historical interactions in Insights Manager for reporting or compliance purposes.
Expanding support for customer authentication in this channel should:
1. Reduce the share of interactions that are directed to agents due to customers being unable to access automated flows that require authentication.
2. Reduce the share of interactions that are directed to agents due to customers being unable to access automated flows that require authentication
3. Expand the share of interactions with agents that benefit from account information and conversation history, reducing effort to identify customers and search for account information
## How It Works
**User Experience**
Once implemented, any instance in an ASAPP automated flow that triggers customer authentication today will do so during an interaction in Apple Messages for Business.
When this occurs, Apple Messages for Business will ask the user to login via a button. Once the user clicks the button, they will be brought out of the iMessages app and redirected to a webpage/browser window to sign in. Users will have to sign-in with their credentials every time their authentication token expires.
**Architecture**
User Authentication in Apple Messages for Business utilizes a standards-based approach using an OAuth 2.0 flow with additional key validation and OAuth token encryption steps.
This approach requires companies to implement and host a login page to which Apple Messages for Business will direct the user for authentication.
Visit [Apple Messages for Business integration guide](/messaging-platform/integrations/apple-messages-for-business#customer-authentication) for more information.
 ## Use and Impact
ASAPP offers a convenient solution for gathering customer information in a structured format through the creation of customizable forms. These forms are seamlessly delivered as Form Messages to Apple Messages for Business customers whenever supported. Incorporating Form Messages into Apple Messages for Business enhances the customer experience by providing a seamless and aesthetically pleasing interface that is consistent with other Apple applications.
## How It Works
Watch the video walkthrough below to learn more about Form Messages:
### Supported Forms
When a form is sent to a customer in Apple Messages for Business, supported forms will display as a Form Message, which has a single form field on each page and allows the customer to review their form entries before submitting.
Examples of supported form field types include:
* Text
* Name
* Location
* Date
* Phone Number
* Numbers
* Selectors
### Unsupported Forms
Customers will be sent an Omniform rather than an AMB Form Message if one of the following is true:
* The customer is not on an iOS version that supports Form Messages
* It is a Secure Form
* The flow node is configured to have the form disappear when a new message is sent
* There are more than seven fields in the form; this limit exists because there is a known AMB Form Messages issue that requires a customer to start over if they background the Messages app while filling out a form and then return back to it
* Any field has a prefilled value
* Any field has password masking
* If the form has more than one submit button
* The form contains a scale, paragraph, or table field
Contact your ASAPP account team to enable Form Messages and to determine which forms customers will receive as Form Messages.
## Use and Impact
ASAPP offers a convenient solution for gathering customer information in a structured format through the creation of customizable forms. These forms are seamlessly delivered as Form Messages to Apple Messages for Business customers whenever supported. Incorporating Form Messages into Apple Messages for Business enhances the customer experience by providing a seamless and aesthetically pleasing interface that is consistent with other Apple applications.
## How It Works
Watch the video walkthrough below to learn more about Form Messages:
### Supported Forms
When a form is sent to a customer in Apple Messages for Business, supported forms will display as a Form Message, which has a single form field on each page and allows the customer to review their form entries before submitting.
Examples of supported form field types include:
* Text
* Name
* Location
* Date
* Phone Number
* Numbers
* Selectors
### Unsupported Forms
Customers will be sent an Omniform rather than an AMB Form Message if one of the following is true:
* The customer is not on an iOS version that supports Form Messages
* It is a Secure Form
* The flow node is configured to have the form disappear when a new message is sent
* There are more than seven fields in the form; this limit exists because there is a known AMB Form Messages issue that requires a customer to start over if they background the Messages app while filling out a form and then return back to it
* Any field has a prefilled value
* Any field has password masking
* If the form has more than one submit button
* The form contains a scale, paragraph, or table field
Contact your ASAPP account team to enable Form Messages and to determine which forms customers will receive as Form Messages.
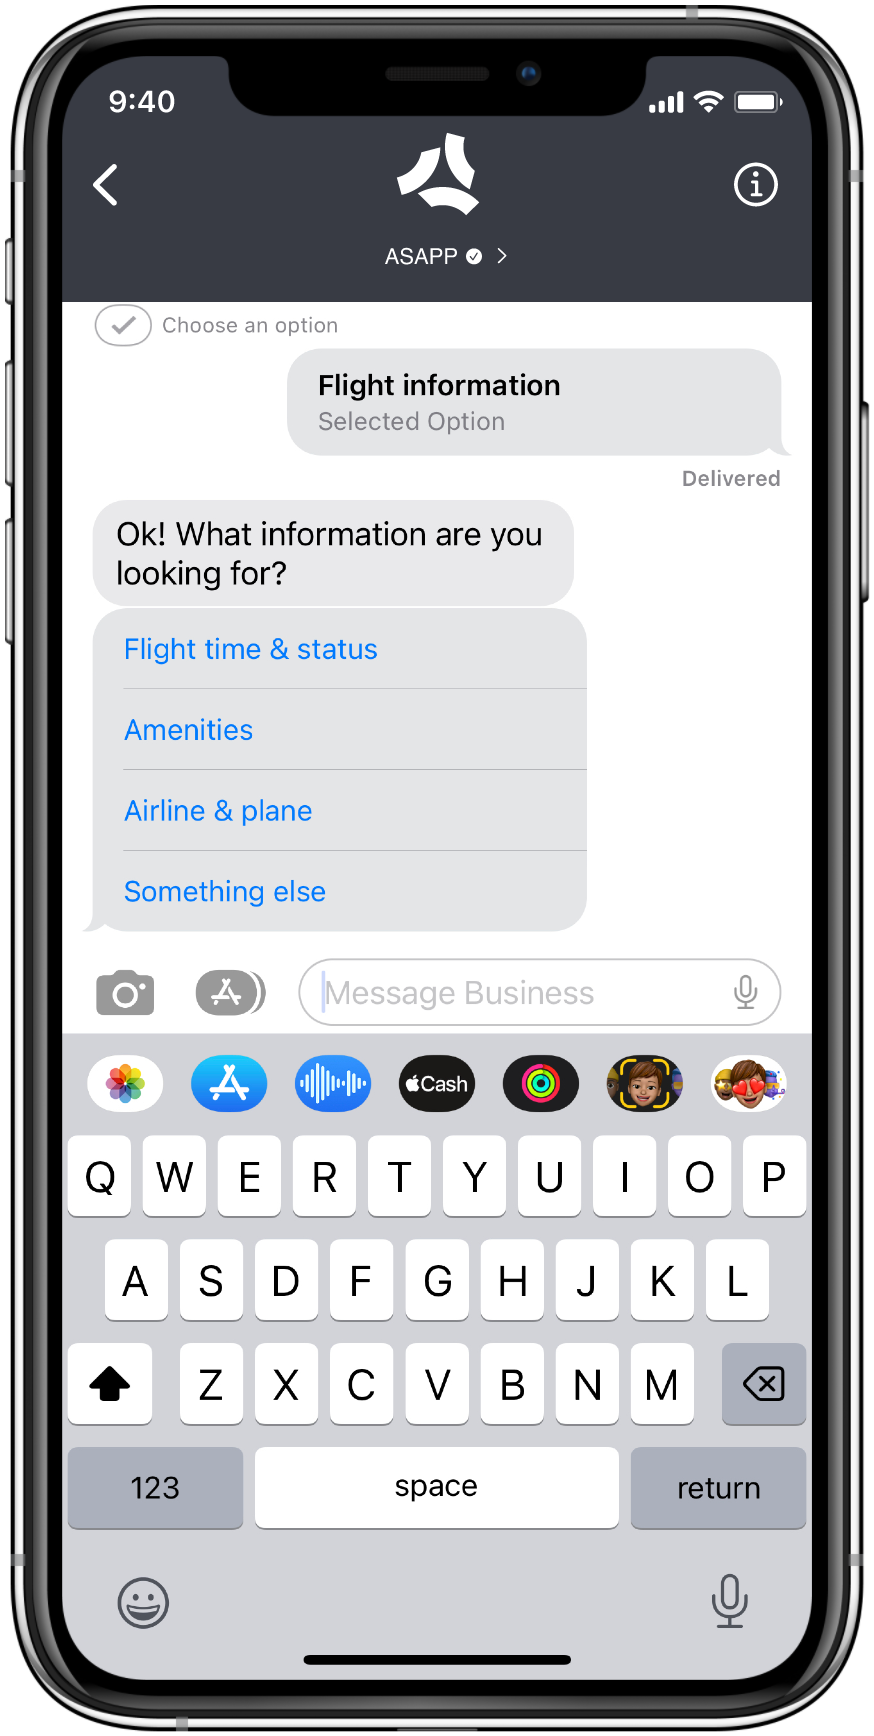 ## Use and Impact
As in ASAPP's customer channels for web and mobile apps, quick replies are used to give customers a defined set of response options, each of which leads to a corresponding branch in an automated flow. Key use cases for quick replies in automated flows include the following:
1. Discovery questions to better specify a customer issue or account detail
2. Ensuring the customer's issue has been addressed by an automated flow
Using quick replies in Apple Messages for Business is expected to reduce friction that can cause customer drop-off and frustration before fully completing a flow or reaching an agent to better assist with an issue.
## How It Works
Quick reply support in Apple Messages for Business is expected to function similarly to quick replies in ASAPP SDKs for web and mobile apps, with the following differences:
**Number of Quick Replies**\
Apple Messages for Business supports a minimum of two quick replies and a maximum of five per node.
**Push Notification and Selection Confirmation**\
When quick reply options are sent, users receive a push notification if Messages is not open; the title of the message will be 'Choose an option'. Once the user selects a response option, Apple displays a checkmark beside text 'Choose an option' in the Messages UI. This is a default behavior and is not configurable.
**Length of Quick Replies**\
All quick replies will render as a single line of text with a maximum of 24 characters; if the text exceeds 24 characters, it will be truncated with ellipses after the first 21 characters.
**OS Version Support**\
Quick replies are supported in iOS 15.1 and macOS 12.0 or higher; prior operating systems will use the list picker interface.
## FAQs
1. **Is there any work required to adapt existing automated flows to support quick replies in Apple Messages for Business?**\
Once your ASAPP account team completes a small configuration change, all flows configured with quick replies today will automatically use them in Apple Messages for Business for supported iOS and macOS versions.
## Use and Impact
As in ASAPP's customer channels for web and mobile apps, quick replies are used to give customers a defined set of response options, each of which leads to a corresponding branch in an automated flow. Key use cases for quick replies in automated flows include the following:
1. Discovery questions to better specify a customer issue or account detail
2. Ensuring the customer's issue has been addressed by an automated flow
Using quick replies in Apple Messages for Business is expected to reduce friction that can cause customer drop-off and frustration before fully completing a flow or reaching an agent to better assist with an issue.
## How It Works
Quick reply support in Apple Messages for Business is expected to function similarly to quick replies in ASAPP SDKs for web and mobile apps, with the following differences:
**Number of Quick Replies**\
Apple Messages for Business supports a minimum of two quick replies and a maximum of five per node.
**Push Notification and Selection Confirmation**\
When quick reply options are sent, users receive a push notification if Messages is not open; the title of the message will be 'Choose an option'. Once the user selects a response option, Apple displays a checkmark beside text 'Choose an option' in the Messages UI. This is a default behavior and is not configurable.
**Length of Quick Replies**\
All quick replies will render as a single line of text with a maximum of 24 characters; if the text exceeds 24 characters, it will be truncated with ellipses after the first 21 characters.
**OS Version Support**\
Quick replies are supported in iOS 15.1 and macOS 12.0 or higher; prior operating systems will use the list picker interface.
## FAQs
1. **Is there any work required to adapt existing automated flows to support quick replies in Apple Messages for Business?**\
Once your ASAPP account team completes a small configuration change, all flows configured with quick replies today will automatically use them in Apple Messages for Business for supported iOS and macOS versions.
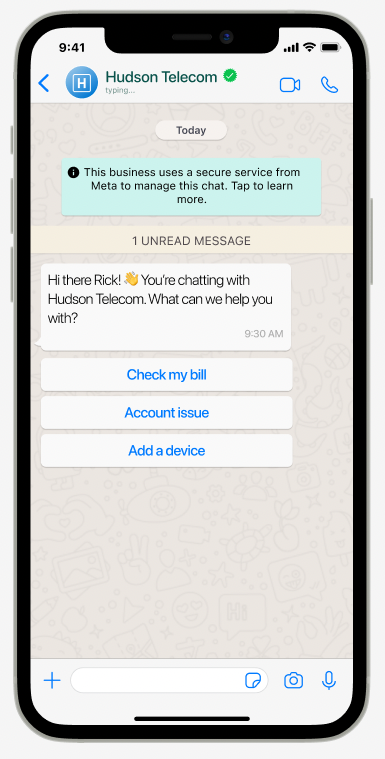 ## Use and Impact
Similar to ASAPP's integrations with Apple Messages for Business, support for WhatsApp Business gives enterprises the ability to offer more of their customers robust messaging experiences in their preferred app. This expanded support is intended to create appeal for avid WhatsApp users, encouraging them to select a messaging channel more often and to have more satisfying interactions in a familiar setting.
## How It Works
ASAPP's integration with WhatsApp Business supports similar functionality to what is available in other customer channels. At an overview level, see below for supported and unsupported features:
**Support included:**
* Automated flows
* Deeplinked entry points
* Free-text disambiguation
* Estimated wait time
* Live chat with agents
* Push notifications
* Secure forms
* End-of-chat feedback forms
**Not currently supported:**
* Customer authentication
* Customer history
* Chat Instead entry point
* Customer attributes for routing
* Customer typing preview for agents, typing indicator for customers
* Images sent by customers
* Carousels, attachment, images in automated flows
* New question/welcome back prompts
* Proactive messaging
* Co-browsing
## Use and Impact
Similar to ASAPP's integrations with Apple Messages for Business, support for WhatsApp Business gives enterprises the ability to offer more of their customers robust messaging experiences in their preferred app. This expanded support is intended to create appeal for avid WhatsApp users, encouraging them to select a messaging channel more often and to have more satisfying interactions in a familiar setting.
## How It Works
ASAPP's integration with WhatsApp Business supports similar functionality to what is available in other customer channels. At an overview level, see below for supported and unsupported features:
**Support included:**
* Automated flows
* Deeplinked entry points
* Free-text disambiguation
* Estimated wait time
* Live chat with agents
* Push notifications
* Secure forms
* End-of-chat feedback forms
**Not currently supported:**
* Customer authentication
* Customer history
* Chat Instead entry point
* Customer attributes for routing
* Customer typing preview for agents, typing indicator for customers
* Images sent by customers
* Carousels, attachment, images in automated flows
* New question/welcome back prompts
* Proactive messaging
* Co-browsing
Feature Name |
Feature Release Details |
Additional Relevant Information (if available) |
|---|---|---|
Multichat View |
||
Agent Performance Stats |
||
Automatic Chat Finalization |
||
High Confidence Suggestions |
||
Avert Concurrent Voice & Digital Interactions |
||
Customer History - New Historical Transcript View |
||
Knowledge Base Favorite Folders |
||
Auto-Suggest Response Library |
||
Desk Redesign: Left Rail, Card, & Color Temperature Setting |
||
Knowledge Base Search Enhancement |
||
Knowledge Base Navigation Redesign |
||
Chat Log / Transcript & Composer View Redesign |
||
Auto-Pilot Forms |
||
Small Breakpoints |
||
Auto-Pilot Greetings |
||
Automatic Summary |
||
KB Quick Access Recommendations |
||
New Feature Announcements |
See new features in Desk |
|
Themeable Desk |
Includes Dark Mode |
|
AutoSummary Data for Agent Desk |
New S3 data field for implementations with AutoSummary enabled |
|
Disable Transfer to Same Queue in Agent Desk |
||
Transfer to a Paused Queue in Agent Desk |
||
Default Status for Agents in Voice and Agent Desk |
||
Data Insert in Agent Responses |
||
Customer History Context |
||
Auto-Pilot Endings |
||
Search Queue Names |
||
Adding a New Field last\_dispositioned\_ts to rep\_activity |
||
Send attachments |
|
|
Chat Takeover |
 *Auto-Pilot Endings running in Agent Desk with Initial Message queued.*
## Use and Impact
Customers often become unresponsive once they do not need anything else from the agent. To free up their slots to serve other customers waiting in the queue, agents must confirm there is nothing more they can help the customer with before closing the chat. To ensure the customer has a grace period to respond before being disconnected, agents follow a formulaic, multi-step check-in process with the customer prior to ending the chat. In these situations, Auto-Pilot Endings is intended to free up agents' attention for more active conversations, leading to greater agent efficiency.
## How It Works
Watch the video walkthrough below to learn more about Auto-Pilot Endings:
Auto-Pilot Endings enables agents to configure the ending message that is delivered in sequence. Each message is meant to be automatically sent to the customer when they become unresponsive:
### Messages
* **Initial Message** - Asking the customer if there is anything else that needs to be discussed.\
*Example: "Is there anything else I can help you with?"*
* **Check-in Message** - Confirming whether the customer is still there.\
*Example: "Are you still with me?"*
* **Second (Closing) Message** - A graceful ending message to close out the conversation. ASAPP can embed the customer name in this message.\
*Example: "Thank you {FirstName}! It was a pleasure assisting you today. Feel free to reach out if you have any other questions."*
### Procedure
For each conversation, Auto-Pilot Endings follows a simple sequence when enabled:
1. **Suggestion or Manual Start:** Agent Desk will suggest to the agent to start the ending flow, through a pop-up banner at the top of the middle panel, when it predicts the issue has concluded. Agents can also manually start it from the dropdown menu in the header before a suggestion appears.
2. **Initial Message Queued:** Once Auto-Pilot Ending is initiated, Agent Desk shows the agent the initial message that is ready to send to the customer. On the right-hand panel, the notes panel will appear showing agents the automatic summary and free-text notes field. An indicator will show on the left-hand panel chat card along with a timer countdown showing when the initial message will be sent.
3. **Initial Message Sent:** Once the countdown is complete, the initial message is sent and another timer begins waiting for the customer to respond.
4. **Customer Response:** Agent Desk shows a countdown for how long it will wait for a response before sending a Check-in Message. It detects the following customer response types and acts accordingly:
| Customer Response Type | Action |
| ---------------------------------------------- | --------------------------------------------------------------------------------------------------------------------------------------------------------------------------------------------------------------------------------------------------------------------------------------------------------------------------------------------------------------------------------------------------- |
| A. Customer confirms they don’t need more help | Closing Message is queued and sends after its countdown is complete; the chat issue ends. The agent can also choose to end the conversation before the countdown completes.  |
| B. Customer confirms they need more help | The Auto-Pilot Endings flow is canceled; the conversation continues as normal. A “new message” signal is sent to the agent to inform him that the customer returned the interaction.  |
| C. Unresponsive customer | A Check-in Message is sent and another timer begins. If the customer remains unresponsive, the Closing Message is sent and the chat issue ends. If the customer responds with any message, the Auto-Pilot Endings flow is canceled and the conversation continues as normal. |
### Agent Capabilities
**Manually Ending Auto-Pilot Endings Flow**\
At any time, an agent can click **Cancel** in the Composer window to end the Auto-Pilot Ending flow and return the conversation to its normal state.
**Manually Sending Ending Messages**\
Any time a message is queued, an agent can click **Send now** in the Composer window to bypass the countdown timer, send the message, and move to the next step in the flow.
**Managing Auto-Pilot Endings**\
Under the **Ending** tab in the **Responses** drawer of the right rail of Agent Desk, agents can:
* Enable or disable AutoPilot Endings using a toggle at the top of the tab.
* Customize the wording of the Closing Message; there are two versions of the message, accounting for when Agent Desk is aware and unaware of the customer's first name.
*Auto-Pilot Endings running in Agent Desk with Initial Message queued.*
## Use and Impact
Customers often become unresponsive once they do not need anything else from the agent. To free up their slots to serve other customers waiting in the queue, agents must confirm there is nothing more they can help the customer with before closing the chat. To ensure the customer has a grace period to respond before being disconnected, agents follow a formulaic, multi-step check-in process with the customer prior to ending the chat. In these situations, Auto-Pilot Endings is intended to free up agents' attention for more active conversations, leading to greater agent efficiency.
## How It Works
Watch the video walkthrough below to learn more about Auto-Pilot Endings:
Auto-Pilot Endings enables agents to configure the ending message that is delivered in sequence. Each message is meant to be automatically sent to the customer when they become unresponsive:
### Messages
* **Initial Message** - Asking the customer if there is anything else that needs to be discussed.\
*Example: "Is there anything else I can help you with?"*
* **Check-in Message** - Confirming whether the customer is still there.\
*Example: "Are you still with me?"*
* **Second (Closing) Message** - A graceful ending message to close out the conversation. ASAPP can embed the customer name in this message.\
*Example: "Thank you {FirstName}! It was a pleasure assisting you today. Feel free to reach out if you have any other questions."*
### Procedure
For each conversation, Auto-Pilot Endings follows a simple sequence when enabled:
1. **Suggestion or Manual Start:** Agent Desk will suggest to the agent to start the ending flow, through a pop-up banner at the top of the middle panel, when it predicts the issue has concluded. Agents can also manually start it from the dropdown menu in the header before a suggestion appears.
2. **Initial Message Queued:** Once Auto-Pilot Ending is initiated, Agent Desk shows the agent the initial message that is ready to send to the customer. On the right-hand panel, the notes panel will appear showing agents the automatic summary and free-text notes field. An indicator will show on the left-hand panel chat card along with a timer countdown showing when the initial message will be sent.
3. **Initial Message Sent:** Once the countdown is complete, the initial message is sent and another timer begins waiting for the customer to respond.
4. **Customer Response:** Agent Desk shows a countdown for how long it will wait for a response before sending a Check-in Message. It detects the following customer response types and acts accordingly:
| Customer Response Type | Action |
| ---------------------------------------------- | --------------------------------------------------------------------------------------------------------------------------------------------------------------------------------------------------------------------------------------------------------------------------------------------------------------------------------------------------------------------------------------------------- |
| A. Customer confirms they don’t need more help | Closing Message is queued and sends after its countdown is complete; the chat issue ends. The agent can also choose to end the conversation before the countdown completes.  |
| B. Customer confirms they need more help | The Auto-Pilot Endings flow is canceled; the conversation continues as normal. A “new message” signal is sent to the agent to inform him that the customer returned the interaction.  |
| C. Unresponsive customer | A Check-in Message is sent and another timer begins. If the customer remains unresponsive, the Closing Message is sent and the chat issue ends. If the customer responds with any message, the Auto-Pilot Endings flow is canceled and the conversation continues as normal. |
### Agent Capabilities
**Manually Ending Auto-Pilot Endings Flow**\
At any time, an agent can click **Cancel** in the Composer window to end the Auto-Pilot Ending flow and return the conversation to its normal state.
**Manually Sending Ending Messages**\
Any time a message is queued, an agent can click **Send now** in the Composer window to bypass the countdown timer, send the message, and move to the next step in the flow.
**Managing Auto-Pilot Endings**\
Under the **Ending** tab in the **Responses** drawer of the right rail of Agent Desk, agents can:
* Enable or disable AutoPilot Endings using a toggle at the top of the tab.
* Customize the wording of the Closing Message; there are two versions of the message, accounting for when Agent Desk is aware and unaware of the customer's first name.
 ### Feature Configuration
Customers must reach out to their ASAPP contact to configure Auto-Pilot Endings globally for their program:
**Global Default Auto-Pilot Ending Messages**
* Initial Message
* Check-in message
* Closing Message (named customer)
* Closing Message (unidentified customer)
### Feature Configuration
Customers must reach out to their ASAPP contact to configure Auto-Pilot Endings globally for their program:
**Global Default Auto-Pilot Ending Messages**
* Initial Message
* Check-in message
* Closing Message (named customer)
* Closing Message (unidentified customer)
 ## FAQs
1. **When will `auto_summary_text` have a value?**
* For any assignment where the agent submitted one or more bullets of an automatically generated summary.
* If an agent removes every bullet in the summary, the `auto_summary_text` field will be empty.
* If AutoSummary is not enabled, the `auto_summary_text` field will be empty.
2. **Does the type of model used for AutoSummary affect the value in `auto_summary_text`?**
* If AutoSummary is enabled, the `auto_summary_text` field will have a value regardless of the model used to generate the summary. The underlying model only affects the words used in the generated summary.
3. **How can I tell if AutoSummary is enabled?**
* When the right-hand panel expands at disposition time, the **Notes** panel shows a bulleted automatic summary above a manual disposition field labeled **Additional Notes**.
* If AutoSummary is not yet enabled, the **Notes** panel contains summary tags that agents can manually select to be inserted into a manual disposition field below. For more information about the process to enable AutoSummary, reach out to your ASAPP account team.
# Chat Takeover
Source: https://docs.asapp.com/messaging-platform/feature-releases/digital-agent-desk/chat-takeover
## Feature Release
This is the announcement for an upcoming ASAPP feature. Your ASAPP account team will provide a target release date and can direct you to more detailed information as needed.
## Overview
Managers have the ability to take over a chat from either an agent or an unassigned chat in the queue. Managers will then be able to service the chat from Agent Desk.
## FAQs
1. **When will `auto_summary_text` have a value?**
* For any assignment where the agent submitted one or more bullets of an automatically generated summary.
* If an agent removes every bullet in the summary, the `auto_summary_text` field will be empty.
* If AutoSummary is not enabled, the `auto_summary_text` field will be empty.
2. **Does the type of model used for AutoSummary affect the value in `auto_summary_text`?**
* If AutoSummary is enabled, the `auto_summary_text` field will have a value regardless of the model used to generate the summary. The underlying model only affects the words used in the generated summary.
3. **How can I tell if AutoSummary is enabled?**
* When the right-hand panel expands at disposition time, the **Notes** panel shows a bulleted automatic summary above a manual disposition field labeled **Additional Notes**.
* If AutoSummary is not yet enabled, the **Notes** panel contains summary tags that agents can manually select to be inserted into a manual disposition field below. For more information about the process to enable AutoSummary, reach out to your ASAPP account team.
# Chat Takeover
Source: https://docs.asapp.com/messaging-platform/feature-releases/digital-agent-desk/chat-takeover
## Feature Release
This is the announcement for an upcoming ASAPP feature. Your ASAPP account team will provide a target release date and can direct you to more detailed information as needed.
## Overview
Managers have the ability to take over a chat from either an agent or an unassigned chat in the queue. Managers will then be able to service the chat from Agent Desk.
 A confirmation modal will appear:
 ## Use and Impact
Chat Takeover provides managers with the ability to take over both live chats and queued chats. This capability impacts the following ways:
* Close chats where the issue has been resolved but still hasn't been dispositioned.
* Take over complex or convoluted chats.
* Handle part of the queue traffic in high-traffic situations.
## How it Works
Managers can take over a chat by navigating to a specific conversation in Live Insights and clicking on it to open the transcript area. The user can then click on the Takeover button in the upper left-hand corner. A confirmation prompt will appear to ensure the user wants to take over the chat. Once the chat has been transferred, the user will be notified. There is no limit to the number of chats a user can take over.
After that, admins can continue the chat and manage it at will. Users need to ensure they have access to Agent Desk to service the chat they have taken over. Access to the takeover functionality is granted through permissions set up by ASAPP.
# Customer History Context for Agent Desk
Source: https://docs.asapp.com/messaging-platform/feature-releases/digital-agent-desk/customer-history-context-for-agent-desk
## Feature Release
This is the announcement for an upcoming ASAPP feature. Your ASAPP account team will provide a target release date and can direct you to more detailed information as needed.
## Overview
This feature enables Agent Desk users to get context and historical conversation highlights when providing support to an authenticated customer.
## Use and Impact
Chat Takeover provides managers with the ability to take over both live chats and queued chats. This capability impacts the following ways:
* Close chats where the issue has been resolved but still hasn't been dispositioned.
* Take over complex or convoluted chats.
* Handle part of the queue traffic in high-traffic situations.
## How it Works
Managers can take over a chat by navigating to a specific conversation in Live Insights and clicking on it to open the transcript area. The user can then click on the Takeover button in the upper left-hand corner. A confirmation prompt will appear to ensure the user wants to take over the chat. Once the chat has been transferred, the user will be notified. There is no limit to the number of chats a user can take over.
After that, admins can continue the chat and manage it at will. Users need to ensure they have access to Agent Desk to service the chat they have taken over. Access to the takeover functionality is granted through permissions set up by ASAPP.
# Customer History Context for Agent Desk
Source: https://docs.asapp.com/messaging-platform/feature-releases/digital-agent-desk/customer-history-context-for-agent-desk
## Feature Release
This is the announcement for an upcoming ASAPP feature. Your ASAPP account team will provide a target release date and can direct you to more detailed information as needed.
## Overview
This feature enables Agent Desk users to get context and historical conversation highlights when providing support to an authenticated customer.

 **Updated "past conversation" indicator in the "Profile" tab, and updated "Past Conversation" tab.**
## Use and Impact
Past Conversations enables agents to provide customers with a more confident, informed, and tailored experience by displaying information about previous conversations with those customers.
This feature improves agents' efficiency and effectiveness by enhancing the retrievability and usefulness of historical conversation data.
As a result, it helps to reduce operational metrics such as Average Handling Time (AHT) and increase effectiveness indicators like the Customer Satisfaction (CSAT) score.
## How It Works
When agents log in to Agent Desk, they will notice a dynamic indicator under the context card's profile tab. This indicator alerts agents of past conversations with the customer and how long ago they occurred, eliminating the need for agents to switch between tabs.
Agents can either click the view button or toggle to the **Past Conversations** tab (formerly labeled **History**).
Past conversations are organized by date, with the most recent conversations showing first.
## FAQs
* **Do I need to configure anything to access this new feature?**
No, this update will roll out to all Agent Desk users.
# Default Agent Status in Desk
Source: https://docs.asapp.com/messaging-platform/feature-releases/digital-agent-desk/default-agent-status-in-desk
## Feature Release
This is the announcement for an upcoming ASAPP feature. Your ASAPP account team will provide a target release date and can direct you to more detailed information as needed.
## Overview
Administrators can configure a default status for agents for every time they log in.
**Updated "past conversation" indicator in the "Profile" tab, and updated "Past Conversation" tab.**
## Use and Impact
Past Conversations enables agents to provide customers with a more confident, informed, and tailored experience by displaying information about previous conversations with those customers.
This feature improves agents' efficiency and effectiveness by enhancing the retrievability and usefulness of historical conversation data.
As a result, it helps to reduce operational metrics such as Average Handling Time (AHT) and increase effectiveness indicators like the Customer Satisfaction (CSAT) score.
## How It Works
When agents log in to Agent Desk, they will notice a dynamic indicator under the context card's profile tab. This indicator alerts agents of past conversations with the customer and how long ago they occurred, eliminating the need for agents to switch between tabs.
Agents can either click the view button or toggle to the **Past Conversations** tab (formerly labeled **History**).
Past conversations are organized by date, with the most recent conversations showing first.
## FAQs
* **Do I need to configure anything to access this new feature?**
No, this update will roll out to all Agent Desk users.
# Default Agent Status in Desk
Source: https://docs.asapp.com/messaging-platform/feature-releases/digital-agent-desk/default-agent-status-in-desk
## Feature Release
This is the announcement for an upcoming ASAPP feature. Your ASAPP account team will provide a target release date and can direct you to more detailed information as needed.
## Overview
Administrators can configure a default status for agents for every time they log in.
 *Active status selected by default in the Status selection menu.*
## Use and Impact
By default, when agents log in to the platform, they inherit the same status they had when they last logged out. This behavior often leads to downtime if the agents fail to update their status to an active state, creating backlogs in queues as there are fewer agents to allocate chats to than there should be.
This feature allows customers to set a default status, such as available, every time an agent logs in. Administrators can configure this default status for both Voice and Agent desks.
## How It Works
After enabling this feature, whenever an agent logs back into Voice or Agent Desk, their status is automatically changed to a configured default status.
**Configuration**
To automatically set a default status for agents when they log in, contact your ASAPP account team.
## FAQs
1. **Would agents always get a default status even if I don't configure one?**
No. If you don't configure a default status, your agents will continue to have the same status they had when they last logged out.
2. **Can I choose any default status?**
Yes. Although setting a default status of "active" would prevent possible delays in assigning messages from a queue, you can configure whatever status you need.
# Disable Transfer to Same Queue in Agent Desk
Source: https://docs.asapp.com/messaging-platform/feature-releases/digital-agent-desk/disable-transfer-to-same-queue-in-agent-desk
## Feature Release
This is the announcement for an upcoming ASAPP feature. Your ASAPP account team will provide a target release date and can direct you to more detailed information as needed.
## Overview
Agent Desk can prevent agents from transferring a customer to another agent in the same queue.
*Active status selected by default in the Status selection menu.*
## Use and Impact
By default, when agents log in to the platform, they inherit the same status they had when they last logged out. This behavior often leads to downtime if the agents fail to update their status to an active state, creating backlogs in queues as there are fewer agents to allocate chats to than there should be.
This feature allows customers to set a default status, such as available, every time an agent logs in. Administrators can configure this default status for both Voice and Agent desks.
## How It Works
After enabling this feature, whenever an agent logs back into Voice or Agent Desk, their status is automatically changed to a configured default status.
**Configuration**
To automatically set a default status for agents when they log in, contact your ASAPP account team.
## FAQs
1. **Would agents always get a default status even if I don't configure one?**
No. If you don't configure a default status, your agents will continue to have the same status they had when they last logged out.
2. **Can I choose any default status?**
Yes. Although setting a default status of "active" would prevent possible delays in assigning messages from a queue, you can configure whatever status you need.
# Disable Transfer to Same Queue in Agent Desk
Source: https://docs.asapp.com/messaging-platform/feature-releases/digital-agent-desk/disable-transfer-to-same-queue-in-agent-desk
## Feature Release
This is the announcement for an upcoming ASAPP feature. Your ASAPP account team will provide a target release date and can direct you to more detailed information as needed.
## Overview
Agent Desk can prevent agents from transferring a customer to another agent in the same queue.
 ## Use and Impact
In some situations, transferring customers to the same queue they were waiting in can cause a poor customer experience.
Additionally, agents might transfer customers to the same queue to unassign themselves from the case, causing other agents to have to pick up new or complicated cases.
This feature gives administrators more flexibility in configuring which queues are available to their agents for transfer. It also prevents agents from transferring customers with difficult or time-consuming requests to another agent.
Overall, this feature ensures a better customer experience by preventing possible delays by transferring waiting customers to the same queue.
## How It Works
Enabling this feature removes the queue where the issue is assigned from the transfer menu.
## Use and Impact
In some situations, transferring customers to the same queue they were waiting in can cause a poor customer experience.
Additionally, agents might transfer customers to the same queue to unassign themselves from the case, causing other agents to have to pick up new or complicated cases.
This feature gives administrators more flexibility in configuring which queues are available to their agents for transfer. It also prevents agents from transferring customers with difficult or time-consuming requests to another agent.
Overall, this feature ensures a better customer experience by preventing possible delays by transferring waiting customers to the same queue.
## How It Works
Enabling this feature removes the queue where the issue is assigned from the transfer menu.
 *Search queue name in queue transfer menu.*
## Use and Impact
The search functionality is particularly useful for agents that have a long list of queue choices in the transfer menu.
We expect that a search functionality will help ensure agents select the right queue, reducing the number of transfers to unintended or incorrect queues.
## How It Works
Agents can select the queue to which they want to transfer the conversation by entering its name and choosing it from a filtered list.
*Search queue name in queue transfer menu.*
## Use and Impact
The search functionality is particularly useful for agents that have a long list of queue choices in the transfer menu.
We expect that a search functionality will help ensure agents select the right queue, reducing the number of transfers to unintended or incorrect queues.
## How It Works
Agents can select the queue to which they want to transfer the conversation by entering its name and choosing it from a filtered list.
 |
|  |
## How it Works
Agents can see the attachment component in a chat with a customer.
Agents can view images in a separate modal and can download and view a PDF.
|
## How it Works
Agents can see the attachment component in a chat with a customer.
Agents can view images in a separate modal and can download and view a PDF.
 Supported file types
* JPEG
* JPG
* PNG
* PDF
The capability is currently supported on:
* Apple Messaged for Business
Maximum size is 10MB for images and 20MB for PDFs.
# Transfer to Paused Queues in Agent Desk
Source: https://docs.asapp.com/messaging-platform/feature-releases/digital-agent-desk/transfer-to-paused-queues-in-agent-desk
## Feature Release
This is the announcement for an upcoming ASAPP feature. Your ASAPP account team will provide a target release date and can direct you to more detailed information as needed.
## Overview
Agents now have the ability to transfer customers to a paused queue.
Supported file types
* JPEG
* JPG
* PNG
* PDF
The capability is currently supported on:
* Apple Messaged for Business
Maximum size is 10MB for images and 20MB for PDFs.
# Transfer to Paused Queues in Agent Desk
Source: https://docs.asapp.com/messaging-platform/feature-releases/digital-agent-desk/transfer-to-paused-queues-in-agent-desk
## Feature Release
This is the announcement for an upcoming ASAPP feature. Your ASAPP account team will provide a target release date and can direct you to more detailed information as needed.
## Overview
Agents now have the ability to transfer customers to a paused queue.
 ## Use and Impact
In some cases, the only agents that can properly address a customer's issue are part of a queue that is temporarily paused. To ensure that agents can always redirect customers to the applicable queue, this feature allows agents to transfer customers to a paused queue, even if the wait times are long.
This feature prevents poor customer experience by telling customers to reach out later or sending them to a queue that cannot appropriately help them.
It also saves agents time by enabling them to route the customer to the proper queue when they cannot address the issue.
## How It Works
Administrators might pause a queue if they detect they are getting a higher demand than expected.
When enabled, paused queues appear in the agent's transfer menu with a label indicating their status so that agents can identify them.
## Use and Impact
In some cases, the only agents that can properly address a customer's issue are part of a queue that is temporarily paused. To ensure that agents can always redirect customers to the applicable queue, this feature allows agents to transfer customers to a paused queue, even if the wait times are long.
This feature prevents poor customer experience by telling customers to reach out later or sending them to a queue that cannot appropriately help them.
It also saves agents time by enabling them to route the customer to the proper queue when they cannot address the issue.
## How It Works
Administrators might pause a queue if they detect they are getting a higher demand than expected.
When enabled, paused queues appear in the agent's transfer menu with a label indicating their status so that agents can identify them.
Feature Name |
Feature Release Details |
Additional Relevant Information (if available) |
|---|---|---|
AutoPilot Ending Metrics to Dashboards and Feeds |
||
GBM Survey Data into Customer Reporting |
||
Organizational Groups |
||
Chatlog Redesign |
||
Customer-Ended Flexible Concurrency Signal |
||
Historical Reporting Upgrade Release |
||
Conversation Manager - Experience Updates |
||
Conversation Manager - Optimizations |
||
Live Insights Queue Groups |
||
Flexible Concurrency |
||
Sentiment Analysis |
||
Conversation Manager - Loading Enhancements |
||
High Queue Mitigation - Custom High Wait Message |
||
Custom Attributes in Conversation Manager |
||
Exact Search |
||
Occupancy and Utilization Update |
||
Rebrand and Nav Update |
||
Conversation Sentiment Enhancements |
||
A new field rep\_unassignment\_ts added to rep\_activity export |
New field rep\_unassignment\_ts added to rep\_activity export |
|
Deprecation of company\_id |
||
Team and Location tables for Live Insights |
||
Ingest entry\_type dimension via a customer facing feed |
||
Adding an allow-list for known good fields to output from CustomerJourney Feed |
Adding an allow-list for known good fields to output from CustomerJourney Feed |
|
Snowflake Cubes Deployment |
||
Overflow Queue Routing |
Administrators can redirect traffic from one queue to another. |
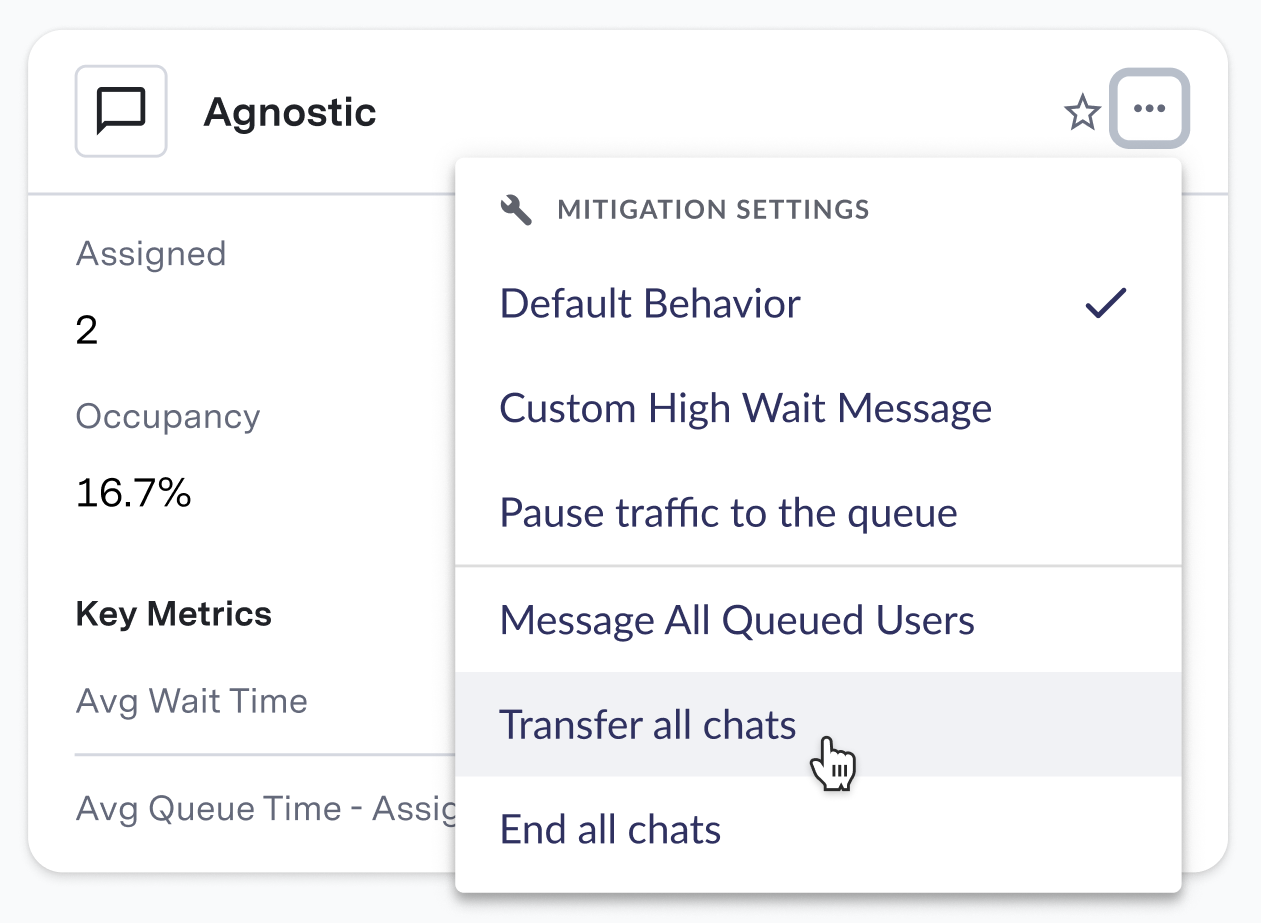 ### Bulk Chat Transfer
A user sees a dropdown list and selects the “Transfer all chats” item from the dropdown menu.
A queue selection modal appears to ask: “Select the queue which you want to transfer all chats to?” and they see a downdrop list of all the queue names and need to select a queue name and click transfer chats button.
A toast message appears informing the user that all chats have been transferred.
The end customer does not see a change on their side and assumes they are still waiting in a queue.
### Bulk Chat Closure
A user clicks on the 3 dots in the upper right hand corner of the queue card they want to impact.
The user sees a dropdown list and selects the “End all chats” item from the dropdown menu. A confirmation modal appears to ask: “Are you sure you want to end all chats in this queue?” and they need to select confirm/yes to complete the action of ending all chats.
A toast message appears informing the user that all chats are ended.
The end customer sees the normal “Conversation has ended” component.
# Overflow Queue Routing
Source: https://docs.asapp.com/messaging-platform/feature-releases/insights-manager/overflow-queue-routing
## Feature Release
This is the announcement for an upcoming ASAPP feature. Your ASAPP account team will provide a target release date and can direct you to more detailed information as needed.
## Overview
Administrators can redirect the traffic from one queue to another queue based on two different rules, namely: business hours and agent availability.
**Business Hours Rule**
The chat traffic from queue A is redirected to queue B when it is later than the open operating business hours for queue B.
**Agent Availability Rule**
The chat traffic from queue A is redirected to queue B when there is no available agent serving queue A.
## Use and Impact
Queue Routing impacts in the following ways:
* Reduce estimated wait time for end-customers
* Support closed queues when it is a legal requirement
## How it Works
Admins can choose to redirect traffic from Queue A to Queue B based on a rule configuration which is set by an ASAPP representative.
# Teams and Locations Tables for Live Insights
Source: https://docs.asapp.com/messaging-platform/feature-releases/insights-manager/teams-and-locations-tables-for-live-insights
## Feature Release
This is the announcement for an upcoming ASAPP feature. Your ASAPP account team will provide a target release date and can direct you to more detailed information as needed.
## Overview
Live Insights now offers a Team and a Locations tab with filtering options that helps to oversee the management of teams and agents. Each tab shows the size and occupancy of each result.
### Bulk Chat Transfer
A user sees a dropdown list and selects the “Transfer all chats” item from the dropdown menu.
A queue selection modal appears to ask: “Select the queue which you want to transfer all chats to?” and they see a downdrop list of all the queue names and need to select a queue name and click transfer chats button.
A toast message appears informing the user that all chats have been transferred.
The end customer does not see a change on their side and assumes they are still waiting in a queue.
### Bulk Chat Closure
A user clicks on the 3 dots in the upper right hand corner of the queue card they want to impact.
The user sees a dropdown list and selects the “End all chats” item from the dropdown menu. A confirmation modal appears to ask: “Are you sure you want to end all chats in this queue?” and they need to select confirm/yes to complete the action of ending all chats.
A toast message appears informing the user that all chats are ended.
The end customer sees the normal “Conversation has ended” component.
# Overflow Queue Routing
Source: https://docs.asapp.com/messaging-platform/feature-releases/insights-manager/overflow-queue-routing
## Feature Release
This is the announcement for an upcoming ASAPP feature. Your ASAPP account team will provide a target release date and can direct you to more detailed information as needed.
## Overview
Administrators can redirect the traffic from one queue to another queue based on two different rules, namely: business hours and agent availability.
**Business Hours Rule**
The chat traffic from queue A is redirected to queue B when it is later than the open operating business hours for queue B.
**Agent Availability Rule**
The chat traffic from queue A is redirected to queue B when there is no available agent serving queue A.
## Use and Impact
Queue Routing impacts in the following ways:
* Reduce estimated wait time for end-customers
* Support closed queues when it is a legal requirement
## How it Works
Admins can choose to redirect traffic from Queue A to Queue B based on a rule configuration which is set by an ASAPP representative.
# Teams and Locations Tables for Live Insights
Source: https://docs.asapp.com/messaging-platform/feature-releases/insights-manager/teams-and-locations-tables-for-live-insights
## Feature Release
This is the announcement for an upcoming ASAPP feature. Your ASAPP account team will provide a target release date and can direct you to more detailed information as needed.
## Overview
Live Insights now offers a Team and a Locations tab with filtering options that helps to oversee the management of teams and agents. Each tab shows the size and occupancy of each result.
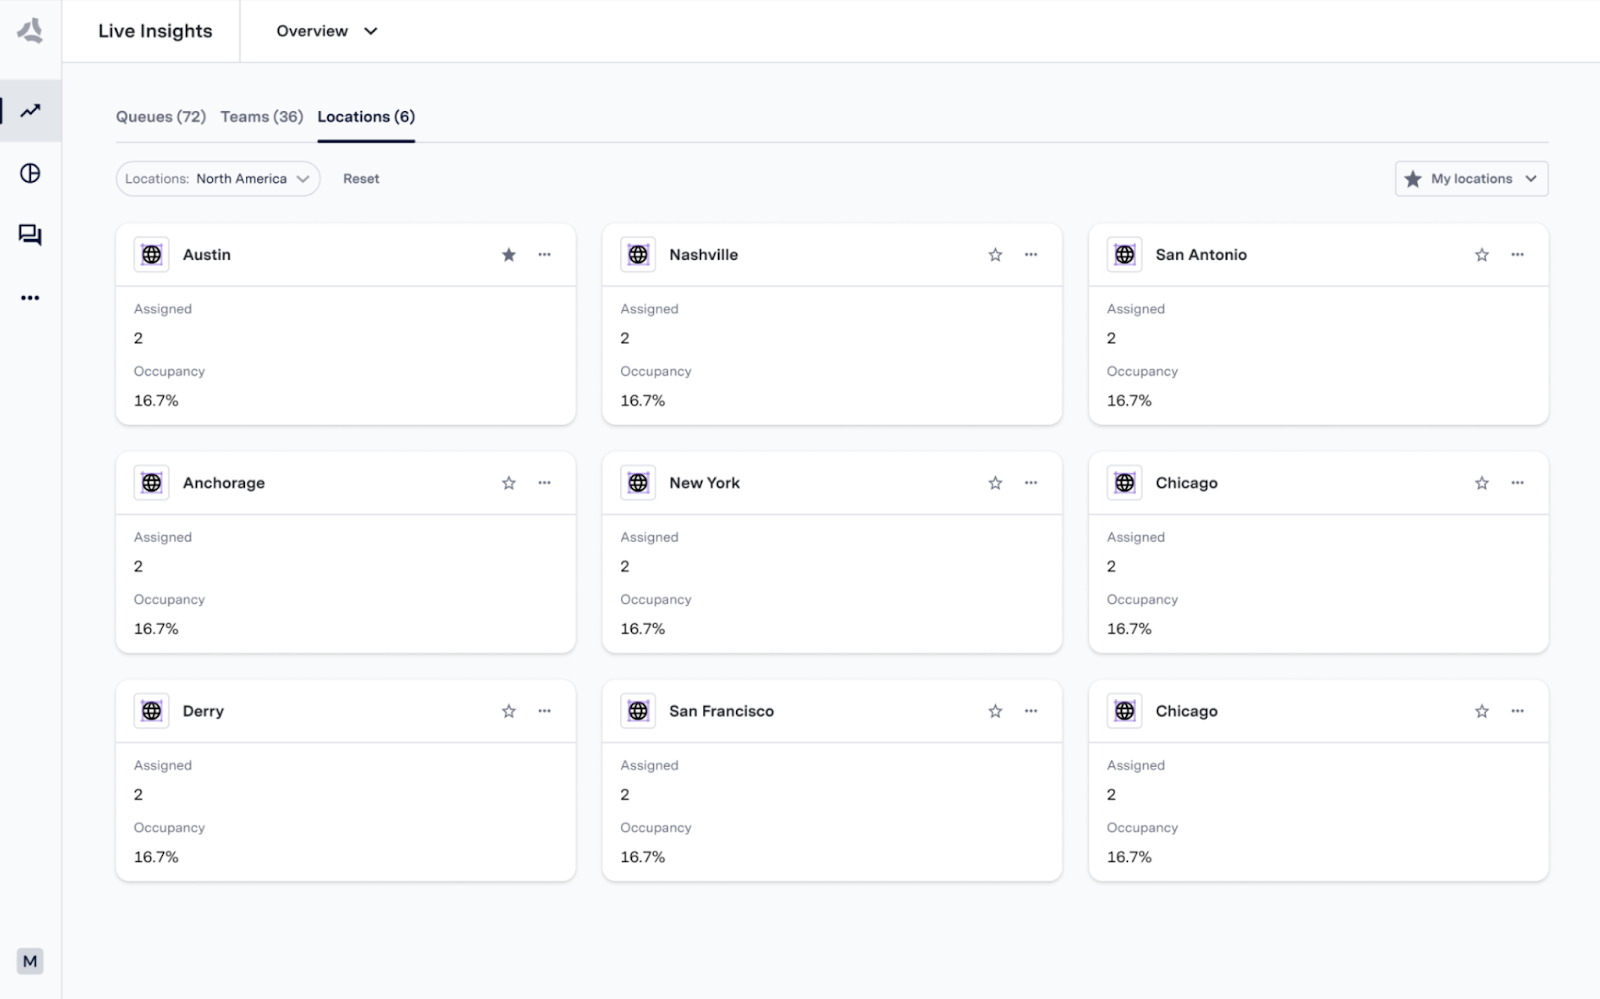 ## Use and Impact
Customers assign staff to their queues from various sites/BPOs, which complicates tracking the real-time performance of their agents for administrators. They lack visibility into agent behaviors, outages, and staffing levels across different geographic locations.
Additionally, supervisors are sometimes required to provide hourly updates on agent status (active, on lunch, etc.), necessitating an easy method for accessing this information. The additional teams and location tabs in insights manager make the administrators task of managing their teams across various locations easier and more efficient.
## How It Works
Supervisors can track the following:
### Live Insights
* **Team Tab**
* **Locations Tab**
### Procedure
The administrator can see a list of agents after they have clicked into a particular queue, then selected Performance from the left-hand panel and clicked into the Agents icon on the right-hand panel.
They can further oversee results by performance metrics of the current day and filter both the agent list and metrics by any of the following attributes:
1. **Agent Name**
2. **Location**
3. **Team**
4. **Status**
## Use and Impact
Customers assign staff to their queues from various sites/BPOs, which complicates tracking the real-time performance of their agents for administrators. They lack visibility into agent behaviors, outages, and staffing levels across different geographic locations.
Additionally, supervisors are sometimes required to provide hourly updates on agent status (active, on lunch, etc.), necessitating an easy method for accessing this information. The additional teams and location tabs in insights manager make the administrators task of managing their teams across various locations easier and more efficient.
## How It Works
Supervisors can track the following:
### Live Insights
* **Team Tab**
* **Locations Tab**
### Procedure
The administrator can see a list of agents after they have clicked into a particular queue, then selected Performance from the left-hand panel and clicked into the Agents icon on the right-hand panel.
They can further oversee results by performance metrics of the current day and filter both the agent list and metrics by any of the following attributes:
1. **Agent Name**
2. **Location**
3. **Team**
4. **Status**
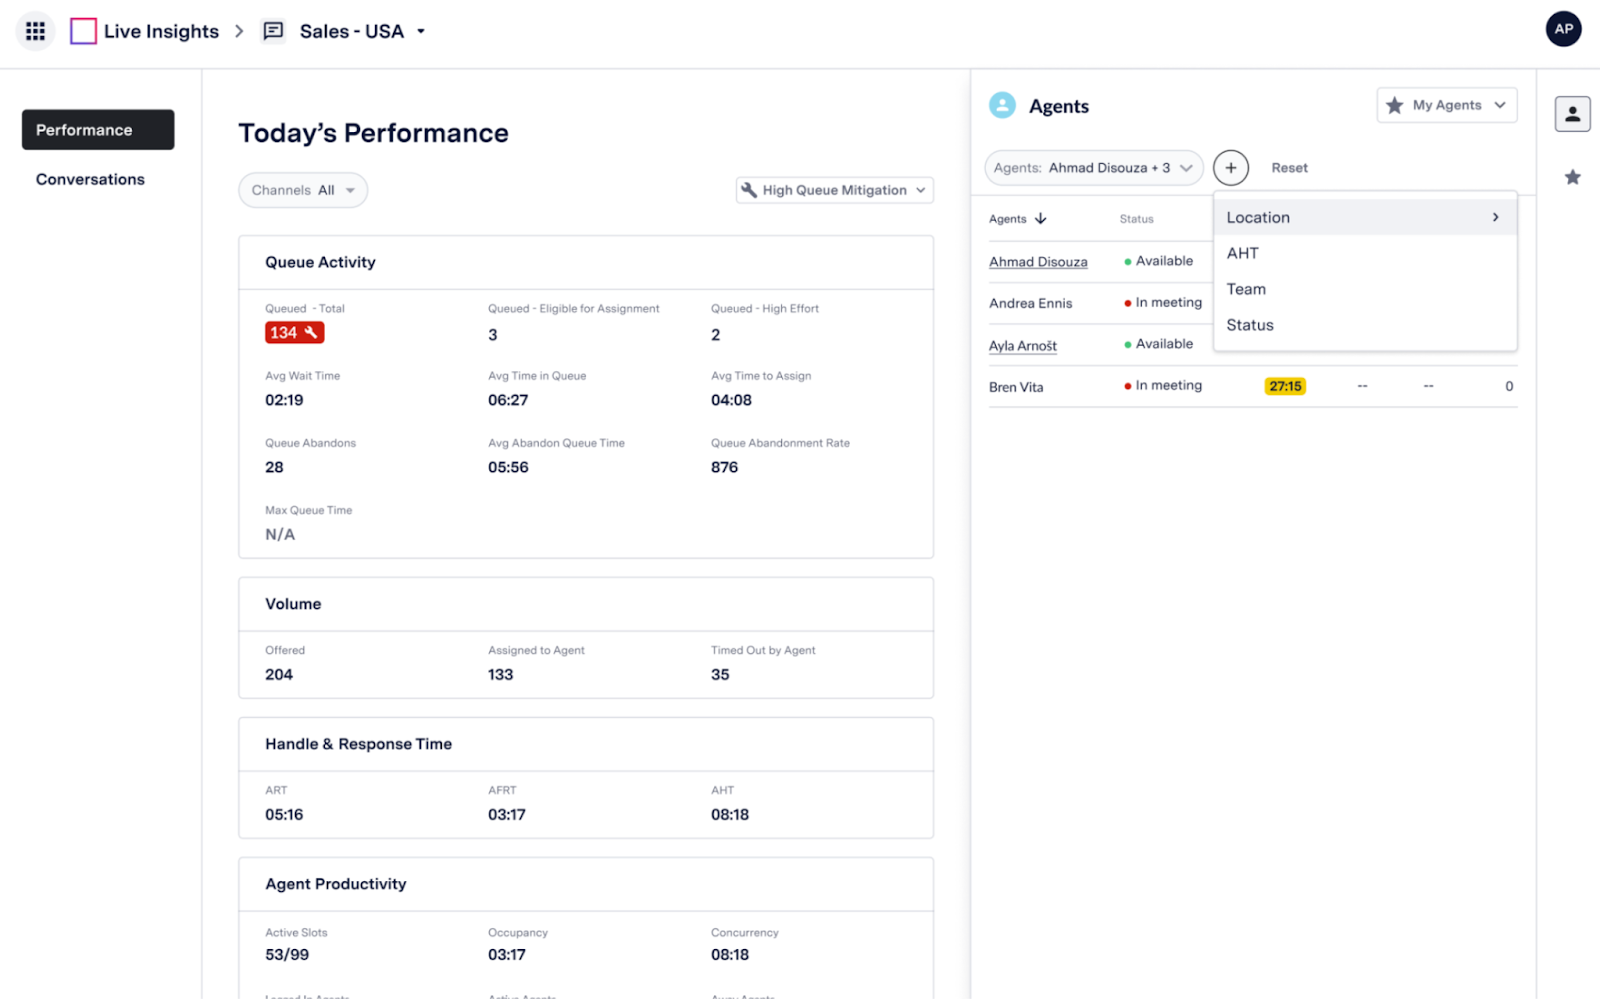 ### Management Capabilities
**Filtering by location**
Each location provides updates of performance and agents names.
**Filtering by site**
Each administrator can provide an hourly update of how many agents are active, on lunch, or in a different state as well as view corresponding metrics
### Feature Configuration
All information on which location and teams an agent belongs to is sourced through the SSO integration with ASAPP. Customers that require any changes to the data should change the respective attribute being passed to ASAPP.
Please contact your ASAPP representative for further information.
# Specific Case Releases Overview
Source: https://docs.asapp.com/messaging-platform/feature-releases/specific-case-releases
| Feature Name | Feature Release Details | Additional Relevant Information (if available) |
| :-------------------------- | :--------------------------------------------------------------------------------------------------------------------------------------------------- | :--------------------------------------------- |
| Grouping Data and Filtering | [Grouping Data and Filtering](/messaging-platform/feature-releases/specific-case-releases/grouping-data-and-filtering "Grouping Data and Filtering") | |
| Import and Export Flows | [Import and Export Flows](/messaging-platform/feature-releases/specific-case-releases/import-and-export-flows "Import and Export Flows") | |
| Live Insights Metrics | [Live Insights Metrics](/messaging-platform/feature-releases/specific-case-releases/live-insights-metrics "Live Insights Metrics") | |
# Grouping Data and Filtering
Source: https://docs.asapp.com/messaging-platform/feature-releases/specific-case-releases/grouping-data-and-filtering
## Feature Release
This is the announcement for an upcoming ASAPP feature. Your ASAPP account team will provide a target release date and can direct you to more detailed information as needed.
## Overview
Each user is assigned to a group based on their SSO/SAML credentials.
SSO/SAML credentials determine what metrics and chats each user can see in Live Insights, Conversation Manager, and User Management.
## Use and Impact
Different Users now have access to different data, according to their SSO Credentials.
This helps each user to only see what their tasks cover, without need for further filtering or browsing.
Data Grouping results in the following:
* Each BPO is restricted to only the chats that they service
* Workforce Management users are able to see all chats, metrics and agents related to their BPO
* Each agent sees only their respective chats and data
* Each manager is able to see only their teams chats according to the group
Organizations send ASAPP four attributes per user (BPO, Product, Role, Location) and ASAPP will construct a group name from the attributes.
ASAPP will maintain a view of the group structure in order to allow for filtering and queue association
## How it Works
The filters are defined according to attributes provided by each user through SSO, allowing filtering of User manager by groups.
### Management Capabilities
**Filtering by location**
Each location provides updates of performance and agents names.
**Filtering by site**
Each administrator can provide an hourly update of how many agents are active, on lunch, or in a different state as well as view corresponding metrics
### Feature Configuration
All information on which location and teams an agent belongs to is sourced through the SSO integration with ASAPP. Customers that require any changes to the data should change the respective attribute being passed to ASAPP.
Please contact your ASAPP representative for further information.
# Specific Case Releases Overview
Source: https://docs.asapp.com/messaging-platform/feature-releases/specific-case-releases
| Feature Name | Feature Release Details | Additional Relevant Information (if available) |
| :-------------------------- | :--------------------------------------------------------------------------------------------------------------------------------------------------- | :--------------------------------------------- |
| Grouping Data and Filtering | [Grouping Data and Filtering](/messaging-platform/feature-releases/specific-case-releases/grouping-data-and-filtering "Grouping Data and Filtering") | |
| Import and Export Flows | [Import and Export Flows](/messaging-platform/feature-releases/specific-case-releases/import-and-export-flows "Import and Export Flows") | |
| Live Insights Metrics | [Live Insights Metrics](/messaging-platform/feature-releases/specific-case-releases/live-insights-metrics "Live Insights Metrics") | |
# Grouping Data and Filtering
Source: https://docs.asapp.com/messaging-platform/feature-releases/specific-case-releases/grouping-data-and-filtering
## Feature Release
This is the announcement for an upcoming ASAPP feature. Your ASAPP account team will provide a target release date and can direct you to more detailed information as needed.
## Overview
Each user is assigned to a group based on their SSO/SAML credentials.
SSO/SAML credentials determine what metrics and chats each user can see in Live Insights, Conversation Manager, and User Management.
## Use and Impact
Different Users now have access to different data, according to their SSO Credentials.
This helps each user to only see what their tasks cover, without need for further filtering or browsing.
Data Grouping results in the following:
* Each BPO is restricted to only the chats that they service
* Workforce Management users are able to see all chats, metrics and agents related to their BPO
* Each agent sees only their respective chats and data
* Each manager is able to see only their teams chats according to the group
Organizations send ASAPP four attributes per user (BPO, Product, Role, Location) and ASAPP will construct a group name from the attributes.
ASAPP will maintain a view of the group structure in order to allow for filtering and queue association
## How it Works
The filters are defined according to attributes provided by each user through SSO, allowing filtering of User manager by groups.
 # Import and Export Flows
Source: https://docs.asapp.com/messaging-platform/feature-releases/specific-case-releases/import-and-export-flows
## Feature Release
This is the announcement for an upcoming ASAPP feature. Your ASAPP account team will provide a target release date and can direct you to more detailed information as needed.
## Overview
Provide flow builders with the ability to promote a flow from lower environments into production environments.
Export Button is available in the lower environment company marker to download a JSON file containing the flow details for a specific version.
Further, there is an import function in the production environment company marker where a user can upload (import) a JSON file with the flow details for a particular version.
## Use and Impact
This feature allows flow builders to export the JSON file for a given flow and then import the JSON file into to the production company marker. This allows the user to promote the flow from the lower environments into the production environment.
# Import and Export Flows
Source: https://docs.asapp.com/messaging-platform/feature-releases/specific-case-releases/import-and-export-flows
## Feature Release
This is the announcement for an upcoming ASAPP feature. Your ASAPP account team will provide a target release date and can direct you to more detailed information as needed.
## Overview
Provide flow builders with the ability to promote a flow from lower environments into production environments.
Export Button is available in the lower environment company marker to download a JSON file containing the flow details for a specific version.
Further, there is an import function in the production environment company marker where a user can upload (import) a JSON file with the flow details for a particular version.
## Use and Impact
This feature allows flow builders to export the JSON file for a given flow and then import the JSON file into to the production company marker. This allows the user to promote the flow from the lower environments into the production environment.
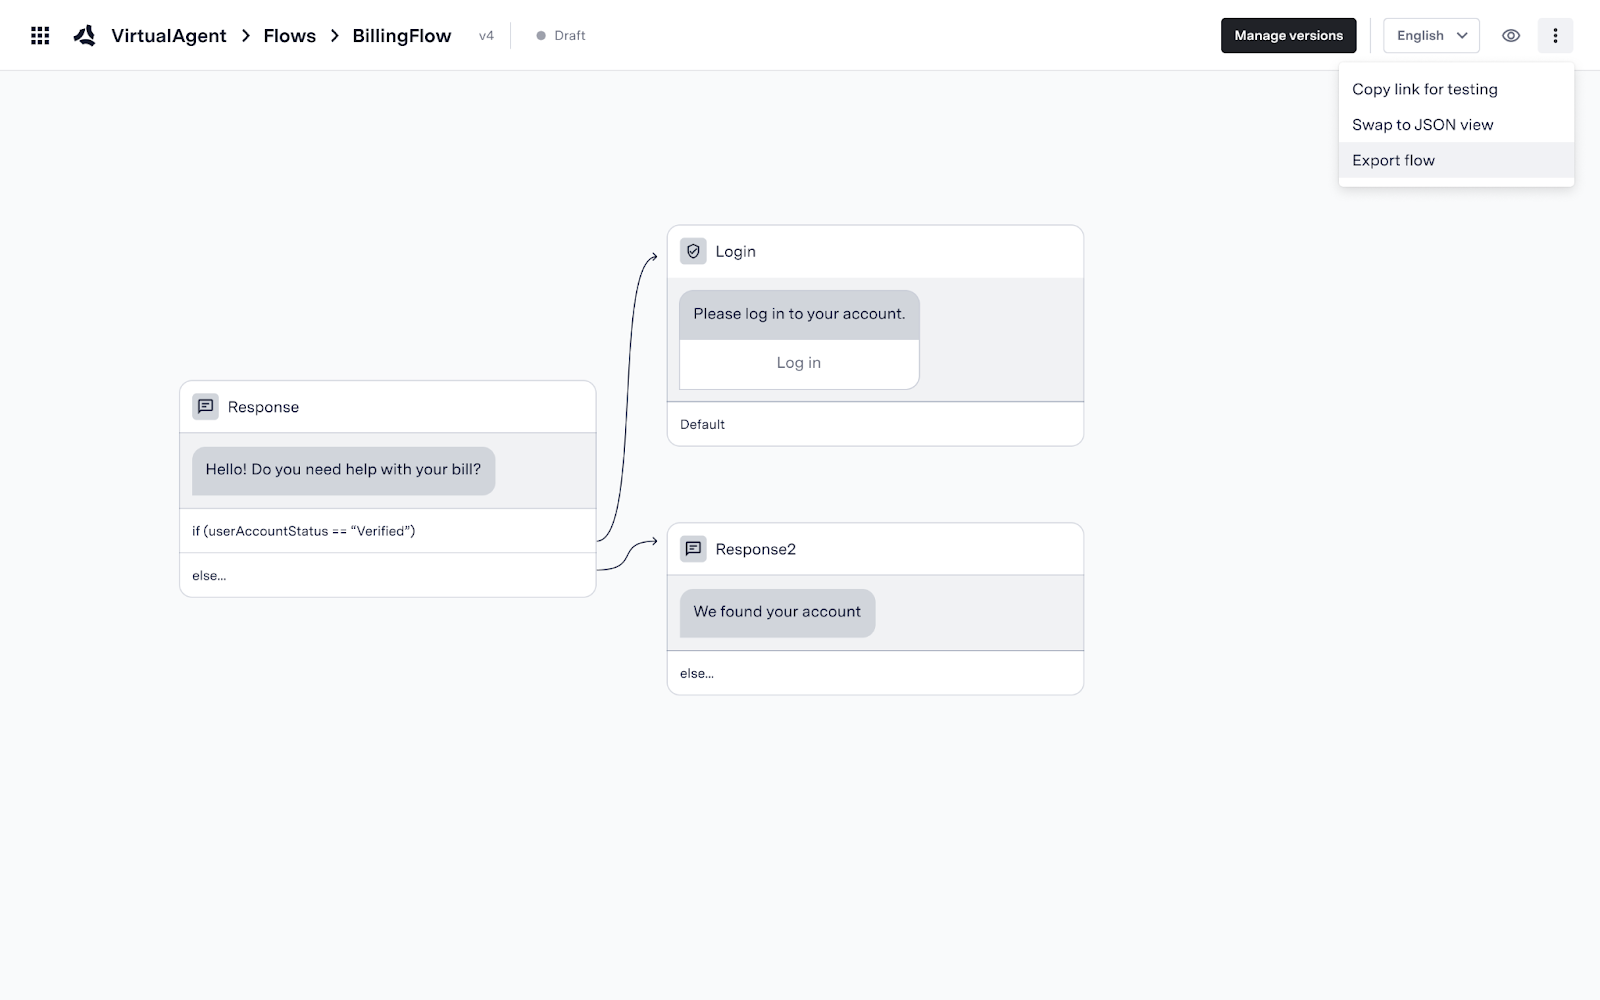 ## How it Works
In AI Console, a user navigates to the Flows tab of Virtual Agent to import a version of the flow.
The user navigates to the list of flows in the Virtual Agent tooling and clicks the "Import flow" button. The normal window to find and upload a file on the computer is brought up.
* If the flow already exists it will be auto-incremented to a new version to save it.
* If the flow does not exist it is saved with the associated index file and the version set is #1.
Users can select the flow and choose to export.
## How it Works
In AI Console, a user navigates to the Flows tab of Virtual Agent to import a version of the flow.
The user navigates to the list of flows in the Virtual Agent tooling and clicks the "Import flow" button. The normal window to find and upload a file on the computer is brought up.
* If the flow already exists it will be auto-incremented to a new version to save it.
* If the flow does not exist it is saved with the associated index file and the version set is #1.
Users can select the flow and choose to export.
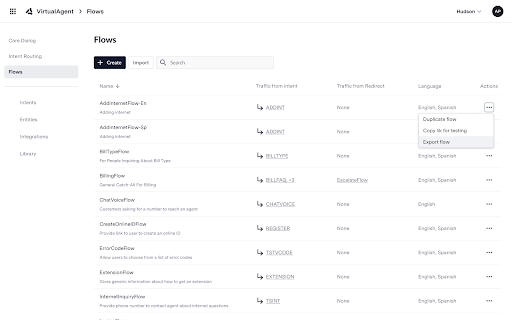 Export pop-up allows users to select the version to export.
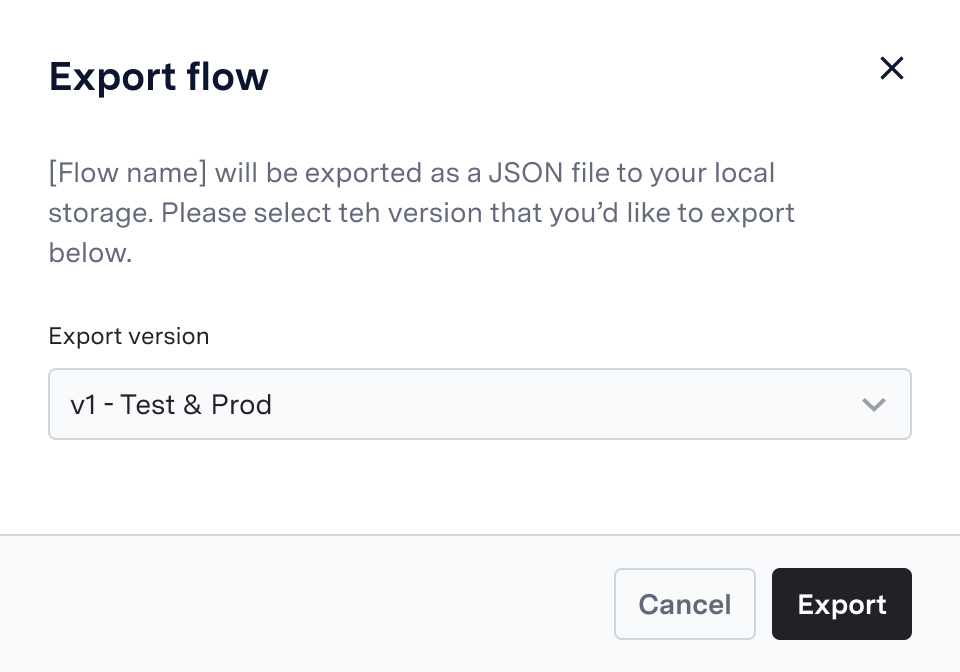 | | |
| :--------------------------------------------------------------------------------------------------------------------------------- | :--------------------------------------------------------------------------------------------------------------------------------- |
|
| | |
| :--------------------------------------------------------------------------------------------------------------------------------- | :--------------------------------------------------------------------------------------------------------------------------------- |
|  |
|  |
They can also choose an environment to import a flow.
# Live Insights Metrics
Source: https://docs.asapp.com/messaging-platform/feature-releases/specific-case-releases/live-insights-metrics
## Feature Release
This is the announcement for an upcoming ASAPP feature. Your ASAPP account team will provide a target release date and can direct you to more detailed information as needed.
## Overview
A new metric named - Average First Response Time was added in Live Insights to each queue card in order to monitor the amount of time it takes for a customer to receive their first response from an agent.
Additionally, a column named - SLA- was added to the conversations table within a queue card to monitor whether a conversation meets the response SLA time.
|
They can also choose an environment to import a flow.
# Live Insights Metrics
Source: https://docs.asapp.com/messaging-platform/feature-releases/specific-case-releases/live-insights-metrics
## Feature Release
This is the announcement for an upcoming ASAPP feature. Your ASAPP account team will provide a target release date and can direct you to more detailed information as needed.
## Overview
A new metric named - Average First Response Time was added in Live Insights to each queue card in order to monitor the amount of time it takes for a customer to receive their first response from an agent.
Additionally, a column named - SLA- was added to the conversations table within a queue card to monitor whether a conversation meets the response SLA time.
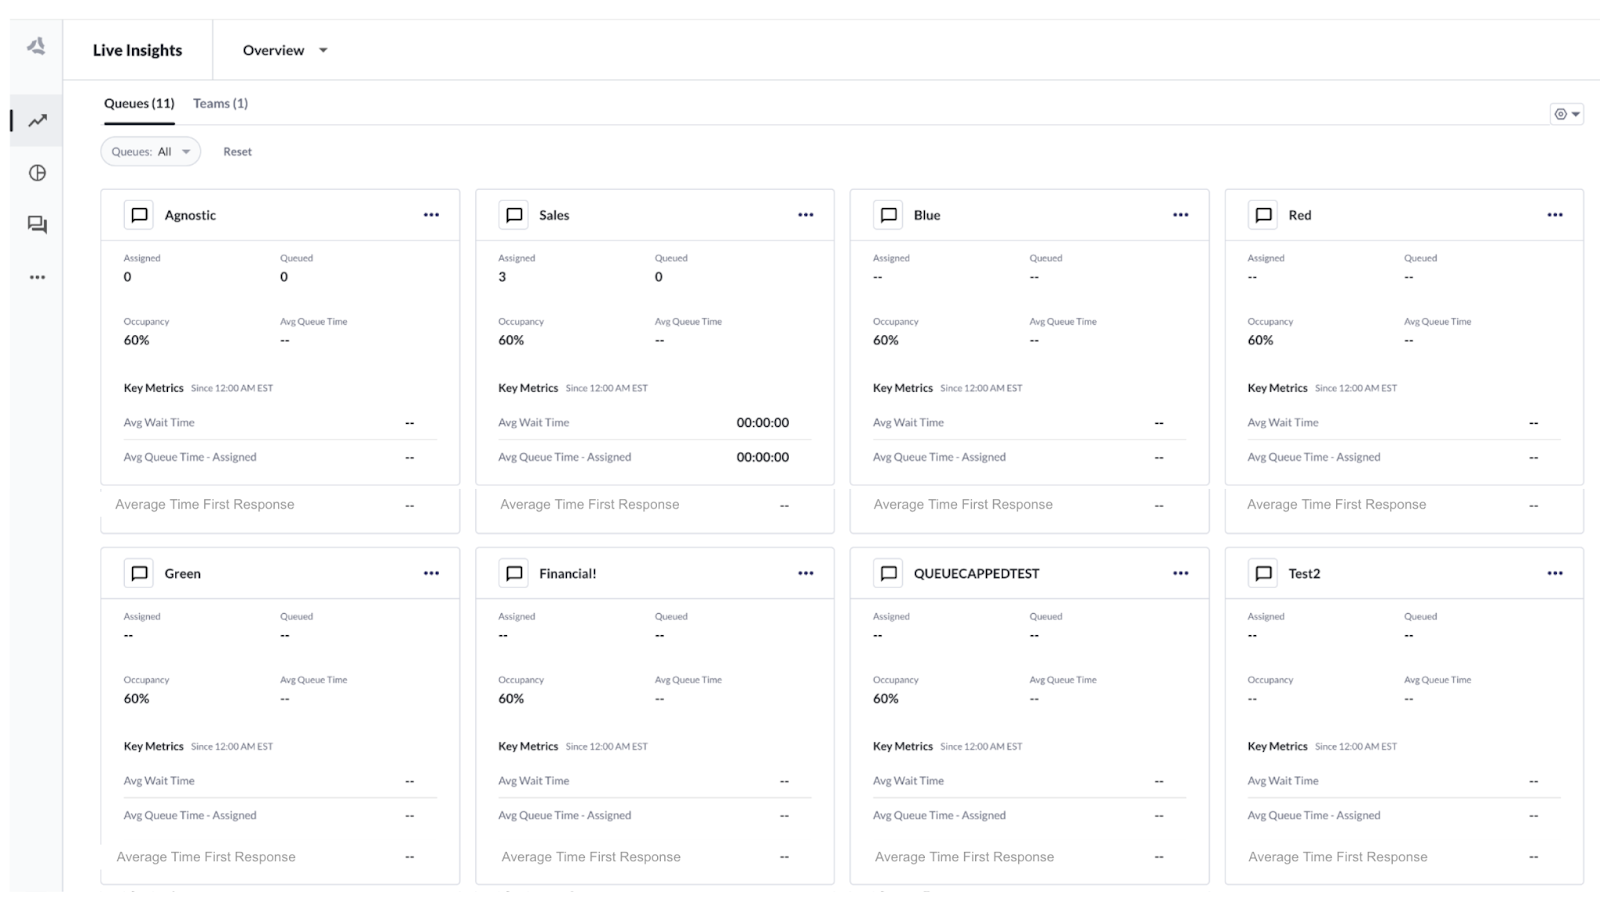 ## Use and Impact
WorkForce managers need to monitor SLA's in order to respond to changes in capacity as they need to meet contractual commitments.
## How it Works
Workforce management team monitors two key live metrics which are not present in ASAPP's Live Insights.
Some organizations require that the First Response time be within 2 minutes. In order to monitor whether they're meeting this SLA they have a metric named 'Average First Response Time' (definition: the average time consumers wait for the first human response in a conversation).
ASAPP will add a metric named 'Average First Response Time' to each queue card in Live Insights.
## Use and Impact
WorkForce managers need to monitor SLA's in order to respond to changes in capacity as they need to meet contractual commitments.
## How it Works
Workforce management team monitors two key live metrics which are not present in ASAPP's Live Insights.
Some organizations require that the First Response time be within 2 minutes. In order to monitor whether they're meeting this SLA they have a metric named 'Average First Response Time' (definition: the average time consumers wait for the first human response in a conversation).
ASAPP will add a metric named 'Average First Response Time' to each queue card in Live Insights.
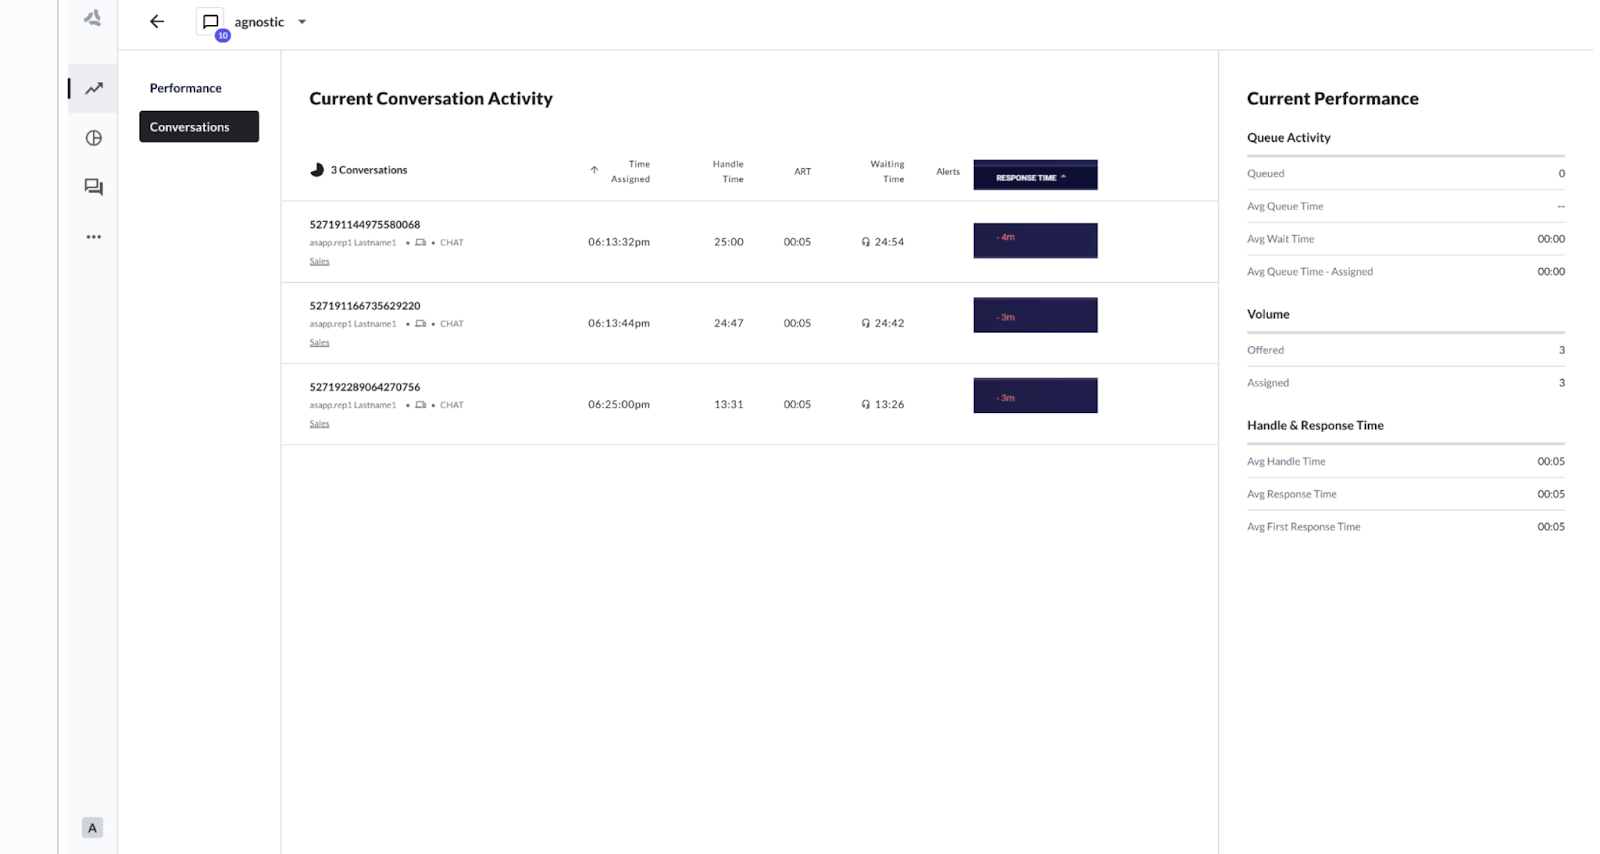 # Voice Agent Desk
Source: https://docs.asapp.com/messaging-platform/feature-releases/voice-agent-desk
# Voice Agent Desk
Source: https://docs.asapp.com/messaging-platform/feature-releases/voice-agent-desk
Feature Name |
Feature Release Details |
Additional Relevant Information (if available) |
|---|---|---|
Agent Performance Stats |
||
KB Center Panel Suggestions Redesign |
Please contact your Implementation Manager for further release details. |
|
On-the-fly Notes |
Please contact your Implementation Manager for further release details. |
|
Knowledge Base Favorite Folders |
||
Knowledge Base Quick Access Recommendations |
Please contact your Implementation Manager for further release details. |
|
Transcript Preview |
Please contact your Implementation Manager for further release details. |
|
Context Card: Recent Calls |
Please contact your Implementation Manager for further release details. |
|
Displaying IVR Utterances in Voice Desk |
Please contact your Implementation Manager for further release details. |
|
Desk Redesign: Left Rail, Call, & Color Temperature Setting |
Please contact your Implementation Manager for further release details. |
|
Whisper |
Please contact your Implementation Manager for release details. |
|
Chat Log / Transcript Redesign |
Please contact your Implementation Manager for further release details. |
|
Automatic Summary |
||
Themeable Desk |
Includes Dark Mode |
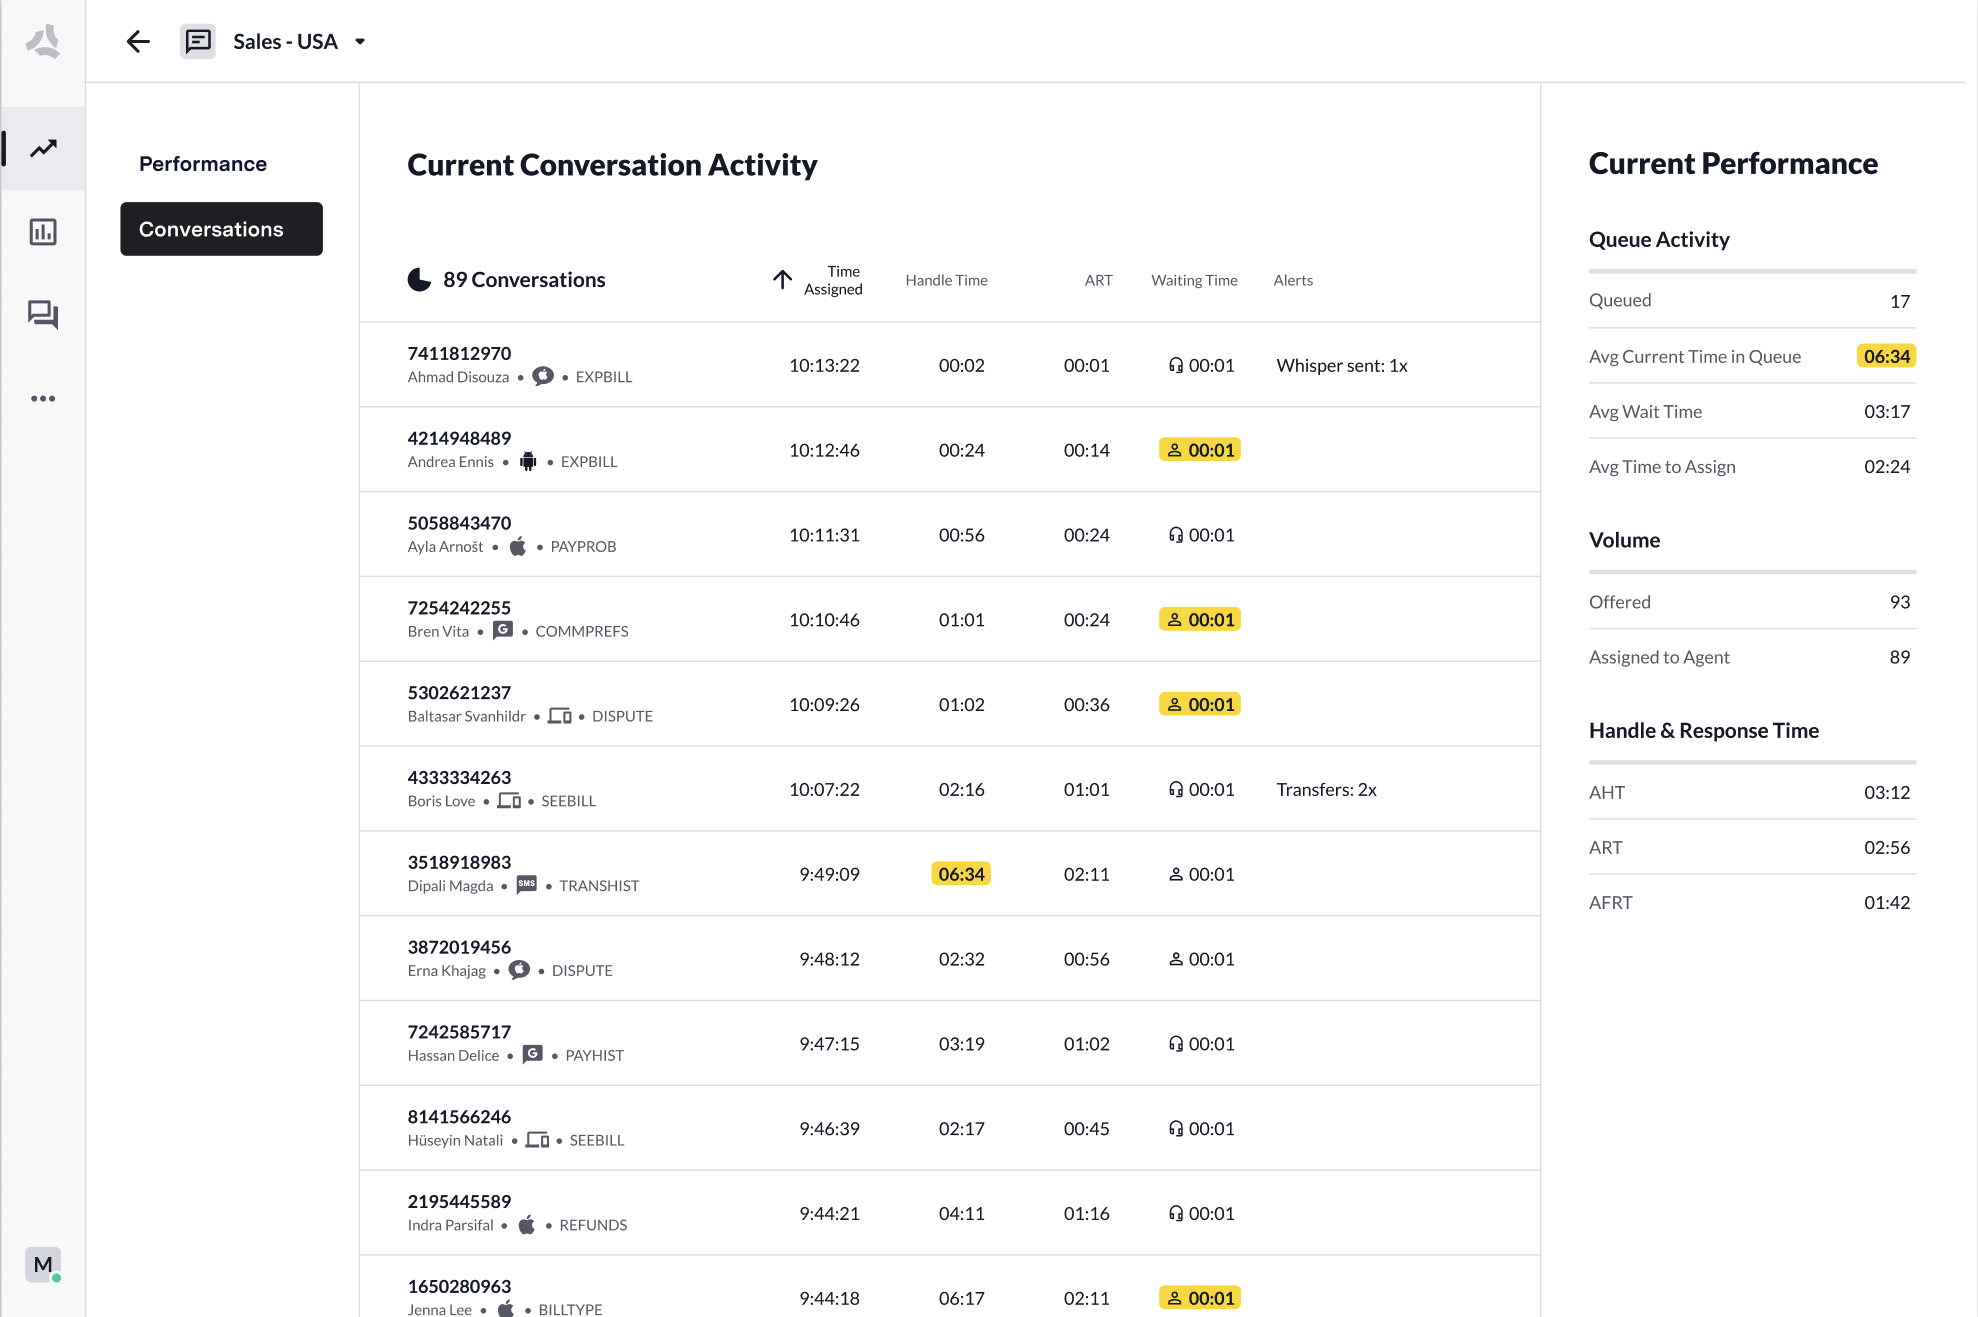 * Track agent performance in real-time
* Monitor conversations as they happen through the live transcription service
* Whisper to agents as customer interactions happen to guide and course-correct behaviors
* Keep an eye on all your live performance metrics such as handle time, queue volume, and resolution rate
* Mitigate high queue volume to better manage instances of high traffic
* Track agent performance in real-time
* Monitor conversations as they happen through the live transcription service
* Whisper to agents as customer interactions happen to guide and course-correct behaviors
* Keep an eye on all your live performance metrics such as handle time, queue volume, and resolution rate
* Mitigate high queue volume to better manage instances of high traffic
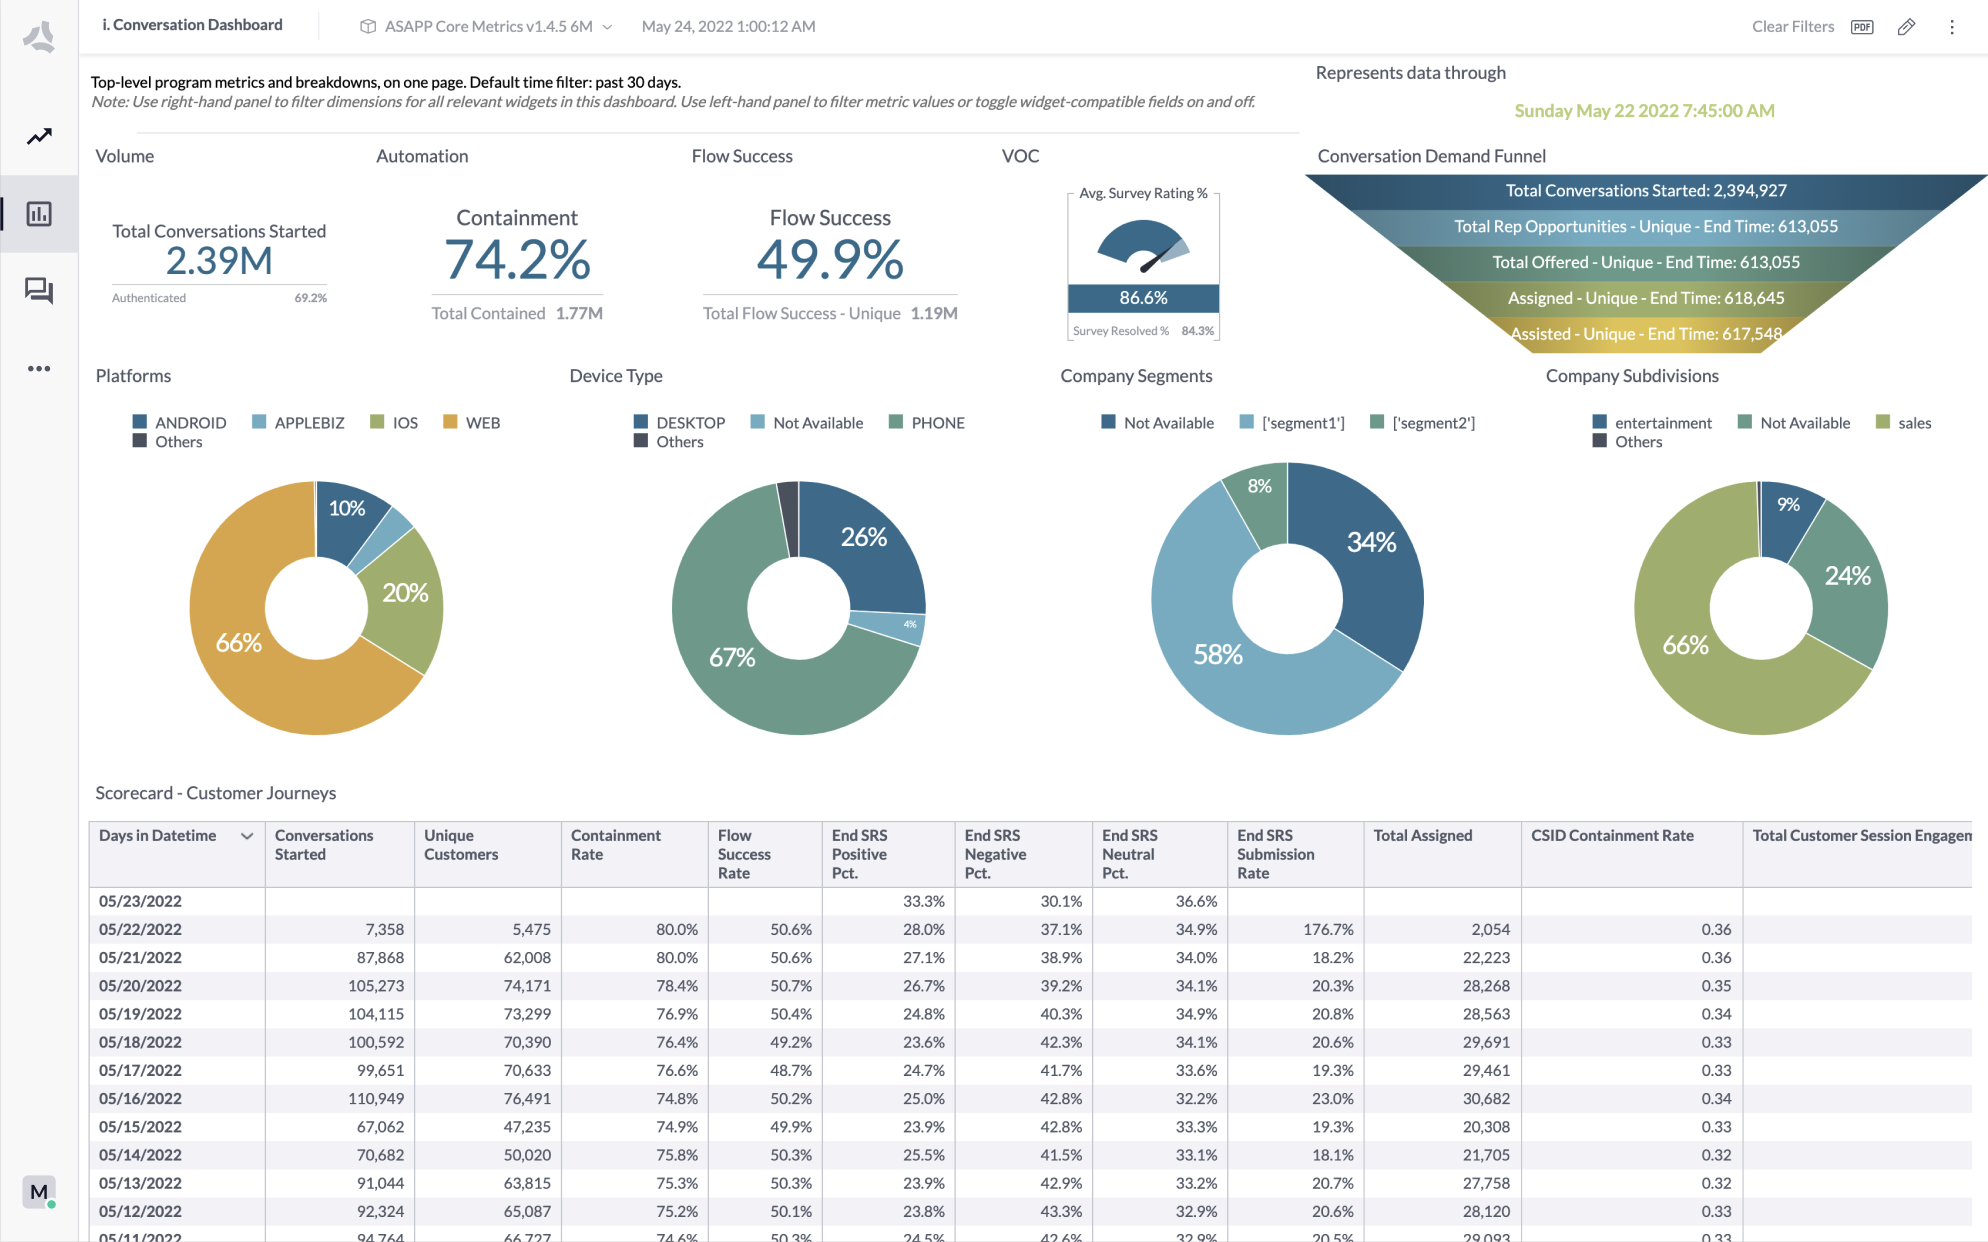 * Access core performance dashboards pre-populated with your data, and ready to conduct analyses
* Program dashboards provide a deep overview of primary conversation and agent metrics
* Automation & Flow dashboards provide insights into the performance of flow containment, successful automations, and intent performance
* Operation & Workforce Management dashboards provide in-depth data to understand how agents are utilized, and pinpoint areas that are ripe for improvement
* Outcomes dashboards provide a view into the voice of the customer
* Content creators can create and share dashboards with members of your organization
* Automate report sharing based on your preferred schedule. Attach data to automated emails to continue investigations into your preferred tools
## Conversation Manager
Conversation Manager provides robust features to help you conduct investigations on customer interactions. Use the tools provided to find relevant conversations to support your quality control needs, to deepen research initiated in Historical Insights, or to review performance data associated with your conversations.
* Access core performance dashboards pre-populated with your data, and ready to conduct analyses
* Program dashboards provide a deep overview of primary conversation and agent metrics
* Automation & Flow dashboards provide insights into the performance of flow containment, successful automations, and intent performance
* Operation & Workforce Management dashboards provide in-depth data to understand how agents are utilized, and pinpoint areas that are ripe for improvement
* Outcomes dashboards provide a view into the voice of the customer
* Content creators can create and share dashboards with members of your organization
* Automate report sharing based on your preferred schedule. Attach data to automated emails to continue investigations into your preferred tools
## Conversation Manager
Conversation Manager provides robust features to help you conduct investigations on customer interactions. Use the tools provided to find relevant conversations to support your quality control needs, to deepen research initiated in Historical Insights, or to review performance data associated with your conversations.
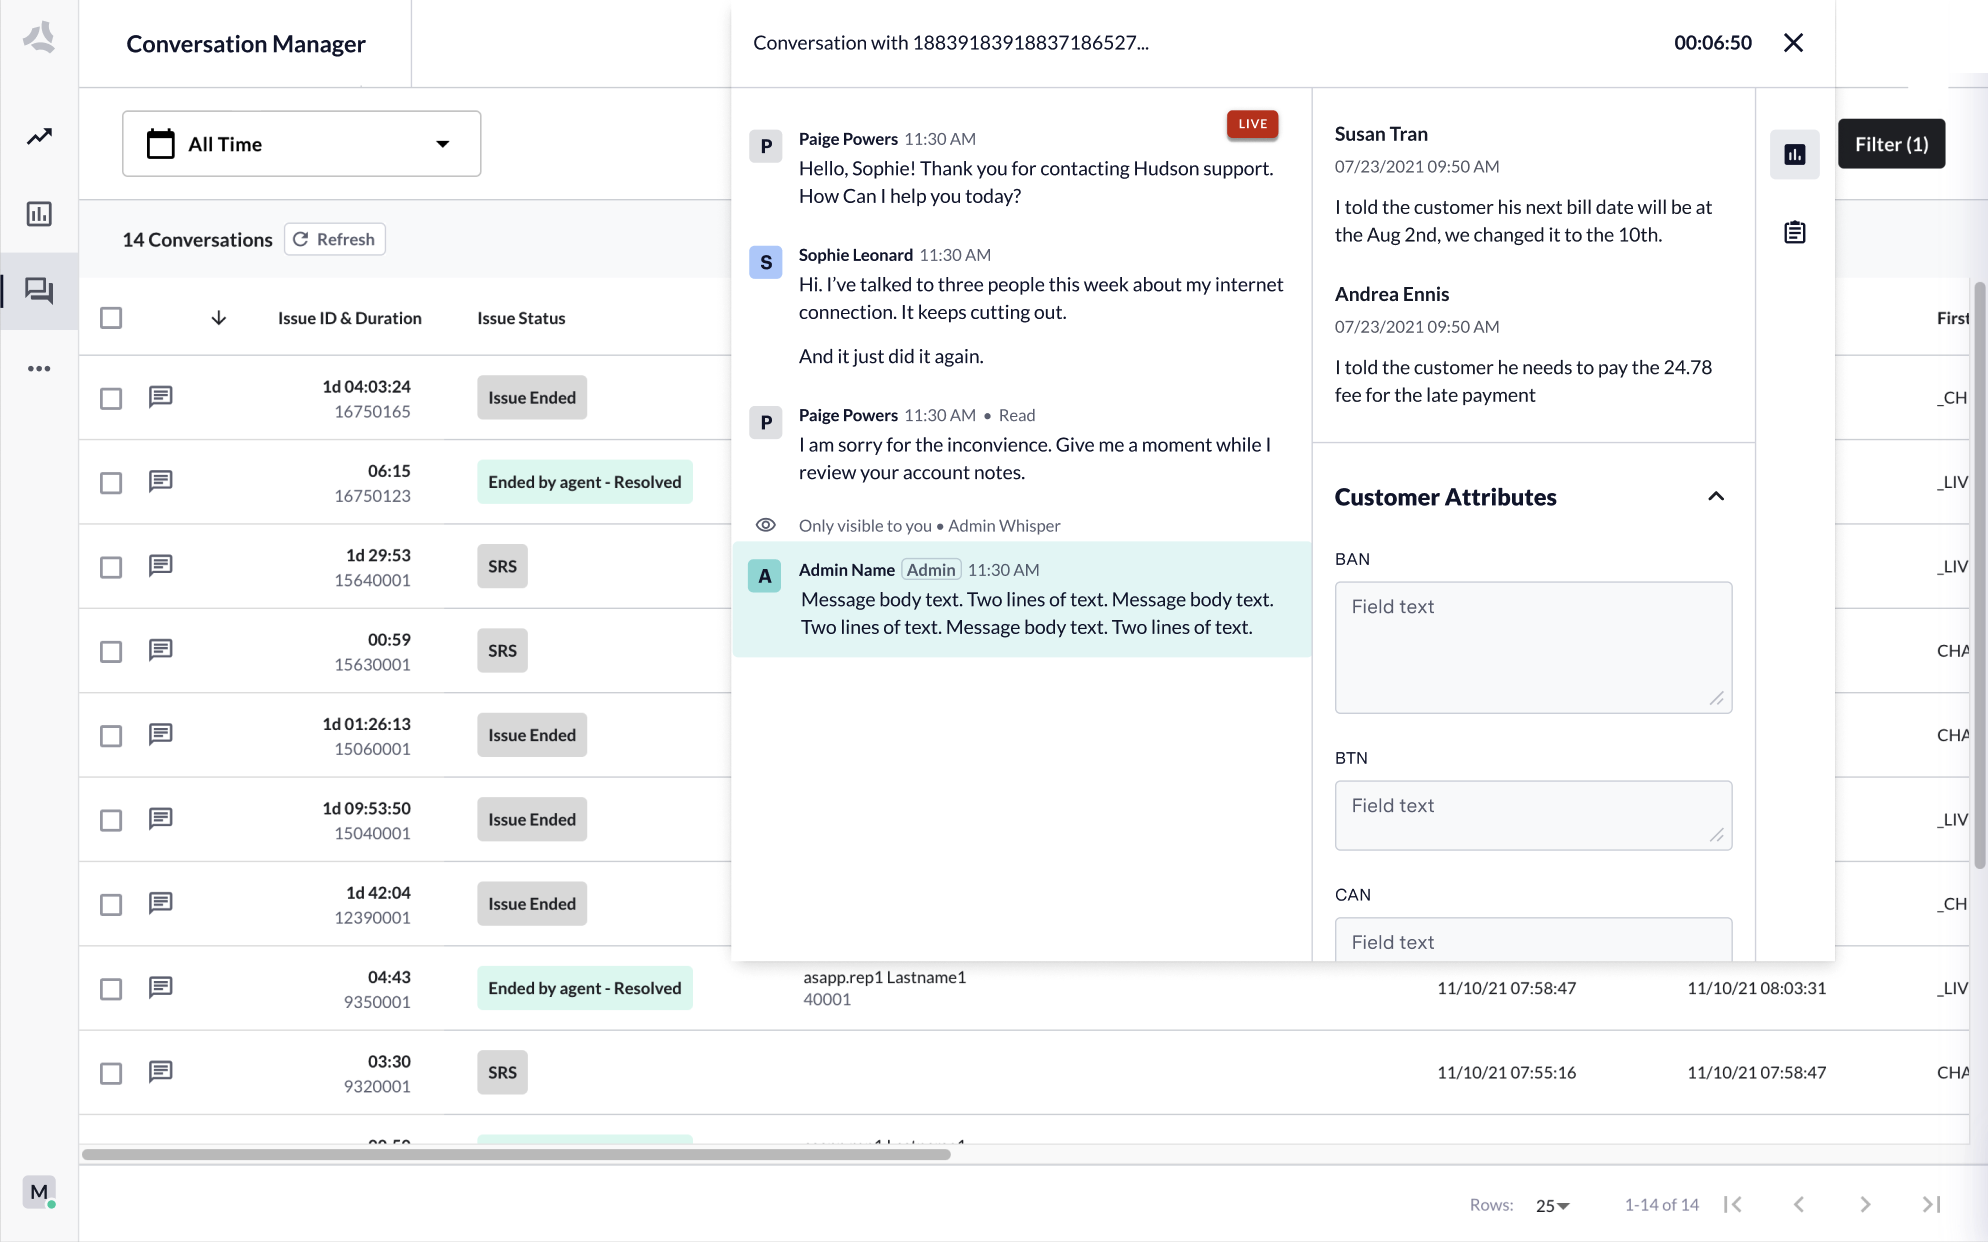 * Find all captured conversations, regardless of channels
* Filter and drill-down into conversation content based on performance data, metadata, keywords, and personal customer identifiers
* Review feedback survey data submitted by customers
## Users & Capabilities
Insights Manager supports two main types of users: **Workforce Management Leaders** and **Business Stakeholders**.
| Workforce Management Leaders | Business Stakeholders |
| :--------------------------------------------------------------------------------------------------------------------------------------------------------------------------- | :----------------------------------------------------------------------------------------------------------------------------------------------------------------------------- |
| Who: Supervisors, Managers, and Front Line Leaders directly involved in the day-to-day management of individual or multiple contact centers. | Who: Business & CX Analysts, Program Managers, and Directors directly working with ASAPP teams to implement and optimize for business goals. |
| What: Managing agent staffing and contact center volume; Monitoring agent performance and customer satisfaction levels; Involved in coaching and quality management efforts. | What: Focused on optimizing for specific business goals; Creating and synthesizing data for end-to-end reporting; Detecting trends and improving customer experience insights. |
### Monitoring Capabilities
| | Workforce Management Leaders | Business Stakeholders |
| :----------------------------- | :--------------------------- | :-------------------- |
| Queue Groups & Personalization | ✓ | ✓ |
| Queue Performance | ✓ | ✓ |
| Agent Monitoring | ✓ | ✓ |
| CSAT Monitoring | ✓ | ✓ |
| Viewing Live Conversations | ✓ | - |
| Whisper | ✓ | - |
| High Queue Mitigation | - | ✓ |
| Chat Takeover | ✓ | - |
| Queue Overflow Routing | ✓ | - |
### Reporting Capabilities
| | Workforce Management Leaders | Business Stakeholders |
| :---------------------------- | :--------------------------- | :-------------------- |
| Core Historical Reports | ✓ | ✓ |
| Creating & Sharing Reports | ✓ | ✓ |
| Data Definitions / Dictionary | ✓ | ✓ |
| Viewing Conversations | ✓ | ✓ |
| Filters | ✓ | ✓ |
| Notes | ✓ | ✓ |
| Search | ✓ | ✓ |
| Export | ✓ | ✓ |
### Management Capabilities
| | Workforce Management Leaders | Business Stakeholders |
| :------------- | :--------------------------- | :-------------------- |
| Business Hours | ✓ | - |
| Users | ✓ | - |
# Live Insights Overview
Source: https://docs.asapp.com/messaging-platform/insights-manager/live-insights
Learn how to use Live Insights to monitor and analyze real-time contact center activity.
Live Insights provides tools to track agent and conversation performance in real-time. You can:
* Monitor all queues
* Monitor alerts
* Drill down into each queue to gain insight into what areas need attention.
* Find all captured conversations, regardless of channels
* Filter and drill-down into conversation content based on performance data, metadata, keywords, and personal customer identifiers
* Review feedback survey data submitted by customers
## Users & Capabilities
Insights Manager supports two main types of users: **Workforce Management Leaders** and **Business Stakeholders**.
| Workforce Management Leaders | Business Stakeholders |
| :--------------------------------------------------------------------------------------------------------------------------------------------------------------------------- | :----------------------------------------------------------------------------------------------------------------------------------------------------------------------------- |
| Who: Supervisors, Managers, and Front Line Leaders directly involved in the day-to-day management of individual or multiple contact centers. | Who: Business & CX Analysts, Program Managers, and Directors directly working with ASAPP teams to implement and optimize for business goals. |
| What: Managing agent staffing and contact center volume; Monitoring agent performance and customer satisfaction levels; Involved in coaching and quality management efforts. | What: Focused on optimizing for specific business goals; Creating and synthesizing data for end-to-end reporting; Detecting trends and improving customer experience insights. |
### Monitoring Capabilities
| | Workforce Management Leaders | Business Stakeholders |
| :----------------------------- | :--------------------------- | :-------------------- |
| Queue Groups & Personalization | ✓ | ✓ |
| Queue Performance | ✓ | ✓ |
| Agent Monitoring | ✓ | ✓ |
| CSAT Monitoring | ✓ | ✓ |
| Viewing Live Conversations | ✓ | - |
| Whisper | ✓ | - |
| High Queue Mitigation | - | ✓ |
| Chat Takeover | ✓ | - |
| Queue Overflow Routing | ✓ | - |
### Reporting Capabilities
| | Workforce Management Leaders | Business Stakeholders |
| :---------------------------- | :--------------------------- | :-------------------- |
| Core Historical Reports | ✓ | ✓ |
| Creating & Sharing Reports | ✓ | ✓ |
| Data Definitions / Dictionary | ✓ | ✓ |
| Viewing Conversations | ✓ | ✓ |
| Filters | ✓ | ✓ |
| Notes | ✓ | ✓ |
| Search | ✓ | ✓ |
| Export | ✓ | ✓ |
### Management Capabilities
| | Workforce Management Leaders | Business Stakeholders |
| :------------- | :--------------------------- | :-------------------- |
| Business Hours | ✓ | - |
| Users | ✓ | - |
# Live Insights Overview
Source: https://docs.asapp.com/messaging-platform/insights-manager/live-insights
Learn how to use Live Insights to monitor and analyze real-time contact center activity.
Live Insights provides tools to track agent and conversation performance in real-time. You can:
* Monitor all queues
* Monitor alerts
* Drill down into each queue to gain insight into what areas need attention.
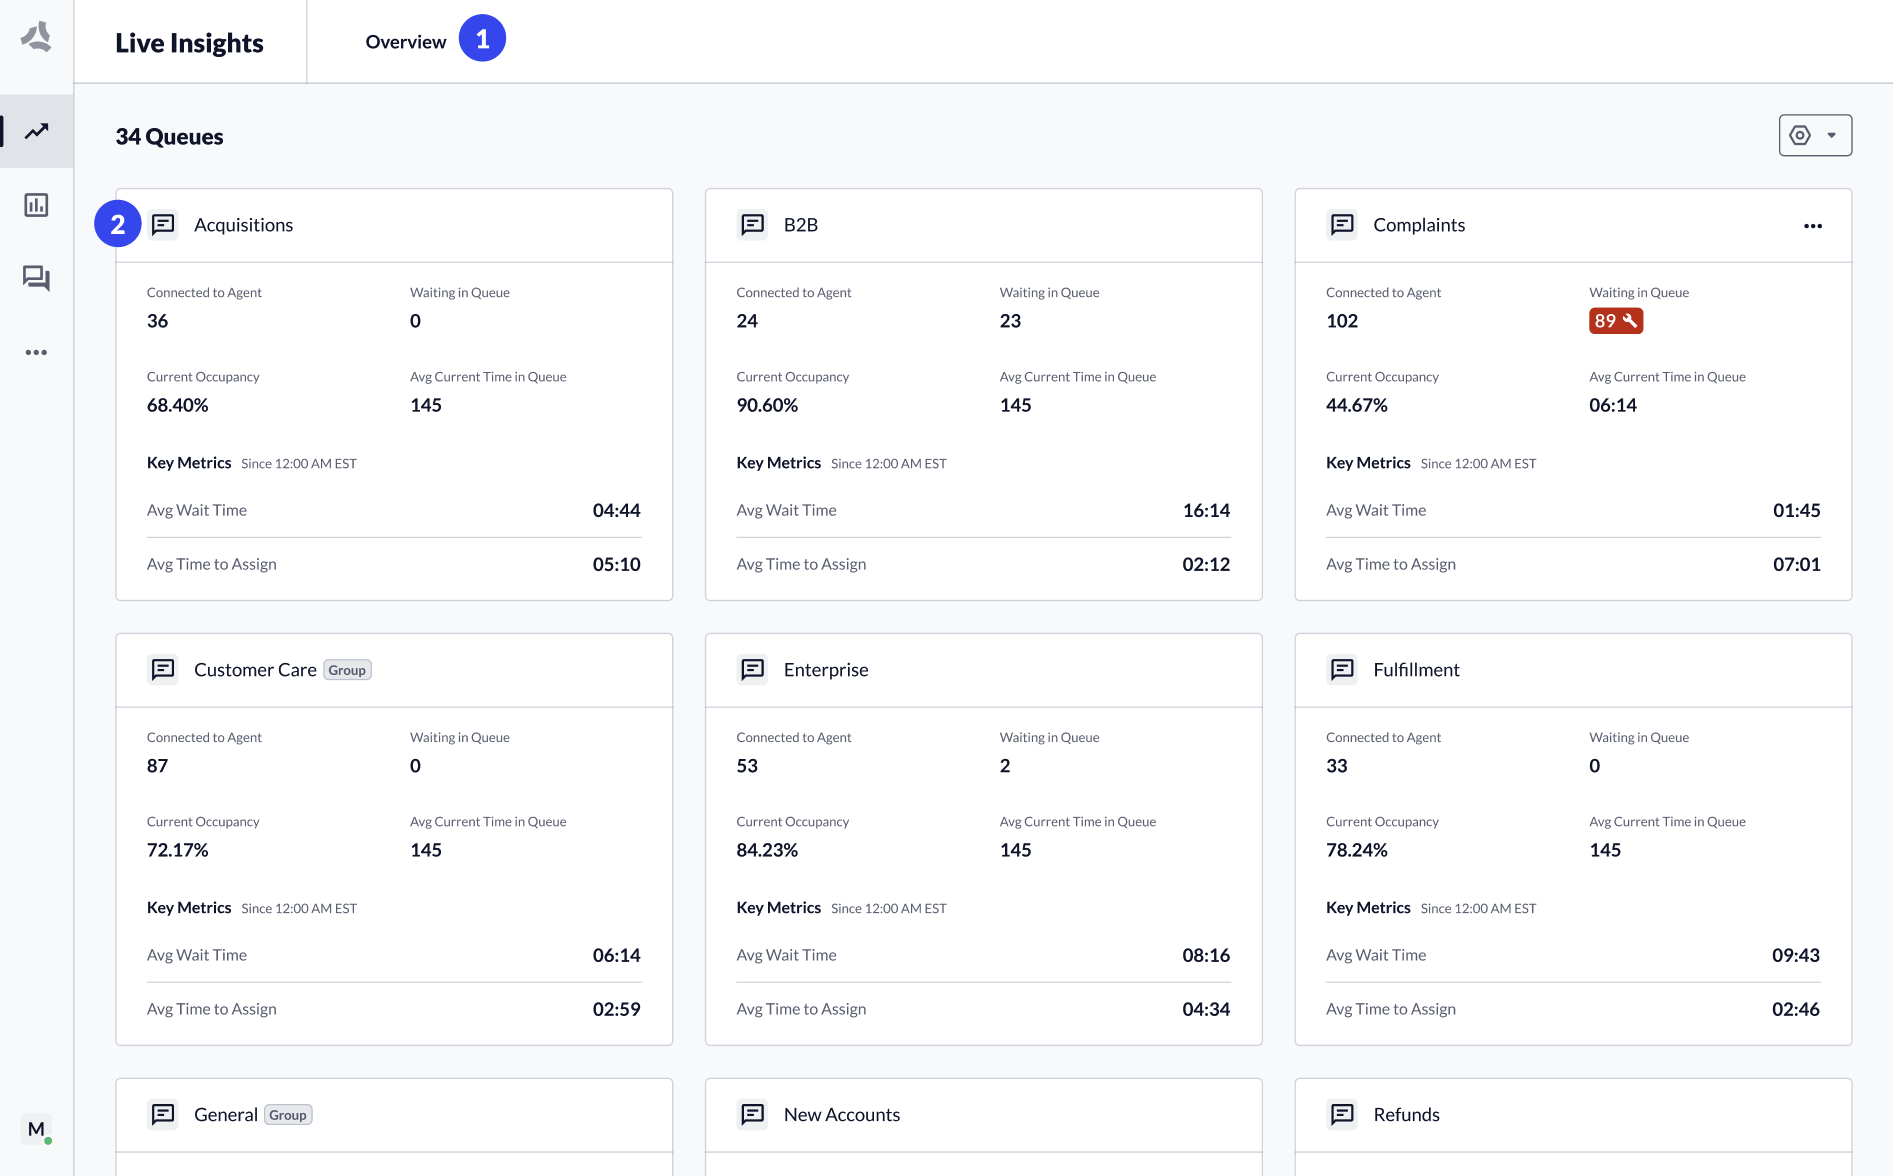 1. The Overview page (All Queues) shows a summary widget for each configured queue.
2. Click a **queue tile** or select a **queue** from the header dropdown to navigate to the Queue Details page.
## Monitor Performance per Queue
The Queue Details page for each queue shows performance across the most important metrics.
All metrics displayed in the dashboard update in true real-time. Metrics can be categorized either as "Right Now" or "Current Period":
* Right Now metrics update immediately upon a change in the ecosystem.
* Current Period metrics will constantly update in aggregate over the day.
## Information Architecture
ASAPP continues to improve the Live Insights experience with new touch points to host live transcripts and to scale up when introducing new metrics and performance signals.
1. The Overview page (All Queues) shows a summary widget for each configured queue.
2. Click a **queue tile** or select a **queue** from the header dropdown to navigate to the Queue Details page.
## Monitor Performance per Queue
The Queue Details page for each queue shows performance across the most important metrics.
All metrics displayed in the dashboard update in true real-time. Metrics can be categorized either as "Right Now" or "Current Period":
* Right Now metrics update immediately upon a change in the ecosystem.
* Current Period metrics will constantly update in aggregate over the day.
## Information Architecture
ASAPP continues to improve the Live Insights experience with new touch points to host live transcripts and to scale up when introducing new metrics and performance signals.
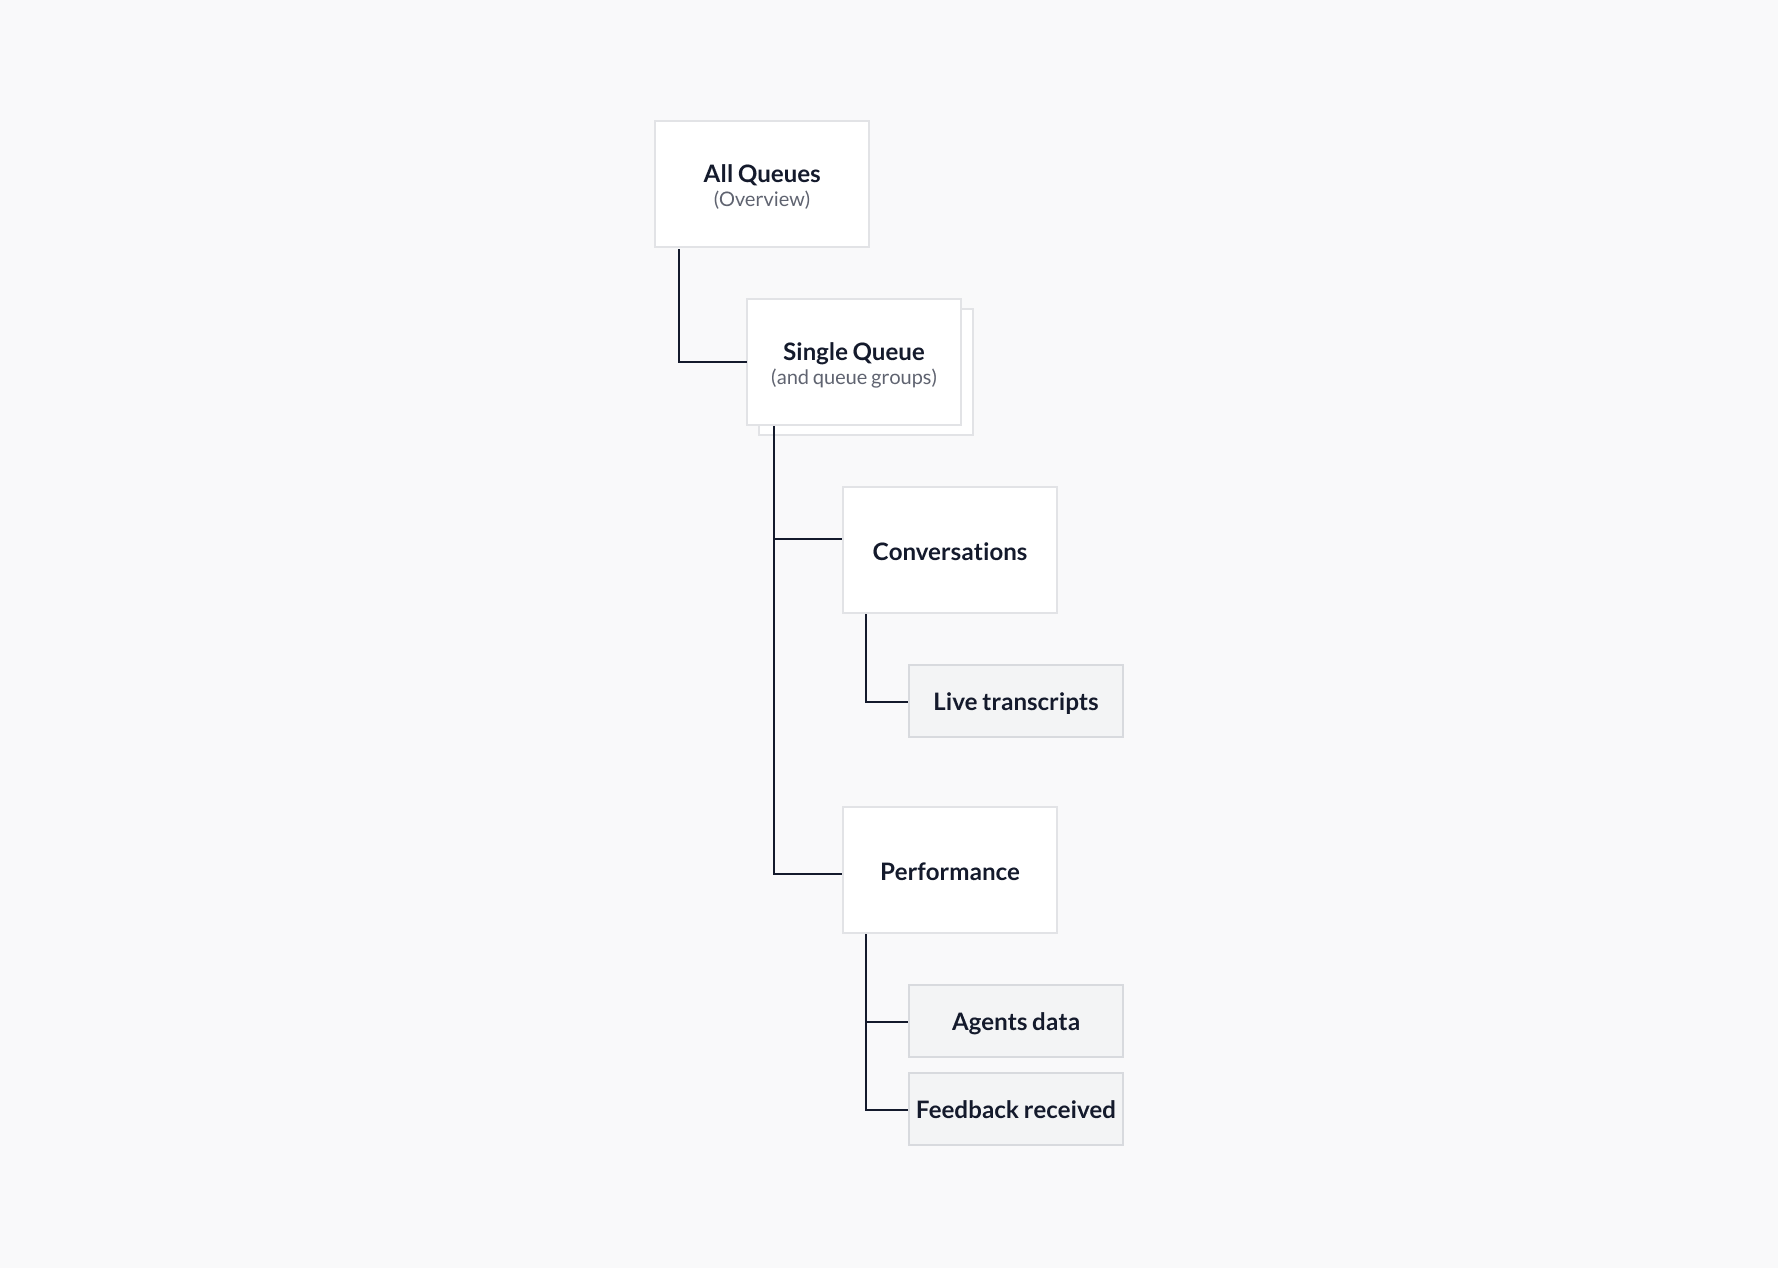 1. **All Queues** → Provides a performance overview of all queues and queue groups. Also provides customization tools to show/hide queues and create/manage queue groups.
2. **Single Queue and Queue Groups** → These now include two pages:
* **Conversations:** Displays performance data for all conversations currently connected to an agent, as well as live transcripts and alerts.
* **Performance:** Displays queue performance data, both for 'right now' and rolling 'since 12 am'. It also provides agent performance data and showcases feedback sent by customers.
### Two Views: Conversations & Performance
1. **All Queues** → Provides a performance overview of all queues and queue groups. Also provides customization tools to show/hide queues and create/manage queue groups.
2. **Single Queue and Queue Groups** → These now include two pages:
* **Conversations:** Displays performance data for all conversations currently connected to an agent, as well as live transcripts and alerts.
* **Performance:** Displays queue performance data, both for 'right now' and rolling 'since 12 am'. It also provides agent performance data and showcases feedback sent by customers.
### Two Views: Conversations & Performance

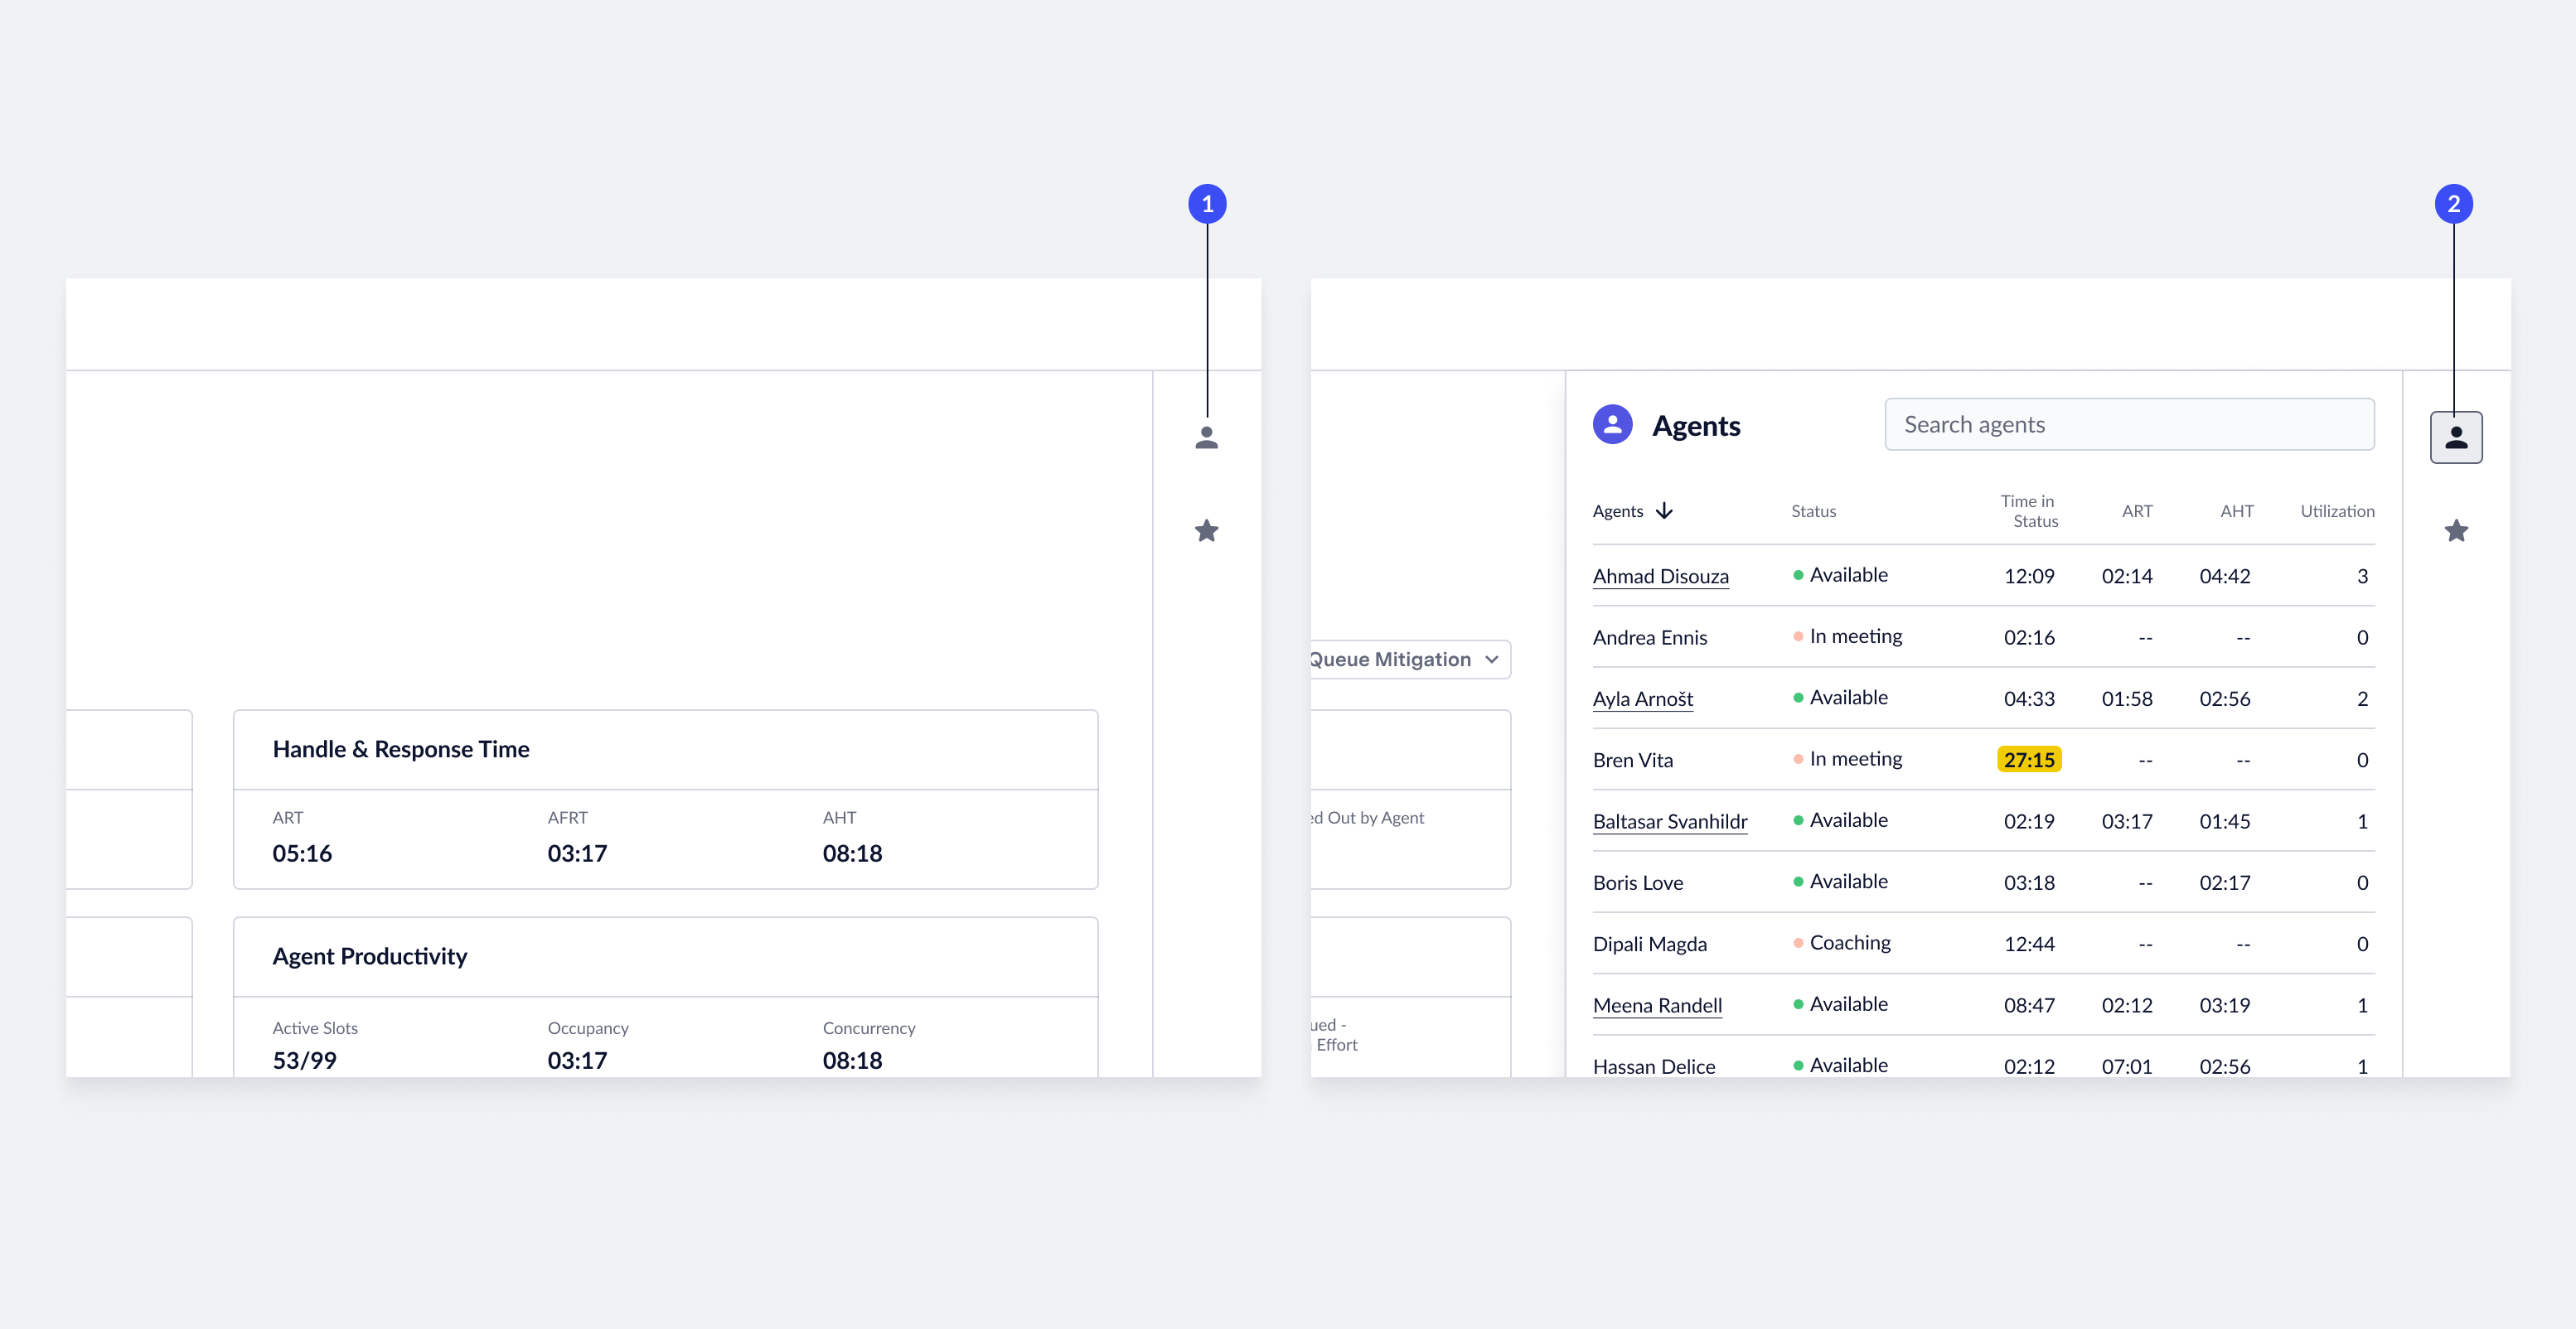 1. **Open agent panel**: To view agent performance data, click the **Agent** icon on the right-side of the screen. A panel opens that contains a list of all agents currently logged into the queue.
2. **Close agent panel**: To close the agent panel, click the **close** icon.
## Agent Real-time Performance Data
Live Insights automatically updates performance data related to agents in real-time every 15 seconds.
## Search for Agents & Sort Data
ASAPP provides tools to organize and find the right content. You can search for a specific agent name or sort the data based on current performance.
1. **Open agent panel**: To view agent performance data, click the **Agent** icon on the right-side of the screen. A panel opens that contains a list of all agents currently logged into the queue.
2. **Close agent panel**: To close the agent panel, click the **close** icon.
## Agent Real-time Performance Data
Live Insights automatically updates performance data related to agents in real-time every 15 seconds.
## Search for Agents & Sort Data
ASAPP provides tools to organize and find the right content. You can search for a specific agent name or sort the data based on current performance.
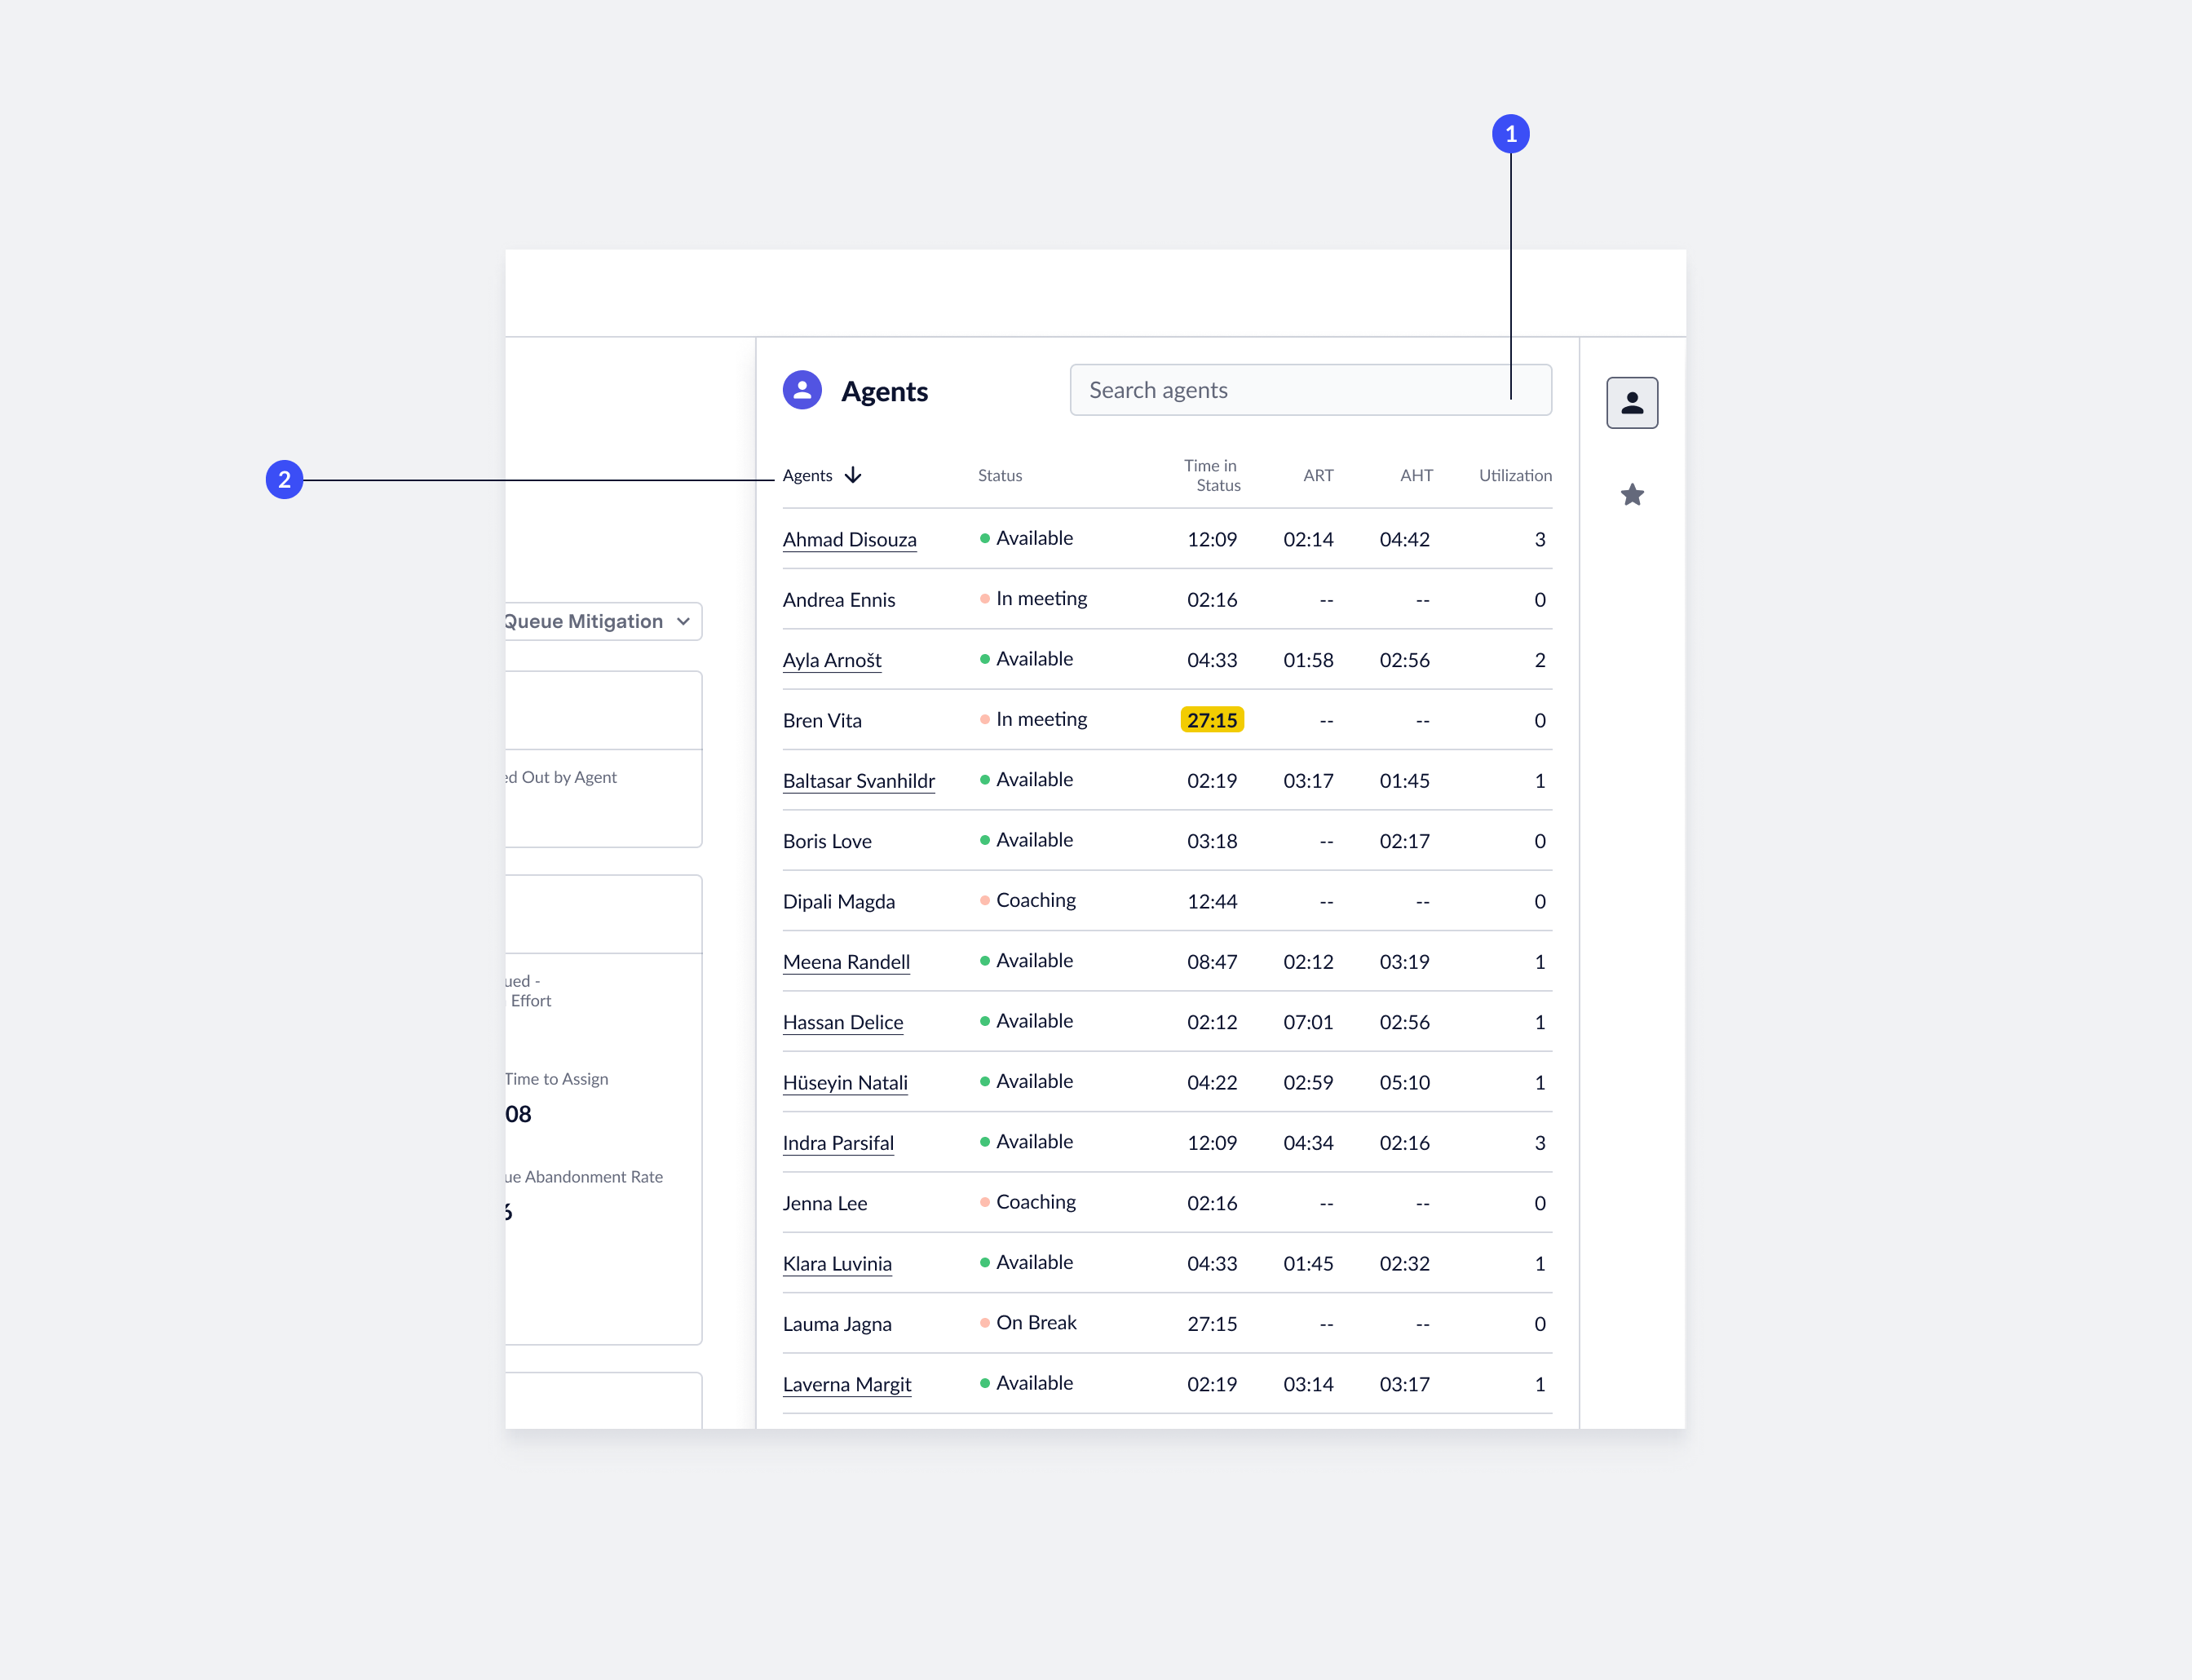 1. **Find agents**: To find a specific agent, enter the **agent name** in the search field. The list of agents will filter down to the relevant results. To remove the query, delete the **agent name** from the search field.
2. **Sort agents**: You can use each column in the agent panel to sort content. Default: list is sorted by agent name. To sort by a different metric, click the **column name**. To change the sort order, click the **active column name**.
## View Agent Transcripts
You can access live agent transcripts from the 'Agent' panel.
1. **Find agents**: To find a specific agent, enter the **agent name** in the search field. The list of agents will filter down to the relevant results. To remove the query, delete the **agent name** from the search field.
2. **Sort agents**: You can use each column in the agent panel to sort content. Default: list is sorted by agent name. To sort by a different metric, click the **column name**. To change the sort order, click the **active column name**.
## View Agent Transcripts
You can access live agent transcripts from the 'Agent' panel.
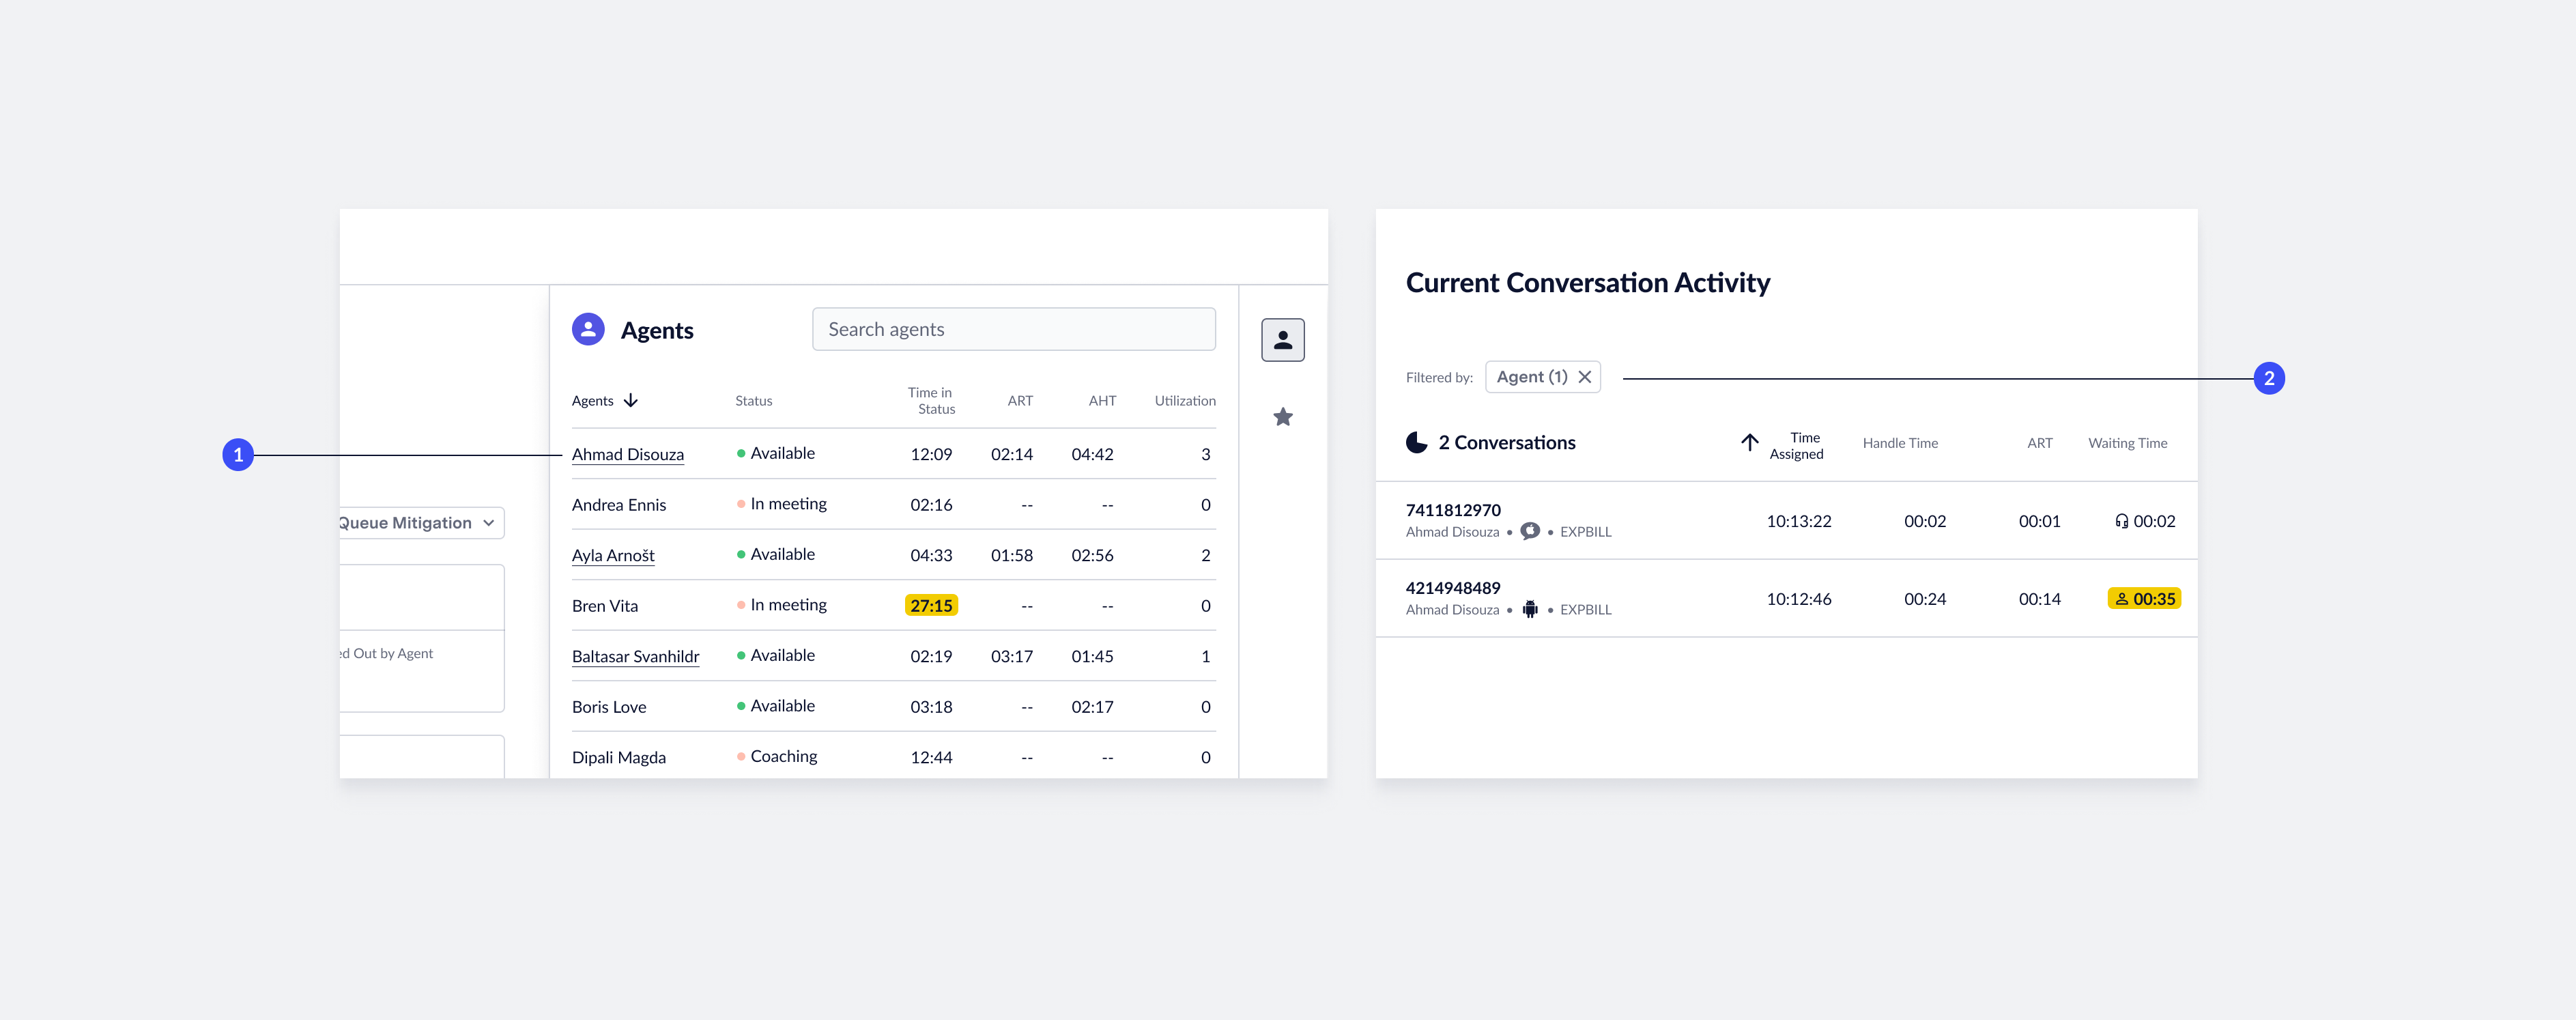 1. **Agents with assignments**: Agents currently taking assignments are underlined in the 'Agent' panel. Click an **underlined agent name** to go to the 'Conversation' page to view relevant agent transcripts.
2. **Agent filter applied**: When you view an agent's transcript, the 'Conversation Activity' table displays only their chats. This is indicated by the filter chip displayed above the list of conversations. To remove the filter, click the **X** icon in the filter chip.
# Alerts, Signals & Mitigation
Source: https://docs.asapp.com/messaging-platform/insights-manager/live-insights/alerts,-signals---mitigation
Use alerts, signals, and mitigation measures to improve agent task efficiency.
To improve user focus and task efficiency, ASAPP elevates various alerts and signals within Live Insights.
These alerts notify users when performance is degrading, when events are detected, or when high queue mitigation measures can be activated based on volume.
## Type of Alerts
1. **Agents with assignments**: Agents currently taking assignments are underlined in the 'Agent' panel. Click an **underlined agent name** to go to the 'Conversation' page to view relevant agent transcripts.
2. **Agent filter applied**: When you view an agent's transcript, the 'Conversation Activity' table displays only their chats. This is indicated by the filter chip displayed above the list of conversations. To remove the filter, click the **X** icon in the filter chip.
# Alerts, Signals & Mitigation
Source: https://docs.asapp.com/messaging-platform/insights-manager/live-insights/alerts,-signals---mitigation
Use alerts, signals, and mitigation measures to improve agent task efficiency.
To improve user focus and task efficiency, ASAPP elevates various alerts and signals within Live Insights.
These alerts notify users when performance is degrading, when events are detected, or when high queue mitigation measures can be activated based on volume.
## Type of Alerts
 Live Insights displays four alert types:
1. **Metric Highlighting**: Highlights metrics that are above their target threshold within Live Insights. You can see the highlights on the Overview page, as well as within single queues and queue groups. The alert will persist until the metric's performance returns below its threshold.
2. **Event-based Alerts**: Detects and records events per conversation and displays them in the conversation activity table.
3. **High Queue Mitigation**: Activates when the queue volume exceeds the target threshold. When active, you can use mitigation measures to reduce queue volume impacts.
4. **High Effort Issue**: Indicates when a high effort issue is awaiting assignment and is currently blocking other issues from being assigned.
## Metric Highlighting
Live Insights highlights metrics that are above their target threshold on the Overview page, as well as within single queues and queue groups.
The alert persists until the metric's performance returns below its threshold.
Live Insights displays four alert types:
1. **Metric Highlighting**: Highlights metrics that are above their target threshold within Live Insights. You can see the highlights on the Overview page, as well as within single queues and queue groups. The alert will persist until the metric's performance returns below its threshold.
2. **Event-based Alerts**: Detects and records events per conversation and displays them in the conversation activity table.
3. **High Queue Mitigation**: Activates when the queue volume exceeds the target threshold. When active, you can use mitigation measures to reduce queue volume impacts.
4. **High Effort Issue**: Indicates when a high effort issue is awaiting assignment and is currently blocking other issues from being assigned.
## Metric Highlighting
Live Insights highlights metrics that are above their target threshold on the Overview page, as well as within single queues and queue groups.
The alert persists until the metric's performance returns below its threshold.
 Where metrics are highlighted:
1. **Conversation performance**: You can highlight both 'average handle time' and 'average response time'.
2. **Agent performance**: 'Time in status', 'average handle time', and 'average response time'.
3. **Queue performance**: You can highlight queue-level metrics within a single queue, queue groups, or on the Overview page.
## Event-based Alerts
Events are generated from actions taken by agents, customers or you.
Live Insights detects and records these events and displays them alongside conversation data, within the 'alert' column.
Where metrics are highlighted:
1. **Conversation performance**: You can highlight both 'average handle time' and 'average response time'.
2. **Agent performance**: 'Time in status', 'average handle time', and 'average response time'.
3. **Queue performance**: You can highlight queue-level metrics within a single queue, queue groups, or on the Overview page.
## Event-based Alerts
Events are generated from actions taken by agents, customers or you.
Live Insights detects and records these events and displays them alongside conversation data, within the 'alert' column.
 1. **Conversation events**: These events are related to a unique conversation. The events can be generated from agent actions or your actions.
* **Customer transfers**: When an agent transfers a customer, Live Insights displays an alert next to the conversation.
* **Whisper sent**: When you send a whisper message to an agent, Live Insights records and displays the event next to the conversation.
2. **Agent events**: These events impact the agent workload and help you contextualize agent performance. Live Insights displays the events for all targeted agents, within the Agent Performance panel.
* **High effort**: Agents that are currently handling a high effort issue.
* **Flex concurrency**: The agent is currently flexed and has a higher than normal utilization.
## High Queue Mitigation
ASAPP provides tools to enable workforce management groups to act fast when queues are or could be anomalously high.
**Tools Overview**
Live Insights can:
* Monitor queue volume for unusually high volume.
* Highlight 'Queued' metric based on severity level.
* Activate 'Custom High Wait Time' messaging and replace Estimated Wait Time messaging.
* Pause queues experiencing extremely high volume and prevent new queue assignments.
**Volume Thresholds:**
Live Insights highlights metrics when they reach past a threshold defined for the queue.
1. **Conversation events**: These events are related to a unique conversation. The events can be generated from agent actions or your actions.
* **Customer transfers**: When an agent transfers a customer, Live Insights displays an alert next to the conversation.
* **Whisper sent**: When you send a whisper message to an agent, Live Insights records and displays the event next to the conversation.
2. **Agent events**: These events impact the agent workload and help you contextualize agent performance. Live Insights displays the events for all targeted agents, within the Agent Performance panel.
* **High effort**: Agents that are currently handling a high effort issue.
* **Flex concurrency**: The agent is currently flexed and has a higher than normal utilization.
## High Queue Mitigation
ASAPP provides tools to enable workforce management groups to act fast when queues are or could be anomalously high.
**Tools Overview**
Live Insights can:
* Monitor queue volume for unusually high volume.
* Highlight 'Queued' metric based on severity level.
* Activate 'Custom High Wait Time' messaging and replace Estimated Wait Time messaging.
* Pause queues experiencing extremely high volume and prevent new queue assignments.
**Volume Thresholds:**
Live Insights highlights metrics when they reach past a threshold defined for the queue.
 1. **Low Severity:** detects abnormal activity and has moderate impact on the queue.
2. **High Severity**: detects highly abnormal activity. The queue is severely impacted.
**Mitigation Options:**
1. **Low Severity:** detects abnormal activity and has moderate impact on the queue.
2. **High Severity**: detects highly abnormal activity. The queue is severely impacted.
**Mitigation Options:**
Mitigation |
Severity Threshold |
Features available |
|
Default behavior Business as usual. All queues are operating based on this setting. |
None |
|
|
Custom High Wait Time Message Low severity mitigation measure. Replaces Estimated Wait Time messaging. |
Low Severity |
|
|
Pausing the Queue High severity mitigation measure. Prevents new assignments to the queue. |
High Severity |
|
 1. **Mitigation menu options**: When available, Live Insights displays a menu on the relevant queue card in the Overview, as well as on the 'Performance' page of single queues and queue groups. To view those options, click the **menu** icon. The menu icon only displays when you highlight 'Queued'.
2. **Select mitigation**: Based on the severity level, Live Insights displays different mitigation options. Select an **option** to activate it. To remove the mitigation behavior, select **Default behavior**.
3. **Mitigation applied**: When you select a mitigation option, it is indicated on the queue card or on the Performance page.
## High Effort Issues
ASAPP supports a capability to enable agent focus for higher effort issues, while maintaining efficiency.
This feature dynamically adjusts how many concurrent issues an agent should handle while assigned a high effort issue.
### What is a High Effort Issue
ASAPP will route customers based on the expected effort of their issue. All issues, by default, will have an effort of 1.
Any issue with an effort value greater than 1 will be considered "high effort". Reach out to your ASAPP Implementation team to configure high effort rules for your program.
## Feature Definition
* **Slot**: A slot represents a space for a chat to be assigned to an agent. You can assign and configure multiple slots to a single agent via User Management.
* **Effort**: Effort represents what is needed from an agent to solve an issue. For each effort point assigned to an issue, an agent must have an equivalent number of available slots to be assigned that issue. ASAPP determines an issue's effort by its relevant customer attributes.
* **High Effort Time Threshold**: A threshold that sets how much time an agent can parallelize a high effort issue with other issues. You can configure this threshold per queue. This threshold represents the duration of all existing assignments an agent is handling when a high effort issue is next in line.
* **Flex Slot**: All agents have 1 additional slot that can be used if they are eligible to receive a flex assignment or if they are temporarily over-effort when handling a high effort issue.
* **Linear Utilization Level:** A type of Linear Utilization relative to the number of assignments an agent has assigned at a given time, regardless of the assignment workload state.
* **Assignment Workload**: A measure of Linear Workload relative to the number of active assignments an agent has assigned at a given time. An assignment is not considered active if it has caused an agent to become Flex Eligible.
* **Effort Workload**: A measure of Linear Workload relative to the issue effort of all active assignments an agent has assigned at a given time.
1. **Mitigation menu options**: When available, Live Insights displays a menu on the relevant queue card in the Overview, as well as on the 'Performance' page of single queues and queue groups. To view those options, click the **menu** icon. The menu icon only displays when you highlight 'Queued'.
2. **Select mitigation**: Based on the severity level, Live Insights displays different mitigation options. Select an **option** to activate it. To remove the mitigation behavior, select **Default behavior**.
3. **Mitigation applied**: When you select a mitigation option, it is indicated on the queue card or on the Performance page.
## High Effort Issues
ASAPP supports a capability to enable agent focus for higher effort issues, while maintaining efficiency.
This feature dynamically adjusts how many concurrent issues an agent should handle while assigned a high effort issue.
### What is a High Effort Issue
ASAPP will route customers based on the expected effort of their issue. All issues, by default, will have an effort of 1.
Any issue with an effort value greater than 1 will be considered "high effort". Reach out to your ASAPP Implementation team to configure high effort rules for your program.
## Feature Definition
* **Slot**: A slot represents a space for a chat to be assigned to an agent. You can assign and configure multiple slots to a single agent via User Management.
* **Effort**: Effort represents what is needed from an agent to solve an issue. For each effort point assigned to an issue, an agent must have an equivalent number of available slots to be assigned that issue. ASAPP determines an issue's effort by its relevant customer attributes.
* **High Effort Time Threshold**: A threshold that sets how much time an agent can parallelize a high effort issue with other issues. You can configure this threshold per queue. This threshold represents the duration of all existing assignments an agent is handling when a high effort issue is next in line.
* **Flex Slot**: All agents have 1 additional slot that can be used if they are eligible to receive a flex assignment or if they are temporarily over-effort when handling a high effort issue.
* **Linear Utilization Level:** A type of Linear Utilization relative to the number of assignments an agent has assigned at a given time, regardless of the assignment workload state.
* **Assignment Workload**: A measure of Linear Workload relative to the number of active assignments an agent has assigned at a given time. An assignment is not considered active if it has caused an agent to become Flex Eligible.
* **Effort Workload**: A measure of Linear Workload relative to the issue effort of all active assignments an agent has assigned at a given time.
 ### How are high effort issues prioritized and assigned?
ASAPP assigns high effort chats in the order that they entered the queue. You can prioritize high effort chats higher in the queue using customer attributes. This prioritization is optional and not required. A configurable *high effort time threshold* allows each queue to set how much time an agent can parallelize a high effort issue with other assignments.
### How are high effort issues prioritized and assigned?
ASAPP assigns high effort chats in the order that they entered the queue. You can prioritize high effort chats higher in the queue using customer attributes. This prioritization is optional and not required. A configurable *high effort time threshold* allows each queue to set how much time an agent can parallelize a high effort issue with other assignments.
 ### How are high effort issues assigned against other issues?
ASAPP assigns high effort issues in order of configured priority and when they entered the queue. An agent will receive a high effort assignment if they meet at least 1 of the following criteria:
* An agent has 0 active assignments.
* An agent has sufficient open slots to receive a high effort assignment.
* The **high effort time threshold** has elapsed for all of an agent's current assignments and the high effort chat's effort would not extend the agent's Effort Workload past their Flex Slot.
### How do high effort issues impact performance?
* High effort issues will not change current behavior for Queue Priority.
* High effort issues will not change current behavior for Flex Eligibility or Flex Protect.
* High effort issues take longer to assign because they have to wait for an agent to have sufficient effort capacity.
* If a set of queues has 50% or more agents in common, then a high effort issue at the front of one queue will hold the issues in the other "shared" queues until it is assigned.
### How do I monitor the impact of high effort issues?
You can view the 'Queued - High Effort' metric in Live Insights on queue detail pages. This metric captures the number of high effort issues currently waiting in the queue. If a high effort issue is first in queue and slows other issues from being assigned, Live Insights displays an alert on this metric. These changes will also be visible for programs that do not have high effort rules configured.
### How are high effort issues assigned against other issues?
ASAPP assigns high effort issues in order of configured priority and when they entered the queue. An agent will receive a high effort assignment if they meet at least 1 of the following criteria:
* An agent has 0 active assignments.
* An agent has sufficient open slots to receive a high effort assignment.
* The **high effort time threshold** has elapsed for all of an agent's current assignments and the high effort chat's effort would not extend the agent's Effort Workload past their Flex Slot.
### How do high effort issues impact performance?
* High effort issues will not change current behavior for Queue Priority.
* High effort issues will not change current behavior for Flex Eligibility or Flex Protect.
* High effort issues take longer to assign because they have to wait for an agent to have sufficient effort capacity.
* If a set of queues has 50% or more agents in common, then a high effort issue at the front of one queue will hold the issues in the other "shared" queues until it is assigned.
### How do I monitor the impact of high effort issues?
You can view the 'Queued - High Effort' metric in Live Insights on queue detail pages. This metric captures the number of high effort issues currently waiting in the queue. If a high effort issue is first in queue and slows other issues from being assigned, Live Insights displays an alert on this metric. These changes will also be visible for programs that do not have high effort rules configured.
 ### How can I tell which agents are handling high effort issues?
In the Agent Right Rail, you can monitor which agents are currently handling high effort issues. ASAPP displays an icon next to the agent's utilization indicating a high effort issue is assigned. These changes will also be visible for programs that do not have high effort rules configured.
### How can I tell which agents are handling high effort issues?
In the Agent Right Rail, you can monitor which agents are currently handling high effort issues. ASAPP displays an icon next to the agent's utilization indicating a high effort issue is assigned. These changes will also be visible for programs that do not have high effort rules configured.
 # Customer Feedback
Source: https://docs.asapp.com/messaging-platform/insights-manager/live-insights/customer-feedback
Learn how to view customer feedback in Live Insights.
Live Insights tracks customers that engage with the satisfaction survey.
The Customer Feedback panel displays all feedback received throughout the day.
## Access Customer Feedback
# Customer Feedback
Source: https://docs.asapp.com/messaging-platform/insights-manager/live-insights/customer-feedback
Learn how to view customer feedback in Live Insights.
Live Insights tracks customers that engage with the satisfaction survey.
The Customer Feedback panel displays all feedback received throughout the day.
## Access Customer Feedback
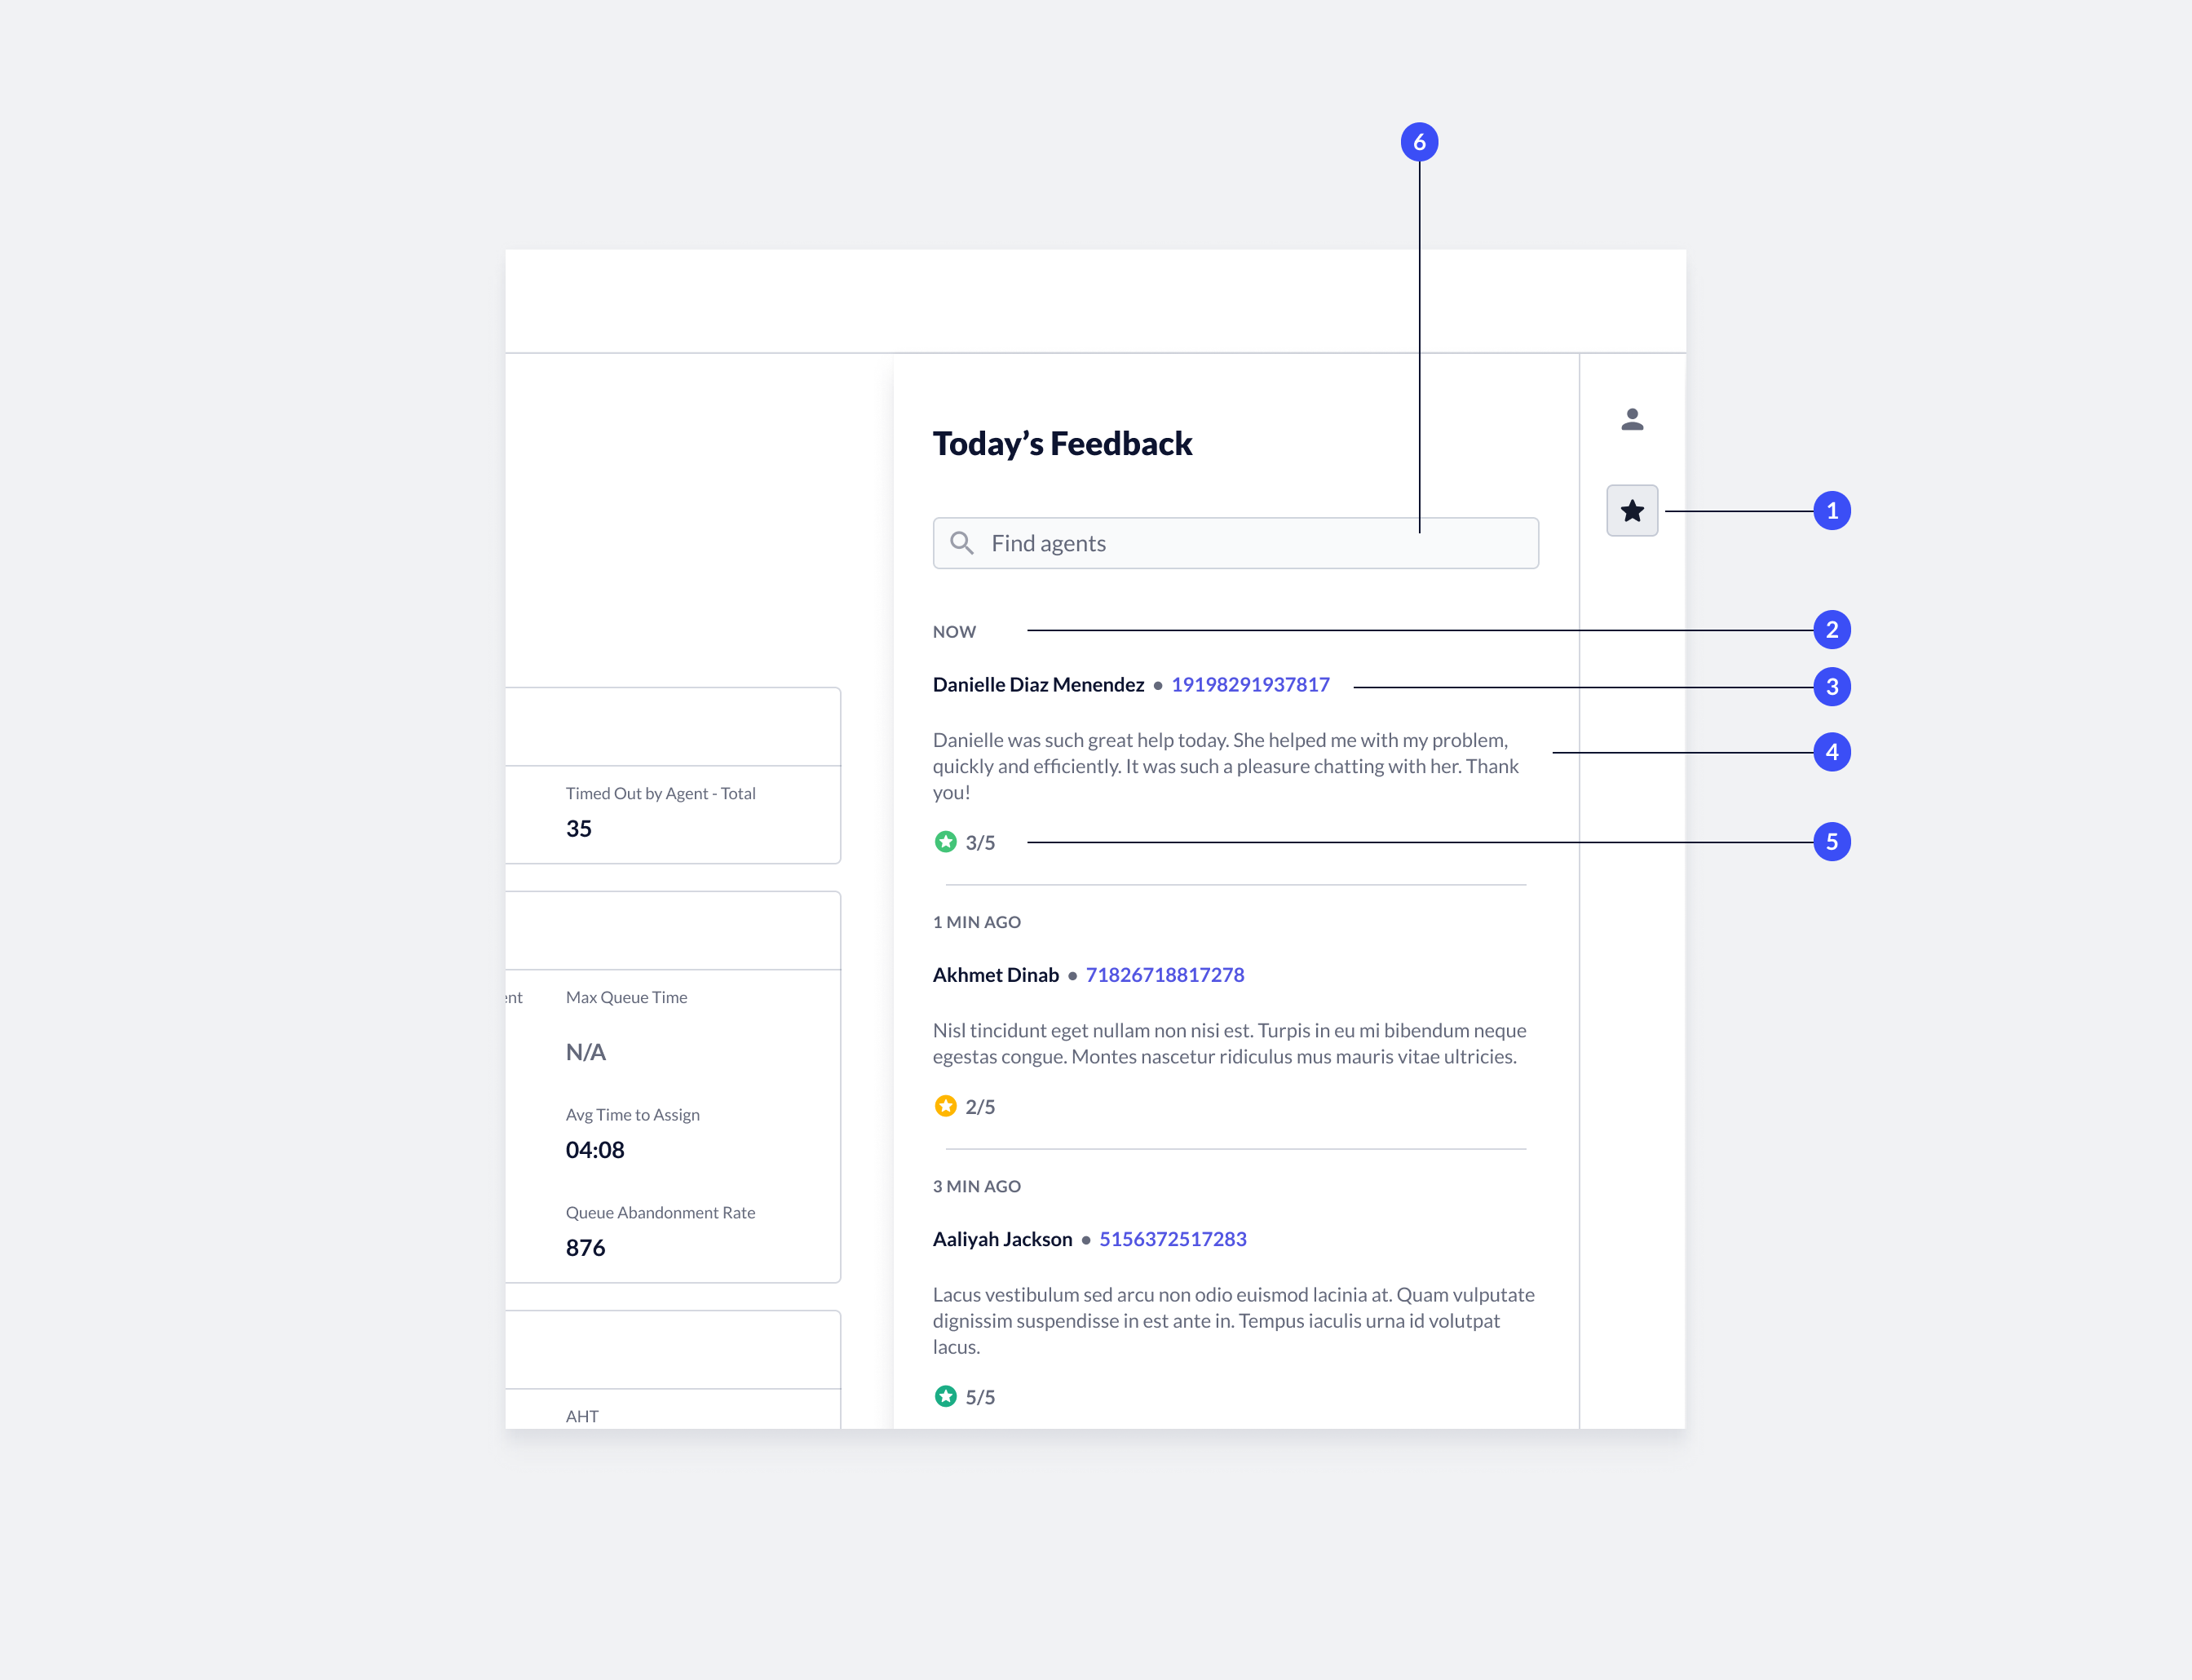 1. **Open feedback panel**: To view feedback, click the **Feedback** icon on the right side of the 'Performance' page. The Customer Feedback panel opens.
2. **Time stamp**: Indicates when the feedback was recorded.
3. **Agent name and issue ID**: Indicates the targeted agent, as well as the customer's issue ID.
* **Issue ID link**: click the **issue ID** to display the transcript in the Conversation Manager.
4. **Feedback**: Feedback left by the customer.
5. **CSAT**: CSAT score calculated based on customer responses to the survey.
6. **Find agent**: You can filter the feedback received by agent. To view feedback related to a specific agent, type the **agent name** in the search field.
# Live Conversations Data
Source: https://docs.asapp.com/messaging-platform/insights-manager/live-insights/live-conversations-data
Learn how to view and interact with live conversations in Live Insights.
You can find all conversations that are currently connected to an agent in Live Insights.
Performance data updates automatically in Live Insights. If a conversation's metrics are outside their target range, alerts display.
## Conversation Activity
The conversation activity table is the bread and butter of real-time monitoring.
You can see all conversations currently assigned to an agent. You can sort content by performance metrics to provide you with the view that is most relevant to your needs. Live Insights automatically refreshes performance data every 15 seconds.
Furthermore, you can access live transcripts for each conversation currently assigned.
1. **Open feedback panel**: To view feedback, click the **Feedback** icon on the right side of the 'Performance' page. The Customer Feedback panel opens.
2. **Time stamp**: Indicates when the feedback was recorded.
3. **Agent name and issue ID**: Indicates the targeted agent, as well as the customer's issue ID.
* **Issue ID link**: click the **issue ID** to display the transcript in the Conversation Manager.
4. **Feedback**: Feedback left by the customer.
5. **CSAT**: CSAT score calculated based on customer responses to the survey.
6. **Find agent**: You can filter the feedback received by agent. To view feedback related to a specific agent, type the **agent name** in the search field.
# Live Conversations Data
Source: https://docs.asapp.com/messaging-platform/insights-manager/live-insights/live-conversations-data
Learn how to view and interact with live conversations in Live Insights.
You can find all conversations that are currently connected to an agent in Live Insights.
Performance data updates automatically in Live Insights. If a conversation's metrics are outside their target range, alerts display.
## Conversation Activity
The conversation activity table is the bread and butter of real-time monitoring.
You can see all conversations currently assigned to an agent. You can sort content by performance metrics to provide you with the view that is most relevant to your needs. Live Insights automatically refreshes performance data every 15 seconds.
Furthermore, you can access live transcripts for each conversation currently assigned.
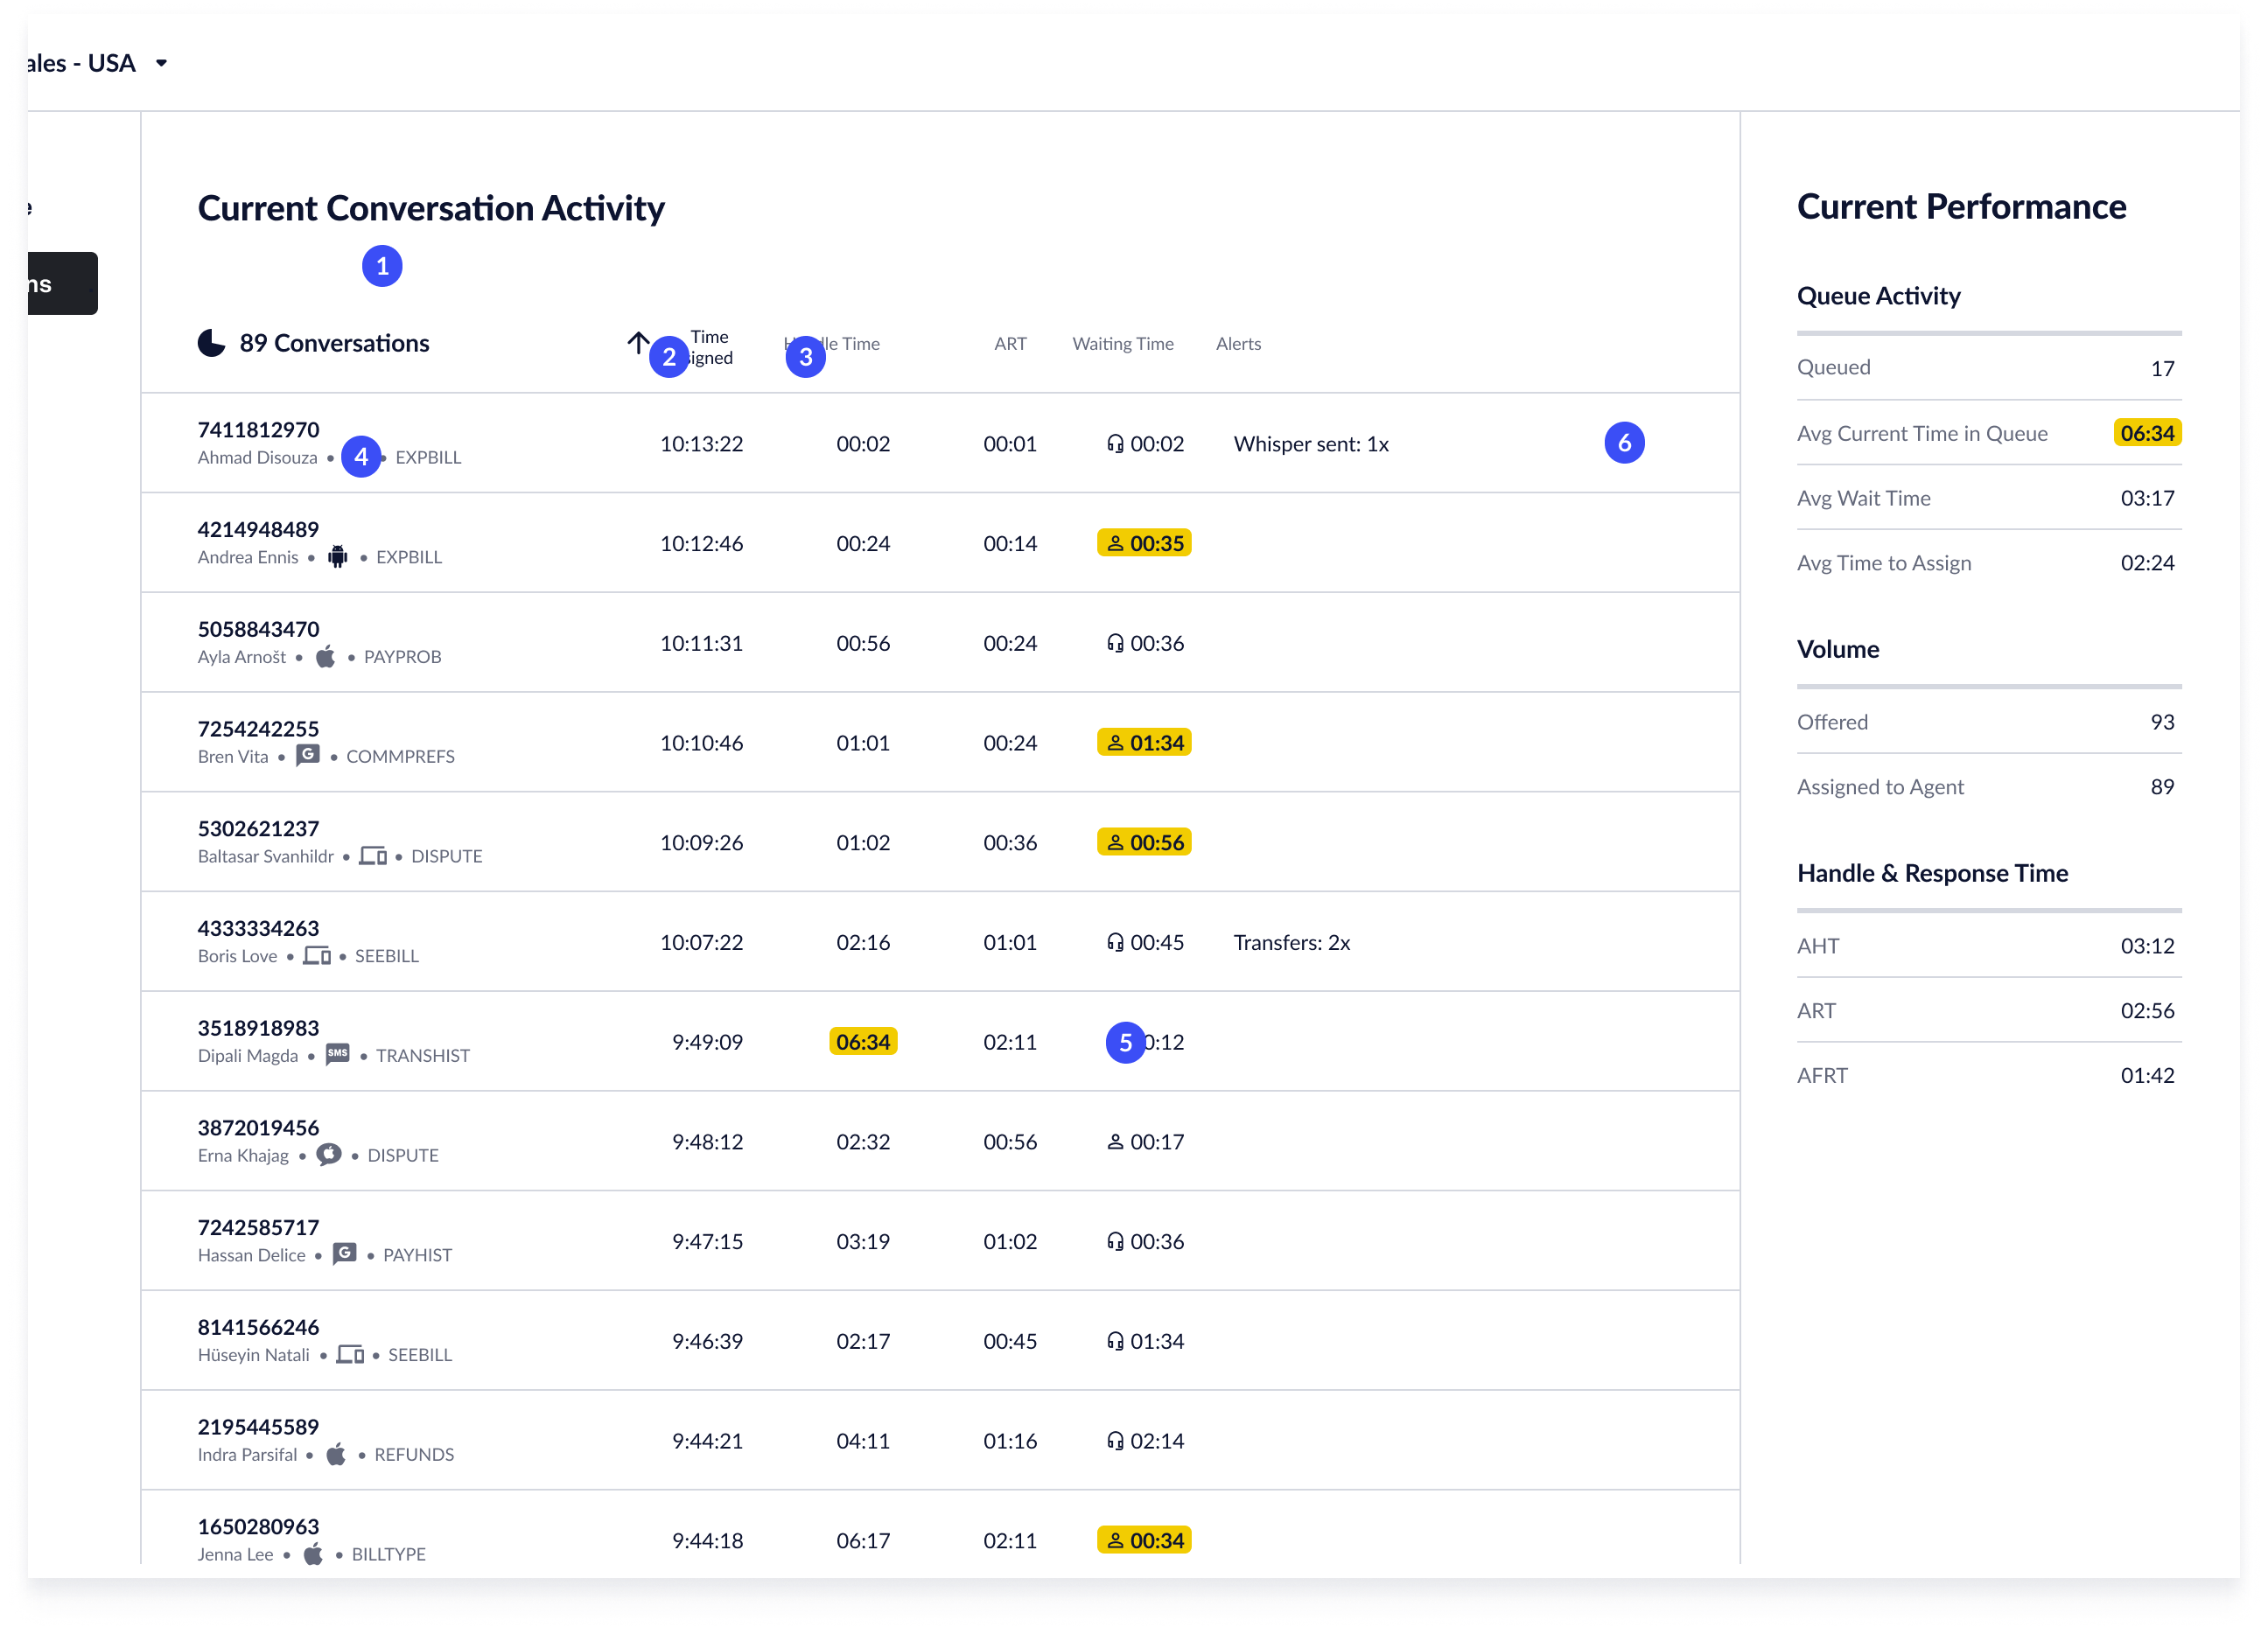 1. **Links**: Provides a quick entry point to view historical transcripts or performance data.
2. **Conversation count & refresh**: Displays the total conversations displayed in the table. Live Insights updates the content automatically every 15 seconds.
3. **Sorting**: You can sort the content by each of the metrics captured for each conversation. You can sort all columns in ascending/descending order. To sort, click the **column header**. Click the **header** again to reverse the sorting order. Default: Ascending by time assigned.
4. **Conversations**: Each conversation currently assigned to an agent displays as a row in the Conversation Activity table. Metrics associated with the conversation display and update dynamically.
5. **Metric highlighting**: Metrics that have assigned thresholds are highlighted. See 'Metrics Highlighting' for more information.
6. **Alerts**: When an event is recorded, it displays in the column. Not all conversations will include an event.
1. **Links**: Provides a quick entry point to view historical transcripts or performance data.
2. **Conversation count & refresh**: Displays the total conversations displayed in the table. Live Insights updates the content automatically every 15 seconds.
3. **Sorting**: You can sort the content by each of the metrics captured for each conversation. You can sort all columns in ascending/descending order. To sort, click the **column header**. Click the **header** again to reverse the sorting order. Default: Ascending by time assigned.
4. **Conversations**: Each conversation currently assigned to an agent displays as a row in the Conversation Activity table. Metrics associated with the conversation display and update dynamically.
5. **Metric highlighting**: Metrics that have assigned thresholds are highlighted. See 'Metrics Highlighting' for more information.
6. **Alerts**: When an event is recorded, it displays in the column. Not all conversations will include an event.
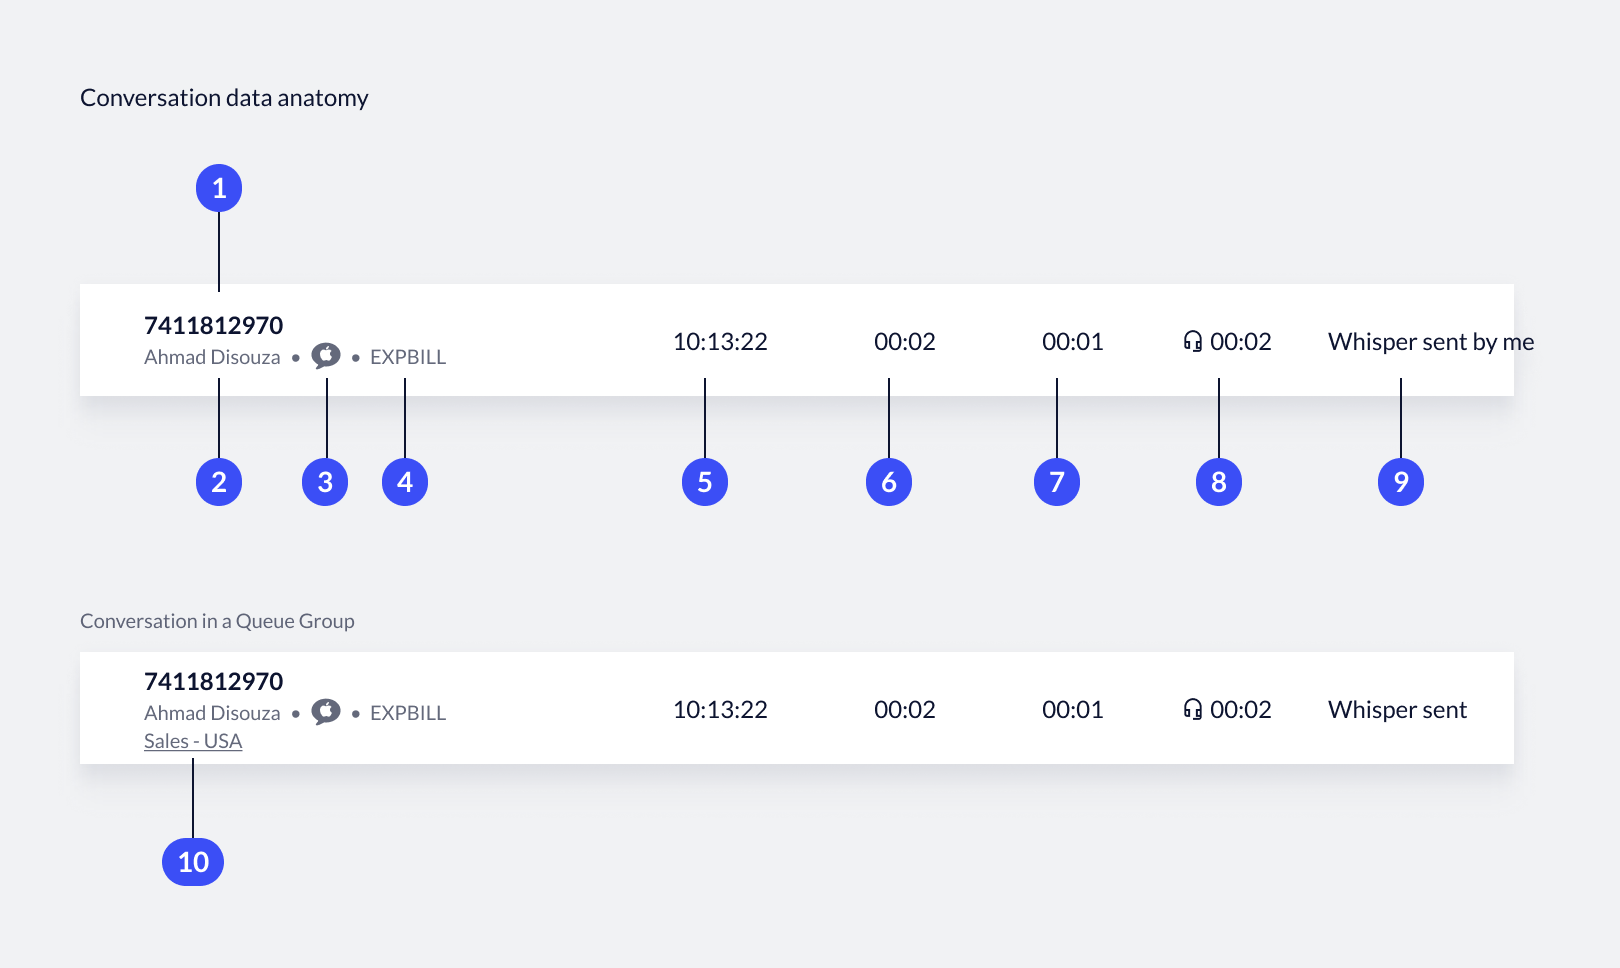 1. **Issue ID**: Unique conversation identifier assigned to a customer intent.
2. **Agent name**: Name of the agents handling the conversation.
3. **Channel**: Detected channel the customer is engaging with.
4. **Intent**: Last detected intent prior to the user being assigned to the queue.
5. **Time Assigned**: Time the conversation was assigned to an agent.
6. **Handle time**: Current handle time of the conversation.
7. **Average Response Time**: Average time it takes an agent to reply to customer utterances.
8. **Time Waiting**: Time since the last message that the sender has been waiting for a response.
9. **Alerts**: Event-based signals recorded throughout the conversation.
10. **Queue name**: Name of the queue the issue was assigned to. This feature only displays in Queue Groups. Click the **queue name** to go to the queue details view.
## View a Live Transcript
Each conversation connected to an agent includes a live transcript that you can view.
The transcript updates in real-time. You can send a Whisper to the agent from the transcript.
1. **Issue ID**: Unique conversation identifier assigned to a customer intent.
2. **Agent name**: Name of the agents handling the conversation.
3. **Channel**: Detected channel the customer is engaging with.
4. **Intent**: Last detected intent prior to the user being assigned to the queue.
5. **Time Assigned**: Time the conversation was assigned to an agent.
6. **Handle time**: Current handle time of the conversation.
7. **Average Response Time**: Average time it takes an agent to reply to customer utterances.
8. **Time Waiting**: Time since the last message that the sender has been waiting for a response.
9. **Alerts**: Event-based signals recorded throughout the conversation.
10. **Queue name**: Name of the queue the issue was assigned to. This feature only displays in Queue Groups. Click the **queue name** to go to the queue details view.
## View a Live Transcript
Each conversation connected to an agent includes a live transcript that you can view.
The transcript updates in real-time. You can send a Whisper to the agent from the transcript.
 1. **Queue Activity**: Includes 'Queued', 'Avg current time in queue', 'Average wait time', and 'Average time to assign'.
2. **Volume**: Includes 'Offered', 'Assigned to agent', and 'Time out by agent'.
3. **Handle & Response Time**: Includes 'Average handle time (AHT)', 'Average response time (ART)', and 'Average first response time (AFRT)'
# Metric Definitions
Source: https://docs.asapp.com/messaging-platform/insights-manager/live-insights/metric-definitions
Learn about the metrics available in Live Insights.
## Performance - 'Right Now' Metrics
| **Metric name** | **Definition** |
| :------------------------------------ | :---------------------------------------------------------------------------------------------------------------------------------------------------------------------------------------------------------- |
| **Offered** | The number of conversations that are currently connected with an agent or waiting in the queue. |
| **Assigned to Agent** | The number of conversations where a customer is currently talking to a live agent. |
| **Timed out by Agent** | Only available as a current period metric for the day. |
| **Queued** | The number of customers who are waiting in the queue to be connected to an agent. |
| **Queued - Eligible for Assignment** | The number of customers who are waiting in the queue, received a check-in message, and replied to it. |
| **Max Queue Time** | The actual wait time of the customer who is positioned last in the given queue. |
| **Average Wait Time** | The average queue time for all customers who are currently assigned to an agent or waiting in the queue, including 'zero-time' for customers directly assigned to an agent when there were available slots. |
| **Average Time in Queue** | The average queue time for all customers who are currently waiting in the queue. |
| **Average Time to Assign** | The average queue time for all customers who are currently assigned to an agent, including 'zero-time' for customers directly assigned to an agent when there were available slots. |
| **Queue Abandons** | Only available as a current period metric for the day. |
| **Average Abandon Queue Time** | Only available as a current period metric for the day. |
| **Queue Abandonment Rate** | Only available as a current period metric for the day. |
| **Average Agent Response Time** | The average amount of time to respond to a customer message across the assignment for agents who are currently handling chats. |
| **Average Agent First Response Time** | The average amount of time to send the first line to a customer after the chat was assigned for agents who are currently handling chats. |
| **Average Handle Time** | The time spent across all current chats by an agent per assignment starting from when the chat was assigned to when it is dispositioned. |
| **Active Slots** | A ratio of the number of currently active conversations to number of concurrent slots for agents who are in an Active status or actively handling chats. |
| **Occupancy** | The percentage of currently assigned chats to the number of agents with slots set to active. |
| **Concurrency** | The percentage of currently assigned chats to the number of agents with currently assigned chats. |
| **Logged In Agents** | The number of agents currently logged in to Agent Desk. |
| **Active and Away Agents** | The number of agents with an active-type and away-type label respectively. |
| **Agent Status** | The number of agents with each status label. |
## Agent Metrics
| **Metric name** | **Definition** |
| :------------------------ | :---------------------------------------------------------------------------------------------------------------------------------------------------------------------------------------------------- |
| **Agent Name** | Name of the agent currently logged in to Agent Desk. Agents currently handling assignments have their names underlined. On click, the agent's current assignments display in the 'Conversations' tab. |
| **Agent Status** | Name of the status selected by the agent in Agent Desk. Green labels represent Available statuses, while orange labels represent Away statuses. |
| **Time in Status** | The time an agent has spent in the currently displayed status. |
| **Average Handle time** | The time spent across all current assignments, starting from when the chat was assigned to when it is dispositioned, for a given agent. |
| **Average Response Time** | The average amount of time to respond to a customer message across all current assignments for a given agent. |
| **Assignments** | The number of assignments an agent is currently handling. |
## Conversation Metrics
| **Metric name** | **Definition** |
| :------------------------ | :-------------------------------------------------------------------------------------- |
| **Issue ID** | Unique conversation identifier assigned to a customer intent. |
| **Agent Name** | Name of the agents handling the conversation. |
| **Channel** | Channel the customer is engaging with. |
| **Intent** | Last detected intent prior to the user being assigned to the queue. |
| **Queue Membership** | Queue the issue was assigned to based on intent classification and queue routing rules. |
| **Time Assigned** | Time the conversation was assigned to an agent. |
| **Handle Time** | Current handle time of the conversation. |
| **Average Response Time** | Average time it takes an agent to reply to customer utterances. |
| **Time Waiting** | Time since the last message sender has been awaiting a response. |
| **Alerts** | Event-based signals recorded throughout the conversation. |
## Performance - 'Current Period' Metrics (since 12 am)
| **Metric name** | **Definition** |
| :------------------------------------ | :------------------------------------------------------------------------------------------------------------------------------------------------------------------------------------------------------------------ |
| **Offered - Total** | The total instances where the conversation was either placed in queue or assigned directly to an agent attributed to the time interval the Queue or direct Assignment event (without being placed in queue) occurs. |
| **Assigned to Agent - Total** | The total instances where the customer was assigned to an agent. |
| **Timed Out by Agent - Total** | The total instances assigned to an agent where they "Timed Out" the customer. |
| **Queued - Total** | The total instances where a customer was placed in or is currently waiting in the queue to be connected to an agent. |
| **Queued - Eligible for Assignment** | Only available as a right now metric. |
| **Max Queue Time** | Only available as a right now metric. |
| **Average Wait Time** | The average time a customer waited to abandon or be assigned to an agent, including 'zero-time' for customers directly assigned to an agent when there were available slots. |
| **Average Time in Queue** | The average time a customer waited in queue for those who either abandoned the queue or were assigned to an agent. |
| **Average Time to Assign** | The average queue time for all customers who were assigned to an agent, including 'zero-time' for customers directly assigned to an agent when there were available slots. |
| **Queue Abandons** | The total count of customers who abandoned the queue. |
| **Average Abandon Queue Time** | The average time a customer waited in queue prior to abandoning, either by being dequeued on the web or ending the chat before being assigned to an agent. |
| **Queue Abandonment Rate** | The percent of customers who required a visit to the queue and abandoned before being assigned to an agent. |
| **Average Agent Response Time** | The average amount of time it takes an agent to respond to a customer message across all assignments. |
| **Average Agent First Response Time** | The average amount of time it takes an agent to send the first line to a customer after the chat was assigned across all assignments. |
| **Average Handle Time** | The average amount of time spent by an agent per assignment, from when the chat was assigned to when the agent finishes dispositioning the assignment. |
| **Active Slots** | Only available as a right now metric. |
| **Occupancy** | The percentage of cumulative utilization time to cumulative available time for all agents who handled chats. |
| **Concurrency** | The weighted average number of concurrent chats that agents are handling at once, given an agent is utilized by handling at least one chat. |
| **Logged In Agents** | Only available as a right now metric. |
| **Active and Away Agents** | Only available as a right now metric. |
| **Agent Status** | Only available as a right now metric. |
## Teams and Locations
You can track the live behaviors of agents by overseeing outages and staff levels at different geographic locations. Furthermore, each team provides hourly updates as to who is active/lunch etc and they want to be able to get this information easily.
Admins see a list of agents when they click into a particular queue and select Performance from the left-hand panel and clicked into the Agents icon on the right-hand panel. Admins can further oversee results by performance metrics of the current day and filter both the agent list and metrics by any of the following attributes:
* **Agent Name**
* **Location**
* **Team**
* **Status**
### Team Table
Admins can filter teams by type of role and review each company assigned to the team. Also, each result shows the size and the occupancy of each team.
Each administrator can provide an hourly update of how many agents are active, on lunch, or in a different state as well as view corresponding metrics.
1. **Queue Activity**: Includes 'Queued', 'Avg current time in queue', 'Average wait time', and 'Average time to assign'.
2. **Volume**: Includes 'Offered', 'Assigned to agent', and 'Time out by agent'.
3. **Handle & Response Time**: Includes 'Average handle time (AHT)', 'Average response time (ART)', and 'Average first response time (AFRT)'
# Metric Definitions
Source: https://docs.asapp.com/messaging-platform/insights-manager/live-insights/metric-definitions
Learn about the metrics available in Live Insights.
## Performance - 'Right Now' Metrics
| **Metric name** | **Definition** |
| :------------------------------------ | :---------------------------------------------------------------------------------------------------------------------------------------------------------------------------------------------------------- |
| **Offered** | The number of conversations that are currently connected with an agent or waiting in the queue. |
| **Assigned to Agent** | The number of conversations where a customer is currently talking to a live agent. |
| **Timed out by Agent** | Only available as a current period metric for the day. |
| **Queued** | The number of customers who are waiting in the queue to be connected to an agent. |
| **Queued - Eligible for Assignment** | The number of customers who are waiting in the queue, received a check-in message, and replied to it. |
| **Max Queue Time** | The actual wait time of the customer who is positioned last in the given queue. |
| **Average Wait Time** | The average queue time for all customers who are currently assigned to an agent or waiting in the queue, including 'zero-time' for customers directly assigned to an agent when there were available slots. |
| **Average Time in Queue** | The average queue time for all customers who are currently waiting in the queue. |
| **Average Time to Assign** | The average queue time for all customers who are currently assigned to an agent, including 'zero-time' for customers directly assigned to an agent when there were available slots. |
| **Queue Abandons** | Only available as a current period metric for the day. |
| **Average Abandon Queue Time** | Only available as a current period metric for the day. |
| **Queue Abandonment Rate** | Only available as a current period metric for the day. |
| **Average Agent Response Time** | The average amount of time to respond to a customer message across the assignment for agents who are currently handling chats. |
| **Average Agent First Response Time** | The average amount of time to send the first line to a customer after the chat was assigned for agents who are currently handling chats. |
| **Average Handle Time** | The time spent across all current chats by an agent per assignment starting from when the chat was assigned to when it is dispositioned. |
| **Active Slots** | A ratio of the number of currently active conversations to number of concurrent slots for agents who are in an Active status or actively handling chats. |
| **Occupancy** | The percentage of currently assigned chats to the number of agents with slots set to active. |
| **Concurrency** | The percentage of currently assigned chats to the number of agents with currently assigned chats. |
| **Logged In Agents** | The number of agents currently logged in to Agent Desk. |
| **Active and Away Agents** | The number of agents with an active-type and away-type label respectively. |
| **Agent Status** | The number of agents with each status label. |
## Agent Metrics
| **Metric name** | **Definition** |
| :------------------------ | :---------------------------------------------------------------------------------------------------------------------------------------------------------------------------------------------------- |
| **Agent Name** | Name of the agent currently logged in to Agent Desk. Agents currently handling assignments have their names underlined. On click, the agent's current assignments display in the 'Conversations' tab. |
| **Agent Status** | Name of the status selected by the agent in Agent Desk. Green labels represent Available statuses, while orange labels represent Away statuses. |
| **Time in Status** | The time an agent has spent in the currently displayed status. |
| **Average Handle time** | The time spent across all current assignments, starting from when the chat was assigned to when it is dispositioned, for a given agent. |
| **Average Response Time** | The average amount of time to respond to a customer message across all current assignments for a given agent. |
| **Assignments** | The number of assignments an agent is currently handling. |
## Conversation Metrics
| **Metric name** | **Definition** |
| :------------------------ | :-------------------------------------------------------------------------------------- |
| **Issue ID** | Unique conversation identifier assigned to a customer intent. |
| **Agent Name** | Name of the agents handling the conversation. |
| **Channel** | Channel the customer is engaging with. |
| **Intent** | Last detected intent prior to the user being assigned to the queue. |
| **Queue Membership** | Queue the issue was assigned to based on intent classification and queue routing rules. |
| **Time Assigned** | Time the conversation was assigned to an agent. |
| **Handle Time** | Current handle time of the conversation. |
| **Average Response Time** | Average time it takes an agent to reply to customer utterances. |
| **Time Waiting** | Time since the last message sender has been awaiting a response. |
| **Alerts** | Event-based signals recorded throughout the conversation. |
## Performance - 'Current Period' Metrics (since 12 am)
| **Metric name** | **Definition** |
| :------------------------------------ | :------------------------------------------------------------------------------------------------------------------------------------------------------------------------------------------------------------------ |
| **Offered - Total** | The total instances where the conversation was either placed in queue or assigned directly to an agent attributed to the time interval the Queue or direct Assignment event (without being placed in queue) occurs. |
| **Assigned to Agent - Total** | The total instances where the customer was assigned to an agent. |
| **Timed Out by Agent - Total** | The total instances assigned to an agent where they "Timed Out" the customer. |
| **Queued - Total** | The total instances where a customer was placed in or is currently waiting in the queue to be connected to an agent. |
| **Queued - Eligible for Assignment** | Only available as a right now metric. |
| **Max Queue Time** | Only available as a right now metric. |
| **Average Wait Time** | The average time a customer waited to abandon or be assigned to an agent, including 'zero-time' for customers directly assigned to an agent when there were available slots. |
| **Average Time in Queue** | The average time a customer waited in queue for those who either abandoned the queue or were assigned to an agent. |
| **Average Time to Assign** | The average queue time for all customers who were assigned to an agent, including 'zero-time' for customers directly assigned to an agent when there were available slots. |
| **Queue Abandons** | The total count of customers who abandoned the queue. |
| **Average Abandon Queue Time** | The average time a customer waited in queue prior to abandoning, either by being dequeued on the web or ending the chat before being assigned to an agent. |
| **Queue Abandonment Rate** | The percent of customers who required a visit to the queue and abandoned before being assigned to an agent. |
| **Average Agent Response Time** | The average amount of time it takes an agent to respond to a customer message across all assignments. |
| **Average Agent First Response Time** | The average amount of time it takes an agent to send the first line to a customer after the chat was assigned across all assignments. |
| **Average Handle Time** | The average amount of time spent by an agent per assignment, from when the chat was assigned to when the agent finishes dispositioning the assignment. |
| **Active Slots** | Only available as a right now metric. |
| **Occupancy** | The percentage of cumulative utilization time to cumulative available time for all agents who handled chats. |
| **Concurrency** | The weighted average number of concurrent chats that agents are handling at once, given an agent is utilized by handling at least one chat. |
| **Logged In Agents** | Only available as a right now metric. |
| **Active and Away Agents** | Only available as a right now metric. |
| **Agent Status** | Only available as a right now metric. |
## Teams and Locations
You can track the live behaviors of agents by overseeing outages and staff levels at different geographic locations. Furthermore, each team provides hourly updates as to who is active/lunch etc and they want to be able to get this information easily.
Admins see a list of agents when they click into a particular queue and select Performance from the left-hand panel and clicked into the Agents icon on the right-hand panel. Admins can further oversee results by performance metrics of the current day and filter both the agent list and metrics by any of the following attributes:
* **Agent Name**
* **Location**
* **Team**
* **Status**
### Team Table
Admins can filter teams by type of role and review each company assigned to the team. Also, each result shows the size and the occupancy of each team.
Each administrator can provide an hourly update of how many agents are active, on lunch, or in a different state as well as view corresponding metrics.
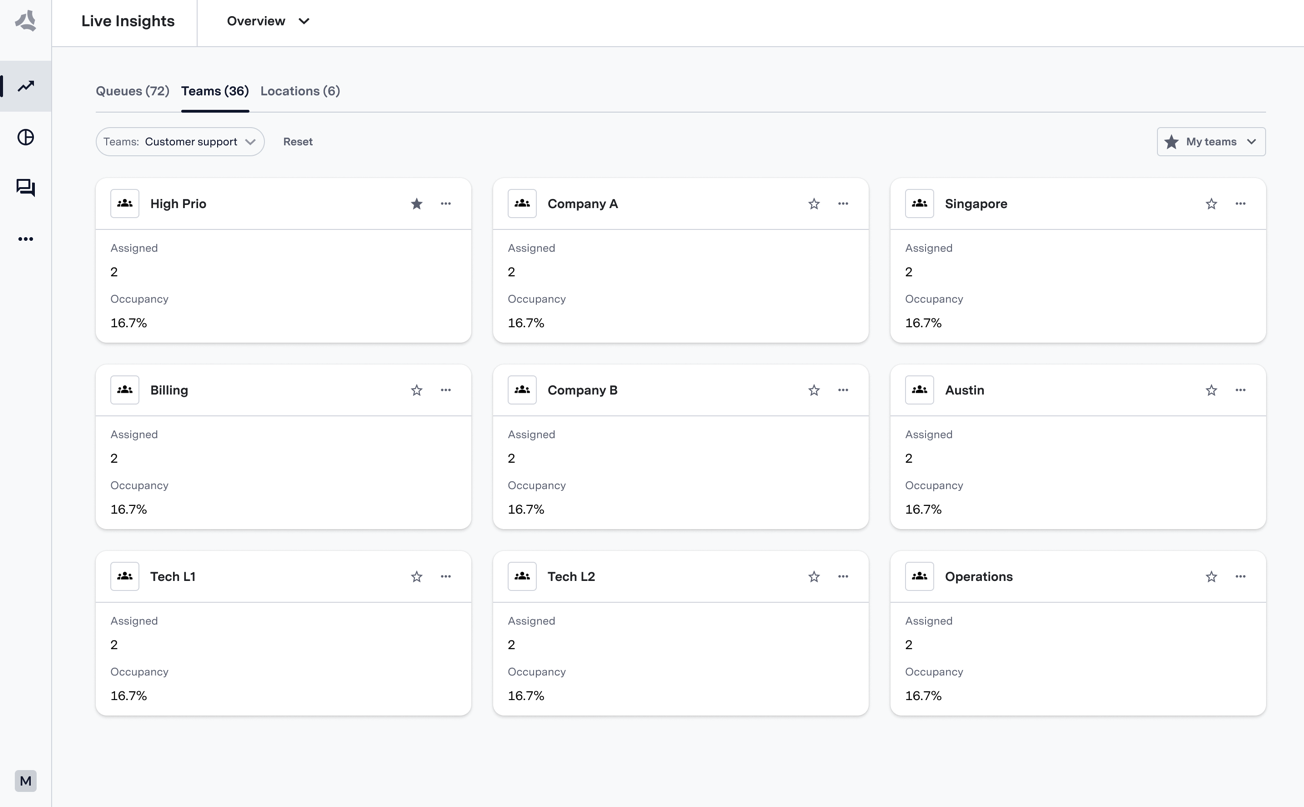 ### Location Table
Admins can filter locations by region and review the occupancy and size of each location.
Each location provides updates of performance and agent names.
### Location Table
Admins can filter locations by region and review the occupancy and size of each location.
Each location provides updates of performance and agent names.
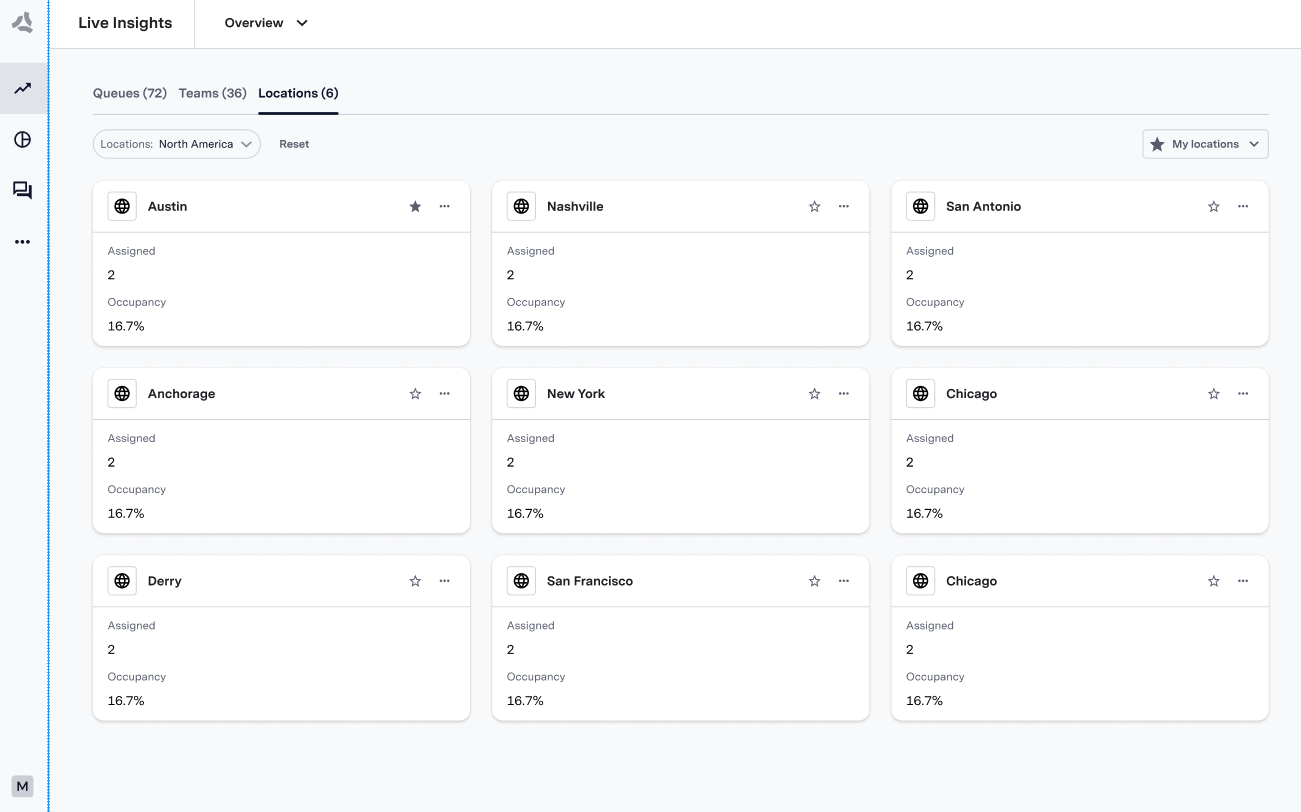 # Navigation
Source: https://docs.asapp.com/messaging-platform/insights-manager/live-insights/navigation
Learn how to navigate the Live Insights interface.
## How to Access Live Insights
* You can access Live Insights from the primary navigation. To open, click the **Live Insights** link.
# Navigation
Source: https://docs.asapp.com/messaging-platform/insights-manager/live-insights/navigation
Learn how to navigate the Live Insights interface.
## How to Access Live Insights
* You can access Live Insights from the primary navigation. To open, click the **Live Insights** link.
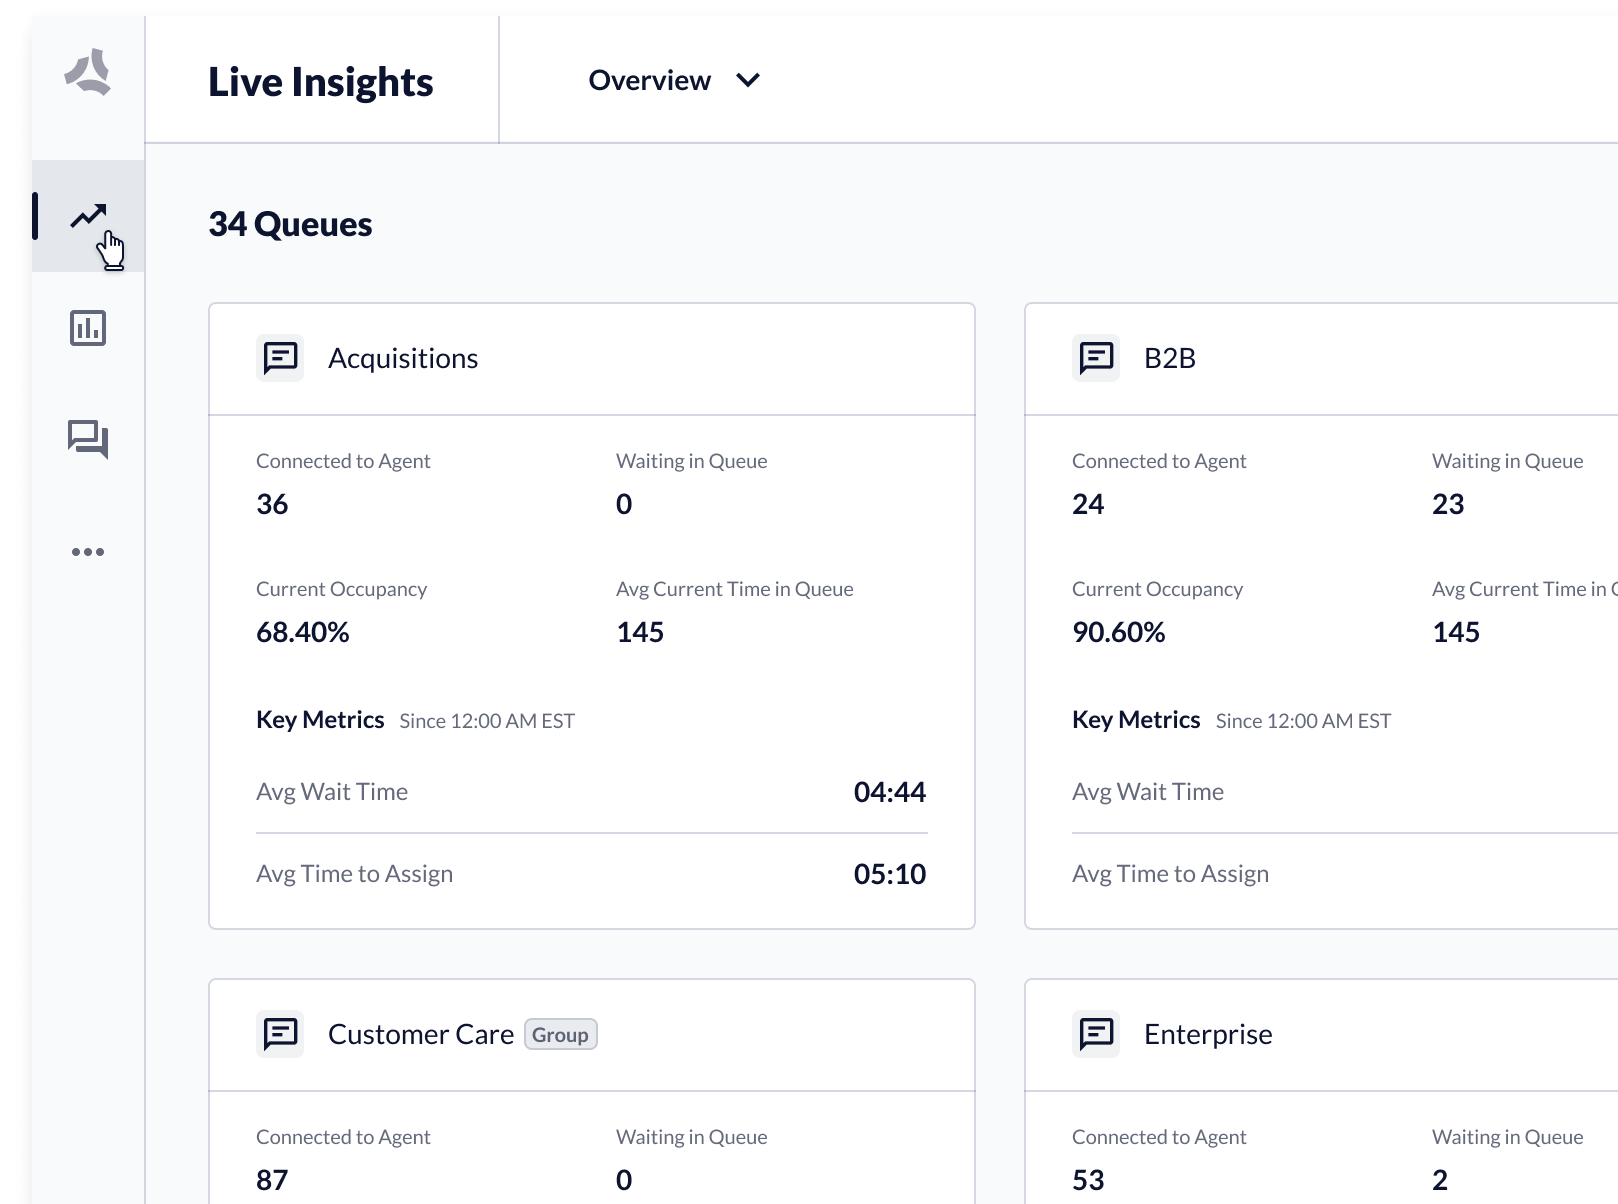 ## How to Access a Queue or Queue Group
Live Insights provides different views of queue performance data:
* Overview of all queue activity, including queue groups and organizational groups.
* Single queue and queue groups, which display queue and agent performance data.
## How to Access a Queue or Queue Group
Live Insights provides different views of queue performance data:
* Overview of all queue activity, including queue groups and organizational groups.
* Single queue and queue groups, which display queue and agent performance data.
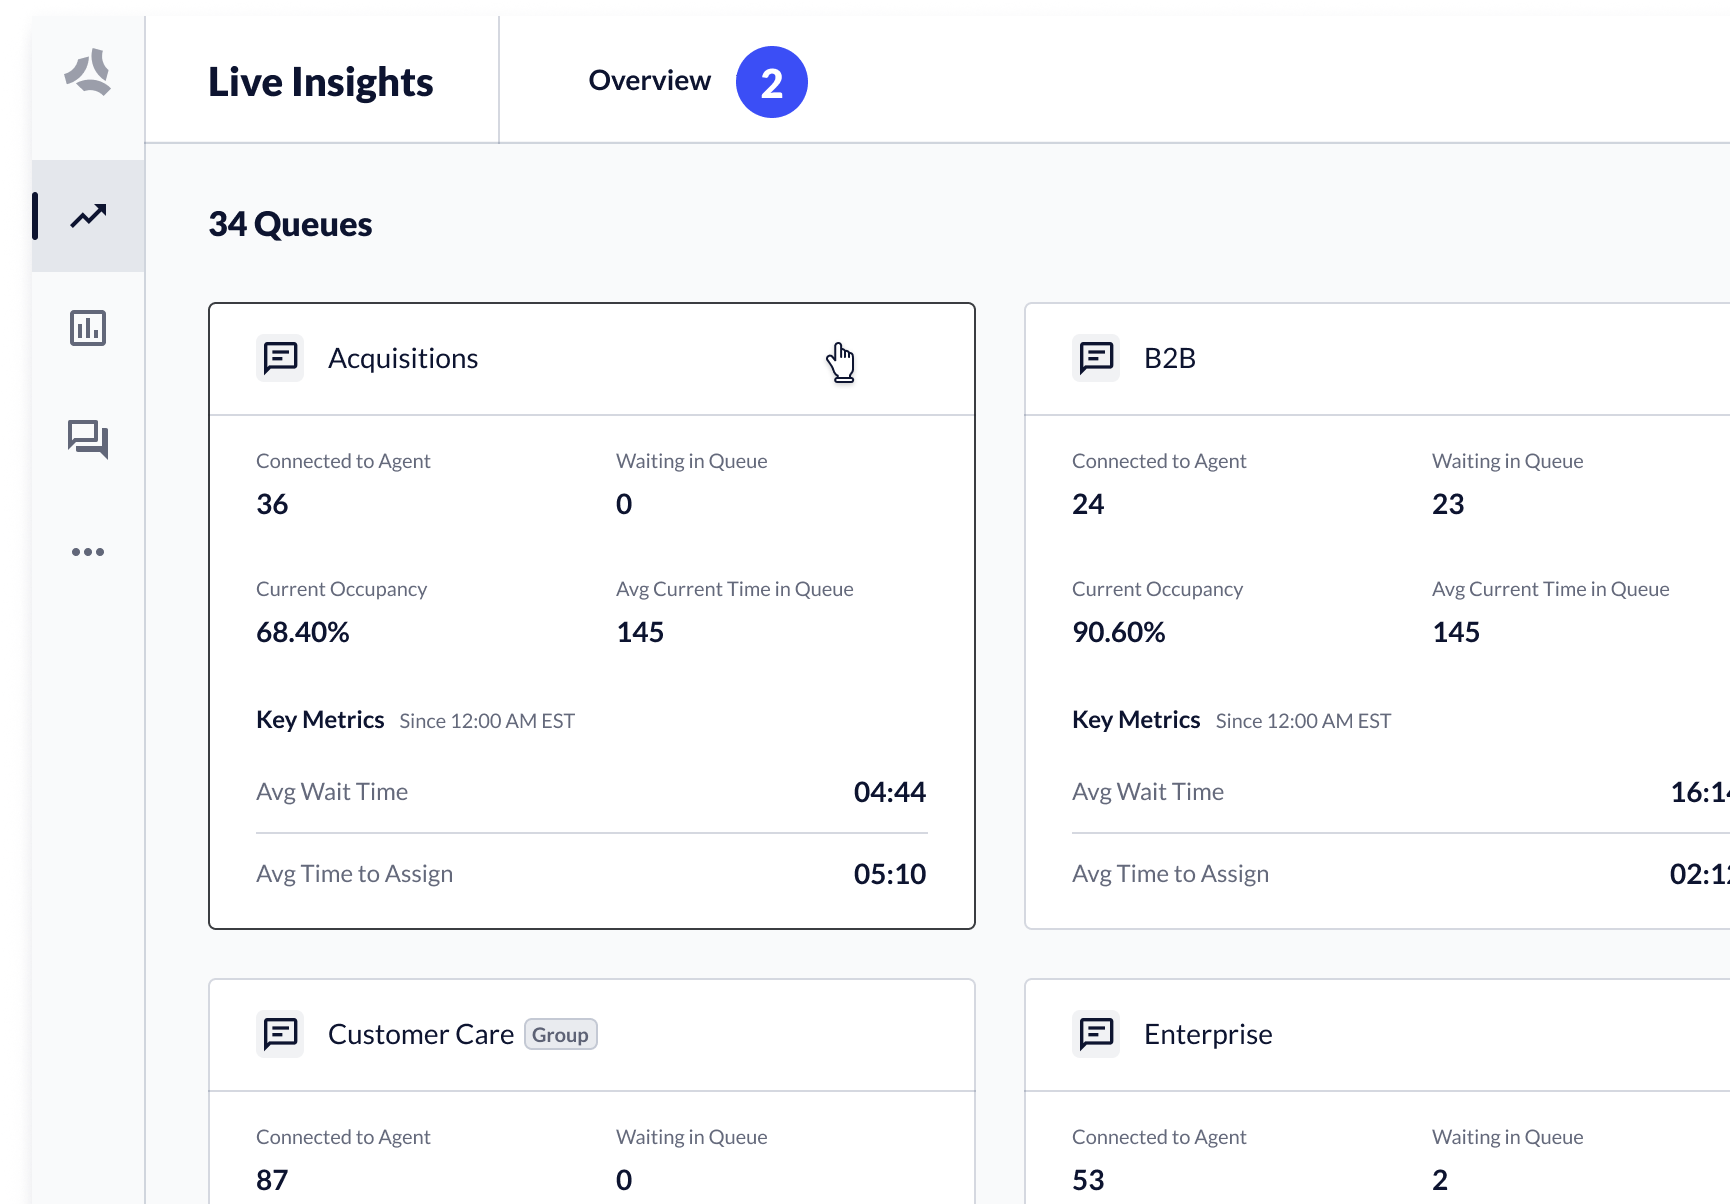 You can access single queue or queue group in two ways:
1. From Overview, **click a tile** → the relevant queue details page opens.
2. From the **queue dropdown**, select a **queue** or **queue group**.
## Navigate Away from a Single Queue or Queue Group
You can navigate back to the Live Insights Overview, or to a different queue or queue group.
You can access single queue or queue group in two ways:
1. From Overview, **click a tile** → the relevant queue details page opens.
2. From the **queue dropdown**, select a **queue** or **queue group**.
## Navigate Away from a Single Queue or Queue Group
You can navigate back to the Live Insights Overview, or to a different queue or queue group.
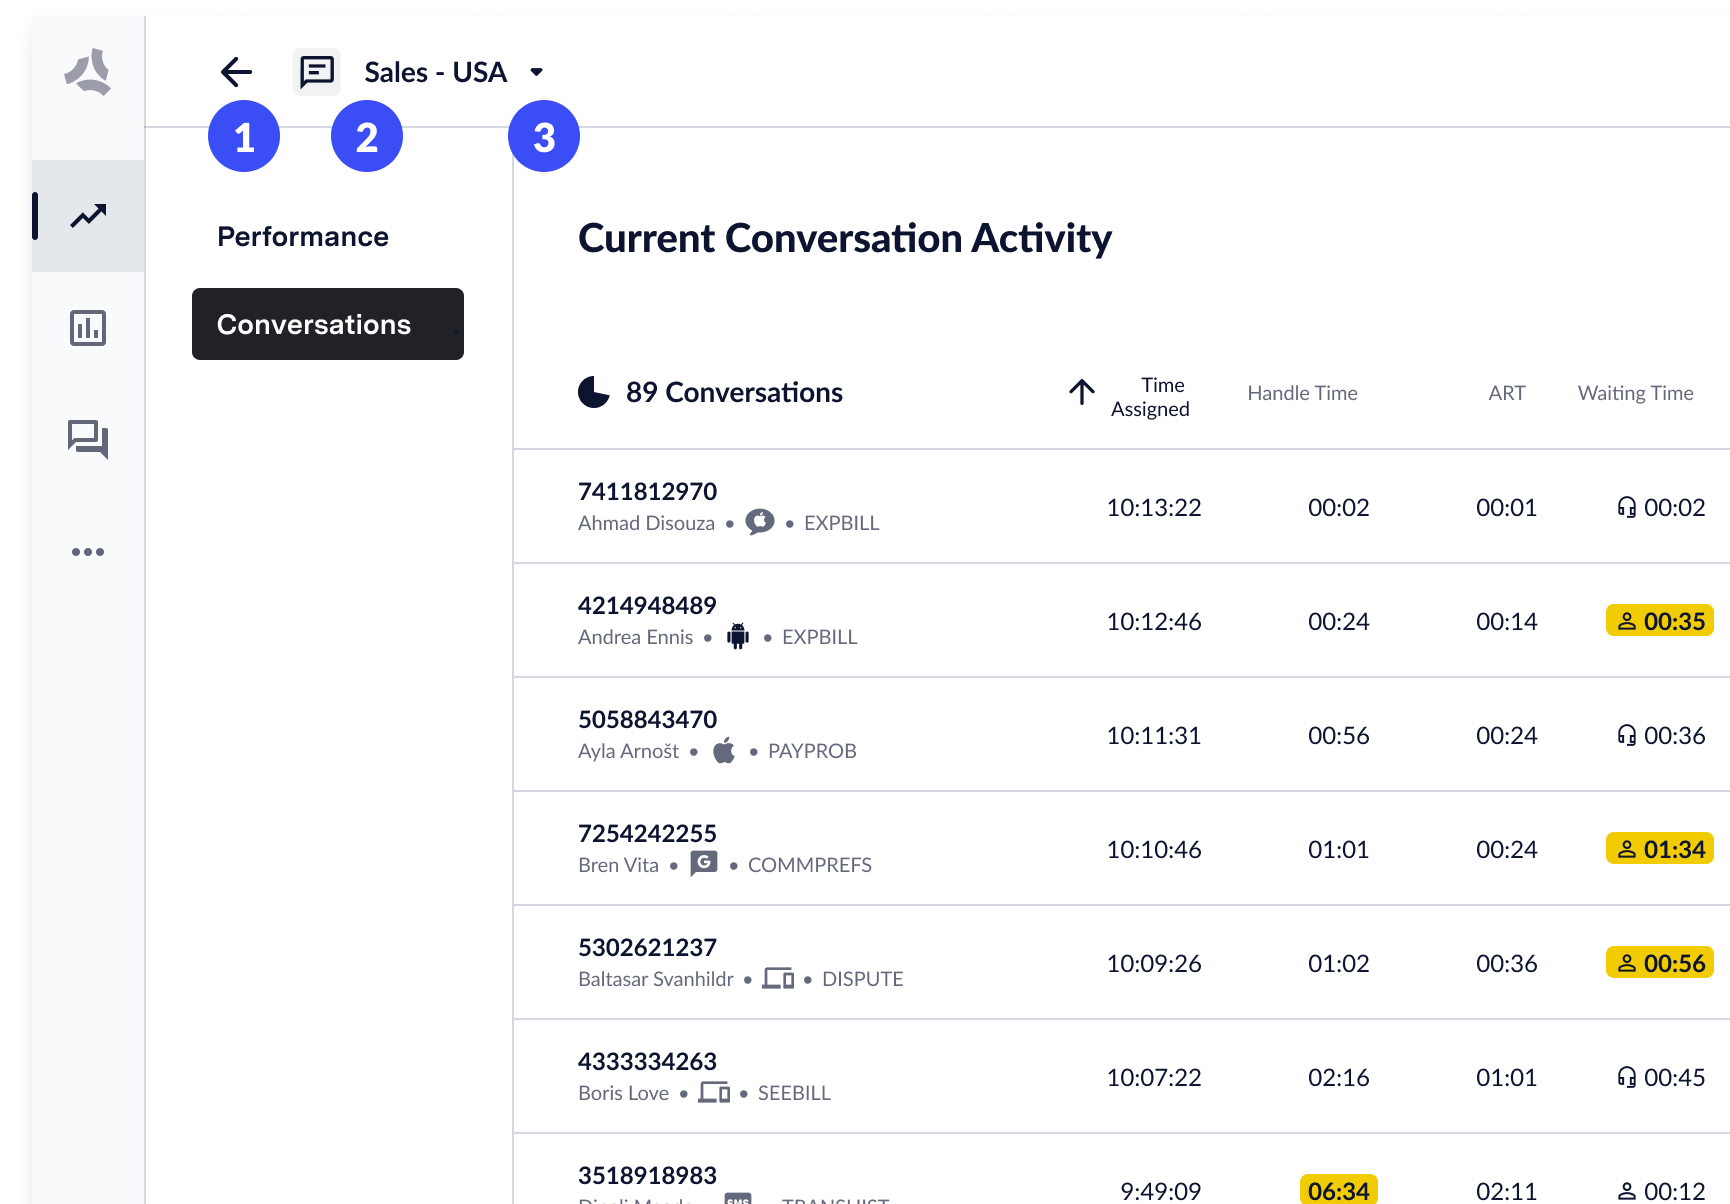 1. **Back arrow**: on click, the Live Insights Overview opens.
2. **Queue channel indicator**: indicates if the queue is a voice or chat queue.
3. **Queue dropdown**: on click, you can select a different queue or queue group.
## Channel-based Queues
Queues and queue groups host channel-specific content. ASAPP supports three queue types:
1. **Back arrow**: on click, the Live Insights Overview opens.
2. **Queue channel indicator**: indicates if the queue is a voice or chat queue.
3. **Queue dropdown**: on click, you can select a different queue or queue group.
## Channel-based Queues
Queues and queue groups host channel-specific content. ASAPP supports three queue types:
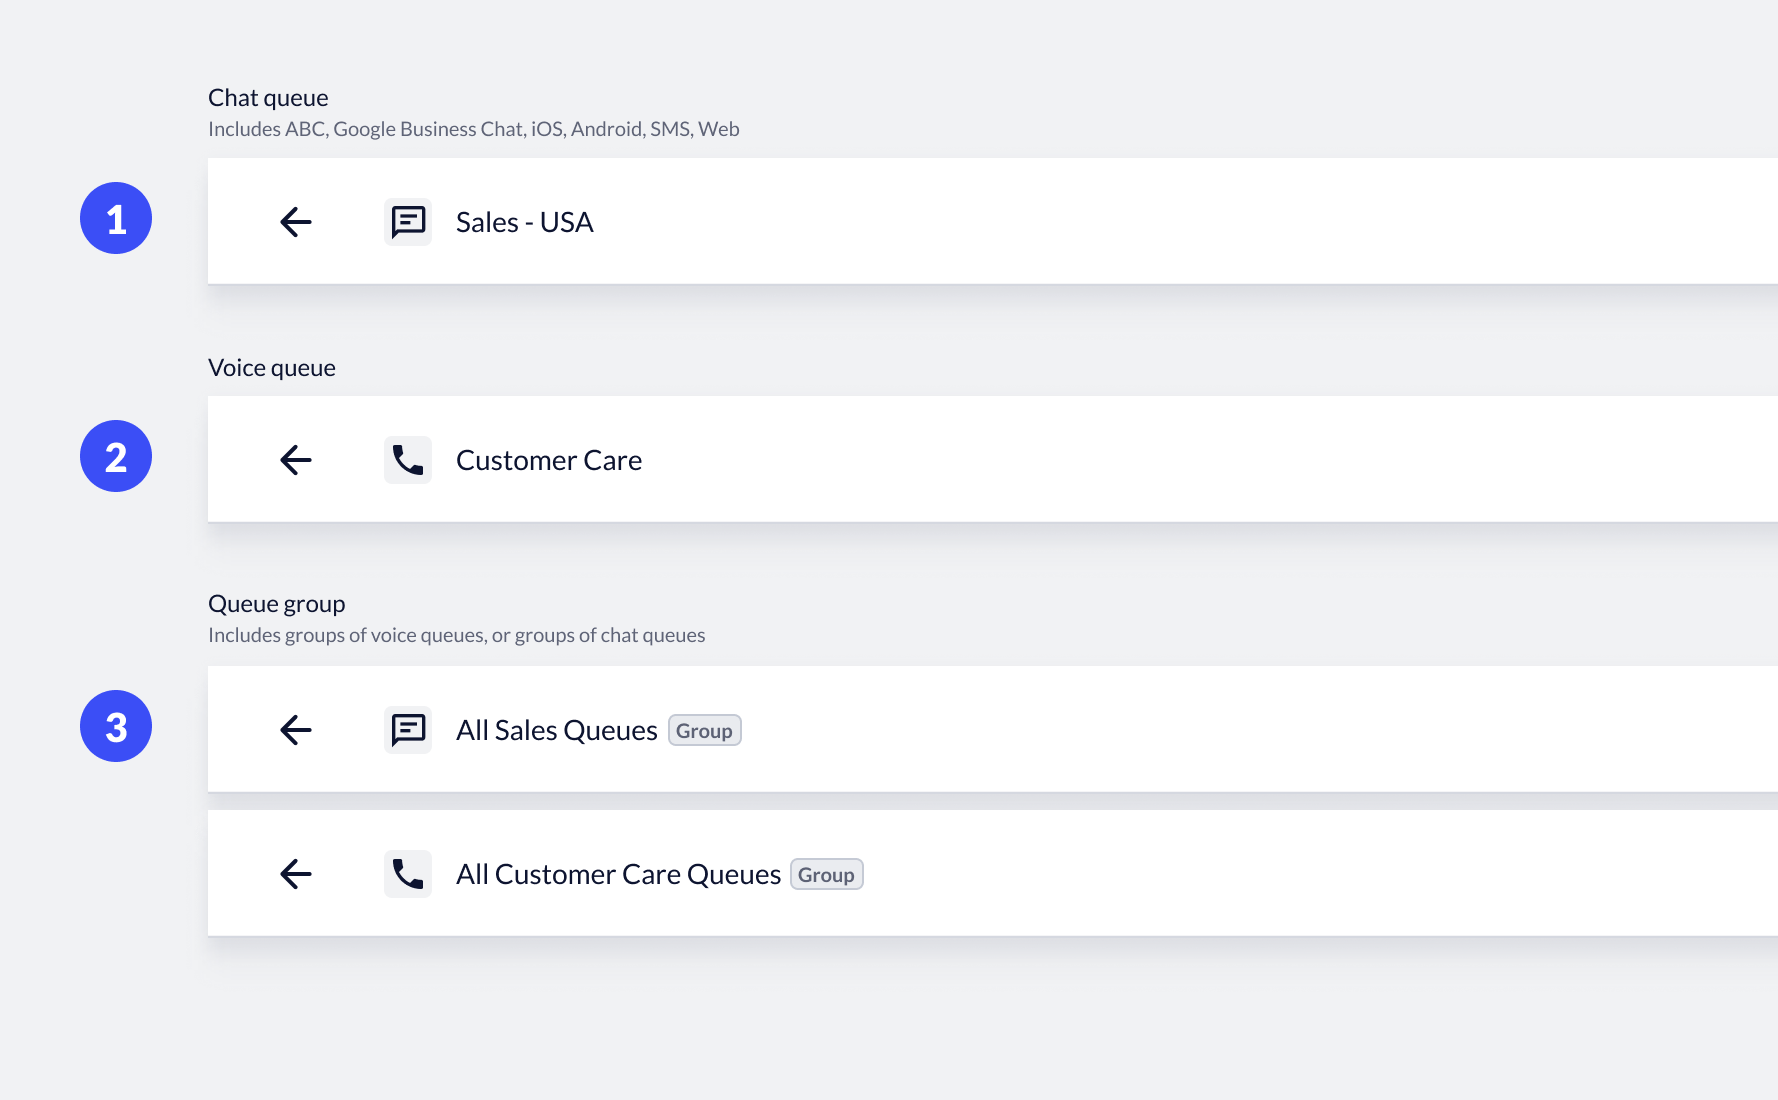 1. **Chat queues**: includes all digital channels such as Apple Messages for Business, Web, SMS, iOS and Android.
2. **Voice queues**: includes all voice channels in one queue.
3. **Queue groups**: groups are made of aggregated queues of a single type. Each group contains either chat queues or voice queues. The number of queues in the queue group displays below the channel icon.
## Access Queue Performance and Conversation Data
Single queues and queue groups include two views: performance data about the queue and conversation activity data.
1. **Chat queues**: includes all digital channels such as Apple Messages for Business, Web, SMS, iOS and Android.
2. **Voice queues**: includes all voice channels in one queue.
3. **Queue groups**: groups are made of aggregated queues of a single type. Each group contains either chat queues or voice queues. The number of queues in the queue group displays below the channel icon.
## Access Queue Performance and Conversation Data
Single queues and queue groups include two views: performance data about the queue and conversation activity data.
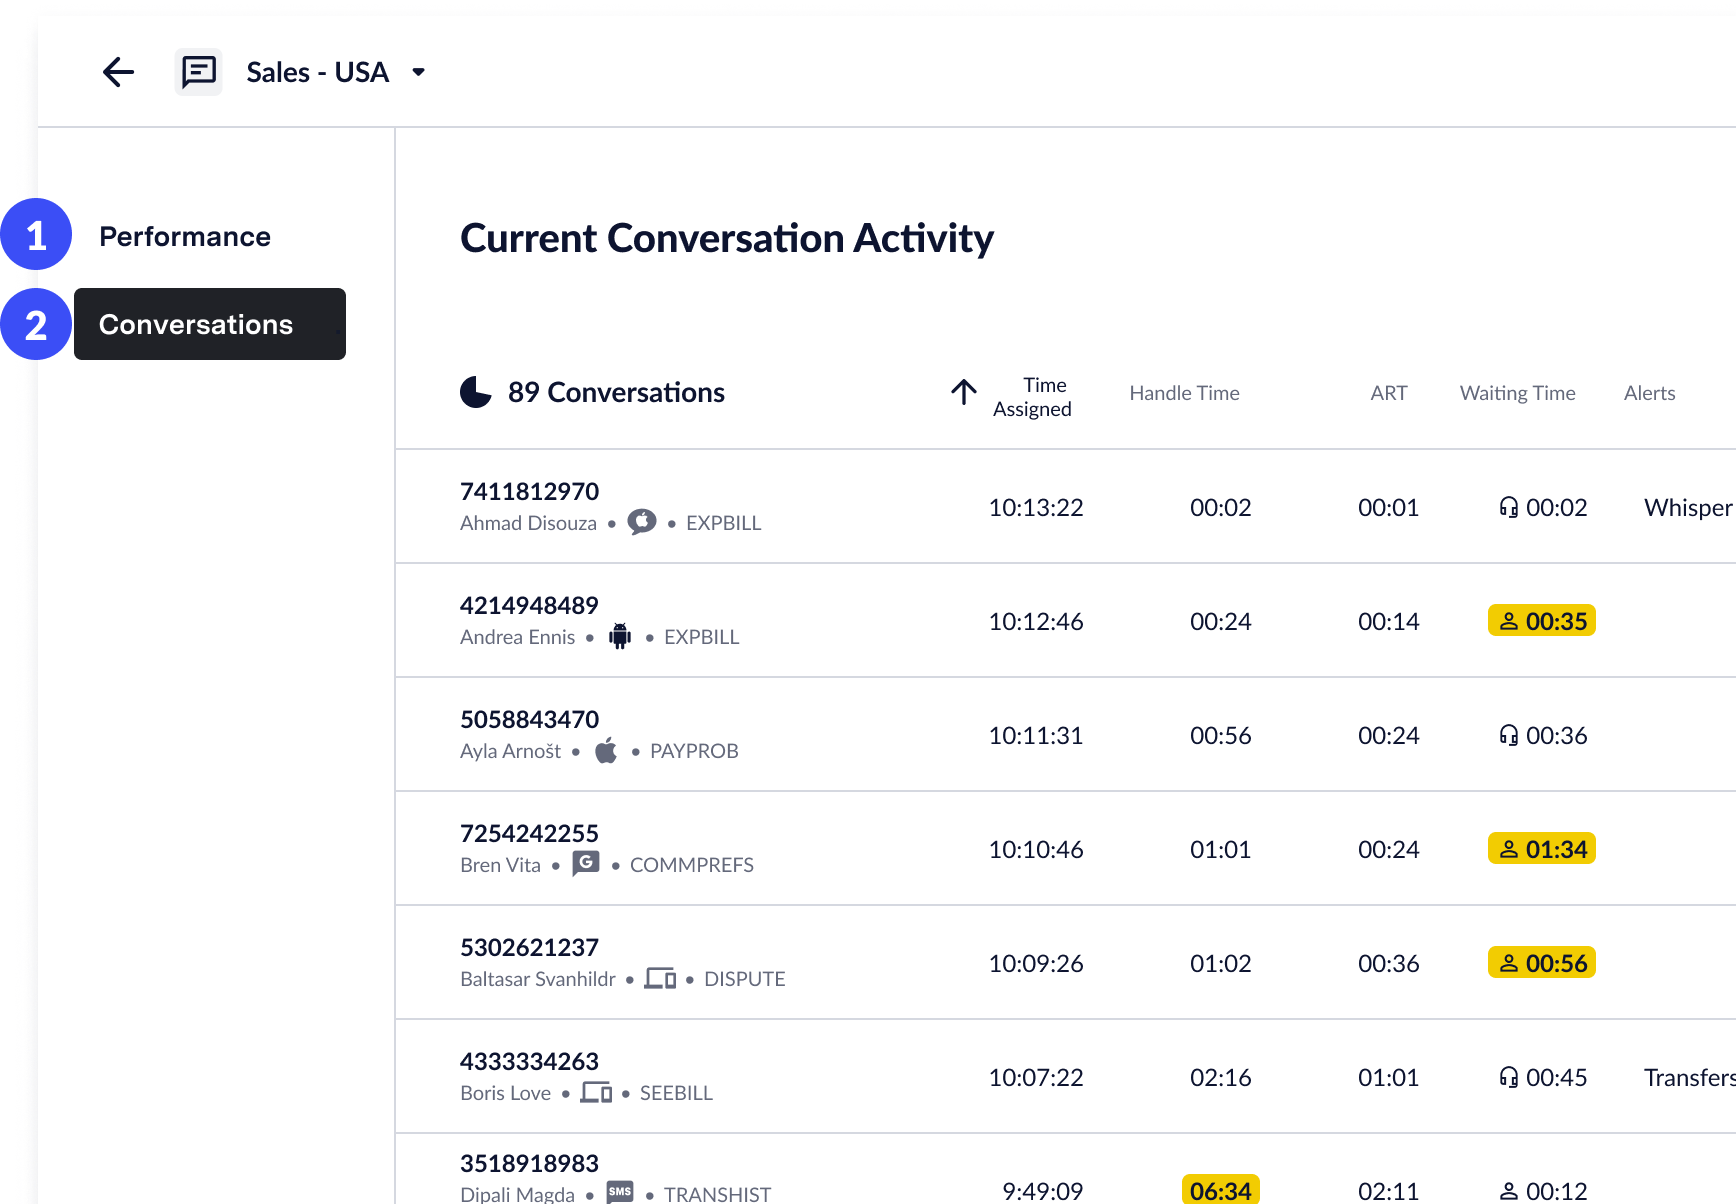 1. **Performance**: Click to access the performance data of the queue, as well as agent performance data and customer feedback.
2. **Conversations**: Click to access conversation activity, view transcripts, and send whisper messages.
# Performance Data
Source: https://docs.asapp.com/messaging-platform/insights-manager/live-insights/performance-data
Learn how to view performance data in Live Insights.
Live Insights provides a comprehensive view of today's performance within each queue and queue group.
You can view performance data for 'right now', as well as for the 'current period', defined as since 12 am. You can also view alerts, signals, and agent performance data on the Performance page.
1. **Data definitions**: On click, opens a link to view metric definitions within Historical Reporting.
2. **Channel filter**: Filter performance data by channel. On click, channel options display. Select options to automatically filter data.
3. **Performance metrics**: Displays all performance metrics currently available. By default, performance metrics showcase a 'Right Now' view.
4. **Intraday**: Rolling data since the beginning of the day (12 am) is available upon activation. When active, the rolling count or averages since 12 am display.
5. **Agent metrics and feedback data**: On click, displays the Agent performance data or customer feedback received.
## Intraday Data
You can view current performance data ('right now') or view aggregate counts and averages since the beginning of the day ('current period').
These two views provide you with a fuller picture of queue performance and facilitate investigations and contextualization of events.
1. **Performance**: Click to access the performance data of the queue, as well as agent performance data and customer feedback.
2. **Conversations**: Click to access conversation activity, view transcripts, and send whisper messages.
# Performance Data
Source: https://docs.asapp.com/messaging-platform/insights-manager/live-insights/performance-data
Learn how to view performance data in Live Insights.
Live Insights provides a comprehensive view of today's performance within each queue and queue group.
You can view performance data for 'right now', as well as for the 'current period', defined as since 12 am. You can also view alerts, signals, and agent performance data on the Performance page.
1. **Data definitions**: On click, opens a link to view metric definitions within Historical Reporting.
2. **Channel filter**: Filter performance data by channel. On click, channel options display. Select options to automatically filter data.
3. **Performance metrics**: Displays all performance metrics currently available. By default, performance metrics showcase a 'Right Now' view.
4. **Intraday**: Rolling data since the beginning of the day (12 am) is available upon activation. When active, the rolling count or averages since 12 am display.
5. **Agent metrics and feedback data**: On click, displays the Agent performance data or customer feedback received.
## Intraday Data
You can view current performance data ('right now') or view aggregate counts and averages since the beginning of the day ('current period').
These two views provide you with a fuller picture of queue performance and facilitate investigations and contextualization of events.
 1. **Right Now**: Default view. Provides performance data currently captured.
2. **Since 12 am**: Click the **toggle** to display 'current period' metrics.
Some metrics are not available in this configuration.
1. **Right Now**: Default view. Provides performance data currently captured.
2. **Since 12 am**: Click the **toggle** to display 'current period' metrics.
Some metrics are not available in this configuration.
 1. **Channel dropdown**: To filter data per channel, click the **channel** dropdown to activate channel selection.
2. **Channel options**: All available channels display in the channel dropdown. You can select one or more **channels** to filter data by. Once selected, the data will automatically update.
# Queue Overview (All Queues)
Source: https://docs.asapp.com/messaging-platform/insights-manager/live-insights/queue-overview--all-queues-
Learn how to view and customize the performance overview for all queues and queue groups.
Live Insights provides a view of all single queues and queue groups, with a performance overview.
Live Insights highlights metrics that are outside the normal performance range. You can also find customization tools to show/hide queues, or to create and manage queue groups on this page.
1. **Channel dropdown**: To filter data per channel, click the **channel** dropdown to activate channel selection.
2. **Channel options**: All available channels display in the channel dropdown. You can select one or more **channels** to filter data by. Once selected, the data will automatically update.
# Queue Overview (All Queues)
Source: https://docs.asapp.com/messaging-platform/insights-manager/live-insights/queue-overview--all-queues-
Learn how to view and customize the performance overview for all queues and queue groups.
Live Insights provides a view of all single queues and queue groups, with a performance overview.
Live Insights highlights metrics that are outside the normal performance range. You can also find customization tools to show/hide queues, or to create and manage queue groups on this page.
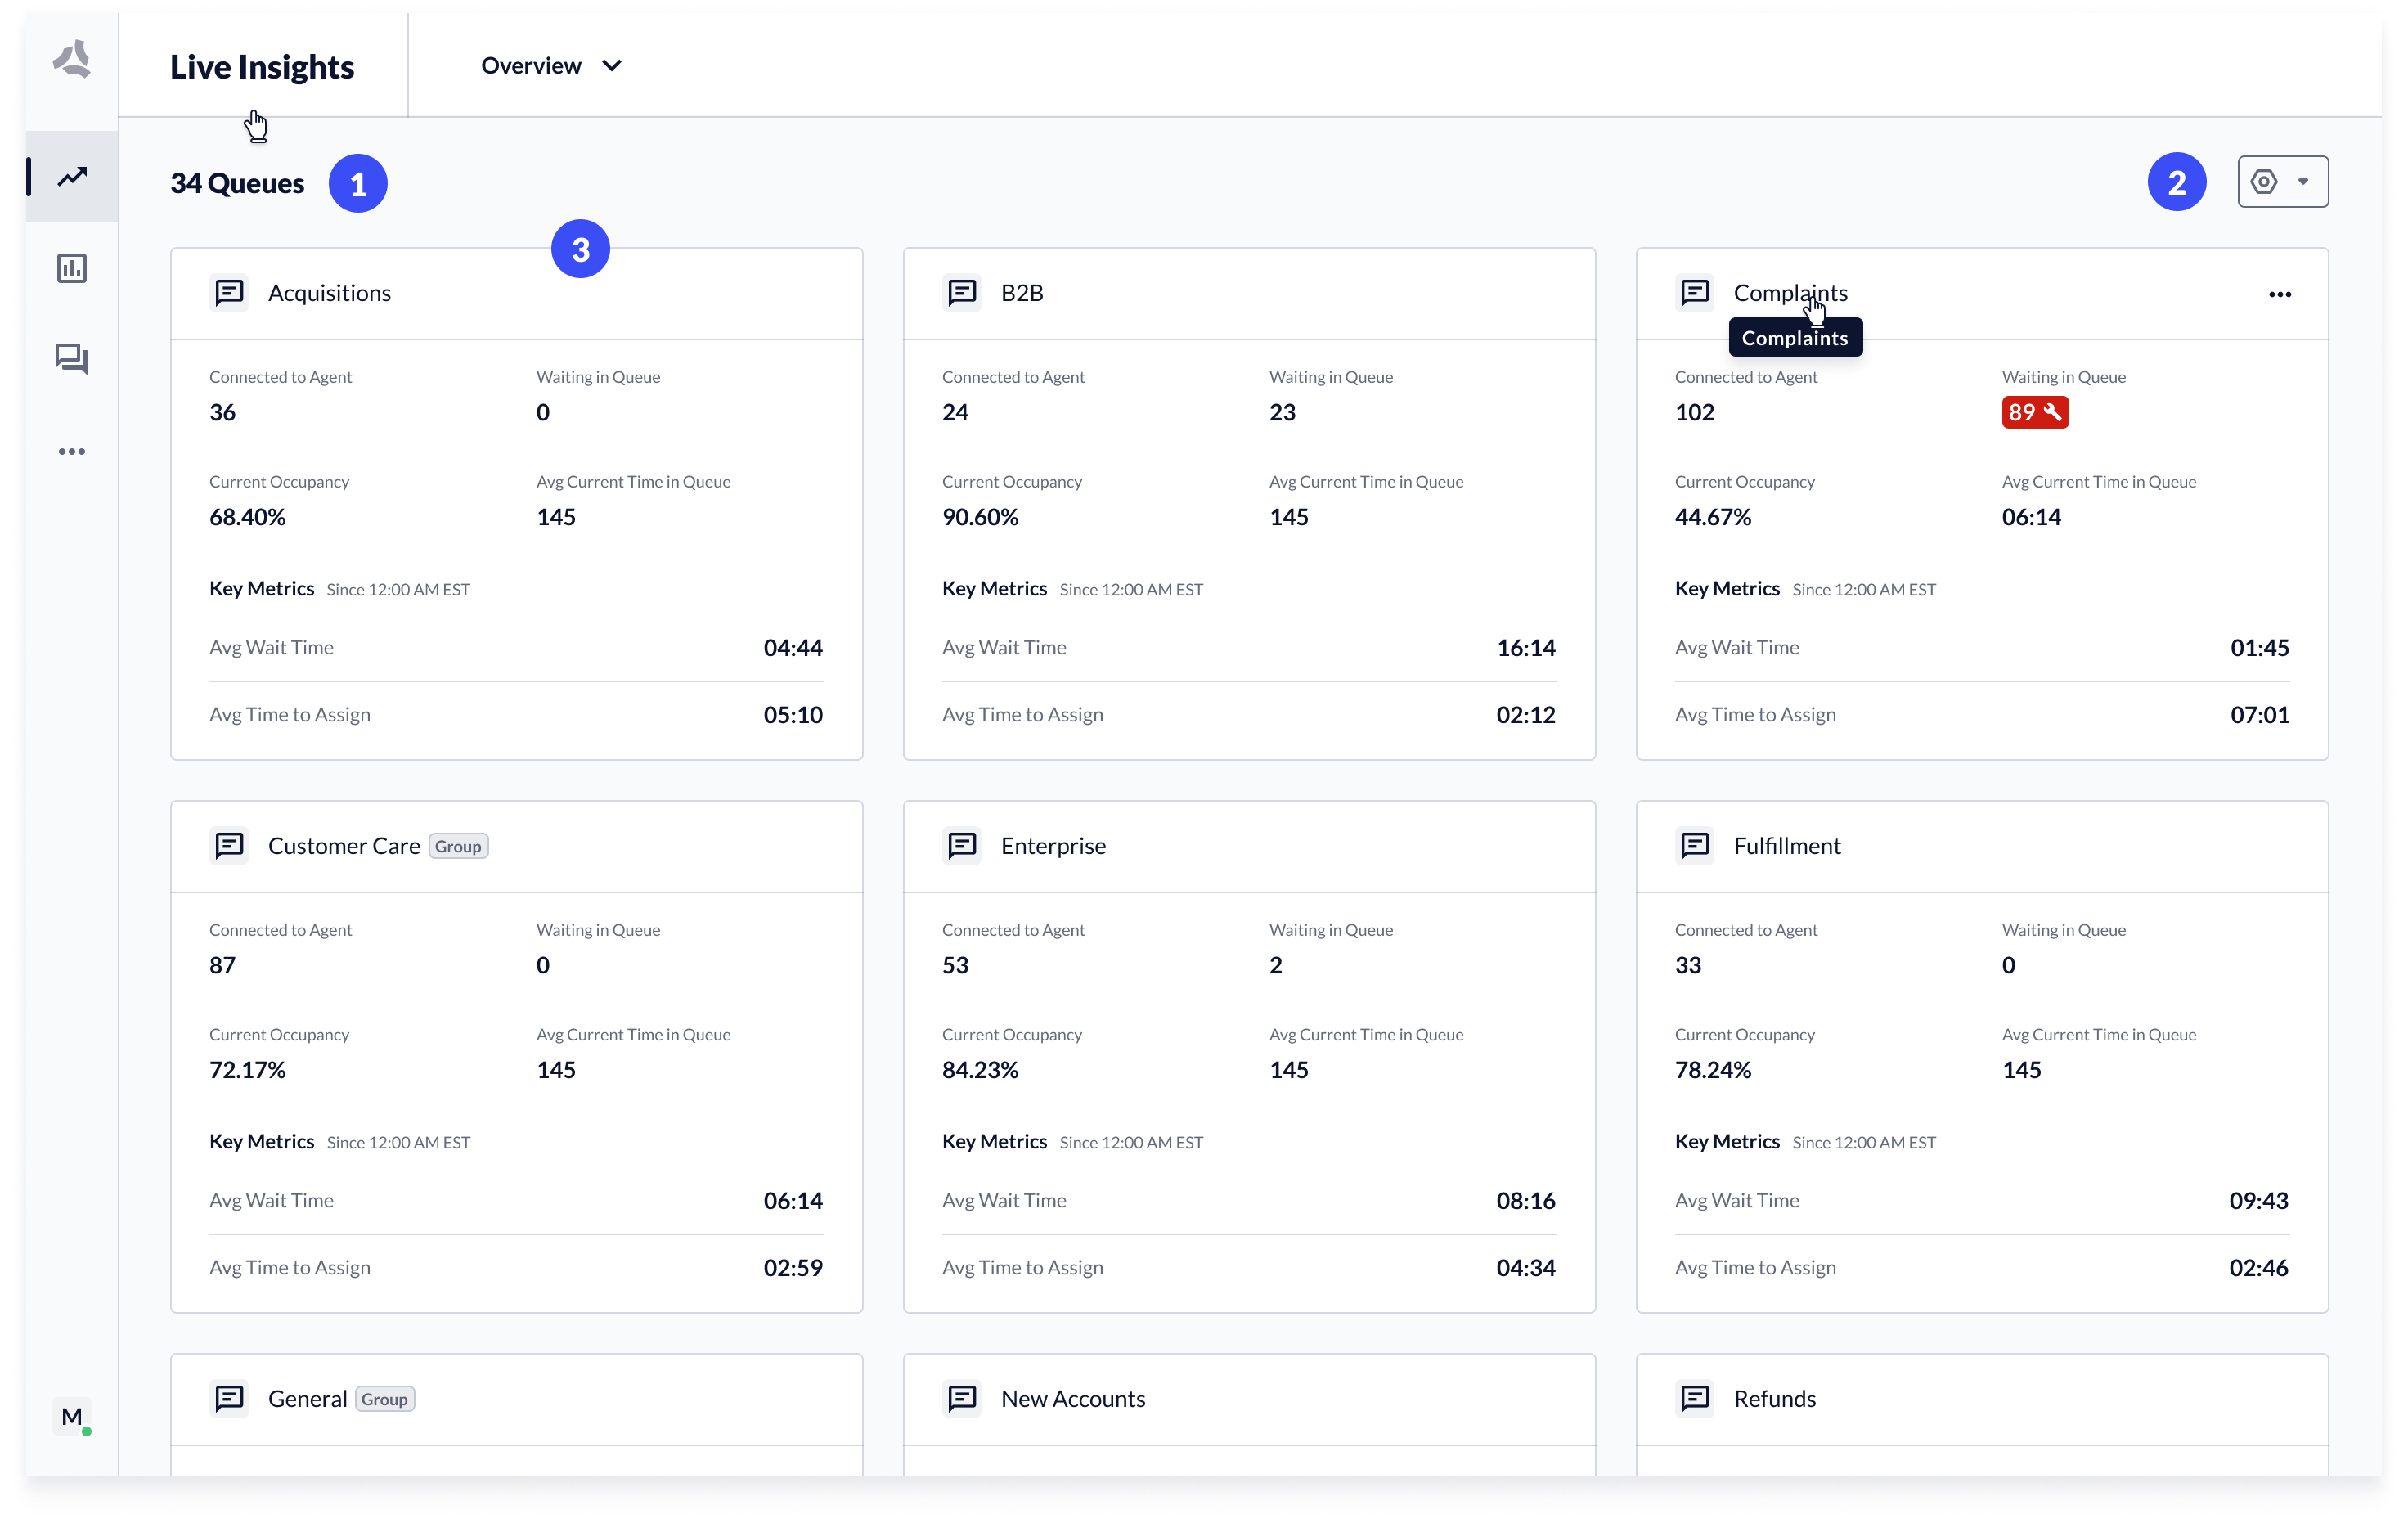 1. **Queue count**: Displays the total number of queues available.
2. **Customization**: Tools to customize the display of queues are available to users.
* Queue visibility: Show/hide queues to customize the Overview page
* Queue groups: Create new queue groups, edit existing groups.
3. **Single Queues & Queue groups**: Displays performance overview for each queue and queue groups. Each tile leads to a drilled down view.
## Customization
ASAPP supports customization features to change the display of queues, as well as create and manage queue groupings.
1. **Queue count**: Displays the total number of queues available.
2. **Customization**: Tools to customize the display of queues are available to users.
* Queue visibility: Show/hide queues to customize the Overview page
* Queue groups: Create new queue groups, edit existing groups.
3. **Single Queues & Queue groups**: Displays performance overview for each queue and queue groups. Each tile leads to a drilled down view.
## Customization
ASAPP supports customization features to change the display of queues, as well as create and manage queue groupings.
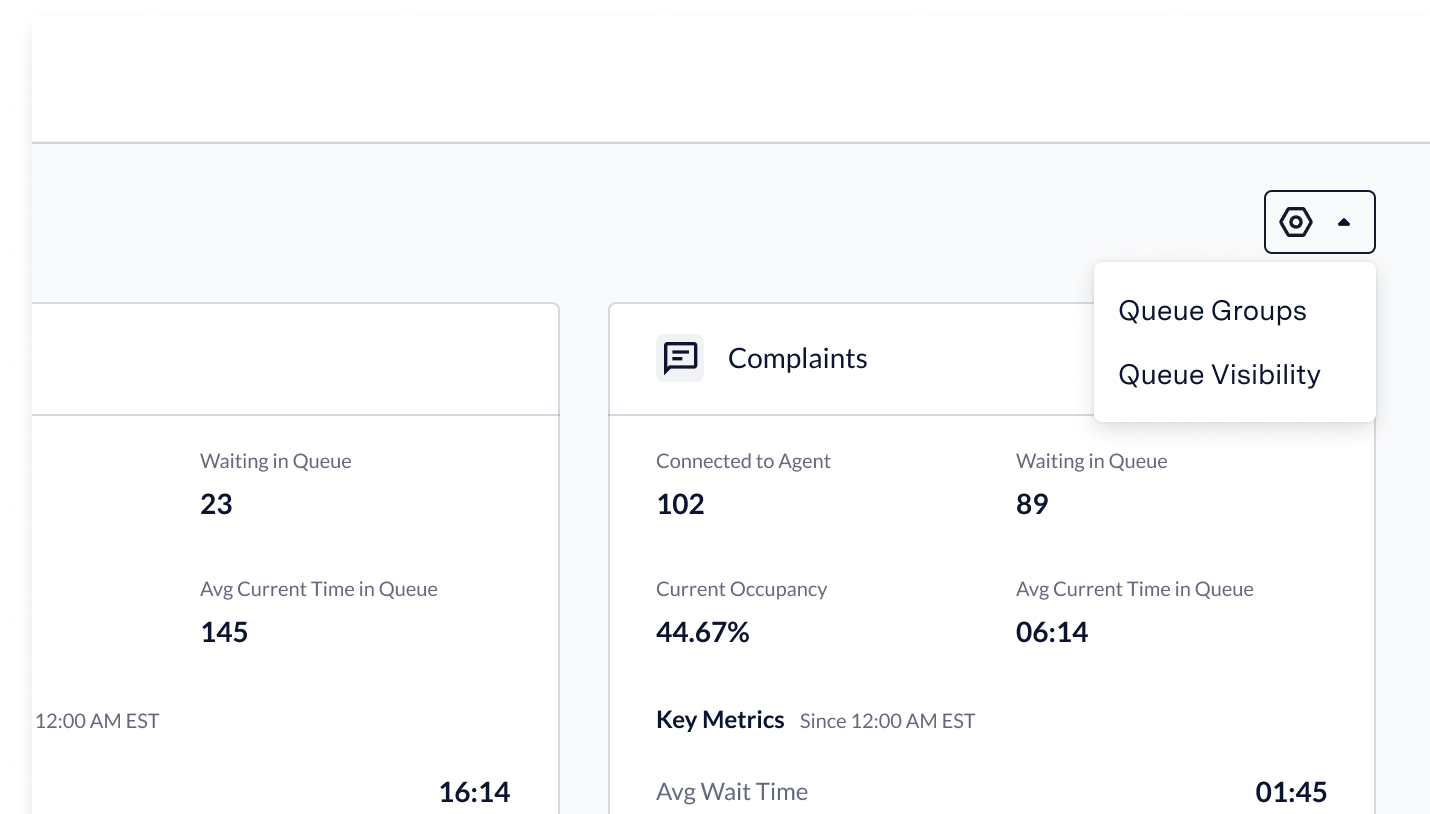 To access customization features: click the **Customize** button on the Overview page. Two options appear. Click an **option** to launch the associated customization feature.
## Change Queue Visibility
ASAPP provides tools for you to customize the queues showcased on the Overview page. You can hide Queues based on customization needs.
Click the **Customize** button on the All Queues page to sort and select the **queues** to display.
To access customization features: click the **Customize** button on the Overview page. Two options appear. Click an **option** to launch the associated customization feature.
## Change Queue Visibility
ASAPP provides tools for you to customize the queues showcased on the Overview page. You can hide Queues based on customization needs.
Click the **Customize** button on the All Queues page to sort and select the **queues** to display.
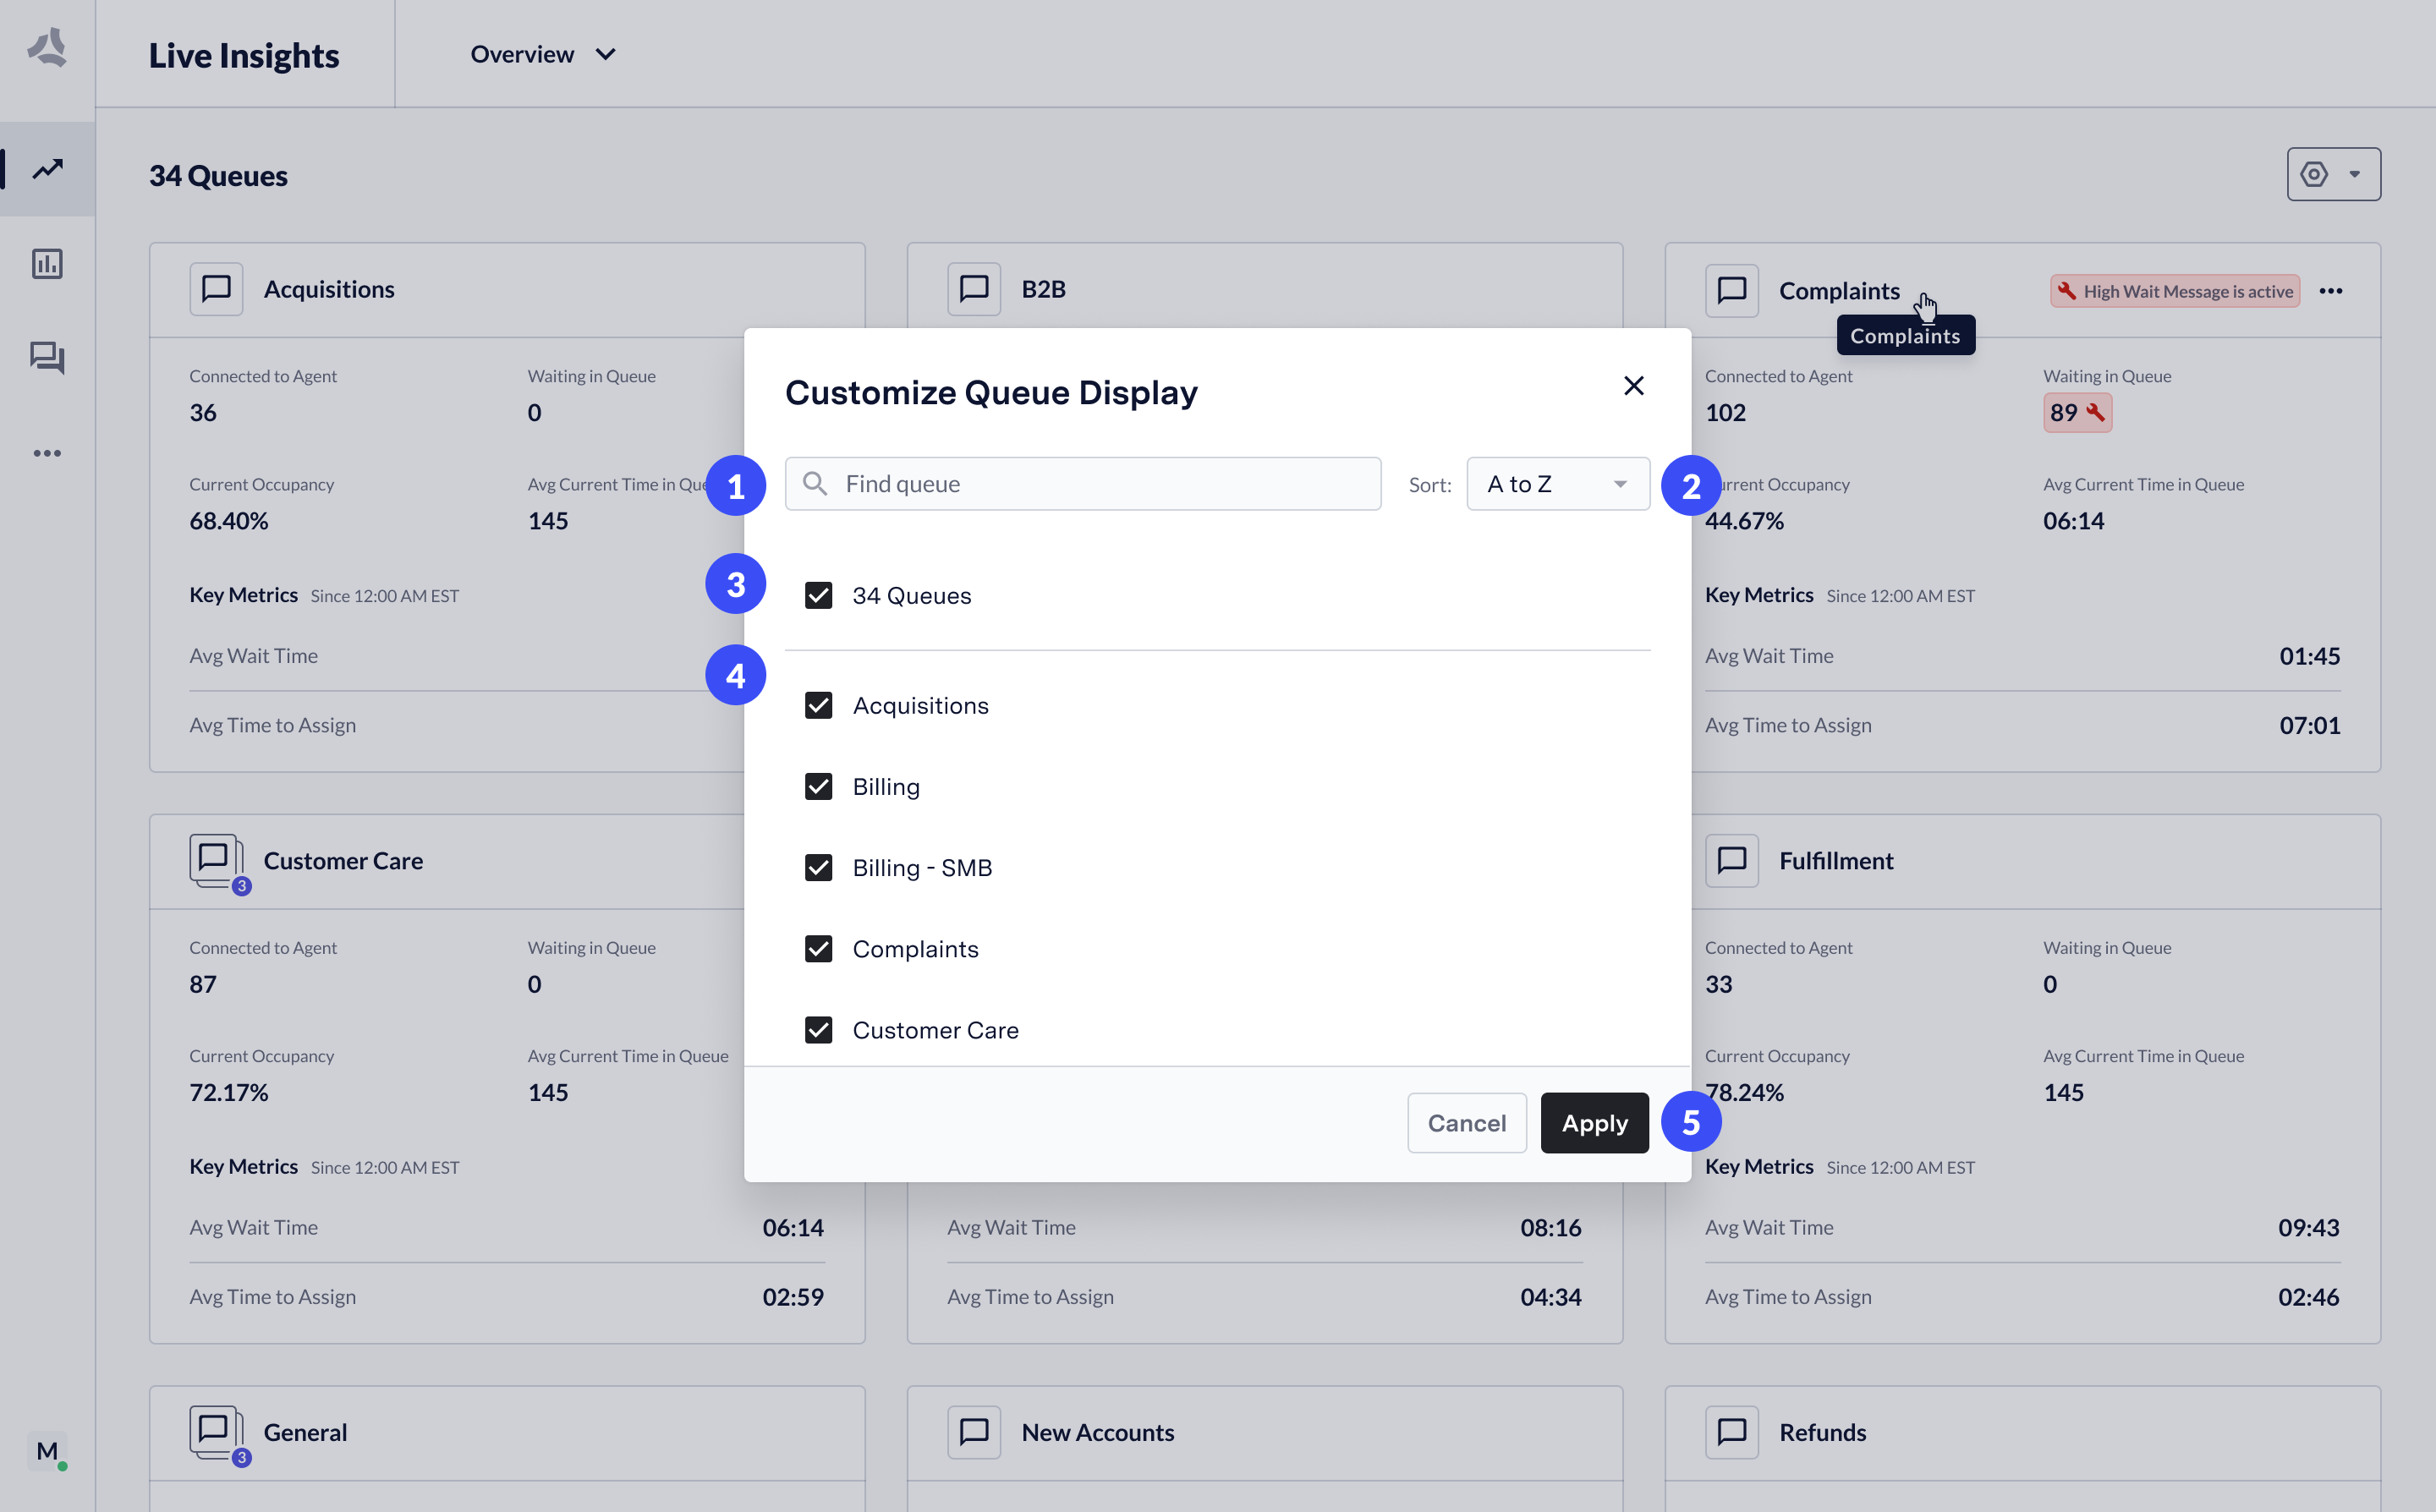 1. **Find a queue**: Use the search field to find a specific queue. Type in the **queue name** to filter the list of queues down to relevant matches.
2. **Sort queues**: You can sort in ascending or descending order. Click the **Sort** dropdown to select the desired sort order.
3. **Bulk selection**: To select all queues, or deselect all queues, click the **bulk selection feature** to view all queues. Click again to deselect all queues.
4. **Single queue selection**: select and deselect **queues** in the list. Deselected queues are hidden on the Overview page.
5. **Apply and cancel**: To confirm your selection, click **Apply**. To dismiss changes or close the modal, select **Cancel**.
## Create and Edit Queue Groups
You can create groups of queues to more efficiently monitor performance across multiple queues. When you create a queue group, a drill-down view of the queue group appears.
A queue group behaves similarly to a single queue: you get access to all live transcripts across all queues selected in the group.
You can access Performance data for all agents in the group, as well as consolidated customer feedback.
Queue groups are unique to each user. You can edit and create an unlimited number of queue groups.
1. **Find a queue**: Use the search field to find a specific queue. Type in the **queue name** to filter the list of queues down to relevant matches.
2. **Sort queues**: You can sort in ascending or descending order. Click the **Sort** dropdown to select the desired sort order.
3. **Bulk selection**: To select all queues, or deselect all queues, click the **bulk selection feature** to view all queues. Click again to deselect all queues.
4. **Single queue selection**: select and deselect **queues** in the list. Deselected queues are hidden on the Overview page.
5. **Apply and cancel**: To confirm your selection, click **Apply**. To dismiss changes or close the modal, select **Cancel**.
## Create and Edit Queue Groups
You can create groups of queues to more efficiently monitor performance across multiple queues. When you create a queue group, a drill-down view of the queue group appears.
A queue group behaves similarly to a single queue: you get access to all live transcripts across all queues selected in the group.
You can access Performance data for all agents in the group, as well as consolidated customer feedback.
Queue groups are unique to each user. You can edit and create an unlimited number of queue groups.
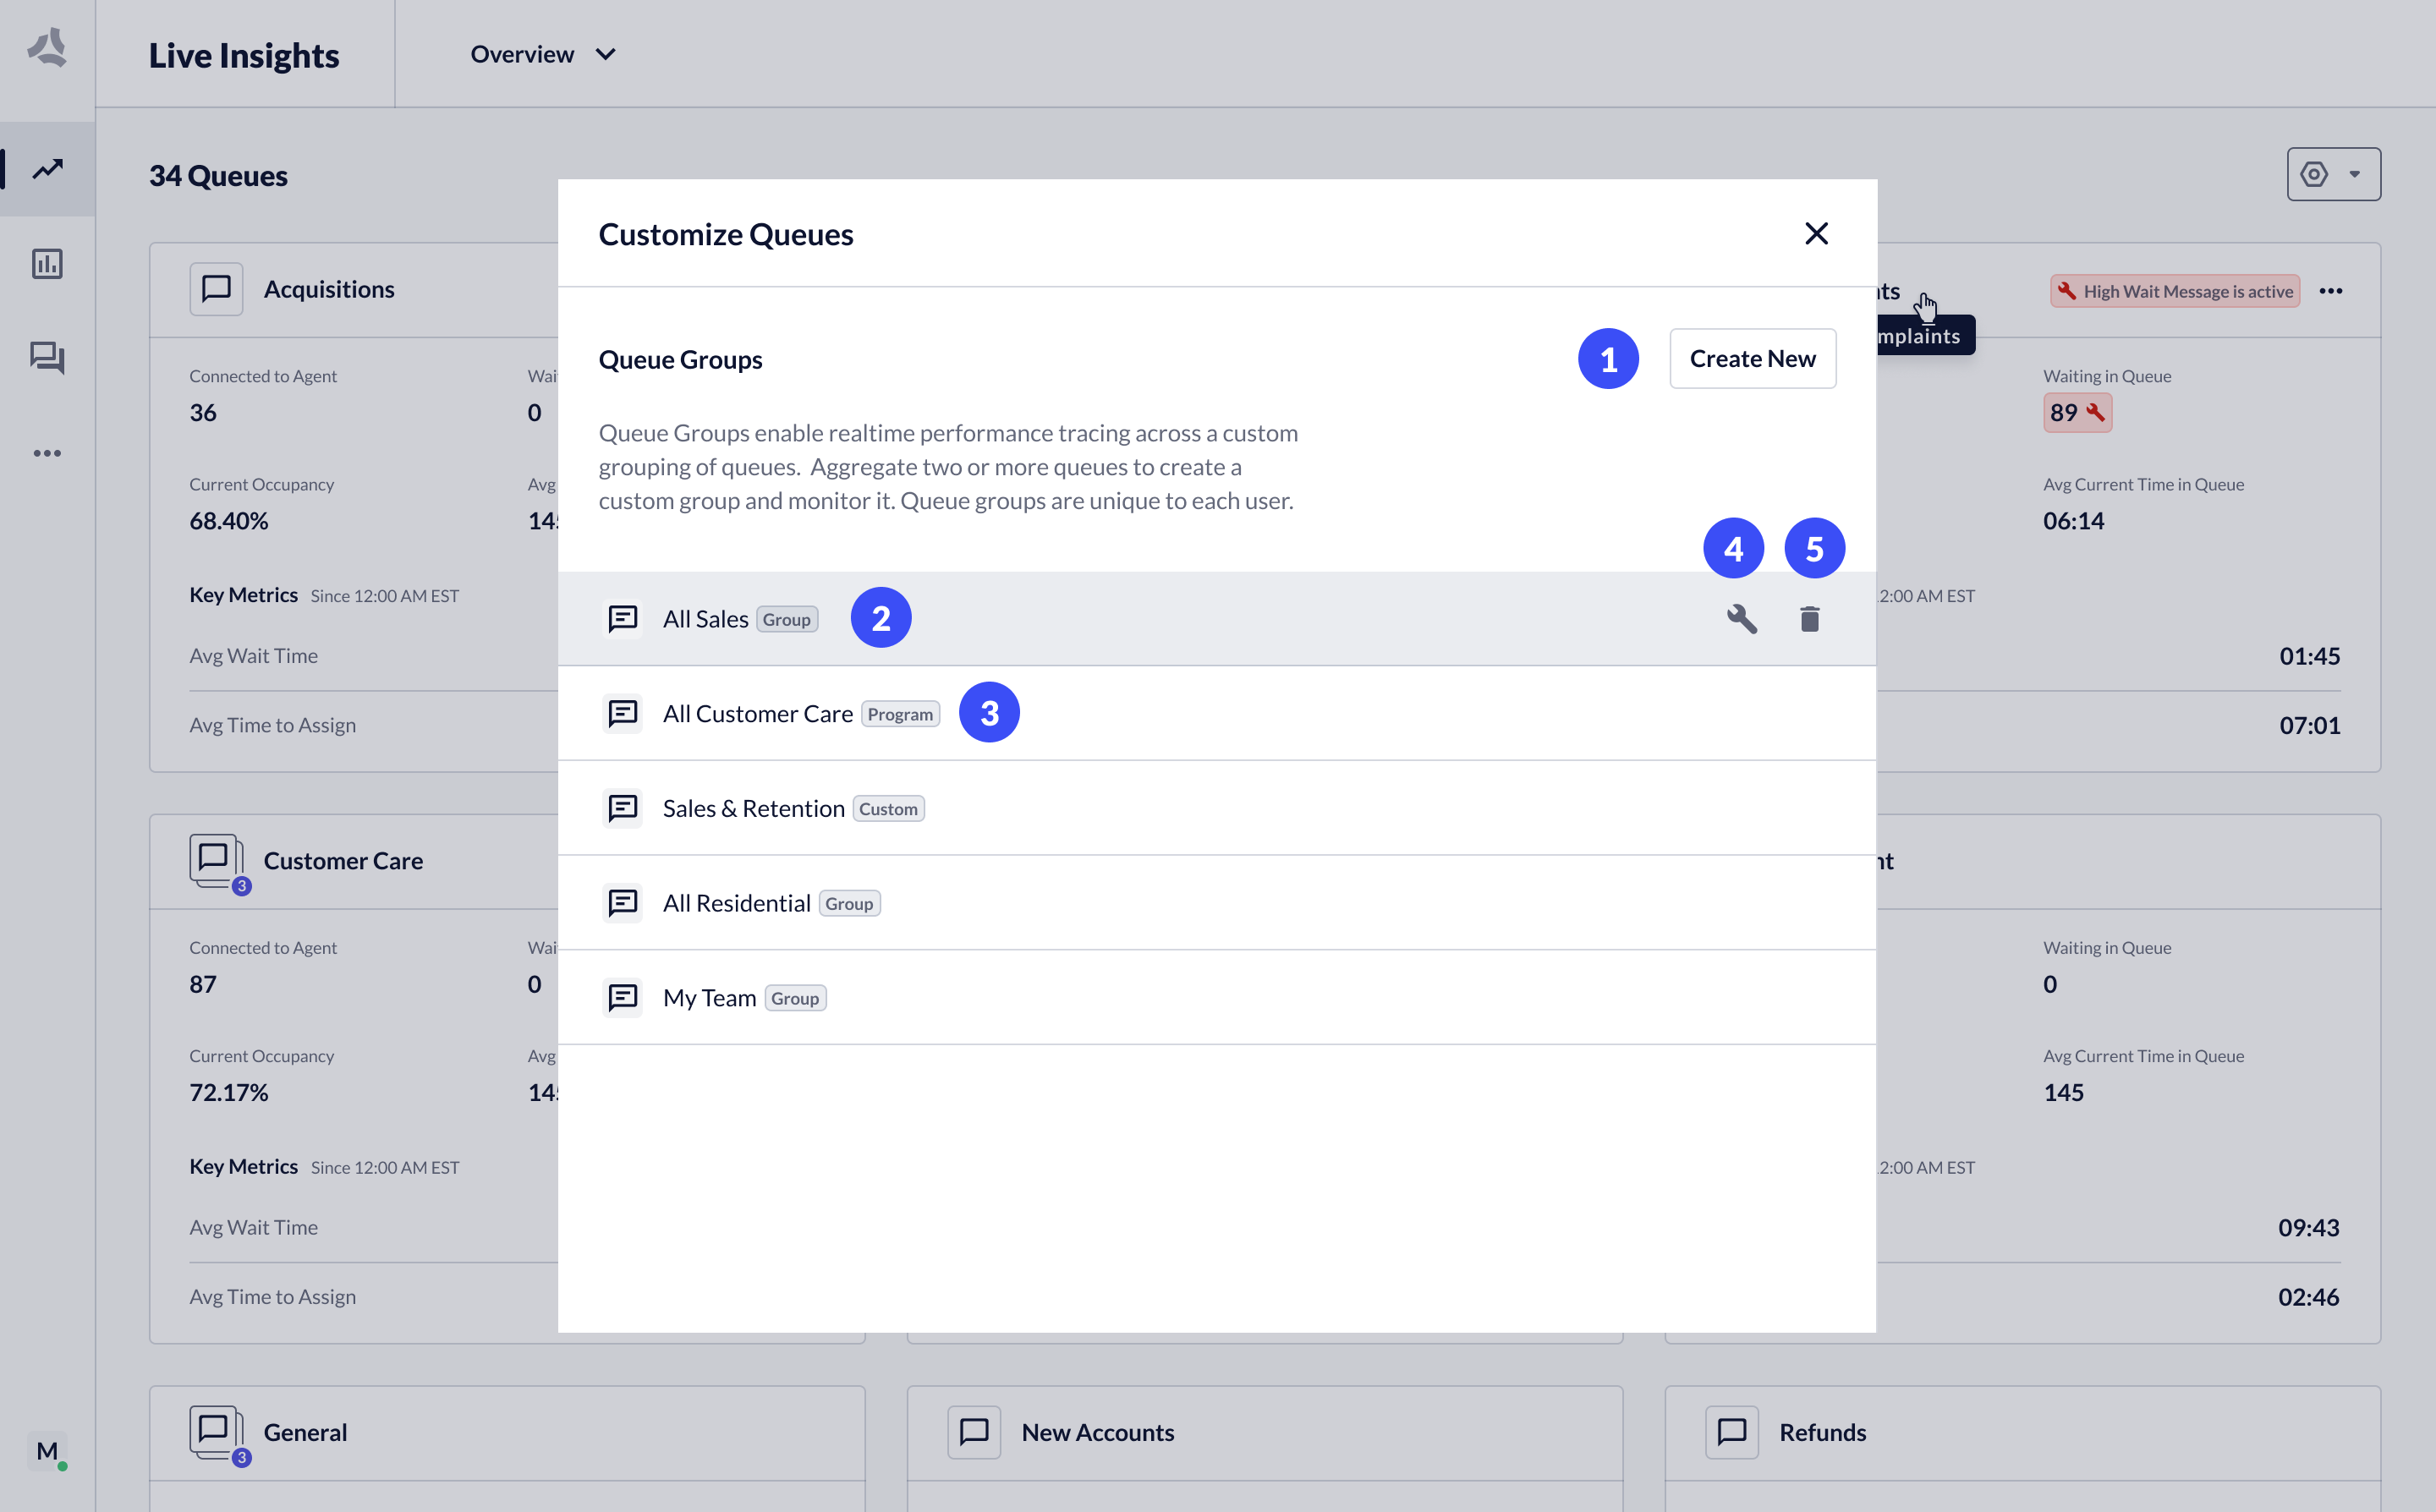 1. **Create new group**: Click this **button** to create a new queue group.
2. **Existing queue group**: You can view, edit or delete them.
3. **Organizational group**: Queue groups created by your organization display with a 'Preset' tag. Queues with this tag are visible by all Live Insights users. These groups cannot be edited or deleted.
4. **Edit a group**: To edit an existing queue group, click the **Edit** icon.
5. **Delete a group**: To delete an existing queue group, click the **Delete** icon.
1. **Create new group**: Click this **button** to create a new queue group.
2. **Existing queue group**: You can view, edit or delete them.
3. **Organizational group**: Queue groups created by your organization display with a 'Preset' tag. Queues with this tag are visible by all Live Insights users. These groups cannot be edited or deleted.
4. **Edit a group**: To edit an existing queue group, click the **Edit** icon.
5. **Delete a group**: To delete an existing queue group, click the **Delete** icon.
 **Edit a queue group:**
1. **Queue group name**: Name assigned to the queue group.
2. **Available queues**: List of all queues that you can add to a group. Select **queues** to add the queues to the group, and vice versa.
3. **Queues added to group**: Queues currently selected appear under the queue name.
4. **Apply and cancel**: To apply changes, click the **Apply** button. To dismiss changes or close the modal, click the **Cancel** button.
## Overflow Queue Routing
Administrators can redirect the traffic from a queue to another.
This helps to reduce overflow and helps to fulfill requirements of the overflowed queue.
# Integration Channels
Source: https://docs.asapp.com/messaging-platform/integrations
Learn about the channels and integrations available for ASAPP Messaging.
ASAPP Messaging offers a wide range of integration options to connect your brand with customers across various channels and enhance your customer service capabilities.
These integrations are divided into two main categories: [Customer Channels](#customer-channels) and [Applications Integrations](#applications-integrations).
**Customer Channels** are the direct touchpoints where your customers can interact with your brand.
**Edit a queue group:**
1. **Queue group name**: Name assigned to the queue group.
2. **Available queues**: List of all queues that you can add to a group. Select **queues** to add the queues to the group, and vice versa.
3. **Queues added to group**: Queues currently selected appear under the queue name.
4. **Apply and cancel**: To apply changes, click the **Apply** button. To dismiss changes or close the modal, click the **Cancel** button.
## Overflow Queue Routing
Administrators can redirect the traffic from a queue to another.
This helps to reduce overflow and helps to fulfill requirements of the overflowed queue.
# Integration Channels
Source: https://docs.asapp.com/messaging-platform/integrations
Learn about the channels and integrations available for ASAPP Messaging.
ASAPP Messaging offers a wide range of integration options to connect your brand with customers across various channels and enhance your customer service capabilities.
These integrations are divided into two main categories: [Customer Channels](#customer-channels) and [Applications Integrations](#applications-integrations).
**Customer Channels** are the direct touchpoints where your customers can interact with your brand.
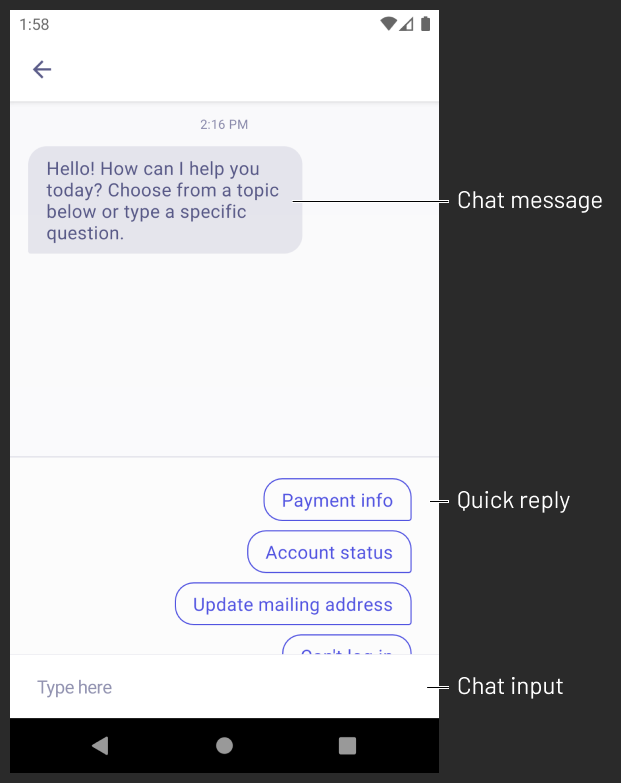 ## Next Steps
 There are two other colors you may consider customizing for accessibility or to achieve an exact match with your app's theme: `asapp_on_background` and `asapp_on_primary`. `asapp_on_background` is used by other elements that might appear in front of the background. `asapp_on_primary` is used for text and other elements that appear in front of the primary color.
### More Colors
Besides the colors used for [themes](#themes "Themes"), you can override specific colors in a number of categories: the toolbar, chat content, messages, and other elements. You can override all properties mentioned below in the `ASAPPTheme.Chat` style.
The status bar color is `asapp_status_bar` and toolbar colors are `asapp_toolbar` (background), `asapp_nav_button`, `asapp_nav_icon`, and `asapp_nav_text` (foreground).
There are two other colors you may consider customizing for accessibility or to achieve an exact match with your app's theme: `asapp_on_background` and `asapp_on_primary`. `asapp_on_background` is used by other elements that might appear in front of the background. `asapp_on_primary` is used for text and other elements that appear in front of the primary color.
### More Colors
Besides the colors used for [themes](#themes "Themes"), you can override specific colors in a number of categories: the toolbar, chat content, messages, and other elements. You can override all properties mentioned below in the `ASAPPTheme.Chat` style.
The status bar color is `asapp_status_bar` and toolbar colors are `asapp_toolbar` (background), `asapp_nav_button`, `asapp_nav_icon`, and `asapp_nav_text` (foreground).
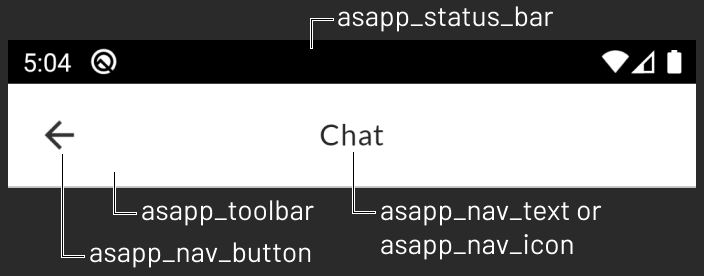 **General chat content colors**
* `asapp_background`
* `asapp_separator_color`
* `asapp_control_tint`
* `asapp_control_secondary`
* `asapp_control_background`
* `asapp_success`
* `asapp_warning`
* `asapp_failure`
**General chat content colors**
* `asapp_background`
* `asapp_separator_color`
* `asapp_control_tint`
* `asapp_control_secondary`
* `asapp_control_background`
* `asapp_success`
* `asapp_warning`
* `asapp_failure`
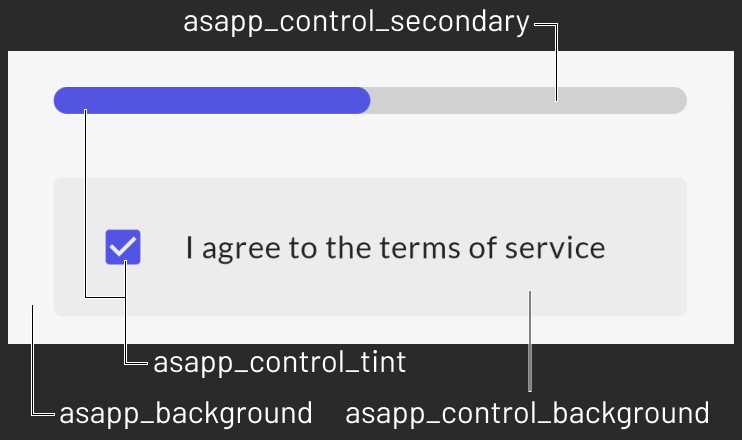
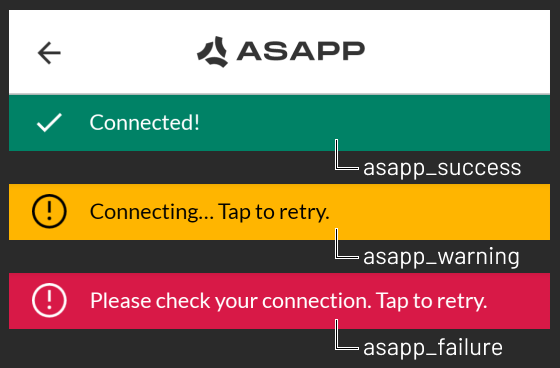 **Message colors**
* `asapp_messages_list_background`
* `asapp_chat_bubble_sent_text`
* `asapp_chat_bubble_sent_bg`
* `asapp_chat_bubble_reply_text`
* `asapp_chat_bubble_reply_bg`
**Message colors**
* `asapp_messages_list_background`
* `asapp_chat_bubble_sent_text`
* `asapp_chat_bubble_sent_bg`
* `asapp_chat_bubble_reply_text`
* `asapp_chat_bubble_reply_bg`
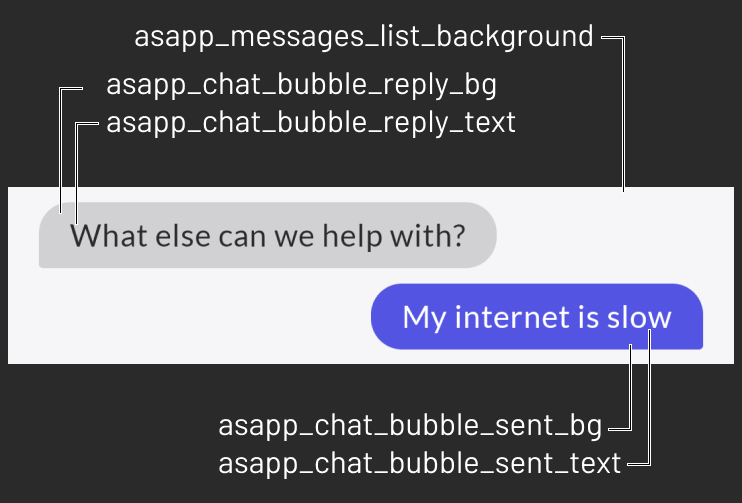 ### Text and Buttons
To customize fonts and colors for both text and buttons, use the `ASAPPCustomTextStyleHandler`. To set this optional handler use `ASAPPStyleConfig.setTextStyleHandler`. Use the given `ASAPPTextStyles`
object to:
* Set a new font family with `updateFonts`. If no new fonts are set, the system default will be used instead.
* Override font sizes, letter spacing, text colors, and text casing styles. You can also customize the font family for each text style individually, if needed.
* Override button colors for normal, highlighted and disabled states.
Example:
```kotlin
ASAPP.instance.getStyleConfig()
.setTextStyleHandler { context, textStyles ->
val regular = Typeface.createFromAsset(context.assets, "fonts/NH-Regular.ttf")
val medium = Typeface.createFromAsset(context.assets, "fonts/Lato-Bold.ttf")
val black = Typeface.createFromAsset(context.assets, "fonts/Lato-Black.ttf")
textStyles.updateFonts(regular, medium, black)
textStyles.body.fontSize = 14f
val textHighlightColor = ContextCompat.getColor(context, R.color.my_text_hightlight_color)
textStyles.primaryButton.textHighlighted = textHighlightColor
}
```
See `ASAPPTextStyles` to see all overridable styles.
### Text and Buttons
To customize fonts and colors for both text and buttons, use the `ASAPPCustomTextStyleHandler`. To set this optional handler use `ASAPPStyleConfig.setTextStyleHandler`. Use the given `ASAPPTextStyles`
object to:
* Set a new font family with `updateFonts`. If no new fonts are set, the system default will be used instead.
* Override font sizes, letter spacing, text colors, and text casing styles. You can also customize the font family for each text style individually, if needed.
* Override button colors for normal, highlighted and disabled states.
Example:
```kotlin
ASAPP.instance.getStyleConfig()
.setTextStyleHandler { context, textStyles ->
val regular = Typeface.createFromAsset(context.assets, "fonts/NH-Regular.ttf")
val medium = Typeface.createFromAsset(context.assets, "fonts/Lato-Bold.ttf")
val black = Typeface.createFromAsset(context.assets, "fonts/Lato-Black.ttf")
textStyles.updateFonts(regular, medium, black)
textStyles.body.fontSize = 14f
val textHighlightColor = ContextCompat.getColor(context, R.color.my_text_hightlight_color)
textStyles.primaryButton.textHighlighted = textHighlightColor
}
```
See `ASAPPTextStyles` to see all overridable styles.
 ### Drawable Title
To add an icon to the chat header use: `setChatActivityToolbarLogo`. You can also center the header content by calling `setIsToolbarTitleOrIconCentered(true)`. For example:
```kotlin
ASAPP.instance.getStyleConfig
.setChatActivityToolbarLogo(R.drawable.asapp_chat_icon)
.setIsToolbarTitleOrIconCentered(true)
```
### Drawable Title
To add an icon to the chat header use: `setChatActivityToolbarLogo`. You can also center the header content by calling `setIsToolbarTitleOrIconCentered(true)`. For example:
```kotlin
ASAPP.instance.getStyleConfig
.setChatActivityToolbarLogo(R.drawable.asapp_chat_icon)
.setIsToolbarTitleOrIconCentered(true)
```

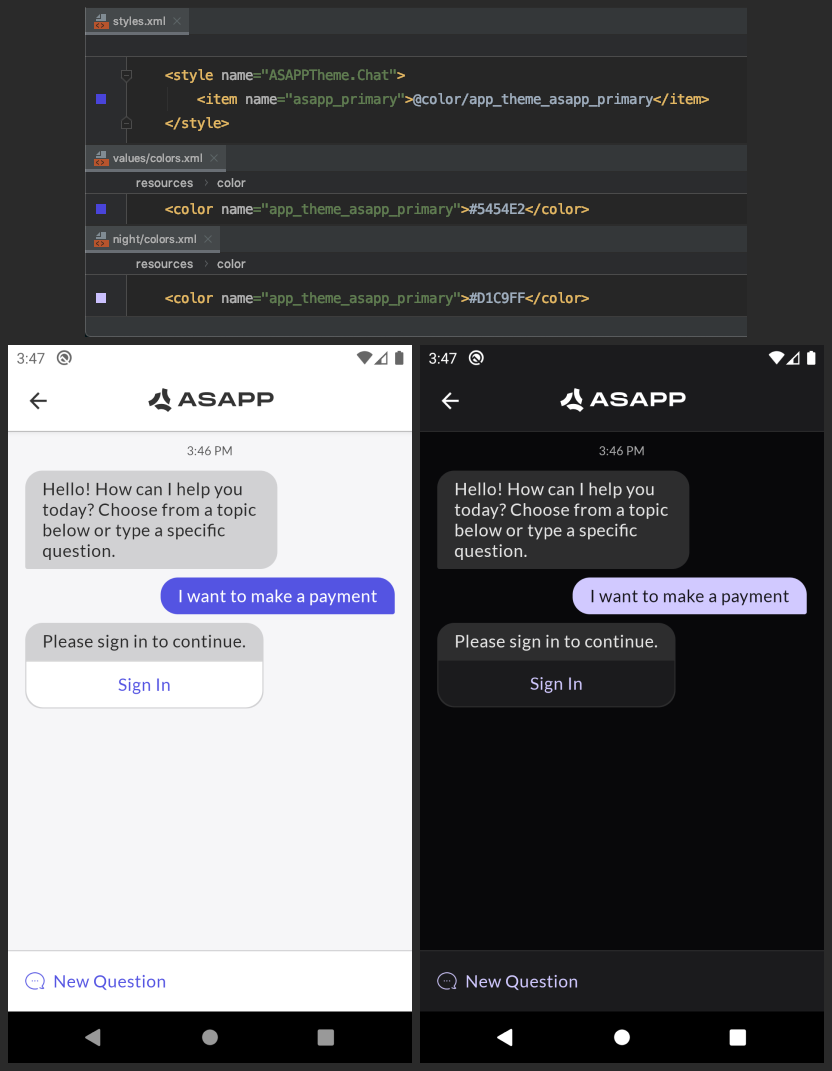 ### Disable or Force a Dark Mode Setting
To disable Dark Mode, or to force Dark Mode for Android API levels below 29, ASAPP recommends using the [AppCompatDelegate.setDefaultNightMode](https://developer.android.com/reference/androidx/appcompat/app/AppCompatDelegate#setDefaultNightMode\(int\)) AndroidX API. This function changes the night mode setting throughout the entire application session, which also includes ASAPP SDK activities.
For example, it is possible to use Dark Mode on Android API 21 with the following:
```kotlin
AppCompatDelegate.setDefaultNightMode(AppCompatDelegate.MODE_NIGHT_YES)
```
# Deep Links and Web Links
Source: https://docs.asapp.com/messaging-platform/integrations/android-sdk/deep-links-and-web-links
## Handling Deep Links in Chat
Certain chat flows may present buttons that are deep links to another part of your app. To react to taps on these buttons, implement the `ASAPPDeepLinkHandler` interface:
```kotlin
ASAPP.instance.deepLinkHandler = object : ASAPPDeepLinkHandler {
override fun handleASAPPDeepLink(deepLink: String, data: JSONObject?, activity: Activity) {
// Handle deep link.
}
}
```
ASAPP provides an `Activity` instance for convenience, in case you need to start a new activity. Please ask your Implementation Manager if you have questions regarding deep link names and data.
## Handling Web Links in Chat
Certain chat flows may present buttons that are web links. To react to taps on these buttons, implement the `ASAPPWebLinkHandler` interface:
```kotlin
ASAPP.instance.webLinkHandler = object : ASAPPWebLinkHandler {
override fun handleASAPPWebLink(webLink: String, activity: Activity) {
// Handle web link.
}
}
```
### Disable or Force a Dark Mode Setting
To disable Dark Mode, or to force Dark Mode for Android API levels below 29, ASAPP recommends using the [AppCompatDelegate.setDefaultNightMode](https://developer.android.com/reference/androidx/appcompat/app/AppCompatDelegate#setDefaultNightMode\(int\)) AndroidX API. This function changes the night mode setting throughout the entire application session, which also includes ASAPP SDK activities.
For example, it is possible to use Dark Mode on Android API 21 with the following:
```kotlin
AppCompatDelegate.setDefaultNightMode(AppCompatDelegate.MODE_NIGHT_YES)
```
# Deep Links and Web Links
Source: https://docs.asapp.com/messaging-platform/integrations/android-sdk/deep-links-and-web-links
## Handling Deep Links in Chat
Certain chat flows may present buttons that are deep links to another part of your app. To react to taps on these buttons, implement the `ASAPPDeepLinkHandler` interface:
```kotlin
ASAPP.instance.deepLinkHandler = object : ASAPPDeepLinkHandler {
override fun handleASAPPDeepLink(deepLink: String, data: JSONObject?, activity: Activity) {
// Handle deep link.
}
}
```
ASAPP provides an `Activity` instance for convenience, in case you need to start a new activity. Please ask your Implementation Manager if you have questions regarding deep link names and data.
## Handling Web Links in Chat
Certain chat flows may present buttons that are web links. To react to taps on these buttons, implement the `ASAPPWebLinkHandler` interface:
```kotlin
ASAPP.instance.webLinkHandler = object : ASAPPWebLinkHandler {
override fun handleASAPPWebLink(webLink: String, activity: Activity) {
// Handle web link.
}
}
```
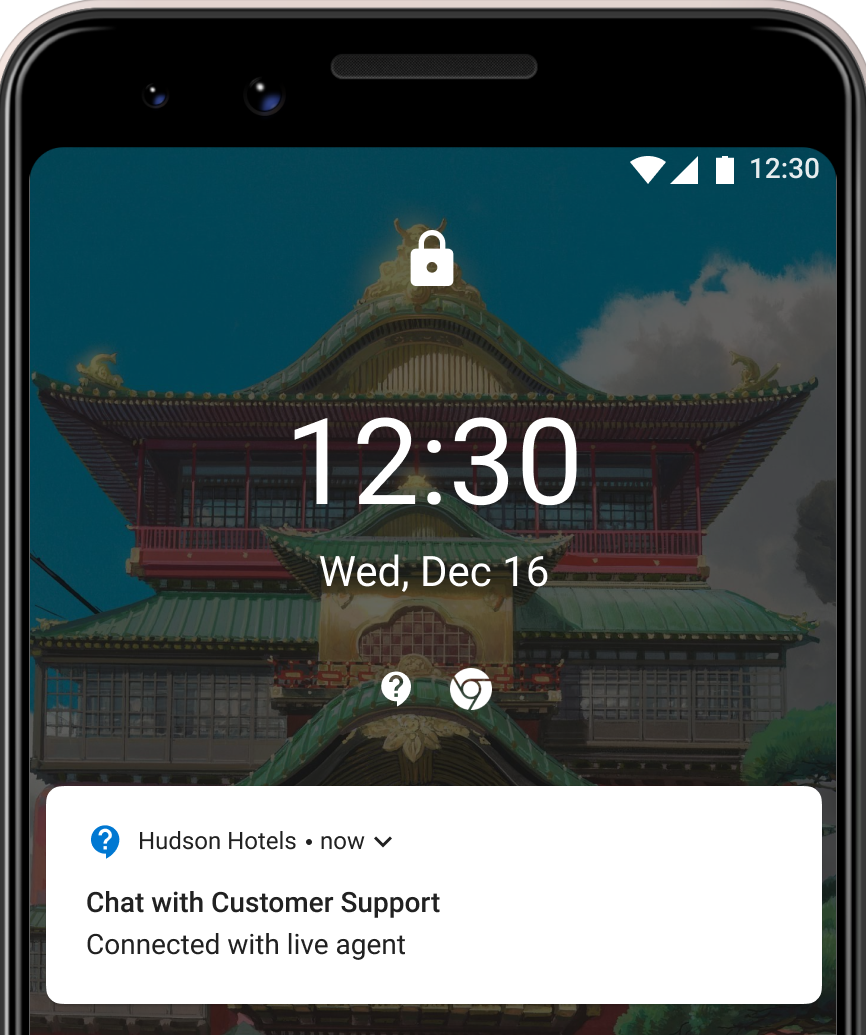 The ASAPP Android SDK will automatically surface a persistent notification when a user joins a queue or is connected to a live agent (starting on v8.4.0). Tapping the notification triggers an intent that takes the user directly into ASAPP Chat. Once the live chat ends or the user leaves the queue, the notification is dismissed.
Persistent notifications are:
* ongoing, not dismissible [notifications](https://developer.android.com/reference/android/app/Notification).
* low priority and do not vibrate or make sounds.
* managed directly by the SDK and do not require integration changes.
ASAPP enables this feature by default. To disable it, please reach out to your ASAPP Implementation Manager.
The ASAPP Android SDK will automatically surface a persistent notification when a user joins a queue or is connected to a live agent (starting on v8.4.0). Tapping the notification triggers an intent that takes the user directly into ASAPP Chat. Once the live chat ends or the user leaves the queue, the notification is dismissed.
Persistent notifications are:
* ongoing, not dismissible [notifications](https://developer.android.com/reference/android/app/Notification).
* low priority and do not vibrate or make sounds.
* managed directly by the SDK and do not require integration changes.
ASAPP enables this feature by default. To disable it, please reach out to your ASAPP Implementation Manager.
 To customize the title of persistent notifications, override the following string resource:
```json
To customize the title of persistent notifications, override the following string resource:
```json
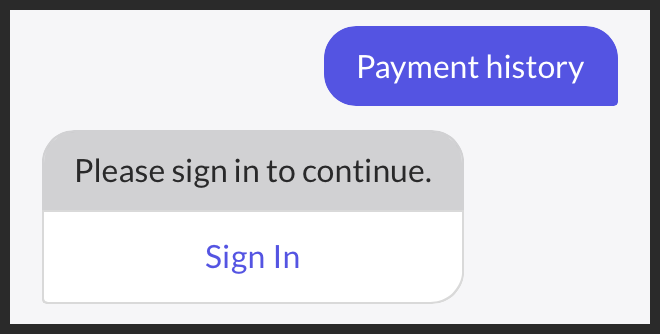 If you then tap the **Sign In** button, the SDK will use the `ASAPPUserLoginHandler` to call to the application. Due to the asynchronous nature of this flow, your application should use the activity lifecycle to provide a result to the SDK.
How to Implement the Sign In Flow
1. Implement the `ASAPPUserLoginHandler` and start your application's `LoginActivity`, including the given request code.
```kotlin
ASAPP.instance.userLoginHandler = object: ASAPPUserLoginHandler {
override fun loginASAPPUser(requestCode: Int, activity: Activity) {
val loginIntent = new Intent(activity, LoginActivity::class.java)
activity.startActivityForResult(loginIntent, requestCode)
}
}
```
2. If a user successfully signs into your application, update the user instance and then finish your `LoginActivity` with `Activity.RESULT_OK`.
```kotlin
ASAPP.instance.user = ASAPPUser(userIdentifier, contextProvider)
setResult(Activity.RESULT_OK)
finish()
```
3. In case a user cancels the operation, finish your `LoginActivity` with `Activity.RESULT_CANCELED`.
```kotlin
setResult(Activity.RESULT_CANCELED)
finish()
```
After your `LoginActivity` finishes, the SDK will capture the result and resume the chat conversation.
## Token Expiration and Refreshing the Context
If the provided token has expired, the SDK will call the [ASAPPRequestContextProvider](https://docs-sdk.asapp.com/api/chatsdk/android/latest/chatsdk/com.asapp.chatsdk/-a-s-a-p-p-request-context-provider) with an `refreshContext` parameter set to `true` indicating that the context must be refreshed. In that case, please make sure to return a map with fresh credentials that can be used to authenticate the user. In case an API call is required to refresh the credentials, make sure to block the calling thread until the updated context can be returned.
# Apple Messages for Business
Source: https://docs.asapp.com/messaging-platform/integrations/apple-messages-for-business
Apple Messages for Business is a service that enables your organization to communicate directly with your customers through your Customer Service Platform (CSP), which in this case will be ASAPP, using the Apple Messages for Business app.
If you then tap the **Sign In** button, the SDK will use the `ASAPPUserLoginHandler` to call to the application. Due to the asynchronous nature of this flow, your application should use the activity lifecycle to provide a result to the SDK.
How to Implement the Sign In Flow
1. Implement the `ASAPPUserLoginHandler` and start your application's `LoginActivity`, including the given request code.
```kotlin
ASAPP.instance.userLoginHandler = object: ASAPPUserLoginHandler {
override fun loginASAPPUser(requestCode: Int, activity: Activity) {
val loginIntent = new Intent(activity, LoginActivity::class.java)
activity.startActivityForResult(loginIntent, requestCode)
}
}
```
2. If a user successfully signs into your application, update the user instance and then finish your `LoginActivity` with `Activity.RESULT_OK`.
```kotlin
ASAPP.instance.user = ASAPPUser(userIdentifier, contextProvider)
setResult(Activity.RESULT_OK)
finish()
```
3. In case a user cancels the operation, finish your `LoginActivity` with `Activity.RESULT_CANCELED`.
```kotlin
setResult(Activity.RESULT_CANCELED)
finish()
```
After your `LoginActivity` finishes, the SDK will capture the result and resume the chat conversation.
## Token Expiration and Refreshing the Context
If the provided token has expired, the SDK will call the [ASAPPRequestContextProvider](https://docs-sdk.asapp.com/api/chatsdk/android/latest/chatsdk/com.asapp.chatsdk/-a-s-a-p-p-request-context-provider) with an `refreshContext` parameter set to `true` indicating that the context must be refreshed. In that case, please make sure to return a map with fresh credentials that can be used to authenticate the user. In case an API call is required to refresh the credentials, make sure to block the calling thread until the updated context can be returned.
# Apple Messages for Business
Source: https://docs.asapp.com/messaging-platform/integrations/apple-messages-for-business
Apple Messages for Business is a service that enables your organization to communicate directly with your customers through your Customer Service Platform (CSP), which in this case will be ASAPP, using the Apple Messages for Business app.
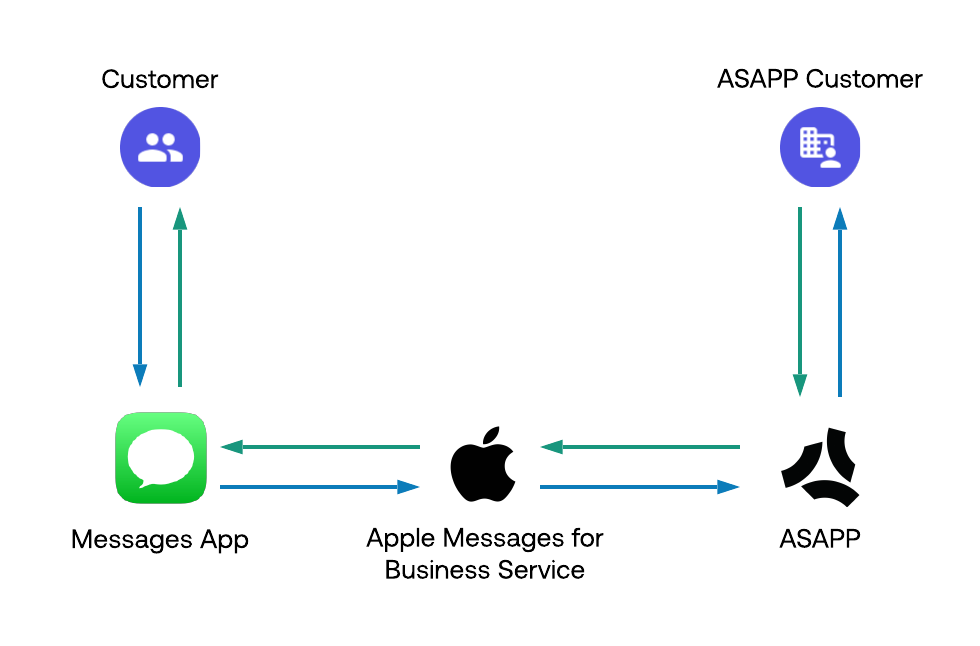
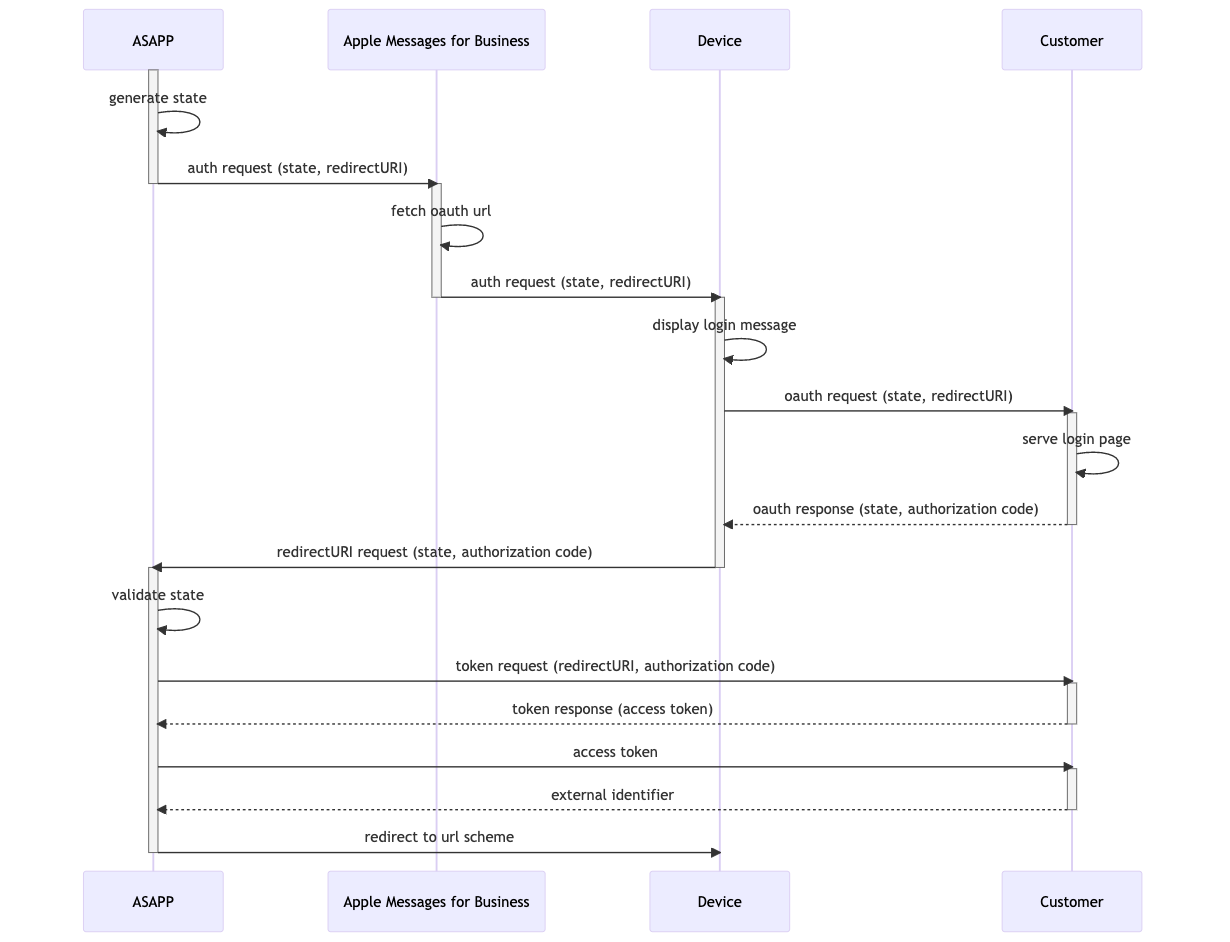 #### Old Authentication Flow
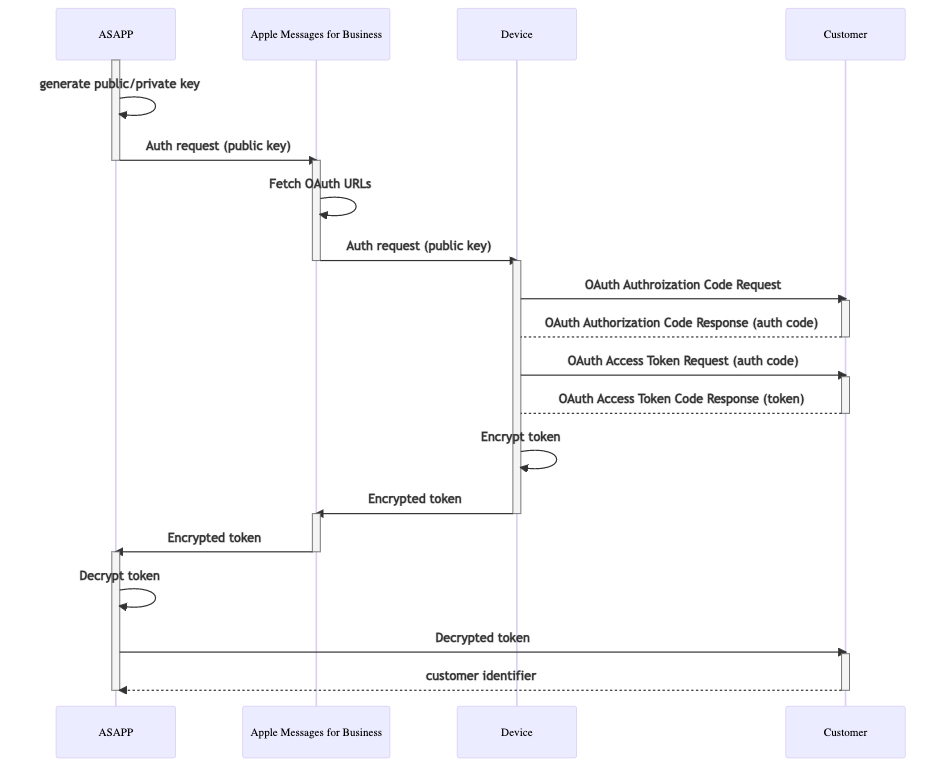 ASAPP requires the following customer functionalities to support the older authentication flow:
* An OAuth 2.0 login flow, including a login page that supports form autofill. This page must be Apple-compliant. See the [Authentication Message](https://register.apple.com/resources/messages/msp-rest-api/type-interactive#authentication-message) documentation for more details.
* Provide an API endpoint for ASAPP to obtain an external user identifier. This should be the same identifier that is supplied via the ASAPP web and mobile SDKs as the CustomerId.
* Provide an endpoint through which to obtain an access token by supplying an authcode. This endpoint must support URL encoded parameters.
* Provide an endpoint that can accepted POST requests in the following format:
```json
Content-Type: application/x-www-form-urlencoded
grant_type=authorization_code&code=xxxx
&client_id=yyyy&client_secret=zzzz
where:
xxxx=authorization_code value
yyyy=client_id value
zzzz=client_secret value
```
ASAPP requires the following customer functionalities to support the older authentication flow:
* An OAuth 2.0 login flow, including a login page that supports form autofill. This page must be Apple-compliant. See the [Authentication Message](https://register.apple.com/resources/messages/msp-rest-api/type-interactive#authentication-message) documentation for more details.
* Provide an API endpoint for ASAPP to obtain an external user identifier. This should be the same identifier that is supplied via the ASAPP web and mobile SDKs as the CustomerId.
* Provide an endpoint through which to obtain an access token by supplying an authcode. This endpoint must support URL encoded parameters.
* Provide an endpoint that can accepted POST requests in the following format:
```json
Content-Type: application/x-www-form-urlencoded
grant_type=authorization_code&code=xxxx
&client_id=yyyy&client_secret=zzzz
where:
xxxx=authorization_code value
yyyy=client_id value
zzzz=client_secret value
```
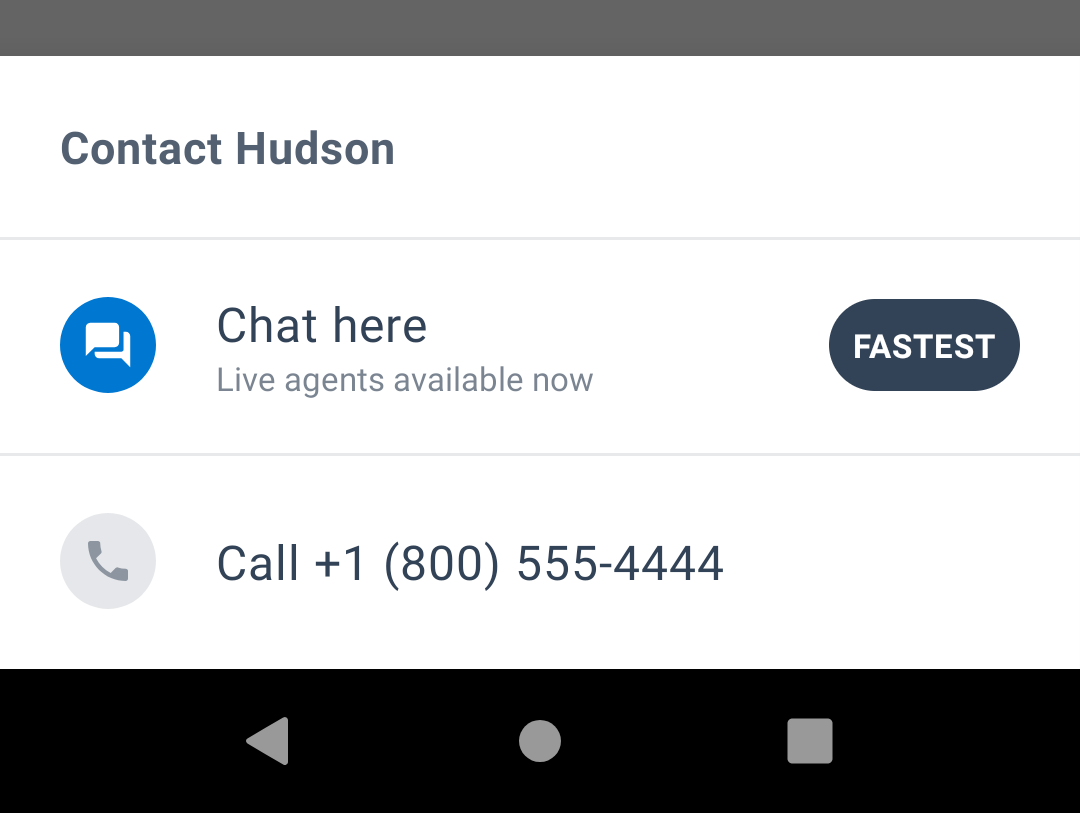 ## Requirements
Chat Instead requires ASAPP Android Chat SDK 8.0.0 or later, and a valid phone number. Before you proceed, make sure you configure it [correctly](/messaging-platform/integrations/android-sdk).
## Phone Formats
Chat Instead accepts a wide variety of formats. See [tools.ietf.org/html/rfc3966](https://tools.ietf.org/html/rfc3966) for the precise definition. For example, it will accept: "+1 (555) 555-5555" and "555-555-5555".
## Getting Started
There are two ways to add Chat Instead. The easiest way is to add the `ASAPPChatInsteadButton` to the layout and call the `ASAPPChatInsteadButton.init`. Alternatively, you can manage the lifecycle yourself.
### 1. Add an ASAPPChatInsteadButton
You can add this button to any layout, like any other [AppCompatButton](https://developer.android.com/reference/androidx/appcompat/widget/AppCompatButton).
```json
## Requirements
Chat Instead requires ASAPP Android Chat SDK 8.0.0 or later, and a valid phone number. Before you proceed, make sure you configure it [correctly](/messaging-platform/integrations/android-sdk).
## Phone Formats
Chat Instead accepts a wide variety of formats. See [tools.ietf.org/html/rfc3966](https://tools.ietf.org/html/rfc3966) for the precise definition. For example, it will accept: "+1 (555) 555-5555" and "555-555-5555".
## Getting Started
There are two ways to add Chat Instead. The easiest way is to add the `ASAPPChatInsteadButton` to the layout and call the `ASAPPChatInsteadButton.init`. Alternatively, you can manage the lifecycle yourself.
### 1. Add an ASAPPChatInsteadButton
You can add this button to any layout, like any other [AppCompatButton](https://developer.android.com/reference/androidx/appcompat/widget/AppCompatButton).
```json
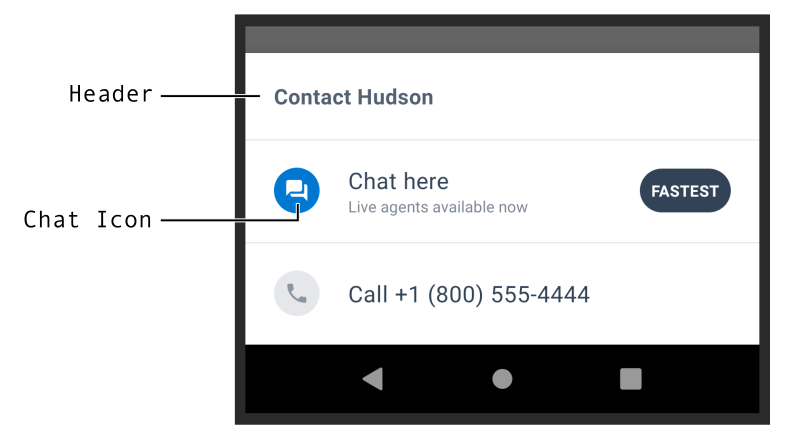 ### Header
By default it will use the text in `R.string.asapp_chat_instead_default_header`. You can send a different string when initializing Chat Instead, but it's important to know the ASAPP Backend will overwrite it if the call is successful.
### Chat Icon
You can customize the SDK Chat channel icon. By default it will be tinted with `asapp_primary` and `asapp_on_primary`.
### Header
By default it will use the text in `R.string.asapp_chat_instead_default_header`. You can send a different string when initializing Chat Instead, but it's important to know the ASAPP Backend will overwrite it if the call is successful.
### Chat Icon
You can customize the SDK Chat channel icon. By default it will be tinted with `asapp_primary` and `asapp_on_primary`.
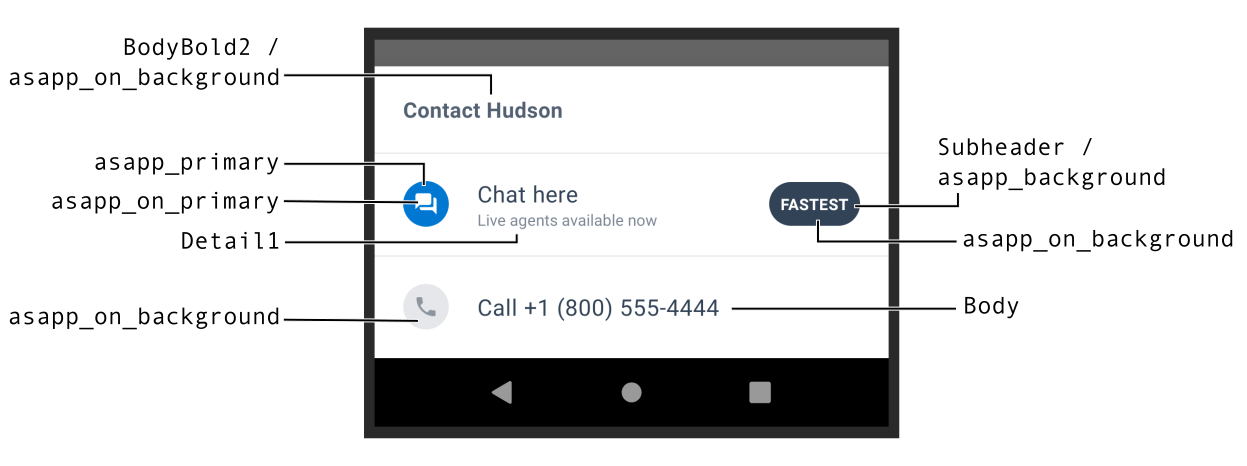 ## Remote settings
Chat Instead receives configuration information from ASAPP's Backend (BE), in addition to the channels to display. The configuration enables/disables the feature and selects the device type (mobile, tablet, none). Contact your Implementation Manager at ASAPP if you have any questions.
## Remote settings
Chat Instead receives configuration information from ASAPP's Backend (BE), in addition to the channels to display. The configuration enables/disables the feature and selects the device type (mobile, tablet, none). Contact your Implementation Manager at ASAPP if you have any questions.
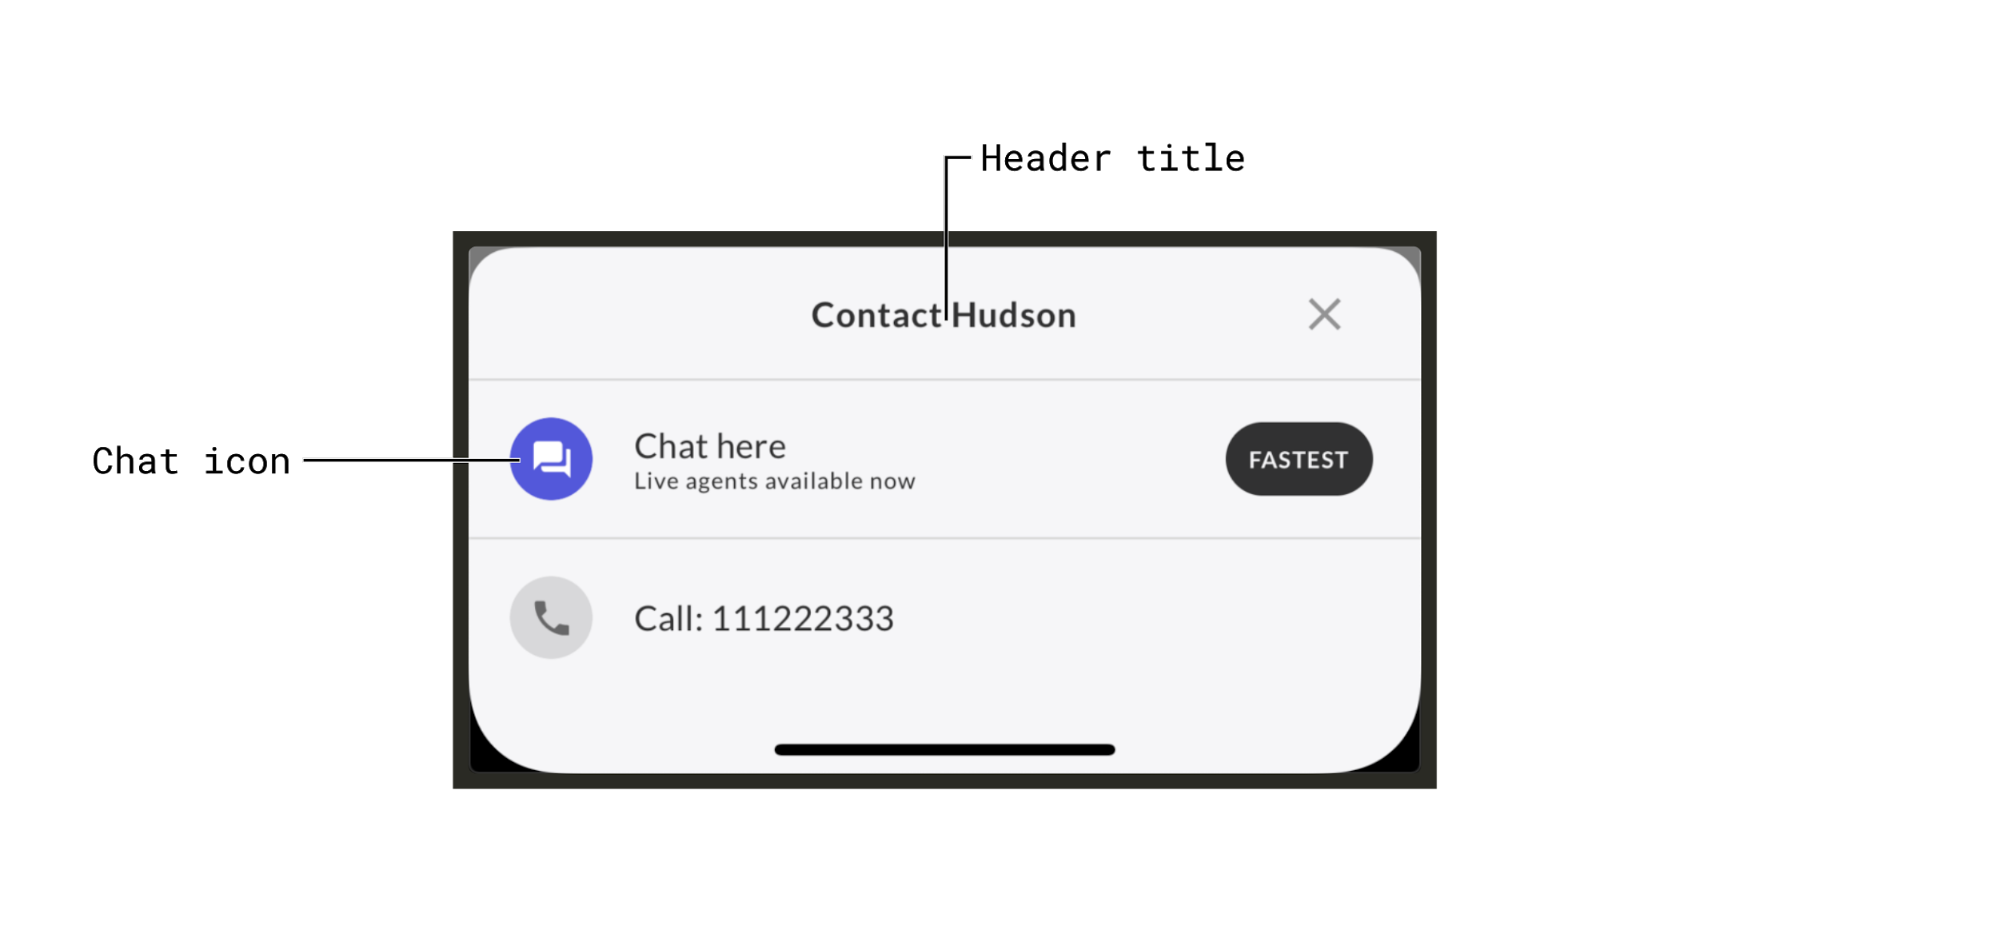 `ASAPPChatInsteadViewController` uses [ASAPPColors](https://docs-sdk.asapp.com/api/chatsdk/ios/latest/Classes/ASAPPColors.html) for styling, so it will automatically use the colors set there (e.g. `primary`, `background`, `onBackground`, etc.), which are the same colors used for customizing the ASAPP chat interface. There is no way to independently change the styling of the Chat Instead UI.
 ASAPP supports [Dark Mode](../ios-sdk/customization#dark-mode-15935 "Dark Mode") by default as long as you enable it.
## Remote settings
When you create an instance of `ASAPPChatInsteadViewController`, it will automatically fetch remote settings to indicate which channels to display. You can configure these settings.
ASAPP supports [Dark Mode](../ios-sdk/customization#dark-mode-15935 "Dark Mode") by default as long as you enable it.
## Remote settings
When you create an instance of `ASAPPChatInsteadViewController`, it will automatically fetch remote settings to indicate which channels to display. You can configure these settings.
 |
|  |
# Customer Authentication
Source: https://docs.asapp.com/messaging-platform/integrations/customer-authentication
Customer Authentication enables consistent and personalized conversations across channels and over time. The authentication requirements consist of two main elements:
1. A customer identifier
2. An access token
The source, format, and use of these items depends on the customer's infrastructure and services. However, where applicable and feasible, ASAPP instills a few direct requirements for integration of these components.
This section outlines the requirements and considerations in the sections below.
Integrations leveraging customer authentication enable two main features of ASAPP:
1. Combination of the conversation history of a customer into a single view to enable the true asynchronous behavior of ASAPP. This allows a customer to come back over time as well as change communication channels but maintain a consistent state and experience.
2. Validation of a customer and make API calls for a customer's data to display to a representative or directly to the customer.
The following sequence diagram depicts an example of a customer authentication integration utilizing OAuth customer credentials and a JSON Web Token (JWT) for API calls.
## Identification
### What is a Customer Identifier?
A customer identifier is the first and most important piece of the Customer Authentication strategy. The identifier is the key element to determine:
* when to transition from unauthenticated to authenticated
* when to show previous conversation history within chat
When a customer returns with the same identifier, the customer sees all previous history within web and mobile chat. These identifiers are typically string values of hashed or encrypted account numbers or other internal values. However, it is important to not send identifiable or reusable information as the customer identifier, such as their actual unprotected account numbers or PII.
### Customer Identifier Format
The customer may determine the format of the customer identifier. The ASAPP requirements for the customer identifier are:
* Consistent - the same customer must authenticate using the same customer identifier every time.
* Unique - the customer identifier must represent a unique customer; No two customers can have the same identifier.
* Opaque - ASAPP does not store PII data. The customer must obfuscate the customer identifier so it does not contain PII or any other sensitive data. An example of obfuscation strategy is to generate a hash or an encrypted value of a unique user identifier (e.g. user ID, account number, or email address).
* Traceable - customer-traceable but not ASAPP-traceable.
* The customer must be able to trace the customer identifier back to a user. However, it cannot be used by ASAPP, or any other party, to trace back to a specific user.
* The reporting data generated by ASAPP includes the customer identifier. This reporting data is typically used to generate further analytics by the customer. You can use the customer identifier to relate ASAPP's reporting data back to the actual user identifier and record on the customer side.
### Passing the Customer Identifier to ASAPP
Once a customer authenticates a user on their website or app, the customer must retrieve and pass the customer identifier to ASAPP ( typically via the SDK parameters) as part of the conversation authentication flow.
You can find more details for your specific integration in the following sections:
* [Web SDK - Web Authentication](/messaging-platform/integrations/web-sdk/web-authentication "Web Authentication")
* [Android SDK - Chat User Authentication in the Android Integration Walkthrough](/messaging-platform/integrations/android-sdk/user-authentication)
* [iOS SDK - Basic Usage in the iOS SDK Quick Start](/messaging-platform/integrations/ios-sdk/ios-quick-start)iOS SDK
## Tokens
While they are not a hard requirement for Customer Authentication, tokens play an important part in the overall Customer Authentication strategy. Tokens provide a way of securely wrapping all communication between Customers, Customer Companies and ASAPP. You can achieve this when you ensure that every request to a server is accompanied by a signed token, which ASAPP can verify for authenticity.
Some of the benefits of using tokens over other methods, such as cookies, is that tokens are completely stateless and are typically short-lived. The following sections outline some examples of token input, as well as requirements for their use and validation.
### Identity Tokens
Identity tokens are self contained, signed, short-lived tokens containing User Attributes like Name, User Identifiers, Contact Information, Claims, and Roles. The simplest and most common example of such a token is a JSON Web Token, JWT. JWTs contain a Header, Payload and Signature. The Header contains metadata about the token, the Payload contains the user info and claims, and the Signature is the algorithmically signed portion of the token based on the payload. You can find more information about JWTs at [https://jwt.io/](https://jwt.io/).
**Example JWT:**
```json
eyJhbGciOiJIUzI1NiIsInR5cCI6IkpXVCJ9.eyJzdWIiOiIxMjM0NTY3ODkwIiwibmFtZSI6IkpvaG4gRG9lIiwiaWF0IjoxNTE2MjM5MDIyfQ.SflKxwRJSMeKKF2QT4fwpMeJf36POk6yJV_adQssw5c
```
### Bearer Tokens
A Bearer Token is a lightweight security token which provides the bearer, or user, access to protected resources. When a user authenticates, a Bearer Token type is issued that contains an access token and a refresh token, along with expiration details. Bearer tokens are short-lived, dynamic access tokens that can be updated throughout a session using a refresh token.
**Example Bearer Token:**
```json
{
"token_type":"Bearer",
"access_token":"eyJhbGci....",
"expires_in":3600,
"expires_on":1479937454,
"refresh_token":"0/LTo...."
}
```
### Token Duration
Since every token has an expiration time, you need a way for ASAPP to know when a token is valid and when it expires. A customer can do this by:
* allowing decoding of signed tokens.
* providing an API to validate the token.
#### Token Refresh
You need to refresh expired tokens on either the client side, via the ASAPP SDK, or through an API call.
You can find SDK token refresh implementation examples at:
* [Web SDK - Web Context Provider](/messaging-platform/integrations/web-sdk/web-contextprovider#authentication "Web ContextProvider")
* [Web SDK - Set Customer](/messaging-platform/integrations/web-sdk/web-javascript-api#setcustomer "'setCustomer'")
* [Android SDK - Context Provider](/messaging-platform/integrations/android-sdk/user-authentication)
* [iOS SDK - Type Aliases](https://docs-sdk.asapp.com/api/chatsdk/ios/latest/Typealiases.html)
#### Token Validation
You need to validate tokens before you can rely on them for API access or user information. Two examples of token validation are:
* **Compare multiple pieces of information** - ASAPP compares a JWT payload against the SDK input of the same attributes, or against response data from a UserProfile API call.
* **Signature Validation** - ASAPP can also validate signatures and decode data if needed. This would require sharing of a trusted public certificate with ASAPP.
## Omni-Channel Strategy
One of the key capabilities of the ASAPP backend is that it supports customer interaction via multiple channels - such as chat on web portals or within mobile apps. This enables a customer to migrate from one channel to another, if they choose, within the same support dialog. In order for this to function, it is important that the process of Customer Authentication be common to all channels. The ASAPP backend should obtain the same access token to access the Customer's API endpoints regardless of the channel that the customer selects. If a customer switches from one channel to another, the access token should remain the same.
## Testing
You need a comprehensive testing strategy to ensure success. This includes the ability to exercise edge cases with various permutations of test account data, as well as utilize the customer login with direct test account credentials. Operationally, the customer handles customer login credentialing; however, ASAPP requires the ability to simulate the login process in order to execute end to end tests. This process is crucial in performing test scenarios that require customer authentication. Corollary, it is equally important to ensure complete test scenario coverage with different types of test-based customer accounts.
# iOS SDK Overview
Source: https://docs.asapp.com/messaging-platform/integrations/ios-sdk
Welcome to the ASAPP iOS SDK Overview! This document guides you through the process of integrating ASAPP functionality into your iOS application. It includes the following sections:
* [Quick Start](/messaging-platform/integrations/ios-sdk/ios-quick-start "iOS Quick Start")
* [Customization](/messaging-platform/integrations/ios-sdk/customization "Customization")
* [User Authentication](/messaging-platform/integrations/ios-sdk/user-authentication "User Authentication")
* [Miscellaneous APIs](/messaging-platform/integrations/ios-sdk/miscellaneous-apis "Miscellaneous APIs")
* [Deep Links and Web Links](/messaging-platform/integrations/ios-sdk/deep-links-and-web-links "Deep Links and Web Links")
* [Push Notifications](/messaging-platform/integrations/ios-sdk/push-notifications "Push Notifications")
In addition, you can view the following documentation:
* [iOS SDK Release Notes](/messaging-platform/integrations/ios-sdk/ios-sdk-release-notes "iOS SDK Release Notes")
## Requirements
ASAPP supports iOS 12.0 and up. As a rule, ASAPP supports two major versions behind the latest. Once iOS 15 is released, ASAPP will drop support for iOS 12 and only support iOS 13.0 and up.
The SDK is written in Swift 5 and compiled with support for binary stability, meaning it is compatible with any Swift compiler version greater than or equal to 5.
# Customization
Source: https://docs.asapp.com/messaging-platform/integrations/ios-sdk/customization
## Styling
### Themes
There is one main color that you can set to ensure the ASAPP chat view controller fits with your app's theme: `ASAPP.styles.colors.primary`.
ASAPP recommends starting out only setting `.primary` to be your brand's primary color, and adjusting other colors when necessary for accessibility.
`.primary` is used as the message bubble background and in most buttons and other controls.
|
# Customer Authentication
Source: https://docs.asapp.com/messaging-platform/integrations/customer-authentication
Customer Authentication enables consistent and personalized conversations across channels and over time. The authentication requirements consist of two main elements:
1. A customer identifier
2. An access token
The source, format, and use of these items depends on the customer's infrastructure and services. However, where applicable and feasible, ASAPP instills a few direct requirements for integration of these components.
This section outlines the requirements and considerations in the sections below.
Integrations leveraging customer authentication enable two main features of ASAPP:
1. Combination of the conversation history of a customer into a single view to enable the true asynchronous behavior of ASAPP. This allows a customer to come back over time as well as change communication channels but maintain a consistent state and experience.
2. Validation of a customer and make API calls for a customer's data to display to a representative or directly to the customer.
The following sequence diagram depicts an example of a customer authentication integration utilizing OAuth customer credentials and a JSON Web Token (JWT) for API calls.
## Identification
### What is a Customer Identifier?
A customer identifier is the first and most important piece of the Customer Authentication strategy. The identifier is the key element to determine:
* when to transition from unauthenticated to authenticated
* when to show previous conversation history within chat
When a customer returns with the same identifier, the customer sees all previous history within web and mobile chat. These identifiers are typically string values of hashed or encrypted account numbers or other internal values. However, it is important to not send identifiable or reusable information as the customer identifier, such as their actual unprotected account numbers or PII.
### Customer Identifier Format
The customer may determine the format of the customer identifier. The ASAPP requirements for the customer identifier are:
* Consistent - the same customer must authenticate using the same customer identifier every time.
* Unique - the customer identifier must represent a unique customer; No two customers can have the same identifier.
* Opaque - ASAPP does not store PII data. The customer must obfuscate the customer identifier so it does not contain PII or any other sensitive data. An example of obfuscation strategy is to generate a hash or an encrypted value of a unique user identifier (e.g. user ID, account number, or email address).
* Traceable - customer-traceable but not ASAPP-traceable.
* The customer must be able to trace the customer identifier back to a user. However, it cannot be used by ASAPP, or any other party, to trace back to a specific user.
* The reporting data generated by ASAPP includes the customer identifier. This reporting data is typically used to generate further analytics by the customer. You can use the customer identifier to relate ASAPP's reporting data back to the actual user identifier and record on the customer side.
### Passing the Customer Identifier to ASAPP
Once a customer authenticates a user on their website or app, the customer must retrieve and pass the customer identifier to ASAPP ( typically via the SDK parameters) as part of the conversation authentication flow.
You can find more details for your specific integration in the following sections:
* [Web SDK - Web Authentication](/messaging-platform/integrations/web-sdk/web-authentication "Web Authentication")
* [Android SDK - Chat User Authentication in the Android Integration Walkthrough](/messaging-platform/integrations/android-sdk/user-authentication)
* [iOS SDK - Basic Usage in the iOS SDK Quick Start](/messaging-platform/integrations/ios-sdk/ios-quick-start)iOS SDK
## Tokens
While they are not a hard requirement for Customer Authentication, tokens play an important part in the overall Customer Authentication strategy. Tokens provide a way of securely wrapping all communication between Customers, Customer Companies and ASAPP. You can achieve this when you ensure that every request to a server is accompanied by a signed token, which ASAPP can verify for authenticity.
Some of the benefits of using tokens over other methods, such as cookies, is that tokens are completely stateless and are typically short-lived. The following sections outline some examples of token input, as well as requirements for their use and validation.
### Identity Tokens
Identity tokens are self contained, signed, short-lived tokens containing User Attributes like Name, User Identifiers, Contact Information, Claims, and Roles. The simplest and most common example of such a token is a JSON Web Token, JWT. JWTs contain a Header, Payload and Signature. The Header contains metadata about the token, the Payload contains the user info and claims, and the Signature is the algorithmically signed portion of the token based on the payload. You can find more information about JWTs at [https://jwt.io/](https://jwt.io/).
**Example JWT:**
```json
eyJhbGciOiJIUzI1NiIsInR5cCI6IkpXVCJ9.eyJzdWIiOiIxMjM0NTY3ODkwIiwibmFtZSI6IkpvaG4gRG9lIiwiaWF0IjoxNTE2MjM5MDIyfQ.SflKxwRJSMeKKF2QT4fwpMeJf36POk6yJV_adQssw5c
```
### Bearer Tokens
A Bearer Token is a lightweight security token which provides the bearer, or user, access to protected resources. When a user authenticates, a Bearer Token type is issued that contains an access token and a refresh token, along with expiration details. Bearer tokens are short-lived, dynamic access tokens that can be updated throughout a session using a refresh token.
**Example Bearer Token:**
```json
{
"token_type":"Bearer",
"access_token":"eyJhbGci....",
"expires_in":3600,
"expires_on":1479937454,
"refresh_token":"0/LTo...."
}
```
### Token Duration
Since every token has an expiration time, you need a way for ASAPP to know when a token is valid and when it expires. A customer can do this by:
* allowing decoding of signed tokens.
* providing an API to validate the token.
#### Token Refresh
You need to refresh expired tokens on either the client side, via the ASAPP SDK, or through an API call.
You can find SDK token refresh implementation examples at:
* [Web SDK - Web Context Provider](/messaging-platform/integrations/web-sdk/web-contextprovider#authentication "Web ContextProvider")
* [Web SDK - Set Customer](/messaging-platform/integrations/web-sdk/web-javascript-api#setcustomer "'setCustomer'")
* [Android SDK - Context Provider](/messaging-platform/integrations/android-sdk/user-authentication)
* [iOS SDK - Type Aliases](https://docs-sdk.asapp.com/api/chatsdk/ios/latest/Typealiases.html)
#### Token Validation
You need to validate tokens before you can rely on them for API access or user information. Two examples of token validation are:
* **Compare multiple pieces of information** - ASAPP compares a JWT payload against the SDK input of the same attributes, or against response data from a UserProfile API call.
* **Signature Validation** - ASAPP can also validate signatures and decode data if needed. This would require sharing of a trusted public certificate with ASAPP.
## Omni-Channel Strategy
One of the key capabilities of the ASAPP backend is that it supports customer interaction via multiple channels - such as chat on web portals or within mobile apps. This enables a customer to migrate from one channel to another, if they choose, within the same support dialog. In order for this to function, it is important that the process of Customer Authentication be common to all channels. The ASAPP backend should obtain the same access token to access the Customer's API endpoints regardless of the channel that the customer selects. If a customer switches from one channel to another, the access token should remain the same.
## Testing
You need a comprehensive testing strategy to ensure success. This includes the ability to exercise edge cases with various permutations of test account data, as well as utilize the customer login with direct test account credentials. Operationally, the customer handles customer login credentialing; however, ASAPP requires the ability to simulate the login process in order to execute end to end tests. This process is crucial in performing test scenarios that require customer authentication. Corollary, it is equally important to ensure complete test scenario coverage with different types of test-based customer accounts.
# iOS SDK Overview
Source: https://docs.asapp.com/messaging-platform/integrations/ios-sdk
Welcome to the ASAPP iOS SDK Overview! This document guides you through the process of integrating ASAPP functionality into your iOS application. It includes the following sections:
* [Quick Start](/messaging-platform/integrations/ios-sdk/ios-quick-start "iOS Quick Start")
* [Customization](/messaging-platform/integrations/ios-sdk/customization "Customization")
* [User Authentication](/messaging-platform/integrations/ios-sdk/user-authentication "User Authentication")
* [Miscellaneous APIs](/messaging-platform/integrations/ios-sdk/miscellaneous-apis "Miscellaneous APIs")
* [Deep Links and Web Links](/messaging-platform/integrations/ios-sdk/deep-links-and-web-links "Deep Links and Web Links")
* [Push Notifications](/messaging-platform/integrations/ios-sdk/push-notifications "Push Notifications")
In addition, you can view the following documentation:
* [iOS SDK Release Notes](/messaging-platform/integrations/ios-sdk/ios-sdk-release-notes "iOS SDK Release Notes")
## Requirements
ASAPP supports iOS 12.0 and up. As a rule, ASAPP supports two major versions behind the latest. Once iOS 15 is released, ASAPP will drop support for iOS 12 and only support iOS 13.0 and up.
The SDK is written in Swift 5 and compiled with support for binary stability, meaning it is compatible with any Swift compiler version greater than or equal to 5.
# Customization
Source: https://docs.asapp.com/messaging-platform/integrations/ios-sdk/customization
## Styling
### Themes
There is one main color that you can set to ensure the ASAPP chat view controller fits with your app's theme: `ASAPP.styles.colors.primary`.
ASAPP recommends starting out only setting `.primary` to be your brand's primary color, and adjusting other colors when necessary for accessibility.
`.primary` is used as the message bubble background and in most buttons and other controls.
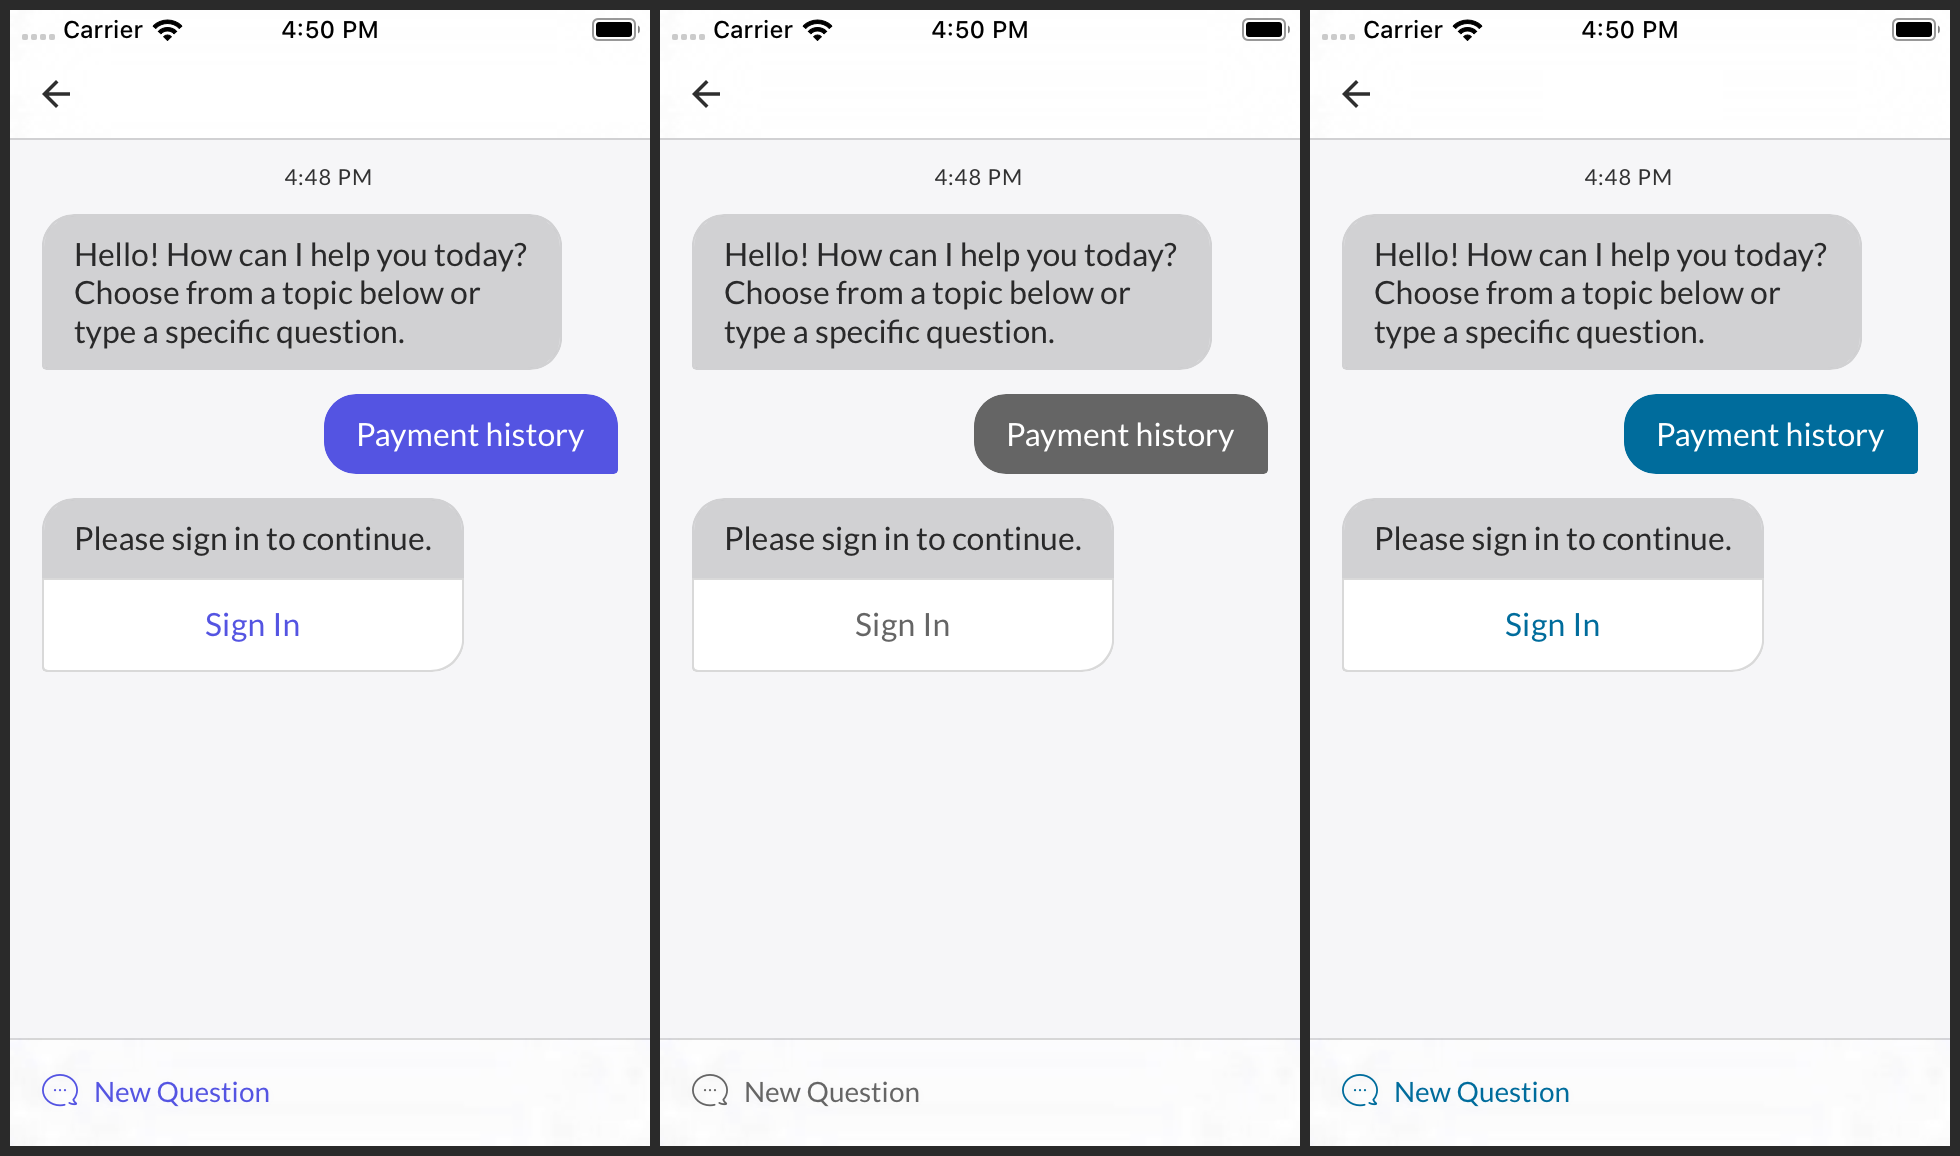 There are two other colors you may consider customizing for accessibility or to achieve an exact match with your app's theme: `ASAPP.styles.colors.onBackground` and `.onPrimary`. `.onBackground` is used for most other elements that might appear in front of the background. `.onPrimary` is used for text and other elements that appear in front of the primary color.
### Fonts
The ASAPP SDK uses the iOS system font family, SF Pro, by default. To use another font family, pass an `ASAPPFontFamily` to `ASAPP.styles.textStyles.updateStyles(for:)`. There are two `ASAPPFontFamily` initializers: one that takes font file names and another that takes `UIFont` references.
```json
let avenirNext = ASAPPFontFamily(
lightFontName: “AvenirNext-Regular”,
regularFontName: “AvenirNext-Medium”,
mediumFontName: “AvenirNext-DemiBold”,
boldFontName: “AvenirNext-Bold”)!
ASAPP.styles.textStyles.updateStyles(for: avenirNext)
```
## Overrides
The ASAPP SDK API allows you to override many aspects of the design of the chat interface, including [colors](#colors "Colors"), [button styles](#buttons "Buttons"), [navigation bar styles](#navigation-bar-styles "Navigation Bar Styles"), and various [text styles](#text-styles "Text Styles").
### Colors
Besides the colors used for themes, you can override specific colors in a number of categories:
* Navigation bar
* General chat content
* Buttons
* Messages
* Quick replies
* Input field.
All property names mentioned below are under `ASAPP.styles.colors`.
Navigation bar colors are .`navBarBackground`, `.navBarTitle`, `.navBarButton`, and `.navBarButtonActive`.
There are two other colors you may consider customizing for accessibility or to achieve an exact match with your app's theme: `ASAPP.styles.colors.onBackground` and `.onPrimary`. `.onBackground` is used for most other elements that might appear in front of the background. `.onPrimary` is used for text and other elements that appear in front of the primary color.
### Fonts
The ASAPP SDK uses the iOS system font family, SF Pro, by default. To use another font family, pass an `ASAPPFontFamily` to `ASAPP.styles.textStyles.updateStyles(for:)`. There are two `ASAPPFontFamily` initializers: one that takes font file names and another that takes `UIFont` references.
```json
let avenirNext = ASAPPFontFamily(
lightFontName: “AvenirNext-Regular”,
regularFontName: “AvenirNext-Medium”,
mediumFontName: “AvenirNext-DemiBold”,
boldFontName: “AvenirNext-Bold”)!
ASAPP.styles.textStyles.updateStyles(for: avenirNext)
```
## Overrides
The ASAPP SDK API allows you to override many aspects of the design of the chat interface, including [colors](#colors "Colors"), [button styles](#buttons "Buttons"), [navigation bar styles](#navigation-bar-styles "Navigation Bar Styles"), and various [text styles](#text-styles "Text Styles").
### Colors
Besides the colors used for themes, you can override specific colors in a number of categories:
* Navigation bar
* General chat content
* Buttons
* Messages
* Quick replies
* Input field.
All property names mentioned below are under `ASAPP.styles.colors`.
Navigation bar colors are .`navBarBackground`, `.navBarTitle`, `.navBarButton`, and `.navBarButtonActive`.
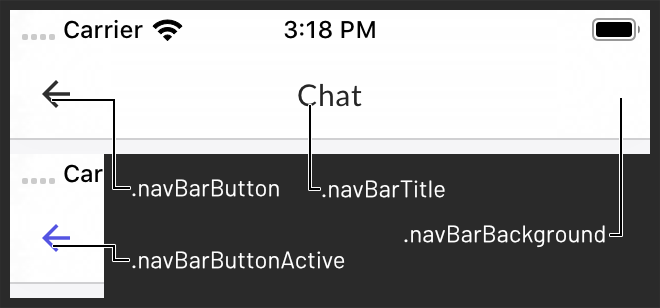 General chat content colors are `.background`, `.separatorPrimary`, `.separatorSecondary`, `.controlTint`, `.controlSecondary`, `.controlBackground`, `.success`, `.warning`, and `.failure`.
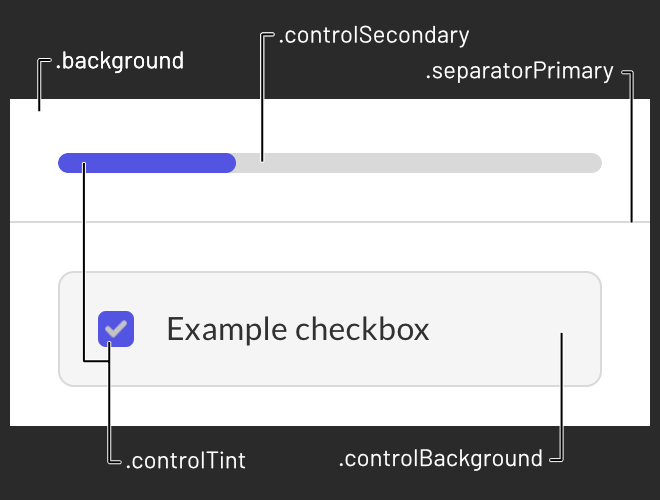
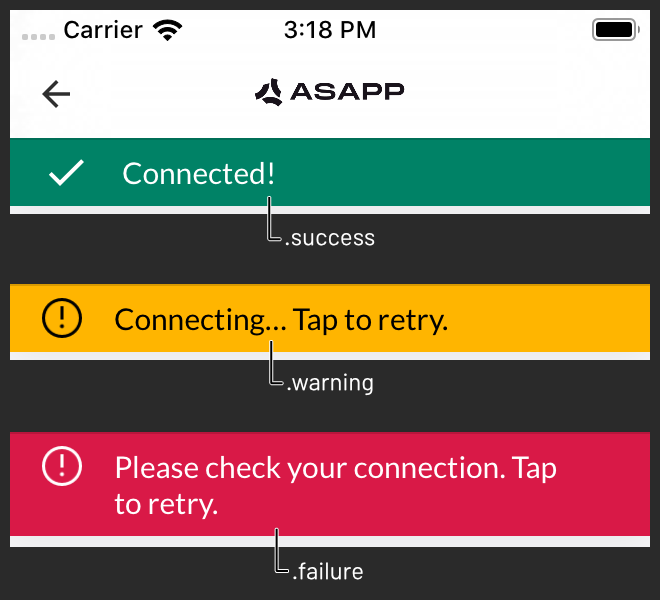 Buttons use sets of colors defined with an `ASAPPButtonColors` initializer. You can override `.textButtonPrimary`, `.buttonPrimary`, and `.buttonSecondary`.
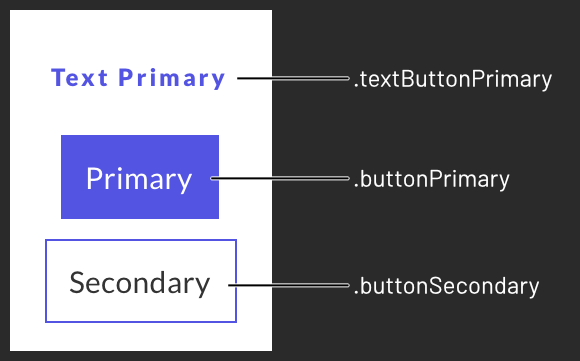 Message colors are `.messagesListBackground`, `.messageText`, `.messageBackground`, `.messageBorder`, `.replyMessageText`, `.replyMessageBackground`, and `.replyMessageBorder`.
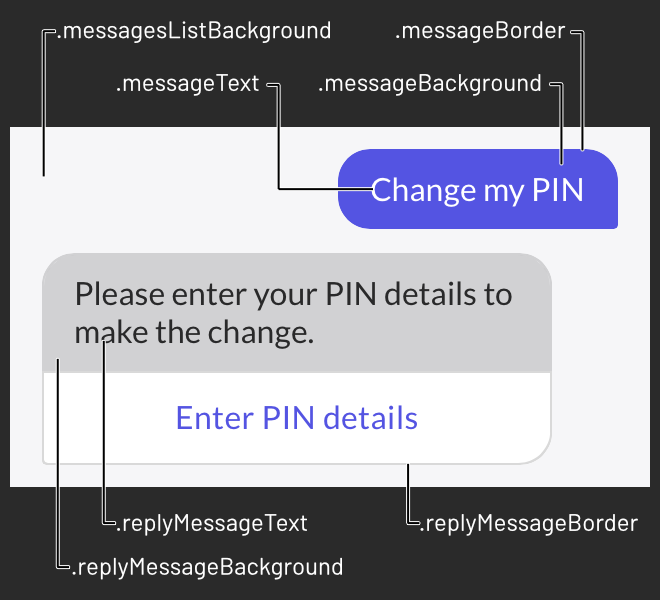 Quick replies and action buttons also use `ASAPPButtonColors`. You can override `.quickReplyButton` and `.actionButton`.
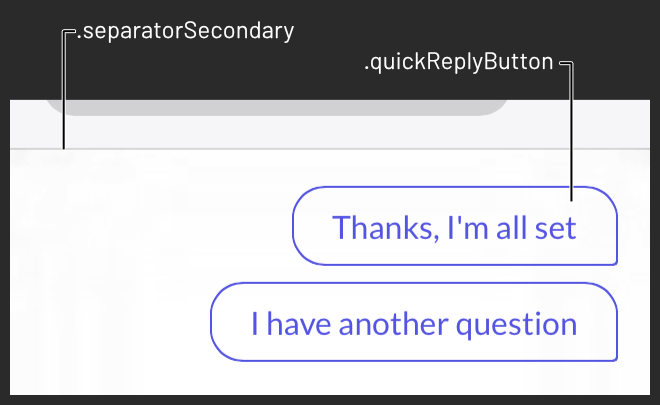
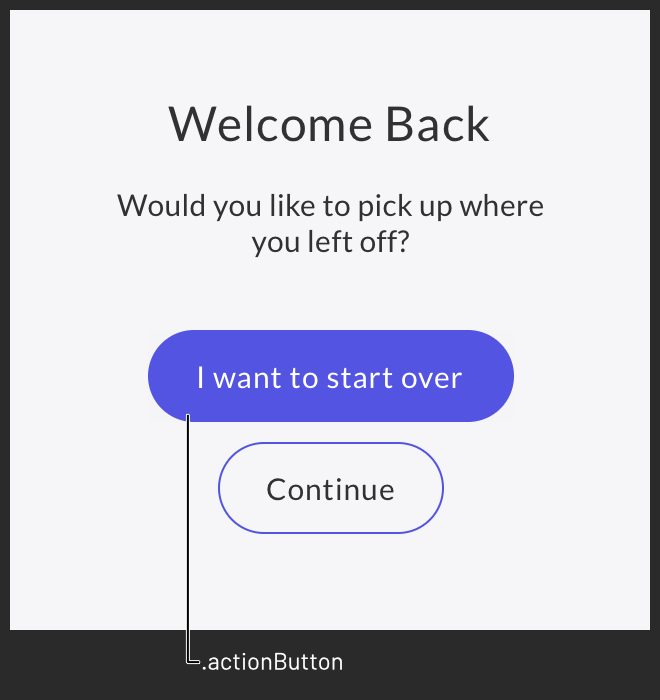 The chat input field uses `ASAPPInputColors`. You can override `.chatInput`.
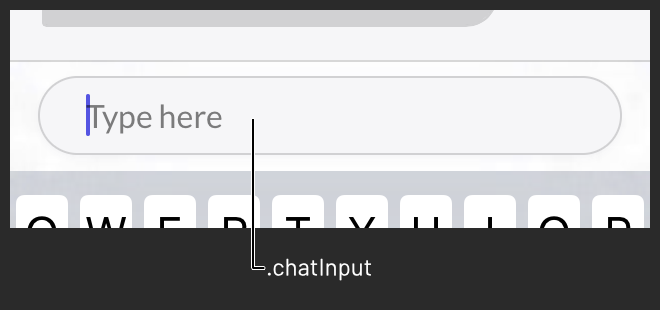 ### Text Styles
ASAPP strongly recommends that you use one font family as described in the [Fonts](#fonts) section. However, if you need to, you may override: `ASAPP.styles.textStyles.navButton`, `.button`, `.actionButton`, `.link`, `.header1`, `.header2`, `.header3`, `.subheader`, `.body`, `.bodyBold`, `.body2`, `.bodyBold2`, `.detail1`, `.detail2`, and `.error`. To update all but the first four with a color, call `ASAPP.styles.textStyles.updateColors(with:)`.
### Navigation Bar Styles
You can override the default `ASAPP.styles.navBarStyles.titlePadding` using `UIEdgeInsets`.
### Buttons
The shape of primary buttons in message attachments, forms, and other dynamic layouts is determined by the value of `ASAPP.styles.primaryButtonRoundingStyle`. The default value is `.radius(0)`. You can set it to a custom radius with `.radius(_:)` or fully rounded with `.pill`.
## Images
### Navigation Bar
There are three images used in the chat view controller's navigation bar that are overridable: the icons for the **close ✕**, **back ⟨**, and **more ⋮** buttons. Each is tinted appropriately, so the image need only be a template in black with an alpha channel. ASAPP displays only one of the **close** and **back** buttons at a time; the former is used when the chat view controller is presented modally, and the latter when pushed onto a navigation stack.
```json
ASAPP.styles.navBarStyles.buttonImages.close
ASAPP.styles.navBarStyles.buttonImages.back
ASAPP.styles.navBarStyles.buttonImages.more
```
Use the `ASAPPCustomImage(image:size:insets:)` initializer to override each:
```json
ASAPP.styles.navBarStyles.buttonImages.more = ASAPPCustomImage(
image: UIImage(named: “Your More Icon Name”)!,
size: CGSize(width: 20, height: 20),
insets: UIEdgeInsets(top: 14, left: 0, bottom: 14, right: 0))
```
### Title View
To use a custom title view, assign `ASAPP.views.chatTitle`. If you set a custom title view, it will override any string you set as `ASAPP.strings.chatTitle`. The title view will be rendered in the center of the navigation bar.
## Dark Mode
Apple introduced Dark Mode in iOS 13. Please see Apple's [Supporting Dark Mode in Your Interface](https://developer.apple.com/documentation/xcode/supporting_dark_mode_in_your_interface) documentation for an overview.
The ASAPP SDK does not automatically convert any colors for use in Dark Mode; you must define dark variants for each custom color at the app level, which the SDK will use automatically when the interface style changes.
ASAPP recommends that you add a Dark Appearance to colors you define in color sets in an asset catalog. Please see [Apple's documentation](https://developer.apple.com/documentation/xcode/supporting_dark_mode_in_your_interface#2993897) for more details. Once you have defined a color set, you can refer to it by name with the `UIColor(named:)` initializer, which was introduced in iOS 11. After you have defined a dark variant for at least the primary color, be sure to set it and flip the Dark Mode flag:
```json
ASAPP.styles.colors.primary = UIColor(named: "Your Primary Color Name")!
ASAPP.styles.isDarkModeAllowed = true
```
### Text Styles
ASAPP strongly recommends that you use one font family as described in the [Fonts](#fonts) section. However, if you need to, you may override: `ASAPP.styles.textStyles.navButton`, `.button`, `.actionButton`, `.link`, `.header1`, `.header2`, `.header3`, `.subheader`, `.body`, `.bodyBold`, `.body2`, `.bodyBold2`, `.detail1`, `.detail2`, and `.error`. To update all but the first four with a color, call `ASAPP.styles.textStyles.updateColors(with:)`.
### Navigation Bar Styles
You can override the default `ASAPP.styles.navBarStyles.titlePadding` using `UIEdgeInsets`.
### Buttons
The shape of primary buttons in message attachments, forms, and other dynamic layouts is determined by the value of `ASAPP.styles.primaryButtonRoundingStyle`. The default value is `.radius(0)`. You can set it to a custom radius with `.radius(_:)` or fully rounded with `.pill`.
## Images
### Navigation Bar
There are three images used in the chat view controller's navigation bar that are overridable: the icons for the **close ✕**, **back ⟨**, and **more ⋮** buttons. Each is tinted appropriately, so the image need only be a template in black with an alpha channel. ASAPP displays only one of the **close** and **back** buttons at a time; the former is used when the chat view controller is presented modally, and the latter when pushed onto a navigation stack.
```json
ASAPP.styles.navBarStyles.buttonImages.close
ASAPP.styles.navBarStyles.buttonImages.back
ASAPP.styles.navBarStyles.buttonImages.more
```
Use the `ASAPPCustomImage(image:size:insets:)` initializer to override each:
```json
ASAPP.styles.navBarStyles.buttonImages.more = ASAPPCustomImage(
image: UIImage(named: “Your More Icon Name”)!,
size: CGSize(width: 20, height: 20),
insets: UIEdgeInsets(top: 14, left: 0, bottom: 14, right: 0))
```
### Title View
To use a custom title view, assign `ASAPP.views.chatTitle`. If you set a custom title view, it will override any string you set as `ASAPP.strings.chatTitle`. The title view will be rendered in the center of the navigation bar.
## Dark Mode
Apple introduced Dark Mode in iOS 13. Please see Apple's [Supporting Dark Mode in Your Interface](https://developer.apple.com/documentation/xcode/supporting_dark_mode_in_your_interface) documentation for an overview.
The ASAPP SDK does not automatically convert any colors for use in Dark Mode; you must define dark variants for each custom color at the app level, which the SDK will use automatically when the interface style changes.
ASAPP recommends that you add a Dark Appearance to colors you define in color sets in an asset catalog. Please see [Apple's documentation](https://developer.apple.com/documentation/xcode/supporting_dark_mode_in_your_interface#2993897) for more details. Once you have defined a color set, you can refer to it by name with the `UIColor(named:)` initializer, which was introduced in iOS 11. After you have defined a dark variant for at least the primary color, be sure to set it and flip the Dark Mode flag:
```json
ASAPP.styles.colors.primary = UIColor(named: "Your Primary Color Name")!
ASAPP.styles.isDarkModeAllowed = true
```
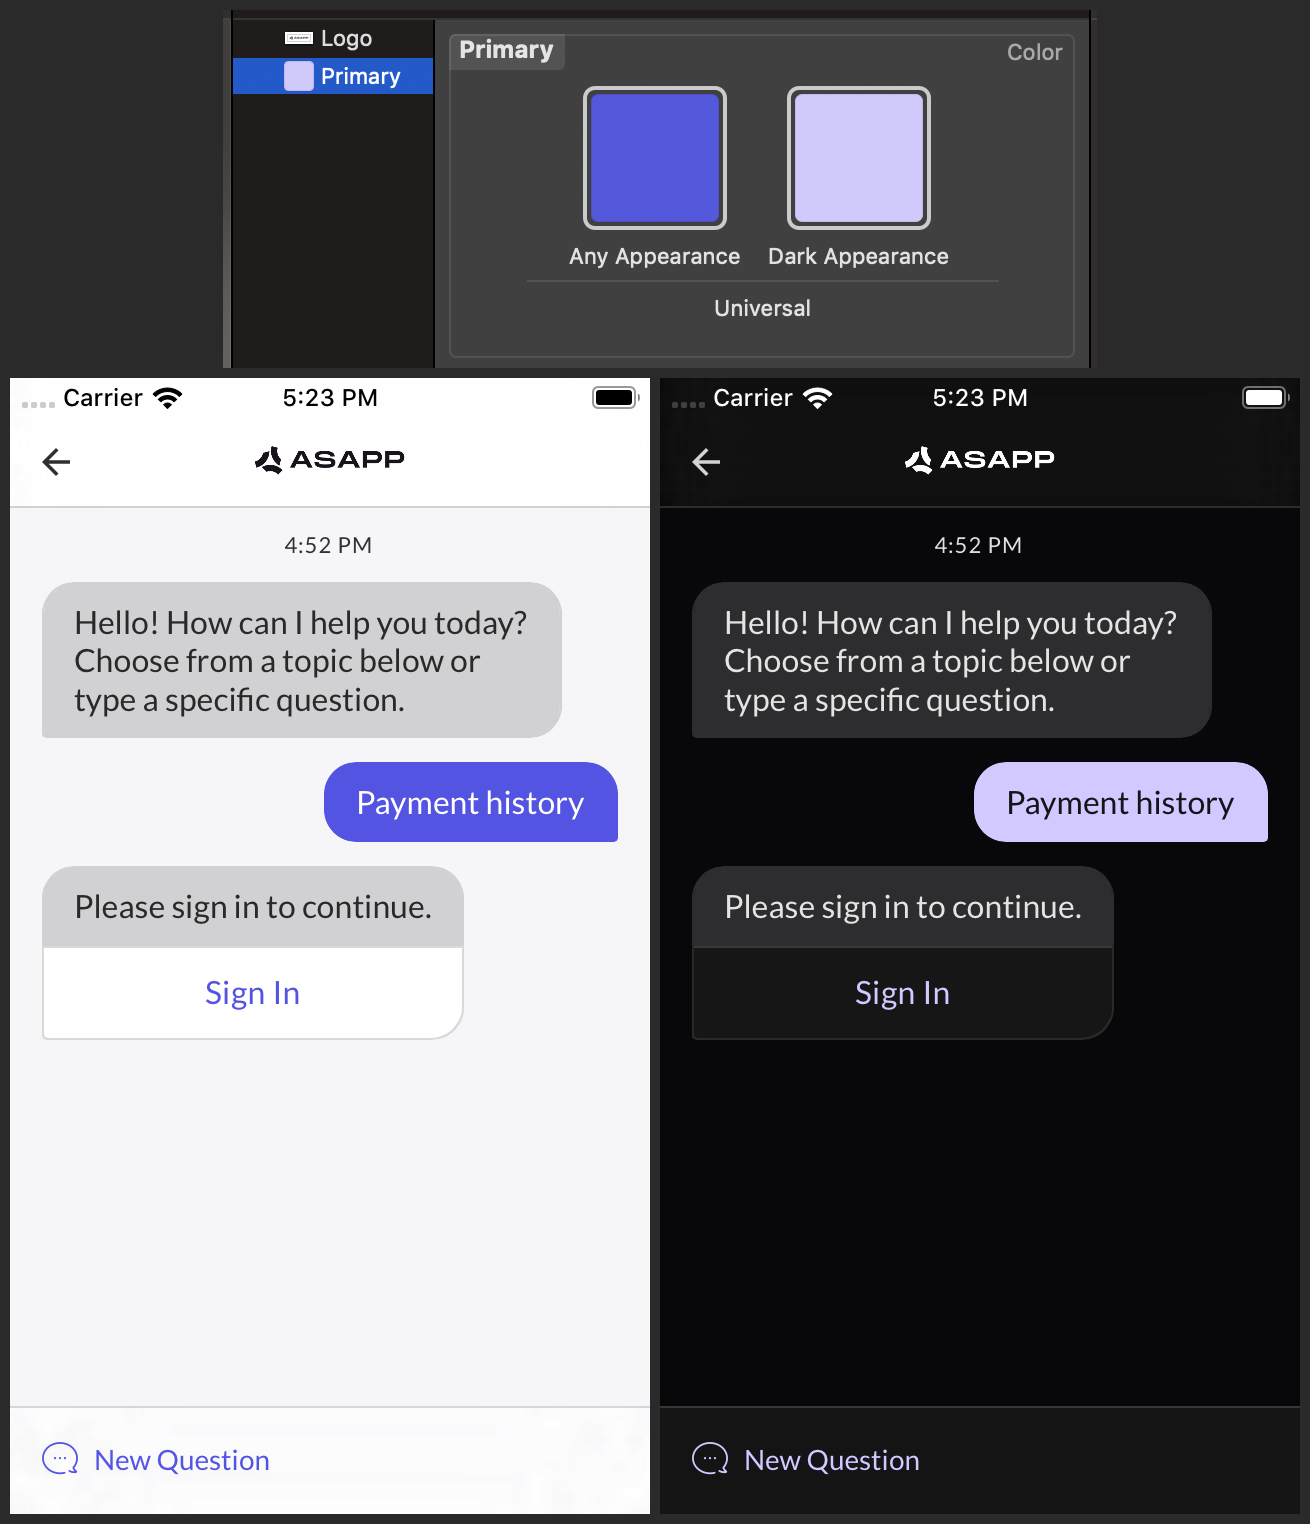 ## Orientation
The default value of `ASAPP.styles.allowedOrientations` is `.portraitLocked`, meaning the chat view controller will always render in portrait orientation. To allow landscape orientation on an iPad, set it to `.iPadLandscapeAllowed` instead. There is currently no landscape orientation option for iPhone.
## Strings
Please see the class reference for details on each member of `ASAPPStrings`.
# Deep Links and Web Links
Source: https://docs.asapp.com/messaging-platform/integrations/ios-sdk/deep-links-and-web-links
## Handle Deep Links in Chat
Certain chat flows may present buttons that are deep links to another part of your app. To react to taps on these buttons, implement the `ASAPPDelegate` protocol, including the `chatViewControlledDidTapDeepLink(name:data:)` method. Please ask your Implementation Manager if you have questions regarding deep link names and data.
## Handle Web Links in Chat
Certain chat flows may present buttons that are web links. To react to taps on these buttons, implement the `ASAPPDelegate` protocol, including the `chatViewControllerShouldHandleWebLink(url:)` method. Return true if the ASAPP SDK should open the link in an `SFSafariViewController`; return `false` if you'd like to handle it instead.
## Implement Deep Links into Chat
### Getting Started
Please see Apple's documentation on [Allowing Apps and Websites to Link to Your Content](https://developer.apple.com/documentation/xcode/allowing_apps_and_websites_to_link_to_your_content).
### Connect the Pieces
Once you have set up a custom URL scheme for your app, you can detect links pointing to ASAPP chat within `application(_:open:options:)`. Call one of the four provided methods to create an ASAPP chat view controller:
```json
ASAPP.createChatViewControllerForPushing(fromNotificationWith:)
ASAPP.createChatViewControllerForPresenting(fromNotificationWith:)
ASAPP.createChatViewControllerForPushing(withIntent:)
ASAPP.createChatViewControllerForPresenting(withIntent:)
```
# iOS Quick Start
Source: https://docs.asapp.com/messaging-platform/integrations/ios-sdk/ios-quick-start
If you want to start fast, follow these steps:
1. [Gather Required Information](#1-gather-required-information "1. Gather Required Information")
2. [Download the SDK](#2-download-the-sdk "2. Download the SDK")
3. [Install the SDK](#3-install-the-sdk "3. Install the SDK")
4. [Configure the SDK](#4-configure-the-sdk "4. Configure the SDK")
5. [Open Chat](#5-open-chat "5. Open Chat")
## 1. Gather Required Information
Before downloading and installing the SDK, please make sure you have the following information. Contact your Implementation Manager at ASAPP if you have any questions.
| App ID | Also known as the "Company Marker", assigned by ASAPP. |
| :------------------- | :------------------------------------------------------------------------------------------------------------------------------------------------------------------------------------------------------------------------------------- |
| API Host Name | The fully-qualified domain name used by the SDK to communicate with ASAPP's API. Provided by ASAPP and subject to change based on the stage of implementation. |
| Region Code | The ISO 3166-1 alpha-2 code for the region of the implementation, provided by ASAPP. |
| Supported Languages | Your app's supported languages, in order of preference, as an array of language tag strings. Strings can be in the format "\{ISO 639-1 Code}-\{ISO 3166-1 Code}" or "\{ISO 639-1 Code}", such as "en-us" or "en". Defaults to \["en"]. |
| Client Secret | This can be an empty or random string\* until otherwise notified by ASAPP. |
| User Identifier | A username or similar value used to identify and authenticate the customer, provided by the Customer Company. |
| Authentication Token | A password-equivalent value, which may or may not expire, used to authenticate the customer that is provided by the Customer Company. |
\* In the future, the ASAPP-provided client secret will be a string that authorizes the integrated SDK to call the ASAPP API in production. ASAPP recommends fetching this string from a server and storing it securely using Secure Storage; however, as it is one of many layers of security, you can hard-code the client secret.
## 2. Download the SDK
Download the iOS SDK from the [ASAPP iOS SDK releases page on GitHub](https://github.com/asappinc/chat-sdk-ios-release/releases).
## 3. Install the SDK
ASAPP provides the SDK as an `.xcframework` with and without bitcode in dynamic and static flavors. If in doubt, ASAPP recommends that you use the dynamic `.xcframework` with bitcode.
Add your chosen flavor of the framework to the "Frameworks, Libraries, and Embedded Content" section of your target's "General" settings.
### Include SDK Resources When Using the Static Framework
Add the provided `ASAPPResources.bundle` to your target's "Frameworks, Libraries, and Embedded Content" and then include it in your target's "Copy Bundle Resources" build phase.
The SDK allows a customer to take and upload photos, [unless these features are disabled through configuration](https://docs-sdk.asapp.com/api/chatsdk/ios/latest/Classes/ASAPP.html#/Permissions). Since iOS 10, Apple requires descriptions for why your app uses the photo library and/or camera, which will be displayed to the customer. If you haven't already, you'll need to add these descriptions to your app's `Info.plist`.
* If you access `Info.plist` via Xcode's plist editor, the description keys are "Privacy - Camera Usage Description" and "Privacy - Photo Library Usage Description".
* If you access `Info.plist` via a text editor, the keys are "NSPhotoLibraryUsageDescription" and "NSCameraUsageDescription".
### Validate iOS SDK Authenticity
ASAPP uses GPG (GNU Privacy Guard) for creating digital signatures. To install on macOS:
1. Using [Homebrew](https://brew.sh), install gpg:
`brew install gpg`
2. Download the [ASAPP SDK Team public key](https://docs-sdk.asapp.com/api/chatsdk/ios/security/asapp_public.gpg).
3. Add the key to GPG:
`gpg --import asapp_public.gpg`
Optionally, you can also validate the public key. Please refer to the [GPG documentation](https://www.gnupg.org/documentation/manuals.html) for more information.
Then, you can verify the signature using:
`gpg --verify <-sdk-filename>.sig
## Orientation
The default value of `ASAPP.styles.allowedOrientations` is `.portraitLocked`, meaning the chat view controller will always render in portrait orientation. To allow landscape orientation on an iPad, set it to `.iPadLandscapeAllowed` instead. There is currently no landscape orientation option for iPhone.
## Strings
Please see the class reference for details on each member of `ASAPPStrings`.
# Deep Links and Web Links
Source: https://docs.asapp.com/messaging-platform/integrations/ios-sdk/deep-links-and-web-links
## Handle Deep Links in Chat
Certain chat flows may present buttons that are deep links to another part of your app. To react to taps on these buttons, implement the `ASAPPDelegate` protocol, including the `chatViewControlledDidTapDeepLink(name:data:)` method. Please ask your Implementation Manager if you have questions regarding deep link names and data.
## Handle Web Links in Chat
Certain chat flows may present buttons that are web links. To react to taps on these buttons, implement the `ASAPPDelegate` protocol, including the `chatViewControllerShouldHandleWebLink(url:)` method. Return true if the ASAPP SDK should open the link in an `SFSafariViewController`; return `false` if you'd like to handle it instead.
## Implement Deep Links into Chat
### Getting Started
Please see Apple's documentation on [Allowing Apps and Websites to Link to Your Content](https://developer.apple.com/documentation/xcode/allowing_apps_and_websites_to_link_to_your_content).
### Connect the Pieces
Once you have set up a custom URL scheme for your app, you can detect links pointing to ASAPP chat within `application(_:open:options:)`. Call one of the four provided methods to create an ASAPP chat view controller:
```json
ASAPP.createChatViewControllerForPushing(fromNotificationWith:)
ASAPP.createChatViewControllerForPresenting(fromNotificationWith:)
ASAPP.createChatViewControllerForPushing(withIntent:)
ASAPP.createChatViewControllerForPresenting(withIntent:)
```
# iOS Quick Start
Source: https://docs.asapp.com/messaging-platform/integrations/ios-sdk/ios-quick-start
If you want to start fast, follow these steps:
1. [Gather Required Information](#1-gather-required-information "1. Gather Required Information")
2. [Download the SDK](#2-download-the-sdk "2. Download the SDK")
3. [Install the SDK](#3-install-the-sdk "3. Install the SDK")
4. [Configure the SDK](#4-configure-the-sdk "4. Configure the SDK")
5. [Open Chat](#5-open-chat "5. Open Chat")
## 1. Gather Required Information
Before downloading and installing the SDK, please make sure you have the following information. Contact your Implementation Manager at ASAPP if you have any questions.
| App ID | Also known as the "Company Marker", assigned by ASAPP. |
| :------------------- | :------------------------------------------------------------------------------------------------------------------------------------------------------------------------------------------------------------------------------------- |
| API Host Name | The fully-qualified domain name used by the SDK to communicate with ASAPP's API. Provided by ASAPP and subject to change based on the stage of implementation. |
| Region Code | The ISO 3166-1 alpha-2 code for the region of the implementation, provided by ASAPP. |
| Supported Languages | Your app's supported languages, in order of preference, as an array of language tag strings. Strings can be in the format "\{ISO 639-1 Code}-\{ISO 3166-1 Code}" or "\{ISO 639-1 Code}", such as "en-us" or "en". Defaults to \["en"]. |
| Client Secret | This can be an empty or random string\* until otherwise notified by ASAPP. |
| User Identifier | A username or similar value used to identify and authenticate the customer, provided by the Customer Company. |
| Authentication Token | A password-equivalent value, which may or may not expire, used to authenticate the customer that is provided by the Customer Company. |
\* In the future, the ASAPP-provided client secret will be a string that authorizes the integrated SDK to call the ASAPP API in production. ASAPP recommends fetching this string from a server and storing it securely using Secure Storage; however, as it is one of many layers of security, you can hard-code the client secret.
## 2. Download the SDK
Download the iOS SDK from the [ASAPP iOS SDK releases page on GitHub](https://github.com/asappinc/chat-sdk-ios-release/releases).
## 3. Install the SDK
ASAPP provides the SDK as an `.xcframework` with and without bitcode in dynamic and static flavors. If in doubt, ASAPP recommends that you use the dynamic `.xcframework` with bitcode.
Add your chosen flavor of the framework to the "Frameworks, Libraries, and Embedded Content" section of your target's "General" settings.
### Include SDK Resources When Using the Static Framework
Add the provided `ASAPPResources.bundle` to your target's "Frameworks, Libraries, and Embedded Content" and then include it in your target's "Copy Bundle Resources" build phase.
The SDK allows a customer to take and upload photos, [unless these features are disabled through configuration](https://docs-sdk.asapp.com/api/chatsdk/ios/latest/Classes/ASAPP.html#/Permissions). Since iOS 10, Apple requires descriptions for why your app uses the photo library and/or camera, which will be displayed to the customer. If you haven't already, you'll need to add these descriptions to your app's `Info.plist`.
* If you access `Info.plist` via Xcode's plist editor, the description keys are "Privacy - Camera Usage Description" and "Privacy - Photo Library Usage Description".
* If you access `Info.plist` via a text editor, the keys are "NSPhotoLibraryUsageDescription" and "NSCameraUsageDescription".
### Validate iOS SDK Authenticity
ASAPP uses GPG (GNU Privacy Guard) for creating digital signatures. To install on macOS:
1. Using [Homebrew](https://brew.sh), install gpg:
`brew install gpg`
2. Download the [ASAPP SDK Team public key](https://docs-sdk.asapp.com/api/chatsdk/ios/security/asapp_public.gpg).
3. Add the key to GPG:
`gpg --import asapp_public.gpg`
Optionally, you can also validate the public key. Please refer to the [GPG documentation](https://www.gnupg.org/documentation/manuals.html) for more information.
Then, you can verify the signature using:
`gpg --verify <-sdk-filename>.sig  # iOS SDK Release Notes
Source: https://docs.asapp.com/messaging-platform/integrations/ios-sdk/ios-sdk-release-notes
The scrolling window below shows release notes for ASAPP's iOS SDK.
This content may also be viewed as a stand-alone webpage here: [https://docs-sdk.asapp.com/api/chatsdk/ios/releasenotes](https://docs-sdk.asapp.com/api/chatsdk/ios/releasenotes)
# Miscellaneous APIs
Source: https://docs.asapp.com/messaging-platform/integrations/ios-sdk/miscellaneous-apis
## Conversation Status
Call `ASAPP.getChatStatus(success:failure:)` to get the current conversation status. The first parameter of the success handler provides a count of unread messages, while the second indicates whether the chat is live. If `isLive` is true, it means the customer is currently connected to a live customer support agent, even if the user isn't currently on the chat screen or the application is in the background.
**Example:**
```json
ASAPP.getChatStatus(success: { unread, isLive in
DispatchQueue.main.async { [weak self] in
self?.updateBadge(count: unread, isLive: isLive)
}
}, failure: { error in
print("Could not get chat status: \(error)")
})
```
## Debug Logs
To allow the SDK to print more debugging information to the console, set `ASAPP.debugLogLevel` to.debug. Please see [`ASAPPLogLevel`](https://docs-sdk.asapp.com/api/chatsdk/ios/latest/Enums/ASAPPLogLevel.html) for more options and make sure to set the level to `.errors` or `.none` in release builds.
Example:
```json
#if DEBUG
ASAPP.debugLogLevel = .debug
#else
ASAPP.debugLogLevel = .none
#endif
```
## Clear the Persisted Session
To clear the session persisted on disk, call `ASAPP.clearSavedSession()`. This will also disable push notifications to the customer.
## Set an Intent
To open chat with an initial intent, call one of the two functions below, passing in a dictionary specifying the intent in a format provided by ASAPP. Please ask your Implementation Manager for details.
### Create a Chat View Controller with an Initial Intent
```json
let chat = ASAPP.createChatViewControllerForPushing(withIntent: [“Code”:
“EXAMPLE_INTENT”])
or
let chat = ASAPP.createChatViewControllerForPresenting(withIntent:
[“Code”: “EXAMPLE_INTENT”])
```
To set the intent while chat is already open, call `ASAPP.setIntent(_:)`, passing in a dictionary as described above. This should only be called if a chat view controller already exists.
## Handle Chat Events
Certain agreed-upon events may occur during chat. To react to these events, implement the `ASAPPDelegate` protocol, including the `chatViewControllerDidReceiveChatEvent(name:data:)` method. Please ask your Implementation Manager if you have questions regarding chat event names and data.
# Push Notifications
Source: https://docs.asapp.com/messaging-platform/integrations/ios-sdk/push-notifications
## Get Started with Push Notifications
Please see Apple's documentation on the [Apple Push Notification service](https://developer.apple.com/library/archive/documentation/NetworkingInternet/Conceptual/RemoteNotificationsPG/APNSOverview#//apple_ref/doc/uid/TP40008194-CH8-SW1) and the [User Notifications](https://developer.apple.com/documentation/usernotifications) framework.
## ASAPP Push Notifications
ASAPP's systems may trigger push notifications at certain times, such as when an agent sends a message to a customer who does not currently have the chat interface open. These push notifications are triggered by ASAPP's servers calling your company's API with data that identifies the recipient's device; ASAPP's servers do not communicate with APNs directly. Therefore, we provide methods in the SDK to register and deregister the customer's device for ASAPP push notifications.
For a deeper dive on how push notifications are handled between ASAPP and your company's API, please see our documentation on [Push Notifications and the Mobile SDKs](../push-notifications-and-the-mobile-sdks "Push Notifications and the Mobile SDKs").
### Enable Push Notifications
To enable push notifications for the current user when using the token provided by APNs in `didRegisterForRemoteNotificationsWithDeviceToken(_:)`, call `ASAPP.enablePushNotifications(with deviceToken: Data)`.
To enable push notifications using an arbitrary string that uniquely identifies the device and current user, call `ASAPP.enablePushNotifications(with uuid: String)`.
### Disable Push Notifications
To disable push notifications for the current user on the device, call `ASAPP.disablePushNotifications(failure:)`. The failure handler will be called in the event of an error. Make sure you call this function before you change or clear `ASAPP.user` to prevent the customer receiving push notifications that are not meant for them.
### Handle Push Notifications
Implement `application(_:didReceiveRemoteNotification:[fetchCompletionHandler:])` and pass the `userInfo` dictionary to `ASAPP.canHandleNotification(with:)` to determine if the push notification was triggered by ASAPP. If the function returns `true`, you can then pass `userInfo` to: `ASAPP.createChatViewControllerForPushing(fromNotificationWith:)`.
# iOS SDK Release Notes
Source: https://docs.asapp.com/messaging-platform/integrations/ios-sdk/ios-sdk-release-notes
The scrolling window below shows release notes for ASAPP's iOS SDK.
This content may also be viewed as a stand-alone webpage here: [https://docs-sdk.asapp.com/api/chatsdk/ios/releasenotes](https://docs-sdk.asapp.com/api/chatsdk/ios/releasenotes)
# Miscellaneous APIs
Source: https://docs.asapp.com/messaging-platform/integrations/ios-sdk/miscellaneous-apis
## Conversation Status
Call `ASAPP.getChatStatus(success:failure:)` to get the current conversation status. The first parameter of the success handler provides a count of unread messages, while the second indicates whether the chat is live. If `isLive` is true, it means the customer is currently connected to a live customer support agent, even if the user isn't currently on the chat screen or the application is in the background.
**Example:**
```json
ASAPP.getChatStatus(success: { unread, isLive in
DispatchQueue.main.async { [weak self] in
self?.updateBadge(count: unread, isLive: isLive)
}
}, failure: { error in
print("Could not get chat status: \(error)")
})
```
## Debug Logs
To allow the SDK to print more debugging information to the console, set `ASAPP.debugLogLevel` to.debug. Please see [`ASAPPLogLevel`](https://docs-sdk.asapp.com/api/chatsdk/ios/latest/Enums/ASAPPLogLevel.html) for more options and make sure to set the level to `.errors` or `.none` in release builds.
Example:
```json
#if DEBUG
ASAPP.debugLogLevel = .debug
#else
ASAPP.debugLogLevel = .none
#endif
```
## Clear the Persisted Session
To clear the session persisted on disk, call `ASAPP.clearSavedSession()`. This will also disable push notifications to the customer.
## Set an Intent
To open chat with an initial intent, call one of the two functions below, passing in a dictionary specifying the intent in a format provided by ASAPP. Please ask your Implementation Manager for details.
### Create a Chat View Controller with an Initial Intent
```json
let chat = ASAPP.createChatViewControllerForPushing(withIntent: [“Code”:
“EXAMPLE_INTENT”])
or
let chat = ASAPP.createChatViewControllerForPresenting(withIntent:
[“Code”: “EXAMPLE_INTENT”])
```
To set the intent while chat is already open, call `ASAPP.setIntent(_:)`, passing in a dictionary as described above. This should only be called if a chat view controller already exists.
## Handle Chat Events
Certain agreed-upon events may occur during chat. To react to these events, implement the `ASAPPDelegate` protocol, including the `chatViewControllerDidReceiveChatEvent(name:data:)` method. Please ask your Implementation Manager if you have questions regarding chat event names and data.
# Push Notifications
Source: https://docs.asapp.com/messaging-platform/integrations/ios-sdk/push-notifications
## Get Started with Push Notifications
Please see Apple's documentation on the [Apple Push Notification service](https://developer.apple.com/library/archive/documentation/NetworkingInternet/Conceptual/RemoteNotificationsPG/APNSOverview#//apple_ref/doc/uid/TP40008194-CH8-SW1) and the [User Notifications](https://developer.apple.com/documentation/usernotifications) framework.
## ASAPP Push Notifications
ASAPP's systems may trigger push notifications at certain times, such as when an agent sends a message to a customer who does not currently have the chat interface open. These push notifications are triggered by ASAPP's servers calling your company's API with data that identifies the recipient's device; ASAPP's servers do not communicate with APNs directly. Therefore, we provide methods in the SDK to register and deregister the customer's device for ASAPP push notifications.
For a deeper dive on how push notifications are handled between ASAPP and your company's API, please see our documentation on [Push Notifications and the Mobile SDKs](../push-notifications-and-the-mobile-sdks "Push Notifications and the Mobile SDKs").
### Enable Push Notifications
To enable push notifications for the current user when using the token provided by APNs in `didRegisterForRemoteNotificationsWithDeviceToken(_:)`, call `ASAPP.enablePushNotifications(with deviceToken: Data)`.
To enable push notifications using an arbitrary string that uniquely identifies the device and current user, call `ASAPP.enablePushNotifications(with uuid: String)`.
### Disable Push Notifications
To disable push notifications for the current user on the device, call `ASAPP.disablePushNotifications(failure:)`. The failure handler will be called in the event of an error. Make sure you call this function before you change or clear `ASAPP.user` to prevent the customer receiving push notifications that are not meant for them.
### Handle Push Notifications
Implement `application(_:didReceiveRemoteNotification:[fetchCompletionHandler:])` and pass the `userInfo` dictionary to `ASAPP.canHandleNotification(with:)` to determine if the push notification was triggered by ASAPP. If the function returns `true`, you can then pass `userInfo` to: `ASAPP.createChatViewControllerForPushing(fromNotificationWith:)`.
 If the customer then taps on the **Sign In** button, the SDK will call a delegate method: `chatViewControllerDidTapUserLoginButton()`. Please implement this method and set `ASAPP.user` once the customer has logged in. The SDK will detect the change and then authenticate the user. You may set `ASAPP.user` in any thread. Make sure to set the delegate as well: for example, `ASAPP.delegate = self`. See `ASAPPDelegate` for more details.
## Token Expiration and Refresh the Context
In the event that the provided token has expired, the SDK will call the request context provider with an argument that is true, indicating that you must refresh the context. In that case, please make sure to return a dictionary with fresh credentials that the SDK can use to authenticate the user. If the SDK requires an API call to refresh the credentials, please make sure to block the calling thread until you can return the updated context.
# Push Notifications and the Mobile SDKs
Source: https://docs.asapp.com/messaging-platform/integrations/push-notifications-and-the-mobile-sdks
## Use Cases
In ASAPP Chat, users can receive Push Notifications (a.k.a. ASAPP background messages) for the following reasons:
* **New live messages**: if a customer is talking to a live agent and leaves the chat interface, new messages can be delivered via Push Notifications.
* **Proactive messages**: used to notify customers about promotions, reminders, or other relevant information, depending on the requirements of the implementation.
If you are looking for a way to get the most recent Conversation Status, please see the [Android](/messaging-platform/integrations/android-sdk/miscellaneous-apis "Miscellaneous APIs") or [iOS](/messaging-platform/integrations/ios-sdk/miscellaneous-apis "Miscellaneous APIs") documentation.
## Overall Architecture
### Overview 1 - Device Token Registration
If the customer then taps on the **Sign In** button, the SDK will call a delegate method: `chatViewControllerDidTapUserLoginButton()`. Please implement this method and set `ASAPP.user` once the customer has logged in. The SDK will detect the change and then authenticate the user. You may set `ASAPP.user` in any thread. Make sure to set the delegate as well: for example, `ASAPP.delegate = self`. See `ASAPPDelegate` for more details.
## Token Expiration and Refresh the Context
In the event that the provided token has expired, the SDK will call the request context provider with an argument that is true, indicating that you must refresh the context. In that case, please make sure to return a dictionary with fresh credentials that the SDK can use to authenticate the user. If the SDK requires an API call to refresh the credentials, please make sure to block the calling thread until you can return the updated context.
# Push Notifications and the Mobile SDKs
Source: https://docs.asapp.com/messaging-platform/integrations/push-notifications-and-the-mobile-sdks
## Use Cases
In ASAPP Chat, users can receive Push Notifications (a.k.a. ASAPP background messages) for the following reasons:
* **New live messages**: if a customer is talking to a live agent and leaves the chat interface, new messages can be delivered via Push Notifications.
* **Proactive messages**: used to notify customers about promotions, reminders, or other relevant information, depending on the requirements of the implementation.
If you are looking for a way to get the most recent Conversation Status, please see the [Android](/messaging-platform/integrations/android-sdk/miscellaneous-apis "Miscellaneous APIs") or [iOS](/messaging-platform/integrations/ios-sdk/miscellaneous-apis "Miscellaneous APIs") documentation.
## Overall Architecture
### Overview 1 - Device Token Registration
 Figure 1: Push Notification Overview 1 - Device Token Registration.
### Overview 2 - Sending Push Notifications
Figure 1: Push Notification Overview 1 - Device Token Registration.
### Overview 2 - Sending Push Notifications
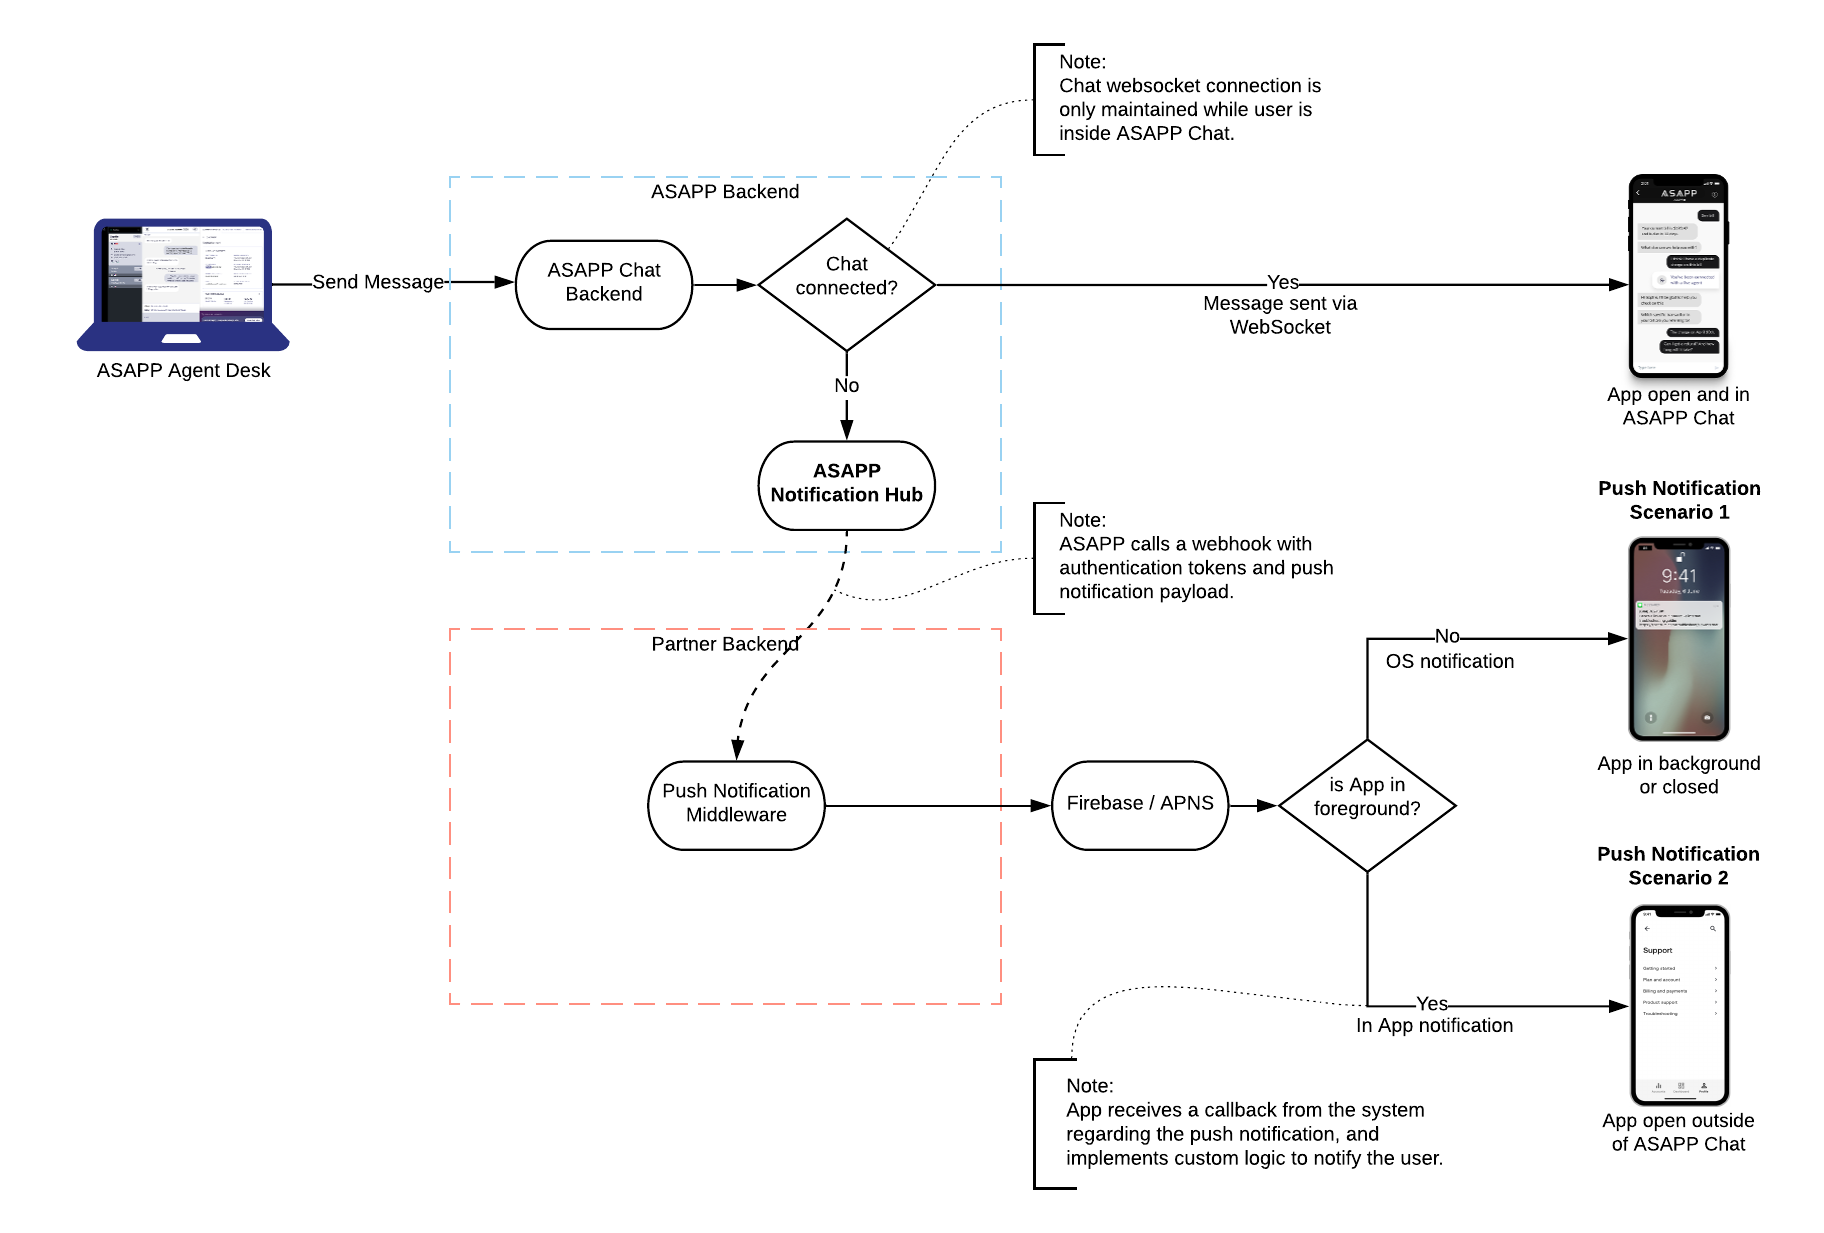 Figure 2: Push Notification Overview 2 - Sending Push Notifications
## Device Token
After the Customer App (Figure 1) acquires the Device Token, it is then responsible to register it to the ASAPP SDK. ASAPP's servers use this token to send push notification requests to a Customer-provided API endpoint (Customer Backend), which in turn sends requests to Firebase and/or APNs.
The ASAPP SDK and servers act as the middle-man with regards to the Device Token. In general, the Device Token must be a string that uniquely identifies the device that is defined and generated by the customer.
The Device Token format and content can be customized to include the necessary information for the Customer's Backend service to send the push notifications. As an example, the Device Token can be a base64-encoded JSON Web Token (JWT) that contains the end user information required by the Customer's Backend service.
ASAPP does not need to understand the content of the Device Token; however, the Device Token is persisted within the ASAPP Push Notification system.
This section describes the following:
* [Process Overview](#process-overview)
* [Resource Overview](#resource-overview)
* [Definitions](#definitions "Definitions")
## Process Overview
This is a high-level overview of the User Management setup process.
1. ASAPP demos the Desk/Admin Interface.
2. Call with ASAPP to confirm the access and permission requirements. ASAPP and you complete a Configuration spreadsheet defining all the Roles & Permissions.
3. ASAPP sends you a copy of the Configuration spreadsheet for review and approval. ASAPP will make additional changes if needed and send to you for approval.
4. ASAPP implements and tests the configuration.
5. ASAPP trains you to set up and modify User Management.
6. ASAPP goes live with your new Customer Interaction system.
## Resource Overview
The following table lists and defines all resources:
Figure 2: Push Notification Overview 2 - Sending Push Notifications
## Device Token
After the Customer App (Figure 1) acquires the Device Token, it is then responsible to register it to the ASAPP SDK. ASAPP's servers use this token to send push notification requests to a Customer-provided API endpoint (Customer Backend), which in turn sends requests to Firebase and/or APNs.
The ASAPP SDK and servers act as the middle-man with regards to the Device Token. In general, the Device Token must be a string that uniquely identifies the device that is defined and generated by the customer.
The Device Token format and content can be customized to include the necessary information for the Customer's Backend service to send the push notifications. As an example, the Device Token can be a base64-encoded JSON Web Token (JWT) that contains the end user information required by the Customer's Backend service.
ASAPP does not need to understand the content of the Device Token; however, the Device Token is persisted within the ASAPP Push Notification system.
This section describes the following:
* [Process Overview](#process-overview)
* [Resource Overview](#resource-overview)
* [Definitions](#definitions "Definitions")
## Process Overview
This is a high-level overview of the User Management setup process.
1. ASAPP demos the Desk/Admin Interface.
2. Call with ASAPP to confirm the access and permission requirements. ASAPP and you complete a Configuration spreadsheet defining all the Roles & Permissions.
3. ASAPP sends you a copy of the Configuration spreadsheet for review and approval. ASAPP will make additional changes if needed and send to you for approval.
4. ASAPP implements and tests the configuration.
5. ASAPP trains you to set up and modify User Management.
6. ASAPP goes live with your new Customer Interaction system.
## Resource Overview
The following table lists and defines all resources:
Feature |
Overview |
Resource |
Definition |
|---|---|---|---|
Agent Desk |
The App where Agents communicate with customers. |
Authorization |
Allows you to successfully authenticate via Single Sign-On (SSO) into the ASAPP Agent Desk. |
Go to Desk |
Allows you to click Go to Desk from the Nav to open Agent Desk in a new tab. Requires Agent Desk access. |
||
Default Concurrency |
The default value for the maximum number of chats a newly added agent can handle at the same time. |
Default Concurrency |
Sets the default concurrency of all new users with access to Agent Desk if no concurrency was set via the ingest method. |
Admin Dashboard |
The App where you can monitor agent activity in real-time, view agent metrics, and take operational actions (e.g. biz hours adjustments) |
Authorization |
Allows you to successfully authenticate via SSO into the ASAPP Admin Dashboard. |
Live Insights |
Dashboard in Admin that displays how each of your queues are performing in real-time. You can drill down into each queue to gain insight into what areas need attention. |
Access |
Allows you to see Live Insights in the Admin navigation and access it. |
Data Security |
Limits the agent-level data that certain users can see in Live Insights. If a user is not allowed to see data for any agents who belong to a given queue, that queue will not be visible to that user in Live Insights. |
||
Historical Reporting |
Dashboard in Admin where you can find data and insights from customer experience and automation all the way to agent performance and workforce management. |
Power Analyst Access |
Allows you to see the Historical Reporting page in the Admin Navigation with Power Analyst access type, which entails the following:
|
Creator Access |
Allows you to see the Historical Reporting page in the Admin Navigation with Creator access type, which entails the following:
|
||
Reporting Groups |
Out-of-the-box groups are:
If a client has data security enabled for Historical Reporting, policies need to be written to add users to the following 3 groups:
If you have any Creator users, you may want custom groups created. This can be achieved by writing a policy to create reporting groups based on a specific user attribute (i.e. I need reporting groups per queue, where queue is the attribute). |
||
Data Security |
Limits the agent-level data that certain users can see in Historical Reporting. If anyone has these policies, then the Core, Contact Center, and All Reports groups should be enabled. |
||
Business Hours |
Allows Admin users to set their business hours of operation and holidays on a per queue basis. |
Access |
Allows you to see Business Hours in the Admin navigation, access it, and make changes. |
Triggers |
An ASAPP feature that allows you to specify which pages display the ASAPP Chat UI. You can show the ASAPP Chat UI on all pages with the ASAPP Chat SDK embedded and loaded, or on just a subset of those pages. |
Access |
Allows you to see Triggers in the Admin navigation, access it, and make changes. |
Knowledge Base |
An ASAPP feature that helps Agents access information without the needing to navigate any external systems by surfacing KB content directly within Agent Desk. |
Access |
Allows you to see Knowledge Base content in the Admin navigation, access it, and make changes. |
Conversation Manager |
Admin Feature where you can monitor current conversations individually in the Conversation Manager. The Conversation Manager shows all current, queued, and historical conversations handled by SRS, bot, or by a live agent. |
Access |
Allows you to see Conversation Manager in the Admin navigation and access it. |
Conversation Download |
Allows you to select 1 or more conversations in Conversation Manager to export to either an HTML or CSV file. |
||
Whisper |
Allows you to send an inline, private message to an agent within a currently live chat, selected from the Conversation Manager. |
||
SRS Issues |
Allows you to see conversations only handled by SRS in the Conversation Manager. |
||
Data Security |
Limits the agent-assisted conversations that certain users can see at the agent-level in the Conversation Manager. |
||
User Management |
Admin Feature to edit user roles and permissions. |
Access |
Allows you to see User Management in their Admin navigation, access it, and make changes to queue membership, status, and concurrency per user. |
Editable Roles |
Allows you to change the role(s) of a user in User Management. |
||
Editable Custom Attributes |
Allows you to change the value of a custom user attribute per user in User Management. If Off, then these custom attributes will be read-only in the list of users. |
||
Data Security |
Limits the users that certain users can see or edit in User Management. |
Role |
Definition |
|---|---|
Resource |
The ASAPP functionality that you can permission in a certain way. ASAPP determines Resources when features are built. |
Action |
Describes the possible privileges a user can have on a given resource. (i.e. View Only vs. Edit) |
Permission |
Action + Resource. ex. "can view Live Insights" |
Target |
The user or a set of users who are given a permission. |
User Attribute |
A describing attribute for a client user. User Attributes are either sent to ASAPP via accepted method by the client, or ASAPP Native. |
ASAPP Native User Attribute |
A user attribute that exists within the ASAPP platform without the client needing to send it. Currently:
|
Custom User Attribute |
An attribute specific to the client's organization that is sent to ASAPP. |
Clarifier |
An additional and optional layer of restriction in a policy. Must be defined by a user attribute that already exists in the system. |
Policy |
An individual rule that assigns a permission to a user or set of users. The structure is generally: Target + Permission (opt. + Clarifier) = Target + Action + Resource (opt. + Clarifier) |
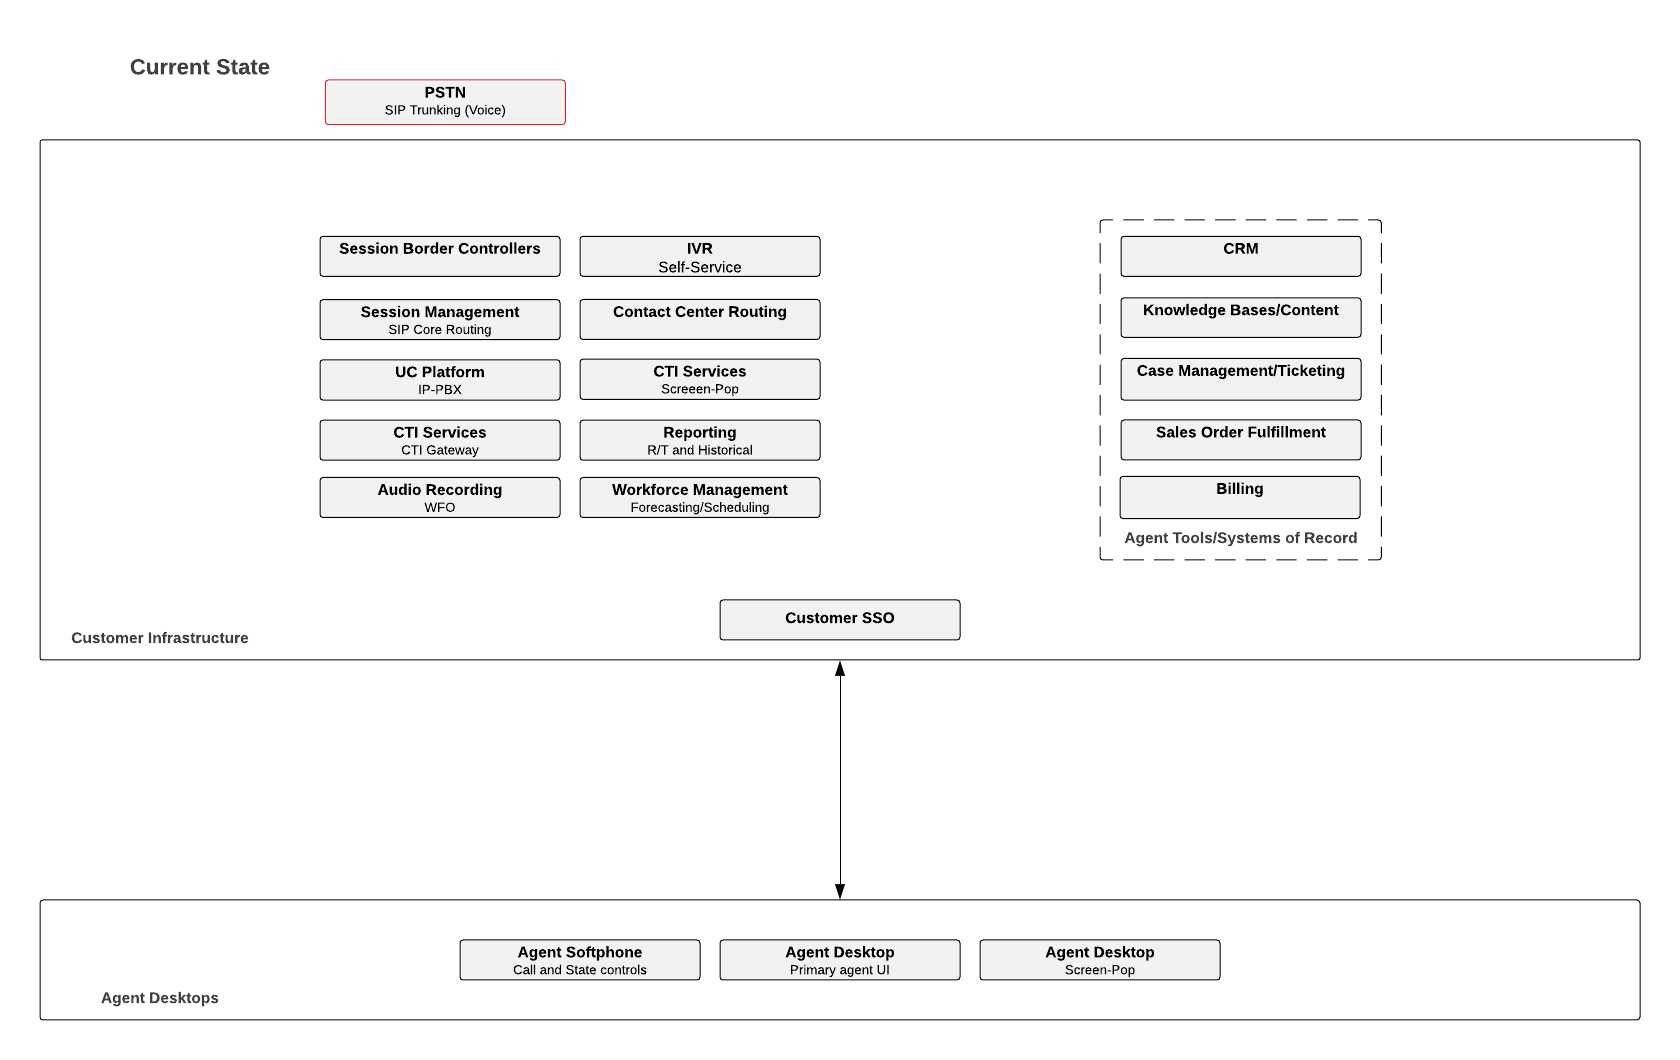 ## Solution Architecture
After the discovery of the customer's current state is complete, ASAPP completes the architecture definition, including integration points into the existing infrastructure. You can deploy the ASAPP [media gateways and media gateway proxies](#glossary "Glossary") within your existing AWS instance or within ASAPP's, providing additional flexibility and control.
## Solution Architecture
After the discovery of the customer's current state is complete, ASAPP completes the architecture definition, including integration points into the existing infrastructure. You can deploy the ASAPP [media gateways and media gateway proxies](#glossary "Glossary") within your existing AWS instance or within ASAPP's, providing additional flexibility and control.

 ### Network Connectivity
ASAPP will determine the network connectivity between your infrastructure and the ASAPP AWS Virtual Private Cloud (VPC) based on the architecture, however, there will be secure connections deployed between your data centers and the ASAPP VPC.
### Network Connectivity
ASAPP will determine the network connectivity between your infrastructure and the ASAPP AWS Virtual Private Cloud (VPC) based on the architecture, however, there will be secure connections deployed between your data centers and the ASAPP VPC.
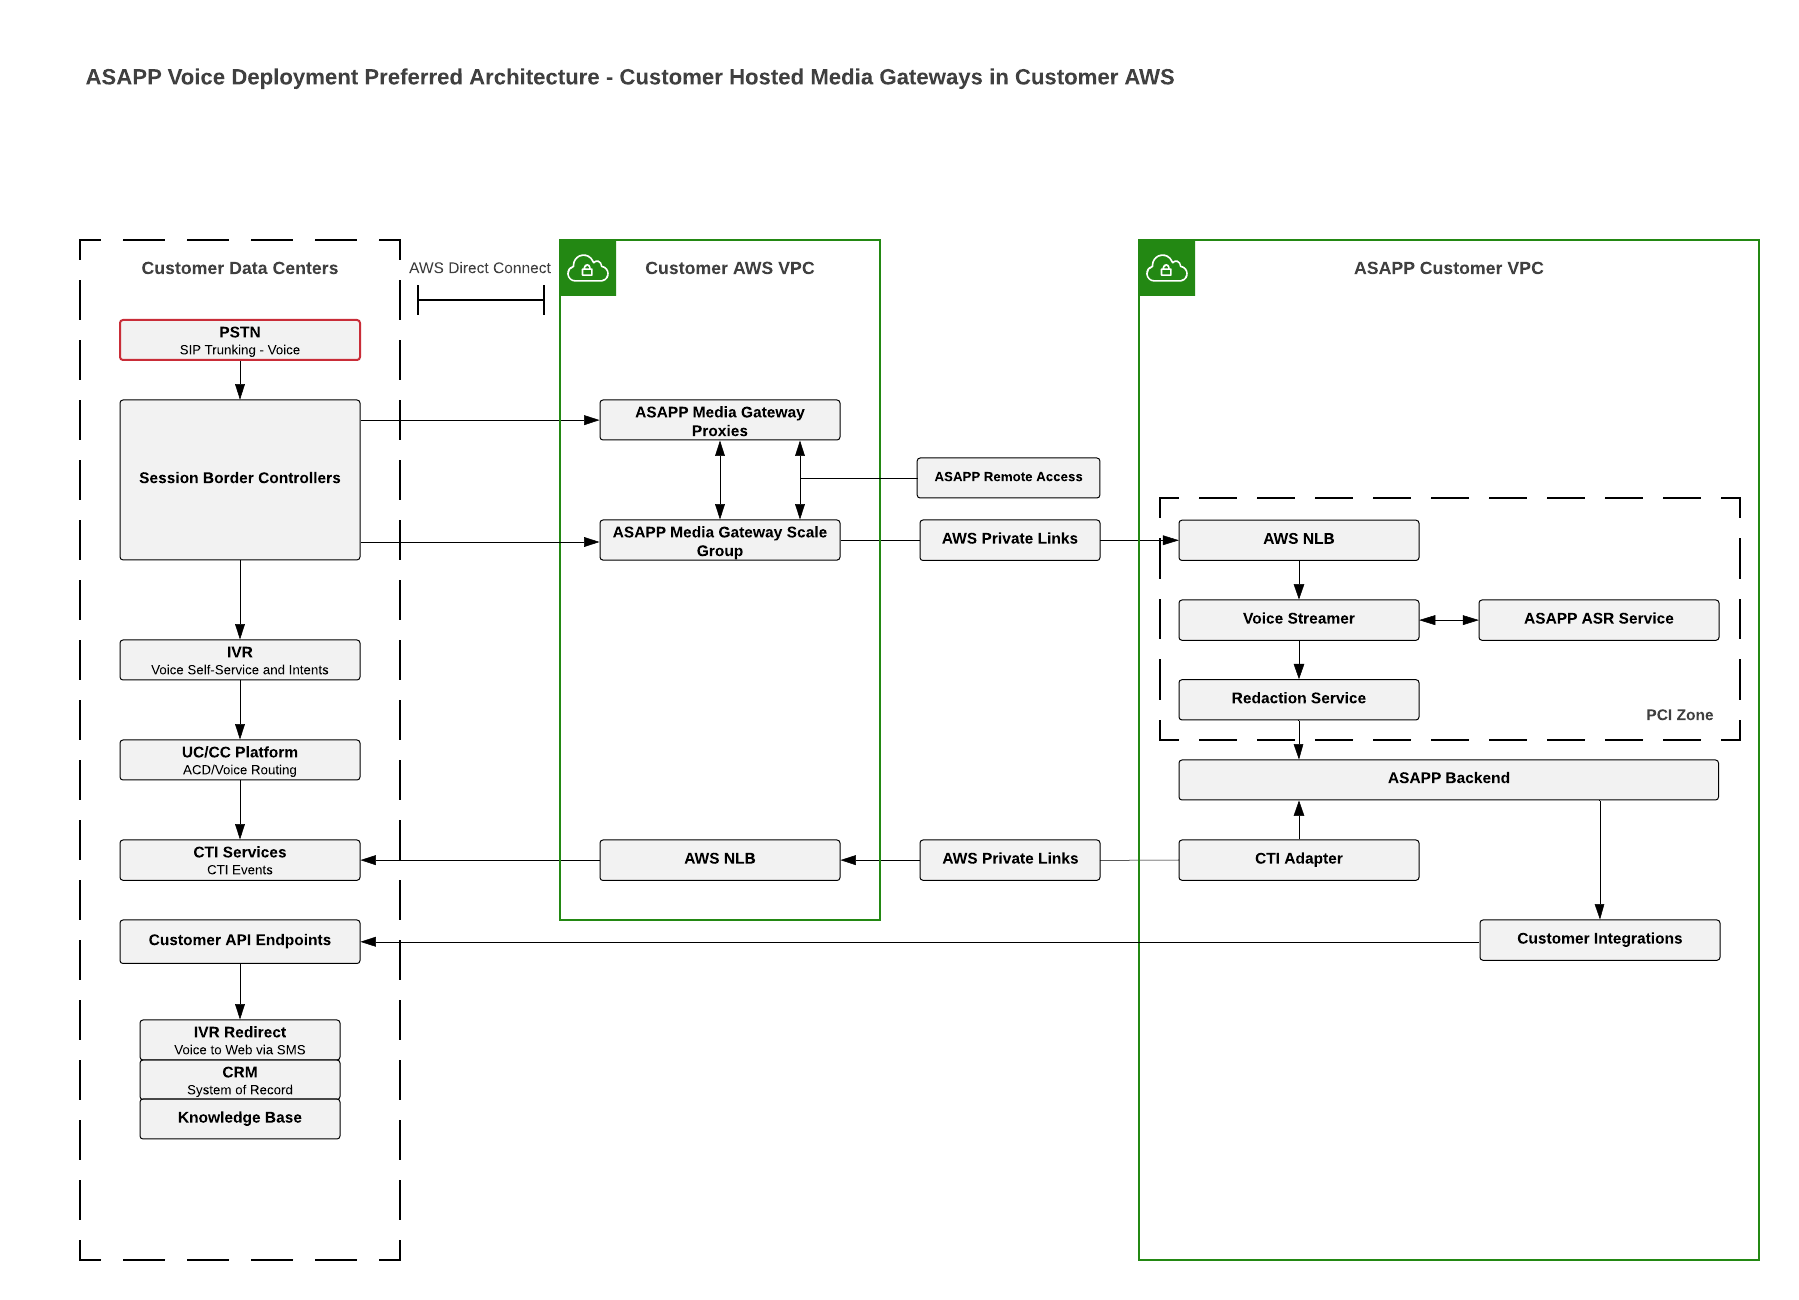
 ### Port Details
You can see ports and protocols in use for the Voice implementation depicted in the following diagram. These definitions provide visibility to your security teams for the provisioning of firewalls and ACL's.
* SIP/SIPREC - TCP (5060, 5070-5072)
* SBC to Media Gateway Proxies
* SBC to Media Gateway/s
* Audio Streams - UDP \
### Port Details
You can see ports and protocols in use for the Voice implementation depicted in the following diagram. These definitions provide visibility to your security teams for the provisioning of firewalls and ACL's.
* SIP/SIPREC - TCP (5060, 5070-5072)
* SBC to Media Gateway Proxies
* SBC to Media Gateway/s
* Audio Streams - UDP \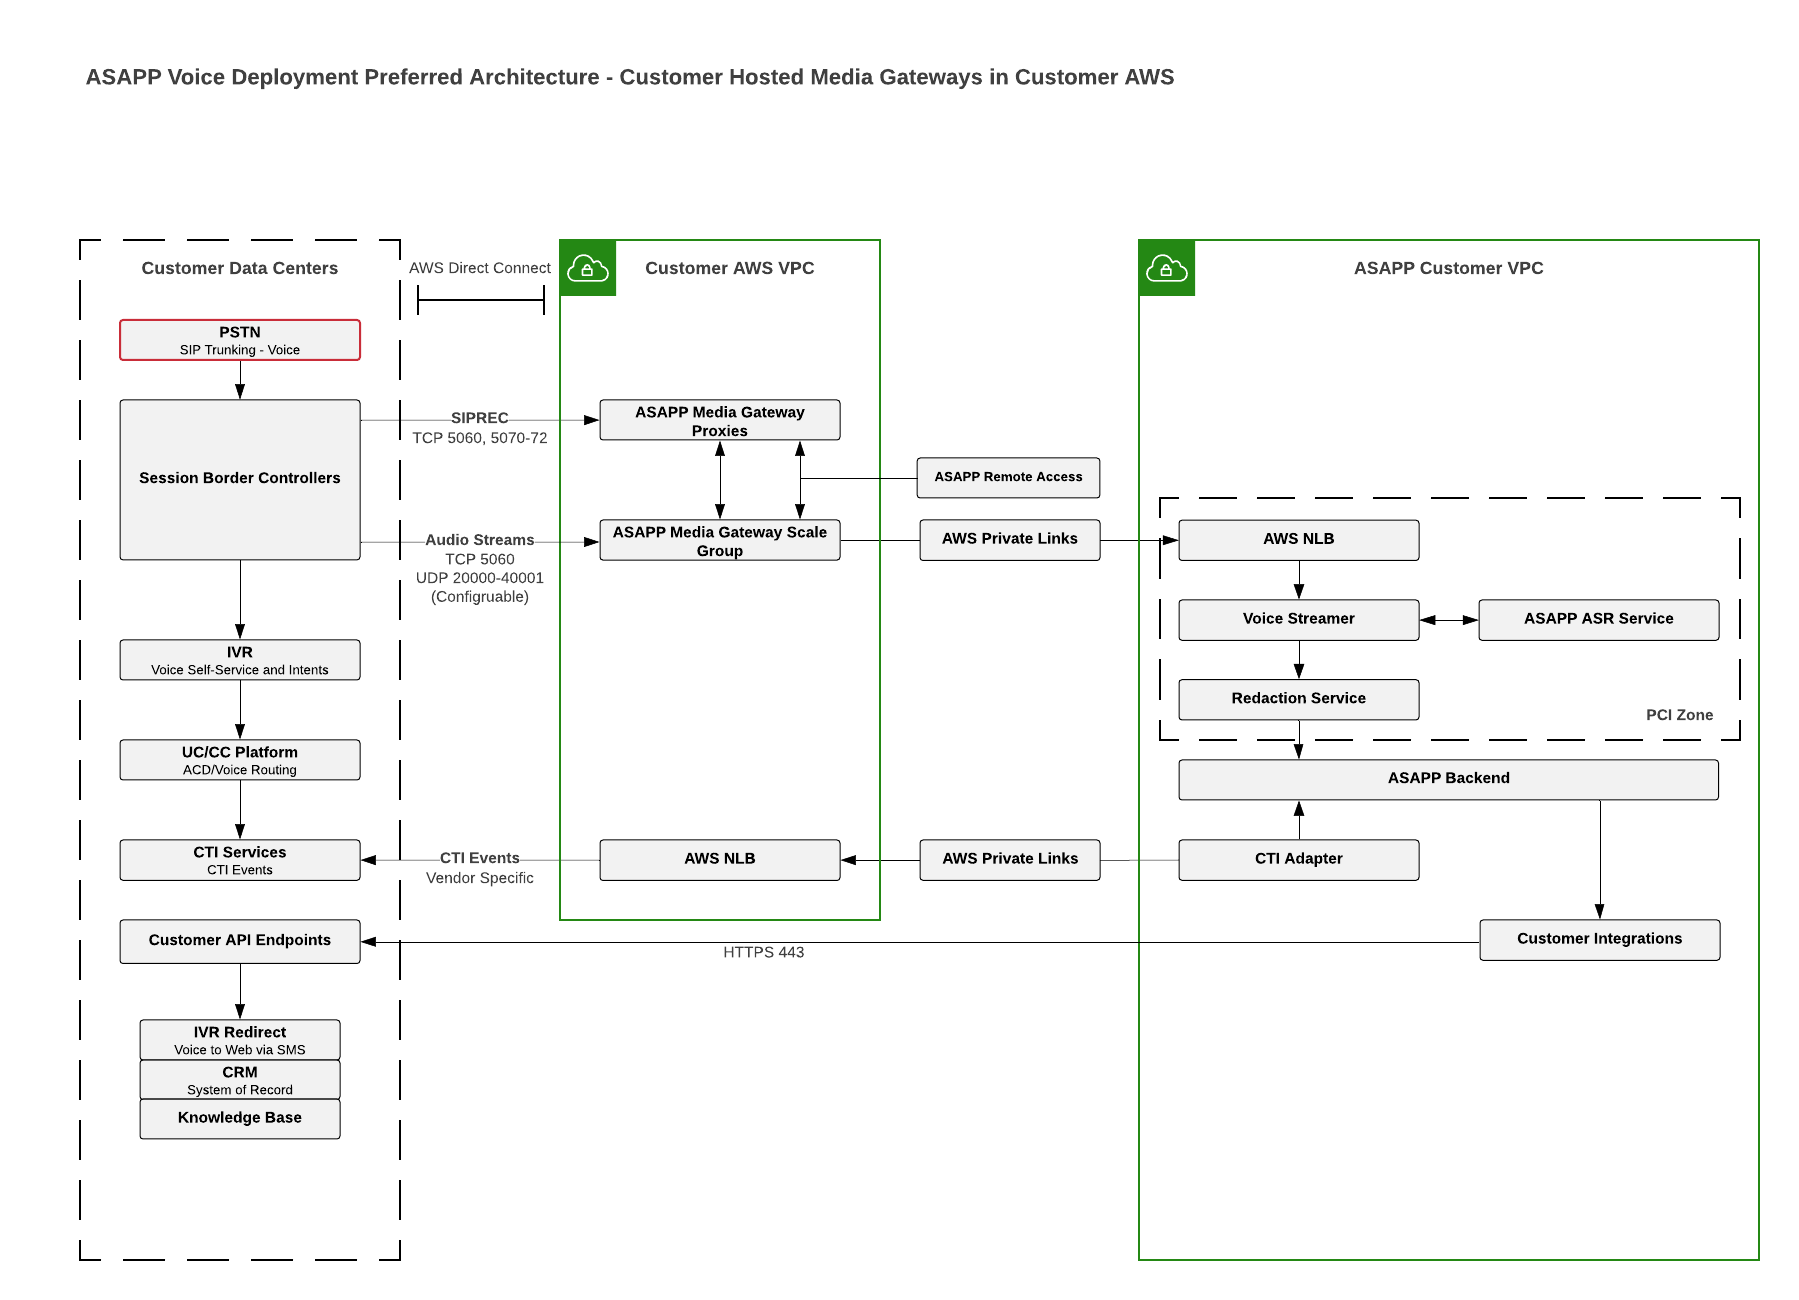
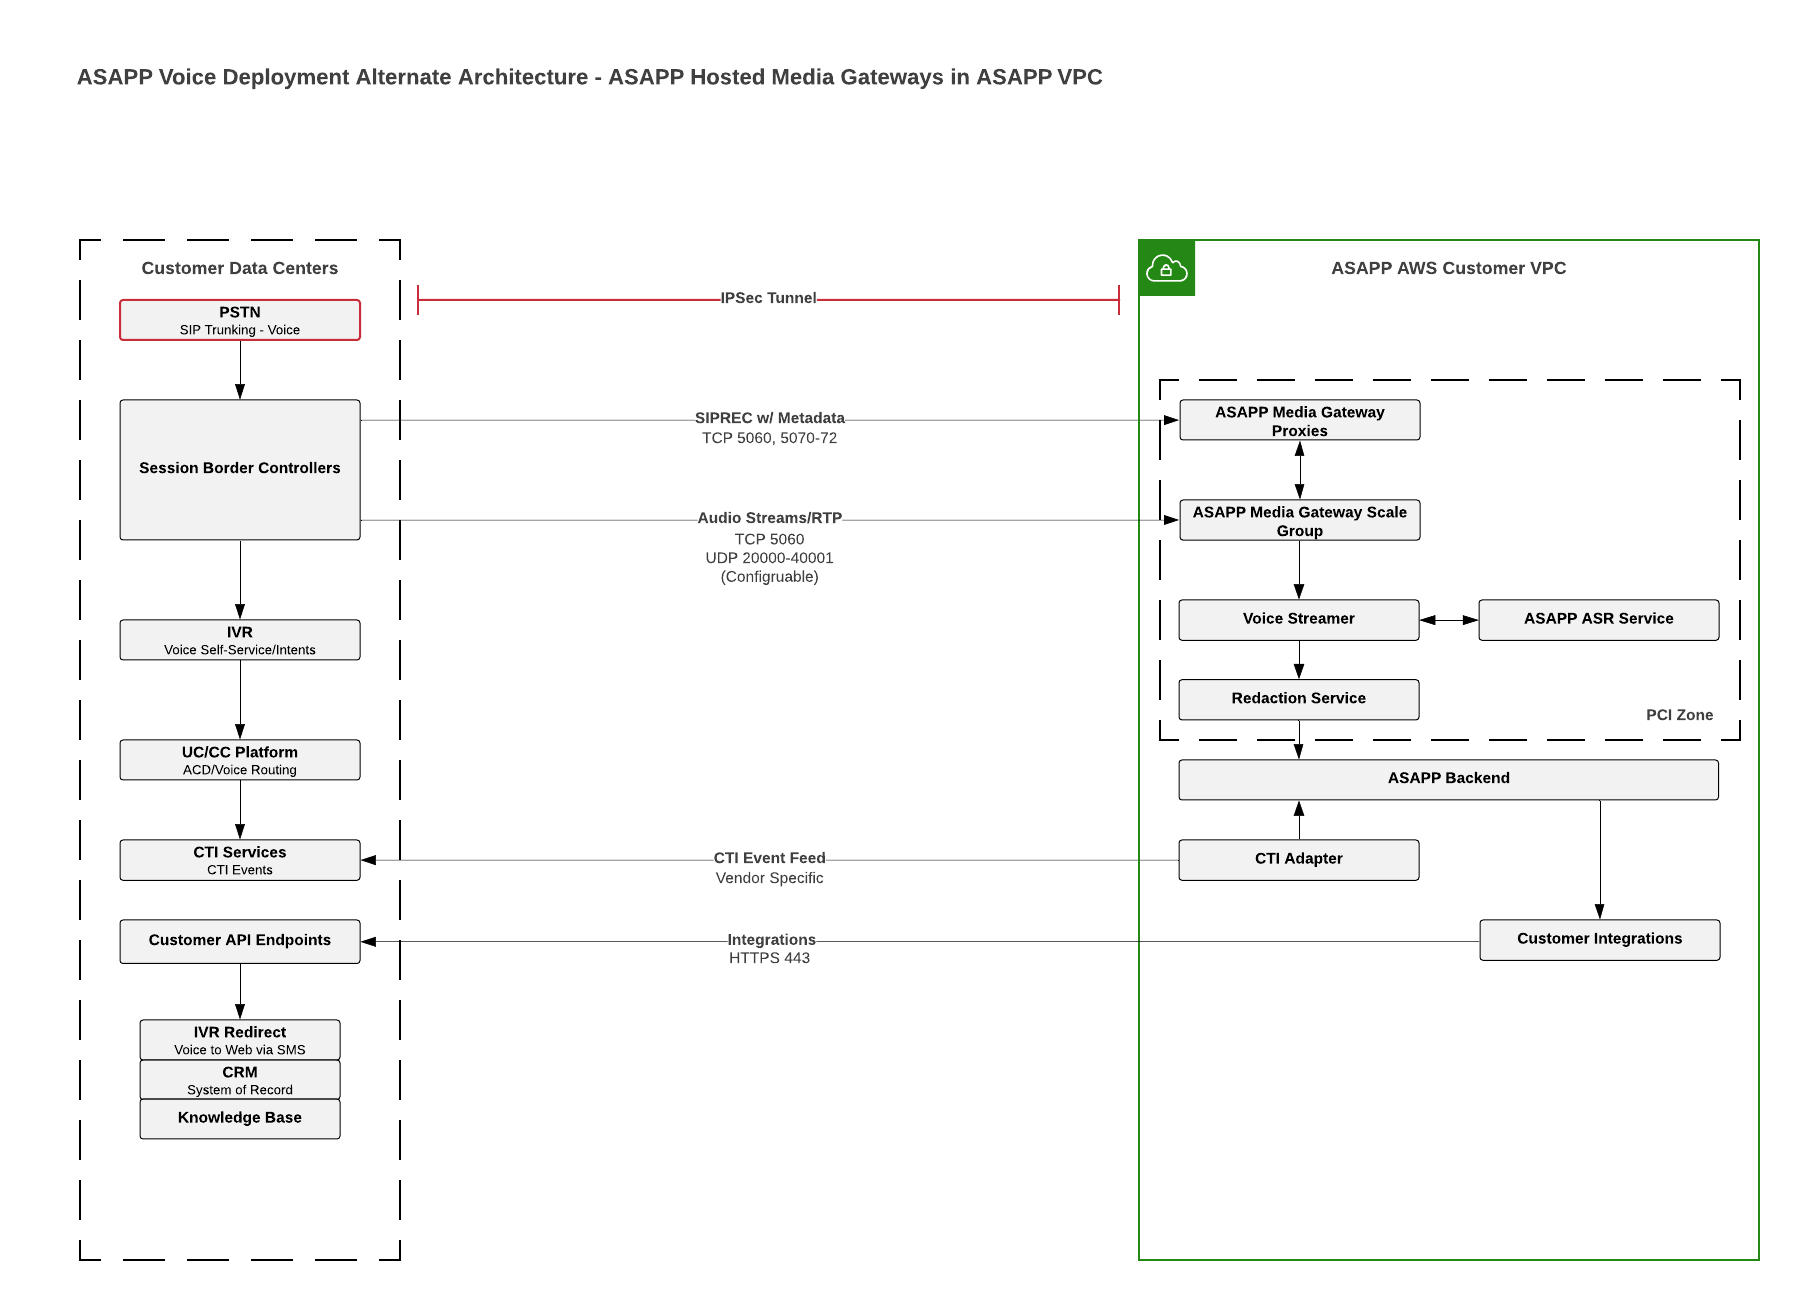 ### Data Flow
The Voice Agent Desk Data Flow diagram illustrates the [PCI Zone](#glossary "Glossary") within the ASAPP solution. The customer SBC originates the SIPREC sessions and the media streams and sends them to ASAPP media gateways, which repackage the streams into secure WebSockets and sends them to the [Voice Streamer](#glossary "Glossary") within the PCI zone. ASAPP encrypts the data in transit and at rest.
The SBC does not typically encrypt the SIPREC sessions and associated media streams from the SBC to the ASAPP media gateways, but usually encapsulates them within a secure connection. You are responsible for the compliance/security of the network path between the SBC and the media gateways, in accordance with applicable customer policies.
### Data Flow
The Voice Agent Desk Data Flow diagram illustrates the [PCI Zone](#glossary "Glossary") within the ASAPP solution. The customer SBC originates the SIPREC sessions and the media streams and sends them to ASAPP media gateways, which repackage the streams into secure WebSockets and sends them to the [Voice Streamer](#glossary "Glossary") within the PCI zone. ASAPP encrypts the data in transit and at rest.
The SBC does not typically encrypt the SIPREC sessions and associated media streams from the SBC to the ASAPP media gateways, but usually encapsulates them within a secure connection. You are responsible for the compliance/security of the network path between the SBC and the media gateways, in accordance with applicable customer policies.
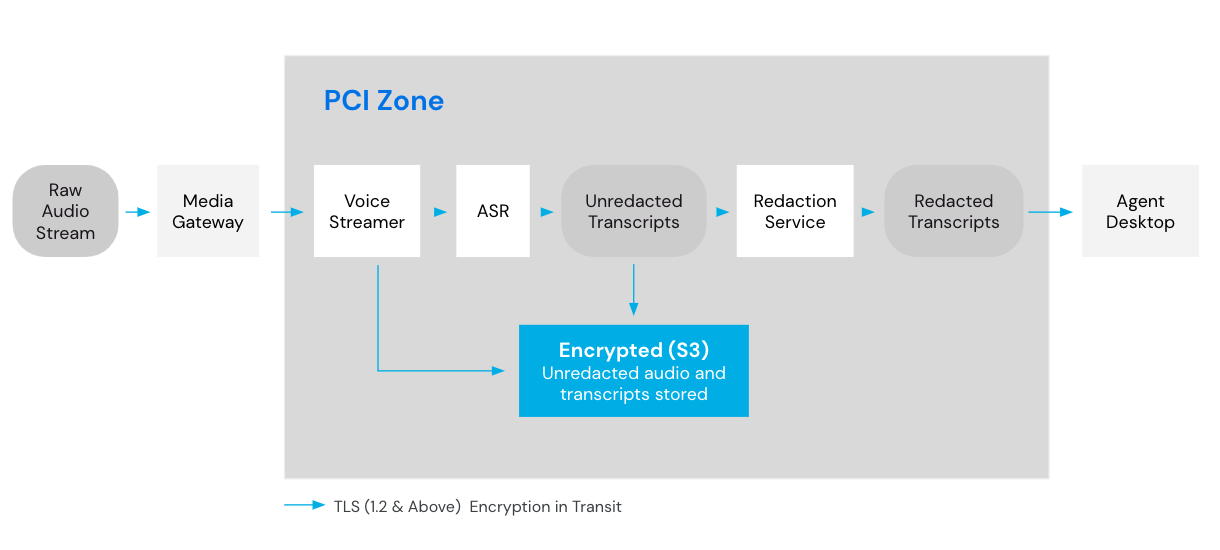 ## SIPREC and CTI Correlation and Association
In order to be able to associate the correct audio stream and the correct agent and agent desktop, ASAPP must associate the audio session and the CTI events of the particular agent.
ASAPP assigns voice agents a unique Agent ID and adds it to the SSO profile as a custom attribute. ASAPP will then map this to the Agent ID within ASAPP.
You configure the SBCs to set a unique call identifier, such as [UCID](#glossary "Glossary") (Avaya) or [GUID](#glossary "Glossary")/GUCID (Cisco), etc. on inbound calls, which provides ASAPP the means to correlate the individual SIPREC stream with the CTI events of the correct agent.
The SBCs will initiate a SIPREC session INVITE for each new call. With SIPREC, the customer SBC and the ASAPP media gateway negotiate the media attributes via the [SDP](#glossary "Glossary") offer/answer exchange during the establishment of the session. The codec/s in use today are:
1. G.711
2. G.729
Traffic and load considerations:
* Total number of voice agents using ASAPP -\
## SIPREC and CTI Correlation and Association
In order to be able to associate the correct audio stream and the correct agent and agent desktop, ASAPP must associate the audio session and the CTI events of the particular agent.
ASAPP assigns voice agents a unique Agent ID and adds it to the SSO profile as a custom attribute. ASAPP will then map this to the Agent ID within ASAPP.
You configure the SBCs to set a unique call identifier, such as [UCID](#glossary "Glossary") (Avaya) or [GUID](#glossary "Glossary")/GUCID (Cisco), etc. on inbound calls, which provides ASAPP the means to correlate the individual SIPREC stream with the CTI events of the correct agent.
The SBCs will initiate a SIPREC session INVITE for each new call. With SIPREC, the customer SBC and the ASAPP media gateway negotiate the media attributes via the [SDP](#glossary "Glossary") offer/answer exchange during the establishment of the session. The codec/s in use today are:
1. G.711
2. G.729
Traffic and load considerations:
* Total number of voice agents using ASAPP -\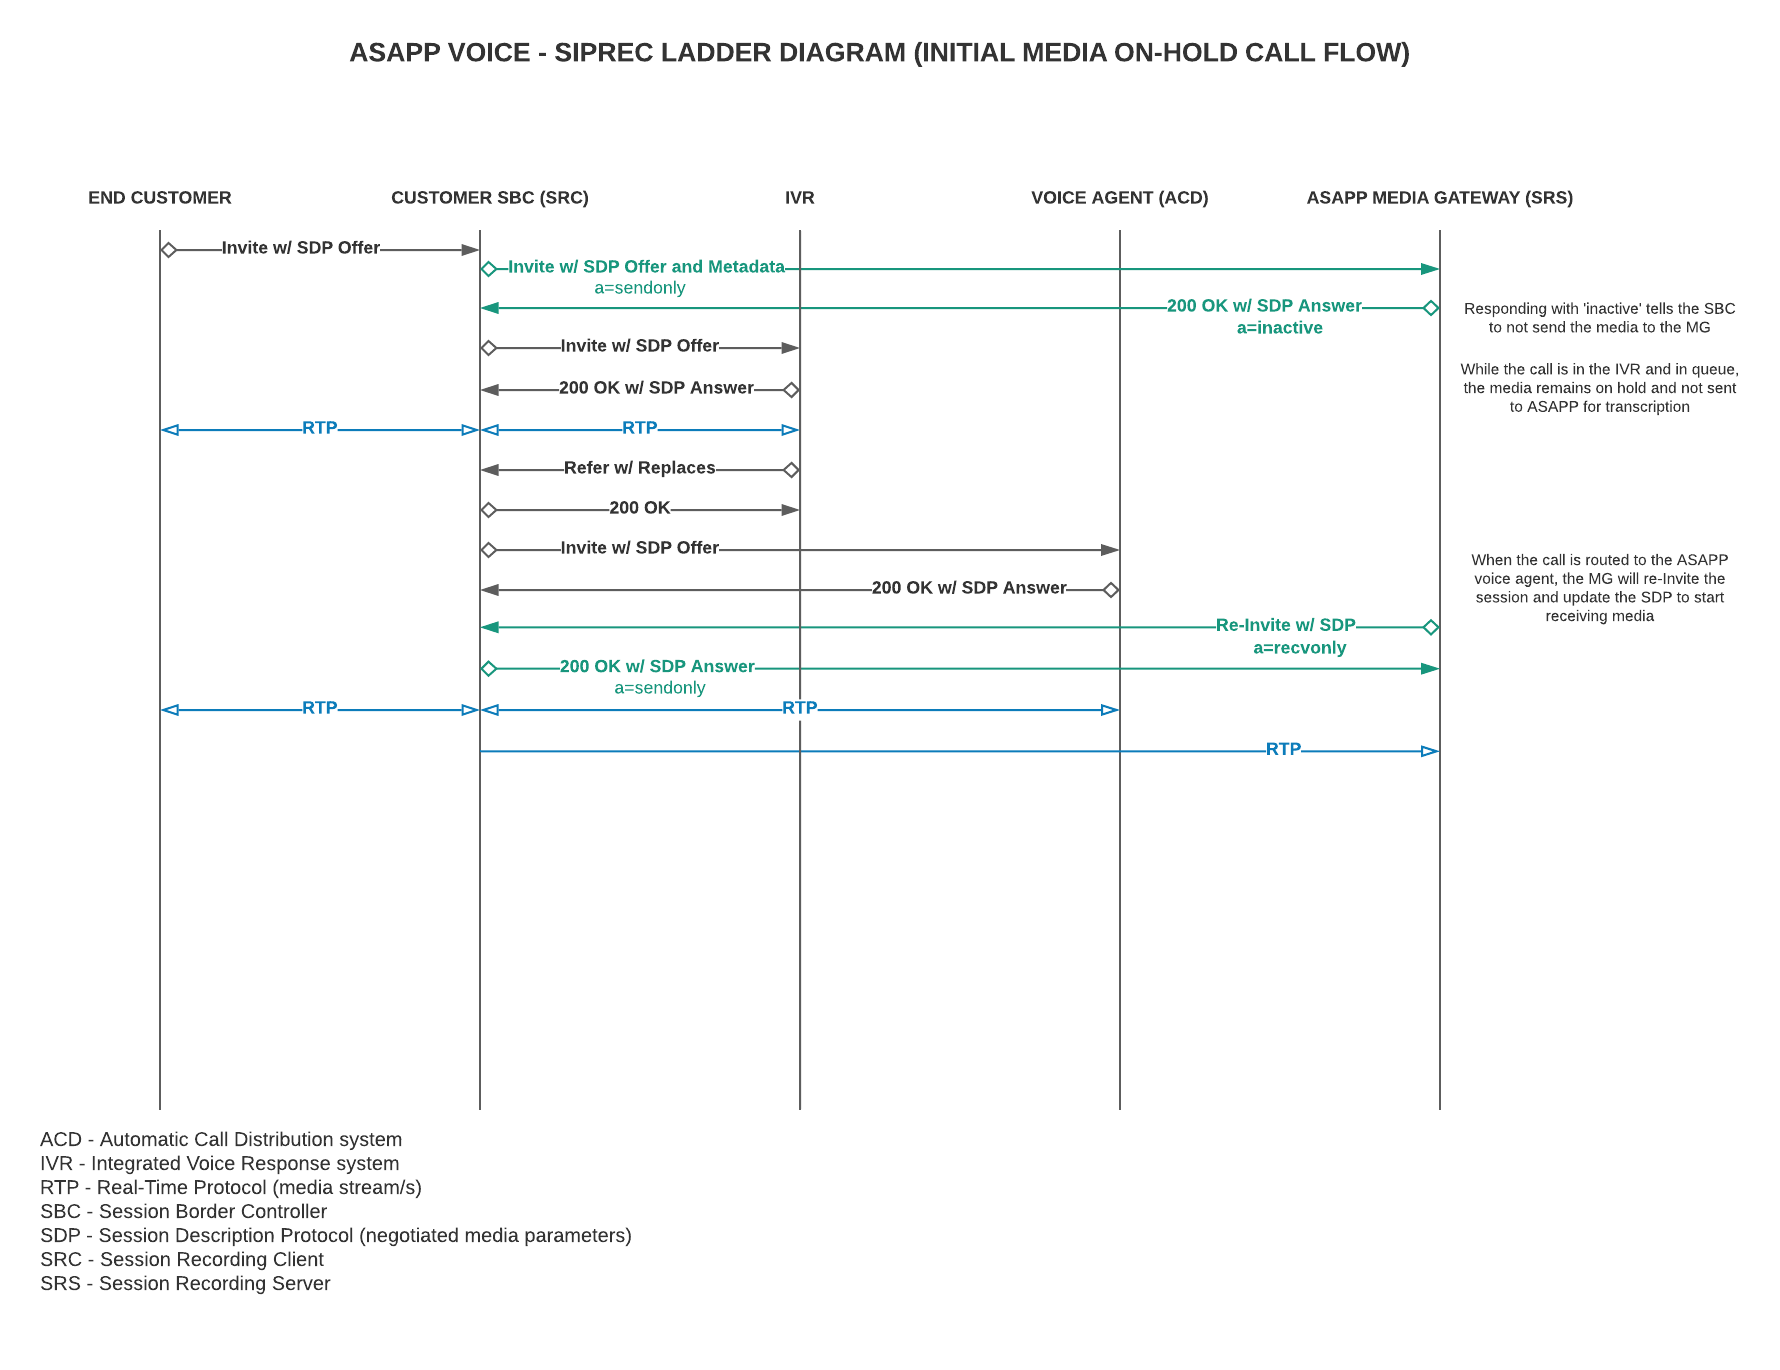 * SIP RFC handles some level of packet loss and re-transmissions but if the SIP signal is lost, the SIPREC dialog will be torn down and the media will no longer be sent.
* Media is sent via UDP.
* No retransmissions so packet loss or disconnects result in permanent loss of the audio.
* Proxies are transactionally stateless.
* No audio is ever sent to/through proxies, all audio goes directly to media gateways.
* Proxies are no longer in the signal path after the first transaction.
* If a proxy fails or is disconnected, SBCs can "hunt" or failover to the next proxy in it's configuration.
* No existing calls are impacted.
* If media gateways fail or are disconnected, the next SIP transaction will fail and the existing media stream (if resumed) will be sent via UDP to nothing (media is lost).
* Media gateways use regular SIP OPTIONS sent to static proxies that indicate if they are available and their current number of calls.
* Proxies use this active call load to evenly load balance to the least used media gateway.
* As well as dynamically pick up when a media gateway is no longer available or new ones come online.
* Any inbound calls coming in over ISDN-PRI/TDM trunk facilities will not have associated SIPREC sessions, as these calls do not traverse the SBC.
### Media Gateways to ASAPP Voice Streamers
* Secure websocket initiated per stream (2 per call) to the ASAPP Voice Streamer
* Media gateways do not store media, all processing is done in memory.
* Packet loss can be tolerated a little with TCP retransmissions.
* Buffer overrun audio data in the media gateway is purged instantly (per stream).
* If a secure websocket connection is lost, the media gateway will attempt a limited number of reconnections and then fail.
* If a voice streamer fails, a media gateway will reconnect to a new streamer.
* If a media gateway fails, the SIPREC stream is lost and the SBC can no longer send audio for that group of calls.
## Integration
### API Integration
Integration to existing customer systems enable ASAPP to call for information from those systems to present to the agent, such as:
* customer profile information
* billing history/statements
* customer product purchases
* Knowledge Base
Integration also enables ASAPP to push information to those systems, such as disposition notes and account changes/updates.
ASAPP will work with you to determine use cases for each integration that will add value to the agent and customer experience.
### Custom Call Data from CTI Information
In many instances, CTI will carry end customer specific information about the end customer and the call. This may be in the form of [User-to-User Information (UUI)](#glossary "Glossary"), `Call Variables`, Custom `NamedVariables`, or Custom `KVList UserData`. ASAPP uses this data to provide more information to agents and admins. It may contain information that provides customer identity information, route codes, queue information, customer authentication status, IVR interactions/ outputs, or simply unique identifiers for further data lookup from APIs. ASAPP extracts the custom fields and leverages the data in real-time to provide agents as much information as possible as part of the initial part of the interaction.
Each environment is uniquely different and ASAPP needs to understand what data is available from the CTI events to maximize relevant data to the agent and for voice intelligence processing.
Examples:
**Avaya**
```json
UserToUserInfo: “10000002321489708161;verify=T;english;2012134581”
```
**Cisco**
```json
CallVariable1:10000002321489708161
CallVariable7:en-us
user.AuthDetect:87
```
**Genesys**
```json
userAccount:10000002321489708161
userLanguage:en
userFirstName:John
```
**Twilio**
```json
* SIP RFC handles some level of packet loss and re-transmissions but if the SIP signal is lost, the SIPREC dialog will be torn down and the media will no longer be sent.
* Media is sent via UDP.
* No retransmissions so packet loss or disconnects result in permanent loss of the audio.
* Proxies are transactionally stateless.
* No audio is ever sent to/through proxies, all audio goes directly to media gateways.
* Proxies are no longer in the signal path after the first transaction.
* If a proxy fails or is disconnected, SBCs can "hunt" or failover to the next proxy in it's configuration.
* No existing calls are impacted.
* If media gateways fail or are disconnected, the next SIP transaction will fail and the existing media stream (if resumed) will be sent via UDP to nothing (media is lost).
* Media gateways use regular SIP OPTIONS sent to static proxies that indicate if they are available and their current number of calls.
* Proxies use this active call load to evenly load balance to the least used media gateway.
* As well as dynamically pick up when a media gateway is no longer available or new ones come online.
* Any inbound calls coming in over ISDN-PRI/TDM trunk facilities will not have associated SIPREC sessions, as these calls do not traverse the SBC.
### Media Gateways to ASAPP Voice Streamers
* Secure websocket initiated per stream (2 per call) to the ASAPP Voice Streamer
* Media gateways do not store media, all processing is done in memory.
* Packet loss can be tolerated a little with TCP retransmissions.
* Buffer overrun audio data in the media gateway is purged instantly (per stream).
* If a secure websocket connection is lost, the media gateway will attempt a limited number of reconnections and then fail.
* If a voice streamer fails, a media gateway will reconnect to a new streamer.
* If a media gateway fails, the SIPREC stream is lost and the SBC can no longer send audio for that group of calls.
## Integration
### API Integration
Integration to existing customer systems enable ASAPP to call for information from those systems to present to the agent, such as:
* customer profile information
* billing history/statements
* customer product purchases
* Knowledge Base
Integration also enables ASAPP to push information to those systems, such as disposition notes and account changes/updates.
ASAPP will work with you to determine use cases for each integration that will add value to the agent and customer experience.
### Custom Call Data from CTI Information
In many instances, CTI will carry end customer specific information about the end customer and the call. This may be in the form of [User-to-User Information (UUI)](#glossary "Glossary"), `Call Variables`, Custom `NamedVariables`, or Custom `KVList UserData`. ASAPP uses this data to provide more information to agents and admins. It may contain information that provides customer identity information, route codes, queue information, customer authentication status, IVR interactions/ outputs, or simply unique identifiers for further data lookup from APIs. ASAPP extracts the custom fields and leverages the data in real-time to provide agents as much information as possible as part of the initial part of the interaction.
Each environment is uniquely different and ASAPP needs to understand what data is available from the CTI events to maximize relevant data to the agent and for voice intelligence processing.
Examples:
**Avaya**
```json
UserToUserInfo: “10000002321489708161;verify=T;english;2012134581”
```
**Cisco**
```json
CallVariable1:10000002321489708161
CallVariable7:en-us
user.AuthDetect:87
```
**Genesys**
```json
userAccount:10000002321489708161
userLanguage:en
userFirstName:John
```
**Twilio**
```json
SAML Attribute Values |
ASAPP Usage |
Examples |
Agent Login ID |
Provides mapping of the customer telephony agent ID to ASAPP’s internal user ID. |
or
|
Givenname |
Given name |
|
Surname |
Surname |
|
Email address |
|
|
Unique User Identifier |
The User ID (authRepId); can be represented as an employee ID or email address. |
|
PhysicalDeliveryOfficeName |
Physical delivery office name |
|
HireDate |
Hire date attribute used by reporting. |
|
Title |
Can be used for reporting. |
|
Role |
The roles define what agents can see in the UI and have access to when they login. |
|
Group |
For Voice, this is only for reporting purposes. For digital chat this also can be used for queue management. |
|
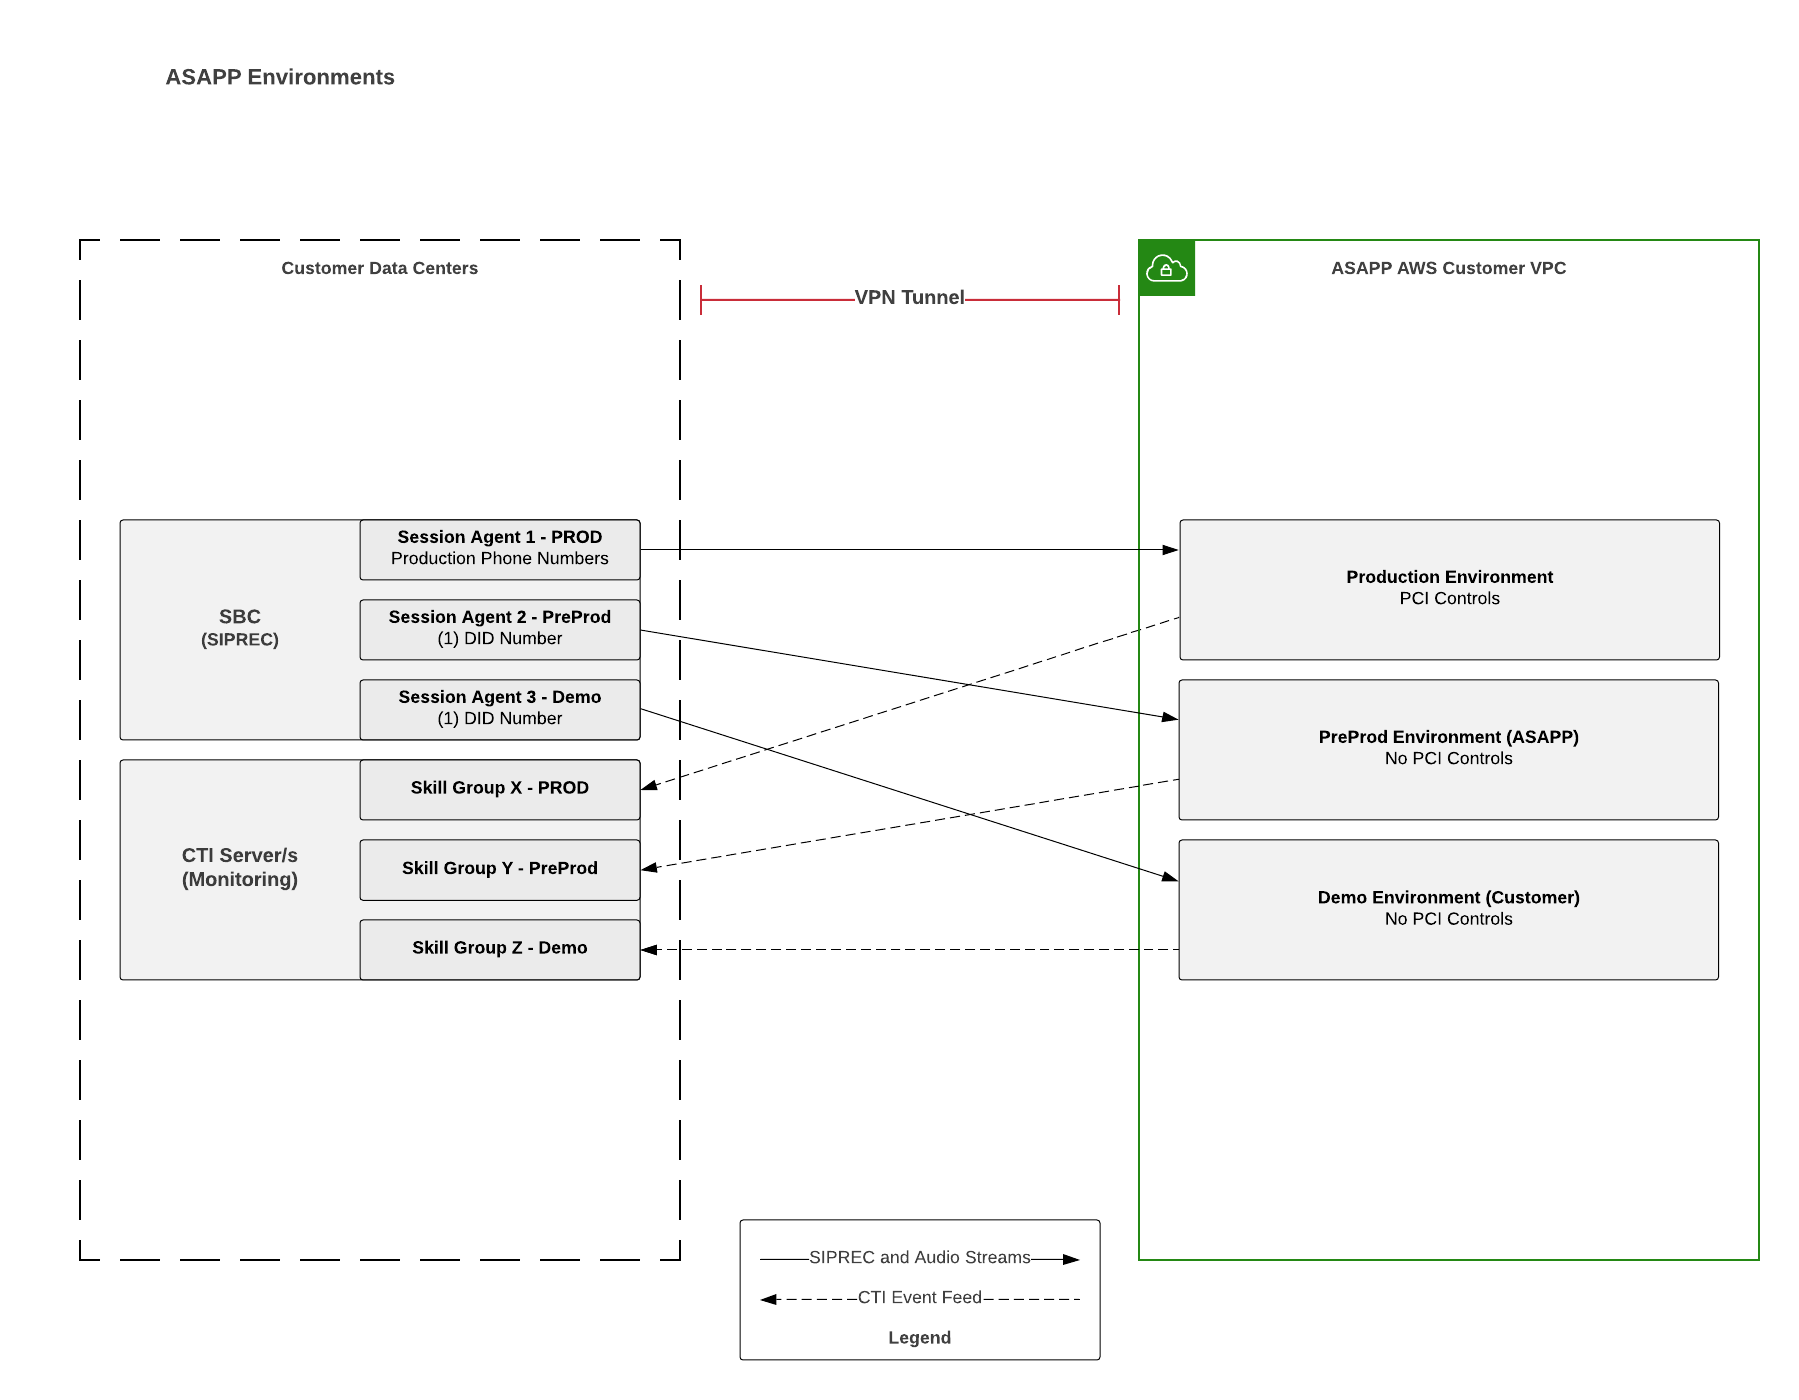 ## Appendix A - Avaya Configuration Details
This section provides specific configuration details for the solution that leverages Avaya telephony infrastructure.
**Avaya Communication Manager**
* Set Avaya [Internet Protocol - Private Branch Exchange (IP-PBX)](#glossary "Glossary") SIP trunks to 'shared' to ensure the UCID is not reset by the PBX.
* Change trunk-group x -> page 3 -> UUI Treatment:shared
* Set `SendtoASAI` parameter to 'yes.'
* Change system-parameters features -> page 13 -> Send UCID to ASAI? Y
* Add ASAPP voice agents to a new skill, one that is not used for queuing or routing.
* Configure AES to monitor the new skill.
* ASAPP will use the `cstaMonitorDevice` service to monitor the ACD skill.
* ASAPP may also call `cstaMonitorCallsViaDevice` if more call data is needed.
**Avaya AES [TSAPI](#glossary "Glossary") configuration**
* Networking -> Ports -> TSAPI Ports
* Enabled
* TSAPI Service Port (450)
* Firewalls will also need to allow these ports.
| **Connection Type** | **TCP Min Port** | **TCP Max Port** |
| :------------------ | :--------------- | :--------------- |
| unencrypted/TCP | 1050 | 1065 |
| encrypted/TLS | 1066 | 1081 |
* AES link to ASAPP connection provisioning
* Provisioning of new ASAPP Voice skill for monitoring.
## Appendix B - Cisco Configuration Details
This section provides specific configuration details for the solution that leverages Cisco telephony infrastructure.
**Cisco CTI Server configuration**
* ASAPP will connect with the `CTI_SERVICE_ALL_EVENTS`
* You will need the Preferred `ClientID` (identifier for ASAPP) and `ClientPassword` (if not null) to send the `OPEN_REQ` message.
* Ports 42027 (side A) and 43027 (side B)
* Instance number if not 0 will increase these ports
* Firewalls will also need to allow these ports
* `CallVariable`1-10 Definitions/usages
* Custom `NamedVariables` and `NamedArrays` Definitions/usages
* Events currently used by ASAPP:
* `OPEN_REQ`
* `OPEN_CONF`
* `SYSTEM`
* `AGENT_STATE`
* `AGENT_PRE_CALL`
* `BEGIN_CALL`
* `CALL_DATA_UPDATE`
* `CALL_CLEARED`
* `END_CALL`
## Appendix C - Oracle (Acme) Session Border Controller
In order to provide the correlation between the SIPREC session and specific CTI events, ASAPP will use the following approach:
* Session Border Controller
* Configure the SBC to create an Avaya UCID (universal call identifier) in the SIP header.
* UCID generation is a native feature for Oracle/Acme Packet session border controller platforms.
* [Oracle SBC UCID Admin](https://docs.oracle.com/en/industries/communications/enterprise-session-border-controller/8.4.0/configuration/universal-call-identifier-spl#GUID-97456BB9-264F-4290-AB92-8C60F64B9734)
* In the Oracle (Acme Packet) SBCs, load balancing across the ASAPP Media Gateway Proxies requires the use of static IP addresses versus the use of dynamic hostnames.
* SBC Settings for Media Gateway Proxies - Production and Lower Environments:
* Transport = TCP
* SIP OPTIONS = disabled
* Load Balancing strategy = "hunt"
* Session-recording-required = disabled
* Port = 5070
## Glossary
| **Term** | **Acronym** | **Definition** |
| :-------------------------------------------------------- | :---------- | :------------------------------------------------------------------------------------------------------------------------------------------------------------------------------------------------------------------------------ |
| **Automated Speech Recognition** | ASR | The service that converts speech (audio) to text. |
| **Automatic Call Distributor** | ACD | A telephony system that automatically receives incoming calls and distributes them to an available agent. Its purpose is to help inbound contact centers sort and manage large volumes of calls to avoid overwhelming the team. |
| **Computer Telephony Integration** | CTI | The means of linking a call center's telephone systems to a business application. In this case, ASAPP is monitoring agents and receives call state event data via CTI. |
| **Direct Inward Dialing** | DID | A service that allows a company to provide individual phone numbers for each employee without a separate physical line. |
| **Globally Unique IDentifier** | GUID | A numeric label used for information in communications systems. When generated according to the standard methods, GUIDs are, for practical purposes, unique. Also known as Universally Unique IDentifier (UUID) |
| **Internet Protocol Private Branch Exchange** | IP-PBX | A system that connects phone extensions to the Public Switched Telephone Network (PSTN) and provides internal business communication. |
| **Media Gateway** | MG | Entry point for all calls from Customer. Receives and forwards SIP and audio data. |
| **Media Gateway Proxy** | MGP | SIP Proxy, used for SIP signaling to/from customer SBC. |
| **Payment Card Industry Data Security Standard** | PCI DSS | Payment card industry compliance refers to the technical and operational standards that businesses follow to secure and protect credit card data provided by cardholders and transmitted through card processing transactions. |
| **Payment Card Industry Zone** | PCI Zone | PCI Level I Certified environment for cardholder data and other sensitive customer data storage (Transport layer security for encryption in transit, encryption at rest, access tightly restricted and monitored). |
| **Pulse-Code Modulation** | PCM | Pulse-code modulation is a method used to digitally represent sampled analog signals. It is the standard form of digital audio in digital telephony. |
| **Security Assertion Markup Language** | SAML | An open standard for exchanging authentication and authorization data between an identity provider and a service provider. |
| **Session Border Controller** | SBC | SIP-based voice security platform; source of the SIPREC sessions to ASAPP. |
| **Session Description Protocol** | SDP | Used between endpoints for negotiation of network metrics, media types, and other associated properties, such as codec and sample size. |
| **Session Initiation Protocol Application-Level Gateway** | SIP ALG | A firewall function that enables the firewall to inspect the SIP dialog/s. This function should be disabled to prevent SIP dialog interruption. |
| **Session Initiation Protocol Recording** | SIPREC | IETF standard used for establishing recording sessions and reporting of the metadata of the communication sessions. |
| **Single Sign On** | SSO | Single sign-on is an authentication scheme that allows a user to log in with a single ID and password to any of several related, yet independent, software systems. |
| **Toll-Free Number** | TFN | A service that allows callers to reach businesses without being charged for the call. The called person is charged for the toll-free number. |
| **Telephony Services API** | TSAPI | Telephony server application programming interface (TSAPI) is a computer telephony integration standard that enables telephony and computer telephony integration (CTI) application programming. |
| **Universal Call IDentifier** | UCID | UCID assigns a unique number to a call when it enters that call center network. The single UCID can be passed among platforms, and can be used to compile call-related information across platforms and sites. |
| **User to User Information** | UUI | The SIP UUI header allows the IVR to insert information about the call/caller and pass it to downstream elements, in this case, Communication Manager. The UUI information is then available via CTI. |
| **Voice Streamer** | VS | Receives SIP and audio data from MG. Gets the audio transcribed into text through the ASR and sends that downstream. |
# Web SDK Overview
Source: https://docs.asapp.com/messaging-platform/integrations/web-sdk
Welcome to the ASAPP Chat SDK Web Overview!
This document provides an overview of how to integrate the SDK (authenticate, customize, display) and the various API methods and properties you can use to call the ASAPP Chat SDK. In addition, it provides an overview of the ASAPP ContextProvider, which allows you to pass various user information to the Chat SDK.
If you're just getting started with the ASAPP Chat SDK, ASAPP recommends starting with the [Web Quick Start](/messaging-platform/integrations/web-sdk/web-quick-start "Web Quick Start") section. There you will learn the basics of embedding the ASAPP Chat SDK and how to best align it with your site.
ASAPP functionality can be integrated into your website simply, by making sure that a snippet of javascript is included in your site template.
The subsections below provide both an integration overview and detailed documentation covering everything from how to easily get started with your ASAPP integration through how to implement arbitrarily fine-grained customization of the look and feel and the functioning of ASAPP technology to meet your design and functional requirements.
The Web SDK Overview includes the following sections:
* [Web Quick Start](/messaging-platform/integrations/web-sdk/web-quick-start "Web Quick Start")
* [Web Authentication](/messaging-platform/integrations/web-sdk/web-authentication "Web Authentication")
* [Web Customization](/messaging-platform/integrations/web-sdk/web-customization "Web Customization")
* [Web Features](/messaging-platform/integrations/web-sdk/web-features "Web Features")
* [Web JavaScript API](/messaging-platform/integrations/web-sdk/web-javascript-api "Web JavaScript API")
* [Web App Settings](/messaging-platform/integrations/web-sdk/web-app-settings "Web App Settings")
* [Web ContextProvider](/messaging-platform/integrations/web-sdk/web-contextprovider "Web ContextProvider")
* [Web Examples](/messaging-platform/integrations/web-sdk/web-examples "Web Examples")
# Web App Settings
Source: https://docs.asapp.com/messaging-platform/integrations/web-sdk/web-app-settings
This section details the various properties you can provide to the Chat SDK.
These properties are used for various display, feature, and application settings.
Before utilizing these settings, make sure you've [integrated the ASAPP SDK](/messaging-platform/integrations/web-sdk/web-quick-start "Web Quick Start") script on your page.
Once you've integrated the SDK with your site, you can use the [JavaScript API](/messaging-platform/integrations/web-sdk/web-javascript-api "Web JavaScript API") for applying these settings.
The properties available to the ASAPP Chat SDK include:
* [APIHostName](#apihostname "APIHostName")
* [AppId](#appid "AppId")
* [ContextProvider](#contextprovider "ContextProvider")
* [CustomerId](#customerid "CustomerId")
* [Display](#display "Display")
* [Intent](#intent "Intent")
* [Language](#language)
* [onLoadComplete](#onloadcomplete "onLoadComplete")
* [RegionCode](#regioncode "RegionCode")
* [Sound](#sound "Sound")
* [UserLoginHandler](#userloginhandler-11877 "UserLoginHandler")
Each property has three attributes:
* Key - provides the name of the property that you can set.
* Available APIs - lists the [JavaScript APIs](/messaging-platform/integrations/web-sdk/web-javascript-api "Web JavaScript API") that the property is accepted on.
* Value Type - describes the primitive type of value required.
## APIHostName
* Key: `APIHostName`
* Available APIs: [Load](/messaging-platform/integrations/web-sdk/web-javascript-api#load "'load'")
* Value Type: `String`
Sets the ASAPP APIHostName for connecting customers with customer support.
## AppId
* Key: `AppId`
* Available APIs: [Load](/messaging-platform/integrations/web-sdk/web-javascript-api#load "'load'")
* Value Type: `String`
Your unique Company Identifier.
## ContextProvider
* Key: `ContextProvider`
* Available APIs: [Load](/messaging-platform/integrations/web-sdk/web-javascript-api#load "'load'"), ['setCustomer'](/messaging-platform/integrations/web-sdk/web-javascript-api#setcustomer "'setCustomer'")
* Value Type: `Function`
The ASAPP `ContextProvider` is used for passing various information about your users to the Chat SDK. This information may include authentication, analytics, or session information. Please see the in-depth section on [Using the ContextProvider](/messaging-platform/integrations/web-sdk/web-contextprovider "Web ContextProvider") for details about each of the use cases.
## CustomerId
* Key: `CustomerId`
* Available APIs: [Load](/messaging-platform/integrations/web-sdk/web-javascript-api#load "'load'"), ['setCustomer'](/messaging-platform/integrations/web-sdk/web-javascript-api#setcustomer "'setCustomer'")
* Value Type: `String`
The unique identifier for an authenticated customer. This value is typically a customer's login name or account ID. If setting a **`CustomerId`** you must also provide a [ContextProvider ](#contextprovider "ContextProvider")property to pass along their access token and any other required authentication properties.
## Display
* Key: `Display`
* Available APIs: [Load](/messaging-platform/integrations/web-sdk/web-javascript-api#load "'load'")
* Value Type: `Object`
The `Display` setting allows you to customize the presentation aspects of the Chat SDK. The setting is an object that contains each of the customization's you wish to provide.
Read on below for the currently supported keys:
```javascript
ASAPP('load',
{ "APIHostname": "example-co-api.asapp.com",
"AppId": "example-co",
"Display": {
"Align": "left",
"AlwaysShowMinimize": true,
"BadgeColor": "rebeccapurple",
"BadgeText": "Support",
"BadgeType": "tray",
"FrameDraggable": true,
"FrameStyle": "sidebar",
"HideBadgeOnLoad": false,
"Identity": "electronics"
}
}
```
### Align
* Key: `Align`
* Value Type: `String`
* Accepted Values: `'left'`, `'right'` (default)
Renders the [Chat SDK Badge](/messaging-platform/integrations/web-sdk/web-customization#badge "Badge") and [iframe](/messaging-platform/integrations/web-sdk/web-customization#iframe "iframe") on the left or right side of your page.
### AlwaysShowMinimize
* Key: `AlwaysShowMinimize`
* Value Type: `Boolean`
Determines if the iframe minimize icon displays in the Chat SDK's header. The default `false` value displays the button only on tablet and mobile screen sizes. When set to `true`, the button will also be visible on desktop-sized screens.
### BadgeColor
* Key: `BadgeColor`
* Value Type: `String`
* Accepted Values: `Color Keyword`,`RGB hex value`
Customizes the background color of the [Chat SDK Badge](/messaging-platform/integrations/web-sdk/web-customization#badge "Badge").
This will be the primary color of Proactive Messages and Channel Picker if the PrimaryColor is not provided.
### BadgeText
* Key: `BadgeText`
* Value Type: `String`
Applies a caption to the [Chat SDK Badge](/messaging-platform/integrations/web-sdk/web-customization#badge "Badge").
## Appendix A - Avaya Configuration Details
This section provides specific configuration details for the solution that leverages Avaya telephony infrastructure.
**Avaya Communication Manager**
* Set Avaya [Internet Protocol - Private Branch Exchange (IP-PBX)](#glossary "Glossary") SIP trunks to 'shared' to ensure the UCID is not reset by the PBX.
* Change trunk-group x -> page 3 -> UUI Treatment:shared
* Set `SendtoASAI` parameter to 'yes.'
* Change system-parameters features -> page 13 -> Send UCID to ASAI? Y
* Add ASAPP voice agents to a new skill, one that is not used for queuing or routing.
* Configure AES to monitor the new skill.
* ASAPP will use the `cstaMonitorDevice` service to monitor the ACD skill.
* ASAPP may also call `cstaMonitorCallsViaDevice` if more call data is needed.
**Avaya AES [TSAPI](#glossary "Glossary") configuration**
* Networking -> Ports -> TSAPI Ports
* Enabled
* TSAPI Service Port (450)
* Firewalls will also need to allow these ports.
| **Connection Type** | **TCP Min Port** | **TCP Max Port** |
| :------------------ | :--------------- | :--------------- |
| unencrypted/TCP | 1050 | 1065 |
| encrypted/TLS | 1066 | 1081 |
* AES link to ASAPP connection provisioning
* Provisioning of new ASAPP Voice skill for monitoring.
## Appendix B - Cisco Configuration Details
This section provides specific configuration details for the solution that leverages Cisco telephony infrastructure.
**Cisco CTI Server configuration**
* ASAPP will connect with the `CTI_SERVICE_ALL_EVENTS`
* You will need the Preferred `ClientID` (identifier for ASAPP) and `ClientPassword` (if not null) to send the `OPEN_REQ` message.
* Ports 42027 (side A) and 43027 (side B)
* Instance number if not 0 will increase these ports
* Firewalls will also need to allow these ports
* `CallVariable`1-10 Definitions/usages
* Custom `NamedVariables` and `NamedArrays` Definitions/usages
* Events currently used by ASAPP:
* `OPEN_REQ`
* `OPEN_CONF`
* `SYSTEM`
* `AGENT_STATE`
* `AGENT_PRE_CALL`
* `BEGIN_CALL`
* `CALL_DATA_UPDATE`
* `CALL_CLEARED`
* `END_CALL`
## Appendix C - Oracle (Acme) Session Border Controller
In order to provide the correlation between the SIPREC session and specific CTI events, ASAPP will use the following approach:
* Session Border Controller
* Configure the SBC to create an Avaya UCID (universal call identifier) in the SIP header.
* UCID generation is a native feature for Oracle/Acme Packet session border controller platforms.
* [Oracle SBC UCID Admin](https://docs.oracle.com/en/industries/communications/enterprise-session-border-controller/8.4.0/configuration/universal-call-identifier-spl#GUID-97456BB9-264F-4290-AB92-8C60F64B9734)
* In the Oracle (Acme Packet) SBCs, load balancing across the ASAPP Media Gateway Proxies requires the use of static IP addresses versus the use of dynamic hostnames.
* SBC Settings for Media Gateway Proxies - Production and Lower Environments:
* Transport = TCP
* SIP OPTIONS = disabled
* Load Balancing strategy = "hunt"
* Session-recording-required = disabled
* Port = 5070
## Glossary
| **Term** | **Acronym** | **Definition** |
| :-------------------------------------------------------- | :---------- | :------------------------------------------------------------------------------------------------------------------------------------------------------------------------------------------------------------------------------ |
| **Automated Speech Recognition** | ASR | The service that converts speech (audio) to text. |
| **Automatic Call Distributor** | ACD | A telephony system that automatically receives incoming calls and distributes them to an available agent. Its purpose is to help inbound contact centers sort and manage large volumes of calls to avoid overwhelming the team. |
| **Computer Telephony Integration** | CTI | The means of linking a call center's telephone systems to a business application. In this case, ASAPP is monitoring agents and receives call state event data via CTI. |
| **Direct Inward Dialing** | DID | A service that allows a company to provide individual phone numbers for each employee without a separate physical line. |
| **Globally Unique IDentifier** | GUID | A numeric label used for information in communications systems. When generated according to the standard methods, GUIDs are, for practical purposes, unique. Also known as Universally Unique IDentifier (UUID) |
| **Internet Protocol Private Branch Exchange** | IP-PBX | A system that connects phone extensions to the Public Switched Telephone Network (PSTN) and provides internal business communication. |
| **Media Gateway** | MG | Entry point for all calls from Customer. Receives and forwards SIP and audio data. |
| **Media Gateway Proxy** | MGP | SIP Proxy, used for SIP signaling to/from customer SBC. |
| **Payment Card Industry Data Security Standard** | PCI DSS | Payment card industry compliance refers to the technical and operational standards that businesses follow to secure and protect credit card data provided by cardholders and transmitted through card processing transactions. |
| **Payment Card Industry Zone** | PCI Zone | PCI Level I Certified environment for cardholder data and other sensitive customer data storage (Transport layer security for encryption in transit, encryption at rest, access tightly restricted and monitored). |
| **Pulse-Code Modulation** | PCM | Pulse-code modulation is a method used to digitally represent sampled analog signals. It is the standard form of digital audio in digital telephony. |
| **Security Assertion Markup Language** | SAML | An open standard for exchanging authentication and authorization data between an identity provider and a service provider. |
| **Session Border Controller** | SBC | SIP-based voice security platform; source of the SIPREC sessions to ASAPP. |
| **Session Description Protocol** | SDP | Used between endpoints for negotiation of network metrics, media types, and other associated properties, such as codec and sample size. |
| **Session Initiation Protocol Application-Level Gateway** | SIP ALG | A firewall function that enables the firewall to inspect the SIP dialog/s. This function should be disabled to prevent SIP dialog interruption. |
| **Session Initiation Protocol Recording** | SIPREC | IETF standard used for establishing recording sessions and reporting of the metadata of the communication sessions. |
| **Single Sign On** | SSO | Single sign-on is an authentication scheme that allows a user to log in with a single ID and password to any of several related, yet independent, software systems. |
| **Toll-Free Number** | TFN | A service that allows callers to reach businesses without being charged for the call. The called person is charged for the toll-free number. |
| **Telephony Services API** | TSAPI | Telephony server application programming interface (TSAPI) is a computer telephony integration standard that enables telephony and computer telephony integration (CTI) application programming. |
| **Universal Call IDentifier** | UCID | UCID assigns a unique number to a call when it enters that call center network. The single UCID can be passed among platforms, and can be used to compile call-related information across platforms and sites. |
| **User to User Information** | UUI | The SIP UUI header allows the IVR to insert information about the call/caller and pass it to downstream elements, in this case, Communication Manager. The UUI information is then available via CTI. |
| **Voice Streamer** | VS | Receives SIP and audio data from MG. Gets the audio transcribed into text through the ASR and sends that downstream. |
# Web SDK Overview
Source: https://docs.asapp.com/messaging-platform/integrations/web-sdk
Welcome to the ASAPP Chat SDK Web Overview!
This document provides an overview of how to integrate the SDK (authenticate, customize, display) and the various API methods and properties you can use to call the ASAPP Chat SDK. In addition, it provides an overview of the ASAPP ContextProvider, which allows you to pass various user information to the Chat SDK.
If you're just getting started with the ASAPP Chat SDK, ASAPP recommends starting with the [Web Quick Start](/messaging-platform/integrations/web-sdk/web-quick-start "Web Quick Start") section. There you will learn the basics of embedding the ASAPP Chat SDK and how to best align it with your site.
ASAPP functionality can be integrated into your website simply, by making sure that a snippet of javascript is included in your site template.
The subsections below provide both an integration overview and detailed documentation covering everything from how to easily get started with your ASAPP integration through how to implement arbitrarily fine-grained customization of the look and feel and the functioning of ASAPP technology to meet your design and functional requirements.
The Web SDK Overview includes the following sections:
* [Web Quick Start](/messaging-platform/integrations/web-sdk/web-quick-start "Web Quick Start")
* [Web Authentication](/messaging-platform/integrations/web-sdk/web-authentication "Web Authentication")
* [Web Customization](/messaging-platform/integrations/web-sdk/web-customization "Web Customization")
* [Web Features](/messaging-platform/integrations/web-sdk/web-features "Web Features")
* [Web JavaScript API](/messaging-platform/integrations/web-sdk/web-javascript-api "Web JavaScript API")
* [Web App Settings](/messaging-platform/integrations/web-sdk/web-app-settings "Web App Settings")
* [Web ContextProvider](/messaging-platform/integrations/web-sdk/web-contextprovider "Web ContextProvider")
* [Web Examples](/messaging-platform/integrations/web-sdk/web-examples "Web Examples")
# Web App Settings
Source: https://docs.asapp.com/messaging-platform/integrations/web-sdk/web-app-settings
This section details the various properties you can provide to the Chat SDK.
These properties are used for various display, feature, and application settings.
Before utilizing these settings, make sure you've [integrated the ASAPP SDK](/messaging-platform/integrations/web-sdk/web-quick-start "Web Quick Start") script on your page.
Once you've integrated the SDK with your site, you can use the [JavaScript API](/messaging-platform/integrations/web-sdk/web-javascript-api "Web JavaScript API") for applying these settings.
The properties available to the ASAPP Chat SDK include:
* [APIHostName](#apihostname "APIHostName")
* [AppId](#appid "AppId")
* [ContextProvider](#contextprovider "ContextProvider")
* [CustomerId](#customerid "CustomerId")
* [Display](#display "Display")
* [Intent](#intent "Intent")
* [Language](#language)
* [onLoadComplete](#onloadcomplete "onLoadComplete")
* [RegionCode](#regioncode "RegionCode")
* [Sound](#sound "Sound")
* [UserLoginHandler](#userloginhandler-11877 "UserLoginHandler")
Each property has three attributes:
* Key - provides the name of the property that you can set.
* Available APIs - lists the [JavaScript APIs](/messaging-platform/integrations/web-sdk/web-javascript-api "Web JavaScript API") that the property is accepted on.
* Value Type - describes the primitive type of value required.
## APIHostName
* Key: `APIHostName`
* Available APIs: [Load](/messaging-platform/integrations/web-sdk/web-javascript-api#load "'load'")
* Value Type: `String`
Sets the ASAPP APIHostName for connecting customers with customer support.
## AppId
* Key: `AppId`
* Available APIs: [Load](/messaging-platform/integrations/web-sdk/web-javascript-api#load "'load'")
* Value Type: `String`
Your unique Company Identifier.
## ContextProvider
* Key: `ContextProvider`
* Available APIs: [Load](/messaging-platform/integrations/web-sdk/web-javascript-api#load "'load'"), ['setCustomer'](/messaging-platform/integrations/web-sdk/web-javascript-api#setcustomer "'setCustomer'")
* Value Type: `Function`
The ASAPP `ContextProvider` is used for passing various information about your users to the Chat SDK. This information may include authentication, analytics, or session information. Please see the in-depth section on [Using the ContextProvider](/messaging-platform/integrations/web-sdk/web-contextprovider "Web ContextProvider") for details about each of the use cases.
## CustomerId
* Key: `CustomerId`
* Available APIs: [Load](/messaging-platform/integrations/web-sdk/web-javascript-api#load "'load'"), ['setCustomer'](/messaging-platform/integrations/web-sdk/web-javascript-api#setcustomer "'setCustomer'")
* Value Type: `String`
The unique identifier for an authenticated customer. This value is typically a customer's login name or account ID. If setting a **`CustomerId`** you must also provide a [ContextProvider ](#contextprovider "ContextProvider")property to pass along their access token and any other required authentication properties.
## Display
* Key: `Display`
* Available APIs: [Load](/messaging-platform/integrations/web-sdk/web-javascript-api#load "'load'")
* Value Type: `Object`
The `Display` setting allows you to customize the presentation aspects of the Chat SDK. The setting is an object that contains each of the customization's you wish to provide.
Read on below for the currently supported keys:
```javascript
ASAPP('load',
{ "APIHostname": "example-co-api.asapp.com",
"AppId": "example-co",
"Display": {
"Align": "left",
"AlwaysShowMinimize": true,
"BadgeColor": "rebeccapurple",
"BadgeText": "Support",
"BadgeType": "tray",
"FrameDraggable": true,
"FrameStyle": "sidebar",
"HideBadgeOnLoad": false,
"Identity": "electronics"
}
}
```
### Align
* Key: `Align`
* Value Type: `String`
* Accepted Values: `'left'`, `'right'` (default)
Renders the [Chat SDK Badge](/messaging-platform/integrations/web-sdk/web-customization#badge "Badge") and [iframe](/messaging-platform/integrations/web-sdk/web-customization#iframe "iframe") on the left or right side of your page.
### AlwaysShowMinimize
* Key: `AlwaysShowMinimize`
* Value Type: `Boolean`
Determines if the iframe minimize icon displays in the Chat SDK's header. The default `false` value displays the button only on tablet and mobile screen sizes. When set to `true`, the button will also be visible on desktop-sized screens.
### BadgeColor
* Key: `BadgeColor`
* Value Type: `String`
* Accepted Values: `Color Keyword`,`RGB hex value`
Customizes the background color of the [Chat SDK Badge](/messaging-platform/integrations/web-sdk/web-customization#badge "Badge").
This will be the primary color of Proactive Messages and Channel Picker if the PrimaryColor is not provided.
### BadgeText
* Key: `BadgeText`
* Value Type: `String`
Applies a caption to the [Chat SDK Badge](/messaging-platform/integrations/web-sdk/web-customization#badge "Badge").
 `BadgeType: 'badge'`
 Customizes the display of the [Chat SDK Badge](/messaging-platform/integrations/web-sdk/web-customization#badge "Badge"). When you set the type to `'tray'`, you may also enter a `BadgeText` value. When you set this to 'none', the badge will not render.
### FrameDraggable
* Key: `FrameDraggable`
* Value Type: `Boolean`
Enabling this setting allows a user to reposition the placement of the [Chat SDK iframe](/messaging-platform/integrations/web-sdk/web-customization#iframe "iframe").
When this is set to `true`, a user can hover over the frame's heading region, then click and drag to reposition the frame. The user's frame position will be recalled as they navigate your site or minimize/open the Chat SDK.
If the user has repositioned the frame, a button will appear allowing them to reset the Chat SDK to its default position.
### FrameStyle
* Key: `FrameStyle`
* Value Type: `String`
Accepted Values: `'sidebar'`, `'default'` (default)
Customizes the layout of the [Chat SDK iframe](/messaging-platform/integrations/web-sdk/web-customization#iframe "iframe").
By default, the frame will appear as a floating window with a responsive height and width. When set to `'sidebar'`, the frame will be docked to the side of the page and take 100% of the browser's viewport height. The`'sidebar'` setting will adjust your page's content as though the user resized their browser viewport.
Use the `Align` setting if you wish to change which side of the page the frame appears on.
### HideBadgeOnLoad
* Key: `HideBadgeOnLoad`
* Value Type: `Boolean`
* Accepted Values: `'true'`,`'false'`(default)
When set to true, [Chat Badge](/messaging-platform/integrations/web-sdk/web-customization#badge "Badge") is not visible on load. You can open the [Chat SDK iframe](/messaging-platform/integrations/web-sdk/web-customization#iframe "iframe") via Proactive Message, [Chat Instead](../chat-instead/web "Web"), or [Show API](/messaging-platform/integrations/web-sdk/web-javascript-api#show "'show'").
Once you open the Chat SDK iframe, Chat Badge will become visible allowing a user to minimize/reopen.
### Identity
* Key: `Identity`
* Value Type: `String`
A string that represents the branding you wish to display on the SDK. Your ASAPP Implementation Manager will help you determine this value.
If set to a non-supported value the Chat SDK will display in a generic, non-branded experience.
### PrimaryColor
* Key: `PrimaryColor`
* Value Type: `String`
* Accepted Values: `Color Keyword`,`RGB hex value`
Customizes the primary color of Proactive Messages and [Chat Instead](/messaging-platform/integrations/chat-instead/web "Web").
This will be the background color of the [Chat SDK Badge](/messaging-platform/integrations/web-sdk/web-customization#badge "Badge") if the BadgeColor is not provided.
## Intent
* Key: `Intent`
* Available APIs: [Load](/messaging-platform/integrations/web-sdk/web-javascript-api#-load- "'load'")
* Value Type: `String`
The intent code that you wish for a user's conversation to initialize with. The setting takes an object, with a required key of `Code`. `Code` accepts a string.
Your team and your ASAPP Implementation Manager will determine the available values.
```javascript
ASAPP('load', {
APIHostname: 'example-co-api.asapp.com',
AppId: 'example-co',
Intent: {
Code: 'PAYBILL'
}
});
```
## Language
* Key: `Language`
* Available APIs: [Load](/messaging-platform/integrations/web-sdk/web-javascript-api#load "'load'")
* Value Type: `String`
By Default, the SDK will use English (`en`). You can override this by setting the `Language` property. It accepts a value of:
* `en` for English
* `fr` for French
* `es` for Spanish
ASAPP does not support switching languages mid-session, after a conversation has started. You must set a language before starting a conversation.
Customizes the display of the [Chat SDK Badge](/messaging-platform/integrations/web-sdk/web-customization#badge "Badge"). When you set the type to `'tray'`, you may also enter a `BadgeText` value. When you set this to 'none', the badge will not render.
### FrameDraggable
* Key: `FrameDraggable`
* Value Type: `Boolean`
Enabling this setting allows a user to reposition the placement of the [Chat SDK iframe](/messaging-platform/integrations/web-sdk/web-customization#iframe "iframe").
When this is set to `true`, a user can hover over the frame's heading region, then click and drag to reposition the frame. The user's frame position will be recalled as they navigate your site or minimize/open the Chat SDK.
If the user has repositioned the frame, a button will appear allowing them to reset the Chat SDK to its default position.
### FrameStyle
* Key: `FrameStyle`
* Value Type: `String`
Accepted Values: `'sidebar'`, `'default'` (default)
Customizes the layout of the [Chat SDK iframe](/messaging-platform/integrations/web-sdk/web-customization#iframe "iframe").
By default, the frame will appear as a floating window with a responsive height and width. When set to `'sidebar'`, the frame will be docked to the side of the page and take 100% of the browser's viewport height. The`'sidebar'` setting will adjust your page's content as though the user resized their browser viewport.
Use the `Align` setting if you wish to change which side of the page the frame appears on.
### HideBadgeOnLoad
* Key: `HideBadgeOnLoad`
* Value Type: `Boolean`
* Accepted Values: `'true'`,`'false'`(default)
When set to true, [Chat Badge](/messaging-platform/integrations/web-sdk/web-customization#badge "Badge") is not visible on load. You can open the [Chat SDK iframe](/messaging-platform/integrations/web-sdk/web-customization#iframe "iframe") via Proactive Message, [Chat Instead](../chat-instead/web "Web"), or [Show API](/messaging-platform/integrations/web-sdk/web-javascript-api#show "'show'").
Once you open the Chat SDK iframe, Chat Badge will become visible allowing a user to minimize/reopen.
### Identity
* Key: `Identity`
* Value Type: `String`
A string that represents the branding you wish to display on the SDK. Your ASAPP Implementation Manager will help you determine this value.
If set to a non-supported value the Chat SDK will display in a generic, non-branded experience.
### PrimaryColor
* Key: `PrimaryColor`
* Value Type: `String`
* Accepted Values: `Color Keyword`,`RGB hex value`
Customizes the primary color of Proactive Messages and [Chat Instead](/messaging-platform/integrations/chat-instead/web "Web").
This will be the background color of the [Chat SDK Badge](/messaging-platform/integrations/web-sdk/web-customization#badge "Badge") if the BadgeColor is not provided.
## Intent
* Key: `Intent`
* Available APIs: [Load](/messaging-platform/integrations/web-sdk/web-javascript-api#-load- "'load'")
* Value Type: `String`
The intent code that you wish for a user's conversation to initialize with. The setting takes an object, with a required key of `Code`. `Code` accepts a string.
Your team and your ASAPP Implementation Manager will determine the available values.
```javascript
ASAPP('load', {
APIHostname: 'example-co-api.asapp.com',
AppId: 'example-co',
Intent: {
Code: 'PAYBILL'
}
});
```
## Language
* Key: `Language`
* Available APIs: [Load](/messaging-platform/integrations/web-sdk/web-javascript-api#load "'load'")
* Value Type: `String`
By Default, the SDK will use English (`en`). You can override this by setting the `Language` property. It accepts a value of:
* `en` for English
* `fr` for French
* `es` for Spanish
ASAPP does not support switching languages mid-session, after a conversation has started. You must set a language before starting a conversation.
 ## Authenticating at Page Load
If a user who is already authenticated with your site requests a page that includes ASAPP chat functionality, you can proactively authenticate that user to the ASAPP SDK at page load time. This allows an authenticated user who initiates a chat session to have immediate access to their account details without having to login again.
To authenticate a user to the ASAPP Chat SDK on page load, use the ASAPP [Load API](/messaging-platform/integrations/web-sdk/web-javascript-api#load "'load'") providing both [ContextProvider](/messaging-platform/integrations/web-sdk/web-app-settings#contextprovider "ContextProvider") and [CustomerId](/messaging-platform/integrations/web-sdk/web-app-settings#customerid "CustomerId") as additional keys in the [Load method](/messaging-platform/integrations/web-sdk/web-javascript-api#load "'load'").
For example:
```javascript
```
The sample above initializes the ASAPP Chat SDK with your user's `CustomerId` and a `ContextProvider` incorporating that user's `Auth`.
When a user opens the ASAPP Chat SDK, they will already be authenticated to the chat client and can access account information within the chat without being asked to login again.
## Authenticating Asynchronously
If a user's authentication credentials are not available at page load time, you can authenticate asynchronously using the ASAPP [SetCustomer](/messaging-platform/integrations/web-sdk/web-javascript-api#setcustomer "'setCustomer'") API.
After you've retrieved your user's credentials, you can call the API to authenticate that user with the ASAPP Chat SDK mid-session.
You might want to asynchronously authenticate a user to the ASAPP Chat SDK when (for example) that user has just completed a login flow, or if their credentials are retrieved after the page initially loads, or if a session expires and the user needs to reauthenticate.
The following sample snippet shows how to call the SetCustomer API:
```javascript
```
Once you call the [SetCustomer](/messaging-platform/integrations/web-sdk/web-javascript-api#setcustomer "'setCustomer'") method is called, and as long as the provided `Auth` information remains valid on your backend, any ASAPP Chat SDK actions that require authentication will be properly authenticated.
## Authenticating at Page Load
If a user who is already authenticated with your site requests a page that includes ASAPP chat functionality, you can proactively authenticate that user to the ASAPP SDK at page load time. This allows an authenticated user who initiates a chat session to have immediate access to their account details without having to login again.
To authenticate a user to the ASAPP Chat SDK on page load, use the ASAPP [Load API](/messaging-platform/integrations/web-sdk/web-javascript-api#load "'load'") providing both [ContextProvider](/messaging-platform/integrations/web-sdk/web-app-settings#contextprovider "ContextProvider") and [CustomerId](/messaging-platform/integrations/web-sdk/web-app-settings#customerid "CustomerId") as additional keys in the [Load method](/messaging-platform/integrations/web-sdk/web-javascript-api#load "'load'").
For example:
```javascript
```
The sample above initializes the ASAPP Chat SDK with your user's `CustomerId` and a `ContextProvider` incorporating that user's `Auth`.
When a user opens the ASAPP Chat SDK, they will already be authenticated to the chat client and can access account information within the chat without being asked to login again.
## Authenticating Asynchronously
If a user's authentication credentials are not available at page load time, you can authenticate asynchronously using the ASAPP [SetCustomer](/messaging-platform/integrations/web-sdk/web-javascript-api#setcustomer "'setCustomer'") API.
After you've retrieved your user's credentials, you can call the API to authenticate that user with the ASAPP Chat SDK mid-session.
You might want to asynchronously authenticate a user to the ASAPP Chat SDK when (for example) that user has just completed a login flow, or if their credentials are retrieved after the page initially loads, or if a session expires and the user needs to reauthenticate.
The following sample snippet shows how to call the SetCustomer API:
```javascript
```
Once you call the [SetCustomer](/messaging-platform/integrations/web-sdk/web-javascript-api#setcustomer "'setCustomer'") method is called, and as long as the provided `Auth` information remains valid on your backend, any ASAPP Chat SDK actions that require authentication will be properly authenticated.
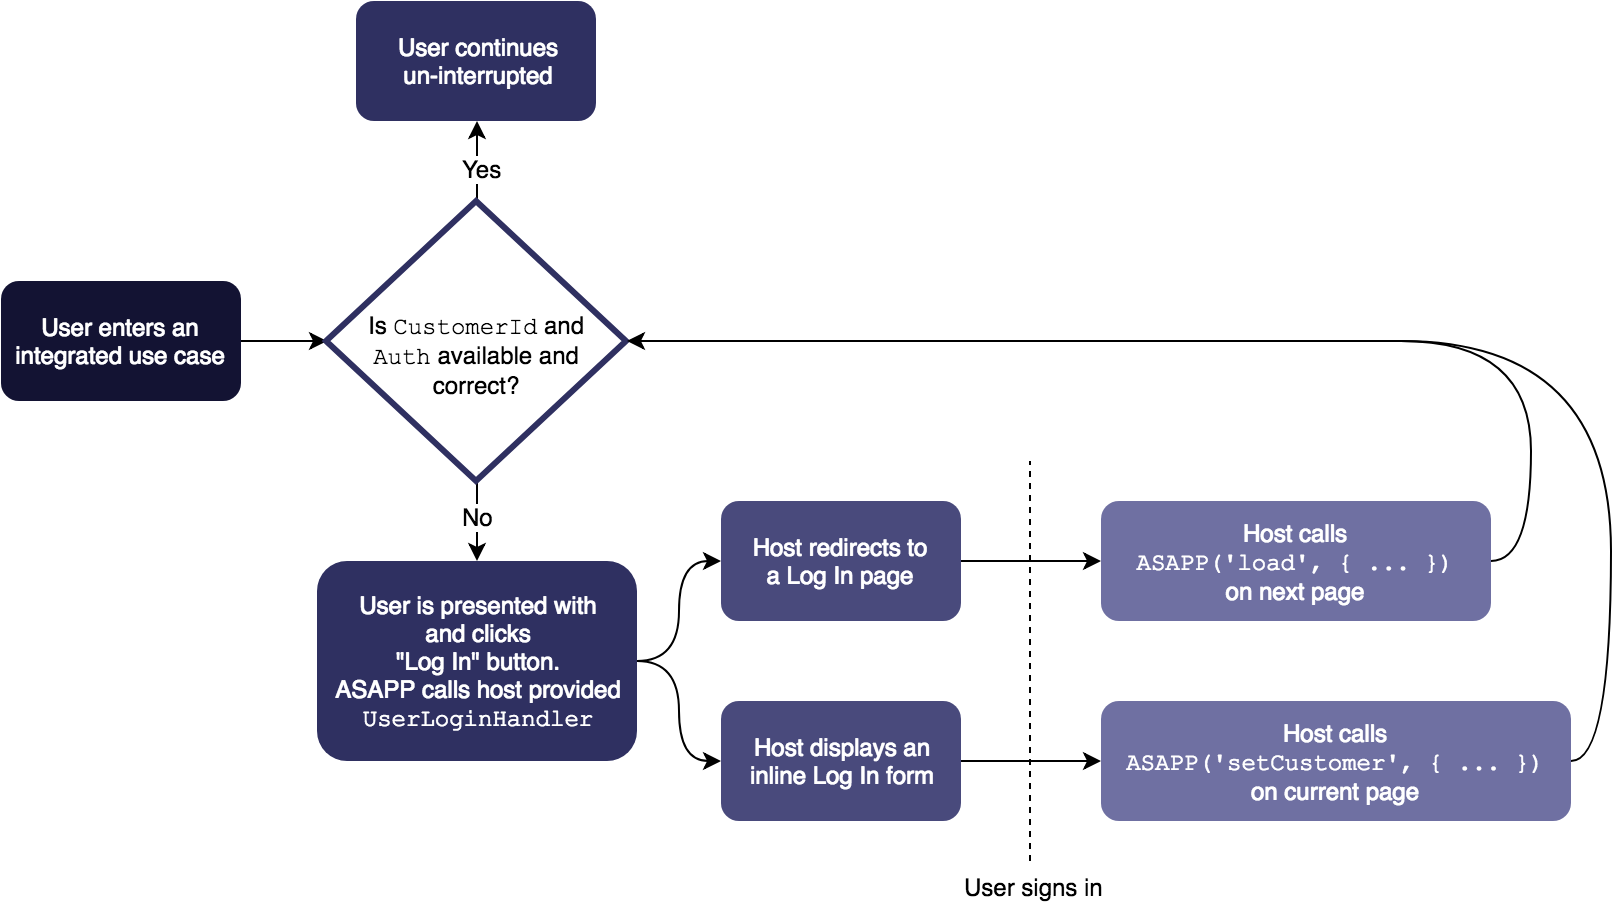 ```javascript
```
# Web ContextProvider
Source: https://docs.asapp.com/messaging-platform/integrations/web-sdk/web-contextprovider
This section details the various ways you can use the ASAPP ContextProvider with the Chat SDK API. Before using the ContextProvider, make sure you've [integrated the ASAPP SDK](/messaging-platform/integrations/web-sdk/web-quick-start "Web Quick Start") script on your page.
The ASAPP `ContextProvider` is used for passing various information about your users or their sessions to the Chat SDK. It is a key that may be set in the [Load and SetCustomer](/messaging-platform/integrations/web-sdk/web-javascript-api) APIs. The key must be assigned a function that will receive two arguments.
The first argument is a `callback` function. The second argument is a `needsRefresh` boolean indicating whether or not the authorization information needs to be refreshed.
## 'Callback'
After you've retrieved all the context needed for a user, call the `callback` argument with your context object as the sole argument. This will pass your context object to the ASAPP Chat SDK.
## 'needsRefresh'
The `needsRefresh` argument returns a boolean value indicating whether or not your user's authorization has expired.
```json
function contextProviderHandler(callback, needsRefresh) {
var contextObject = Object.assign(
{},
yourGetAnalyticsMethod(),
yourGetSessionMethod(),
yourGetAuthenticationMethod()
);
if (needsRefresh) {
Object.assign(contextObject.Auth,
getUpdatedAuthorization()
);
}
callback(contextObject);
}
ASAPP('setCustomer', {
CustomerId: yourGetCustomerIdMethod(),
ContextProvider: contextProviderHandler
}
)
\
;
```
## Authentication
The `ContextProvider` plays an important role in authorizing your users with the ASAPP Chat SDK. Whether your users are always authenticated or transitioning from an anonymous to integrated use case, you must use the ContextProvider's `Auth` key to provide a user's authorization.
```javascript
```
# Web ContextProvider
Source: https://docs.asapp.com/messaging-platform/integrations/web-sdk/web-contextprovider
This section details the various ways you can use the ASAPP ContextProvider with the Chat SDK API. Before using the ContextProvider, make sure you've [integrated the ASAPP SDK](/messaging-platform/integrations/web-sdk/web-quick-start "Web Quick Start") script on your page.
The ASAPP `ContextProvider` is used for passing various information about your users or their sessions to the Chat SDK. It is a key that may be set in the [Load and SetCustomer](/messaging-platform/integrations/web-sdk/web-javascript-api) APIs. The key must be assigned a function that will receive two arguments.
The first argument is a `callback` function. The second argument is a `needsRefresh` boolean indicating whether or not the authorization information needs to be refreshed.
## 'Callback'
After you've retrieved all the context needed for a user, call the `callback` argument with your context object as the sole argument. This will pass your context object to the ASAPP Chat SDK.
## 'needsRefresh'
The `needsRefresh` argument returns a boolean value indicating whether or not your user's authorization has expired.
```json
function contextProviderHandler(callback, needsRefresh) {
var contextObject = Object.assign(
{},
yourGetAnalyticsMethod(),
yourGetSessionMethod(),
yourGetAuthenticationMethod()
);
if (needsRefresh) {
Object.assign(contextObject.Auth,
getUpdatedAuthorization()
);
}
callback(contextObject);
}
ASAPP('setCustomer', {
CustomerId: yourGetCustomerIdMethod(),
ContextProvider: contextProviderHandler
}
)
\
;
```
## Authentication
The `ContextProvider` plays an important role in authorizing your users with the ASAPP Chat SDK. Whether your users are always authenticated or transitioning from an anonymous to integrated use case, you must use the ContextProvider's `Auth` key to provide a user's authorization.
 ## Basic Integration (With Authentication)
Integrating the Chat SDK with authenticated users requires the addition of the `CustomerId`, `ContextProvider`, and `UserLoginHandler` keys.
See the [App Settings](/messaging-platform/integrations/web-sdk/web-app-settings "Web App Settings") page for more detailed information on their usage. With each of these keys set, a user will be able to access integrated use cases or be capable of logging in if they are not already.
The following code snippet is an example of providing user credentials for allowing a user to enter integrated use cases.
```json
document.addEventListener('DOMContentLoaded', function () {
ASAPP('load', {
APIHostname: 'example-co.api.asapp.com',
AppId: 'example-co',
CustomerId: 'hashed-customer-identifier',
ContextProvider: function (callback, tokenIsExpired) {
var context = {
Auth: {
Token: 'secure-session-user-token'
}
};
callback(context);
},
// If a user's token expires or their user credentials
// are not available, handle their login path
UserLoginHandler: function () {
window.location.href = '/login';
}
});
});
```
With the above information set, a user will be able to access integrated use cases. If their session or token information has expired, then the user will be presented with a "Sign In" button.
Once the user clicks the Sign In button, the Chat SDK will call your provided `UserLoginHandler`, allowing them to authorize.
Here's a sample of what the Sign In button looks like.
## Basic Integration (With Authentication)
Integrating the Chat SDK with authenticated users requires the addition of the `CustomerId`, `ContextProvider`, and `UserLoginHandler` keys.
See the [App Settings](/messaging-platform/integrations/web-sdk/web-app-settings "Web App Settings") page for more detailed information on their usage. With each of these keys set, a user will be able to access integrated use cases or be capable of logging in if they are not already.
The following code snippet is an example of providing user credentials for allowing a user to enter integrated use cases.
```json
document.addEventListener('DOMContentLoaded', function () {
ASAPP('load', {
APIHostname: 'example-co.api.asapp.com',
AppId: 'example-co',
CustomerId: 'hashed-customer-identifier',
ContextProvider: function (callback, tokenIsExpired) {
var context = {
Auth: {
Token: 'secure-session-user-token'
}
};
callback(context);
},
// If a user's token expires or their user credentials
// are not available, handle their login path
UserLoginHandler: function () {
window.location.href = '/login';
}
});
});
```
With the above information set, a user will be able to access integrated use cases. If their session or token information has expired, then the user will be presented with a "Sign In" button.
Once the user clicks the Sign In button, the Chat SDK will call your provided `UserLoginHandler`, allowing them to authorize.
Here's a sample of what the Sign In button looks like.
 ## Customizing the Interface
The Chat SDK offers a few basic keys for customizing the interface to your liking.
The `Display` key enables you to perform those customizations as needed. Please see the [Display Settings](/messaging-platform/integrations/web-sdk/web-app-settings#display "Display") section for detailed information on each of the available keys.
The following code snippet shows how to add the Display key to your integration to customize the display settings of the Chat SDK.
```json
document.addEventListener('DOMContentLoaded', function () {
ASAPP('load', {
APIHostname: 'example-co.api.asapp.com',
AppId: 'example-co',
Display: {
Align: 'left',
AlwaysShowMinimize: true,
BadgeColor: '#36393A',
BadgeText: 'Chat With Us',
BadgeType: 'tray',
FrameDraggable: true,
FrameStyle: 'sideBar'
}
});
});
```
For cases in which you have more specific styling needs, you may utilize the available IDs or classnames for targeting and customizing the Chat SDK elements with CSS.
These selectors are stable and can be used to target the ASAPP Badge and iFrame for specific styling needs.
The following code snippet provides a CSS example showcasing a few advanced style changes.
```json
#asapp-chat-sdk-badge,
#asapp-chat-sdk-badge,
#asapp-chat-sdk-badge {
border-radius: 25px;
bottom: 10px;
box-shadow: 0 0 0 2px #fff, 0 0 0 4px #36393A;
}
#asapp-chat-sdk-iframe {
border-radius: 0;
}
```
With the above customizations in place, the Chat SDK Badge will look like the following.
## Customizing the Interface
The Chat SDK offers a few basic keys for customizing the interface to your liking.
The `Display` key enables you to perform those customizations as needed. Please see the [Display Settings](/messaging-platform/integrations/web-sdk/web-app-settings#display "Display") section for detailed information on each of the available keys.
The following code snippet shows how to add the Display key to your integration to customize the display settings of the Chat SDK.
```json
document.addEventListener('DOMContentLoaded', function () {
ASAPP('load', {
APIHostname: 'example-co.api.asapp.com',
AppId: 'example-co',
Display: {
Align: 'left',
AlwaysShowMinimize: true,
BadgeColor: '#36393A',
BadgeText: 'Chat With Us',
BadgeType: 'tray',
FrameDraggable: true,
FrameStyle: 'sideBar'
}
});
});
```
For cases in which you have more specific styling needs, you may utilize the available IDs or classnames for targeting and customizing the Chat SDK elements with CSS.
These selectors are stable and can be used to target the ASAPP Badge and iFrame for specific styling needs.
The following code snippet provides a CSS example showcasing a few advanced style changes.
```json
#asapp-chat-sdk-badge,
#asapp-chat-sdk-badge,
#asapp-chat-sdk-badge {
border-radius: 25px;
bottom: 10px;
box-shadow: 0 0 0 2px #fff, 0 0 0 4px #36393A;
}
#asapp-chat-sdk-iframe {
border-radius: 0;
}
```
With the above customizations in place, the Chat SDK Badge will look like the following.
 ## Advanced Integration
Here's a more robust example showing how to utilize most of the ASAPP Chat SDK settings.
In the examples below we will define a few helper methods, then pass those helpers to the [Load](/messaging-platform/integrations/web-sdk/web-javascript-api#load "'load'") or [SetCustomer](/messaging-platform/integrations/web-sdk/web-javascript-api#setcustomer "'setCustomer'") APIs.
The following example showcases a [ContextProvider](/messaging-platform/integrations/web-sdk/web-contextprovider "Web ContextProvider") that sets some basic session information, then sets any available user authentication information. Once that information is retrieved, it passes the prepared context to the `callback` so that ASAPP can process each Chat SDK request.
The following code snippet is a ContextProvider example utilizing session expiration conditionals.
```javascript
function asappContextProvider (callback, tokenIsExpired, sessionInfo) {
var context = {
CustomerInfo: {
Region: 'north-america',
ViewingProduct: 'New Smartphone',
}
};
if (tokenIsExpired || !sessionInfo) {
sessionInfo = retrieveSessionInfo();
};
if (sessionInfo) {
context.Auth = {
Cookies: {
'X-User-Header': sessionInfo.cookies.userValue
},
Token: sessionInfo.access_token
};
}
callback(context);
}
```
The next example shows conditional logic for logging a user in on single or multi-page application. You'll likely only need to handle one of the cases in your application.
If a user enters a use case they are not authorized for, they will be presented with a "Sign In" button within the SDK.
When the user clicks that link, it will trigger your provided [UserLoginHandler](/messaging-platform/integrations/web-sdk/web-app-settings#userloginhandler "UserLoginHandler") so you can allow the user to authenticate.
The following code snippet shows a UserLoginHandler utilizing page redirection or modals to log a user in.
```javascript
function asappUserLoginHandler () {
if (isSinglePageApp) {
displayUserLoginModal()
.then(function (customer, sessionInfo) {
ASAPP('SetCustomer', {
CustomerId: customer,
ContextProvider: function (callback, tokenIsExpired) {
asappContextProvider(callback, tokenIsExpired, sessionInfo)
}
});
})
} else {
window.location.href = '/login';
}
}
```
The next helper defines the [onLoadComplete](/messaging-platform/integrations/web-sdk/web-app-settings#onloadcomplete "onLoadComplete") handler.
It is used for preparing any additional logic you wish to tie to ASAPP or your own page functionality. The below example checks whether the Chat SDK loaded via a [Trigger](/messaging-platform/integrations/web-sdk/web-features#triggers "Triggers") (via the `isDisplayingChat` argument).
If it's configured to display, it prepares some event bindings through the [Action API](/messaging-platform/integrations/web-sdk/web-javascript-api#action-on-or-off "action: 'on' or 'off'") which in turn call an example metrics service.
The following code snippet shows an `onLoadComplete` handler being used with the isDisplayingChat conditional and Action API.
```javascript
function asappOnLoadComplete (isDisplayingChat) {
if (isDisplayingChat) {
// Chat SDK has loaded and exists on the page
document.body.classList.add('chat-sdk-loaded');
var customerId = retrieveCurrentSessionOrUserId();
ASAPP('on', 'issue:new', function (event) {
metricService('set', 'chat:action', {
actionName: event.type,
customerId: customerId,
externalCustomerId: event.detail.customerId,
issueId: event.detail.issueId
})
});
ASAPP('on', 'message:received', function (event) {
metricService('set', 'chat:action', {
actionName: event.type,
customerId: customerId,
externalCustomerId: event.detail.customerId,
isLiveChat: event.detail.isLiveChat,
issueId: event.detail.issueId,
senderType: event.detail.senderType
})
});
} else {
// Chat SDK is not configured to display on this page.
// See Display Settings: Triggers documentation
}
}
```
Finally, we tie everything together. The example below shows a combination of adding the above helper functions to the ASAPP [Load API](/messaging-platform/integrations/web-sdk/web-javascript-api#load "'load'").
It also combines many of the [App Settings](/messaging-platform/integrations/web-sdk/web-app-settings "Web App Settings") available to you and your integration.
```javascript
document.addEventListener('DOMContentLoaded', function () {
var customerId = retrieveCustomerIdentifier();
ASAPP('load', {
APIHostname: 'example-co.api.asapp.com',
AppId: 'example-co',
Display: {
Align: 'left',
AlwaysShowMinimize: true,
BadgeColor: 'rebeccapurple',
BadgeText: 'Chat With Us',
BadgeType: 'tray',
FrameDraggable: true,
FrameStyle: 'sideBar',
Identity: 'subsidiary-branding'
},
Intent: {
Code: 'PAYBILL'
},
RegionCode: 'US',
Sound: true,
CustomerId: customerId,
ContextProvider: asappContextProvider,
UserLoginHandler: asappUserLoginHandler,
onLoadComplete: asappOnLoadComplete
});
});
```
# Web Features
Source: https://docs.asapp.com/messaging-platform/integrations/web-sdk/web-features
This section describes various features that are unique to the ASAPP Web SDK:
* [Triggers](#triggers "Triggers")
* [Deeplinks](#deeplinks-11865 "Deeplinks")
In addition, please see [Chat Instead](/messaging-platform/integrations/chat-instead/web "Web").
## Triggers
A Trigger is an ASAPP feature that allows you to specify which pages display the ASAPP Chat UI. You may choose to show the ASAPP Chat UI on all pages where the ASAPP Chat SDK is [embedded and loaded](/messaging-platform/integrations/web-sdk/web-quick-start "Web Quick Start"), or on just a subset of those pages.
## Advanced Integration
Here's a more robust example showing how to utilize most of the ASAPP Chat SDK settings.
In the examples below we will define a few helper methods, then pass those helpers to the [Load](/messaging-platform/integrations/web-sdk/web-javascript-api#load "'load'") or [SetCustomer](/messaging-platform/integrations/web-sdk/web-javascript-api#setcustomer "'setCustomer'") APIs.
The following example showcases a [ContextProvider](/messaging-platform/integrations/web-sdk/web-contextprovider "Web ContextProvider") that sets some basic session information, then sets any available user authentication information. Once that information is retrieved, it passes the prepared context to the `callback` so that ASAPP can process each Chat SDK request.
The following code snippet is a ContextProvider example utilizing session expiration conditionals.
```javascript
function asappContextProvider (callback, tokenIsExpired, sessionInfo) {
var context = {
CustomerInfo: {
Region: 'north-america',
ViewingProduct: 'New Smartphone',
}
};
if (tokenIsExpired || !sessionInfo) {
sessionInfo = retrieveSessionInfo();
};
if (sessionInfo) {
context.Auth = {
Cookies: {
'X-User-Header': sessionInfo.cookies.userValue
},
Token: sessionInfo.access_token
};
}
callback(context);
}
```
The next example shows conditional logic for logging a user in on single or multi-page application. You'll likely only need to handle one of the cases in your application.
If a user enters a use case they are not authorized for, they will be presented with a "Sign In" button within the SDK.
When the user clicks that link, it will trigger your provided [UserLoginHandler](/messaging-platform/integrations/web-sdk/web-app-settings#userloginhandler "UserLoginHandler") so you can allow the user to authenticate.
The following code snippet shows a UserLoginHandler utilizing page redirection or modals to log a user in.
```javascript
function asappUserLoginHandler () {
if (isSinglePageApp) {
displayUserLoginModal()
.then(function (customer, sessionInfo) {
ASAPP('SetCustomer', {
CustomerId: customer,
ContextProvider: function (callback, tokenIsExpired) {
asappContextProvider(callback, tokenIsExpired, sessionInfo)
}
});
})
} else {
window.location.href = '/login';
}
}
```
The next helper defines the [onLoadComplete](/messaging-platform/integrations/web-sdk/web-app-settings#onloadcomplete "onLoadComplete") handler.
It is used for preparing any additional logic you wish to tie to ASAPP or your own page functionality. The below example checks whether the Chat SDK loaded via a [Trigger](/messaging-platform/integrations/web-sdk/web-features#triggers "Triggers") (via the `isDisplayingChat` argument).
If it's configured to display, it prepares some event bindings through the [Action API](/messaging-platform/integrations/web-sdk/web-javascript-api#action-on-or-off "action: 'on' or 'off'") which in turn call an example metrics service.
The following code snippet shows an `onLoadComplete` handler being used with the isDisplayingChat conditional and Action API.
```javascript
function asappOnLoadComplete (isDisplayingChat) {
if (isDisplayingChat) {
// Chat SDK has loaded and exists on the page
document.body.classList.add('chat-sdk-loaded');
var customerId = retrieveCurrentSessionOrUserId();
ASAPP('on', 'issue:new', function (event) {
metricService('set', 'chat:action', {
actionName: event.type,
customerId: customerId,
externalCustomerId: event.detail.customerId,
issueId: event.detail.issueId
})
});
ASAPP('on', 'message:received', function (event) {
metricService('set', 'chat:action', {
actionName: event.type,
customerId: customerId,
externalCustomerId: event.detail.customerId,
isLiveChat: event.detail.isLiveChat,
issueId: event.detail.issueId,
senderType: event.detail.senderType
})
});
} else {
// Chat SDK is not configured to display on this page.
// See Display Settings: Triggers documentation
}
}
```
Finally, we tie everything together. The example below shows a combination of adding the above helper functions to the ASAPP [Load API](/messaging-platform/integrations/web-sdk/web-javascript-api#load "'load'").
It also combines many of the [App Settings](/messaging-platform/integrations/web-sdk/web-app-settings "Web App Settings") available to you and your integration.
```javascript
document.addEventListener('DOMContentLoaded', function () {
var customerId = retrieveCustomerIdentifier();
ASAPP('load', {
APIHostname: 'example-co.api.asapp.com',
AppId: 'example-co',
Display: {
Align: 'left',
AlwaysShowMinimize: true,
BadgeColor: 'rebeccapurple',
BadgeText: 'Chat With Us',
BadgeType: 'tray',
FrameDraggable: true,
FrameStyle: 'sideBar',
Identity: 'subsidiary-branding'
},
Intent: {
Code: 'PAYBILL'
},
RegionCode: 'US',
Sound: true,
CustomerId: customerId,
ContextProvider: asappContextProvider,
UserLoginHandler: asappUserLoginHandler,
onLoadComplete: asappOnLoadComplete
});
});
```
# Web Features
Source: https://docs.asapp.com/messaging-platform/integrations/web-sdk/web-features
This section describes various features that are unique to the ASAPP Web SDK:
* [Triggers](#triggers "Triggers")
* [Deeplinks](#deeplinks-11865 "Deeplinks")
In addition, please see [Chat Instead](/messaging-platform/integrations/chat-instead/web "Web").
## Triggers
A Trigger is an ASAPP feature that allows you to specify which pages display the ASAPP Chat UI. You may choose to show the ASAPP Chat UI on all pages where the ASAPP Chat SDK is [embedded and loaded](/messaging-platform/integrations/web-sdk/web-quick-start "Web Quick Start"), or on just a subset of those pages.
 Once you've [embedded](/messaging-platform/integrations/web-sdk/web-quick-start#1-embed-the-script "1. Embed the Script") and [loaded](/messaging-platform/integrations/web-sdk/web-javascript-api#load "'load'") the Chat SDK on your web pages, ASAPP will determine whether or not to display the Chat UI on the user's current URL.
URLs that are enabled for displaying the UI are configured by a feature known as Triggers.
Once you've [embedded](/messaging-platform/integrations/web-sdk/web-quick-start#1-embed-the-script "1. Embed the Script") and [loaded](/messaging-platform/integrations/web-sdk/web-javascript-api#load "'load'") the Chat SDK on your web pages, ASAPP will determine whether or not to display the Chat UI on the user's current URL.
URLs that are enabled for displaying the UI are configured by a feature known as Triggers.
 1. Visit the **Admin > Triggers** section of your Admin Desk.
2. Click the **Add +** button from the Triggers settings page.
3. In the **URL Link** field, enter the URL for the page where you would like to display the ASAPP Chat UI. (See the **Types of Triggers** section below for some example values.)
4. Click **Next >**.
5. Give the Trigger a display name. (Display names are used only on the Triggers settings page to help you organize and manage your triggers.)
6. Click **Save**.
7. You should now see the new entry on your Trigger settings page.
8. Visit the newly configured page on your site to double-check that the ASAPP Chat UI is loading or hiding as you expect.
### Types of Triggers
You may finely control the display of the ASAPP Chat UI on your site by adding as many Triggers as you like.
Triggers can be defined in two different ways: as **Wildcard** and as **Single-Page Triggers**.
#### Wildcard Triggers
You can use the wildcard character in the URL Link field of a Trigger to enable the display of the Chat SDK pages that follow a URL pattern.
The asterisk (i.e., `/*` is the wildcard character you use when defining a Trigger. When you use an asterisk in the URL Link of your Trigger definition, that character will match any sequence of one or more characters.
To set a wildcard for your entire domain, enter a **URL Link** value for your domain name, followed by `/*` (e.g., `example.com/*` ). This will enable the display of the ASAPP Chat UI on all pages of your site.
To enable the ASAPP Chat UI to appear on a more limited set of pages, enter a **URL Link** value that includes the appropriate sub-route path, followed by the `/*` wildcard (e.g., `example.com/settings/*`).
This will cause the Chat UI to display on any pages that start with the URL and sub-route `example.com/settings/`, such as `example.com/settings/profile` and `example.com/settings/payment`.
#### Single-Page Triggers
If you want the ASAPP Chat UI to display on only a few specific pages, you can create a separate Trigger for each of those pages, one at a time, by entering the exact URL for the page you wish to enable in the URL Link field of the Trigger definition.
For example, entering `example.com/customer-support/shipping.html` in the URL Link field of your Trigger definition will enable the ASAPP Chat UI to display on that single page.
## Deeplinks
A feature that defines how the SDK opens hyperlinks when a user clicks a link to another document. In the ASAPP Web SDK, we use the browser's `window.location.origin` API to determine whether the link should open in the same window or a new window.
In order for a link to open in the same window as the user's current SDK window, the `window.location.origin` must return a matching protocol and hostname.
1. Visit the **Admin > Triggers** section of your Admin Desk.
2. Click the **Add +** button from the Triggers settings page.
3. In the **URL Link** field, enter the URL for the page where you would like to display the ASAPP Chat UI. (See the **Types of Triggers** section below for some example values.)
4. Click **Next >**.
5. Give the Trigger a display name. (Display names are used only on the Triggers settings page to help you organize and manage your triggers.)
6. Click **Save**.
7. You should now see the new entry on your Trigger settings page.
8. Visit the newly configured page on your site to double-check that the ASAPP Chat UI is loading or hiding as you expect.
### Types of Triggers
You may finely control the display of the ASAPP Chat UI on your site by adding as many Triggers as you like.
Triggers can be defined in two different ways: as **Wildcard** and as **Single-Page Triggers**.
#### Wildcard Triggers
You can use the wildcard character in the URL Link field of a Trigger to enable the display of the Chat SDK pages that follow a URL pattern.
The asterisk (i.e., `/*` is the wildcard character you use when defining a Trigger. When you use an asterisk in the URL Link of your Trigger definition, that character will match any sequence of one or more characters.
To set a wildcard for your entire domain, enter a **URL Link** value for your domain name, followed by `/*` (e.g., `example.com/*` ). This will enable the display of the ASAPP Chat UI on all pages of your site.
To enable the ASAPP Chat UI to appear on a more limited set of pages, enter a **URL Link** value that includes the appropriate sub-route path, followed by the `/*` wildcard (e.g., `example.com/settings/*`).
This will cause the Chat UI to display on any pages that start with the URL and sub-route `example.com/settings/`, such as `example.com/settings/profile` and `example.com/settings/payment`.
#### Single-Page Triggers
If you want the ASAPP Chat UI to display on only a few specific pages, you can create a separate Trigger for each of those pages, one at a time, by entering the exact URL for the page you wish to enable in the URL Link field of the Trigger definition.
For example, entering `example.com/customer-support/shipping.html` in the URL Link field of your Trigger definition will enable the ASAPP Chat UI to display on that single page.
## Deeplinks
A feature that defines how the SDK opens hyperlinks when a user clicks a link to another document. In the ASAPP Web SDK, we use the browser's `window.location.origin` API to determine whether the link should open in the same window or a new window.
In order for a link to open in the same window as the user's current SDK window, the `window.location.origin` must return a matching protocol and hostname.
Key |
Description |
Required |
|---|---|---|
|
Phone number used when a user clicks phone in Chat Instead. |
Yes |
Sets the ASAPP APIHostName for connecting customers with customer support. |
No (Required if you have not initialized the WebSDK via the |
|
Your unique Company Identifier. |
 ## Quick Start Guide
1. Create a Business Manager (BM) Account with Meta
2. Create WhatsApp Business Accounts (WABA) in AI-Console
3. Modify Flows and Test
4. Create and Implement Entry Points
5. Determine Launch and Throttling Strategy
### Create a Business Manager (BM) Account
Before integrating with ASAPP's WhatsApp adapter, you must create a Business Manager (BM) account with Meta - visit [this page for account creation](https://www.facebook.com/business/help/1710077379203657?id=180505742745347).
Following account creation, Meta will also request you follow a [business verification](https://www.facebook.com/business/help/1095661473946872?id=180505742745347) process before proceeding.
### Create WhatsApp Business Accounts (WABAs)
Once a Business Manager account is created and verified, proceed to set up WhatsApp Business Accounts (WABAs) using Meta's embedded signup flow in AI-Console's **Messaging Channels** section.
## Quick Start Guide
1. Create a Business Manager (BM) Account with Meta
2. Create WhatsApp Business Accounts (WABA) in AI-Console
3. Modify Flows and Test
4. Create and Implement Entry Points
5. Determine Launch and Throttling Strategy
### Create a Business Manager (BM) Account
Before integrating with ASAPP's WhatsApp adapter, you must create a Business Manager (BM) account with Meta - visit [this page for account creation](https://www.facebook.com/business/help/1710077379203657?id=180505742745347).
Following account creation, Meta will also request you follow a [business verification](https://www.facebook.com/business/help/1095661473946872?id=180505742745347) process before proceeding.
### Create WhatsApp Business Accounts (WABAs)
Once a Business Manager account is created and verified, proceed to set up WhatsApp Business Accounts (WABAs) using Meta's embedded signup flow in AI-Console's **Messaging Channels** section.
 #### Register Phone Numbers
As part of the signup flow, each WABA must have at least one phone number assigned to it (multiple phone #s per WABA are supported). Before adding a number, you must also create a profile display name, **which must match the name of the Business Manager (BM) account.**
#### Register Phone Numbers
As part of the signup flow, each WABA must have at least one phone number assigned to it (multiple phone #s per WABA are supported). Before adding a number, you must also create a profile display name, **which must match the name of the Business Manager (BM) account.**

 Similarly, forms sent by agents and feedback forms at the end of chat also send messages with links to a separate page to complete the survey. Once the survey is completed, users are redirected back to WhatsApp.
#### Quick Reply Limitations
Quick replies in WhatsApp also have different limitations from other ASAPP SDKs:
* Each node may only include up to three quick reply options; a node with more than three replies will be truncated and only the first three replies will be shown.
* Each quick reply may only include up to 20 characters; a quick reply with more than 20 characters will be truncated and only show the first 17 characters, followed by an ellipsis
* Sending a node that includes both a button in the message and quick replies is not recommended, as the links will be sent to the customer out of order
#### Authentication
The WhatsApp Cloud API currently **does not support authentication**. As such, login nodes should not be used in flows that can be reached by users on WhatsApp.
#### Attachments Cards
Nodes that include attachments, such as cards and carousels, are not supported in this channel.
Similarly, forms sent by agents and feedback forms at the end of chat also send messages with links to a separate page to complete the survey. Once the survey is completed, users are redirected back to WhatsApp.
#### Quick Reply Limitations
Quick replies in WhatsApp also have different limitations from other ASAPP SDKs:
* Each node may only include up to three quick reply options; a node with more than three replies will be truncated and only the first three replies will be shown.
* Each quick reply may only include up to 20 characters; a quick reply with more than 20 characters will be truncated and only show the first 17 characters, followed by an ellipsis
* Sending a node that includes both a button in the message and quick replies is not recommended, as the links will be sent to the customer out of order
#### Authentication
The WhatsApp Cloud API currently **does not support authentication**. As such, login nodes should not be used in flows that can be reached by users on WhatsApp.
#### Attachments Cards
Nodes that include attachments, such as cards and carousels, are not supported in this channel.
 ## Customization
Virtual Agent is fully customizable to fit your brand's unique needs. This includes:
* Determing the list of Intents and how they are routed.
* Advanced flows to take in structured and unstructured input.
* Reach out to APIs to both receive and send data.
### Access
The Virtual Agent is configured through the AI-Console. To access AI-Console, log into [Insights Manager](/messaging-platform/insights-manager "Insights Manager"), click on your user icon, and then **Go to AI-Console**. This option will only be available if your organization has granted you permission to access AI-Console.
## How It Works
The Virtual Agent understands what customers say and transforms it into structured data that you can use to define how the Virtual Agent responds. This is accomplished via the following core concepts and components:
### Intents
Intents are the set of reasons that a customer might contact your business and are recognized by the Virtual Agent when the customer first reaches out.
The Virtual Agent can also understand when a user changes intent in the middle of a conversation (see: [digressions](#core-dialog "Core Dialog")).
Our teams can work with you to refine your intent list on an ongoing basis, and train the Virtual Agent to recognize them. Examples include requests to "Pay Bill" or "Reset Password".
Once an intent is recognized, it can be used to determine what happens next in the dialog.
### Intent Routes
Once an intent has been recognized, the next question is "so what?". Intent routes house the logic that determines what will happen after an intent has been recognized.
* Once a customer's intent is classified, the default behaviour is for the Virtual Agent to place the customer in an agent queue
* Alternatively, an intent route can be used to specify a pre-defined flow for the Virtual Agent to execute, which can be used to collect additional information, offer solutions, or link a customer out to self-serve elsewhere.
* To promote flexibility, intent routes can point to different flows based on conditional logic that uses contextual data, like customer channels.
## Customization
Virtual Agent is fully customizable to fit your brand's unique needs. This includes:
* Determing the list of Intents and how they are routed.
* Advanced flows to take in structured and unstructured input.
* Reach out to APIs to both receive and send data.
### Access
The Virtual Agent is configured through the AI-Console. To access AI-Console, log into [Insights Manager](/messaging-platform/insights-manager "Insights Manager"), click on your user icon, and then **Go to AI-Console**. This option will only be available if your organization has granted you permission to access AI-Console.
## How It Works
The Virtual Agent understands what customers say and transforms it into structured data that you can use to define how the Virtual Agent responds. This is accomplished via the following core concepts and components:
### Intents
Intents are the set of reasons that a customer might contact your business and are recognized by the Virtual Agent when the customer first reaches out.
The Virtual Agent can also understand when a user changes intent in the middle of a conversation (see: [digressions](#core-dialog "Core Dialog")).
Our teams can work with you to refine your intent list on an ongoing basis, and train the Virtual Agent to recognize them. Examples include requests to "Pay Bill" or "Reset Password".
Once an intent is recognized, it can be used to determine what happens next in the dialog.
### Intent Routes
Once an intent has been recognized, the next question is "so what?". Intent routes house the logic that determines what will happen after an intent has been recognized.
* Once a customer's intent is classified, the default behaviour is for the Virtual Agent to place the customer in an agent queue
* Alternatively, an intent route can be used to specify a pre-defined flow for the Virtual Agent to execute, which can be used to collect additional information, offer solutions, or link a customer out to self-serve elsewhere.
* To promote flexibility, intent routes can point to different flows based on conditional logic that uses contextual data, like customer channels.
 ### Flows
Flows define how the Virtual Agent interacts with the customer given a specific situation. They can be as simple as an answer to an FAQ, or as complex as a multi-turn dialog used to offer self-service recommendations. Flows are built through a series of [nodes](#flow-nodes "Flow Nodes") that dictate the flow of the conversation as well as any business logic it needs to perform. Once built, flows can be reached through [intent routing](#intent-routes "Intent Routes"), or redirected to from other flows.
### Flows
Flows define how the Virtual Agent interacts with the customer given a specific situation. They can be as simple as an answer to an FAQ, or as complex as a multi-turn dialog used to offer self-service recommendations. Flows are built through a series of [nodes](#flow-nodes "Flow Nodes") that dictate the flow of the conversation as well as any business logic it needs to perform. Once built, flows can be reached through [intent routing](#intent-routes "Intent Routes"), or redirected to from other flows.
 ## Attributes List
The Attributes List contains all the attributes available for intent routing. Here, you'll find the following information displayed in table format:
1. **Attribute name:** display name of the attribute
2. **Definition:** Indicates if the attribute is Standard or Custom. Standard attributes are natively supported by ASAPP. Custom attributes are added in accordance with your business requirements\*
3. **Type:** Indicates the value type of an attribute. There are two possible types: Boolean, or Value.
a. **Boolean:** A boolean attribute includes two values. For example: Yes/No, True/False, On/Off.
b. **Value:** A value attribute can include any number of values. For example: Market 1, Market 2, Market 3.
4. **Origin Key:** exact value that is passed from the company to ASAPP.
## Attributes List
The Attributes List contains all the attributes available for intent routing. Here, you'll find the following information displayed in table format:
1. **Attribute name:** display name of the attribute
2. **Definition:** Indicates if the attribute is Standard or Custom. Standard attributes are natively supported by ASAPP. Custom attributes are added in accordance with your business requirements\*
3. **Type:** Indicates the value type of an attribute. There are two possible types: Boolean, or Value.
a. **Boolean:** A boolean attribute includes two values. For example: Yes/No, True/False, On/Off.
b. **Value:** A value attribute can include any number of values. For example: Market 1, Market 2, Market 3.
4. **Origin Key:** exact value that is passed from the company to ASAPP.
 To view specific attribute details, click an **attribute name** to launch the details modal.
1. **Description:** Describes what the attribute is.
2. **Value ID:** Unique, non-editable key that is directly passed to ASAPP for that attribute (can be non-human readable).
3. **Value name:** Display name for the value to describe what the attribute value is. These value names are reflected in intent routing for ease of use.
Descriptions and value names can be edited. To modify these fields, make your changes and click **Save**. On click, changes will be automatically saved, and changes take effect immediately.
To view specific attribute details, click an **attribute name** to launch the details modal.
1. **Description:** Describes what the attribute is.
2. **Value ID:** Unique, non-editable key that is directly passed to ASAPP for that attribute (can be non-human readable).
3. **Value name:** Display name for the value to describe what the attribute value is. These value names are reflected in intent routing for ease of use.
Descriptions and value names can be edited. To modify these fields, make your changes and click **Save**. On click, changes will be automatically saved, and changes take effect immediately.
 ### (b) Ongoing Refinement
Every flow you build can be thought of as a hypothesis for how to effectively understand and respond to your customers in a given scenario. Your ability to refine those hypotheses over time--and test new ones--is key to managing a truly effective virtual agent program that meets your customers needs.
We recommend performing the following steps on a regular basis--at least monthly--to identify opportunities for flow refinement, and improve effectiveness over time.
#### Step 1: Identify opportunity areas in particular flows
1. **Flows with relatively high containment, but a low success rate:** This indicates that customers are dropping out of the flow before they receive useful information.
2. **Flows with the highest negative EndSRS rates:** This indicates that the flow did not meet the customer's needs.
#### Step 2: Determine Likely Causes for Flow Underperformance, Identify Remedies
Once you've identified problematic flows, the next step is to determine why they are under-performing. In most cases you'll quickly identify at least one of the following issues with your flow by reviewing transcripts of issueIDs from Conversation Manager in Insights Manager:
**1. General unhelpfulness or imprecise responses**
Oftentimes flows break down when the virtual agent responds confidently in a manner that is on-topic but completely misses the customers' point. A common example is customers reaching out about a difficulty to log in, only to be sent to the same "forgot your password" experience they were experiencing issues with in the first place. Issues of this type typically receive a negative EndSRS score from the customer, who doesn't believe their problem has been solved.
The key to increase the performance of these flows is to configure the virtual agent to ask further, more specific questions before jumping to conclusions. Following the example above, you could ask "Have you tried resetting your password yet?". Including this question can go a long way to ensure that the customer receives the support they're looking for.
**2. Unrecognized customer responses**
This happens when the customer says or wants to say something that the virtual agent is unable to understand.
In free-text channels, this will result in classification errors where the virtual agent has re-prompted the customer to no avail, or has incorrectly attempted to digress to another intent. You can identify these issues by searching for re-prompt language in transcripts where customers have escalated to an agent from the flow in question. Looking at the customers' problematic response, you can determine how best to improve your flow. If customers' response is reasonable given the prompt, you can introduce a new response route in the flow and train it to understand what the customer is saying. Even if it's a path of dialog you don't want the virtual agent to pursue, it's better for the virtual agent to acknowledge what they said and redirect rather than failing to understand entirely.
**Don't:**
* "Which option would you prefer?"
* "Let's do both"
* "Sorry I didn't understand that. Could you try again?"
**Do:**
* "Which option would you prefer?"
* "Let's do both"
* "Sorry, but we can only accommodate one. Do you have a preference?"
Another option for avoiding unrecognized customer responses in free-text channels, is to rephrase the prompt in a manner that reduces the number of ways that a customer is likely to respond. This is often the best approach in cases where the virtual agent prompt is vague or open-ended.
**Don't:**
* "What issue are you having with your internet?"
* "I think maybe my router is broken"
* "Sorry I didn't understand that. Could you try again?"
**Do:**
* "Is your internet slow, or is it completely down?"
* "It's completely down"
In SDK channels (web or mobile apps), which are driven by quick replies, the concern here is to ensure that customers have the opportunity to respond in the way that makes sense given their situation. A common example failing to provide an "I'm not sure" quick reply option when asking a "yes or no" question. Faced with this situation, customers will often click on "new question" or abandon the chat entirely, leaving very little signal on what they intended. The best way to improve quick reply coverage is to maintain a clear understanding of the different contexts in which a customer might enter the flow---how they conceive of their issue, what information they might or might not have going in, etc. Gaining this perspective is helped greatly by reviewing live chat interactions that relate to the flow in question, and determining whether your flow could have accommodated the customer's situation.
**3. Incorrect classification**
This issue is unique to free-text use cases and happens when the virtual agent thinks the customer said one thing, when in fact the customer meant something else. One example would be a response like "no idea" being misclassified as "no" rather than the expected "I'm not sure."
Another example might be a response triggering a digression (i.e., a change of intent in the middle of a conversation), rather than an expected trained response route. This can happen in flows where you've trained response routes to help clarify a customer's issue but their response sounds like an intent and thus triggers a digression instead of the response route you intended. For example:
```
"I need help with a refund"
"No problem. What is the reason for the refund?"
"My flight got cancelled"
"Are you trying to rebook travel due to a cancelled flight?"\<\< Digression
"No, I'm asking about a refund"
```
While these issues tend to occur infrequently, when you do encounter them, the best place to start is revising the prompt to encourage responses that are less likely to be classified incorrectly. For example, instead of asking an open-ended question like "What is the reason for your refund?"---to which a customer response is very likely to sound like an intent---you can ask directly ("Was your flight cancelled?") or ask for more concrete information from which you can infer the answer ("No problem! What's the confirmation number?").
Alternatively, you can solve issues of incorrect classification by training a specific response route that targets the exact language that is proving problematic. In the case of the unclear "I'm not sure" route, a response route that's trained explicitly to recognize "no idea" might perform better than one that is broadly trained to recognize the long tail of phrases that more or less mean "I'm not sure." In this case, you can point the response route to the same node as your generic "I'm not sure" route to resolve the issue.
**4. Too much friction**
Another cause for underperformance is too much friction in a particular flow. This happens when the virtual agent is asking a lot of the customer.
One type of friction is authentication. Customers don't always remember their specific login or PINs, so authentication requests should be used only when needed. If customers are asked to find their authentication information unnecessarily, many will oftentimes abandon the chat.
Another type of friction is repetitive or redundant steps--particularly around disambiguating the customer. While it's helpful to clarify what a customer wants to do to adequately solve their need, repetitive questions that don't feel like they are progressing the customer forward often lead to a feeling of frustration--and abandonment.
#### Step 3: Version, improve, and track the impact of flow changes
Once you've identified an issue with a specific flow, create a new version of it in AI-Console with one of the remedies outlined above. After you have implemented a new version, you can save and release the new version to a lower environment to test it, and subsequently to production. Then, track the impact in Historical Reporting in Insights Manager by looking at the Flow Success Rate for such flow on the Business Flow Details tab of the Flow Dashboard.
### 2. Know your Channels
Messaging channels have advantages and limitations. Appreciating the differences will help you optimize virtual agents for the channels they live on, and avoid channel-specific pitfalls.
To illustrate this, look at a single flow rendered in Apple Messages for Business vs the ASAPP SDK:
### (b) Ongoing Refinement
Every flow you build can be thought of as a hypothesis for how to effectively understand and respond to your customers in a given scenario. Your ability to refine those hypotheses over time--and test new ones--is key to managing a truly effective virtual agent program that meets your customers needs.
We recommend performing the following steps on a regular basis--at least monthly--to identify opportunities for flow refinement, and improve effectiveness over time.
#### Step 1: Identify opportunity areas in particular flows
1. **Flows with relatively high containment, but a low success rate:** This indicates that customers are dropping out of the flow before they receive useful information.
2. **Flows with the highest negative EndSRS rates:** This indicates that the flow did not meet the customer's needs.
#### Step 2: Determine Likely Causes for Flow Underperformance, Identify Remedies
Once you've identified problematic flows, the next step is to determine why they are under-performing. In most cases you'll quickly identify at least one of the following issues with your flow by reviewing transcripts of issueIDs from Conversation Manager in Insights Manager:
**1. General unhelpfulness or imprecise responses**
Oftentimes flows break down when the virtual agent responds confidently in a manner that is on-topic but completely misses the customers' point. A common example is customers reaching out about a difficulty to log in, only to be sent to the same "forgot your password" experience they were experiencing issues with in the first place. Issues of this type typically receive a negative EndSRS score from the customer, who doesn't believe their problem has been solved.
The key to increase the performance of these flows is to configure the virtual agent to ask further, more specific questions before jumping to conclusions. Following the example above, you could ask "Have you tried resetting your password yet?". Including this question can go a long way to ensure that the customer receives the support they're looking for.
**2. Unrecognized customer responses**
This happens when the customer says or wants to say something that the virtual agent is unable to understand.
In free-text channels, this will result in classification errors where the virtual agent has re-prompted the customer to no avail, or has incorrectly attempted to digress to another intent. You can identify these issues by searching for re-prompt language in transcripts where customers have escalated to an agent from the flow in question. Looking at the customers' problematic response, you can determine how best to improve your flow. If customers' response is reasonable given the prompt, you can introduce a new response route in the flow and train it to understand what the customer is saying. Even if it's a path of dialog you don't want the virtual agent to pursue, it's better for the virtual agent to acknowledge what they said and redirect rather than failing to understand entirely.
**Don't:**
* "Which option would you prefer?"
* "Let's do both"
* "Sorry I didn't understand that. Could you try again?"
**Do:**
* "Which option would you prefer?"
* "Let's do both"
* "Sorry, but we can only accommodate one. Do you have a preference?"
Another option for avoiding unrecognized customer responses in free-text channels, is to rephrase the prompt in a manner that reduces the number of ways that a customer is likely to respond. This is often the best approach in cases where the virtual agent prompt is vague or open-ended.
**Don't:**
* "What issue are you having with your internet?"
* "I think maybe my router is broken"
* "Sorry I didn't understand that. Could you try again?"
**Do:**
* "Is your internet slow, or is it completely down?"
* "It's completely down"
In SDK channels (web or mobile apps), which are driven by quick replies, the concern here is to ensure that customers have the opportunity to respond in the way that makes sense given their situation. A common example failing to provide an "I'm not sure" quick reply option when asking a "yes or no" question. Faced with this situation, customers will often click on "new question" or abandon the chat entirely, leaving very little signal on what they intended. The best way to improve quick reply coverage is to maintain a clear understanding of the different contexts in which a customer might enter the flow---how they conceive of their issue, what information they might or might not have going in, etc. Gaining this perspective is helped greatly by reviewing live chat interactions that relate to the flow in question, and determining whether your flow could have accommodated the customer's situation.
**3. Incorrect classification**
This issue is unique to free-text use cases and happens when the virtual agent thinks the customer said one thing, when in fact the customer meant something else. One example would be a response like "no idea" being misclassified as "no" rather than the expected "I'm not sure."
Another example might be a response triggering a digression (i.e., a change of intent in the middle of a conversation), rather than an expected trained response route. This can happen in flows where you've trained response routes to help clarify a customer's issue but their response sounds like an intent and thus triggers a digression instead of the response route you intended. For example:
```
"I need help with a refund"
"No problem. What is the reason for the refund?"
"My flight got cancelled"
"Are you trying to rebook travel due to a cancelled flight?"\<\< Digression
"No, I'm asking about a refund"
```
While these issues tend to occur infrequently, when you do encounter them, the best place to start is revising the prompt to encourage responses that are less likely to be classified incorrectly. For example, instead of asking an open-ended question like "What is the reason for your refund?"---to which a customer response is very likely to sound like an intent---you can ask directly ("Was your flight cancelled?") or ask for more concrete information from which you can infer the answer ("No problem! What's the confirmation number?").
Alternatively, you can solve issues of incorrect classification by training a specific response route that targets the exact language that is proving problematic. In the case of the unclear "I'm not sure" route, a response route that's trained explicitly to recognize "no idea" might perform better than one that is broadly trained to recognize the long tail of phrases that more or less mean "I'm not sure." In this case, you can point the response route to the same node as your generic "I'm not sure" route to resolve the issue.
**4. Too much friction**
Another cause for underperformance is too much friction in a particular flow. This happens when the virtual agent is asking a lot of the customer.
One type of friction is authentication. Customers don't always remember their specific login or PINs, so authentication requests should be used only when needed. If customers are asked to find their authentication information unnecessarily, many will oftentimes abandon the chat.
Another type of friction is repetitive or redundant steps--particularly around disambiguating the customer. While it's helpful to clarify what a customer wants to do to adequately solve their need, repetitive questions that don't feel like they are progressing the customer forward often lead to a feeling of frustration--and abandonment.
#### Step 3: Version, improve, and track the impact of flow changes
Once you've identified an issue with a specific flow, create a new version of it in AI-Console with one of the remedies outlined above. After you have implemented a new version, you can save and release the new version to a lower environment to test it, and subsequently to production. Then, track the impact in Historical Reporting in Insights Manager by looking at the Flow Success Rate for such flow on the Business Flow Details tab of the Flow Dashboard.
### 2. Know your Channels
Messaging channels have advantages and limitations. Appreciating the differences will help you optimize virtual agents for the channels they live on, and avoid channel-specific pitfalls.
To illustrate this, look at a single flow rendered in Apple Messages for Business vs the ASAPP SDK:

 ##### ASAPP SDK
The ASAPP SDKs (Web, Android, and iOS) have a number of features that help to build rich virtual agent experiences.
Strengths of SDKs:
1. Quick Replies - surface explicit text options to a customer to tap/click on, and route to the next part of a flow.
2. Authentication / context - with the authentication of customers, the SDK allows for a persistent chat history which provides seamless continuity. Additionally, authentication allows for the direct calling of APIs (e.g. retrieving a bill amount).
Limitations:
* Not as sticky of an experience (i.e. it's not an application the customer has top of mind/high visibility), so the customer may abandon the chat. One cause for this is the lack of guaranteed push notifications -- particularly in the Web SDK.
How to optimize for ASAPP SDKs:
* We encourage you to build more complicated, multi-step flows, leveraging quick replies that keep customers on the rails.
### 3. Promote Function over Form
First and foremost, your virtual agent needs to be effective at facilitating dialog. It may be tempting to prioritize focus on virtual agent tone and voice but that can ultimately detract from virtual agent's functional purpose. Next we'll offer examples that illustrate effective or ineffective dialogs that will help you when building out your flows.
#### (a) It's OK to sound Bot-like
The virtual agent **is** a bot, and it primarily serves a functional purpose. It is much better to be explicit with customers and move the conversation forward, rather than making potential UX sacrifices to sound friendly or human-like. Customers are coming to a virtual agent to solve a specific problem efficiently. Here is a positive example of a greeting that, while bot-like, is clear and effective:
```
"Hello! How can I help you today? Choose from a topic below or type a specific question."
```
#### (b) Tell People How to Interact
Customers interact with virtual agents to solve a problem and/or to achieve something. They benefit from explicit guidance with how they are supposed to interact with the virtual agent. If your flow design expects the customer to do something, tell them upfront. Here is a positive example of clear instructions telling a customer how to interact with the virtual agent:
```
"Please choose an option below so we can best help"
```
#### (c) Set Clear Expectations for Redirects
The virtual agent can't always handle a customer's issue. When you need to redirect the customer to self-serve on a website, or even on a phone number, set clear expectations for what they need to do next. You never want a customer to feel abandoned. Here are two positive examples of very clear instructions about what the customer will need to do next, and what they can expect:
```
"To process your payment and complete your request, you'll need to call us at 1-800-555-5555. **Agents are available** from 8am to 9pm ET, Monday through Friday"
"You can check the status of your order on website by either **entering your order number** or **logging in**".
```
#### (d) Acknowledge Progress & Justify Steps
Think of a bot like a standard interaction funnel -- a customer has to go through multiple steps to achieve an outcome. Acknowledging progress made and justifying steps to the customer makes for a better user experience, and makes it more like for the customer to complete all of the steps (think of a breadcrumb in a checkout flow). The customer should have a sense of where they are in the process. Here's a simple example of orienting a customer to where they are in a process:
```
"We're happy to help answer questions about your bill, but will need you to sign in so we can access your account information."
```
#### (e) Be careful with Personification
Over-personifying your virtual agent can make for a frustrating customer experience:
* **Do** frame language in a more impersonal "we"
* **Don't** make the virtual agent "I"
* **Do** frame the virtual agent as a representative for your company.
* **Don't** give your virtual agent a name / distinct personality.
* **Do** give your virtual agent a warm, action-oriented tone.
* **Don't** give your virtual agent an overly friendly, text-heavy tone.
* **Do** "Great! We can help you pay your bill now. What payment method would you like to use?"
* **Don't** "Great, thank you so much for clarifying that! I am so happy to help you with your bill today."
#### (f) Affirm What Customers Say, Not What the Flow Does
Affirmations help customers feel heard, and they help customers understand what the virtual agent is taking away from their responses. When drafting a virtual agent response, ensure that you match the copy to the variety of customer responses that may precede it -- historical customer responses can be viewed in the utterance table in historical reporting.
If there is a broad set reasons for a customer to end up on a node or a flow, your affirmation should likewise be broad:
* **Do** "We can help with that"
* **Do** "We can help you with your bill"
* **Don't** "We can help you pay your bill online"
Similarly, if there is a narrow set of reasons for a customer to end up in a node or a flow, your affirmation should likewise be narrow. Even then, it's important to not phrase things in such a way that you're putting words in the mouth of the customer, so they don't feel frustrated by the virtual agent.
* **Do** "To set up autopay ..."
* **Don't** "It sounds like you want to set up autopay"
* **Don't** "Okay, so autopay"
In some cases where writing a good affirmation feels particularly tricky, feel free to err on the side of not having one. It's all good so long as the virtual agent responds in an expected manner given what the customer just said.
### 4. Reduce Friction
If interacting with your virtual agent is confusing or hard, people will revert to tried and true escalation pathways like shouting "agent" or just calling in. As you are designing flows, be mindful about the following friction points you could potentially introduce in your flows.
#### (a) Be Judicious with Deep Links
Deep links are used when you link a customer out of chat to self-serve. It is tempting to leverage existing web pages, and to create dozens of flows that are simple link outs. But this often does not provide a good customer experience.
A virtual agent that is mostly single step deep links will feel like a frustrating search engine. Wherever possible, try to solve a customer's problem conversationally within the chat itself. Don't rely on links as a default.
But, when you **do** rely on a deep link, make sure to:
1. Validate the link actually solves the customers intent and is accessible to all customers (e.g. not behind an authentication wall, or only accessible to certain types of customers).
2. Leverage native app links where possible.
3. Be clear about what the customer needs to do when they go to the link and leave the chat experience.
#### (b) Avoid All-or-Nothing Flow Requirements
Be careful with "all or nothing" requirements in a flow; if you want a customer to sign in to allow you to access an API, that's great, but give customers an alternative option at that moment too. Some customers might not remember their password.
When you are at a point in a flow where there is a required step or just one direction a customer can go, think about what alternative answer there could be for a customer. If you don't, those customers might just abandon the virtual agent at that point.
##### ASAPP SDK
The ASAPP SDKs (Web, Android, and iOS) have a number of features that help to build rich virtual agent experiences.
Strengths of SDKs:
1. Quick Replies - surface explicit text options to a customer to tap/click on, and route to the next part of a flow.
2. Authentication / context - with the authentication of customers, the SDK allows for a persistent chat history which provides seamless continuity. Additionally, authentication allows for the direct calling of APIs (e.g. retrieving a bill amount).
Limitations:
* Not as sticky of an experience (i.e. it's not an application the customer has top of mind/high visibility), so the customer may abandon the chat. One cause for this is the lack of guaranteed push notifications -- particularly in the Web SDK.
How to optimize for ASAPP SDKs:
* We encourage you to build more complicated, multi-step flows, leveraging quick replies that keep customers on the rails.
### 3. Promote Function over Form
First and foremost, your virtual agent needs to be effective at facilitating dialog. It may be tempting to prioritize focus on virtual agent tone and voice but that can ultimately detract from virtual agent's functional purpose. Next we'll offer examples that illustrate effective or ineffective dialogs that will help you when building out your flows.
#### (a) It's OK to sound Bot-like
The virtual agent **is** a bot, and it primarily serves a functional purpose. It is much better to be explicit with customers and move the conversation forward, rather than making potential UX sacrifices to sound friendly or human-like. Customers are coming to a virtual agent to solve a specific problem efficiently. Here is a positive example of a greeting that, while bot-like, is clear and effective:
```
"Hello! How can I help you today? Choose from a topic below or type a specific question."
```
#### (b) Tell People How to Interact
Customers interact with virtual agents to solve a problem and/or to achieve something. They benefit from explicit guidance with how they are supposed to interact with the virtual agent. If your flow design expects the customer to do something, tell them upfront. Here is a positive example of clear instructions telling a customer how to interact with the virtual agent:
```
"Please choose an option below so we can best help"
```
#### (c) Set Clear Expectations for Redirects
The virtual agent can't always handle a customer's issue. When you need to redirect the customer to self-serve on a website, or even on a phone number, set clear expectations for what they need to do next. You never want a customer to feel abandoned. Here are two positive examples of very clear instructions about what the customer will need to do next, and what they can expect:
```
"To process your payment and complete your request, you'll need to call us at 1-800-555-5555. **Agents are available** from 8am to 9pm ET, Monday through Friday"
"You can check the status of your order on website by either **entering your order number** or **logging in**".
```
#### (d) Acknowledge Progress & Justify Steps
Think of a bot like a standard interaction funnel -- a customer has to go through multiple steps to achieve an outcome. Acknowledging progress made and justifying steps to the customer makes for a better user experience, and makes it more like for the customer to complete all of the steps (think of a breadcrumb in a checkout flow). The customer should have a sense of where they are in the process. Here's a simple example of orienting a customer to where they are in a process:
```
"We're happy to help answer questions about your bill, but will need you to sign in so we can access your account information."
```
#### (e) Be careful with Personification
Over-personifying your virtual agent can make for a frustrating customer experience:
* **Do** frame language in a more impersonal "we"
* **Don't** make the virtual agent "I"
* **Do** frame the virtual agent as a representative for your company.
* **Don't** give your virtual agent a name / distinct personality.
* **Do** give your virtual agent a warm, action-oriented tone.
* **Don't** give your virtual agent an overly friendly, text-heavy tone.
* **Do** "Great! We can help you pay your bill now. What payment method would you like to use?"
* **Don't** "Great, thank you so much for clarifying that! I am so happy to help you with your bill today."
#### (f) Affirm What Customers Say, Not What the Flow Does
Affirmations help customers feel heard, and they help customers understand what the virtual agent is taking away from their responses. When drafting a virtual agent response, ensure that you match the copy to the variety of customer responses that may precede it -- historical customer responses can be viewed in the utterance table in historical reporting.
If there is a broad set reasons for a customer to end up on a node or a flow, your affirmation should likewise be broad:
* **Do** "We can help with that"
* **Do** "We can help you with your bill"
* **Don't** "We can help you pay your bill online"
Similarly, if there is a narrow set of reasons for a customer to end up in a node or a flow, your affirmation should likewise be narrow. Even then, it's important to not phrase things in such a way that you're putting words in the mouth of the customer, so they don't feel frustrated by the virtual agent.
* **Do** "To set up autopay ..."
* **Don't** "It sounds like you want to set up autopay"
* **Don't** "Okay, so autopay"
In some cases where writing a good affirmation feels particularly tricky, feel free to err on the side of not having one. It's all good so long as the virtual agent responds in an expected manner given what the customer just said.
### 4. Reduce Friction
If interacting with your virtual agent is confusing or hard, people will revert to tried and true escalation pathways like shouting "agent" or just calling in. As you are designing flows, be mindful about the following friction points you could potentially introduce in your flows.
#### (a) Be Judicious with Deep Links
Deep links are used when you link a customer out of chat to self-serve. It is tempting to leverage existing web pages, and to create dozens of flows that are simple link outs. But this often does not provide a good customer experience.
A virtual agent that is mostly single step deep links will feel like a frustrating search engine. Wherever possible, try to solve a customer's problem conversationally within the chat itself. Don't rely on links as a default.
But, when you **do** rely on a deep link, make sure to:
1. Validate the link actually solves the customers intent and is accessible to all customers (e.g. not behind an authentication wall, or only accessible to certain types of customers).
2. Leverage native app links where possible.
3. Be clear about what the customer needs to do when they go to the link and leave the chat experience.
#### (b) Avoid All-or-Nothing Flow Requirements
Be careful with "all or nothing" requirements in a flow; if you want a customer to sign in to allow you to access an API, that's great, but give customers an alternative option at that moment too. Some customers might not remember their password.
When you are at a point in a flow where there is a required step or just one direction a customer can go, think about what alternative answer there could be for a customer. If you don't, those customers might just abandon the virtual agent at that point.
 ### 5. Anticipate Failure
It's tempting to design with the happy path in mind, but customers don't always go down the flow you expect. Anticipate the failure points in a virtual agent, and design for them explicitly.
### 5. Anticipate Failure
It's tempting to design with the happy path in mind, but customers don't always go down the flow you expect. Anticipate the failure points in a virtual agent, and design for them explicitly.
 #### (a) Explicit Design for Error Cases
Always imagine something will go wrong when asking the customer to do something:
* When asking customer to complete something manually, give them a response route or a quick reply that allows them to acknowledge it's not working (e.g. the speed test isn't working).
* When asking the customer to self-serve on a web page or in chat: allow them to go down a path in case that doesn't work (e.g. login isn't working).
* When designing flows that involve self-service through APIs: explicitly design for what happens when the API doesn't work.
#### (b) Consider Free Text Errors
In channels where free text is always enabled (i.e.. AMB, SMS), the customer input may not be recognized. We recommend writing language that guides the customer to explicitly understand the types of answers we're expecting. Leverage "else" conditions in your flows (on Response Nodes).
**Don't:**
* "What issue are you having with your internet?"
* "I think maybe my router is broken"
* "Sorry I didn't understand that. Could you try again?"
**Do:**
* "Is your internet slow, or is it completely down?"
* "I think maybe my router is broken"
* "Sorry I didn't understand that. Is your internet slower than usual, or is your internet completely off?"
## Measuring Virtual Agents
### 1. Flow Success
Containment is a measure of whether a customer was prevented from escalating to an agent; it is the predominant measure in the industry for chatbot effectiveness. ASAPP, however, layers a more stringent definition called "Flow success," which indicates whether or not a customer was actually helped by the virtual agent.
### Important
When you are designing a new flow or modifying an existing flow, be sure to enable flow success when you have provided useful information to the customer.
"Flow success" is defined as when a customer arrives at a screen or receives a response that:
1. Provides useful information addressing the recognized intent of the inquiry.
2. Confirms a completed transaction in a back-end system.
3. Acknowledges the customer has resolved an issue successfully.
With flow success, chronology matters. If a customer starts a flow, and is presented with insightful information (i.e. success), but then escalates to an agent in the middle of a flow (i.e. negation of success), that issue will be recorded as not successful.
### How It Works
Flow success is an event that can be emitted on a [node](/messaging-platform/virtual-agent/flows#node-types "Node Types").
#### (a) Explicit Design for Error Cases
Always imagine something will go wrong when asking the customer to do something:
* When asking customer to complete something manually, give them a response route or a quick reply that allows them to acknowledge it's not working (e.g. the speed test isn't working).
* When asking the customer to self-serve on a web page or in chat: allow them to go down a path in case that doesn't work (e.g. login isn't working).
* When designing flows that involve self-service through APIs: explicitly design for what happens when the API doesn't work.
#### (b) Consider Free Text Errors
In channels where free text is always enabled (i.e.. AMB, SMS), the customer input may not be recognized. We recommend writing language that guides the customer to explicitly understand the types of answers we're expecting. Leverage "else" conditions in your flows (on Response Nodes).
**Don't:**
* "What issue are you having with your internet?"
* "I think maybe my router is broken"
* "Sorry I didn't understand that. Could you try again?"
**Do:**
* "Is your internet slow, or is it completely down?"
* "I think maybe my router is broken"
* "Sorry I didn't understand that. Is your internet slower than usual, or is your internet completely off?"
## Measuring Virtual Agents
### 1. Flow Success
Containment is a measure of whether a customer was prevented from escalating to an agent; it is the predominant measure in the industry for chatbot effectiveness. ASAPP, however, layers a more stringent definition called "Flow success," which indicates whether or not a customer was actually helped by the virtual agent.
### Important
When you are designing a new flow or modifying an existing flow, be sure to enable flow success when you have provided useful information to the customer.
"Flow success" is defined as when a customer arrives at a screen or receives a response that:
1. Provides useful information addressing the recognized intent of the inquiry.
2. Confirms a completed transaction in a back-end system.
3. Acknowledges the customer has resolved an issue successfully.
With flow success, chronology matters. If a customer starts a flow, and is presented with insightful information (i.e. success), but then escalates to an agent in the middle of a flow (i.e. negation of success), that issue will be recorded as not successful.
### How It Works
Flow success is an event that can be emitted on a [node](/messaging-platform/virtual-agent/flows#node-types "Node Types").
 It is incumbent on the author of a flow to define which steps in the flow they design could be considered successful.
Default settings:
* **Response Nodes:** When flow reporting status is **on**, the **success** option will be chosen by default.
* **Agent Node:** When flow reporting status is **on**, the **failure** option will be chosen.
* **End & Redirect:** Flow success is not available in the tooling. By default, the End Node question will emit or not emit flow success depending on the customer response.
### 2. Assessing a Flow's Performance
You're able to track your flows' performance on the "Automation Success" report in historical reporting. There you can assess containment metrics and flow success which will help you determine whether a flow is performing according to expectations.
## Tactical Flow Creation Guide
### 1. Naming Nodes
Flows are composed of different node types, which represent a particular state/act of a given flow. When you create a flow, you create a number of different nodes.
We recommend naming nodes to describe what the node accomplishes in a flow. Clear node names will make the data more readable going forward. Here are some best practices to keep in mind:
* Response node (no prompt): name is by the content (e.g. "NoBalanceMessage")
* Response node (with prompt): name by the request (e.g. "RequestSeatPreferences")
* Any node that takes an action of some sort should start with the action being taken and end with what is being acted upon (e.g. "ResetModem")
### 2. Training Response Routes
When you create a Response Node that is expected to classify free text customer input (e.g. "Would you like a one way flight or a round trip flight?"), you need to supply training utterances to train a response route. There are some best practices you should keep in mind:
* Be explicit where possible.
* Vary your language.
* More training utterances is almost always better.
* Keep neighboring routes in mind -- what are the different types of answers you will be training, and how will the responses differ between them?
### 3. Designing Disambiguation
Sometimes customers initiate conversations with vague utterances like "Help with bill" or "Account issues." In these cases the virtual agent understands enough to classify the customer's intent, but not enough to immediately solve their problem.
In these cases, you are able to design a flow that asks follow-up questions to disambiguate the customer's particular need. Based on the customer's response you can redirect them to more granular intents where they can better be helped.
Designing effective disambiguation starts with reviewing historical conversations to get a sense of what types of issues customer's are having related to the vague intent. Once you've determined these, you'll want to optimize your prompt and response routes for the channel your designing for:
#### (a) ASAPP SDKs
These channels are driven by quick replies only, meaning that the customer can only choose an option that is provided by the virtual agent. Here, the prompt matters less than the response branches / quick replies you write. Just make sure they map to things a customer would say---even if multiple response routes lead to the same place. For example:
```
We're happy to help! Please choose an option below:
- Billing history
- Billing complaint
- Billing question
- Something else
```
#### (b) Free-Text Channels, with Optional Quick Replies (Post-iOS 15 AMB)
These channels offer quick replies, but do not prevent customers from responding with free text. The key here is optimizing your question to increase the likelihood that customers choose a quick reply.
```
We're happy to help! Please tap on one of the options below:
- Billing history
- Billing complaint
- Billing question
- Something else
```
#### (c) Free-Text-Only Channels (Pre iOS 15 AMB, SMS )
These channels are often the most challenging, as the customer could respond in any number of ways, and given the minimal context of the conversation it's challenging to train the virtual agent to adequately understand all of them. Similar to other channels, the objective is to prompt in a manner that limits how customers are likely to respond. The simplest approach here is to list out options as part of your prompt:
```
Please tell us more about your billing needs. You can say things like "Billing history" "Question" "Complaint" or "Something else"
```
### 4. Message Length
Keep messages to be short and to the point. Walls of text can be intimidating. Never allow an individual message to exceed 400 characters (or, even less if there are spaces)..
An example of something to avoid:
It is incumbent on the author of a flow to define which steps in the flow they design could be considered successful.
Default settings:
* **Response Nodes:** When flow reporting status is **on**, the **success** option will be chosen by default.
* **Agent Node:** When flow reporting status is **on**, the **failure** option will be chosen.
* **End & Redirect:** Flow success is not available in the tooling. By default, the End Node question will emit or not emit flow success depending on the customer response.
### 2. Assessing a Flow's Performance
You're able to track your flows' performance on the "Automation Success" report in historical reporting. There you can assess containment metrics and flow success which will help you determine whether a flow is performing according to expectations.
## Tactical Flow Creation Guide
### 1. Naming Nodes
Flows are composed of different node types, which represent a particular state/act of a given flow. When you create a flow, you create a number of different nodes.
We recommend naming nodes to describe what the node accomplishes in a flow. Clear node names will make the data more readable going forward. Here are some best practices to keep in mind:
* Response node (no prompt): name is by the content (e.g. "NoBalanceMessage")
* Response node (with prompt): name by the request (e.g. "RequestSeatPreferences")
* Any node that takes an action of some sort should start with the action being taken and end with what is being acted upon (e.g. "ResetModem")
### 2. Training Response Routes
When you create a Response Node that is expected to classify free text customer input (e.g. "Would you like a one way flight or a round trip flight?"), you need to supply training utterances to train a response route. There are some best practices you should keep in mind:
* Be explicit where possible.
* Vary your language.
* More training utterances is almost always better.
* Keep neighboring routes in mind -- what are the different types of answers you will be training, and how will the responses differ between them?
### 3. Designing Disambiguation
Sometimes customers initiate conversations with vague utterances like "Help with bill" or "Account issues." In these cases the virtual agent understands enough to classify the customer's intent, but not enough to immediately solve their problem.
In these cases, you are able to design a flow that asks follow-up questions to disambiguate the customer's particular need. Based on the customer's response you can redirect them to more granular intents where they can better be helped.
Designing effective disambiguation starts with reviewing historical conversations to get a sense of what types of issues customer's are having related to the vague intent. Once you've determined these, you'll want to optimize your prompt and response routes for the channel your designing for:
#### (a) ASAPP SDKs
These channels are driven by quick replies only, meaning that the customer can only choose an option that is provided by the virtual agent. Here, the prompt matters less than the response branches / quick replies you write. Just make sure they map to things a customer would say---even if multiple response routes lead to the same place. For example:
```
We're happy to help! Please choose an option below:
- Billing history
- Billing complaint
- Billing question
- Something else
```
#### (b) Free-Text Channels, with Optional Quick Replies (Post-iOS 15 AMB)
These channels offer quick replies, but do not prevent customers from responding with free text. The key here is optimizing your question to increase the likelihood that customers choose a quick reply.
```
We're happy to help! Please tap on one of the options below:
- Billing history
- Billing complaint
- Billing question
- Something else
```
#### (c) Free-Text-Only Channels (Pre iOS 15 AMB, SMS )
These channels are often the most challenging, as the customer could respond in any number of ways, and given the minimal context of the conversation it's challenging to train the virtual agent to adequately understand all of them. Similar to other channels, the objective is to prompt in a manner that limits how customers are likely to respond. The simplest approach here is to list out options as part of your prompt:
```
Please tell us more about your billing needs. You can say things like "Billing history" "Question" "Complaint" or "Something else"
```
### 4. Message Length
Keep messages to be short and to the point. Walls of text can be intimidating. Never allow an individual message to exceed 400 characters (or, even less if there are spaces)..
An example of something to avoid:
 ### 5. Quick Replies
Quick Replies should be short and to the point. Some things to keep in mind when writing Quick Replies:
* Avoid punctuation
* Use sentence case capitalization, unless you're referring to a specific product or feature.
* Keep to at least two and up to five quick replies per node.
* While this is generally best practice, it is required for Quick Replies in Apple Messages for Business.
* If there are more than 3 Quick Replies, the list will be truncated to the first 3 in WhatsApp Business
* External channels have character limits and any Quick Replies longer than these limits will be truncated:
* Apple Messages for Business: 24 characters maximum
* WhatsApp Business: 20 characters maximum
# Flows
Source: https://docs.asapp.com/messaging-platform/virtual-agent/flows
Learn how to build flows to define how the virtual agent interacts with the customer.
Flows define how the virtual agent interacts with the customer. They can be as simple as an answer to an FAQ, or as complex as a multi-turn dialog used to offer self-service recommendations.
Flows are built through a series of [nodes](getting-started#flow-nodes "Flow Nodes") that dictate the flow of the conversation as well as any business logic it needs to perform. Once built, flows can be reached from intents, or redirected to from other flows.
## Flows List
In the flows page, you will find a list of existing flows for your business. The following information displays in table format:
* **Flow Name**
A unique flow name, with letters and numbers only.
* **Flow Description**
A brief description that describes the objective of the flow.
* **Traffic from Intent**
Intents can be routed to specific flows through [intent routing](/messaging-platform/virtual-agent/intent-routing "Intent Routing"). In this column, you will see which intents route to the respective flow.
You can click the intent to navigate to the specific [intent routing detail page](/messaging-platform/virtual-agent/intent-routing#intent-routing-detail-page "Intent Routing Detail Page") to view routing behavior details.
* **Traffic from Redirect**
Flows have the ability to link to one another through the use of [redirect nodes](#redirect-node "Redirect Node"). In this column, you will be able to see which existing flows redirect to the respective flow. You can click the flow to navigate to the specific [flow builder page](#flow-builder "Flow Builder") to view flow details.
## Flow Builder
The flow builder consists of three major parts:
1. Flow Graph
2. Node Configuration Panel
3. Toolbar
### 5. Quick Replies
Quick Replies should be short and to the point. Some things to keep in mind when writing Quick Replies:
* Avoid punctuation
* Use sentence case capitalization, unless you're referring to a specific product or feature.
* Keep to at least two and up to five quick replies per node.
* While this is generally best practice, it is required for Quick Replies in Apple Messages for Business.
* If there are more than 3 Quick Replies, the list will be truncated to the first 3 in WhatsApp Business
* External channels have character limits and any Quick Replies longer than these limits will be truncated:
* Apple Messages for Business: 24 characters maximum
* WhatsApp Business: 20 characters maximum
# Flows
Source: https://docs.asapp.com/messaging-platform/virtual-agent/flows
Learn how to build flows to define how the virtual agent interacts with the customer.
Flows define how the virtual agent interacts with the customer. They can be as simple as an answer to an FAQ, or as complex as a multi-turn dialog used to offer self-service recommendations.
Flows are built through a series of [nodes](getting-started#flow-nodes "Flow Nodes") that dictate the flow of the conversation as well as any business logic it needs to perform. Once built, flows can be reached from intents, or redirected to from other flows.
## Flows List
In the flows page, you will find a list of existing flows for your business. The following information displays in table format:
* **Flow Name**
A unique flow name, with letters and numbers only.
* **Flow Description**
A brief description that describes the objective of the flow.
* **Traffic from Intent**
Intents can be routed to specific flows through [intent routing](/messaging-platform/virtual-agent/intent-routing "Intent Routing"). In this column, you will see which intents route to the respective flow.
You can click the intent to navigate to the specific [intent routing detail page](/messaging-platform/virtual-agent/intent-routing#intent-routing-detail-page "Intent Routing Detail Page") to view routing behavior details.
* **Traffic from Redirect**
Flows have the ability to link to one another through the use of [redirect nodes](#redirect-node "Redirect Node"). In this column, you will be able to see which existing flows redirect to the respective flow. You can click the flow to navigate to the specific [flow builder page](#flow-builder "Flow Builder") to view flow details.
## Flow Builder
The flow builder consists of three major parts:
1. Flow Graph
2. Node Configuration Panel
3. Toolbar
 ### Flow Graph
The Flow Graph is a visual representation of the conversation flow you're designing, and displays all possible paths of dialog as you create them.
### Flow Graph
The Flow Graph is a visual representation of the conversation flow you're designing, and displays all possible paths of dialog as you create them.
 #### Select Nodes
Each node in the graph can be selected by clicking anywhere on the node. Upon selection, the node configuration panel will automatically expand on the right.
#### Flow Graph Zoom
You can zoom in on particular parts of the flow by using the zoom percentage bar at the bottom right or using your computer trackpad or mouse.
### Node Configuration Panel
The node configuration panel allows you to manage settings and configure routing rules for the following [node types](#node-types "Node Types"):
* [Response Node](#node-types "Node Types"): configure virtual agent responses, send deeplinks, and classify what customers say in return.
* [Login Node](#login-node "Login Node"): direct the customer to authenticate before proceeding in the flow.
* [Redirect Node](#redirect-node "Redirect Node"): redirect customer to another flow.
* [Agent Node](#agent-node "Agent Node"): direct the customer to an agent queue.
* [End Node](#end-node "End Node"): wrap up the conversation by confirming whether the customer needs additional help.
* [API Node](#api-node): use API fields dynamically in your flows.
### Toolbar
The toolbar displays the flow name and allows to you perform a number of different functions:
1. [Version Dropdown:](#navigate-flow-versions "Navigate Flow Versions") view and toggle through multiple versions of the flow.
2. [Version Indicators](#version-indicators "Version Indicators"): keep track of flow version deployment to Test or Production environments
3. [Manage Versions](#manage-versions "Manage Versions"): manage flow version deployment to Test or Production environments
4. [Preview](#preview-flow "Preview Flow"): click to preview your current flow version in real-time
5. More Actions:
* Copy link to test: Navigate to your demo environment to test a flow.
* Flow Settings: View flow information such as name, description, and flow shortcut.
Learn more: [Save, Deploy, and Test](#save-new-flow "Save New Flow")
#### Select Nodes
Each node in the graph can be selected by clicking anywhere on the node. Upon selection, the node configuration panel will automatically expand on the right.
#### Flow Graph Zoom
You can zoom in on particular parts of the flow by using the zoom percentage bar at the bottom right or using your computer trackpad or mouse.
### Node Configuration Panel
The node configuration panel allows you to manage settings and configure routing rules for the following [node types](#node-types "Node Types"):
* [Response Node](#node-types "Node Types"): configure virtual agent responses, send deeplinks, and classify what customers say in return.
* [Login Node](#login-node "Login Node"): direct the customer to authenticate before proceeding in the flow.
* [Redirect Node](#redirect-node "Redirect Node"): redirect customer to another flow.
* [Agent Node](#agent-node "Agent Node"): direct the customer to an agent queue.
* [End Node](#end-node "End Node"): wrap up the conversation by confirming whether the customer needs additional help.
* [API Node](#api-node): use API fields dynamically in your flows.
### Toolbar
The toolbar displays the flow name and allows to you perform a number of different functions:
1. [Version Dropdown:](#navigate-flow-versions "Navigate Flow Versions") view and toggle through multiple versions of the flow.
2. [Version Indicators](#version-indicators "Version Indicators"): keep track of flow version deployment to Test or Production environments
3. [Manage Versions](#manage-versions "Manage Versions"): manage flow version deployment to Test or Production environments
4. [Preview](#preview-flow "Preview Flow"): click to preview your current flow version in real-time
5. More Actions:
* Copy link to test: Navigate to your demo environment to test a flow.
* Flow Settings: View flow information such as name, description, and flow shortcut.
Learn more: [Save, Deploy, and Test](#save-new-flow "Save New Flow")
 ## Node Types
### Response Node
## Node Types
### Response Node
 The **Response** node allows you to configure virtual agent responses, send deeplinks, and classify what customers say in return. It consists of three sections:
1. **Content**
2. **Routing**
3. **Advanced Settings**
### Content
The **Content** section allows you to specify the responses and deeplinks that will be sent to the customer. You can add as many of either as you like by clicking **Add Content** and selecting from the menu.
Once added, this content can be easily reordered by dragging, or deleted by hovering over the content block and clicking the trash icon. In the flow graph, you will be able to preview how the content will be displayed to the customer.
The **Response** node allows you to configure virtual agent responses, send deeplinks, and classify what customers say in return. It consists of three sections:
1. **Content**
2. **Routing**
3. **Advanced Settings**
### Content
The **Content** section allows you to specify the responses and deeplinks that will be sent to the customer. You can add as many of either as you like by clicking **Add Content** and selecting from the menu.
Once added, this content can be easily reordered by dragging, or deleted by hovering over the content block and clicking the trash icon. In the flow graph, you will be able to preview how the content will be displayed to the customer.
 #### Responses
Any response text you specify will be sent to the customer when they reach the node.
#### Responses
Any response text you specify will be sent to the customer when they reach the node.
 #### Deeplinks
 After selecting **Deeplink** from the **Add Content** menu, the following additional fields will appear:
* **Link to**: select an existing link from the dropdown or directly [create a new link](/messaging-platform/virtual-agent/links#create-a-link "Create a Link").
If you select an existing link, you can click **View link definition** to open the specific [link details](/messaging-platform/virtual-agent/links#edit-a-link "Edit a Link") in a new tab.
* **Call to action**: define the accompanying text that the customer will click on in order to navigate to the link.
* **Hide button after new message**: choose to remove the deeplink after a new response appears to prevent users from navigating to the link past this node.
### Routing
The **Routing** section is where you will configure what happens after the content is sent.
You have two options:
* **Jump to node**
Choosing to **Jump to node** allows you to define a default routing rule that will execute immediately after the node content has been delivered to the user.
After selecting **Deeplink** from the **Add Content** menu, the following additional fields will appear:
* **Link to**: select an existing link from the dropdown or directly [create a new link](/messaging-platform/virtual-agent/links#create-a-link "Create a Link").
If you select an existing link, you can click **View link definition** to open the specific [link details](/messaging-platform/virtual-agent/links#edit-a-link "Edit a Link") in a new tab.
* **Call to action**: define the accompanying text that the customer will click on in order to navigate to the link.
* **Hide button after new message**: choose to remove the deeplink after a new response appears to prevent users from navigating to the link past this node.
### Routing
The **Routing** section is where you will configure what happens after the content is sent.
You have two options:
* **Jump to node**
Choosing to **Jump to node** allows you to define a default routing rule that will execute immediately after the node content has been delivered to the user.
 * **Wait for response**
Choosing to **Wait for response** means that the virtual agent will pause until the customer responds, then attempt to classify their response and branch accordingly. When this option is selected, you'll need to specify the branches and [quick reply text](#quick-replies "Quick Replies") for each type of response you wish the virtual agent to classify. See [Branch Classifiers](#branch-classifiers "Branch Classifiers") section for more detailed information.
* **Wait for response**
Choosing to **Wait for response** means that the virtual agent will pause until the customer responds, then attempt to classify their response and branch accordingly. When this option is selected, you'll need to specify the branches and [quick reply text](#quick-replies "Quick Replies") for each type of response you wish the virtual agent to classify. See [Branch Classifiers](#branch-classifiers "Branch Classifiers") section for more detailed information.
 Flows cannot end on a response node. To appropriately end a flow after a response node, please route to an [End node](#end-node "End Node").
#### Branch Classifiers
When **Wait for response** is selected for routing, you can define the branches for each type of response you wish the virtual agent to classify.
There are two types of branch classifiers that you can use:
* **System classifiers**
ASAPP supports pre-trained system templates to classify free text user input. You can use branches like `CONFIRM` or `DENY` that are already trained by our system and are readily available for use for polar (yes/no) questions. You do not need to supply training utterances for system classifiers.
Flows cannot end on a response node. To appropriately end a flow after a response node, please route to an [End node](#end-node "End Node").
#### Branch Classifiers
When **Wait for response** is selected for routing, you can define the branches for each type of response you wish the virtual agent to classify.
There are two types of branch classifiers that you can use:
* **System classifiers**
ASAPP supports pre-trained system templates to classify free text user input. You can use branches like `CONFIRM` or `DENY` that are already trained by our system and are readily available for use for polar (yes/no) questions. You do not need to supply training utterances for system classifiers.
 * **Custom classifiers**
If pre-trained classifiers do not meet your needs, define your own custom branches and supply training utterances. You must give your branch classifier a **Display Name** and supply at least five training utterances to train this custom classification. Learn more about how to best train your custom branches in the [Training response route](/messaging-platform/virtual-agent/best-practices#2-training-response-routes "2. Training Response Routes") section.
* **Custom classifiers**
If pre-trained classifiers do not meet your needs, define your own custom branches and supply training utterances. You must give your branch classifier a **Display Name** and supply at least five training utterances to train this custom classification. Learn more about how to best train your custom branches in the [Training response route](/messaging-platform/virtual-agent/best-practices#2-training-response-routes "2. Training Response Routes") section.
 #### Quick Replies
For each branch classifier, you should define the corresponding **Quick Reply text**. These will appear in our SDKs (web, mobile) and third-party channels as tapable options.
#### Quick Replies
For each branch classifier, you should define the corresponding **Quick Reply text**. These will appear in our SDKs (web, mobile) and third-party channels as tapable options.
 ### Advanced Settings
In the **Advanced Settings** section, you can set flow success reporting for the response node.
#### Flow Success
Flow success attempts to accurately measure whether a customer has successfully self-served through the virtual agent. You measure this by setting the appropriate flow reporting status on certain nodes within a flow. Learn more: [How do I determine flow success?](/messaging-platform/virtual-agent/best-practices#measuring-virtual-agents "Measuring Virtual Agents")
To set flow reporting status for response nodes:
1. Toggle **Set flow reporting status** on.
2. By default, **Success** is selected for response nodes but this can be modified for your particular flow.
### Advanced Settings
In the **Advanced Settings** section, you can set flow success reporting for the response node.
#### Flow Success
Flow success attempts to accurately measure whether a customer has successfully self-served through the virtual agent. You measure this by setting the appropriate flow reporting status on certain nodes within a flow. Learn more: [How do I determine flow success?](/messaging-platform/virtual-agent/best-practices#measuring-virtual-agents "Measuring Virtual Agents")
To set flow reporting status for response nodes:
1. Toggle **Set flow reporting status** on.
2. By default, **Success** is selected for response nodes but this can be modified for your particular flow.
 ### Login Node
The **Login Node** enables customer authentication within a flow. In this node, you can define the following:
* **Content**
* **Routing**
* **Advanced Settings**
### Login Node
The **Login Node** enables customer authentication within a flow. In this node, you can define the following:
* **Content**
* **Routing**
* **Advanced Settings**
 #### Content
The **Content** section allows you to define the text to be shown to the customer to accompany the login action. All login nodes will have default text which you can modify to suit your particular flow needs.
* **Message text**: Define the main text that will prompt the customer to login
* **Call to action**: Define the accompanying text that the customer will click on in order to login
* **Text sent to indicate that a login is in process**: customize the text that is sent after the customer has tried to log in.
In the flow graph, you can preview how the content will be displayed to the customer.
#### Routing
Flows cannot end on a login node. The **Routing** section is where you can configure what happens after a customer successfully logs in or optionally configure branches for exceptional conditions.
##### On login
In the **On login** section, you must define the default routing rule that will execute after the customer successfully logs in.
#### Content
The **Content** section allows you to define the text to be shown to the customer to accompany the login action. All login nodes will have default text which you can modify to suit your particular flow needs.
* **Message text**: Define the main text that will prompt the customer to login
* **Call to action**: Define the accompanying text that the customer will click on in order to login
* **Text sent to indicate that a login is in process**: customize the text that is sent after the customer has tried to log in.
In the flow graph, you can preview how the content will be displayed to the customer.
#### Routing
Flows cannot end on a login node. The **Routing** section is where you can configure what happens after a customer successfully logs in or optionally configure branches for exceptional conditions.
##### On login
In the **On login** section, you must define the default routing rule that will execute after the customer successfully logs in.
 ##### On response
Similar to response nodes, you can optionally add response branches in the **On response** section to account for exceptional conditions that may occur when a customer is trying to authenticate, such as login errors or retries and refreshes.
Please see [Branch Classifiers](#branch-classifiers "Branch Classifiers") on the response node for more information on how to configure these routing rules.
##### On response
Similar to response nodes, you can optionally add response branches in the **On response** section to account for exceptional conditions that may occur when a customer is trying to authenticate, such as login errors or retries and refreshes.
Please see [Branch Classifiers](#branch-classifiers "Branch Classifiers") on the response node for more information on how to configure these routing rules.
 ##### Else
In the **Else** section, you can define what happens if login is unsuccessful and we do not recognize customer responses.
#### Advanced Settings
In **Advanced Settings**, you have the option to **Force reauthentication** which will prompt all customers to log in again, regardless of current authentication state.
### API Node
The API node allows you to use API fields dynamically in your flows. The data you retrieve on an API node can be used for two things:
1. **Displaying the data** on subsequent nodes.
2. **Routing to different nodes** based on the data.
#### Data Request
The **Data Request** section allows you to add data fields from an existing API integration.
##### Else
In the **Else** section, you can define what happens if login is unsuccessful and we do not recognize customer responses.
#### Advanced Settings
In **Advanced Settings**, you have the option to **Force reauthentication** which will prompt all customers to log in again, regardless of current authentication state.
### API Node
The API node allows you to use API fields dynamically in your flows. The data you retrieve on an API node can be used for two things:
1. **Displaying the data** on subsequent nodes.
2. **Routing to different nodes** based on the data.
#### Data Request
The **Data Request** section allows you to add data fields from an existing API integration.
 Select **Add data fields** to choose objects from existing integrations, which will allow you to add collections of data fields to the node. There is a search bar that allows you to easily search through the available fields.
 After you select objects, all of the referenced fields will automatically populate in the API node.
In addition to objects and arrays, you can request actions.
After you select objects, all of the referenced fields will automatically populate in the API node.
In addition to objects and arrays, you can request actions.
 #### Displaying Data
You are easily able to display API fields from an API node in subsequent response nodes. This field leverages curly brackets: click the **curly bracket** icon or select the **shift>\{** or **}** keys in the Response Node Content section to choose API values to display, which will render as a dynamic API field in the flow graph.
#### Displaying Data
You are easily able to display API fields from an API node in subsequent response nodes. This field leverages curly brackets: click the **curly bracket** icon or select the **shift>\{** or **}** keys in the Response Node Content section to choose API values to display, which will render as a dynamic API field in the flow graph.
 When you click on the API field itself, data format options appear that will allow you to specify exactly what format to display to the end user.
 #### Routing to Different Nodes
Routing and data operators allow you to specify different flow branching based on what is returned from an API. This leverages the same framework as routing on other nodes, but provides additional functionality around operators to give you flexibility in configuring routing conditions.
#### Routing to Different Nodes
Routing and data operators allow you to specify different flow branching based on what is returned from an API. This leverages the same framework as routing on other nodes, but provides additional functionality around operators to give you flexibility in configuring routing conditions.
 Operators allow you to contextually define conditions to route on.
#### Error Handling
API nodes provide default error handling, but you are able to create custom error handling on the node itself if desired. You can specify where a user should be directed in the event of an error with the API call.
Operators allow you to contextually define conditions to route on.
#### Error Handling
API nodes provide default error handling, but you are able to create custom error handling on the node itself if desired. You can specify where a user should be directed in the event of an error with the API call.
 #### API Library
API fields are available under the integrations menu. In this page, you can view and search through all available objects and associated data fields.
### Redirect Node
The **Redirect Node** serves to link flows with one another by directing the customer to a separate flow. A Redirect Node does not display content to the customer.
In this node, you can define the following:
* **Destination**
* **Routing**
* **Advanced Settings**
#### API Library
API fields are available under the integrations menu. In this page, you can view and search through all available objects and associated data fields.
### Redirect Node
The **Redirect Node** serves to link flows with one another by directing the customer to a separate flow. A Redirect Node does not display content to the customer.
In this node, you can define the following:
* **Destination**
* **Routing**
* **Advanced Settings**
 #### Destination
The **Destination** section allows you to define where to redirect the customer. You can redirect to an existing **flow** or an **intent**.
* Select **Flow** to redirect to an individual flow destination.
* Select **Intent** to redirect the customer to solve for a broader issue intent that may route them to different flows depending on the [intent routing rules](/messaging-platform/virtual-agent/intent-routing "Intent Routing").
Depending on the option you select, you will be able to select the destination flow or intent from the dropdown.
#### Routing (Return Upon Completion)
Redirect nodes can end your flow or you can choose to have the customer return your flow after the destination flow has completed. To do so, toggle on **Return upon completion**. After doing so, you can define the default routing rule that will execute upon customer return.
### Agent Node
The **Agent Node** enables you to direct the customer to an agent queue in order to help resolve their issue. The data associated with this customer will be used to determine the live agent queue to put them in.
#### Advanced Settings
In the Advanced Settings section, you can set flow success reporting for the agent node.
##### Flow Success
Flow success attempts to accurately measure whether a customer has successfully self-served through the virtual agent. This is measured by setting the appropriate flow reporting status on certain nodes within a flow. Learn more: [How do I determine flow success?](/messaging-platform/virtual-agent/best-practices#measuring-virtual-agents "Measuring Virtual Agents")
For agent nodes, this is always considered a failure.
To set flow reporting status for agent nodes:
1. Toggle **Set flow reporting status** on.
2. By default, **Failure** will be selected for agent nodes
#### Destination
The **Destination** section allows you to define where to redirect the customer. You can redirect to an existing **flow** or an **intent**.
* Select **Flow** to redirect to an individual flow destination.
* Select **Intent** to redirect the customer to solve for a broader issue intent that may route them to different flows depending on the [intent routing rules](/messaging-platform/virtual-agent/intent-routing "Intent Routing").
Depending on the option you select, you will be able to select the destination flow or intent from the dropdown.
#### Routing (Return Upon Completion)
Redirect nodes can end your flow or you can choose to have the customer return your flow after the destination flow has completed. To do so, toggle on **Return upon completion**. After doing so, you can define the default routing rule that will execute upon customer return.
### Agent Node
The **Agent Node** enables you to direct the customer to an agent queue in order to help resolve their issue. The data associated with this customer will be used to determine the live agent queue to put them in.
#### Advanced Settings
In the Advanced Settings section, you can set flow success reporting for the agent node.
##### Flow Success
Flow success attempts to accurately measure whether a customer has successfully self-served through the virtual agent. This is measured by setting the appropriate flow reporting status on certain nodes within a flow. Learn more: [How do I determine flow success?](/messaging-platform/virtual-agent/best-practices#measuring-virtual-agents "Measuring Virtual Agents")
For agent nodes, this is always considered a failure.
To set flow reporting status for agent nodes:
1. Toggle **Set flow reporting status** on.
2. By default, **Failure** will be selected for agent nodes
 ### End Node
The **End Node** wraps up the conversation by confirming whether the customer needs additional help.
#### Advanced Settings
In the **Advanced Settings** section, you can select the end Semantic Response Score (SRS) options (see below) for your flow.
By default, all three options will be selected when an end node is added, thus presenting all three options for the customer to select from. You can expand the section to modify these options to present to the customer.
##### End SRS Options
At the end of a flow, the virtual agent will ask the customer: "Is there anything else we can help you with today?"\*
After the above message is sent, there are three options available for the customer to select from:
* **"Thanks, I'm all set"**
A customer selecting this **positive** option will prompt the virtual agent to wrap up and resolve the issue.
* **"I have another question"**
A customer selecting this **neutral** option will prompt the virtual agent to ask the customer what their question is.
* **"My question has not been answered"**
A customer selecting this **negative** option will prompt the virtual agent to escalate the customer into agent chat to help resolve their issue.
\*Exact end SRS options and text may vary. Please contact your ASAPP team for more details.
### End Node
The **End Node** wraps up the conversation by confirming whether the customer needs additional help.
#### Advanced Settings
In the **Advanced Settings** section, you can select the end Semantic Response Score (SRS) options (see below) for your flow.
By default, all three options will be selected when an end node is added, thus presenting all three options for the customer to select from. You can expand the section to modify these options to present to the customer.
##### End SRS Options
At the end of a flow, the virtual agent will ask the customer: "Is there anything else we can help you with today?"\*
After the above message is sent, there are three options available for the customer to select from:
* **"Thanks, I'm all set"**
A customer selecting this **positive** option will prompt the virtual agent to wrap up and resolve the issue.
* **"I have another question"**
A customer selecting this **neutral** option will prompt the virtual agent to ask the customer what their question is.
* **"My question has not been answered"**
A customer selecting this **negative** option will prompt the virtual agent to escalate the customer into agent chat to help resolve their issue.
\*Exact end SRS options and text may vary. Please contact your ASAPP team for more details.
 ## Quick Start: Flows
### Create Flow
## Quick Start: Flows
### Create Flow
 Click **Create** to trigger a dialog for creating a new flow. The following data must be provided:
* **Name:** Give a unique name for your flow, using letters and numbers only.
* **Description:** Give a brief description of the purpose of the flow.
Click **Create** to trigger a dialog for creating a new flow. The following data must be provided:
* **Name:** Give a unique name for your flow, using letters and numbers only.
* **Description:** Give a brief description of the purpose of the flow.
 To preview a previously saved version of the flow, navigate to the flow version in the [version dropdown](#version-indicators "Version Indicators"), then click the **eye** icon to preview.
#### Preview Capabilities
There are a few capabilities to leverage in preview:
* **Re-setting:** puts you back to the first node of the flow and allows you to test it again.
* **Debug information:** opens a panel that provides more detailed insights into where you are in a flow and the associated metadata with your preview.
* **Close:** close the in-line preview.
To preview a previously saved version of the flow, navigate to the flow version in the [version dropdown](#version-indicators "Version Indicators"), then click the **eye** icon to preview.
#### Preview Capabilities
There are a few capabilities to leverage in preview:
* **Re-setting:** puts you back to the first node of the flow and allows you to test it again.
* **Debug information:** opens a panel that provides more detailed insights into where you are in a flow and the associated metadata with your preview.
* **Close:** close the in-line preview.
 #### Preview with Mocked Data
The real time preview also has the ability to preview integrated flows using mocked data. By mocking data directly in the preview, you can test different flow paths based on the different values an API can return.
1. Define Request
* You can define if the request is a success or failure when previewing. Each API node is treated as a separate call in the preview experience.
#### Preview with Mocked Data
The real time preview also has the ability to preview integrated flows using mocked data. By mocking data directly in the preview, you can test different flow paths based on the different values an API can return.
1. Define Request
* You can define if the request is a success or failure when previewing. Each API node is treated as a separate call in the preview experience.
 2. View and Edit Mock Data Fields
* For a successful API call, you can view and edit mock data fields, which will inform the subsequent flow path in the preview.
* By default, all returned values are selected and pre-filled. Values set in the preview will be cached until you leave the flow builder, to prevent the need to re-enter each mock data form.
2. View and Edit Mock Data Fields
* For a successful API call, you can view and edit mock data fields, which will inform the subsequent flow path in the preview.
* By default, all returned values are selected and pre-filled. Values set in the preview will be cached until you leave the flow builder, to prevent the need to re-enter each mock data form.
 ### Save New Flow
When you are building a new flow, the following buttons will display in the toolbar:
* **Discard changes:** remove all unsaved changes made to the flow.
* **Save:** save changes to the flow as a new version or override an existing version.
### Save New Flow
When you are building a new flow, the following buttons will display in the toolbar:
* **Discard changes:** remove all unsaved changes made to the flow.
* **Save:** save changes to the flow as a new version or override an existing version.
 To save your new flow, select **Save**.
### Deploy New Flow
Newly created flows (i.e. the initial version) will **immediately deploy to test environments and production**. These new flows can be deployed without harm since customers will not be able to invoke the flow unless there are incoming routes due to [intent routing](/messaging-platform/virtual-agent/intent-routing "Intent Routing").
To save your new flow, select **Save**.
### Deploy New Flow
Newly created flows (i.e. the initial version) will **immediately deploy to test environments and production**. These new flows can be deployed without harm since customers will not be able to invoke the flow unless there are incoming routes due to [intent routing](/messaging-platform/virtual-agent/intent-routing "Intent Routing").
 ### Test New Flow
After deploying your flow to test, navigate to your respective test environment in order to verify your flow changes:
1. In the upper right corner of the toolbar, click the icon for **More actions**.
2. Select **Copy link to demo**.
3. Copy the **Flow Shortcut**.
4. Choose to **Go to demo env.**
5. Once there, select the chat bubble and paste the flow shortcut into the text entry to start testing your flow.
### Test New Flow
After deploying your flow to test, navigate to your respective test environment in order to verify your flow changes:
1. In the upper right corner of the toolbar, click the icon for **More actions**.
2. Select **Copy link to demo**.
3. Copy the **Flow Shortcut**.
4. Choose to **Go to demo env.**
5. Once there, select the chat bubble and paste the flow shortcut into the text entry to start testing your flow.
 ### Edit & Save New Version
You can make changes to your new flow by selecting a node and making edits in the [Node Configuration Panel](#node-configuration-panel "Node Configuration Panel").
Once you are ready to save your changes, select **Save**. Since the current version of the flow is already deployed to production, you will **NOT** be able to save over the current version and **MUST** save as a new version to prevent unintentional changes to flows in production.
### Edit & Save New Version
You can make changes to your new flow by selecting a node and making edits in the [Node Configuration Panel](#node-configuration-panel "Node Configuration Panel").
Once you are ready to save your changes, select **Save**. Since the current version of the flow is already deployed to production, you will **NOT** be able to save over the current version and **MUST** save as a new version to prevent unintentional changes to flows in production.
 For future flow versions that are not deployed to production, you will be able to save your changes as a **new flow version** or to overwrite the **current flow version**.
 ### Deploy Version to Test
After saving, you will be directed to **Manage Versions** where you will manage which flow version is deployed to test environments and to production..
### Deploy Version to Test
After saving, you will be directed to **Manage Versions** where you will manage which flow version is deployed to test environments and to production..
 ### Test Version
After deploying your flow to test, navigate to your respective test environment in order to verify your flow changes:
1. In the upper right corner of the toolbar, click the icon for **More actions**.
2. Select **Copy link to demo**.
3. Copy the **Flow Shortcut**.
4. Choose to **Go to demo env**.
5. Once there, select the chat bubble and paste the flow shortcut into the text entry to start testing your flow.
### Test Version
After deploying your flow to test, navigate to your respective test environment in order to verify your flow changes:
1. In the upper right corner of the toolbar, click the icon for **More actions**.
2. Select **Copy link to demo**.
3. Copy the **Flow Shortcut**.
4. Choose to **Go to demo env**.
5. Once there, select the chat bubble and paste the flow shortcut into the text entry to start testing your flow.
 ### Deploy Version to Prod
After verifying the expected flow behavior in **Test**, you can deploy the flow version to production, which will impact customers if there the [flow is routed from an intent](/messaging-platform/virtual-agent/intent-routing "Intent Routing"):
1. Select the version you want to deploy in the version dropdown for **Prod**.
2. After selection, click **Save**.
3. Flow version will deploy to Production within 5-10 minutes.
### Deploy Version to Prod
After verifying the expected flow behavior in **Test**, you can deploy the flow version to production, which will impact customers if there the [flow is routed from an intent](/messaging-platform/virtual-agent/intent-routing "Intent Routing"):
1. Select the version you want to deploy in the version dropdown for **Prod**.
2. After selection, click **Save**.
3. Flow version will deploy to Production within 5-10 minutes.
 ### Manage Versions
When you are simply viewing a flow without making any changes, **Manage Versions** will always be at the top of the toolbar for you to manage flow version deployments. Upon selection, the versions that are currently deployed to Test and Prod environments will display, which you can edit as appropriate.
### Manage Versions
When you are simply viewing a flow without making any changes, **Manage Versions** will always be at the top of the toolbar for you to manage flow version deployments. Upon selection, the versions that are currently deployed to Test and Prod environments will display, which you can edit as appropriate.
 In addition to version deployments, you can view any existing [intents that route to this flow](/messaging-platform/virtual-agent/intent-routing "Intent Routing") in **Incoming Routes**. Upon selection, you will be directed to the specific [intent detail](/messaging-platform/virtual-agent/intent-routing#intent-routing-detail-page "Intent Routing Detail Page") page where you can view the intent routing rules.
 ### Navigate Flow Versions
Many flows may iterate through multiple versions. You can toggle to view previous flow versions using the version dropdown:
1. Next to the flow name, click the version dropdown in the toolbar.
2. Selecting the version you want to view.
3. Once selected, the version details will display in the flow graph.
4. You can click any node to start editing that specific flow version.
### Navigate Flow Versions
Many flows may iterate through multiple versions. You can toggle to view previous flow versions using the version dropdown:
1. Next to the flow name, click the version dropdown in the toolbar.
2. Selecting the version you want to view.
3. Once selected, the version details will display in the flow graph.
4. You can click any node to start editing that specific flow version.
 #### Version Indicators
As flow versions are iteratively edited and deployed to Test and Prod, there are a few indicators in the toolbar to help the you quickly understand which version is being edited and which versions have been deployed to an environment:
* **Unsaved changes**
If the version is denoted with an asterisk along with a filled gray indicator of "Unsaved Changes", the flow version is currently being edited and must be saved before navigating away from the page.
#### Version Indicators
As flow versions are iteratively edited and deployed to Test and Prod, there are a few indicators in the toolbar to help the you quickly understand which version is being edited and which versions have been deployed to an environment:
* **Unsaved changes**
If the version is denoted with an asterisk along with a filled gray indicator of "Unsaved Changes", the flow version is currently being edited and must be saved before navigating away from the page.
 * **Unreleased version**
If a version is denoted with a hollow *gray* indicator *Unreleased version* , the flow version is saved but not deployed to any environment.
* **Unreleased version**
If a version is denoted with a hollow *gray* indicator *Unreleased version* , the flow version is saved but not deployed to any environment.
 * **Available in test**
If a version is denoted with a hollow *orange* indicator of *Available in test*, the flow version is deployed to test environments (e.g. demo) but it is **not routed** from an intent.
* **Available in test**
If a version is denoted with a hollow *orange* indicator of *Available in test*, the flow version is deployed to test environments (e.g. demo) but it is **not routed** from an intent.
 * **Live in test**
If a version is denoted with a filled *orange* indicator of *Live in test*, the flow version is deployed to test environments (e.g. demo) and it is **routed from an intent**.
* **Live in test**
If a version is denoted with a filled *orange* indicator of *Live in test*, the flow version is deployed to test environments (e.g. demo) and it is **routed from an intent**.
 * **Available in prod**
If a version is denoted with a hollow *green* indicator of *Available in prod*, the flow version is deployed to the production environment but it is **not routed** from an intent.
* **Available in prod**
If a version is denoted with a hollow *green* indicator of *Available in prod*, the flow version is deployed to the production environment but it is **not routed** from an intent.
 * **Live in prod**
If a version is denoted with a filled *green* indicator of *Live in prod*, the flow version is deployed to the production environment and it **is routed from an intent which can be reached by customers**.
* **Live in prod**
If a version is denoted with a filled *green* indicator of *Live in prod*, the flow version is deployed to the production environment and it **is routed from an intent which can be reached by customers**.
 * **Available in test and prod**
If a version is denoted with a hollow *green* indicator of *Available in test and prod*, the flow version is deployed to test environments (e.g. demo) but it is **not routed** from an intent.
* **Available in test and prod**
If a version is denoted with a hollow *green* indicator of *Available in test and prod*, the flow version is deployed to test environments (e.g. demo) but it is **not routed** from an intent.
 * **Live in test and prod**
If a version is denoted with a filled *green* indicator of *Live in test and prod*, the flow version is deployed to all environments and it **is routed from an intent which can be reached by customers**.
* **Live in test and prod**
If a version is denoted with a filled *green* indicator of *Live in test and prod*, the flow version is deployed to all environments and it **is routed from an intent which can be reached by customers**.
 #### View Intent Routing
If a flow is **routed from an intent** (e.g. Live in...), you can hover over these indicators to view and navigate to the respective intent routing page.
#### View Intent Routing
If a flow is **routed from an intent** (e.g. Live in...), you can hover over these indicators to view and navigate to the respective intent routing page.
 # Glossary
Source: https://docs.asapp.com/messaging-platform/virtual-agent/glossary
| | |
| :------------------------------------ | :----------------------------------------------------------------------------------------------------------------------------------------------------------------------------------------------------------------------------------------------------------------------------------------------------------------------------------------------------------------------------------------------------------------------------------------------------------------- |
| **Term** | **Definition** |
| **Agent Node** | A flow node used to direct customers to a live agent. |
| **AI-Console** | A web-based application for managing your implementation of ASAPP's virtual agent. |
| **AMB** | See "Apple Messages for Business" |
| **Ambiguous Utterance** | Customer utterances characterized by having multiple distinct meanings like "My battery died." This is contrasted from "vague" utterances which are characterized by having broad, but still distinct meaning ( e.g. "Phone issue"). |
| **Apple Messages for Business (AMB**) | Offers the ability for customers to chat with businesses directly in the Apple Messages app. Includes dedicated uis to facilitate more efficient interactions than would be possible using traditional SMS, as well as support for highly impactful entry points in Siri Suggestions and chat intercepts for customers who tap on phone numbers while on their iOS device. Learn more at: [apple.com/ios/business-chat](https://www.apple.com/ios/business-chat/). |
| **ASAPP Team** | Your direct representatives at ASAPP, inclusive of your assigned Solutions Architect, Customer Success Manager, and Implementation Manager. |
| **Business Flow** | Business Flows are flows that are built to resolve a customer need as indicated by their intent. This is in contrast to "Non-Business Flows," which are flows that serve more generic purposes such as greeting a customer, disambiguating an utterance, or enabling customers to log in or connect with an agent. |
| **Chat SDKs** | Embeddable chat UI that ASAPP offers for web, iOS, and Android applications. Each SDK supports quick replies, rich components and various other content interactions to facilitate conversations between businesses and their customers. |
| **Classification** | Refers to the process of classifying the customer's intent by analyzing the language they use. |
| **Containment** | The success rate of the virtual agent prevents human interaction. |
| **Core Dialog** | Refers to the settings that define how the virtual agent behaves in common dialog scenarios like initial welcome, live chat enquement, digressions (triggering a new intent in the middle of a flow), and error handling. |
| **Customer** | Your customer who is engaging with your virtual agent. |
| **Customer Channels** | The set of UIs and applications that your customers can use to engage with your business. Includes chat SDKs, Apple Messages for Business, SMS, etc. |
| **Deeplinks** | Links that send users directly to a web page or to a specific page in an app. |
| **Dialog Turns** | The conversational steps required for a virtual agent to acquire the relevant information from the end-user. |
| **Disambiguation** | The process whereby the virtual agent gets clarification from the consumer on what is meant by the customer's message. Disambiguation is often triggered when the customer's message matches multiple intents. |
| **End Node** | The flow node used to end a flow and trigger end SRS options (See: Semantic Response Score) |
| **Enqueuement** | Refers to the process where a customer is waiting in queue to chat with a live agent. |
| **Flow** | Flows define how the virtual agent interacts with the customer given a specific situation. They are built through a series of nodes. |
| **Flow Success** | Metric to accurately measure whether a customer has successfully self-served through the virtual agent. |
| **Free Text** | The unstructured customer utterances that can be freely typed and submitted without Autocomplete or quick replies. |
| **Insights Manager** | The operational hub through which users can monitor traffic and conversations in real time, gain insights through Historical Reporting, and manage queues and queue settings. Learn more in the [Insights Manager overview](../insights-manager "Insights Manager"). |
| **Intent** | Intents are the set of reasons that a customer might contact your business and are recognized by the virtual agent when the customer first reaches out. The virtual agent can also understand when a user changes intent in the middle of a conversation (see: digressions). |
| **Intent Code** | Unique, capitalized identifier for an intent. |
| **Intent Routes** | The logic that determines what will happen after an intent has been recognized. |
| **Library** | The panel that houses content that can be used within intent routing and flows. |
| **Login Node** | A flow node used to enable customer authentication within a flow. |
| **Multi-Turn Dialog** | Questions that should be filtered or refined to determine the correct answer. |
| **Node** | Functional objects used in flows to dictate the conversation as well as any business logic it needs to perform. |
| **Queue** | A group of agents assigned to handle a particular set of issues or types of incoming customers. |
| **Quick Reply** | The set of buttons that customers can directly choose to respond to the virtual agent. |
| **Redirect Node** | A flow node used to link to other flows. |
| **Response Node** | A flow node used to configure virtual agent responses, send deeplinks, and classify what customers say in return. |
| **Response Routes** | On a response node, the set of routes defined to classify a customer response and branch accordingly. Users will define the training data and quick reply text for each type of response. |
| **Routing (within flows)** | On any given node, the set of rules that determine what node the virtual agent should execute next. |
| **Self-Serve** | Regarding the virtual agent, self-serve refers to cases where the virtual agent helps a customer resolve their issue without the need for human agent intervention. |
| **Semantic Response Score (SRS)** | Options presented at the end of a flow to help gauge whether or not the virtual agent met the customer's needs. |
| **User** | Refers to the user of AI-Console. Users of the chat experience are referred to as "customers." |
| **Vague Utterance** | Customer utterances characterized by having broad, but still distinct meaning ( e.g. "Phone issue"). This is contrasted from "ambiguous" utterances which are characterized by having multiple distinct meanings like "My battery died." |
| **Virtual Agent** | The ASAPP "Virtual agent" is chat-based, multi-channel artificial intelligence that can understand customer issues, offer self-service options, and connect customers with live agents when necessary. |
# Intent Routing
Source: https://docs.asapp.com/messaging-platform/virtual-agent/intent-routing
Learn how to route intents to flows or agents.
Intents are the set of reasons that a customer might contact your business and are recognized by the virtual agent when the customer first reaches out. Our ASAPP teams work with you to optimize your intent list on an ongoing basis.
Within intent routing, you can view the full list of intents and the routing behavior after an intent is recognized. Creators have the ability to modify this behavior.
## Navigate to Intent Routing
You can access **Intent Routing** in the **Virtual Agent** navigation panel.
# Glossary
Source: https://docs.asapp.com/messaging-platform/virtual-agent/glossary
| | |
| :------------------------------------ | :----------------------------------------------------------------------------------------------------------------------------------------------------------------------------------------------------------------------------------------------------------------------------------------------------------------------------------------------------------------------------------------------------------------------------------------------------------------- |
| **Term** | **Definition** |
| **Agent Node** | A flow node used to direct customers to a live agent. |
| **AI-Console** | A web-based application for managing your implementation of ASAPP's virtual agent. |
| **AMB** | See "Apple Messages for Business" |
| **Ambiguous Utterance** | Customer utterances characterized by having multiple distinct meanings like "My battery died." This is contrasted from "vague" utterances which are characterized by having broad, but still distinct meaning ( e.g. "Phone issue"). |
| **Apple Messages for Business (AMB**) | Offers the ability for customers to chat with businesses directly in the Apple Messages app. Includes dedicated uis to facilitate more efficient interactions than would be possible using traditional SMS, as well as support for highly impactful entry points in Siri Suggestions and chat intercepts for customers who tap on phone numbers while on their iOS device. Learn more at: [apple.com/ios/business-chat](https://www.apple.com/ios/business-chat/). |
| **ASAPP Team** | Your direct representatives at ASAPP, inclusive of your assigned Solutions Architect, Customer Success Manager, and Implementation Manager. |
| **Business Flow** | Business Flows are flows that are built to resolve a customer need as indicated by their intent. This is in contrast to "Non-Business Flows," which are flows that serve more generic purposes such as greeting a customer, disambiguating an utterance, or enabling customers to log in or connect with an agent. |
| **Chat SDKs** | Embeddable chat UI that ASAPP offers for web, iOS, and Android applications. Each SDK supports quick replies, rich components and various other content interactions to facilitate conversations between businesses and their customers. |
| **Classification** | Refers to the process of classifying the customer's intent by analyzing the language they use. |
| **Containment** | The success rate of the virtual agent prevents human interaction. |
| **Core Dialog** | Refers to the settings that define how the virtual agent behaves in common dialog scenarios like initial welcome, live chat enquement, digressions (triggering a new intent in the middle of a flow), and error handling. |
| **Customer** | Your customer who is engaging with your virtual agent. |
| **Customer Channels** | The set of UIs and applications that your customers can use to engage with your business. Includes chat SDKs, Apple Messages for Business, SMS, etc. |
| **Deeplinks** | Links that send users directly to a web page or to a specific page in an app. |
| **Dialog Turns** | The conversational steps required for a virtual agent to acquire the relevant information from the end-user. |
| **Disambiguation** | The process whereby the virtual agent gets clarification from the consumer on what is meant by the customer's message. Disambiguation is often triggered when the customer's message matches multiple intents. |
| **End Node** | The flow node used to end a flow and trigger end SRS options (See: Semantic Response Score) |
| **Enqueuement** | Refers to the process where a customer is waiting in queue to chat with a live agent. |
| **Flow** | Flows define how the virtual agent interacts with the customer given a specific situation. They are built through a series of nodes. |
| **Flow Success** | Metric to accurately measure whether a customer has successfully self-served through the virtual agent. |
| **Free Text** | The unstructured customer utterances that can be freely typed and submitted without Autocomplete or quick replies. |
| **Insights Manager** | The operational hub through which users can monitor traffic and conversations in real time, gain insights through Historical Reporting, and manage queues and queue settings. Learn more in the [Insights Manager overview](../insights-manager "Insights Manager"). |
| **Intent** | Intents are the set of reasons that a customer might contact your business and are recognized by the virtual agent when the customer first reaches out. The virtual agent can also understand when a user changes intent in the middle of a conversation (see: digressions). |
| **Intent Code** | Unique, capitalized identifier for an intent. |
| **Intent Routes** | The logic that determines what will happen after an intent has been recognized. |
| **Library** | The panel that houses content that can be used within intent routing and flows. |
| **Login Node** | A flow node used to enable customer authentication within a flow. |
| **Multi-Turn Dialog** | Questions that should be filtered or refined to determine the correct answer. |
| **Node** | Functional objects used in flows to dictate the conversation as well as any business logic it needs to perform. |
| **Queue** | A group of agents assigned to handle a particular set of issues or types of incoming customers. |
| **Quick Reply** | The set of buttons that customers can directly choose to respond to the virtual agent. |
| **Redirect Node** | A flow node used to link to other flows. |
| **Response Node** | A flow node used to configure virtual agent responses, send deeplinks, and classify what customers say in return. |
| **Response Routes** | On a response node, the set of routes defined to classify a customer response and branch accordingly. Users will define the training data and quick reply text for each type of response. |
| **Routing (within flows)** | On any given node, the set of rules that determine what node the virtual agent should execute next. |
| **Self-Serve** | Regarding the virtual agent, self-serve refers to cases where the virtual agent helps a customer resolve their issue without the need for human agent intervention. |
| **Semantic Response Score (SRS)** | Options presented at the end of a flow to help gauge whether or not the virtual agent met the customer's needs. |
| **User** | Refers to the user of AI-Console. Users of the chat experience are referred to as "customers." |
| **Vague Utterance** | Customer utterances characterized by having broad, but still distinct meaning ( e.g. "Phone issue"). This is contrasted from "ambiguous" utterances which are characterized by having multiple distinct meanings like "My battery died." |
| **Virtual Agent** | The ASAPP "Virtual agent" is chat-based, multi-channel artificial intelligence that can understand customer issues, offer self-service options, and connect customers with live agents when necessary. |
# Intent Routing
Source: https://docs.asapp.com/messaging-platform/virtual-agent/intent-routing
Learn how to route intents to flows or agents.
Intents are the set of reasons that a customer might contact your business and are recognized by the virtual agent when the customer first reaches out. Our ASAPP teams work with you to optimize your intent list on an ongoing basis.
Within intent routing, you can view the full list of intents and the routing behavior after an intent is recognized. Creators have the ability to modify this behavior.
## Navigate to Intent Routing
You can access **Intent Routing** in the **Virtual Agent** navigation panel.
 ## Intent Routing List
On the intent routing page, you will find a filterable list of intents along with their routing information. The following information is displayed in the table:
1. **Intent name:** displays the name of the intent, as well as a brief description on what it is.
2. **Code:** unique identifier for each intent.
3. **Routing:** displays the flow routing rules currently configured for an intent, if available.
a. If the intent is routed to one or more flows, the column will list such flow(s).
b. If the intent is not routed to any flow, the column will display an 'Add Route...'. These intents will immediately direct customers to an agent queue.
## Intent Routing List
On the intent routing page, you will find a filterable list of intents along with their routing information. The following information is displayed in the table:
1. **Intent name:** displays the name of the intent, as well as a brief description on what it is.
2. **Code:** unique identifier for each intent.
3. **Routing:** displays the flow routing rules currently configured for an intent, if available.
a. If the intent is routed to one or more flows, the column will list such flow(s).
b. If the intent is not routed to any flow, the column will display an 'Add Route...'. These intents will immediately direct customers to an agent queue.
 ## Intent Routing Detail Page
Clicking on a specific intent in the list will direct you to a page where routing behavior for the intent can be defined. The intent detail page is broken down as follows:
1. **Routing behavior**
2. **Conditional rules and default flow**
3. **Intent information**
4. **Intent toolbar**
## Intent Routing Detail Page
Clicking on a specific intent in the list will direct you to a page where routing behavior for the intent can be defined. The intent detail page is broken down as follows:
1. **Routing behavior**
2. **Conditional rules and default flow**
3. **Intent information**
4. **Intent toolbar**
 ### Routing Behavior
Routing behavior for a specific intent is determined by selecting one of the following options:
1. **Route to a live agent**
When the intent is identified, the customer will be immediately directed to an agent queue. This is the default selection for any new intents unless configured otherwise.
2. **Route to a flow**
When the intent is identified, the customer will be directed to a flow in accordance with the [conditional rules](#conditional-rules-and-default-flow) that you will subsequently define.
### Routing Behavior
Routing behavior for a specific intent is determined by selecting one of the following options:
1. **Route to a live agent**
When the intent is identified, the customer will be immediately directed to an agent queue. This is the default selection for any new intents unless configured otherwise.
2. **Route to a flow**
When the intent is identified, the customer will be directed to a flow in accordance with the [conditional rules](#conditional-rules-and-default-flow) that you will subsequently define.
 ### Conditional Rules and Default Flow
If an intent is configured to be [routed to a flow](#routing-behavior), you have the option to build conditional rules and route to a flow only when the conditions are validated TRUE. If all the conditional rules are invalid, customers will be routed to a [default flow](#default-flow) of your choosing.
#### Add Conditional Route
To add a new conditional route:
1. Select **Add Conditional Route**.
2. Define a conditional statement in the **Conditional Route** editor by:
a. Selecting an available [attribute](/messaging-platform/virtual-agent/attributes) as target from the drop-down menu and choose the value to validate against. E.g. authentication equals true.
i. Multiple conditions can be added by clicking **Add Conditions**. Once added, they can be reordered by dragging, or deleted by clicking the trash can icon.
b. Selecting the flow to route customers to, if the conditions are validated in the dropdown.
c. Click **Apply** to save your changes.
3. Edit or delete a route by hovering over the route and selecting the respective icons.
### Conditional Rules and Default Flow
If an intent is configured to be [routed to a flow](#routing-behavior), you have the option to build conditional rules and route to a flow only when the conditions are validated TRUE. If all the conditional rules are invalid, customers will be routed to a [default flow](#default-flow) of your choosing.
#### Add Conditional Route
To add a new conditional route:
1. Select **Add Conditional Route**.
2. Define a conditional statement in the **Conditional Route** editor by:
a. Selecting an available [attribute](/messaging-platform/virtual-agent/attributes) as target from the drop-down menu and choose the value to validate against. E.g. authentication equals true.
i. Multiple conditions can be added by clicking **Add Conditions**. Once added, they can be reordered by dragging, or deleted by clicking the trash can icon.
b. Selecting the flow to route customers to, if the conditions are validated in the dropdown.
c. Click **Apply** to save your changes.
3. Edit or delete a route by hovering over the route and selecting the respective icons.

 #### Multiple Conditional Routes
You can add multiple conditional rules that can route to different flows. You can reorder these conditions by dragging the conditional rule from the icon on the left. Once saved, conditions are evaluated from top to bottom, with the customer being routed to the first flow for which the conditions are validated. If no conditional route is valid, the customer will be routed to the [default flow](#default-flow).
#### Multiple Conditional Routes
You can add multiple conditional rules that can route to different flows. You can reorder these conditions by dragging the conditional rule from the icon on the left. Once saved, conditions are evaluated from top to bottom, with the customer being routed to the first flow for which the conditions are validated. If no conditional route is valid, the customer will be routed to the [default flow](#default-flow).
 #### Default Flow
A default flow must be selected if the routing behavior is defined to [route to a flow](#routing-behavior).
Customers will be routed to the selected default flow if no conditional routes exist, or if none of the conditional routes were valid.
#### Default Flow
A default flow must be selected if the routing behavior is defined to [route to a flow](#routing-behavior).
Customers will be routed to the selected default flow if no conditional routes exist, or if none of the conditional routes were valid.
 ### Intent Information
The **Intent Information** panel will display the intent name, code, and description for easy reference as you are viewing or editing intent routes.
The **Assigned routes** will display any flow(s) that are currently routed from the intent.
### Intent Toolbar
When you are editing intent routing, the following buttons will display in the toolbar:
* **Discard changes**: remove all unsaved changes.
* **Save**: save changes to intent routing.
## Save Intent Routing
To save any changes to intent routing, click **Save** from the toolbar. By default, when saving an intent route, it is immediately released to production. There is currently no versioning available when saving intent routes.
### Intent Information
The **Intent Information** panel will display the intent name, code, and description for easy reference as you are viewing or editing intent routes.
The **Assigned routes** will display any flow(s) that are currently routed from the intent.
### Intent Toolbar
When you are editing intent routing, the following buttons will display in the toolbar:
* **Discard changes**: remove all unsaved changes.
* **Save**: save changes to intent routing.
## Save Intent Routing
To save any changes to intent routing, click **Save** from the toolbar. By default, when saving an intent route, it is immediately released to production. There is currently no versioning available when saving intent routes.
 ### Test a Different Intent Route in Test Environments
To avoid impacting customer routing and assignments in production you can test a particular intent route in a test environment before releasing it to customers by following the steps below:
* In the **Conditional Route** editor, add a condition that targets the 'InTest' attribute.
a. The value assigned to 'InTest' should equal 'TRUE'.
b. Select the flow that you want to test the routing for.
c. Click **Apply**.
### Test a Different Intent Route in Test Environments
To avoid impacting customer routing and assignments in production you can test a particular intent route in a test environment before releasing it to customers by following the steps below:
* In the **Conditional Route** editor, add a condition that targets the 'InTest' attribute.
a. The value assigned to 'InTest' should equal 'TRUE'.
b. Select the flow that you want to test the routing for.
c. Click **Apply**.

 To fully release the intent route to Production, delete the conditional statement and update the routing to the new flow.
 ## Test Intent Routes
Intent routes can be tested in demo environments. To test an intent route:
1. Access your demo environment.
2. Type `INTENT_INTENTCODE`, where `INTENTCODE` is the code associated with the intent you want to test. Please note that this is case sensitive.
3. Press **Enter** to test intent routes for that intent.
# Links
Source: https://docs.asapp.com/messaging-platform/virtual-agent/links
Learn how to manage external links and URLs that direct customers to web pages.
ASAPP provides a powerful mechanism to manage external links and URLs that direct customers to web pages. Links are predominantly used in flows, core dialogs, and customer profiles.
## Links List
The Links list page displays a list of all links available to use in AI-Console. When a link is created, it can be attached to content in a node in Flow Tooling, included in the Customer Profile panels, assigned to a View, etc.
Here, you'll find the **Link name & URL**. When adding a link to a flow or other feature, you will be required to add it from a list of all link names.
## Test Intent Routes
Intent routes can be tested in demo environments. To test an intent route:
1. Access your demo environment.
2. Type `INTENT_INTENTCODE`, where `INTENTCODE` is the code associated with the intent you want to test. Please note that this is case sensitive.
3. Press **Enter** to test intent routes for that intent.
# Links
Source: https://docs.asapp.com/messaging-platform/virtual-agent/links
Learn how to manage external links and URLs that direct customers to web pages.
ASAPP provides a powerful mechanism to manage external links and URLs that direct customers to web pages. Links are predominantly used in flows, core dialogs, and customer profiles.
## Links List
The Links list page displays a list of all links available to use in AI-Console. When a link is created, it can be attached to content in a node in Flow Tooling, included in the Customer Profile panels, assigned to a View, etc.
Here, you'll find the **Link name & URL**. When adding a link to a flow or other feature, you will be required to add it from a list of all link names.
 ## Create a Link
To create a link:
1. From the **Links** landing page, click the **+** button at the bottom right.
2. A modal window will open.
3. **Link name:** Provide a name for the link. Make the name descriptive so that other users can recognize its purpose.
4. **URL:** Include the full external URL, including **http\://** (e.g., `http://example.com/about`).
5. **Channel Targets:** This feature is optional. It allows users to create a link variant that targets customers using a specific channel. See details below.
## Create a Link
To create a link:
1. From the **Links** landing page, click the **+** button at the bottom right.
2. A modal window will open.
3. **Link name:** Provide a name for the link. Make the name descriptive so that other users can recognize its purpose.
4. **URL:** Include the full external URL, including **http\://** (e.g., `http://example.com/about`).
5. **Channel Targets:** This feature is optional. It allows users to create a link variant that targets customers using a specific channel. See details below.
 ### Add a Channel Target Variant
1. Click **Add Channel Target** to add a URL variant. A new input field will be added.
a. **URL Override:** Include the URL variant for the targeted channel. Please follow the same URL syntax as described under **Create a Link**.
b. **Channel Target:** From the drop-down menu, select which channel to target. Bear in mind that a single variant per channel is currently supported.
2. **Delete targets:** To remove a target, click the **Delete** icon.
3. **Save:** To save the link, click the **Save** button. The link will not be active until it is assigned to a flow, customer profile or any other feature that supports **Links**.
4. **Cancel:** On click, all changes will be cleared.
### Add a Channel Target Variant
1. Click **Add Channel Target** to add a URL variant. A new input field will be added.
a. **URL Override:** Include the URL variant for the targeted channel. Please follow the same URL syntax as described under **Create a Link**.
b. **Channel Target:** From the drop-down menu, select which channel to target. Bear in mind that a single variant per channel is currently supported.
2. **Delete targets:** To remove a target, click the **Delete** icon.
3. **Save:** To save the link, click the **Save** button. The link will not be active until it is assigned to a flow, customer profile or any other feature that supports **Links**.
4. **Cancel:** On click, all changes will be cleared.
 ### Link Assignments
Once a link has been created, it can be sent to customers in flows. The **Links** feature will keep tabs on where each link has been assigned and provide quick access to those feature areas.
When viewing a specific link, the Usage section indicates which flows are currently using the respective link. On click, you can navigate directly to the flow. When a link is not assigned in any flow, 'Not yet assigned' will be displayed.
### Link Assignments
Once a link has been created, it can be sent to customers in flows. The **Links** feature will keep tabs on where each link has been assigned and provide quick access to those feature areas.
When viewing a specific link, the Usage section indicates which flows are currently using the respective link. On click, you can navigate directly to the flow. When a link is not assigned in any flow, 'Not yet assigned' will be displayed.
 ## Edit a Link
Link changes are global, which means that saved changes are immediately pushed to all features that reference the link.
1. From the **Links** landing page, click the **link name** you want to edit.
2. **Link ID:** After a link is saved for the first time, a unique identifier is automatically assigned to the link. This identifier does not change over time, including when the link is edited.
a. The **Link ID** can be referenced in **Historical Reporting** for your reporting needs.
3. Assign changes to the configurations.
4. **Save:** When changes are complete, click **Save** to automatically apply the changes.
## Delete a Link
Links can be deleted, but only if they are not currently assigned. To delete a link that is assigned, remove the assignments first.
## Edit a Link
Link changes are global, which means that saved changes are immediately pushed to all features that reference the link.
1. From the **Links** landing page, click the **link name** you want to edit.
2. **Link ID:** After a link is saved for the first time, a unique identifier is automatically assigned to the link. This identifier does not change over time, including when the link is edited.
a. The **Link ID** can be referenced in **Historical Reporting** for your reporting needs.
3. Assign changes to the configurations.
4. **Save:** When changes are complete, click **Save** to automatically apply the changes.
## Delete a Link
Links can be deleted, but only if they are not currently assigned. To delete a link that is assigned, remove the assignments first.
 1. If the link is assigned: When opening the Link modal, the **Delete** button will be disabled. The delete function will remain disabled until all link assignments have been removed.
2. If the link is not assigned: The link can be deleted by clicking on the **Delete** button on the bottom-left area of the link modal.
# Reporting and Insights
Source: https://docs.asapp.com/reporting
ASAPP reports data back via several channels, each with different use cases:
1. If the link is assigned: When opening the Link modal, the **Delete** button will be disabled. The delete function will remain disabled until all link assignments have been removed.
2. If the link is not assigned: The link can be deleted by clicking on the **Delete** button on the bottom-left area of the link modal.
# Reporting and Insights
Source: https://docs.asapp.com/reporting
ASAPP reports data back via several channels, each with different use cases:
 The diagram above provides a high-level view of how a customer-maintained service that receives real-time ASAPP events might be designed; a service that runs on ASAPP-controlled infrastructure will push real-time event data to one or more HTTP endpoints maintained by the customer. For each individual event, the ASAPP service makes one POST request to the endpoint.
Event data will be transmitted using mTLS-based authentication (See the separate document [Securing Endpoints with Mutual TLS](/reporting/secure-data-retrieval#certificate-configuration) for details).
### Customer Requirements
* The customer must implement a POST API endpoint to handle the event messages.
* The customer and ASAPP must develop the mTLS authentication integration to secure the API endpoint
* All ASAPP real-time "raw" events will post to the same endpoint; the customer is expected to filter the received events to their needs based on name and event type.
* Each ASAPP real-time "processed" reporting feed can be configured to post to one arbitrary endpoint, at the customer's specified preference (i.e., each feed can post to a separate URI, or each can post to the same URI, or any combination required by the customer's use case.)
It should be noted that real-time events do not implement the de-duplication and grouping of ASAPP's batch reporting feeds; rather these real-time events provide building blocks for the customer to aggregate and build on. When making use of ASAPP's real-time events, the customer will be responsible for grouping, de-duplication, and aggregation of related events as required by the customer's particular use case. The events include metadata fields to facilitate such tasks.
### Endpoint Sizing
The endpoint configured by the customer should provisioned with sufficient scale to receive events at the rate generated by the customer's ASAPP implementation. As a rule of thumb, customers can expect:
* A voice call will generate on the order of 100 events per issue
* A text chat will generate on the order of 10 events per issue
So, for example, if the customer's application services 1000 issues per minute, that customer should expect their endpoint to receive 10,000 -- 100,000 messages per minute, or on the order of 1,000 messages per second.
### Endpoint Configuration
ASAPP can configure its service with the following parameters:
* **url:** The destination URL of the customer API endpoint that is set up to handle POST http requests.
* **timeout\_ms:** The number of milliseconds to wait for a HTTP 200 "OK" response before timing out.
* **retries:** The number of times to retry to send a message after a failed delivery.
* **(optional)event\_list:** List of `event_types` to send.
The diagram above provides a high-level view of how a customer-maintained service that receives real-time ASAPP events might be designed; a service that runs on ASAPP-controlled infrastructure will push real-time event data to one or more HTTP endpoints maintained by the customer. For each individual event, the ASAPP service makes one POST request to the endpoint.
Event data will be transmitted using mTLS-based authentication (See the separate document [Securing Endpoints with Mutual TLS](/reporting/secure-data-retrieval#certificate-configuration) for details).
### Customer Requirements
* The customer must implement a POST API endpoint to handle the event messages.
* The customer and ASAPP must develop the mTLS authentication integration to secure the API endpoint
* All ASAPP real-time "raw" events will post to the same endpoint; the customer is expected to filter the received events to their needs based on name and event type.
* Each ASAPP real-time "processed" reporting feed can be configured to post to one arbitrary endpoint, at the customer's specified preference (i.e., each feed can post to a separate URI, or each can post to the same URI, or any combination required by the customer's use case.)
It should be noted that real-time events do not implement the de-duplication and grouping of ASAPP's batch reporting feeds; rather these real-time events provide building blocks for the customer to aggregate and build on. When making use of ASAPP's real-time events, the customer will be responsible for grouping, de-duplication, and aggregation of related events as required by the customer's particular use case. The events include metadata fields to facilitate such tasks.
### Endpoint Sizing
The endpoint configured by the customer should provisioned with sufficient scale to receive events at the rate generated by the customer's ASAPP implementation. As a rule of thumb, customers can expect:
* A voice call will generate on the order of 100 events per issue
* A text chat will generate on the order of 10 events per issue
So, for example, if the customer's application services 1000 issues per minute, that customer should expect their endpoint to receive 10,000 -- 100,000 messages per minute, or on the order of 1,000 messages per second.
### Endpoint Configuration
ASAPP can configure its service with the following parameters:
* **url:** The destination URL of the customer API endpoint that is set up to handle POST http requests.
* **timeout\_ms:** The number of milliseconds to wait for a HTTP 200 "OK" response before timing out.
* **retries:** The number of times to retry to send a message after a failed delivery.
* **(optional)event\_list:** List of `event_types` to send.
Key |
Description |
|---|---|
env |
Environment (prod, pre\_prod, test) |
company\_name |
The company name: acme, duff, stark\_industries, etc. Note: company name should not have spaces within. |
aws-region |
us-east-1 Note: this is the current region supported for your ASAPP instance. |
FIELD NAME |
REQUIRED? |
FORMAT |
EXAMPLE |
NOTES |
|---|---|---|---|---|
customer\_id |
Yes |
String |
347bdddb-d3a1-45fc-bbcd-dbd3a175fc1c |
External User ID. This is a hashed version of the client ID. |
conversation\_id |
No |
String |
21352352 |
If filled in, should map to ASAPP's system. May be empty, if the customer has not had a conversation with ASAPP. |
call\_start |
Yes |
Timestamp |
2020-01-03T20:02:13Z |
ISO 8601 formatted UTC timestamp. Time/date call is received by the system. |
call\_end |
Yes |
Timestamp |
2020-01-03T20:02:13Z |
ISO 8601 formatted UTC timestamp. Time/date call ends. Note: duration of call should be Call End - Call Start. |
call\_assigned\_to\_agent |
No |
Timestamp |
2020-01-03T20:02:13Z |
ISO 8601 formatted UTC timestamp. The date/time the call was answered by the agent. |
customer\_type |
No |
String |
Wireless Premier |
Customer account classification by client. |
survey\_offered |
No |
Bool |
true/false |
Whether a survey was offered or not. |
survey\_taken |
No |
Bool |
true/false |
When a survey was offered, whether it was completed or not. |
survey\_answer |
No |
String |
Survey answer |
|
toll\_free\_number |
No |
String |
888-929-1467 |
Client phone number (toll free number) used to call in that allows for tracking different numbers, particularly ones referred directly by SRS. If websource or click to call, the web campaign is passed instead of TFN. |
ivr\_intent |
No |
String |
Power Outage |
Phone pathing logic for routing to the appropriate agent group or providing self-service resolution. Could be multiple values. |
ivr\_resolved |
No |
Bool |
true/false |
Caller triggered a self-service response from the IVR and then disconnected. |
ivr\_abandoned |
No |
Bool |
true/false |
Caller disconnected without receiving a self-service response from IVR nor being placed in live agent queue. |
agent\_queue\_assigned |
No |
String |
Wireless Sales |
Agent group/agent skill group (aka queue name) |
time\_in\_queue |
No |
Integer |
600 |
Seconds caller waits in queue to be assigned to an agent. |
queue\_abandoned |
No |
Bool |
true/false |
Caller disconnected after being assigned to a live agent queue but before being assigned to an agent. |
call\_handle\_time |
No |
Integer |
650 |
Call duration in seconds from call assignment event to call disconnect event. |
call\_wrap\_time |
No |
Integer |
30 |
Duration in seconds from call disconnect event to end of agent wrap event. |
transfer |
No |
String |
Sales Group |
Agent queue name if call was transferred. NA or Null value for calls not transferred. |
disposition\_category |
No |
String |
Change plan |
Categorical outcome selection from agent. Alternatively, could be category like 'Resolved', 'Unresolved', 'Transferred', 'Referred'. |
disposition\_notes |
No |
String |
Notes from agent regarding the disposition of the call. |
|
transaction\_completed |
No |
String |
Upgrade Completed, Payment Processed |
Name of transaction type completed by call agent on behalf of customer. Could contain multiple delimited values. May not be available for all agents. |
caller\_account\_value |
No |
Decimal |
129.45 |
Current account value of customer. |
Full |
Abbreviated |
|---|---|
|
Agent: Choose an option from the list below Agent: (A) 1-way ticket (B) 2-way ticket (C) None of the above Customer: (A) 1-way ticket |
Agent: Choose an option from the list below Customer: (A) |
 #### 2. Provide the Public Key to ASAPP
Save the public and private key. Only send the public file for your key pair to ASAPP. This is not a secret and can be emailed.
#### 3. Upload Files
Use an SFTP utility such as Cyberduck (available from [Cyberduck](https://cyberduck.io/) ) to upload files to ASAPP. Click **Open Connection**, add sftp.us-east-1.asapp.com as the Server, and add `sftpcompanymarker` as the Username. Choose the private key you generated in step 2 as the SSH Private Key and click **connect**. The following screenshots show how to do this using Cyberduck.
#### 2. Provide the Public Key to ASAPP
Save the public and private key. Only send the public file for your key pair to ASAPP. This is not a secret and can be emailed.
#### 3. Upload Files
Use an SFTP utility such as Cyberduck (available from [Cyberduck](https://cyberduck.io/) ) to upload files to ASAPP. Click **Open Connection**, add sftp.us-east-1.asapp.com as the Server, and add `sftpcompanymarker` as the Username. Choose the private key you generated in step 2 as the SSH Private Key and click **connect**. The following screenshots show how to do this using Cyberduck.
 A pop-up window appears. Click to allow the unknown fingerprint. You will then see the `in` and `out` directories.
 Double click the `in` directory and click **Upload** to choose files to send to ASAPP.
### Mac/Linux Users
If you are using a Mac or Linux, follow the steps below:
#### 1. Generate an SSH Key Pair
If you are using a Mac or Linux, you can generate a key pair from the terminal as follows.
If you already have an `id_rsa` file in the `.ssh` directory that you use with other applications, you should specify a different filename for the key so you do not overwrite it. You can either do that with the `-f` option or type in a `filename` when prompted.
`ssh-keygen -t rsa -b 4096 -C sftp
Double click the `in` directory and click **Upload** to choose files to send to ASAPP.
### Mac/Linux Users
If you are using a Mac or Linux, follow the steps below:
#### 1. Generate an SSH Key Pair
If you are using a Mac or Linux, you can generate a key pair from the terminal as follows.
If you already have an `id_rsa` file in the `.ssh` directory that you use with other applications, you should specify a different filename for the key so you do not overwrite it. You can either do that with the `-f` option or type in a `filename` when prompted.
`ssh-keygen -t rsa -b 4096 -C sftp IP Addresses can be unblocked by clicking the trash icon on the blocked IP's row, and then saving and deploying the updated list.
 ### Issue Reporting Template
When you report issues to ASAPP, please provide the following information whenever possible.
* **Issue ID**: provide the Issue ID if the bug took place during a specific conversation.
* **Hashed, encrypted customer ID:** (see below)
* **Severity\*:** provide the severity level based on the 4 point severity scale.
* **Subject\*:** provide a brief, accurate summary of the observed behavior.
* **Date Observed\*:** provide the date you observed the issue. (please note: the observed date may differ from the date the issue is being reported)
* **Description\*:** provide a detailed description of the observed issue, including number of impacted users, the specific users experiencing the issue, impacted sites, and the timestamp when the issue began.
* **Steps to Reproduce\*:** provide detailed list of steps taken at the time you observed the issue.
* **ASAPP Portal\*:** indicate environment if the bug is not in production.
* **Device/Operating System\*:** provide the device / OS being utilized at the time you observed the issue.
* **Browser\*:** provide the browser being utilized at the time you observed the issue.
* **Attachments**: include any screenshots or videos that may help clearly illustrate the issue.
* **\*** Indicates a required field.
### Issue Reporting Template
When you report issues to ASAPP, please provide the following information whenever possible.
* **Issue ID**: provide the Issue ID if the bug took place during a specific conversation.
* **Hashed, encrypted customer ID:** (see below)
* **Severity\*:** provide the severity level based on the 4 point severity scale.
* **Subject\*:** provide a brief, accurate summary of the observed behavior.
* **Date Observed\*:** provide the date you observed the issue. (please note: the observed date may differ from the date the issue is being reported)
* **Description\*:** provide a detailed description of the observed issue, including number of impacted users, the specific users experiencing the issue, impacted sites, and the timestamp when the issue began.
* **Steps to Reproduce\*:** provide detailed list of steps taken at the time you observed the issue.
* **ASAPP Portal\*:** indicate environment if the bug is not in production.
* **Device/Operating System\*:** provide the device / OS being utilized at the time you observed the issue.
* **Browser\*:** provide the browser being utilized at the time you observed the issue.
* **Attachments**: include any screenshots or videos that may help clearly illustrate the issue.
* **\*** Indicates a required field.
 ### Locate the Issue ID
**In Desk:** During the conversation, click on the **Notes** icon at the top of the center panel.
The issue ID is next to the date. The issue ID is also in the Left Hand Panel and End Chat modal window.
### Locate the Issue ID
**In Desk:** During the conversation, click on the **Notes** icon at the top of the center panel.
The issue ID is next to the date. The issue ID is also in the Left Hand Panel and End Chat modal window.

 **In Admin:** Go to Conversation Manager.
Issue IDs are in the first column for both live and ended conversations.
**In Admin:** Go to Conversation Manager.
Issue IDs are in the first column for both live and ended conversations.
 # Service Desk Information
Source: https://docs.asapp.com/support/service-desk-information
**What is the ASAPP Service Desk?**
Service Desk is the tool ASAPP uses for the ingestion and tracking of all issues and modifications in our customers' demo and production environments. All issue reports and configuration requests between ASAPP and our customers are handled via the tool.
**How can I access the Service Desk?**
The Service Desk can be accessed at [support.asapp.com](http://support.asapp.com).
Service Desk access is provisioned by your ASAPP account team after the initial Service Desk training is completed. All subsequent access requests and/or modifications should be handled via email with your ASAPP account team.
**When do I create a ticket?**
A Service Desk ticket should be created any time an issue is identified with an ASAPP product (this includes Admin, Desk, Chat SDK, and AI Services) in either the demo or production environment. Additionally, a ticket should be created in cases where an existing configuration needs to be updated.
**How do I create a ticket?**
A Service Desk ticket can be created by navigating to support.asapp.com, logging in, clicking **Submit a Request** in the top right corner of the screen, and filling out and submitting the ticket form.
**What happens after I've created a ticket?**
Once the ticket form is submitted, ASAPP will receive an automatic notification. The ASAPP Technical Services team will acknowledge and review the ticket, triage internally, and request additional information if needed. All correspondence, including requests for additional information, explanations of existing functionality, and updates on fix timelines will take place in the ticket comments.
**Should I use Service Desk to ask questions?**
In general, reaching out to your ASAPP account contact(s) directly is the best way to answer a question or begin a discussion. Your ASAPP account contacts can help you determine whether observed behavior is expected or an unexpected issue.
If an issue is confirmed unexpected or a configuration available, create a ticket in Service Desk to begin addressing it.
**What if I have an urgent production problem?**
ASAPP calls urgent production issues **Severity 1** and defines them as follows:
# Service Desk Information
Source: https://docs.asapp.com/support/service-desk-information
**What is the ASAPP Service Desk?**
Service Desk is the tool ASAPP uses for the ingestion and tracking of all issues and modifications in our customers' demo and production environments. All issue reports and configuration requests between ASAPP and our customers are handled via the tool.
**How can I access the Service Desk?**
The Service Desk can be accessed at [support.asapp.com](http://support.asapp.com).
Service Desk access is provisioned by your ASAPP account team after the initial Service Desk training is completed. All subsequent access requests and/or modifications should be handled via email with your ASAPP account team.
**When do I create a ticket?**
A Service Desk ticket should be created any time an issue is identified with an ASAPP product (this includes Admin, Desk, Chat SDK, and AI Services) in either the demo or production environment. Additionally, a ticket should be created in cases where an existing configuration needs to be updated.
**How do I create a ticket?**
A Service Desk ticket can be created by navigating to support.asapp.com, logging in, clicking **Submit a Request** in the top right corner of the screen, and filling out and submitting the ticket form.
**What happens after I've created a ticket?**
Once the ticket form is submitted, ASAPP will receive an automatic notification. The ASAPP Technical Services team will acknowledge and review the ticket, triage internally, and request additional information if needed. All correspondence, including requests for additional information, explanations of existing functionality, and updates on fix timelines will take place in the ticket comments.
**Should I use Service Desk to ask questions?**
In general, reaching out to your ASAPP account contact(s) directly is the best way to answer a question or begin a discussion. Your ASAPP account contacts can help you determine whether observed behavior is expected or an unexpected issue.
If an issue is confirmed unexpected or a configuration available, create a ticket in Service Desk to begin addressing it.
**What if I have an urgent production problem?**
ASAPP calls urgent production issues **Severity 1** and defines them as follows:
 ### Environment Targeting
To determine the ASAPP environment targeted by the front-end, you can look at the network traffic and note what hostname is referenced. For instance, ...something-demo01.test.asapp.com is the demo environment for that implementation. You will see this on every call to the ASAPP backend and it may be helpful to filter the network traffic to "ASAPP".
1. Open **Dev Tools** and navigate to the **Network** tab.
2. Reload the page or navigate to a page with ASAPP chat enabled.
3. Filter network traffic to **ASAPP**.
4. Look at the "Request URL" for the network call.
5. Parse the hostname from `https://something-demo01.test.asapp.com/api/noauth/ShouldDisplayWebChat?ASAPP-ClientType=web-sdk&ASAPP-ClientVersion=4.0.1-uat\`: something-demo01.test.asapp.com
### Environment Targeting
To determine the ASAPP environment targeted by the front-end, you can look at the network traffic and note what hostname is referenced. For instance, ...something-demo01.test.asapp.com is the demo environment for that implementation. You will see this on every call to the ASAPP backend and it may be helpful to filter the network traffic to "ASAPP".
1. Open **Dev Tools** and navigate to the **Network** tab.
2. Reload the page or navigate to a page with ASAPP chat enabled.
3. Filter network traffic to **ASAPP**.
4. Look at the "Request URL" for the network call.
5. Parse the hostname from `https://something-demo01.test.asapp.com/api/noauth/ShouldDisplayWebChat?ASAPP-ClientType=web-sdk&ASAPP-ClientVersion=4.0.1-uat\`: something-demo01.test.asapp.com
 ### WebSocket Status
In addition to looking at the API calls, it is important to look at the WebSocket connections in use. You should also be able to inspect the frames within the WebSocket to ensure messages are received properly.
### WebSocket Status
In addition to looking at the API calls, it is important to look at the WebSocket connections in use. You should also be able to inspect the frames within the WebSocket to ensure messages are received properly.
 [https://developers.google.com/web/tools/chrome-devtools/network/reference#frames](https://developers.google.com/web/tools/chrome-devtools/network/reference#frames)
## Troubleshooting Customer Chat
### Should Display Web Chat
If chat does not display on the desired web page, the first place to check is ASAPP's call for `ShouldDisplayWebChat` via the **Chrome Developer Tool Network** tab. A successful API call response should contain a `DisplayCustomerSupport` field with a value of `true`. If this value is `false` for a page that should display chat, please reach out to the ASAPP Support Team. Superusers can access the Triggers section of ASAPP Admin. This will enable them to determine if the URL visited is set to display chat.
To troubleshoot:
1. Open **Dev Tools** and navigate to the **Network** tab.
2. Reload the page or navigate to a page with ASAPP chat enabled.
3. Filter network traffic to **ASAPP**.
4. Look at the "Request Payload" for `ShouldDisplayWebChat` and look for a `true` response for `DisplayCustomerSupport`.
[https://developers.google.com/web/tools/chrome-devtools/network/reference#frames](https://developers.google.com/web/tools/chrome-devtools/network/reference#frames)
## Troubleshooting Customer Chat
### Should Display Web Chat
If chat does not display on the desired web page, the first place to check is ASAPP's call for `ShouldDisplayWebChat` via the **Chrome Developer Tool Network** tab. A successful API call response should contain a `DisplayCustomerSupport` field with a value of `true`. If this value is `false` for a page that should display chat, please reach out to the ASAPP Support Team. Superusers can access the Triggers section of ASAPP Admin. This will enable them to determine if the URL visited is set to display chat.
To troubleshoot:
1. Open **Dev Tools** and navigate to the **Network** tab.
2. Reload the page or navigate to a page with ASAPP chat enabled.
3. Filter network traffic to **ASAPP**.
4. Look at the "Request Payload" for `ShouldDisplayWebChat` and look for a `true` response for `DisplayCustomerSupport`.
 ### Web SDK Context Input
To view the context provided to the SDK, you can look at the request payload of most SDK API calls. Context input may vary but typical items include:
* Subdivisions
* Segments
* Customer info parameters
* External session IDs
### Web SDK Context Input
To view the context provided to the SDK, you can look at the request payload of most SDK API calls. Context input may vary but typical items include:
* Subdivisions
* Segments
* Customer info parameters
* External session IDs
 ### Customer Authentication Input
For authenticated customer chat sessions, you can see the Auth key within the context parameters used throughout the API calls to ASAPP.
The values passed into the Auth context will depend on the integration.
### Customer Authentication Input
For authenticated customer chat sessions, you can see the Auth key within the context parameters used throughout the API calls to ASAPP.
The values passed into the Auth context will depend on the integration.
 ### 204 API call
The ASAPP Agent Desk makes API calls to the backend periodically to ensure status and connectivity reporting is functional. Verify the HTTP status and response timing of these calls to look for indicators of an issue. These calls display as the number 204 in the Chrome Developer Tools Network tab.
To view these calls:
1. Open **Dev Tools** and navigate to the **Network** tab.
2. Reload page or navigate to a page with ASAPP chat enabled.
3. Filter network traffic to **ASAPP**.
4. Look at the "204" calls over time to determine good health.
### 204 API call
The ASAPP Agent Desk makes API calls to the backend periodically to ensure status and connectivity reporting is functional. Verify the HTTP status and response timing of these calls to look for indicators of an issue. These calls display as the number 204 in the Chrome Developer Tools Network tab.
To view these calls:
1. Open **Dev Tools** and navigate to the **Network** tab.
2. Reload page or navigate to a page with ASAPP chat enabled.
3. Filter network traffic to **ASAPP**.
4. Look at the "204" calls over time to determine good health.
 ### WebSocket
When a customer chat loads onto the ASAPP Agent Desk, this creates a WebSocket. During the life of that conversation, ASAPP sends continual echoes (requests and responses) to determine WebSocket health and status. ASAPP sends the echoes every 16-18 seconds and has a 6 second timeout by default. If these requests and responses intermittently time out, there is likely a network issue between the Agent Desktop and the ASAPP Desk application.
You can also view messages being sent through WebSocket, as the agent to customer conversation happens:
1. Open **Dev Tools** and navigate to the **Network** tab.
2. Reload page or navigate to a page with ASAPP chat enabled.
3. Click **WS** next to the Filter text box to filter network traffic to WebSocket.
4. Look at the Messages tab in WebSocket.
### WebSocket
When a customer chat loads onto the ASAPP Agent Desk, this creates a WebSocket. During the life of that conversation, ASAPP sends continual echoes (requests and responses) to determine WebSocket health and status. ASAPP sends the echoes every 16-18 seconds and has a 6 second timeout by default. If these requests and responses intermittently time out, there is likely a network issue between the Agent Desktop and the ASAPP Desk application.
You can also view messages being sent through WebSocket, as the agent to customer conversation happens:
1. Open **Dev Tools** and navigate to the **Network** tab.
2. Reload page or navigate to a page with ASAPP chat enabled.
3. Click **WS** next to the Filter text box to filter network traffic to WebSocket.
4. Look at the Messages tab in WebSocket.

 If you see one of these pairs of echoes missing, it is most likely because Agent Desk did not receive the echo from the ASAPP backend due to packet loss. If the 'Attempting to reconnect..' message shows, Agent Desk attempts to reconnect with the ASAPP backend to establish a new WebSocket. The messages display in red text starting with 'request?ASAPP-ClientType' in the Network tab of Chrome Developer Tools.
 If you loose network connectivity and then re-establish it, there will be multiple WebSocket entries visible when you click on **WS**.
 ## Troubleshooting Agent Desk/Admin Access Issues
### Using Employee List in ASAPP Admin
If a user has issues logging in to ASAPP, you can view their details within ASAPP Admin after their first successful login. Check the Enabled status, Roles, and Groups for the user to determine if there are any user level issues. ASAPP will reject the user's login attempt if their account is disabled.
To find an employee:
1. Login to ASAPP Admin.
2. Navigate to Employee List.
3. Use the filter to find the desired account.
4. Check account attributes for: Enabled, Roles, and Groups.
## Troubleshooting Agent Desk/Admin Access Issues
### Using Employee List in ASAPP Admin
If a user has issues logging in to ASAPP, you can view their details within ASAPP Admin after their first successful login. Check the Enabled status, Roles, and Groups for the user to determine if there are any user level issues. ASAPP will reject the user's login attempt if their account is disabled.
To find an employee:
1. Login to ASAPP Admin.
2. Navigate to Employee List.
3. Use the filter to find the desired account.
4. Check account attributes for: Enabled, Roles, and Groups.
 ### Employee Roles Mismatch
During the user's SSO login process, ASAPP receives a list of user roles via the Single-Sign-On SAML assertion.
If the user roles in the Employee List is incorrect:
1. Check with your Identity & Access Management team to verify that the user has been added to the correct set of AD Security Groups.
2. Once you have verified the user's AD Security Groups, please ask the user to log out and log back in using the IDP-initiated SSO URL.
3. If you still see a mismatch between the user's AD Security Groups and the ASAPP Employee List, then please reach out to the ASAPP Support Team.
### Errors During User Login
The SSO flow is a series of browser redirects in the following order:
1. Your SSO engine IDP-initiated URL -- typically hosted within your domain. This is the URL that users must use to login.
2. Your system's authentication system -- typically hosted within your domain. If the user is already authenticated, then it will immediately redirect the user back to your SSO engine URL. Otherwise, the user will be presented with the login page and prompted to enter their credentials.
3. ASAPP's SSO engine -- hosted on the auth-\{customerName}.asapp.com domain.
4. ASAPP's Agent/Admin app -- hosted on the \{customerName}.asapp.com domain.
There are several potential errors that may happen during login. In all of these cases, it is beneficial to find out:
1. The SSO login URL being used by the user to login.
2. The error page URL and error message displayed.
#### Incorrect SSO Login URL
Confirm the user logins to the correct SSO URL. Due to browser redirects, users may accidentally bookmark an incorrect URL (e.g., ASAPP's SSO engine URL, instead of your SSO engine IDP-initiated URL).
#### Invalid Role Values in the SSO SAML Assertion
If the user sees a "Failed to authenticate user" error message and the URL is an ASAPP URL (...asapp.com), then please confirm that correct role values are being sent in the SAML assertion. This error message typically indicates that the user role value is not recognizable within ASAPP.
#### Other Login Errors
For any other errors, please check the error page URL. If the error page URL is an ASAPP URL (ends in asapp.com), please reach out to the ASAPP Support Team for help. If the URL is your SSO URL or your system's authentication system, please contact your internal support team.
# Welcome to ASAPP
Source: https://docs.asapp.com/welcome
Revolutionizing Contact Centers with AI
Welcome to the ASAPP documentation! This is the place to find information on how to use ASAPP as a platform or as integration.
### Employee Roles Mismatch
During the user's SSO login process, ASAPP receives a list of user roles via the Single-Sign-On SAML assertion.
If the user roles in the Employee List is incorrect:
1. Check with your Identity & Access Management team to verify that the user has been added to the correct set of AD Security Groups.
2. Once you have verified the user's AD Security Groups, please ask the user to log out and log back in using the IDP-initiated SSO URL.
3. If you still see a mismatch between the user's AD Security Groups and the ASAPP Employee List, then please reach out to the ASAPP Support Team.
### Errors During User Login
The SSO flow is a series of browser redirects in the following order:
1. Your SSO engine IDP-initiated URL -- typically hosted within your domain. This is the URL that users must use to login.
2. Your system's authentication system -- typically hosted within your domain. If the user is already authenticated, then it will immediately redirect the user back to your SSO engine URL. Otherwise, the user will be presented with the login page and prompted to enter their credentials.
3. ASAPP's SSO engine -- hosted on the auth-\{customerName}.asapp.com domain.
4. ASAPP's Agent/Admin app -- hosted on the \{customerName}.asapp.com domain.
There are several potential errors that may happen during login. In all of these cases, it is beneficial to find out:
1. The SSO login URL being used by the user to login.
2. The error page URL and error message displayed.
#### Incorrect SSO Login URL
Confirm the user logins to the correct SSO URL. Due to browser redirects, users may accidentally bookmark an incorrect URL (e.g., ASAPP's SSO engine URL, instead of your SSO engine IDP-initiated URL).
#### Invalid Role Values in the SSO SAML Assertion
If the user sees a "Failed to authenticate user" error message and the URL is an ASAPP URL (...asapp.com), then please confirm that correct role values are being sent in the SAML assertion. This error message typically indicates that the user role value is not recognizable within ASAPP.
#### Other Login Errors
For any other errors, please check the error page URL. If the error page URL is an ASAPP URL (ends in asapp.com), please reach out to the ASAPP Support Team for help. If the URL is your SSO URL or your system's authentication system, please contact your internal support team.
# Welcome to ASAPP
Source: https://docs.asapp.com/welcome
Revolutionizing Contact Centers with AI
Welcome to the ASAPP documentation! This is the place to find information on how to use ASAPP as a platform or as integration.
 ## Getting Started
If you're new to ASAPP, start here to learn the essentials and make your first API call.
## Getting Started
If you're new to ASAPP, start here to learn the essentials and make your first API call.