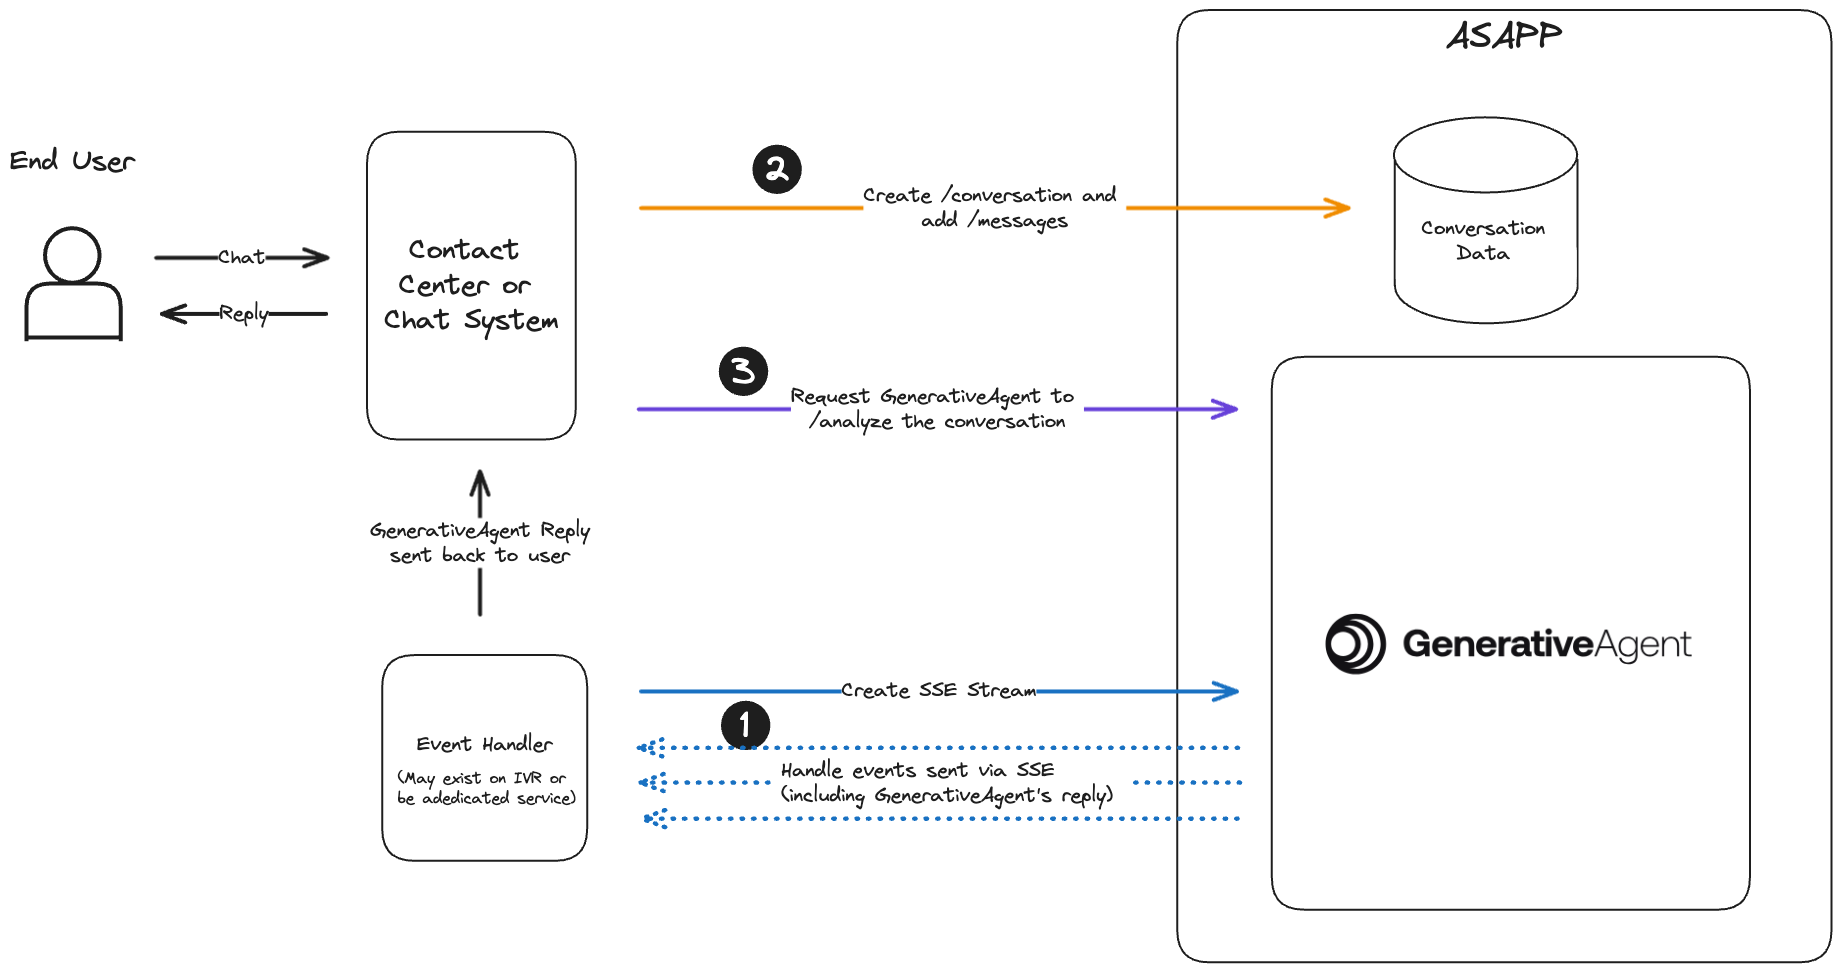
You have the option to integrate with GenerativeAgent using the our APIs to directly provide the conversation transcript. This may be helpful if you:
- Have your own Speech-to-Text (STT) and Text-to-Speech (TTS) service.
- Adding GenerativeAgent to a text only channel like SMS or web site chat.
GenerativeAgent works on a loop where you will send text content of the conversation and have GenerativeAgent analyze a conversation, then handle the results from GenerativeAgent.
This process is repeated until GenerativeAgent addresses the user’s needs, or GenerativeAgent is unable to help the user and requests a transfer to agent.
Your text-only integration needs to handle:
-
Listening and Handling GenerativeAgent events. Create a single SSE stream where events from all conversations are sent.
-
Connecting your chat system and trigger GenerativeAgent.
- Create a conversation
- Add Messages
- Analyze a conversation
This diagram shows the interaction between your server and ASAPP, these steps are explained in more detail below:
Before you Begin
Before you start integrating to GenerativeAgent, you need to:
Step 1: Listen and Handle GenerativeAgent Events
GenerativeAgent sends you events during the conversation. All events for all conversations being evaluated by GenerativeAgent are sent through the single Server-Sent-Event (SSE) stream..
To create the SSE stream URL, POST to /streams:
curl -X POST 'https://api.sandbox.asapp.com/generativeagent/v1/streams' \
--header 'asapp-api-id: <API KEY ID>' \
--header 'asapp-api-secret: <API TOKEN>' \
--header 'Content-Type: application/json' \
--data '{}'
{
   "streamId": "01ARZ3NDEKTSV4RRFFQ69G5FAV",
   "streamingUrl": "https://ws-coradnor.asapp.com/push-api/connect/sse?token=token",
  "messageTypes": [
    "generative-agent-message"
  ]
}
streamId. You will use this later to send the GenerativeAgent events to this SSE stream.
You need to listen and handle these events to enable GenerativeAgent to interact with your users.
Step 2: Create a Conversation
A conversation represents a thread of messages between an end user and one or more agents. GenerativeAgent evaluates and responds in a given conversation.
Create a conversation providing your Ids for the conversation and customer:
curl -X POST 'https://api.sandbox.asapp.com/conversation/v1/conversations' \
--header 'asapp-api-id: <API KEY ID>' \
--header 'asapp-api-secret: <API TOKEN>' \
--header 'Content-Type: application/json' \
--data '{
  "externalId": "1",
  "customer": {
    "externalId": "[Your id for the customer]",
    "name": "customer name"
  },
  "timestamp": "2024-01-23T11:42:42Z"
}'
id. Save the conversation id as it is used when calling GenerativeAgent
{"id":"01HNE48VMKNZ0B0SG3CEFV24WM"}
Step 3: Add messages
Whether you are implementing a text based channel or using your own transcription, provide the utterances from your users by creating messages. A message represents a single communication within a conversation.
Create a message providing the text of what your user said:
curl -X POST 'https://api.sandbox.asapp.com/conversation/v1/conversations/01HNE48VMKNZ0B0SG3CEFV24WM/messages' \
--header 'asapp-api-id: <API KEY ID>' \
--header 'asapp-api-secret: <API TOKEN>' \
--header 'Content-Type: application/json' \
--data '{
  "text": "Hello, I would like to upgrade my internet plan to GOLD.",
  "sender": {
    "role": "customer",
    "externalId": "[Your id for the customer]"
  },
  "timestamp": "2024-01-23T11:42:42Z"
}'
You can provide a single message as part of the /analyze call if that better works with the design of your system.
Step 4: Analyze conversation with GenerativeAgent
Once you have the SSE stream connected and are sending messages, you need to engage GenerativeAgent with a given conversation.
To have GenerativeAgent analyze a conversation, make a POST request to /analyze:
curl -X POST 'https://api.sandbox.asapp.com/generativeagent/v1/analyze' \
--header 'asapp-api-id: <API KEY ID>' \
--header 'asapp-api-secret: <API TOKEN>' \
--header 'Content-Type: application/json' \
--data '{
    "conversationId": "01HNE48VMKNZ0B0SG3CEFV24WM",
    "streamId": "01ARZ3NDEKTSV4RRFFQ69G5FAV"
}'
streamId created when you started the SSE Stream.
GenerativeAgent evaluates the conversation at that moment of time to determine a response. GenerativeAgent is not aware of any additional messages that are sent while processing.
A successful response returns a 200 and the conversation Id.
{
  "conversationId":"01HNE48VMKNZ0B0SG3CEFV24WM"
}
Analyze with Message
You have the option to send a message when calling analyze.
curl -X POST 'https://api.sandbox.asapp.com/generativeagent/v1/analyze' \
--header 'asapp-api-id: <API KEY ID>' \
--header 'asapp-api-secret: <API TOKEN>' \
--header 'Content-Type: application/json' \
--data '{
    "conversationId": "01HNE48VMKNZ0B0SG3CEFV24WM",
    "streamId": "01ARZ3NDEKTSV4RRFFQ69G5FAV",
    "message": {
        "text": "hello, can I see my bill?",
        "sender": {
            "externalId": "321",
            "role": "customer"
        },
        "timestamp": "2024-01-23T11:50:50Z"
    }
}'
{
  "conversationId":"01HNE48VMKNZ0B0SG3CEFV24WM",
  "messageId":"01HNE6ZEAC94ENQT1VF2EPZE4Y"
}
Add Input Variables and Task context
As the conversation goes, it is possible to give GenerativeAgent more context of the conversation by using thetaskName and inputVariables attributes.
You can also simulate Tasks and Input Variables in the Previewer
curl --request POST \
  --url https://api.sandbox.asapp.com/generativeagent/v1/analyze \
  --header 'Content-Type: application/json' \
  --header 'asapp-api-id: <api-key>' \
  --header 'asapp-api-secret: <api-key>' \
  --data '{
  "conversationId": "01BX5ZZKBKACTAV9WEVGEMMVS0",
  "message": {
    "text": "Hello, I would like to upgrade my internet plan to GOLD.",
    "sender": {
      "role": "agent",
      "externalId": 123
    },
    "timestamp": "2021-11-23T12:13:14.555Z"
  },
  "taskName": "UpgradePlan",
  "inputVariables": {
    "context": "Customer called to upgrade their current plan to GOLD",
    "customer_info": {
      "current_plan": "SILVER",
      "customer_since": "2020-01-01"
    }
  }
}'
Next Steps
With your system implemented into GenerativeAgent, sending messages and engage GenerativeAgent, you are ready to use GenerativeAgent.
You may find these other pages helpful in using GenerativeAgent:
