Want to skip the manual setup?You can automatically deploy this integration using our QuickStart in the GenerativeAgent Amazon Connect - Code Samples on GitHub.
How it works
At a high level, the Amazon Connect integration with GenerativeAgent works by handing off the conversation between your Amazon Connect flow and GenerativeAgent:- Hand off the conversation to GenerativeAgent through your Amazon Connect Flows.
- GenerativeAgent handles the conversation using Lambda functions to communicate with ASAPP’s APIs, and respond to the caller using AWS’s Text to Speech (TTS) service.
- Return control back to your Amazon Connect Flow when:
- The conversation is successfully completed
- The caller requests a human agent
- An error occurs
Detailed Flow
Detailed Flow
Here’s how a GenerativeAgent call will work in detail within your Amazon Connect: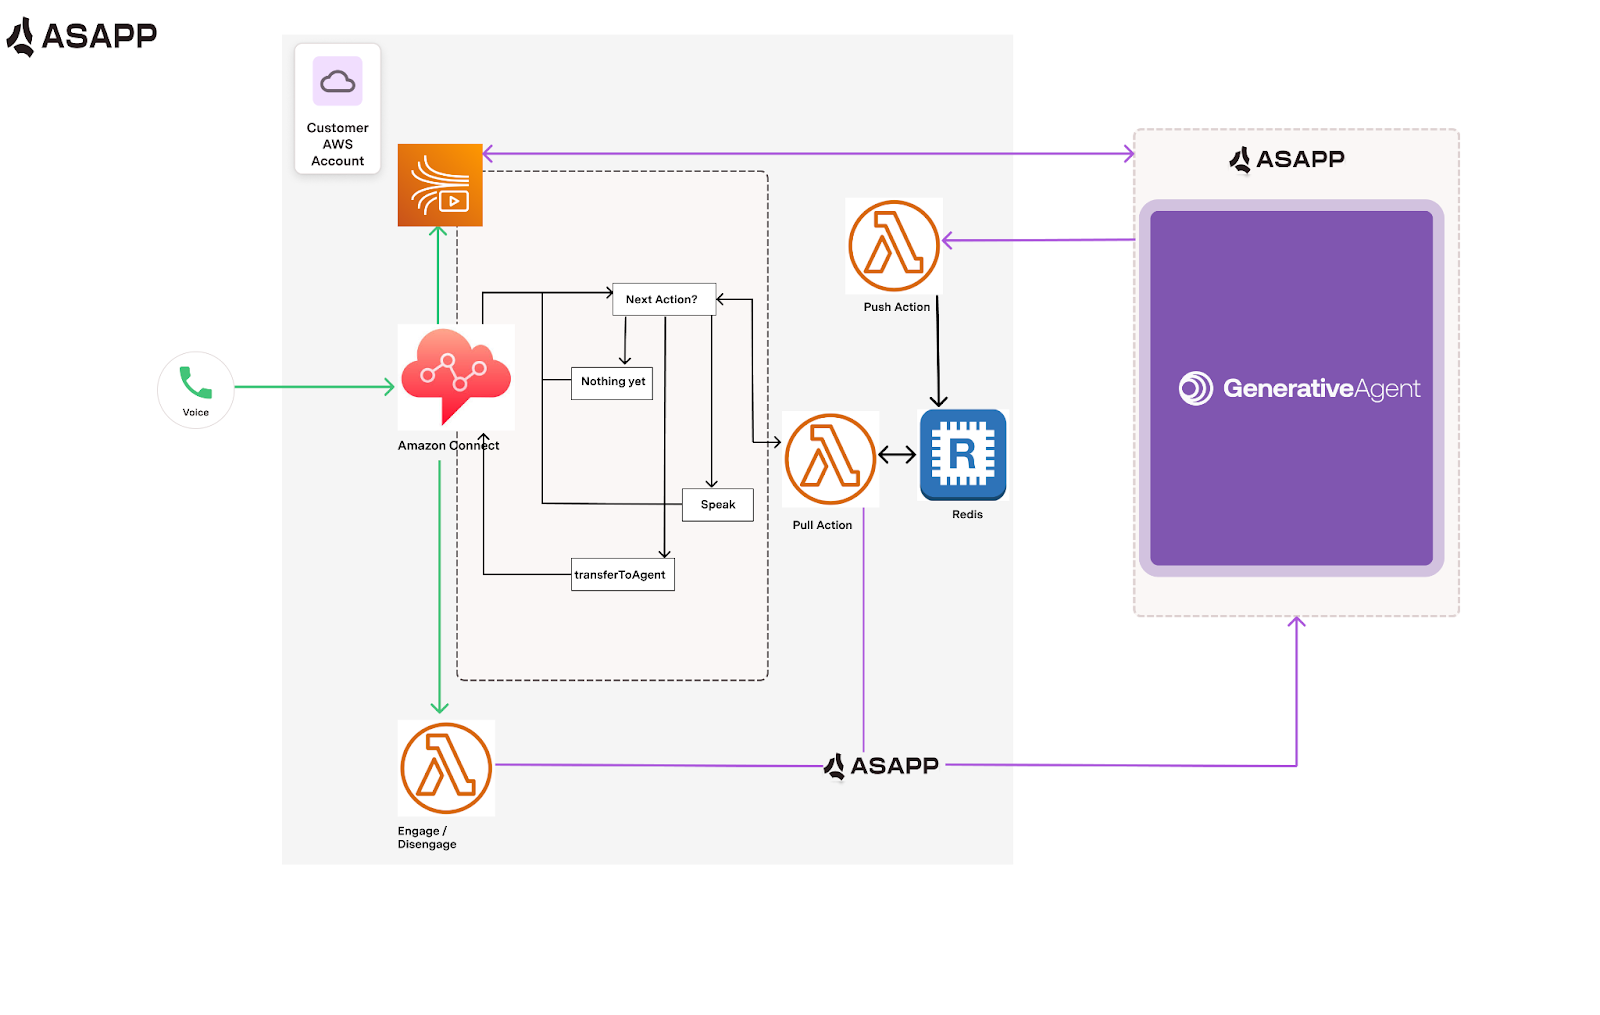
- Your Amazon Connect Flow receives an incoming call
- When the flow engages GenerativeAgent, the Flow:
- Sets required contact attributes
- Starts media streaming
- Calls ASAPP’s API to initiate the conversation
- During the conversation:
- Live audio streams through Kinesis Video Streams
- Lambda functions coordinate between Amazon Connect and GenerativeAgent including using AWS’s Text to Speech (TTS) service to respond to the caller.
- Valkey manages the conversation state
- When the conversation ends, GenerativeAgent returns control to your Flow with:
- The conversation outcome
- Any error messages
- Instructions for next steps (e.g., transfer to agent)
You are free to choose the moment when GenerativeAgent is invoked by Amazon Connect in your Contact Flow.You can add GenerativeAgent to any or all of your Amazon Contact Phone Numbers.
Before you Begin
Before using the GenerativeAgent integration with Amazon Connect, you need to:-
Get your API Key Id and Secret
- Ensure your API key has been configured to access GenerativeAgent APIs. Reach out to your ASAPP team if you need access enabled.
-
Have an existing Amazon Connect instance:
- Have claimed phone numbers.
- Access to an Amazon Connect admin account.
-
Have a AWS administrator account with the permissions for the following:
- Creating/managing IAM roles/policies: create a policy permitting list/read operations on the Kinesis Video Streams associated with the Amazon Connect Flow
- Managing Amazon Connect instance
- Create/manage Lambda functions
- Create/manage CloudWatch Log Groups
- Create/manage ElastiCache for Valkey
- Create/manage VPC
-
Be familiar with AWS including Amazon Connect, IAM roles, and more:
AWS Components
You will set up and configure the following AWS services:- Amazon Connect - Handles call flow and audio streaming
- Valkey ElastiCache - Manages conversation state and actions
- Virtual Private Cloud (VPC) - Provides network isolation
- Kinesis Video Streams - Handles real-time audio streaming
- IAM Roles and Permissions - Controls access between services
- Lambda functions - These functions will handle communication between Amazon Connect and GenerativeAgent
- Receive the GenerativeAgent Connect Flow and Prompts from your ASAPP team.
This guide uses files from the GenerativeAgent Amazon Connect - Code Samples repository.
Step 1: Set up your AWS Account and Amazon Connect instance
You need to set up your AWS Account and configure AWS services that will be used for an Amazon Connect flow that engages GenerativeAgent. You will configure the flow in a future step.Provide a dedicated VPC
All components of the GenerativeAgent Amazon Connect integration must be in the same VPC. You can use an existing VPC or create a new one:- To use an existing VPC: Verify it has at least two subnets in different Availability Zones, and that the subnets are private and isolated (not connected to the Internet).
- To create a new VPC: In the AWS Console, go to VPC > Your VPCs, click Create VPC, and follow the prompts to set up a VPC with at least two private isolated subnets in different Availability Zones.
Configure your Amazon Connect instance
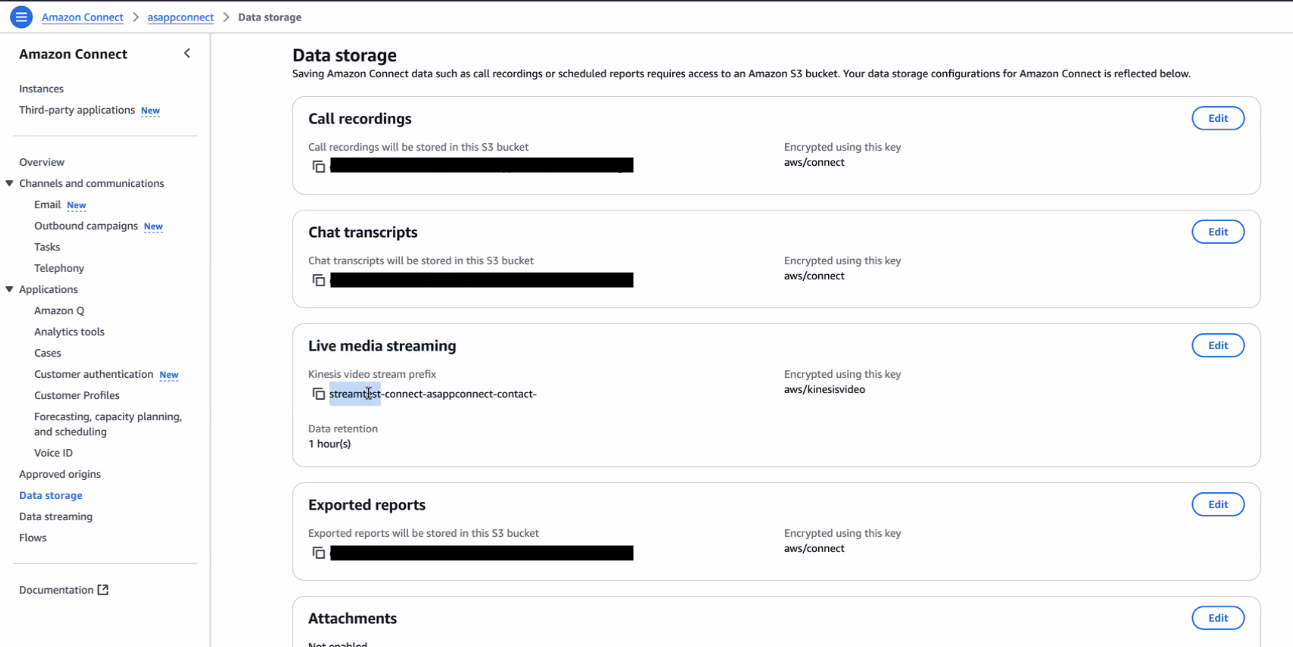
To connect your Amazon Connect instance with an Amazon Kinesis Video Stream service, follow these steps:-
Navigate to Live Media Storage
- In the AWS Console, navigate to Amazon Connect and select your Amazon Connect instance by clicking on the Instance alias.
- On the left menu, go to Data storage > Live Media Storage.
-
Enable Live Media Streaming
- Under Data Storage options, enable Live Media Streaming.
-
Set Retention Period
- Set a retention period of at least 1 hour.
-
Save the Kinesis Video Stream Instance Prefix
- Copy the Kinesis video stream instance prefix; you will need this when you Configure IAM Roles and Policies.
The access to the Kinesis Video Streams service is controlled by IAM policies.GenerativeAgent uses an IAM role in the ASAPP account to assume the IAM role you configure as part of this guide.
The IAM role you configure must trust GenerativeAgent IAM role and provide permissions to access Kinesis Video Streams.
See more in Configuring IAM Roles and Policies
Create security groups
You will need three security groups: one for Valkey ElastiCache, one for the PullAction Lambda function, and one for the PushAction Lambda function.-
Create all three security groups
- In the AWS Console, navigate to VPC > Security Groups.
- For each of the following, click Create security group, using these names (or similar):
ValkeyElastiCacheSecurityGroupPullActionLambdaSecurityGroupPushActionLambdaSecurityGroup
- Associate each security group with your VPC.
- Save the security group IDs for later use.
-
Configure security group rules
-
Valkey ElastiCache security group:
- Inbound rules:
- Allow TCP traffic on port 6379 from the PullAction Lambda security group.
- Allow TCP traffic on port 6379 from the PushAction Lambda security group.
- Outbound rules:
- No outbound rules are required. Remove any default outbound rules.
- Inbound rules:
-
PullAction Lambda security group:
- Outbound rules:
- Allow TCP traffic on port 6379 to the Valkey ElastiCache security group.
- Remove any other default outbound rules.
- Outbound rules:
-
PushAction Lambda security group:
- Outbound rules:
- Allow TCP traffic on port 6379 to the Valkey ElastiCache security group.
- Remove any other default outbound rules.
- Outbound rules:
-
Valkey ElastiCache security group:
Create the Valkey ElastiCache
The Amazon Connect Flow uses ElastiCache (Valkey engine) to store ordered list of actions for each call. Follow these steps to create and configure your Valkey Cache in AWS ElastiCache:-
Create a subnet group
- In the AWS Console, navigate to ElastiCache > Subnet groups.
- Click Create subnet group.
- Enter a name and description for your subnet group (e.g.,
ValkeySubnetGroup). - Select your VPC.
- Add both of your private isolated subnets (each in a different Availability Zone) to the group.
- Save the subnet group.
-
Create a Valkey ElastiCache
- In the AWS Console, navigate to ElastiCache.
- In the left menu, select Valkey caches.
- Click the Create cache button at the top right.
-
Configure Settings
3.1 Configuration
- Engine: Select Valkey.
- Deployment option: Choose Design your own cache.
- Creation method: Select Cluster cache.
- Cluster mode: Set to Disabled.
- Cluster info: Enter a name (e.g.,
asapp-generativeagent), up to 40 characters. - Location: Choose AWS Cloud.
- Multi-AZ: Leave Enabled.
- Engine version, Port, Parameter groups: Leave default values.
- Node type: For testing, select
cache.t4g.micro. Adjust sizing based on your expected call volume before production. - Number of replicas: Set to 1.
- Subnet group: Choose the existing subnet group you created previously.
- Availability Zone placements: Select No preference.
-
Configure Advanced Settings
4.1 Security
- Encryption at rest: Enable
- Encryption in transit: Disable
- Selected security groups: Click Manage and select the security groups created earlier in the Create security groups section.
- Backups: Uncheck Enable automatic backups.
- Maintenance: Leave default options.
- Logs: Leave default options.
-
Review and Create
- Review all settings.
- Click Create to provision your Valkey Cache.
PRIMARY_VALKEY_HOSTandPRIMARY_VALKEY_PORTwhen configuring your Lambda functions.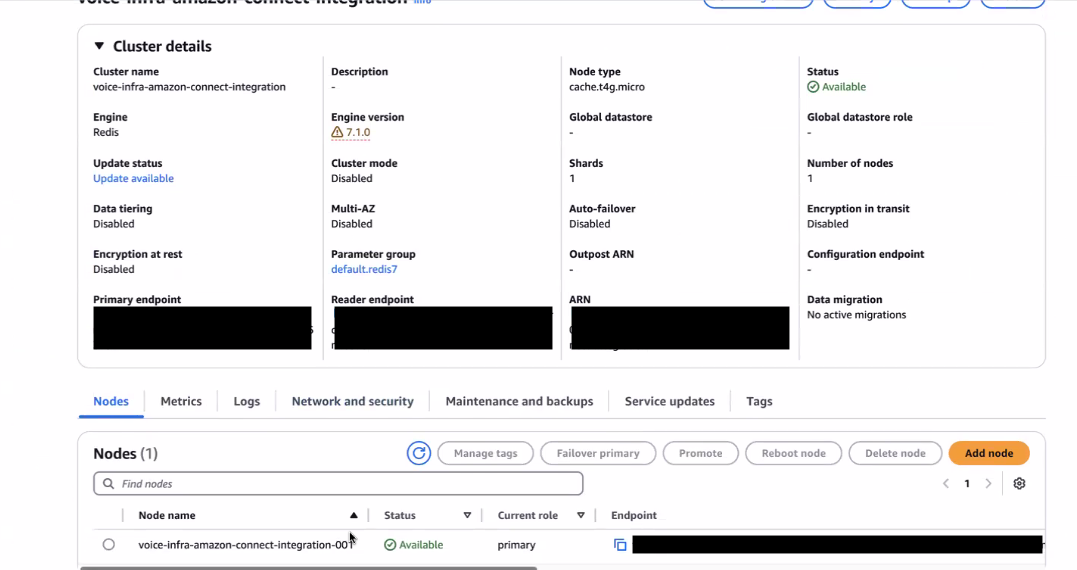
Step 2: Create Lambda functions to call GenerativeAgent
The GenerativeAgent Flow Module expects certain Lambda functions to exist to interact with GenerativeAgent. You will need to create the following Lambda functions:- Engage
- PushAction
- PullAction
Lambda functions are delivered in
Node.js 22.x.For other languages such as Go or Python, contact your ASAPP team.Engage Lambda Function
This Lambda function sends REST API requests to ASAPP and engages GenerativeAgent into a conversation. To create a Lambda function from the AWS Console:1
Create the Lambda function
Navigate to AWS Console > Lambda > Create function.Choose Author from scratch and fill in the required fields as described below.
- Basic Information
- Execution Role
- VPC and Security Groups
- Function name: Choose a name (e.g.,
asapp-generativeagent-engage) - Runtime: The Lambda sample is delivered in
Node.js 22.x. - Architecture:
x86_64.
2
Create and Save ARN
Click Create function.Once the
Engage Lambda function is created, Save the ARN of the Lambda function.You will need this ARN when editing the GenerativeAgent Flow Module JSON in the Create GenerativeAgent Flow Module section.3
Upload the code
With the Lambda function created, go to the Code tab, click Upload from, and upload the
Engage Lambda function code
.zip file containing the Lambda function code.You can find the Lambda function code for Engage in the repository at:Engage Lambda function code
If you need to pass additional
This file controls how Amazon Connect Contact Attribute names are mapped to GenerativeAgent input variable names.
You can find a sample mapping in the Engage Lambda README, which is part of the repository.
input variables from Amazon Connect to GenerativeAgent, update the attributesToInputVariables.mjs file in the Engage Lambda function before uploading your Lambda code.This file controls how Amazon Connect Contact Attribute names are mapped to GenerativeAgent input variable names.
You can find a sample mapping in the Engage Lambda README, which is part of the repository.
4
Add environment variables
After uploading the code, go to the Configuration tab, then select Environment variables from the left menu.
Add the required environment variables for the Lambda function.
Add the required environment variables for the Lambda function.
PullAction Lambda Function
This Lambda function is called by the Amazon Connect Flow and queries Valkey for the next actions of a specific call.The call identifier is the
contactId taken from the Event.ContactData.
1
Create the Lambda function
Navigate to AWS Console > Lambda > Create function.Choose Author from scratch and fill in the required fields as described below.
- Basic Information
- Execution Role
- VPC and Security Groups
- Function name: Choose a name (e.g.,
asapp-generativeagent-pullaction) - Runtime: The Lambda sample is delivered in
Node.js 22.x. - Architecture:
x86_64.
2
Create and Save ARN
Click Create function.Once the
PullAction Lambda function is created, Save the ARN of the Lambda function.You will need this ARN when editing the GenerativeAgent Flow Module JSON in the Create GenerativeAgent Flow Module section.3
Upload the code
With the Lambda function created, go to the Code tab, click Upload from, and upload the
PullAction Lambda function code
.zip file containing the Lambda function code.You can find the Lambda function code for PullAction in the repository at:PullAction Lambda function code
4
Add environment variables
After uploading the code, go to the Configuration tab, then select Environment variables from the left menu.
Add the required environment variables for the Lambda function:
Add the required environment variables for the Lambda function:
Use the primary endpoint created in the Valkey ElastiCache for the
VALKEY_HOST and VALKEY_HOST.Be sure to enter only the hostname part for VALKEY_HOST and only the port number for VALKEY_PORT.PushAction Lambda Function
ASAPP calls this Lambda function to communicate a further action for each call GenerativeAgent is engaging.This function also pushes next actions into Valkey for
PullAction to query at the next opportunity.
1
Create the Lambda function
Navigate to AWS Console > Lambda > Create function.Choose Author from scratch and fill in the required fields as described below.
- Basic Information
- Execution Role
- VPC and Security Groups
- Function name: Choose a name (e.g.,
asapp-generativeagent-pushaction) - Runtime: The Lambda sample is delivered in
Node.js 22.x. - Architecture: Default (
x86_64)
2
Create and Save ARN
Click Create function.Once the
PushAction Lambda function is created, Save the ARN of the Lambda function.You will need this ARN when editing the GenerativeAgent Flow Module JSON in the Create GenerativeAgent Flow Module section.3
Upload the code
With the Lambda function created, go to the Code tab, click Upload from, and upload the
PushAction Lambda function
.zip file containing the Lambda function code.You can find the Lambda function code for PushAction in the repository at:PushAction Lambda function
4
Add environment variables
After uploading the code, go to the Configuration tab, then select Environment variables from the left menu.
Add the required environment variables for the Lambda function:
Add the required environment variables for the Lambda function:
Use the primary endpoint created in the Valkey ElastiCache for the
VALKEY_HOST and VALKEY_HOST.Be sure to enter only the hostname part for VALKEY_HOST and only the port number for VALKEY_PORT.Step 3: Configure IAM Roles and Policies
As part of this integration, ASAPP services will reach out to your AWS account to invoke the Lambda functions and access the Kinesis Video Streams. ASAPP will need to assume a role in your AWS account to access these services. We will provide you with the ARN of ASAPP’s GenerativeAgent role. You need to create an IAM role for ASAPP to assume and specify the ARN of the IAM role in the trust policy. To create an IAM role from the AWS Console:1
Create the IAM role
- Navigate to IAM > Roles > Create role.
-
Choose Custom trust policy and paste the following policy:
Click Next.Replace the
[asapp-assuming-role-arn]placeholder with the value provided by ASAPP.If there are multiple ARNs to trust, create multiple statements with unique Sid values and ASAPP provided ARN values in each statement. - Skip the Permissions screen, don’t immediately add permissions, instead you will add them after creation. Click Next again.
-
In the Name, review, and create screen, enter a role name (for example,
ASAPPGenerativeAgentRole). Review your settings, and click Create role.
2
Add Kinesis Video Stream access
Add Kinesis Video Stream access to the IAM role by creating the following inline permissions policy:
Replace the
[customer-account-id] with your AWS Account number and [kinesis-video-streams-prefix] with the value saved in the Configure your Amazon Connect instance step.3
Add Lambda function access
Add Lambda function access to the IAM role by creating the following inline permissions policy.
This will allow the ASAPP service to invoke Lambda functions:
Replace the
[lambda-pushaction-arn] placeholder with the ARN of the PushAction Lambda function.4
Share the IAM role ARN with ASAPP
ASAPP will use the ARN to interact with the
PushAction Lambda function and Kinesis Video Streams.Step 4: Add Prompts and the GenerativeAgent Flow Module
With the relevant components in place, you need to create or update a flow to use the GenerativeAgent Flow Module to engage GenerativeAgent.Upload the Prompts
The GenerativeAgent Flow Module requires specific prompts during the conversation. To upload the prompts:-
Download the prompt files
Download the required
.wavprompt files from the following repository: Prompt audio files -
Upload and name each prompt in Amazon Connect
In your Amazon Connect instance, navigate to Routing > Prompts.
For each
.wavfile:- Click Add prompt.
- Upload the file.
- When prompted for the name, enter the file name without the
.wavextension:
- Save the prompt ARNs After uploading each prompt, save the ARN for each prompt. You will need these ARNs when editing the GenerativeAgent Flow Module JSON in the Create GenerativeAgent Flow Module section.
Create GenerativeAgent Flow Module
The GenerativeAgent Flow Module will handle the conversation between the customer and GenerativeAgent. To create the GenerativeAgent Flow Module in your Amazon Connect instance:-
Download the Module JSON
- Download the
ASAPPGenerativeAgent.jsonflow module json from the repository: ASAPP GenerativeAgent Flow Module
- Download the
-
Edit the Module JSON
Open the
.jsonfile and update the ARNs to reference your own Lambda functions:- Replace the ARN for the
EngageLambda function with the ARN you created in Step 2: Engage. - Replace the ARN for the
PullActionLambda function with the ARN you created in Step 2: PullAction. - Locate the section with
"Identifier": "Wait1sPrompt"and, within its"Parameters", replace the"PromptId"string value with yourasappSilence1secondprompt ARN. - Locate the section with
"Identifier": "Wait400msPrompt"and, within its"Parameters", replace the"PromptId"string value with yourasappSilence400msprompt ARN. - Locate the section with
"Identifier": "PlayBeepBopShort"and, within its"Parameters", replace the"PromptId"string value with yourasappBeepBopprompt ARN.
- Replace the ARN for the
-
Import the Module
- In your Amazon Connect instance, navigate to Routing > Flows > Modules.
- Click Create flow module.
- Expand the Save dropdown and select Import.
- Upload your edited
.jsonfile and click Import.
-
Verify the Module
- Ensure the imported module appears in your list and references the correct Lambda ARNs.
Invoke the GenerativeAgent Flow Module
To hand off a conversation to GenerativeAgent, you need to invoke the GenerativeAgent Flow Module. Most companies have many flows with nuanced logic and it is entirely up to you on when you engage the GenerativeAgent Flow Module. Once you have determined where within your flows you want to hand off a conversation to GenerativeAgent, you need to:1
Configure Contact Attributes
Before invoking the module, you must set up the required contact attributes:
- Add a “Set contact attributes” block to your flow
- Configure the following attributes:
The
ASAPP_companyMarker is provided by ASAPP along with your API credentials. Contact your ASAPP team if you need this value.Mapping Custom Attributes
Mapping Custom Attributes
To pass custom data to GenerativeAgent:
- Add the attributes to your “Set contact attributes” block
-
Update the mapping in the
EngageLambda function:-
The mapping between Amazon Connect Contact Attribute names and GenerativeAgent input variable names is defined in the
attributesToInputVariables.mjsfile in theEngageLambda function. -
In this file, add a mapping of the contact attribute name to the GenerativeAgent input variable name.
- The key is the attribute name in Amazon Connect, the value is the input variable name passed to generative GenerativeAgent.
-
Providing a value of
taskNamewill be set as the task for GenerativeAgent to enter.- All other fields will be added as input variables.
-
The mapping between Amazon Connect Contact Attribute names and GenerativeAgent input variable names is defined in the
InitialTask is mapped to taskName and AccountNumber is mapped to CustomerAccountNumber for input variables.2
Invoke the GenerativeAgent Flow Module
Create an “Invoke module” block and select the GenerativeAgent Flow Module. This is where the conversation is handed off to GenerativeAgent.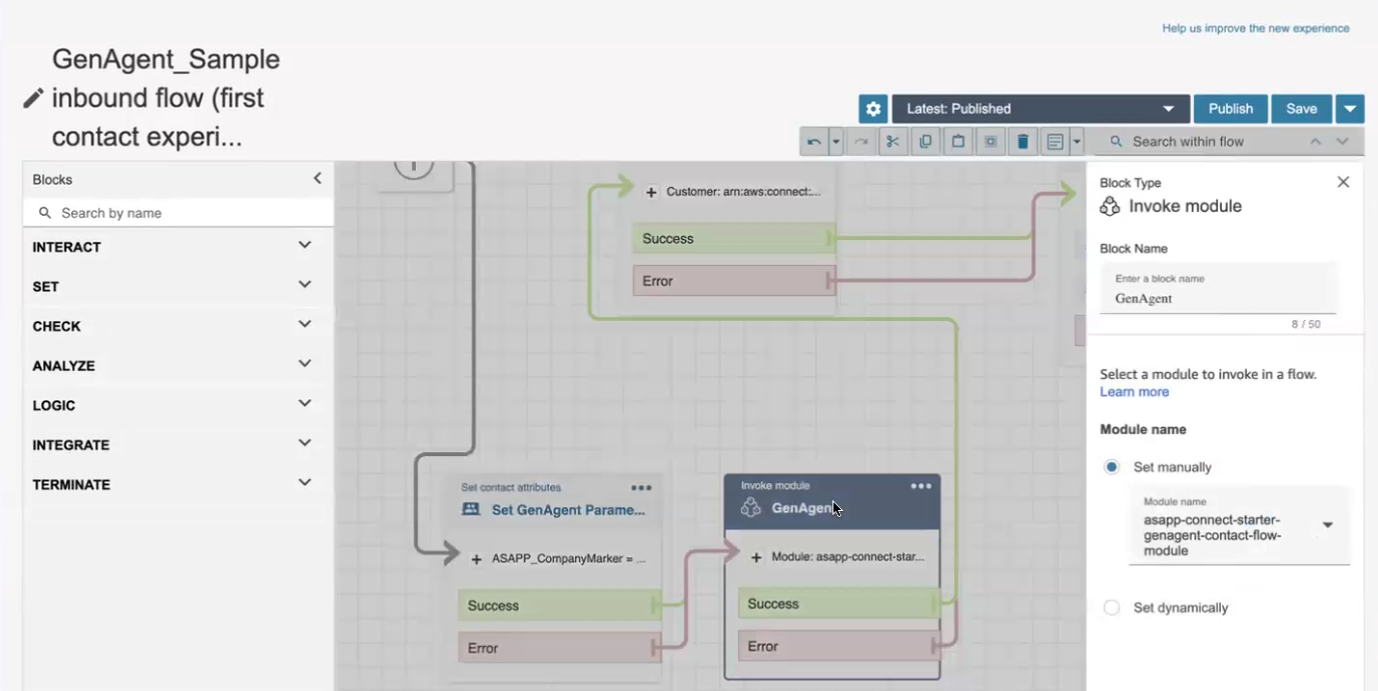
3
Handle the result
The GenerativeAgent Flow Module will exit for one of four reasons, and will output the
ASAPP_Disposition contact attribute with one of the following values:transferToAgent: when the conversation needs to be transferred to an agenttransferToSystem: when the conversation needs to be transferred to an external systemdisengage: when the conversation is completederror: when an error has occurred
4
Map output Variables
After importing the Flow Module, you may want to extract To use the
transferVariables from the system transfer from GenerativeAgent for use in your flow.As of now, only
transferVariables from system transfer are supported.transferVariables in your flow:-
In the imported Flow Module, locate the block named
ExtractOutputVariables. -
For each output variable, specify the key as
$.External.outputVariables.<variableName>where<variableName>is the name of the output variable you want to extract.- As an example, if the transfer variable is
CustomerAccountNumber, the key would be$.External.outputVariables.CustomerAccountNumber.
- As an example, if the transfer variable is
- Save the flow.
- In the flow invoking the GenerativeAgent Flow Module, the variables are available in the flow as contact attributes. Use them in your flow as needed.
Step 5: Engage GenerativeAgent
Now you are ready to make a call and engage GenerativeAgent. Call the phone number configured in your Contact Flow and follow the prompts until you reach the point where GenerativeAgent is engaged. You should see the conversation transition to GenerativeAgent based on where you placed the GenerativeAgent Flow Module in your flow. Verify that:- You are handed off to GenerativeAgent
- GenerativeAgent responds appropriately to your inputs
- You are returned to your flow when the conversation ends
This integration is a good starting point for your integration with GenerativeAgent. You need to further configure the integration to meet your organization’s requirements.
Next Steps
Now that you have integrated GenerativeAgent with Amazon Connect, here are some important next steps to consider:Configuration Overview
Learn how to configure GenerativeAgent’s behaviors, tasks, and communication style
Connect your APIs
Configure your APIs to allow GenerativeAgent to access necessary data and perform actions
Review Knowledge Base
Connect and optimize your knowledge base to improve GenerativeAgent’s responses
Go Live
Follow the deployment checklist to launch GenerativeAgent in your production environment